
Now that you have a good understanding of the component life cycle, we will discuss how to implement a component.
Throughout this chapter, you will develop a custom instant messenger
status icon component (StatusIcon) that
uses many of the features of the component framework. Figure 19-4 shows the finished
component.

StatusIcon allows the user to set
a name, status (available, busy, idle), and font color. It also should
automatically resize to display the entire name and let the user data-bind
to the value of the username, dispatch an event when the status is
changed, and set icons for the different statuses.
The first step in building a component is to decide on the base
class and constructor. For this component, we will use UIComponent. The UIComponent class gives us a basic
implementation for writing a custom component and allows us to build on
top of it as we please. Here are the beginnings of the
component:
package com.oreilly.programmingflex.controls
{
    import mx.core.UIComponent;

    public class StatusIcon extends UIComponent
    {
        public function StatusIcon()
        {
            super();
        }
    }
}
Note
In this chapter, you'll develope custom components using ActionScript. Although it's possible to build the same components in MXML, you will find that for custom components, you'll often opt to use ActionScript.
In this example, we have created the component’s main class,
StatusIcon, which contains the basic
implementation for the constructor. The constructor calls super() and nothing else. Also important to
note is the fact that the constructor in a component should not have any
required parameters because when used in MXML, there would be no way to
pass such parameters to the constructor.
Although at this point the component doesn’t perform any useful function, it already has inherited many capabilities from the component framework, including the component life cycle. For every custom component, the constructor will be the starting point on which to build. The constructor is also the first thing to be called when a component is instantiated. Because of this, many things may not be ready for you to work with. For this reason, it is advisable that you do very little within the constructor and instead save most of the implementation for other steps in the component’s life cycle.
In addition to the constructor, every component overrides some or all four of the following methods: createChildren(), commitProperties(), measure(), and updateDisplayList(), which well cover
shortly. These methods are called in that order during initialization,
as shown in Figure 19-5.
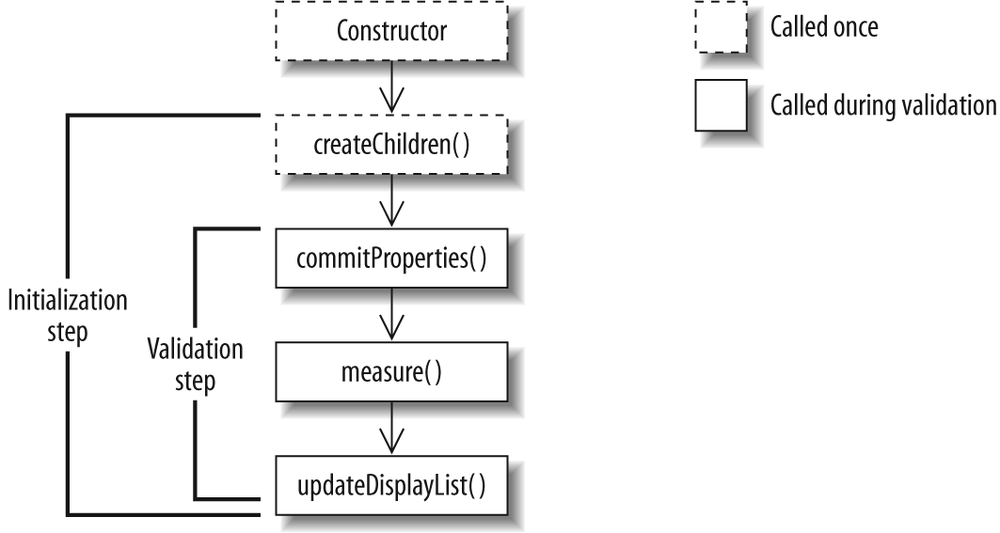
The initialization step includes the call to the constructor as
well as the createChildren(),
commitProperties(), measure(), and updateDisplayList() methods. Within the
initialization step, a validation step occurs. This validation step includes
where the calls to the commitProperties(), measure(), and updateDisplayList() methods occur. This same
validation step is used in the update phase as well, which occurs
several times during the life of a component. The only difference
between the validation step in the initialization and the update is that
in the initialization step, all the methods are called. In the update
phase, the methods that get called depend on many factors, which we will
cover throughout different parts of this chapter.
The createChildren() method is
called during the initialization phase. Its purpose is to attach subobjects to your component at
the beginning of the life of the component. Unlike containers and
components in Flex, in which a child needs to be a UIComponent (or needs to implement
the IUIComponent interface), children
of a custom component can be any type of Flash Player display
object.
As you can see in Figure 19-5, createChildren() is called only once
throughout a component’s life cycle. Because this method is typically
called only once, it is ideal for adding children that are required
through the life of a component, as instantiating new objects is one of
the most intensive operations in Flash Player. The createChildren() method doesn’t have many
rules. First you should call super.createChildren(). Then all you have to do is decide what children you would
like to create early in the life of the component; typically these would
include the children that will be needed throughout the life of the
component, or at least at the beginning of the component’s life. Then
you simply set their initial states, checking to ensure that the
children have not been instantiated already (in cases where your
component has been subclassed). Our StatusIcon component has two child
objects: the status icon and the user’s label. In the createChildren() method, we will need to add
both children to the display list because they are required at all
times. To implement the createChildren() method, you override the
UIComponent base class
implementation. Here is the code to implement the createChildren() method:
[Embed(source="/images/available.gif")]
private var IconAvailable:Class;
[Embed(source="/images/busy.gif")]
private var IconBusy:Class;
[Embed(source="/images/idle.gif")]
private var IconIdle:Class;

private var currentIcon:DisplayObject;
private var displayNameLabel:Label;

override protected function createChildren():void
{
    super.createChildren();

    if(currentIcon == null)
    {
        currentIcon = new IconAvailable();
    }
    addChild(currentIcon);

    if(displayNameLabel == null)
    {
        displayNameLabel = new Label();
    }
    addChild(displayNameLabel);
}
In the createChildren() body,
you call super.createChildren(), then
instantiate both children and add them to the display list using
addChild() while ensuring that the
children have not already been instantiated. Notice that for the icon we
referenced the IconAvailable bitmap
class, and for the display name we used an existing Flex component, the
Label component.
In addition to the initialization phase, during which a component automatically goes through a full validation, a component also goes through validation via update requests. An update request can occur when a user interacts with a component and triggers an event, when methods and properties are set, and when the application or parent it is a part of can interact with a component. To handle such interaction efficiently, the Flex component framework implements an invalidation routine.
Invalidation routines can handle several constraints and assumptions for you. For example, invalidation routines assume that when a component needs to be redrawn, only parts of it may need to be redrawn, not the entire component. Because of this, the component framework divides the view update routines into three types: those that update subobject properties, those that update component sizing, and those that update drawing.
To understand this better, let’s take the example of a component
that is a child of another component. At some point within the
component’s lifetime, its parent may ask to resize it. When that occurs,
the component may not have to change any values or do any redrawing;
instead, it may require only that a component measure its size. For this
purpose, a specific invalidation method, invalidateSize(), and a corresponding
validation method, measure(), are
available. Figure 19-6
shows the invalidation methods and their corresponding validation
methods.
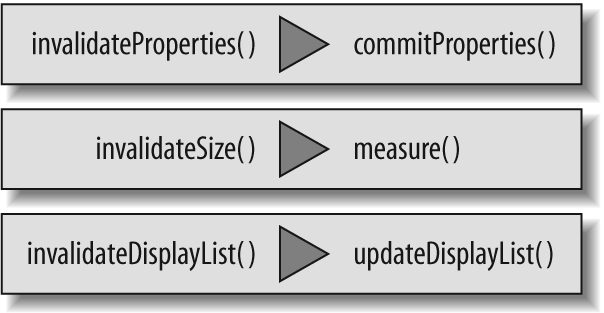
You may be wondering why you need an invalidation method if you can call the validation method directly. The reason concerns another key aspect of invalidation, and it relates to Flash Player behavior.
Flash Player renders on a frame-by-frame basis. Thus, if a value is changed in the middle of a frame several times, although the value is set several times, only the last value set is rendered to the user in the next frame. For this reason, it is a waste to call a validation more than once per frame. Thus, the invalidation routines (also sometimes referred to as marking the component as dirty) have the job of merging changes needed together into a single frame that the component renders in the next frame during validation (the validation step). With this process, an invalidation method may be called several times during a single frame, and the corresponding validation method will be called only once in the next frame.
For this process to work properly, you will need to cache data
changes and allow the validation methods to make the actual change. For
component properties, you should follow the pattern of defining a
private variable for every public property that will hold the new value
until the validation methods are called. For the StatusIcon component, a property label is used
to set the username by updating the values of the _displayNameLabel.text property.
Rather than setting the _displayNameLabel.text property directly,
however, we will store the new value in a private property, _label.
Note
Another reason to have setter functions store values in a temporary property is that setter functions could be called before children are instantiated. If you attempt to set the value of the child immediately before the child is instantiated, this could cause an error.
Here are the label setter and getter functions for StatusComponent:
private var _label:String;

public function set label(value:String):void
{
    _label = value;
    invalidateProperties();
    invalidateSize();
}
In the label setter function, we set the private _label property with the new value and
then call the invalidation methods invalidateProperties() and invalidateSize(). Although we haven’t looked at how to implement the
validation methods, it’s easy to understand that when the label value is
changed, the value of the internal label component needs to change as
well. Thus, when you call the invalidateProperties() method, the size of the
component may change because of the new values of the label, so you call
the invalidateSize() method. Although
it may not be clear when to call which invalidation method, after
reviewing how to implement the three invalidation methods, keeping in
mind Figure 19-6 and what
invalidation methods cause a call to what validation method, and gaining
some experience, you will have a clear understanding when building your
own component.
The validation method that corresponds to calling the invalidateProperties() invalidation method,
and the first validation method to be called during initialization,
is commitProperties().
This method’s purpose is to commit any values typically set by using a
setter function. Often the commitProperties() method is as simple as
calling super.commitProperties() and
setting the cached values:
override protected function commitProperties():void
{
    super.commitProperties();
    displayNameLabel.text = _label;
}
If your component contains many public properties, you may find
that your commitProperties() method becomes
inefficient as it attempts to set values for every value even though
only a single value was changed. To work around this, it is recommended
that you not only store the new value of the set data in a temporary
property, but also track what has changed. You do so by declaring a
Boolean property (also referred to as a dirty flag)
for each public property that serves as a flag for the
commitProperties() method to help it
know how to conditionally set values. Here are the updated setter and
the commitProperties() method which
adds this optimization:
private var _label:String;
private var labelChanged:Boolean = false;

public function set label(value:String):void
{
    _label = value;
    labelChanged = true;
    invalidateProperties();
    invalidateSize();
}
And here is the updated implementation of commitProperties():
override protected function commitProperties():void
{
    super.commitProperties();
    if(labelChanged)
    {
        //reset to false as the value is being commited
        labelChanged = false;
        displayNameLabel.text = _label;
    }
}
Sometimes when a component value is changed, it may require that
new children be created or that existing children be removed. In
addition to updating the values of existing children, the commitProperties() method also serves to add
and remove children. Keep in mind that if a child is going to be
required through the entire life of a component, it should be
instantiated and added to the display list in the createChildren() method. In the
StatusIcon component, this isn’t
required, but if, for example, you wanted to display a label only if it
contained a value, and that use case was the norm, you would add logic
to handle such a case in the commitProperties() method.
When the invalidateSize()
invalidation method is called, the corresponding validation method,
measure(), will be called, and as with other validation methods,
measure() is always called during the
initialization phase of a component as well. The purpose of this method
is to perform measurement calculation and define sizing information for
the framework. Flex provides a sophisticated set of layout containers
whose underlying implementation requires that each component perform
appropriate size measurements. Specifically, the framework requires that
a component specify the optimal size of the component and, optionally,
the minimum size. In Chapter 6, we covered how
to use containers to lay out components. With containers and components,
you can specify the width and height of components explicitly, by
percentage, or not at all, and the framework will automatically do its
best to decide on the sizing for you. This is why the measure() method exists. If your component is
used, and its size is not defined or is defined using constraint-based
layout logic, your component will need to tell the layout containers
what it would like its size to be (the default size). Also, when the
layout logic is attempting to size a component, it will need to tell its
container how small the component can be sized. Because of this, the
measure() method also has a mechanism
for defining the minimum size of the component.
Both the default and minimum sizes of the component are set to a
width and height of zero. You may find that having a minimum width and
height of zero is acceptable, but typically you will at least want to
define the default width and height yourself. Defining the default and
minimum values in the measure()
method requires that you set the values of the measuredWidth, measuredHeight, and optionally, measuredMinWidth and measuredMinHeight properties:
measuredWidth,measuredHeightThese are the component’s default width and height. You should set these values to the width and height that your component requires.
measuredMinWidth,measuredMinHeightThese are the component’s minimum width and height. You will often set their values to the same as the measured value.
Here is the measure() method
implemented for the StatusIcon
component:
override protected function measure():void
{
    super.measure();
    measuredHeight = measuredMinHeight = currentIcon.height;
    measuredWidth = measuredMinWidth = currentIcon.width + displayNameLabel.
getExplicitOrMeasuredWidth();
}
In this measure()
implementation, we override the existing implementation and call
super.measure(). This is typically
how most measure() implementations
will begin. We also set measuredHeight, measuredMinHeight, measuredWidth, and measuredMinWidth. measuredHeight and measuredMinHeight are set to the height of the
icon image, and measuredWidth and
measuredMinWidth are set to the total
width of the children within the component (icon and label).
When performing measurement in order to decide on sizing, you will
often need to retrieve the size of the children along with any
chrome/padding that needs to be taken into account. As a general rule,
you will typically use the children’s width and height properties to retrieve the size values
of children that do not inherit from UIComponent. For children that do inherit from
UIComponent, you will want to use the
getExplicitOrMeasuredWidth() and
getExplicitOrMeasuredHeight()
methods.
The last validation method is updateDisplayList(). This validation method is called as a result of calling
the invalidateDisplayList()
invalidation method, and by the Flex framework internally (typically the
LayoutManager class). The purpose of
this validation method is to lay out the contents of the component and
perform any needed drawing and redrawing. Typically this method contains
a lot of the implementation of a component.
In StatusComponent, we will
implement the basic updateDisplayList() method. The method will
position the displayNameLabel and
then set its size:
override protected function updateDisplayList(unscaledWidth:Number,
unscaledHeight:Number):void
{
    super.updateDisplayList(unscaledWidth,unscaledHeight);
    displayNameLabel.move(currentIcon.x + currentIcon.width,0);
    displayNameLabel.setActualSize(unscaledWidth-currentIcon.width,
unscaledHeight);
}
The updateDisplayList() method
is implemented by overriding the existing implementation. Notice that
this method receives two arguments: unscaledWidth and unscaledHeight. You begin by calling super.updateDisplayList(), passing in the two
arguments. Then typically you will perform any drawing API rendering
before measuring and positioning children.
Note
The updateDisplayList()
method can get very long, especially when you need to handle many
children and styles. For this reason, you may want to break up parts
of the method into smaller functions.
In the measure() validation
method we retrieved the size, and in the updateDisplayList() method we will set the
size and position the children. When positioning and sizing children, if a child does not
inherit from UIComponent, you'll want
to use the x and y properties for positioning and the width and height properties for sizing. If a child does
inherit from UIComponent, you should
use the setActualSize(width,height)
method for sizing and the move(x,y)
method for positioning.