Chapter 24
SQL Azure Administration and Configuration
WHAT’S IN THIS CHAPTER
- SQL Azure Configuration
- Server and Database Management
- Administration Tasks
This chapter provides a look at administering and configuring SQL Azure, assuming that you already have an Azure account and that you have some familiarity with the Azure platform. Microsoft SQL Azure is a database service provided as part of the Windows Azure Platform. Based on Microsoft SQL Server, it is a transactional database that includes many of the same SQL Server features that you know and love. Unlike SQL Server though, you don’t need to worry about installing and maintaining the hardware and software in which SQL Azure runs. SQL Azure is provided as a service, hosted in a Microsoft datacenter. As such, Microsoft takes care of the physical maintenance of the hardware and software layer, enabling you to focus on the important aspects such as database design and development.
SQL Azure is Microsoft’s transactional and relational database offering for cloud computing based on Microsoft SQL Server 2012. It supports many of the features of SQL Server including tables, primary keys, stored procedures, views, and much more.
SQL Azure exposes the tabular data stream interface for T-SQL just like SQL Server. Therefore, your database applications can use SQL Azure databases in the same way they use SQL Server. The only difference is that SQL Azure is a database delivered as a service, meaning administration is slightly different.
SQL Azure abstracts the logical administration from the physical administration. For example, you continue to administer databases, logins, and users, but Microsoft handles the administration of the physical aspects such as drives and storage and the physical server.
Even with the separation of logical and physical administration, the SQL functionality has not changed. SQL Azure is not a no-SQL database; it is a relational and transactional database that contains most of the objects and functionality found in SQL Server, such as tables, primary keys and foreign keys, indexes, stored procedures, and schemas. Yet SQL Azure offers more great features than its on-premises cousin, SQL Server. SQL Azure provides built-in High Availability (HA) and Disaster Recover (DR) without any additional cost; features that would be fairly expensive to add in an on-premises architecture.
The SQL Azure architecture consists of four distinct layers of abstraction that work together to provide a cloud-based relational database. These four layers include:
- Client
- Services
- Platform
- Infrastructure
These four layers of architecture, as shown in Figure 24-1, enable SQL Azure to work with open source, third-party applications, as well as many of the familiar Microsoft technologies.

This layered architecture is quite similar to an on-premises architecture, except for the Services layer. The Services layer is a special SQL Azure layer that provides much of the SQL Azure-specific database platform functionality as described in the following sections.
Client Layer
The Client layer is the layer that exists and resides closest to your application. Your application uses this layer to communicate with SQL Azure. This layer can reside on-premises or be hosted in Windows Azure. SQL Azure uses the same tabular data stream (TDS) interface as SQL Server, which enables developers to use familiar tools and libraries to develop cloud-based client applications. This layer provides data access through ADO.NET and other providers, giving you the flexibility to manipulate the data using standard T-SQL statements and familiar technologies.
Services Layer
The Services layer is the gateway between the Client layer and the Platform Layer and is responsible for the following functions:
- Provisioning: Creates and provisions the databases you specify either through the Azure platform portal or SQL Server Management Studio
- Billing and Metering: Handles the usage-based metering and billing on individual Azure platform accounts.
- Connection Routing: Handles all the connections routed between applications and the physical servers where the data resides
Again, this layer is specific to SQL Azure simply due to the need to route connections, meter and track usage, and provide billing around database usage. Additionally, this layer provides the database creation and provisioning functionality.
Platform Layer
This layer includes the physical servers and services that support the Services layer. It is the Platform layer that contains the many SQL instances of SQL Server with each instance managed by the SQL Azure Fabric.
The key part of this layer is the SQL Azure Fabric, a distributed computing system that is installed on each physical SQL Server and is made up of tightly integrated networks, servers, and storage. The SQL Azure Fabric provides the automatic failover, load balancing, and automatic replication between servers.
Infrastructure Layer
The Infrastructure layer represents the physical IT administration of the actual hardware and operating systems that support the Services layer.
The key to understanding the SQL Azure architecture is to remember the responsibilities of the Service layer; connections aren’t connecting directly to the physical SQL Server. When connecting to SQL Server, connections are made to a physical server. In SQL Azure, connections are made through a TDS endpoint via the Services layer, which routes the connection to the physical server behind the Services layer. Figure 24-2 shows the differences between on-premises and SQL Azure connections.

You can see an example of this in the differences between server names of an on-premises SQL Server and SQL Azure. For example, when connecting to an on-premises SQL Server, the server name typically is the name of the physical server. In SQL Azure, the servername is a Fully Qualified DNS Name (FQDN), which follows the format of server.database.windows.net.
The server portion of the FQDN is a unique 10-digit, randomly generated set of characters. The entire string must be used when making a connection to SQL Azure.
After you create your Azure account, you are ready to start working with SQL Azure. First, you need to create your SQL Azure server and database and learn the different ways to work with SQL Azure. One of these is the Azure Management Portal, a web-based Azure management tool that enables you to manage all aspects of the Azure platform, including your hosted services (web roles and worker roles), storage accounts, and the Azure AppFabric (Service Bus and Access Control). The following sections walk you through these processes.
Server and Database Provisioning
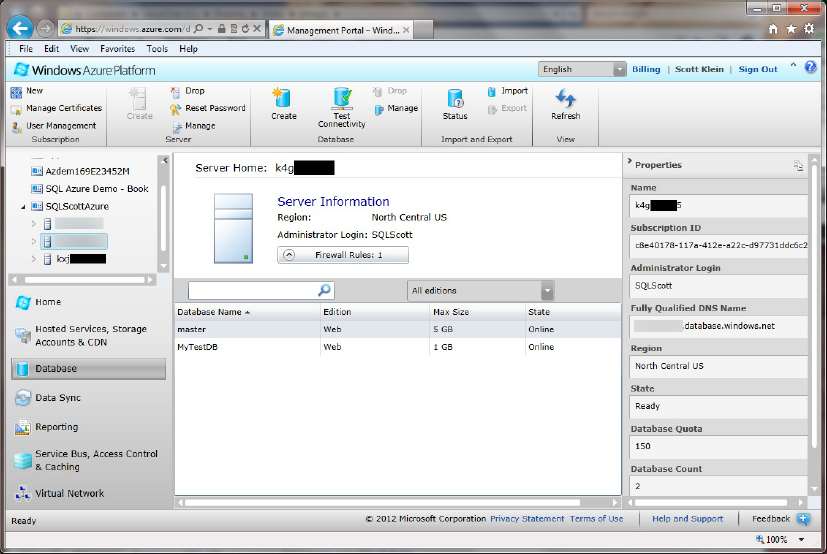
The only way to provision (create) a new server is through the Azure Management Portal. You can access Azure Management Portal, shown in Figure 24-3, at http://Windows.Azure.Com.

Within the Azure Management Portal, you have the ability to manage all aspects of your SQL Azure subscription. Notice also (see Figure 24-3) that each account can have multiple subscriptions, each subscription can have multiple servers, and each server can contain multiple databases.
Creating a new SQL Azure server is as simple as selecting the appropriate subscription and clicking the Create button on the toolbar, which opens the Create Server Wizard. The Create Server Wizard guides you through a few steps necessary to create your SQL Azure server.
1. The first step in the wizard is to select a region where you would like to host your SQL Azure server (see Figure 24-4). Picking the appropriate region in which to host your SQL Azure is crucial. There are six regions to choose from: Microsoft currently has two datacenters in the United States, two in Europe, and two in Asia. Technically, you should pick the datacenter closest to where you live.

However, there are cases where that might not be true. For example, a company in Australia picked an Asia datacenter thinking that it would get better performance by selecting a datacenter closest to it. It soon discovered that it actually got better performance by selecting the South Central U.S. datacenter because the pipe between Australia and the United States was much bigger than the pipe between Australia and Asia. While it is important to take those things into consideration, most of the times the best way to choose is to start with the datacenter closest to you and test it thoroughly.
2. After you choose the appropriate region, select Next. The next page of the wizard asks you to create a login and password for the SQL Azure server, as shown in Figure 24-5. The login and password entered here is the server-level principle for the SQL Azure server you are creating. This login is equivalent to the SQL Server Administrator account (SA) for your on-premises server.

3. After you enter your login and password, click Next. The next page of the wizard asks you to specify firewall rules on your SQL Azure server (see Figure 24-6). The firewall rules can be specified at any time, and will be discussed in the next section. Go ahead and click Finish on the Create Server wizard.

You have now successfully created your SQL Azure server. But before you begin learning how to work with it, you must take note of some important information.
Server Name and Databases
After your server has been created, in the center section of the portal the Items List section displays the list of all the SQL Azure servers in your Azure subscription, including the one you just created. In the Navigation pane the name of the new server appears in the list of servers beneath your selected subscription, as shown in Figure 24-7.
Just in case there is any confusion, click the subscription name in the Navigation pane. The center of the portal window, the Items List section, lists all the SQL Azure servers that pertain to your selected subscription. The list contains four columns:
- Server Name
- Administrator User
- Region
- Fully Qualified Server Name
Notice that the first part of the Fully Qualified Server Name is the same as the Server Name. When you hear people refer to the SQL Azure server, they are referring to the value in the first column; although, using the last column (Fully Qualified Server Name) as the server name reference isn’t harmful. In fact, when specifying the “server name” for an application connection string, it is the value of the Fully Qualified Server Name that needs to be used, like so:
servername.database.windows.net
You need to know this server name (Fully Qualified Server Name) when the topic of connecting to SQL Azure is discussed later in the chapter, so highlight and copy to the clipboard the entire SQL Azure server. The Fully Qualified Server Name is found in the Fully Qualified DNS Name (FQDN) area of the Properties pane. The Properties pane appears when you select the server in the Navigation pane. Even though you are not connecting to a physical computer, your SQL Azure server still behaves similarly to that of an on-premises SQL Server, meaning that a SQL Azure server contains a logical group of databases and acts as the central administrative point for multiple databases. As such, you can create many of the same objects that you can with on-premises databases such as tables, views, stored procedures, and indexes. Again, in the Properties pane of the portal, use the mouse to highlight the complete server name and copy that to the clipboard (Ctrl+C) as this will be used shortly.
With your server name still selected in the Navigation pane, a couple pieces of information need to be highlighted. When the SQL Azure server is created, the master database is automatically provisioned. This database is read-only and contains configuration and security information for your databases. You can see the master database in the list of databases shown previously in Figure 24-7.
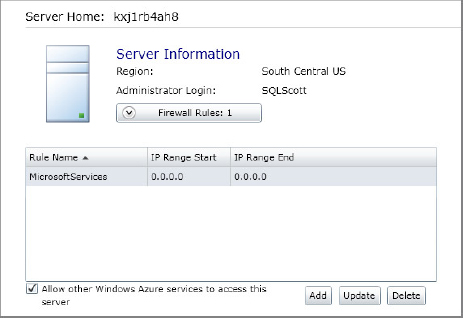
On the Server Information page, you also have the ability to manage your firewall rules by selecting the Firewall Rules button. Here you can create, modify, or delete the rules necessary to allow access to your SQL Azure server. Firewall Rules is the first level of security for SQL Azure and are critical in protecting your data. Configuring SQL Azure Firewall Rules are discussed later in this chapter.
Creating a New Database
As of this writing, SQL Azure supports two database “editions” and several database sizes based on the edition. SQL Azure includes the Web and Business database editions. The Web database edition includes database sizes of 1GB and 5GB. With the Business database edition, you can select from a 10GB, 20GB, 30GB, 40GB, 50GB, and 150GB database. There really is no difference in the databases between editions, except for size. Meaning, the functionality of the database is the same regardless of the edition you choose. To create a new database, follow these steps:
1. Select your server and click the blue Create button on the toolbar that opens the Create Database dialog, shown in Figure 24-8. In this dialog, specify the name of the database and then select the database Edition and the associated Maximum size.
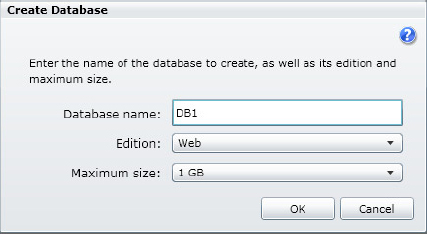
2. Click OK on the Create Database dialog to first create your new database. You are then returned to the Azure Management Portal with your new database selected and the Database Information displayed, which contains information and links on how to develop and deploy applications with SQL Azure and connection information. Figure 24-9 displays the Database Information for this example.

3. Figure 24-9 also displays a connections strings section on the right side of the page in the Properties pane. Click the ellipse button next to View here and you see a dialog in which connection strings for ADO.NET, ODBC, and PHP are already defined. Copy the appropriate connection string for your development environment and paste it into your application. Change the password when you paste the connection string into your application and you are all set.
Throttling and Load Balancing
Throttling is SQL Azure’s mechanism for ensuring that one subscriber’s application or code (stored procedure or T-SQL) does not seize all the resources. Since SQL Azure works behind the scenes to provide a high-performing database, it uses a load balancer mechanism to help ensure that a server is not in a continuous state of throttling. To fully understand throttling and load balancing, let’s first take a step back and look at how, and where, SQL Azure creates new databases.
The goal for Microsoft SQL Azure is to maintain, currently, 99.9 percent availability for the subscriber’s database. This high availability is achieved through several methods. First, Microsoft uses commodity hardware that can be quickly and easily replaced in the case of hardware failure. Second, and more importantly, Microsoft implements the automatic management of database replicas. When you create a database, you actually get three databases; one primary and two secondary. These databases are always in sync, automatically, without any interaction from the end user.
You, your application, or anyone else cannot access the secondary databases directly, but they are there and for an important purpose: if for any reason your primary database should become unavailable, SQL Azure will take it offline, select one of the secondary databases, promote it to primary, and then spin up another secondary database and bring that up to date. All this happens behind the scenes automatically. Any connections to the database that is now unavailable still need to be taken care of though. In this scenario, best practice states that you add to your application a connection and statement execution retry functionality. This way, if the primary database goes down, your application can pick it up, and by the time your application retries, a new primary should be ready to accept the incoming request.
In reality, you should be implementing a connection and statement execution retry functionality in your applications anyway. The last thing end users need to see is an error that the work they just did can’t be completed. Every application should have logic that can automatically retry based on certain errors returned from SQL Server. The same applies to SQL Azure.
The Azure platform is a shared environment platform, meaning that you share server resources with other Azure subscribers. On top of that, other processes running on each server along with your databases are crucial to the steady and fluent running and execution of SQL Azure, such as the SQL Azure fabric.
To ensure that one database doesn’t consume critical resources from another database or from the SQL Azure server itself, Microsoft has implemented the Engine Throttling component whose job it is to ensure that the health of the machine is not jeopardized. The Engine Throttling component has the task to make sure all the appropriate process have all the resources they need to operate smoothly and efficiently, that no one uses more resources than needed, and that resource limits are not exceeded.
If limits are exceeded, such as CPU usage or log size, the Engine Throttling component steps in and applies the necessary measure to correct the situation. These measures could include dropping connections, rejecting reads or writes for a period of time (10 seconds or so), or even permanently rejecting reads and writes if the source of the problem is deemed to continue to cause problems.
As new databases are added, the load balancer determines the locations of the new primary and secondary replica databases based on the current load of the machines in the datacenter.
The location of these databases may be fine for a while, but it is impossible to foresee the workload of other subscribers. Therefore, the Load Balancer has the responsibility to ensure proper performance of the databases. If one machine becomes too loaded, the Load Balancer may automatically move a database to a server that is less loaded. This move is seamless and has no impact on the application.
Configuring SQL Azure Firewalls
You now know how to create your server and databases and what happens behind the scenes of SQL Azure to ensure high availability and great database performance. Yet, it won’t do any good if you can’t connect to the databases. This is where the SQL Azure Firewall comes in.
You could have developed a great application, designed a great database, set the proper connection string, and so on; but unless you define the appropriate firewall rules, it will have been all for naught. The SQL Azure Firewall is the first level of security to help protect your data and prevent unwanted access to your SQL Azure server. All access to your SQL Azure server is rejected and blocked until you specify which computers have permission. Connection attempts coming from the Internet, and even within Azure itself, cannot reach your SQL Azure server until you specify who has access.
Firewall rules are IP address-based, and only acceptable addresses or ranges can be defined. Firewall rules are defined via the Azure Management Portal (refer to Figure 24-7) in the Server Information section.
To configure a firewall rule, click the Firewall Rules button in the Management Portal in the Server Information section, which displays any defined firewall rules. Underneath the firewall rules you see three buttons: Add, Update, and Delete, as shown in Figure 24-10.
To add a new firewall rule, simply click the Add button, which displays the Add Firewall Rule dialog, as shown in Figure 24-11. In this dialog, simply give the new rule a unique name and provide the IP Address you would like to give access to SQL Azure. Alternatively, you can provide an IP Address range to allow multiple IP Addresses access.

Notice also (refer to Figure 24-11), that you can easily add your IP Address because the bottom of the dialog displays it. You can simply highlight, copy, and paste the IP Address into the Start and End Range boxes (if you have added only your single IP address). After you add your IP address, click OK. You then see your firewall rule added to the management portal, as shown in Figure 24-12. At this point, you can connect to your SQL Azure via your applications and SQL Server Management Studio.

Finally, refer back to check box at the bottom of Figure 24-8 called Allow Other Windows Azure Services to Access This Server. Remember that all connection attempts, including those from within Azure itself, cannot reach your SQL Azure server unless you specify so. Therefore, to allow Azure services access to your SQL Azure server, you need to check this box. When you do so, you notice that a rule is added to the list of firewall rules called Microsoft Services. This allows any of your Windows Azure components, such as Worker Roles or Web Roles, access to your database. Components from other accounts cannot see your databases.
Connecting to SQL Azure
Now that you have created your databases and defined the firewall rules, you are ready to connect to your SQL Azure server. To start your SQL Azure connection journey, follow these steps:
The examples in this section show how to connect via SQL Server Management Studio, not via an application, because the connection strings were briefly covered earlier.
1. Fire up SQL Server Management Studio. Connecting to SQL Azure requires either SQL Server 2008, SQL Server 2008 R2, or SQL Server 2012. When the Connect to Server dialog opens, as shown in Figure 24-13, you need to enter the FQDN server name. This should still be on your clipboard; otherwise, go back to the Azure Management portal and recopy it; then paste it into the Server Name box.

2. SQL Azure only supports SQL Authentication, so select SQL Server Authentication and then enter the user name and password you created in Figure 24-5. If you have configured your SQL Azure Firewall with the appropriate IP Address, you should successfully connect. If for some reason the firewall rules are not configured correctly, you see an error message stating so.
3. As a quick exercise, open a new query window and make sure you connect to the master database. In the query window, execute the following command:
SELECT @@VERSION
Figure 24-14 shows the Results window displaying the SQL Azure version currently running at the time of this writing.

Now you are connected to your SQL Azure server via SSMS. Next the logical administration aspect of working with SQL Azure, including creating logins and users, is discussed.
One of the big misconceptions about SQL Azure is that it is nothing like SQL Server. The truth is that both SQL Server and SQL Azure use the same authorization model, with users and roles created in each database and associated to the user logins. SQL Server has fixed serverwide roles such as serveradmin, securityadmin, and dbcreated, which do not exist in SQL Azure. They don’t need to though because of the logical administration aspect of SQL Azure. Instead, SQL Azure has a loginmanager role to create logins and a dbmanager role to create and manage databases. These roles can be assigned to users only in the master database.
Creating Logins and Users
SQL Azure provides the same set of security principles available in SQL Server authentication, which you can use to authorize and secure your data. In SQL Azure, logins are used to authenticate access to SQL Azure at the server level. Database users are used to grant access to SQL Azure at the database level, and database roles are used to group users and grant access to AQL Azure at the database level.
Creating a New Login
Creating a login is nearly identical to SQL Server except that you cannot create a login based on Windows credentials. Thus, all logins are SQL logins for SQL Authentication. The following steps outline how to do this.
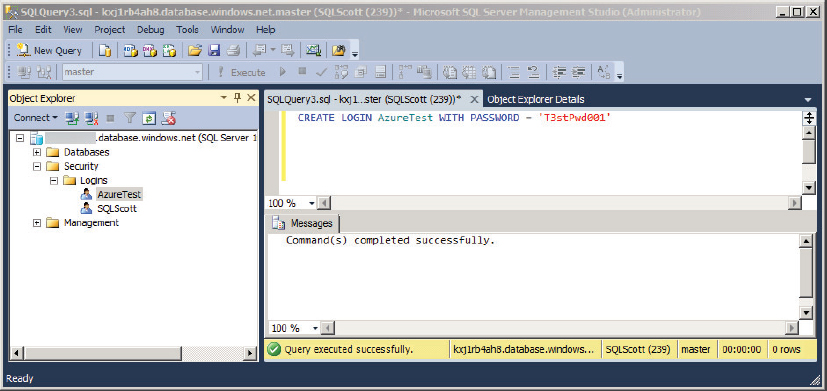
1. In SQL Server Management Studio, open a new query window and connect to the master database using the administrator account created earlier. In the query window, type and run the following command:
CREATE LOGIN AzureTest WITH PASSWORD = 'T3stPwd001'
2. This creates a new login called AzureTest as shown in Figure 24-15.
If you attempt to create the login account in a user database, you receive an error stating that the login must be created in the master database. Likewise, if your password is not complex enough, you receive an error message stating the password validation failed and that the password does not meet Windows policy requirements. These policies include Latin uppercase and lowercase letters (A through Z), Base 10 digits (0 through 9), and Non-alphanumeric characters. In SQL Azure, the password policy cannot be disabled.
3. Although Figure 24-13 shows the login created in SQL Server Management Studio, you can also query the sys.sql_logins table to view all logins for the server like so:
SELECT * FROM sys.sql_logins
Although your logins are created, you cannot log in until a user has been created, which the next section discusses.
Creating a New User
After your login is created, you need to create a user account for it. To create the user account, connect to the specific user database using the administrator account and run the following command:
CREATE USER AzureTest FROM LOGIN AzureTest
Figure 24-16 shows the command executed and the corresponding results. You can see that the user was indeed created in the DB1 database.

If you attempt to create a user without first creating the login account, you receive a message stating that the user is not a valid login. Loginless users are not allowed in SQL Azure.
Assigning Access Rights
The next step in the Administration process is to assign the newly created user account access rights. To allow the AzureTest account to have unlimited access to the selected user database, you need to assign the user to the db_owner group:
EXEC sp_addrolemember 'db_owner', 'AzureTest'
At this point, the AzureTest user can create tables, views, stored procedures, and more. But just like SQL Server, you can get granular with your permissions. You can grant and revoke permissions and grant insert, update, delete, create, and delete privileges just like you can with SQL Server. In SQL Server, user accounts are automatically assigned to the public role. This is not the case in SQL Azure because the public role cannot be assigned to user accounts for enhanced security. As a result, specific access rights must be granted to use a user account.
Working in SQL Server Management Studio has provided a nice and easy way to create databases and tables and do a lot of the management and maintenance of SQL Server through a great user interface. However, some of the better user interface features aren’t automatically available. There is still a way to enjoy them, though, if you are up for writing some code. To do so, perform the following steps:
1. Right click the database node in Object Explorer and select New Database from the Context menu. A query window appears. Figure 24-17 shows this query window with the syntax required to create a SQL Azure database in SQL Server Management Studio.
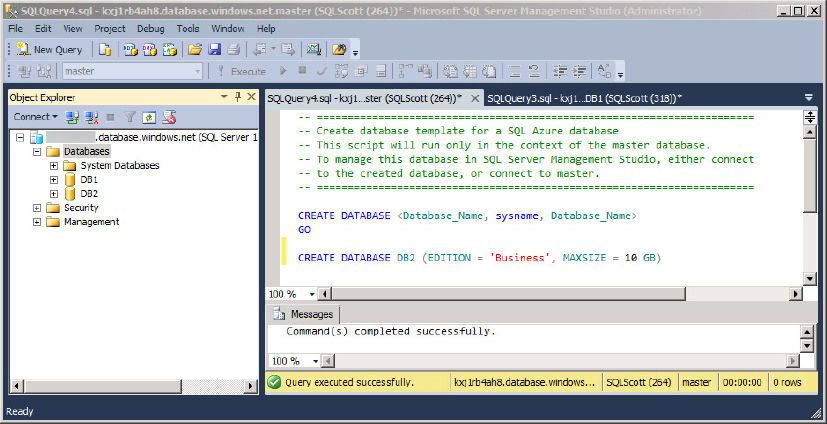
2. You don’t get the Create Database dialog next, but instead, you get to write the Create Database statement yourself. As you can see in Figure 24-17, the syntax isn’t all that difficult. Specify the name of the database, the edition, and the size. If you leave out the edition and size, you simply get a 1GB Web edition database.
Similarly, you can write code to create tables and views, and when working with permissions. Figure 24-18 shows the result of right-mouse-clicking the Tables node in Object Explorer and selecting New Table from the Context menu.

Even though the user-interface features aren’t quite there yet, that doesn’t mean that the functionality isn’t there. You just need to write code (same T-SQL syntax you are used to) to accomplish most of the things you need to do.
Backups with SQL Azure
One of the biggest questions potential Azure customers have is that of backups. Currently, backups with the on-premises SQL Server do not exist in SQL Azure. Instead, a feature called Database Copy enables you to make a transactionally consistent copy of your primary SQL Azure database into another SQL Azure database. The syntax for this is simple:
CREATE DATABASE DB2 AS COPY OF DB1
You can also copy databases between servers using the same syntax; you just need to be admins on both servers. However, administering two servers does entail paying for two databases, and more important, this makes it difficult to do daily backups and keep a history.
The other backup option is to use SQL Azure Data Sync Services. SQL Azure Data Sync Services is currently available via the SQL Azure Labs site (https://datasync.azure.com/SADataSync.aspx) but does require you to sign up. SQL Azure Data Sync Services is a beautiful interim solution and is quite easy to set up and configure. Microsoft understands that there is a need for a better and more efficient backup solution and is working hard at providing this functionality.
Object Explorer for SQL Azure
When you connect to SQL Azure in SQL Server Management Studio, you notice that a few nodes are missing — specifically the Server Objects, Replication, and SQL Server Agent nodes. The following sections explain why these aren’t there (yet) and what you might expect down the road.
Server Objects
Looking at the subnodes in Server Objects, you see the following:
- Backup Devices
- SOAP Endpoints
- Linked Servers
- Triggers
There are a few specific reasons why these items are not included in SQL Azure.
- Backup Devices: First, because you don’t have access to the physical hardware that SQL Azure runs on, you don’t need to create a backup device and won’t have access to it anyway. Second, except for the current backup solutions discussed earlier, there isn’t any other way to back up your databases. Until Microsoft provides more functional backup capabilities, the Backup Devices node doesn’t need to be there.
- SOAP Endpoints: SOAP endpoints go back to SQL Server 2005 and enable you to essentially create web services that expose database access over HTTP. Microsoft has let it be known that this feature will be deprecated in future releases of SQL Server. SQL Azure has a better solution for SOAP Endpoints: OData. With just a few clicks you can expose your SQL Azure data via the OData protocol. The OData Service for SQL Azure provides a simple, no-code solution for providing an OData endpoint through an open HTTP protocol.
- Linked Servers: These are typically used to handle distributed queries. Distributed queries aren’t supported in SQL Azure, but something even better will appear that makes the distributed queries a thing of the past. Microsoft announced in late 2010 a technology called SQL Azure Federation; the ability to partition, or shard, your data to improve the scalability and throughput of your database.
Sharding is the process of breaking an application’s logical database into smaller chunks of data and then distributing those chunks of data across multiple physical databases to achieve application scalability. In sharding, one or more tables within a database are split by row and portioned out across multiple databases. This partitioning can be done with no downtime, and client applications can continue accessing data during sharding operations with no interruption in service.
There are quite a few blog posts and articles available on MSDN that drill into detail about this, but with SQL Azure Federation, Linked Servers aren’t needed.
- Triggers: Enabling these in a shared environment creates a whole new level of complexity, such as potential security risks and possible performance issues.
Replication
Due to SQL Azure Data Sync Services, replication just isn’t needed in SQL Azure. As mentioned earlier, there are three copies of every database you create: the primary and two replicas. SQL Azure keeps these in sync for you and automatically provides the high availability and redundancy you need.
If you need to “replicate” data from one database to another database, SQL Azure Data Sync Services provides an easy-to-use, wizard-driven interface that provides multi-direction data synchronization between two SQL Azure databases (primary to primary) or between SQL Azure and an on-premise SQL Server database. Therefore, replication just isn’t necessary in SQL Azure.
SQL Server Agent
SQL Server agent doesn’t exist for SQL Azure, but there are many articles on the web that explain how to use a Windows Azure Worker Role to mimic the functionality of the SQL Server Agent.
The SQL Server agent is a Microsoft Windows Service that executes scheduled admin tasks called jobs and provides alerting capabilities. A good look at a Windows Azure Worker Role reveals that a Windows Azure Worker Role is basically a Windows Service in the cloud. Worker Roles are roles used to perform background tasks and long running/intermittent tasks.
What makes Worker Roles great is that their structure is close to that of a Windows Service, including the starting, stopping, and configuration concepts that you see in a Windows Service. You can find a great blog post about this here: http://blogs.msdn.com/b/sqlazure/archive/2010/07/30/10044271.aspx.
As you start working with SQL Azure, or, if you are already familiar with SQL Azure, you will at some point wonder why SQL Azure doesn’t have a specific feature or functionality you are looking for, such as Full-Text Search. For example, if you were to do a feature-to-feature comparison you would quickly see that at least the following features are not present in SQL Azure:
- SQLCLR
- Full-Text Search
- Replication
- SQL Agent
- Encryption (TDE)
This is not a complete list, but the complete list is not a long one either. It is not publicly known the reason for the lack of certain features and functionality in SQL Azure. However, this section can at least provide information on some of the items in the above list.
The SQLCLR is in fact “partially” supported. For example, the XML and Spatial data types are actually CLR data types, and you will certainly find these data types in SQL Azure. What SQL Azure doesn’t support for SQLCLR is the ability to create assemblies in managed code (see Chapter 7, “SQL Server CLR Integration”) and deploy those to SQL Azure. It is unknown if and when that will be supported.
Replication really isn’t needed, because of the existence of SQL Azure Data Sync Services, mentioned earlier in the chapter. SQL Azure Data Sync Services works far better and is far easier to configure and use than Replication. Data Sync Services is built entirely on top of the Sync Framework and therefore includes a much richer data synchronization platform for moving data, including conflict handling and status reporting.
Microsoft is working hard at including encryption but there are certain problems they need to solve before you will see it included. The big issue really is how to support multiple levels of encryption in a shared environment. Remember that SQL Azure is a shared environment, and as such, databases are spread out over multiple instances. For example, my database and your database could potentially be located on the same server. In this scenario, the problem arises when I use one level of encryption and you use another.
These are several examples of missing features and depending on the feature, it will elicit a different response. For example, SQL Azure has SQL Azure Reporting Services, but where is the rest of the Business Intelligent (BI) stack of Analysis Services and Integration Services? Microsoft is working on them, but when and how they will be included is yet to be seen.
The moral of this story is that some features you just won’t see because it doesn’t make sense to include them, as is the case in Replication. With other features you just need to be patient.
The goal of this chapter was to provide a solid overview of how to configure and administer SQL Azure, including creating your SQL Azure server, creating databases, and discussing what happens behind the scenes to provide the great high-availability and failover needed in a cloud-based solution.
The logical administration of SQL Azure plays an important role in understanding topics such as creating a SQL Azure Server and associated databases. While difference between on-premise SQL Server and SQL Azure do exist, SQL Azure still maintains power and flexibility as SQL Server “in the cloud.”