
WHAT'S IN THIS CHAPTER?
Customizing the document library
Using a custom workflow in Alfresco Share
Configuring a custom form for Alfresco Share
Customizing metadata with the Alfresco Forms engine
This chapter walks you through the process of adding advanced customizations to Alfresco Share and the Alfresco repository. These customizations include the addition of archiving logic based on the Alfresco repository rules you created in Chapter 14. You will further customize the Alfresco Share interface by introducing new actions and workflows to the document library. Finally, you will look at how you can introduce new custom forms based on the Alfresco Forms Service.
This chapter builds on the foundation work from Chapter 14 as well as the Alfresco Share customizations from Chapter 15. The sample code in this chapter builds on top of the sample code from the two previous chapters. Thus, if you haven't worked through the previous two chapters, please take the time to do so.
This chapter is structured to provide the following sections:
Overview—A high-level explanation of the concepts and application extension points that you will use in the example. You don't have to type in any of the code in this section; it is simply provided to help guide along the conversation.
Installing the Code—A step-by-step guide to the approach you will need to take in order to install all of the sample code on your own Alfresco installation.
Putting It into Action—A walkthrough of your new extensions. Try them out and see what they do!
At the end of this chapter you will find the source code for the samples. This is only provided for reference. To install, you should download the source files from the book's page at www.wrox.com and follow the instructions provided in the section titled "Installing the Code."
In Chapter 14, you looked at customizing the Alfresco repository to provide Knowledge Base services in the form of a Web script. In Chapter 15, you looked at extension points within Alfresco Share and explored ways that you can introduce Knowledge Base functionality into your collaboration sites.
In this chapter, you'll step it up a notch by introducing more advanced customizations to both the Alfresco repository and to Alfresco Share. You'll focus on the document library and look at how you can extend it to offer the following:
Support for the
kb:articleaspectA new action for archiving a Knowledge Base article
A new workflow for approving Knowledge Base articles
In addition, you'll use the Alfresco Forms engine to customize the look and feel of the content entry and editing screens for your Knowledge Base articles. Alfresco Share includes the Forms engine by default.
This section provides an overview of Alfresco Share and covers what each of these things are. You'll go through them one at a time. There will be some code snippets at times to make the reading a little easier. However, you don't have to type in any code in this section. Just read and enjoy!
The document library is one of the default site pages that is included with Alfresco Share collaboration sites. You saw this in the previous chapter. The document library appears in the navigation menu as Document Library (as shown in Figure 16-1).
The document library is a common point of extension for most customers and community members building a solution on top of Alfresco Share. It is the workhorse for most of the document-level collaboration inside of an Alfresco Share site. It features a number of configuration options and is scripted on top of Spring Surf. You can extend the document library without the need for Java development or compilation.
The functionality for the document library lives in two places (see Figure 16-2):
Alfresco Share
Alfresco repository

Alfresco Share contains the document library's user interface elements. This includes things like the buttons, theme elements, and images. This often consists of files like browser-side JavaScript, CSS, or static files like JPGs.
The Alfresco repository contains the services that the document library depends upon. All the data operations occur in the services within the Alfresco repository. The Alfresco repository receives the instructions, performs the task, and then hands back a response (usually in the form of JSON or XML).
The document library provides configuration options in both locations. You can apply some configuration settings within the services to tweak the kinds of data that is sent "over the wire" to Alfresco Share. You can then tweak Alfresco Share itself to adjust how things are presented.
The document library provides a user interface for setting aspects onto your documents. It gives you a list of available aspects to pick from. The list is generated within the document library services.
You can add your kb:article aspect to this list by configuring the document library services responsible for handing back document library aspects. This is implemented as a single Web script. As you might suspect, it hands back a JSON string that lists all of the aspect information for a given document. The JSON string looks like this:
{
   "current": ["cm:auditable", "sys:referenceable", "cm:titled",
               "cm:author","app:inlineeditable"],
   "visible": ["cm:generalclassifiable","cm:complianceable","cm:dublincore",
               "cm:effectivity","cm:summarizable","cm:versionable",
               "cm:templatable","cm:emailed","emailserver:aliasable",
               "cm:taggable"],
   "addable": [],
   "removeable": []
}
If you're not an expert on JSON, fear not. It's pretty straight forward. The JSON lists out four properties – current, visible, addable, and removeable. Each property has an array of aspects. The current property contains the array of all of the aspects that are currently applied to the document. The visible property contains the array of all of the aspects potentially available for the current document. The addable and removeable properties contain the arrays of aspects that can be added to or removed from the current document.
The document library uses this information within Alfresco Share to figure out how to render a meaningful user interface to the end user. All of this comes back from a single repository-side Web script. This Web script looks to a single configuration file to determine which aspects should be visible to the end user. This file is called aspects.get.config.xml.
You can make your kb:article aspect visible by adding it to this configuration file. You could also specify whether your kb:article aspect can be added or removed by document library users. The configuration is essentially as simple as the following code.
<aspects>
   <visible>
      ...
      <aspect name="{http://www.alfresco.org/model/knowledgebase/1.0}article" />
      ...
   </visible>
</aspects>
A full configuration example is provided at the end of this chapter. However, this is the general idea. This simple configuration adjustment enables the document library to work with your Knowledge Base article aspect.
The document library also provides a user interface that lets you run repository actions against your documents. The actions appear on the right-hand side of the document list page. Clicking on an action tells Alfresco Share to fire into the appropriate action handler within the document library services.
A Web script within Alfresco Share generates the list of actions. This Web script is configuration-driven just like the previous one. This means that you can adjust the list of actions through configuration without having to do any coding.
Suppose you wanted to add an action to the right-hand side of the document library. It's easy enough to do. You could adjust the Web script configuration file to appear something like this:
<documentList>
   <actionSets>
      <actionSet id="empty"></actionSet>
      <actionSet id="document">
         ...
         <action id="onActionArchive" type="action-link" permission=""
                 label="actions.document.archive" />
         ...
      </actionSet>
<actionSet id="locked">...</actionSet>
<actionSet id="lockOwner">...</actionSet>
<actionSet id="workingCopyOwner">...</actionSet>
<actionSet id="folder">...</actionSet>
<actionSet id="link">...</actionSet>
</actionSets>
</documentList>This configuration file lets you describe actions that are to be available for documents in various states. For example, you can define which actions should be available for documents that are locked. Or you can define which actions should be available for folders.
The new configuration for the new action is shown in bold. This describes a new action with the ID onActionArchive. It is to be made available when documents are selected in the document library.
You then need to define a JavaScript function that is responsible for handling this action within the browser. When you click on the new action, Alfresco Share will look for a browser-side JavaScript method named onActionArchive to handle the click. You need to supply a browser-side JavaScript file that defines this click handler.
The actions-common.get.head.ftl file defines what should appear in the HEAD of the HTML markup for the document list. You can modify this file to include your own <script> tag to pull in browser-side JavaScript. In the example that you'll install, you will have this file pull in JavaScript from the knowledgebase-action.js file.
The knowledgebase-action.js file defines the function that handles the click. It uses the Alfresco Share client-side API to call back to the Alfresco Share server with a proxy request. The proxy request asks Alfresco Share to call over to the Alfresco repository on behalf of the user. In other words, Alfresco Share will call over to the Alfresco repository and access the document library services on your behalf.
You might choose to have your JavaScript function make a proxy request over to one of the out-of-the-box document library Web scripts. Or you may choose to write your own Alfresco repository Web script as an action handler. It is completely up to you.
In the case of knowledgebase-action.js, the function asks Alfresco Share to invoke a custom action handler. You add the action handler to the document library services by defining a new Web script in the repository. This Web script responds to the POST method. It is written in the style of the Alfresco Share repository Web scripts and uses a library that allows it to handle one document or multiple documents at once.
The Web script considers the incoming document nodes. If they are valid, the script sets the kb:status property of the documents to the value of Archived. This indicates an Archived lifecycle state in your Knowledge Base.
Alfresco Share lets you configure the workflows that can be launched from within the document library. As before, the document library uses a Web script to determine which workflows should be shown to the end user for selection. There is a single Web script file that you can tweak:
/org/alfresco/modules/documentlibrary/workflow.get.html.ftl
You can edit the file and modify its contents to include the following fragment:
<div class="field">
<select id="${el}-type" name="type" tabindex="0">
<option value="wf:review" selected="selected">Review & Approve</option>
<option value="wf:articleapproval">KB Article Review & Approve</option>
<option value="wf:adhoc">Adhoc Task</option>
</select>
</div>The section shown in bold is new. By adding that in, the selector for the document library will let you choose the wf:articleapproval workflow. This ID matches the ID of the workflow declared in the kb-approval-process-definition.xml file that defines your workflow. Alfresco Share will then make the wf:articleapproval workflow available to your users.
Alfresco Share allows you to define and customize interactive forms for use in creating, displaying, and editing your content objects (see Figure 16-3). It does this by packaging the Alfresco Forms engine for you. It is delivered as part of Alfresco Share and includes everything you need.

The Alfresco Forms engine provides a configuration-driven approach to building and delivering role-based interactive forms. Using simple XML configuration, you can define new forms or interfaces for your content metadata. You can also plug in validation logic and browser-side assertions.
For example, you could define a simple view-form for content consumers. This form would just show the basic properties that most people are interested in when they casually glance at a document. You then also define an edit-form for content editors. This form would be editable and would show additional properties that are of interest only to the editors.
One example you could keep in mind is the kb:status property from your Knowledge Base content model. This property is an internal property that indicates the lifecycle state of the document. Consumers may be interested to see it. However, editors shouldn't be allowed to edit it. In fact, the value of the kb:status property should be entirely managed by the rules and workflow in your Knowledge Base space.
The Alfresco Forms engine draws its configuration from the Alfresco configuration service, which means that your XML configuration is able to use inheritance and extension patterns. It is also based on Spring and makes available many options for advanced users, including the ability to plug in custom generator and persistence classes. These let you adapt the Forms engine to custom schema types within Alfresco or within external third-party systems.
You define forms within the share-config-custom.xml file. Within this file, you can override everything from a form definition for a particular content type to all aspects of the form presentation system. The configuration file specification follows. There's a lot that you can do!
<config>
   <forms>
      <default-controls>
         <type name="type" template="path">
            <control-param name="name">value</control-param>
         </type>
      </default-controls>
      <constraint-handlers>
         <constraint type="id" validation-handler="function" [message-id="key"]
            [message="string"] [event="string"] />
      </constraint-handlers>
      <dependencies>
         <js src="path" />
         <css src="path" />
      </dependencies>
   </forms>
</config>

<config evaluator="node-type" condition="type">
   <forms>
      <form [id="string"] [submission-url="url"]>
         <view-form template="path" />
         <edit-form template="path" />
         <create-form template="path" />
         <field-visibility>
            <show id="string" [for-mode="view|edit|create"] [force="boolean"] />
            <hide id="string" [for-mode="view|edit|create"] />
         </field-visibility>
         <appearance>
            <set id="string" appearance="fieldset|panel" [parent="string"]
                 [label="string"] [label-id="key"] [template="path"] />
            <field id="string" [label-id="key"] [label="string"] [description-
                   id="key"] [description="string"]
                  [read-only="boolean"] [mandatory="boolean"] [set="string"]>
               <control [template="path"]>
                  <control-param name="name">value</control-param>
               </control>
<constraint-handlers>
<constraint type="id" validation-handler="function" [message-
id="string"] [message="string"] [event="string"] />
</constraint-handlers>
</field>
</appearance>
</form>
</forms>
</config>Imagine that the Forms engine is asked to render an edit-form for your Knowledge Base article. It begins by looking for a configuration block that is appropriate for your article. This configuration block defines the template to use for the form as well as all of the controls.
In your Knowledge Base content model, you allowed any kind of content to be an article. In fact, you explicitly sought to use aspects so as to make things more flexible. Thus, you can provide your form for cm:content. This is the base content type within Alfresco.
The configuration block might look like this:
<config evaluator="node-type" condition="cm:content">
   <forms>
      <default-controls>
         <type name="text"
               template="/org/alfresco/components/form/controls/textfield.ftl" />
      </default-controls>
      <form>
         <edit-form template="/2-column-edit-form.ftl" />
         <field-visibility>
            <show id="kb:articletype" />
            <show id="kb:status" for-mode="view" />
         </field-visibility>
         <appearance>
            <field id="kb:articletype" label="Article Type"
                   description="Knowledge Base Article Type" />
            <field id="kb:status" label="Status" description="Approval Status" />
         </appearance>
      </form>
   </forms>
</config>
When the Forms engine is asked to render an edit-form for a content object of type cm:content, it will gather together all of the configuration blocks and will include yours. Your configuration block instructs the Forms engine to do the following:
It overrides the form template to use the FreeMarker template file described by the path /2-column-edit-form.ftl.
It specifies that the
kb:articletypefield should be visible.It specifies that the
kb:statusfield should be visible only when the view-form is being shown.It specifies that the
kb:articletypefield should have the label "Article Type" and the description "Knowledge Base Article Type."It specifies that the
kb:statusfield should have the label "Status" and the description "Approval Status."
The Forms engine will look to the <edit-form> element's template attribute to determine which FreeMarker file to use for the form layout. If this isn't provided, it will use the default form layout.
The Forms engine then begins to walk through the properties of the content object. For each property, it must determine which control to use as well as look to the configuration to inform the control about what appearance settings to use.
Consider the kb:status property of type d:text. The Forms engine has to figure out what kind of control to render to the screen for this field. The Forms engine has a number of default controls set up out of the box for the Data Dictionary types (such as d:text).
However, you can also override the default controls as shown in the previous <default-controls> element. You've indicated that text fields should use a specific FreeMarker template. This overrides the out-of-the-box settings. You can also provide form-specific overrides for the view-form if you wish.
The Forms engine renders all of the controls onto the screen by invoking FreeMarker for all of the individual controls. The FreeMarker files are located in the share.war file but you can also override them or implement your own by placing your templates under the /web-extension/templates directory.
This is just an example of what you can do with the Forms engine. As you can see from the full configuration settings, you can also do things like indicate browser-side constraints. You'll install a Forms configuration file as part of the sample file installation process.
This section provides step-by-step instructions for installing this chapter's code into your Alfresco installation. It assumes that you have downloaded the sample source code from www.wrox.com. This is available as a ZIP compressed file.
Inside of the ZIP file, you will find the following folder structure:
/chapter16
      /extension
      /web-extension
      /ROOT
      install_chapter_16.bat
      readme.txt
If you've performed a default installation on Windows under the C:Alfresco directory, you can run the install_chapter_16.bat file to quickly install all of this chapter's sample code in one step! If you elect to do so, you can skip ahead to the section titled "Putting It into Action."
Otherwise follow the manual installation instructions provided here. The sample files are assumed to have been extracted into a location referred to as <sampleLocation>. Bear in mind that the path references in this section use a Windows file convention. If you are using a non-Windows box (such as a Linux distribution), you will need to adjust the file paths accordingly.
Please read through the readme.txt file for last-minute updates and tips on installing the sample code.
The code provided in this chapter builds on what was developed in the previous two chapters. It assumes that you have completed and installed the sample code from Chapters 14 and 15. Please make sure you have completed the sample code installation from Chapters 14 and 15 before continuing.
Before doing anything else, you should stop the Alfresco server. You can do this either from a command line or through the Windows Start menu (if you used the Windows Installer).
From the command line, type the following:
cd<installLocation>alf_stop.bat
This shuts down Alfresco and returns you to the command prompt.
The following steps involve customizations to the document library services in the Alfresco repository.
Begin by adding a custom workflow to your Alfresco repository. A custom workflow comprises a process definition file and a workflow bootstrap file. The latter consists of a Spring bean that informs the Alfresco repository of the new workflow process definition.
From the following directory:
<sampleLocation>chapter16extension
copy the following files:
kb-approval-process-definition.xml
kb-workflow-context.xml
to:
<installLocation> omcatsharedclassesalfrescoextension
Now you'll introduce a custom Web script that will act as an HTTP POST handler for your Archive action.
From the following directory:
<sampleLocation>chapter16extension emplateswebscriptsorgalfrescoslingshotdocumentlibraryaction
copy the following files:
archive.post.desc.xml
archive.post.json.js
archive.post.json.ftl
to:
<installLocation> omcatsharedclassesalfrescoextension emplateswebscriptsorgalfrescoslingshotdocumentlibraryaction
At this point, you will inform the document library to make your custom kb:article aspect visible.
From the following directory:
<sampleLocation>chapter16extension emplateswebscriptsorgalfrescoslingshotdocumentlibrary
copy the following file:
aspects.get.config.xml
to:
<installLocation> omcatsharedclassesalfrescoextension emplateswebscriptsorgalfrescoslingshotdocumentlibrary
The following steps involve customizations to Alfresco Share.
The Document Library page in Alfresco Share features a list of actions along the right-hand side. You would like to add a new Archive action to this list.
When users click the Archive action, an HTTP POST should be performed to the Alfresco repository server. The Web script on that side will put your content into an Archived state.
From the following directory:
<sampleLocation>chapter16web-extensionsite-webscriptsorgalfrescocomponentsdocumentlibrary
copy the following files:
actions-common.get.head.ftl
documentlist.get.config.xml
to:
<installLocation> omcatsharedclassesalfrescoweb-extensionsite-webscriptsorgalfrescocomponentsdocumentlibrary
Earlier, you defined your new custom workflow process and bootstrapped it into the Alfresco repository. You would now like to configure Alfresco Share so that your workflow process appears for end users. You will enable end users to select your workflow and launch it.
From the following directory:
<sampleLocation>chapter16web-extensionsite-webscriptsorgalfrescomodulesdocumentlibrary
copy the following file:
workflow.get.html.ftl
to:
<installLocation> omcatsharedclassesalfrescoweb-extensionsite-webscriptsorgalfrescomodulesdocumentlibrary
Alfresco Share comes out of the box with the ability to render metadata forms for viewing and editing content objects. All you need to do is provide the form definitions and associate them to your kb:article aspect. You can do all of this within the Alfresco Share configuration file.
From the following directory:
<sampleLocation>chapter16web-extension
copy the following file:
share-config-custom.xml
to:
<installLocation> omcatsharedclassesalfrescoweb-extensionIf you worked through Chapter 15, then you will need to overwrite a file with the same name.
You will also need to copy in the template for your form.
From the following directory:
<sampleLocation>chapter16web-extensionsite-webscripts
copy the following file:
2-column-edit-form.ftl
to:
<installLocation> omcatsharedclassesalfrescoweb-extensionsite-webscriptsYour custom message bundle defines text values for the default locale. If you want to provide additional bundles for other locales, you just need to assign the correct suffix extensions.
From the following location:
<sampleLocation>chapter16web-extensionmessages
copy the following file:
kbsite.properties
to:
<installLocation> omcatsharedclassesalfrescoweb-extensionmessages
If you worked through Chapter 15, then you will need to overwrite a file with the same name.
To include your own custom message bundle along with the Alfresco Share message bundles so that you can fully support I18N with your new site preset, you need to override the Spring bean responsible for doing so.
From the following location:
<sampleLocation>chapter16web-extension
copy the following file:
custom-slingshot-application-context.xml
to:
<installLocation> omcatsharedclassesalfrescoweb-extension
If you worked through Chapter 15, then you will need to overwrite a file with the same name.
The customizations in this section have dependencies that need to be resolvable by the browser. One option is to modify the share.war file but a better option is to simply place them in an alternate Web application.
In this case, you've elected to place them into the ROOT Web application under Tomcat. This section will walk you through how to set this up.
The web.xml file is a required file for the ROOT Web application. If it already exists in your Tomcat server, you can skip to the next step. If it doesn't exist, you may have to create the following directory structures by hand.
From the following location:
<sampleLocation>chapter16ROOTWEB-INF
copy the following file:
web.xml
to:
<installLocation> omcatwebappsROOTWEB-INF
From the following location:
<sampleLocation>chapter16ROOTshare-extensioncomponentsdocumentlibrary
copy the following files:
knowledgebase-actions.js
knowledgebase-documentlist.css
to:
<installLocation> omcatwebappsROOTshare-extensioncomponentsdocumentlibrary
If you have followed the instructions, you should be ready to try things out.
If your Alfresco server is already running, you should stop it, either from a command prompt or from the Windows Start menu (if you used the Windows Installer).
From the command line, type the following:
cd<installLocation>alf_stop.bat
You should then start up Alfresco once again. You can it start up either from a command prompt or from the Windows Start menu (if you used the Windows Installer).
From the command line, type the following:
cd<installLocation>alf_start.bat
This starts up Alfresco and returns you to the command prompt.
In Chapter 15, you created a custom Knowledge Base Site preset for Alfresco Share and used this to build a new site. You called this site My Second Project and gave it the short name of second.
Now you'll go into Alfresco Explorer and add a Knowledge Base space to this site's document library. Follow these instructions:
Open a browser and go to Alfresco Explorer. You can access Alfresco Explorer using the following URL:
http://localhost:8080/alfrescoClick the Login link at the top of the page to log in to Alfresco Explorer.
You can use the administrator account with the user name
adminand passwordadmin. Your user dashboard will display once you log in.Click the Company Home link at the top left of the page. This takes you to the root space of the repository.
On the left-hand side of the page you will see a Navigator view of the repository.
Click the arrow next to the Sites space to reveal the subspaces inside.
Click the arrow next to the subspace named second. This will expand the subspace and you should see a few folders underneath it. It should appear similar to Figure 16-4.
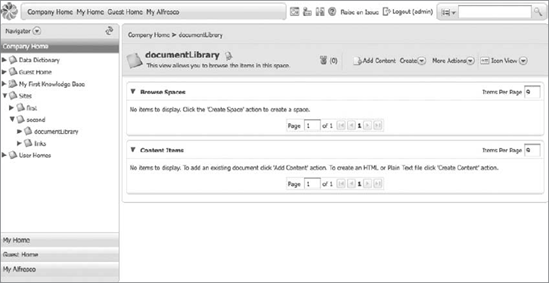
Click on the space named documentLibrary in the left-hand Navigator's subspaces. This will take you into the document library for the My Second Project site. It should look a little like what is shown in Figure 16-5.
Note
If you don't see a space named documentLibrary in your site space, then you skipped a step in Chapter 15! Actually, it's not so bad – you probably only skipped the very last step. In your Knowledge Base site within Alfresco Share, you need to first click on the Document Library tab in the navigation menu. Otherwise, the documentLibrary folder will not appear. If you're caught in this conundrum, you should take a slight detour into Alfresco Share and follow the steps prescribed in Chapter 15.
Click the Create menu and select Advanced Space Wizard from the list.
On the Step One - Starting Space page, choose the Using a Template option and click Next.
On the next page, Step Two – Space Options, select Knowledge Base Project from the drop-down list and click Next.
Give your new Knowledge Base the name Knowledge Base and leave the description field blank.
Click Create Space to create the space.
The document library now has a Knowledge Base space under it. This includes all of the rules you set up in Chapter 14.

Now that your Knowledge Base is properly situated inside of the document library, you can set about adding some content to it. To do so, you'll use Alfresco Share. You'll also check out some of the customizations you added.
Open a browser and point it to the following URL:
http://localhost:8080/share
Log in to Alfresco Share. You can log in using the administrator account. The administrator has a user name of
adminand a password ofadmin.Once you log in, you will see the user dashboard.
On the right-hand side of the user dashboard, you will see a dashlet that lists all of your sites, as shown in Figure 16-6.
You can see all of the sites that you have created during the course of building out this sample application.
Click the My Second Project link in this dashlet. You will be taken into the Alfresco Share site. This is the second site that you created in Chapter 15.
Click the Document Library link along the site menu to navigate to the document library.
Click Show Folders to reveal the folders that are in the document library. Your Knowledge Base space displays!
Click on the Knowledge Base space to navigate into it.
Inside the Knowledge Base space, you should see an Archived folder. This is because you used your Knowledge Base space template to stamp out the structure and rules. The Knowledge Base space is preconfigured for you.

Now you'll add a document to the Knowledge Base. It really doesn't matter what document you add. You might pick from a handy file on your desktop, perhaps a Word document, or a photo of your family. Anything will work just fine.
If you're really hard up for material, there is some sample content included along with the ZIP file. Assume that you wish to upload the following file:
chapter16samplecontentsample.doc
Please proceed with the following steps:
Click the Upload button under the navigation menu (see Figure 16-7).
You will then be presented with a window to help coordinate your upload. This window will let you upload many files at once, if you choose. However, in this case you will just focus on uploading a single file.
Click the button along the top to select files to upload. You will be presented with a file picker. Pick the sample.doc file as described above or pick one of your own files.
Once your files are selected, click the Upload Files button to send your files to the document library (see Figure 16-8).
Of course, this assumes you used the sample.doc file for this upload. If you used a different file, you will see its name shown in the image.
Click OK to close the Upload Files dialog.
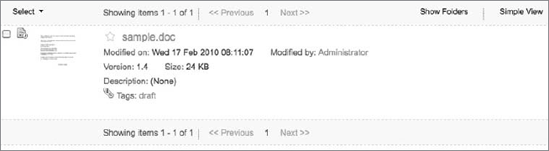
You should now see your content appear in the document library along with a thumbnail icon that identifies the document's content (as shown in Figure 16-9).
Click on the document to bring up the document details and preview (see Figure 16-10).
On the left-hand side, you will see a Flash preview of the document you uploaded. The rest of the page shows details about the document.


Notice that the document was automatically marked with the kb:article aspect. Why? Because you uploaded it into the Knowledge Base! You defined a rule for the Knowledge Base (the first of three) that automatically marked any content placed into it with the kb:article aspect.
Pretty cool. You may also notice that content has also been tagged with the Alfresco Tagging service. It has tags that show up in the metadata viewer. This is because of the server-side JavaScript file that you uploaded in Chapter 14. The rule triggered and kicked off this script for you!
Along the right-hand side of the page, you will see a list of actions you can perform against this document (appropriately shown in a section titled Document Actions).
Click the Edit Metadata link to bring up a form that will let you edit the metadata for your content object (see Figure 16-11).
This metadata editor appears and uses the Forms configuration that you provided for Alfresco Share. The form displayed uses the template and settings that you provided for the edit-form portion of your configuration block.
If you wish to make a change, go ahead and then click Save. The Forms engine will map your values back onto the object and save it.
Notice that the form does not display the
kb:statusfield. You specifically indicated in your form configuration that you didn't want this field to be shown for the edit-form. That way, editors can't change the article's lifecycle without first having it pass through a formal approval process.

When you added the Knowledge Base article, it was automatically assigned a lifecycle state of Draft as per the rules on your Knowledge Base space. In order to approve this Knowledge Base article, you need to have it participate in a workflow process and be formally approved.
The workflow process that you bootstrapped into the repository will do this for you. All you need to do is assign the Knowledge Base article to the workflow and let the workflow engine take over. It will pass the article to someone for approval. If they approve it, the article will have its lifecycle state switched to Current.
When the article's lifecycle state switches to Current, it will have its kb:status field updated. This update will trigger the rules on your Knowledge Base space to automatically invoke the Tagging Service. Rules help to keep your Knowledge Base nice and consistent.
Therefore, submit your Knowledge Base article for approval. You'll do this by assigning a workflow to it. Along the right-hand side of the page, you'll see another action titled Assign Workflow. You can use this action to launch a workflow for this document.
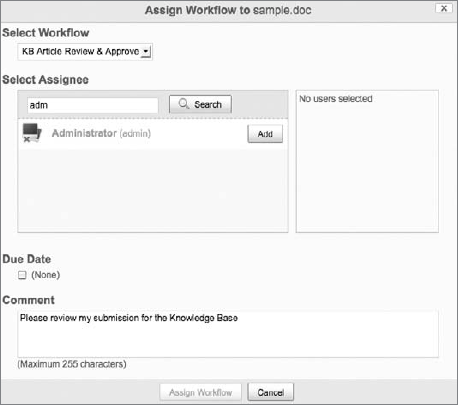
Click the Assign Workflow link to bring up the workflow assignment window. It appears much like Figure 16-12.
Your custom workflow is available as one of the options you can select under Select Workflow. It is titled KB Article Review & Approve. This is the workflow process definition that you bootstrapped into your Alfresco repository. You then configured it to appear as an available option for Alfresco Share.
Select the KB Article Review & Approve workflow.
You then need to assign someone to act as the approver of the workflow. You should simply assign yourself (Administrator) for the purposes of this example. As shown in Figure 16-12, the Administrator user was assigned as the recipient of the workflow.
The KB Article Review & Approve workflow is a simple example that allows you to pick who you wish to have approve the Knowledge Base article. In practice, you would constrain this set to one or more in a group of knowledge experts.
Fill in a comment for the workflow. If a comment is not provided, the workflow cannot be assigned. Any comment will do!
Click Assign Workflow to assign the workflow to the document. This formally puts into motion the request for your Knowledge Base article to be approved.
After you click on Assign Workflow, you will be taken back to the metadata view of the Knowledge Base article. If you refresh the page, you'll notice that the article's tags have already been updated. It used to have a Draft tag and now it has Pending Approval.
Wouldn't it be a wonderful thing if you could approve all of your own requests? Imagine the efficiency gains you would achieve in expense reports alone! Well, for the purposes of this chapter, you'll do exactly that. You'll approve your own Knowledge Base article.
Click the My Dashboard link at the top of the page. This will take you back to your user dashboard.
You will see a dashlet on your user dashboard called My Tasks. By default it is positioned along the right-hand side below the Sites dashlet. This dashlet shows you all of the tasks that have landed in your to-do list. This includes in-flight workflows. The dashlet will appear much like you see in Figure 16-13.
In My Tasks, click on Approve to approve the Knowledge Base article. The dashlet will refresh and indicate that your workflow has successfully approved the Knowledge Base article.
Click on Task Done to complete the task.
Click on My Second Project in the My Sites dashlet (see Figure 16-6) to verify that the Knowledge Base article has successfully transitioned out of Pending Approval and into the Current lifecycle state.
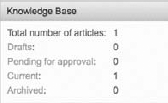
Notice that the Knowledge Base dashlet you built in Chapter 15 now reflects that your site's Knowledge Base has one article and that this article is in the Approved state (see Figure 16-14).

The last thing you need to do is to try out your custom Archive action. You configured Alfresco Share to provide an Archive action for documents. You should now be able to trigger this action and archive your document.
Archiving allows you to complete the content lifecycle for documents. Documents that are Current will eventually need to be replaced as new information or better content becomes available. You will want to archive your Current documents prior to replacing them so that they are backed up. At some point in the future, when you're sure that you won't need these documents any more, you may choose to delete them.
Please perform the following:
Click on the Document Library page in the navigation menu. This will take you into the document library for the site.
Click on the Knowledge Base folder. This will take you into the Knowledge Base space.
Note
If the Knowledge Base folder doesn't appear, try clicking the Show Folders button.
From the document list, you will see a list of action commands along the right side, with three visible choices: Download, Edit Metadata, and Upload New Version.
Click the More... link to summon a drop-down list of additional available actions (see Figure 16-15).
At the bottom, you will see your Archive action.
Click the Archive action to archive the document. Doing so will invoke your browser-side JavaScript function that makes a proxy request back to the Alfresco Share server. Alfresco Share will then invoke the appropriate HTTP POST handler on the document library services in the Alfresco repository.
You added the custom HTTP POST handler as part of your customization to the document library services. This handler will set the
kb:statusproperty of your document to the value Archived. It will also save the document.Once the document is saved, the second of your three rules on the document library space will trigger. It will trigger because the Update event of the document will have been raised because the document was saved. The rule executes and the document is moved to the Archived folder.
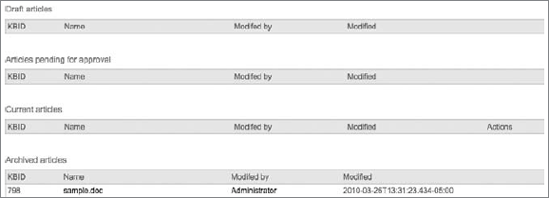
Click on the Knowledge Base page in the navigation menu to see your article in the Custom Site Page that you built in Chapter 15 (see Figure 16-16).

Congratulations! You have completed the sample application.
This chapter's sample code is provided in this section. This code is also available from www.wrox.com.
The following describes configuration of the Alfresco repository.
The following files should be placed into this directory:
<installLocation> omcatsharedclassesalfrescoextensionDefines a custom Knowledge Base – article approval workflow
<?xml version="1.0" encoding="UTF-8"?>
<process-definition xmlns="urn:jbpm.org:jpdl-3.1" name="wf:articleapproval">

   <swimlane name="initiator" />

   <start-state name="start">
      <task name="wf:submitReviewTask" swimlane="initiator" />
         <event type="node-leave">

            <!-- Call script once the package exists i.e. on node-leave -->
            <action class="org.alfresco.repo.workflow.jbpm.AlfrescoJavaScript">

               <!-- Check you have a document attached to the package -->
               <!-- Apply the KB Aspect (kb:status) if not set already. -->
               <!-- Note: The default kb:status property is draft -->
                  <script>
                var l = bpm_package.children.length;
                if (l > 0)
                {
                          for (var i = 0, child = null; l > i; i++)
                          {
                            child = bpm_package.children[i];
                      if (!child.hasAspect("kb:status"))
                      {
                         child.addAspect("kb:status");
                         child.save();
                      }
                          }
                }
                else
                {
                   if (logger.isLoggingEnabled())
                   {
                      logger.log("Error: Package has no content. Length: " +
                         bpm_package.children.length + " Package: " + bpm_package);
                   }
                }
                </script>
            </action>
         </event>
      <transition name="" to="review" />
   </start-state>

   <swimlane name="reviewer">
       <assignment actor-id="#{bpm_assignee.properties['cm:userName']}" />
   </swimlane>
<task-node name="review">
<!-- Update the status to In Review when you enter this task -->
<event type="node-enter">
<action class="org.alfresco.repo.workflow.jbpm.AlfrescoJavaScript">
<script>
for (var i = 0, child = null,
l = bpm_package.children.length; l > i; i++)
{
child = bpm_package.children[i];
child.properties["kb:status"] = "Pending Approval";
child.save();
}
</script>
</action>
</event>
<task name="wf:reviewTask" swimlane="reviewer">
<event type="task-create">
<script>
if (bpm_workflowDueDate != void)
{
taskInstance.dueDate = bpm_workflowDueDate;
}
if (bpm_workflowPriority != void)
{
taskInstance.priority = bpm_workflowPriority;
}
</script>
</event>
</task>
<transition name="reject" to="rejected" />
<transition name="approve" to="approved"/>
</task-node>
<task-node name="rejected">
<!-- Update the status to Draft when you enter this task -->
<event type="node-enter">
<action class="org.alfresco.repo.workflow.jbpm.AlfrescoJavaScript">
<script>
for (var i = 0, child = null,
l = bpm_package.children.length; l > i; i++)
{
child = bpm_package.children[i];
child.properties["kb:status"] = "Draft";
child.save();
}
</script>
</action>
</event>
<task name="wf:rejectedTask" swimlane="initiator" />
<transition name="" to="end" />
</task-node>
<task-node name="approved"><!-- Update the status to Approved when you enter this task -->
<event type="node-enter">
<action class="org.alfresco.repo.workflow.jbpm.AlfrescoJavaScript">
<script>
for (var i = 0, child = null,
l = bpm_package.children.length; l > i; i++)
{
child = bpm_package.children[i];
child.properies["kb:status"] = "Current";
child.save();
}
</script>
</action>
</event>
<task name="wf:approvedTask" swimlane="initiator" />
<transition name="" to="end" />
</task-node>
<end-state name="end" />
<event type="process-end">
<!-- Update the status to Approved when you enter this task -->
<action class="org.alfresco.repo.workflow.jbpm.AlfrescoJavaScript">
<script>
if (cancelled)
{
for (var i = 0, child = null,
l = bpm_package.children.length; l > i; i++)
{
child = bpm_package.children[i];
if (child.hasAspect("kb:status"))
{
child.properties["kb:status"] = "Draft";
child.save();
}
if (logger.isLoggingEnabled())
{
logger.log("Workflow cancelled, status reset to Draft");
}
}
}
if (logger.isLoggingEnabled())
{
logger.log("Workflow completed");
}
</script>
</action>
</event>
</process-definition>Code snippet extensionkb-approval-process-definition.xml
Bootstraps the custom workflow into the Alfresco repository
<?xml version='1.0' encoding='UTF-8'?>
<!DOCTYPE beans PUBLIC '-//SPRING//DTD BEAN//EN'
   'http://www.springframework.org/dtd/spring-beans.dtd'>
<beans>

   <bean id="parallel.workflowBootstrap" parent="workflowDeployer">
      <property name="workflowDefinitions">
         <list>
            <props>
               <prop key="engineId">jbpm</prop>
               <prop key="location">
                  alfresco/extension/kb-approval-process-definition.xml
               </prop>
               <prop key="mimetype">text/xml</prop>
               <prop key="redeploy">false</prop>
            </props>
         </list>
      </property>
   </bean>

</beans>
Code snippet extensionkb-workflow-context.xml
The following files should be placed into this directory:
<installLocation> omcatsharedclassesalfrescoextension emplateswebscriptsorgalfrescoslingshotdocumentlibraryaction
Defines the POST action handler Web script for the document library services
<webscript>
   <shortname>Archive</shortname>
   <description>
      Document List Action - Archive Knowledge Base articles
   </description>
   <url>/slingshot/doclib/action/archive/site/{site}/{container}</url>
   <format default="json">argument</format>
   <authentication>user</authentication>
   <transaction>required</transaction>
</webscript>
Code snippet extension emplateswebscriptsorgalfrescoslingshotdocumentlibraryactionarchive.post.desc.xml
Scriptable controller for the POST action handler Web script
<import resource="classpath:/alfresco/templates/webscripts/org/alfresco/slingshot
                  /documentlibrary/action/action.lib.js">

/**
 * Archive multiple files action
 * @method POST
 */

/**
 * Entrypoint required by action.lib.js
 *
 * @method runAction
 * @param p_params {object} Object literal containing files array
 * @return {object|null} object representation of action results
 */
function runAction(p_params)
{
   var results = [];
   var files = p_params.files;
   var file, fileNode, result, nodeRef;

   // Must have array of files
   if (!files || files.length == 0)
   {
      status.setCode(status.STATUS_BAD_REQUEST, "No files.");
      return;
   }

   for (file in files)
   {
      nodeRef = files[file];
      result =
      {
         nodeRef: nodeRef,
         action: "archiveFile",
         success: false
      }

      try
      {
         fileNode = search.findNode(nodeRef);
         if (fileNode === null)
         {
            result.id = file;
            result.nodeRef = nodeRef;
            result.success = false;
         }
         else
         {
            if (fileNode.properties["kb:status"] != "Current")
            {
// Only knowledge base articles with staus "Current" may be archived
status.setCode(status.STATUS_BAD_REQUEST, "No Current");
return;
}
else
{
result.id = fileNode.name;
result.type = fileNode.isContainer ? "folder" : "document";
result.nodeRef = nodeRef;
// set the kb:status property to "Archived"
fileNode.properties["kb:status"] = "Archived";
fileNode.save();
result.success = (result.nodeRef !== null);
}
}
}
catch (e)
{
result.id = file;
result.nodeRef = nodeRef;
result.success = false;
}
results.push(result);
}
return results;
}
/* Bootstrap action script */
main();Code snippet extension emplateswebscriptsorgalfrescoslingshotdocumentlibraryactionarchive.post.json.js
Template view for the POST action handler Web script
<#import "action.lib.ftl" as actionLib />
<@actionLib.resultsJSON results=results />
Code snippet extension emplateswebscriptsorgalfrescoslingshotdocumentlibraryactionarchive.post.json.ftl
This file should be placed in the following location:
<installLocation> omcatsharedclassesalfrescoextension emplateswebscriptsorgalfrescoslingshotdocumentlibrary
Defines the availability of aspects within the document library
<aspects>
 <visible>
  <aspect name="{http://www.alfresco.org/model/content/1.0}generalclassifiable" />
  <aspect name="{http://www.alfresco.org/model/content/1.0}complianceable" />
  <aspect name="{http://www.alfresco.org/model/content/1.0}dublincore" />
  <aspect name="{http://www.alfresco.org/model/content/1.0}effectivity" />
  <aspect name="{http://www.alfresco.org/model/content/1.0}summarizable" />
  <aspect name="{http://www.alfresco.org/model/content/1.0}versionable" />
  <aspect name="{http://www.alfresco.org/model/content/1.0}templatable" />
  <aspect name="{http://www.alfresco.org/model/content/1.0}emailed" />
  <aspect name="{http://www.alfresco.org/model/emailserver/1.0}aliasable" />
  <aspect name="{http://www.alfresco.org/model/content/1.0}taggable" />
  <aspect name="{http://www.alfresco.org/model/knowledgebase/1.0}article" />
 </visible>

 <!-- Aspects that a user can add. Same as "visible" if left empty -->
 <addable>
 </addable>

 <!-- Aspects that a user can remove. Same as "visible" if left empty -->
 <removeable>
 </removeable>
</aspects>
Code snippet extension emplateswebscriptsorgalfrescoslingshotdocumentlibraryaspects.get.config.xml
The following describes configuration of Alfresco Share.
The following file should be placed in this location:
<installLocation> omcatsharedclassesweb-extension
Custom Alfresco Share configuration file
<alfresco-config>
   <!-- Put Share Client in debug mode -->
   <!--
      <config replace="true">
         <flags>
            <client-debug>true</client-debug>
            <client-debug-autologging>true</client-debug-autologging>
         </flags>
</config>
-->
<!-- Add a custom page type -->
<config evaluator="string-compare" condition="SitePages" replace="true">
<pages>
<page id="calendar">calendar</page>
<page id="wiki-page">wiki-page?title=Main_Page</page>
<page id="documentlibrary">documentlibrary</page>
<page id="discussions-topiclist">discussions-topiclist</page>
<page id="blog-postlist">blog-postlist</page>
<page id="links">links</page>
<page id="tasks">tasks</page>
<page id="knowledgebase">knowledgebase</page>
</pages>
</config>
<!-- Specify another theme as the default theme -->
<config evaluator="string-compare" condition="WebFramework">
<web-framework>
<application-defaults>
<theme>default</theme>
</application-defaults>
</web-framework>
</config>
<!-- Form definition for cm:content -->
<config evaluator="node-type" condition="cm:content">
<forms>
<form>
<!-- 2 column template -->
<edit-form template="/2-column-edit-form.ftl" />
<field-visibility>
<show id="sys:node-dbid" for-mode="view" />
<show id="kb:articletype" />
<show id="kb:status" for-mode="view" />
</field-visibility>
<appearance>
<field id="sys:node-dbid" label="KBID"
description="Knowledge Base ID" />
<field id="kb:articletype" label="Article Type"
description="Knowledge Base Article Type" />
<field id="kb:status" label="Status"
description="Approval Status" />
</appearance></form>
</forms>
</config>
</alfresco-config>Code snippet web-extensionshare-config-custom.xml
The following file should be placed in this location:
<installLocation> omcatsharedclassesweb-extensionsite-webscripts
A two-column edit-form for metadata in Alfresco Share
<#import "/org/alfresco/components/form/form.lib.ftl" as formLib />

<#if error?exists>
   <div class="error">${error}</div>
<#elseif form?exists>

   <#assign formId=args.htmlid + "-form">
   <#assign formUI><#if args.formUI??>${args.formUI}<#else>true</#if></#assign>

   <#if formUI == "true">
      <@formLib.renderFormsRuntime formId=formId />
   </#if>

   <div id="${formId}-container" class="form-container">

      <#if form.showCaption?exists && form.showCaption>
         <div id="${formId}-caption" class="caption">
         <span class="mandatory-indicator">*</span>
         ${msg("form.required.fields")}</div>
      </#if>

      <#if form.mode != "view">
         <form id="${formId}" method="${form.method}" accept-charset=
         "utf-8" enctype="${form.enctype}" action="${form.submissionUrl}">
      </#if>

      <div id="${formId}-fields" class="form-fields">
        <#list form.structure as item>
            <#if item.kind == "set">
               <@renderSetWithColumns set=item />
            <#else>
               <@formLib.renderField field=form.fields[item.id] />
            </#if>
         </#list>
      </div>
<#if form.mode != "view">
<@formLib.renderFormButtons formId=formId />
</form>
</#if>
</div>
</#if>
<#macro renderSetWithColumns set>
<#if set.appearance?exists>
<#if set.appearance == "fieldset">
<fieldset><legend>${set.label}</legend>
<#elseif set.appearance == "panel">
<div class="form-panel">
<div class="form-panel-heading">${set.label}</div>
<div class="form-panel-body">
</#if>
</#if>
<#list set.children as item>
<#if item.kind == "set">
<@renderSetWithColumns set=item />
<#else>
<#if (item_index % 2) == 0>
<div class="yui-g"><div class="yui-u first">
<#else>
<div class="yui-u">
</#if>
<@formLib.renderField field=form.fields[item.id] />
</div>
<#if ((item_index % 2) != 0) || !item_has_next></div></#if>
</#if>
</#list>
<#if set.appearance?exists>
<#if set.appearance == "fieldset">
</fieldset>
<#elseif set.appearance == "panel">
</div>
</div>
</#if>
</#if>
</#macro>Code snippet web-extensionsite-webscripts2-column-edit-form.ftl
The following file should be placed in this location:
<installLocation> omcatsharedclassesweb-extensionsite-webscriptsorgalfrescocomponentsdocumentlibrary
Customization that includes additional JS reference
<#include "../component.head.inc">

<!-- Actions -->
<@script type="text/javascript" src="${page.url.context}/components/
documentlibrary/actions.js"></@script>

<!-- Simple Dialog -->
<@script type="text/javascript" src="${page.url.context}/
modules/simple-dialog.js"></@script>

<!-- Copy-To -->
<@link rel="stylesheet" type="text/css" href="${page.url.context}/
modules/documentlibrary/copy-to.css" />
<@script type="text/javascript" src="${page.url.context}/
modules/documentlibrary/copy-to.js"></@script>

<!-- Move-To -->
<@link rel="stylesheet" type="text/css" href="${page.url.context}/
modules/documentlibrary/move-to.css" />
<@script type="text/javascript" src="${page.url.context}/
modules/documentlibrary/move-to.js"></@script>

<!-- Details -->
<@link rel="stylesheet" type="text/css" href="${page.url.context}/
modules/documentlibrary/details.css" />
<@script type="text/javascript" src="${page.url.context}/
modules/documentlibrary/details.js"></@script>

<!-- Tag Library -->
<@link rel="stylesheet" type="text/css" href="${page.url.context}/
modules/taglibrary/taglibrary.css" />
<@script type="text/javascript" src="${page.url.context}/
modules/taglibrary/taglibrary.js"></@script>

<!-- Assign Workflow -->
<@link rel="stylesheet" type="text/css" href="${page.url.context}/
modules/documentlibrary/workflow.css" />
<@script type="text/javascript" src="${page.url.context}/
modules/documentlibrary/workflow.js"></@script>

<!-- People Finder Assets (req'd by Assign Workflow)  -->
<@link rel="stylesheet" type="text/css" href="${page.url.context}/
components/people-finder/people-finder.css" />
<@script type="text/javascript" src="${page.url.context}/
components/people-finder/people-finder.js"></@script>

<!-- Manage Permissions -->
<@link rel="stylesheet" type="text/css" href="${page.url.context}/
modules/documentlibrary/permissions.css" />
<@script type="text/javascript" src="${page.url.context}/
modules/documentlibrary/permissions.js"></@script>
<!-- Manage Aspects -->
<@link rel="stylesheet" type="text/css" href="${page.url.context}/
modules/documentlibrary/aspects.css" />
<@script type="text/javascript" src="${page.url.context}/
modules/documentlibrary/aspects.js"></@script>
<!-- KB Archive Action -->
<script type="text/javascript" src="${page.url.context}-extension/
components/documentlibrary/knowledgebase-actions.js"></script>Code snippet web-extensionsite-webscriptsorgalfrescocomponentsdocumentlibraryactions-common.get.head.ftl
This file should be placed in the following location:
<installLocation> omcatsharedclassesweb-extensionsite-webscriptsorgalfrescocomponentsdocumentlibrary
Includes additional archive action for documents
<documentList>

   <actionSets>

      <actionSet id="empty"></actionSet>

      <actionSet id="document">
         <action id="onActionDownload" type="simple-link"
                 href="{downloadUrl}" label="actions.document.download" />
         <action id="onActionDetails" type="action-link" permission="edit"
                 label="actions.document.edit-metadata" />
         <action id="onActionUploadNewVersion" type="action-link"
                 label="actions.document.upload-new-version" />
         <action id="onActionEditOnline" type="action-link"
                 permission="edit,online-edit"
                 label="actions.document.edit-online" />
         <action id="onActionEditOffline" type="action-link"
                 permission="edit" label="actions.document.edit-offline" />
         <action id="onActionCopyTo" type="action-link"
                 label="actions.document.copy-to" />
         <action id="onActionMoveTo" type="action-link" permission="delete"
                 label="actions.document.move-to" />
         <action id="onActionDelete" type="action-link" permission="delete"
                 label="actions.document.delete" />
         <action id="onActionAssignWorkflow" type="action-link"
                 label="actions.document.assign-workflow" />
         <action id="onActionManagePermissions" type="action-link"
                 permission="permissions"
                 label="actions.document.manage-permissions" />
         <action id="onActionManageAspects" type="action-link" permission="edit"
label="actions.document.manage-aspects" />
<action id="onActionArchive" type="action-link" permission=""
label="actions.document.archive" />
</actionSet>
<actionSet id="locked">
<action id="onActionDownload" href="{downloadUrl}" type="simple-link"
label="actions.document.download" />
</actionSet>
<actionSet id="lockOwner">
<action id="onActionDownload" href="{downloadUrl}" type="simple-link"
label="actions.document.download-original" />
</actionSet>
<actionSet id="workingCopyOwner">
<action id="onActionUploadNewVersion" type="action-link"
label="actions.document.upload-new-version" />
<action id="onActionDownload" href="{downloadUrl}" type="simple-link"
label="actions.document.download-again" />
<action id="onActionCancelEditing" type="action-link"
label="actions.document.cancel-editing" />
</actionSet>
<actionSet id="folder">
<action id="onActionDetails" permission="edit" type="action-link"
label="actions.folder.edit-metadata" />
<action id="onActionMetadata" type="simple-link" href="{folderDetailsUrl}"
label="actions.folder.view-metadata" />
<action id="onActionCopyTo" type="action-link"
label="actions.folder.copy-to" />
<action id="onActionMoveTo" permission="delete" type="action-link"
label="actions.folder.move-to" />
<action id="onActionDelete" permission="delete" type="action-link"
label="actions.folder.delete" />
<action id="onActionManagePermissions" permission="permissions"
type="action-link" label="actions.folder.manage-permissions" />
<action id="onActionManageAspects" type="action-link" permission="edit"
label="actions.folder.manage-aspects" />
</actionSet>
<actionSet id="link">
<action id="onActionDelete" permission="delete" type="action-link"
label="actions.link.delete" />
</actionSet>
</actionSets>
</documentList>Code snippet web-extensionsite-webscriptsorgalfrescocomponentsdocumentlibrarydocumentlist.get.config.xml
The following file should be placed in this location:
<installLocation> omcatsharedclassesweb-extensionsite-webscriptsorgalfrescomodulesdocumentlibrary
Includes additional reference to custom workflow
<#assign el=args.htmlid>
<script type="text/javascript">//<![CDATA[
Alfresco.util.ComponentManager.get("${el}").setMessages(${messages});
//]]></script>
<div id="${el}-dialog" class="workflow">
<div id="${el}-title" class="hd"></div>
<div class="bd">
<form id="${el}-form" action="" method="post">
<input type="hidden" name="date" id="${el}-date" value="" />
<div class="yui-g">
<h2>${msg("header.type")}</h2>
</div>
<div class="field">
<select id="${el}-type" name="type" tabindex="0">
<option value="wf:review" selected="selected">Review & Approve</option>
<option value="wf:articleapproval">KB Article Review & Approve</option>
<option value="wf:adhoc">Adhoc Task</option>
</select>
</div>
<div class="yui-g">
<h2>${msg("header.people")}</h2>
</div>
<div class="yui-ge field">
<div class="yui-u first">
<div id="${el}-peoplefinder"></div>
</div>
<div class="yui-u">
<div id="${el}-peopleselected" class="people-selected"></div>
</div>
</div>
<div class="yui-g">
<h2>${msg("header.date")}</h2>
</div>
<div class="field">
<input id="${el}-dueDate-checkbox" name="-" type="checkbox" value=
"${msg("label.due-date.none")}" tabindex="0"/>
<span id="${el}-dueDate"><label for="${el}-dueDate-checkbox">
${msg("label.due-date.none")}</label></span>
</div>
<div id="${el}-calendarOverlay" class="calendar-overlay">
<div class="bd">
<div id="${el}-calendar" class="calendar"></div>
</div>
</div><div class="yui-g">
<h2>${msg("header.comment")}</h2>
</div>
<div class="field">
<textarea id="${el}-comment" name="description" rows="3" tabindex="0"></textarea>
<span>${msg("label.comment.max-length")}</span>
</div>
<div class="bdft">
<input type="button" id="${el}-ok" value="${msg("button.assign")}" tabindex="0" />
<input type="button" id="${el}-cancel" value=
"${msg("button.cancel")}" tabindex="0" />
</div>
</form>
</div>
</div>Code snippet web-extensionsite-webscriptsorgalfrescomodulesdocumentlibraryworkflow.get.html.ftl
The following files are used by the customizations provided in this chapter. They are not part of the core Alfresco Share Web application. Rather than modify the Alfresco Share Web application itself, we elected to copy them into a separate ROOT Web application in Tomcat.
The following files should be copied into your Tomcat ROOT Web application at the following location:
<installLocation> omcatwebappsROOTshare-extensioncomponentsdocumentlibrary
Defines a browser-side event handler for the Archive action in Alfresco Share
/**
 * DocumentList "Archive" action
 *
 * @namespace Alfresco
 * @class Alfresco.DocumentList
 */
(function()
{
 /**
* Backup single document.
*
* @method onActionBackup
* @param file {object} Object literal representing one or more file(s) or
   folder(s) to be actioned
*/
Alfresco.doclib.Actions.prototype.onActionArchive =
function DL_onActionArchive(file)
{
this.modules.actions.genericAction(
{
success:
{
event:
{
name: "metadataRefresh"
},
message: this.msg("message.archive.success", file.displayName)
},
failure:
{
message: this.msg("message.archive.failure", file.displayName)
},
webscript:
{
name: "archive/site/{site}/{container}",
method: Alfresco.util.Ajax.POST
},
params:
{
site: this.options.siteId,
container: this.options.containerId
},
config:
{
requestContentType: Alfresco.util.Ajax.JSON,
dataObj:
{
nodeRefs: [file.nodeRef]
}
}
});
};
})();Code snippet ROOTshare-extensioncomponentsdocumentlibraryknowledgebase-actions.js
Includes additional custom CSS used by the document library
.doclist .onActionArchive a
{
 background-image: url(images/kbarchive-16.png);
}
Code snippet ROOTshare-extensioncomponentsdocumentlibraryknowledgebase-documentlist.css