
C H A P T E R 4
Working with Audio and Video
In this chapter, we’ll explore what you can do with two important HTML5 elements—audio and video—and we’ll show you how they can be used to create compelling applications. The audio and video elements add new media options to HTML5 applications that allow you to use audio and video without plugins while providing a common, integrated, and scriptable API.
First, we’ll discuss audio and video container files and codecs, and why we ended up with the codecs supported today. We’ll go on to describe lack of common codec support—the most important drawback for using the media elements—and we’ll discuss how we hope that this won’t be such a big issue in the future. We’ll also show you a mechanism for switching to the most appropriate type of content for the browser to display.
Next, we’ll show you how you can use control audio and video programmatically using the APIs and finally we’ll explore the use of the audio and video in your applications.
Overview of Audio and Video
In the following sections, we’ll discuss some of the key concepts related to Audio and video: containers and codecs.
Video Containers
An audio or video file is really just a container file, similar to a ZIP archive file that contains a number of files. Figure 4-1 shows how a video file (a video container) contains audio tracks, video tracks, and additional metadata. The audio and video tracks are combined at runtime to play the video. The metadata contains information about the video such as cover art, title and subtitle, captioning information, and so on.
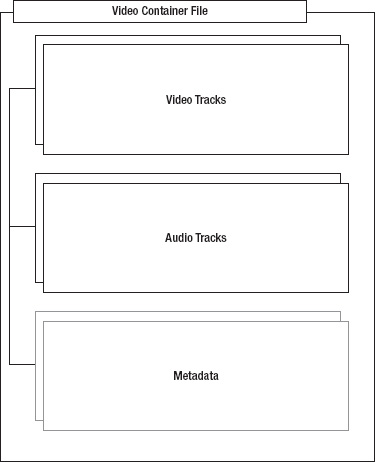
Figure 4-1. Overview of the video container
Some of the popular video container formats include the following:
- Audio Video Interleave (.avi)
- Flash Video (.flv)
- MPEG 4 (.mp4)
- Matroska (.mkv)
- Ogg (.ogv)
Audio and Video Codecs
Audio and video coders/decoders (codecs) are algorithms used to encode and decode a particular audio or video stream so that they can be played back. Raw media files are enormous, so without encoding, a video or audio clip would consist of tremendous amounts of data that could be too large to transmit across the Internet in a reasonable amount of time. Without a decoder, the recipient would not be able to reconstitute the original media source from the encoded form. A codec is able to understand a specific container format and decodes the audio and video tracks that it contains.
Some example audio codecs are the following:
- AAC
- MPEG-3
- Ogg Vorbis
Example video codecs are the following:
- H.264
- VP8
- Ogg Theora
The Codec Wars and the Tentative Truce
Some of the codecs are patent-encumbered, while others are freely available. For example, the Vorbis audio codec and the Theora video codec are freely available, while the use of the MPEG-4 and H.264 codecs are subject to license fees.
Originally, the HTML5 specification was going to require that certain codecs were supported. However, some vendors did not wish to include Ogg Theora as it was not part of their existing hardware and software stacks. Apple's iPhone, for example, includes hardware accelerated decoding for h264 video but not Theora. Free systems, on the other hand, cannot include proprietary for-pay codecs without hurting downstream distribution. On top of that, the performance that certain proprietary codecs provide is a factor in the browser uptake of free codecs. This situation has led to a stalemate; there does not appear to be a single codec that all browser vendors are willing to implement.
For now, the codec requirement has been dropped from the specification. However, this decision may be revisited in the future. For now, understand the current browser support and understand that you may need to re-encode your media for different environments. (You should probably be doing this already.)
We do expect that support for different codecs will increase and converge over time, making the choice of common media types easy and ubiquitous. It is also possible that one codec will grow to be the de facto standard codec for the Web. Additionally, the media tags have a built in mechanism for switching to the most appropriate type of content for the browser to display to make supporting different environments easy.
Audio and Video Restrictions
There are a few things that are not supported in the Audio and video specification:
- Streaming audio and video. That is, there is currently no standard for bitrate switching in HTML5 video; only full media files are supported by current implementations. However, there are aspects of the spec that are designed to support streaming media in the future once the formats are supported.
- Media is restricted by HTTP cross-origin resource sharing. See Chapter 6 for more information about cross-origin resource sharing (CORS).
- Full-screen video is not scriptable because it could be considered a security violation to let a scriptable element take over the full screen. However, browsers have the option of letting users choose to view videos in full screen through additional controls.
Browser Support for Audio and Video
Due to the fractured codec support, simply knowing which browsers support the new audio and video elements is not enough; you also need to know which codecs are supported. Table4-1 shows which browsers support which codecs at the time of this writing.
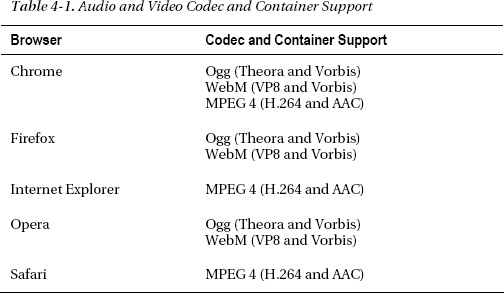
Note also that Google announced it will drop support for the MP4 format, but that has not happened yet. Also, there is a plugin that can be used to play WebM in Internet Explorer 9. It is always good idea to first test whether audio and video are supported. The section “Checking for Browser Support” later in this chapter will show you how you can programmatically check for browser support.
Using the Audio and Video API
In this section, we’ll explore the use of the audio and video in your applications. There are two main benefits to using the new media tags over previous video-embedding techniques—usually videos are embedded using the Flash, QuickTime, or Windows Media plugins—that aim to make life easier for users and developers:
- The new audio and video tags remove deployment hurdles by being part of the native browser environment. Although some plugins have high install rates, they are often blocked in controlled corporate environments. Some users choose to disable these plugins due to the... ostentatious… advertising displays those plugins are also capable of, which also removes their capability to be used for media playback. Plugins are also separate vectors of attack for security issues. And plugins often have difficulty integrating their displays with the rest of browser content, causing clipping or transparency issues with certain site designs. Because plugins use a self-contained rendering model that is different from that of the base web page, developers face difficulties if elements such as popup menus or other visual elements need to cross plugin boundaries in a page.
- The media elements expose a common, integrated, and scriptable API to the document. As a developer, your use of the new media elements allows very simple ways to script the control and playback of content. We will see multiple examples of this later in the chapter.
Of course, there is one primary drawback to using the media tags: lack of common codec support, as discussed in the earlier sections of this chapter. However, we expect that support for codecs will increase and converge over time, making the choice of common media types easy and ubiquitous. Plus, the media tags have a built-in mechanism for switching to the most appropriate type of content for the browser to display, as you will soon see.
Checking for Browser Support
The easiest way to check for support of the video and audio tags is to dynamically create one or both with scripting and check for the existence of a function:
var hasVideo = !!(document.createElement('video').canPlayType);
This simple code line will dynamically create a video element and check for the existence of the canPlayType() function. By using the !! operator, the result is converted to a Boolean value, which indicates whether or not a video object could be created.
However, if video or audio support is not present, you may choose to use an enabling script that introduces media script tags into older browsers, allowing the same scriptability but using technologies such as Flash for playback.
Alternatively, you can choose to include alternate content between your audio or video tags, and the alternate content will display in place of the unsupported tag. This alternate content can be used for a Flash plugin to display the same video if the browser doesn’t support the HTML5 tags. If you merely wish to display a text message for nonsupporting browsers, it is quite easy to add content inside the video or audio elements as shown in Listing 4-1.
Listing 4-1. Simple Video Element
<video src="video.webm" controls>

  Your browser does not support HTML5 video.

</video>
However, if you choose to use an alternative method to render video for browsers without HTML5 media support, you can use the same element content section to provide a reference to an external plugin displaying the same media as shown in Listing 4-2.
Listing 4-2. Video Element with Flash Fallback
<video src="video.webm" controls>

  <object data="videoplayer.swf" type="application/x-shockwave-flash">

    <param name="movie" value="video.swf"/>

  </object>

  Your browser does not support HTML5 video.

</video>
By embedding an object element that displays a Flash video inside the video element, the HTML5 video will be preferred if it is available, and the Flash video will be used as a fallback. Unfortunately, this requires multiple versions of the video to be served up until HTML5 support is ubiquitous.
Accessibility
Making your web applications accessible to everyone isn’t just the right thing to do; it’s good business, and, in some cases, it’s the law! Users with limited vision or hearing should be presented with alternative content that meets their needs. Keep in mind that the alternative content located between the video and audio elements is only displayed if the browser does not support those elements at all and, therefore, is not suitable for accessible displays where the browser may support HTML5 media but the user may not.
The emerging standard for video accessibility is Web Video Text Tracks (WebVTT), formerly known as Web SubRip Text (WebSRT) format. At the time of this writing, it is only just starting to appear in some early builds of browsers. WebVTT uses a simple text file (*.vtt) that starts with the word WEBVTT on the first line. The vtt file must be served up with the mime type text/vtt. Listing 4-3 shows the contents of an example vtt file.
Listing 4-3. WebVTT File
WEBVTT


1

00:00:01,000 --> 00:00:03,000

What do you think about HTML5 Video and WebVTT?...


2

00:00:04,000 --> 00:00:08,000

I think it’s great. I can’t wait for all the browsers to support it!
To use the vtt file in your video element, add the track element pointing to the vtt file as shown in the following example:
<video src="video.webm" controls>

  <track label="English" kind="subtitles" srclang="en" src="subtitles_en.vtt" default>

  Your browser does not support HTML5 video.

</video>
You can add multiple track elements. Listing 4-4 shows how you can support English and Dutch subtitles using track elements pointing to a vtt file.
Listing 4-4. Using WebVTT Tracks in a Video Element
<video src="video.ogg" controls>

  <track label="English" kind="subtitles" srclang="en" src="subtitles_en.vtt">

  <track label="Dutch" kind="subtitles" srclang="nl" src="subtitles_nl.vtt">

  Your browser does not support HTML5 video.

</video>
The WebVTT standard supports more than just subtitles. It also allows for captions and cue settings (instructions for how text is rendered). The full WebVTT syntax is beyond the scope of this book. See the WHATWG specification at www.whatwg.org/specs/web-apps/current-work/webvtt.html for more details.
Understanding Media Elements
Due to a wise design decision, there is much commonality between the audio and video elements in HTML5. Both audio and video support many of the same operations—play, pause, mute/unmute, load, and so on—and therefore, the common behavior was separated out into the media element section of the specification. Let’s start examining the media elements by observing what they have in common.
The Basics: Declaring Your Media Element
For the sake of example, we will use an audio tag to try out the common behaviors of HTML5 media. The examples in this section will be very media-heavy (surprise!), and they are included in the code/av folder of the support files that come with this book.
For the very simplest example (the example file audio.html), let’s create a page that shows an audio player for a soothing, satisfying, and very public domain audio clip: Johann Sebastian Bach’s “Air” (shown in Listing 4-5).
Listing 4-5. HTML Page with an Audio Element
<!DOCTYPE html>

<html>

  <title>HTML5 Audio </title>

  <audio controls src="johann_sebastian_bach_air.ogg">

             An audio clip from Johann Sebastian Bach.

  </audio>

</html>
This clip assumes that the HTML document and the audio file—in this case, johann_sebastian_bach_air.ogg—are served from the same directory. As shown in Figure 4-2, viewing this in a browser supporting the audio tag will show a simple control and play bar representing the audio to play. When the user clicks the play button, the audio track starts as expected.
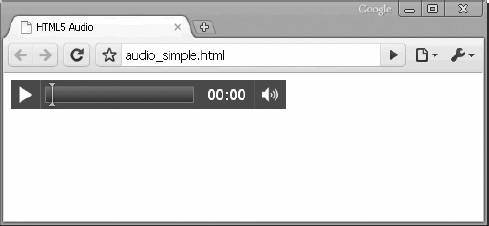
Figure 4-2. Simple audio controls
The controls attribute tells the browser to display common user controls for starting, stopping, and seeking in the media clip, as well as volume control. Leaving out the controls attribute hides them, and leaves the clip with no way for the user to start playing.
The content between the audio tags is a text representation of what the browser will display if it does not support the media tag. This is what you and your users will see if they are running an older browser. It also gives the opportunity to include an alternate renderer for the media, such as a Flash player plugin or a direct link to the media file.
Using the Source
Finally, we come to the most important attribute: src. In the simplest setup, a single src attribute points to the file containing the media clip. But what if the browser in question does not support that container or codec (in this case, Ogg and Vorbis)? Then, an alternate declaration is shown in Listing 4-6; it includes multiple sources from which the browser can choose (see the example file audio_multisource.html).
Listing 4-6. An Audio Element with Multiple Source Elements
<audio controls>

    <source src="johann_sebastian_bach_air.ogg">

    <source src="johann_sebastian_bach_air.mp3">

    An audio clip from Johann Sebastian Bach.

</audio>
In this case, we include two new source elements instead of the src attribute on the audio tag. This allows the browser to choose which source best suits the playback capabilities it has and use the best fit as the actual media clip. Sources are processed in order, so a browser that can play multiple listed source types will use the first one it encounters.
![]() Note Place the media source files with the best user experience or lowest server load highest in any
Note Place the media source files with the best user experience or lowest server load highest in any source list.
Running this clip in a supported browser may not change what you see. But if a browser supports the MP3 format and not the Ogg Vorbis format, the media playback will now be supported. The beauty of this declaration model is that as you write code to interact with the media file, it doesn’t matter to you which container or codec was actually used. The browser provides a unified interface for you to manipulate the media, no matter which source was matched for playback.
However, there is another way to give the browser hints about which media source to use. Recall that a container for media can support many different codec types, and you will understand that a browser may be misled into which types it does or does not support based on the extension of the declared source file. If you specify a type attribute that does not match your source, the browser may refuse to play the media. It may be wise to include the type only if you know it with certainty. Otherwise, it is better to omit this attribute and let the browser detect the encoding as shown in Listing 4-7 (in the example file audio_type.html). Also note that the WebM format allows only one audio codec and one video codec. That means the .webm extension or the video/webm content-type tells you everything you need to know about the file. If a browser can play .webm, it should be able to play any valid .webm file.
Listing 4-7. Including Type and Codec Information in an Audio Element
<audio controls>

    <source src="johann_sebastian_bach_air.ogg" type="audio/ogg; codecs=vorbis">

    <source src="johann_sebastian_bach_air.mp3" type="audio/mpeg">

    An audio clip from Johann Sebastian Bach.

</audio>
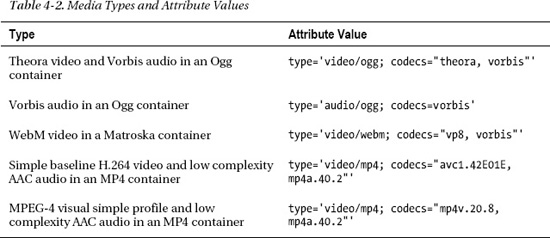
As you can see, the type attribute can declare both the container and codec type. The values here represent Ogg Vorbis and MP3, respectively. The full list is governed by RFC 4281, a document maintained by the Internet Engineering Task Force (IETF), but some common combinations are listed in Table 4-2.
Taking Control
You’ve already seen that the default playback controls can be displayed by using the controls attribute in the video or audio tag. As you might expect, leaving out this attribute will not display controls when the media is displayed, but it will also not show anything at all in the case of audio files, as the only visual representation of an audio element is its controls. (A video without controls still displays the video content.) Leaving out the controls attribute should not display any content that affects the normal rendering of the page. One way to cause the media to play is to set another attribute in the tag: autoplay (see Listing 4-8 and the example file audio_no_control.html).
Listing 4-8. Using the Autoplay Attribute
<audio autoplay>

    <source src="johann_sebastian_bach_air.ogg" type="audio/ogg; codecs=vorbis">

    <source src="johann_sebastian_bach_air.mp3" type="audio/mpeg">

    An audio clip from Johann Sebastian Bach.

</audio>
By including the autoplay attribute, the media file will play as soon as it is loaded, without any user interaction. (Note that autoplay is not supported everywhere. For example, it is disabled on iOS.) However, most users will find this highly annoying, so use autoplay with caution. Playing audio without prompting may be intended to create an atmospheric effect or, worse, to force an advertisement on the user. But it also interferes with other audio playing on the user’s machine, and can be quite detrimental to users who rely on audible screen readers to navigate web content. Note also that some devices, like the iPad, prevent autoplay and even automatically playing a media file (triggered by a page load event, for example).
If the built-in controls do not suit the layout of your user interface, or if you need to control the media element using calculations or behaviors that are not exposed in the default controls, there are many built-in JavaScript functions and attributes to help you, too. Table 4-3 lists some of the most common functions.
The canPlayType(type) method has a non-obvious use case: by passing in a MIME type of an arbitrary video clip to a dynamically created video element, you can use a simple script to determine whether the current browser supports that type. For example, the following code provides a quick way to determine whether the current browser can support playing videos with MIME type of fooType without displaying any visible content in the browser window:
var supportsFooVideo = !!(document.createElement('video').canPlayType(‘fooType’));
Note that this function returns the very non-binary “null,” “maybe,” or “probably,” with probably being the best possible scenario.
Table 4-4 shows a few of the read-only attributes on media elements.
Table 4-5 shows some of the attributes on the media elements that allow scripts to modify them and affect the playback directly. As such, they behave similar to functions.

Between the various functions and attributes, it is possible for a developer to create any media playback user interface and use it to control any audio or video clip that is supported by the browser.
Working with Audio
If you understand the shared attributes for both audio and video media elements, you’ve basically seen all that the audio tag has to offer. So let’s look at a simple example that shows control scripting in action.
Audio Activation
If your user interface needs to play an audio clip for users, but you don’t want to affect the display with a playback timeline or controls, you can create an invisible audio element—one with the controls attribute unset or set to false—and present your own controls for audio playback. Consider the simple code in Listing 4-9, also available in the sample code file audioCue.html.
Listing 4-9. Adding Your Own Play Button to Control Audio
<!DOCTYPE html>

<html>

  <link rel="stylesheet" href="styles.css">

  <title>Audio cue</title>


  <audio id="clickSound">

    <source src="johann_sebastian_bach_air.ogg">
    <source src="johann_sebastian_bach_air.mp3">

  </audio>


  <button id="toggle" onclick="toggleSound()">Play</button>


  <script type="text/javascript">

    function toggleSound() {

        var music = document.getElementById("clickSound");

        var toggle = document.getElementById("toggle");


        if (music.paused) {

          music.play();

          toggle.innerHTML = "Pause";

        }

        else {

          music.pause();

          toggle.innerHTML ="Play";

        }

    }

  </script>

</html>
Once again, we are using an audio element to play our favorite Bach tune. However, in this example we hide user controls and don’t set the clip to autoplay on load. Instead, we have created a toggle button to control the audio playback with script:
<button id="toggle" onclick="toggleSound()">Play</button>
Our simple button is initialized to inform the user that clicking it will start playback. And each time the button is pressed, the toggleSound() function is triggered. Inside the toggleSound() function, we first gain access to the audio and button elements in the DOM:
if (music.paused) {

    music.play();

    toggle.innerHTML = "Pause";

}
By accessing the paused attribute on the audio element, we can check to see whether the user has already paused playback. The attribute defaults to true if no playback is initiated, so this condition will be met on the first click. In that case, we call the play() function on the clip and change the text of the button to indicate that the next click will pause the clip:
else {

    music.pause();

    toggle.innerHTML ="Play";

}
Conversely, if the music clip is not paused (if it is playing), we will actively pause() it and change the button text to indicate that the next click will restart play. Seems simple, doesn’t it? That’s the point of the media elements in HTML5: to create simple display and control across media types where once a myriad of plugins existed. Simplicity is its own reward.
Working with Video
Enough with simplicity. Let’s try something more complicated. The HTML5 video element is very similar to the audio element, but with a few extra attributes thrown in. Table 4-6 shows some of these attributes.
The video element has one other key feature that is not applicable to the audio element: it can be provided to many functions of the HTML5 Canvas (see Chapter 2).
Creating a Video Timeline Browser
In this more complex example, we’ll show how a video element can have its frames grabbed and displayed in a dynamic canvas. To demonstrate this capability, we’ll build a simple video timeline viewer. While the video plays, periodic image frames from its display will be drawn onto a nearby canvas. When the user clicks any frame displayed in the canvas, we’ll jump the playback of the video to that precise moment in time. With only a few lines of code, we can create a timeline browser that users can use to jump around inside a lengthy video.
Our sample video clip is the tempting concession advert from the mid-20th century movie theaters, so let’s all go to the lobby to get ourselves a treat (see Figure 4-3).
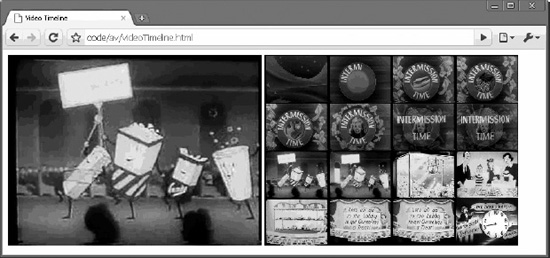
Figure 4-3. The video timeline application
Adding the Video and the Canvas Element
We start with a simple declaration to display our video clip:
<video id="movies" autoplay oncanplay="startVideo()" onended="stopTimeline()" autobuffer="true" width="400px" height="300px">

    <source src="Intermission-Walk-in.ogv">

    <source src="Intermission-Walk-in_512kb.mp4">

</video>
As most of this markup will look familiar to you from the audio example, let’s focus on the differences. Obviously, the <audio> element has been replaced with <video>, and the <source> elements point to the Ogg and MPEG movies that will be selected by the browser.
The video has, in this case, been declared to have autoplay so that it starts as soon as the page loads. Two additional event handler functions have been registered. When the video is loaded and ready to begin play, the oncanplay function will trigger and start our routine. Similarly, when the video ends, the onended callback will allow us to stop creating video frames.
Next, we’ll add a canvas called timeline into which we will draw frames of our video at regular intervals.
<canvas id="timeline" width="400px" height="300px">
Adding Variables
In the next section of our demo, we begin our script by declaring some values that will let us easily tweak the demo and make the code more readable:
// # of milliseconds between timeline frame updates

var updateInterval = 5000;
// size of the timeline frames

var frameWidth = 100;

var frameHeight = 75;


// number of timeline frames

var frameRows = 4;

var frameColumns = 4;

var frameGrid = frameRows * frameColumns;
updateInterval controls how often we will capture frames of the video—in this case, every five seconds. The frameWidth and frameHeight set how large the small timeline video frames will be when displayed in the canvas. Similarly, the frameRows, frameColumns, and frameGrid determine how many frames we will display in our timeline:
// current frame

var frameCount = 0;


// to cancel the timer at end of play

var intervalId;


var videoStarted = false;
To keep track of which frame of video we are viewing, a frameCount is made accessible to all demo functions. (For the sake of our demo, a frame is one of our video samples taken every five seconds.) The intervalId is used to stop the timer we will use to grab frames. And finally, we add a videoStarted flag to make sure that we only create one timer per demo.
Adding the updateFrame Function
The core function of our demo—where the video meets the canvas—is where we grab a video frame and draw it onto our canvas:
// paint a representation of the video frame into our canvas

function updateFrame() {

    var video = document.getElementById("movies");

    var timeline = document.getElementById("timeline");


    var ctx = timeline.getContext("2d");


    // calculate out the current position based on frame

    // count, then draw the image there using the video

    // as a source

    var framePosition = frameCount % frameGrid;

    var frameX = (framePosition % frameColumns) * frameWidth;

    var frameY = (Math.floor(framePosition / frameRows)) * frameHeight;

    ctx.drawImage(video, 0, 0, 400, 300, frameX, frameY, frameWidth, frameHeight);


    frameCount++;

}
As you’ve seen in Chapter 2, the first thing to do with any canvas is to grab a two-dimensional drawing context from it:
Because we want to populate our canvas grid with frames from left to right, top to bottom, we need to figure out exactly which of the grid slots will be used for our frame based on the number of the frame we are capturing. Based on the width and height of each frame, we can then determine exact X and Y coordinates at which to begin our drawing:
var framePosition = frameCount % frameGrid;

var frameX = (framePosition % frameColumns) * frameWidth;

var frameY = (Math.floor(framePosition / frameRows)) * frameHeight;
Finally, we reach the key call to draw an image onto the canvas. We’ve seen the position and scaling arguments before in our canvas demos, but instead of passing an image to the drawImage routine, we here pass the video object itself:
ctx.drawImage(video, 0, 0, 400, 300, frameX, frameY, frameWidth, frameHeight);
Canvas drawing routines can take video sources as images or patterns, which gives you a handy way to modify the video and redisplay it in another location.
![]() Note When a canvas uses a video as an input source, it draws only the currently displayed video frame. Canvas displays will not dynamically update as the video plays. Instead, if you want the canvas content to update, you must redraw your images as the video is playing.
Note When a canvas uses a video as an input source, it draws only the currently displayed video frame. Canvas displays will not dynamically update as the video plays. Instead, if you want the canvas content to update, you must redraw your images as the video is playing.
Adding the startVideo Function
Finally, we update frameCount to reflect that we’ve taken a new snapshot for our timeline. Now, all we need is a routine to regularly update our timeline frames:
function startVideo() {


    // only set up the timer the first time the

    // video is started

    if (videoStarted)

        return;


        videoStarted = true;


        // calculate an initial frame, then create

        // additional frames on a regular timer

        updateFrame();

        intervalId = setInterval(updateFrame, updateInterval);
Recall that the startVideo() function is triggered as soon as the video has loaded enough to begin playing. First, we make sure that we are going to handle the video start only once per page load, just in case the video is restarted:
    // only set up the timer the first time the

    // video is started
    if (videoStarted)

        return;


        videoStarted = true;
When the video starts, we will capture our first frame. Then, we will start an interval timer—a timer that repeats continuously at the specified update interval—which will regularly call our updateFrame() function. The end result is that a new frame will be captured every five seconds:
        // calculate an initial frame, then create

        // additional frames on a regular timer

        updateFrame();

        intervalId = setInterval(updateFrame, updateInterval);
Handling User Input
Now all we need to do is handle user clicks for the individual timeline frames:
// set up a handler to seek the video when a frame

// is clicked

var timeline = document.getElementById("timeline");

timeline.onclick = function(evt) {

    var offX = evt.layerX - timeline.offsetLeft;

    var offY = evt.layerY - timeline.offsetTop;


    // calculate which frame in the grid was clicked

    // from a zero-based index

    var clickedFrame = Math.floor(offY / frameHeight) * frameRows;

    clickedFrame += Math.floor(offX / frameWidth);


    // find the actual frame since the video started

    var seekedFrame = (((Math.floor(frameCount / frameGrid)) *

                                frameGrid) + clickedFrame);


    // if the user clicked ahead of the current frame

    // then assume it was the last round of frames

    if (clickedFrame > (frameCount % 16))

        seekedFrame -= frameGrid;


        // can't seek before the video

        if (seekedFrame < 0)

            return;
Things get a little more complicated here. We retrieve the timeline canvas and set a click-handling function on it. The handler will use the event to determine which X and Y coordinates were clicked by the user:
    var timeline = document.getElementById("timeline");

    timeline.onclick = function(evt) {

        var offX = evt.layerX - timeline.offsetLeft;

        var offY = evt.layerY - timeline.offsetTop;
We then use the frame dimensions to figure out which of the 16 frames was clicked by the user:
            // calculate which frame in the grid was clicked

            // from a zero-based index

            var clickedFrame = Math.floor(offY / frameHeight) * frameRows;

            clickedFrame += Math.floor(offX / frameWidth);
The clicked frame should be only one of the most recent video frames, so determine the most recent frame that corresponds to that grid index:
   // find the actual frame since the video started

    var seekedFrame = (((Math.floor(frameCount / frameGrid)) *

                                               frameGrid) + clickedFrame);
If the user clicks ahead of the current frame, jump back one complete cycle of grid frames to find the actual time:
    // if the user clicked ahead of the current frame

    // then assume it was the last round of frames

    if (clickedFrame > (frameCount % 16))

        seekedFrame -= frameGrid;
And finally, we have to safeguard against any case in which the user clicks a frame that would be before the start of the video clip:
    // can't seek before the video

    if (seekedFrame < 0)

        return;
Now that we know what point in time the user wants to seek out, we can use that knowledge to change the current playback time. Although this is the key demo function, the routine itself is quite simple:
    // seek the video to that frame (in seconds)

    var video = document.getElementById("movies");

    video.currentTime = seekedFrame * updateInterval / 1000;


    // then set the frame count to our destination

    frameCount = seekedFrame;
By setting the currentTime attribute on our video element, we cause the video to seek to the specified time and reset our current frame count to the newly chosen frame.
![]() Note Unlike many JavaScript timers that deal with milliseconds, the
Note Unlike many JavaScript timers that deal with milliseconds, the currentTime of a video is specified in seconds.
Adding the stopTimeline Function
All that remains for our video timeline demo is to stop capturing frames when the video finishes playing. Although not required, if we don’t take this step, the demo will continue capturing frames of the finished demo, blanking out the entire timeline after a while:
The stopTimeline handler will be called when another of our video handlers—onended—is triggered by the completion of video playback.
Our video timeline is probably not full-featured enough to satisfy power users, but it took only a short amount of code to accomplish. Now, on with the show.
The Final Code
Listing 4-10 shows the complete code for the video timeline page.
Listing 4-10. The Complete Video Timeline Code
<!DOCTYPE html>
<html>
<link rel="stylesheet" href="styles.css">
<title>Video Timeline</title>
<video id="movies" autoplay oncanplay="startVideo()" onended="stopTimeline()"
autobuffer="true"
width="400px" height="300px">
<source src="Intermission-Walk-in.ogv">
<source src="Intermission-Walk-in_512kb.mp4">
</video>
<canvas id="timeline" width="400px" height="300px">
<script type="text/javascript">
// # of milliseconds between timeline frame updates
var updateInterval = 5000;
// size of the timeline frames
var frameWidth = 100;
var frameHeight = 75;
// number of timeline frames
var frameRows = 4;
var frameColumns = 4;
var frameGrid = frameRows * frameColumns;
// current frame
var frameCount = 0;
// to cancel the timer at end of play
var intervalId;
var videoStarted = false;
function startVideo() {
// only set up the timer the first time the
// video is started
if (videoStarted)
return;
videoStarted = true;
// calculate an initial frame, then create
// additional frames on a regular timer
updateFrame();
intervalId = setInterval(updateFrame, updateInterval);
// set up a handler to seek the video when a frame
// is clicked
var timeline = document.getElementById("timeline");
timeline.onclick = function(evt) {
var offX = evt.layerX - timeline.offsetLeft;
var offY = evt.layerY - timeline.offsetTop;
// calculate which frame in the grid was clicked
// from a zero-based index
var clickedFrame = Math.floor(offY / frameHeight) * frameRows;
clickedFrame += Math.floor(offX / frameWidth);
// find the actual frame since the video started
var seekedFrame = (((Math.floor(frameCount / frameGrid)) *
frameGrid) + clickedFrame);
// if the user clicked ahead of the current frame
// then assume it was the last round of frames
if (clickedFrame > (frameCount % 16))
seekedFrame -= frameGrid;
// can't seek before the video
if (seekedFrame < 0)
return;
// seek the video to that frame (in seconds)
var video = document.getElementById("movies");
video.currentTime = seekedFrame * updateInterval / 1000;
// then set the frame count to our destination
frameCount = seekedFrame;
}
}
// paint a representation of the video frame into our canvas
function updateFrame() {
var video = document.getElementById("movies");
var timeline = document.getElementById("timeline");
var ctx = timeline.getContext("2d");
// calculate out the current position based on frame
// count, then draw the image there using the video
// as a source
var framePosition = frameCount % frameGrid;
var frameX = (framePosition % frameColumns) * frameWidth;
var frameY = (Math.floor(framePosition / frameRows)) * frameHeight;
ctx.drawImage(video, 0, 0, 400, 300, frameX, frameY, frameWidth, frameHeight);
frameCount++;
}
// stop gathering the timeline frames

function stopTimeline() {

    clearInterval(intervalId);

}
</script>
</html>
Practical Extras
Sometimes there are techniques that don’t fit into our regular examples, but which nonetheless apply to many types of HTML5 applications. We present to you some short, but common, practical extras here.
Background Noise in a Page
Many a web site has attempted to entertain its viewers by playing audio by default for any visitors. While we don’t condone this practice, Audio support makes it quite easy to achieve this, as shown in Listing 4-11.
Listing 4-11. Using the Loop and Autoplay Attributes
<!DOCTYPE html>

<html>

  <link rel="stylesheet" href="styles.css">

  <title>Background Music</title>


  <audio autoplay loop>

      <source src="johann_sebastian_bach_air.ogg">

      <source src="johann_sebastian_bach_air.mp3">

  </audio
  <h1>You're hooked on Bach!</h1>


</html>
As you can see, playing a looping background sound is as easy as declaring a single audio tag with the autoplay and loop attributes set (see Figure 4-4).
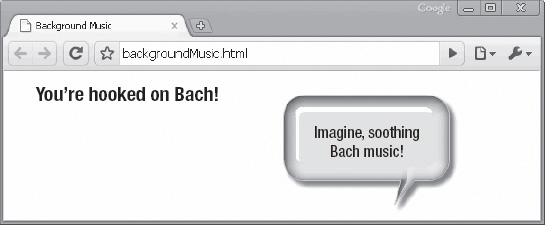
Figure 4-4. Using autoplay to play music when a page loads
Losing Viewers in the <Blink> of an eye
Mouseover Video Playback
Another way to use simple scripting effectively with video clips is to trigger the play and pause routines, based on mouse movement over the video. This could be useful in a site that needs to display many video clips and let the user choose which ones to play. The video gallery can display short preview clips on when a user moves the mouse over them and a full video display when the user clicks. It is quite easy to achieve this affect using a code sample similar to Listing 4-12 (see the example file mouseoverVideo.html).
Listing 4-12. Mouse Detection on a Video Element
<!DOCTYPE html>

<html>
  <link rel="stylesheet" href="styles.css">

  <title>Mouseover Video</title>


  <video id="movies" onmouseover="this.play()" onmouseout="this.pause()"

        autobuffer="true"

    width="400px" height="300px">

    <source src="Intermission-Walk-in.ogv" type='video/ogg; codecs="theora, vorbis"'>

    <source src="Intermission-Walk-in_512kb.mp4" type='video/mp4; codecs="avc1.42E01E,
                 mp4a.40.2"'>

  </video>

</html>
By simply setting a few extra attributes, the preview playback can trigger when a user points at the video, as shown in Figure 4-5.
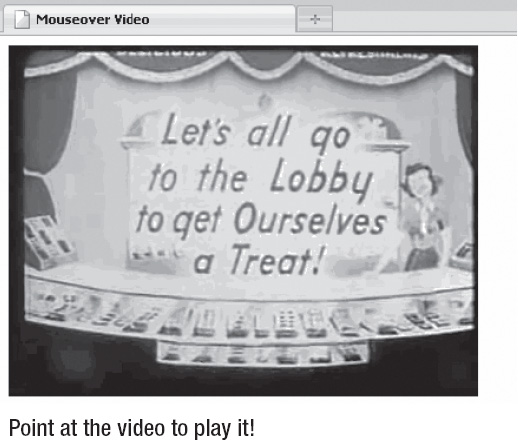
Figure 4-5. Mouseover video playback
Summary
In this chapter, we have explored what you can do with the two important HTML5 elements audio and video. We have shown you how they can be used to create compelling web applications. The audio and video elements add new media options to HTML5 applications that allow you to use audio and video without plugins, while at the same time providing a common, integrated, and scriptable API.
First, we discussed the audio and video container files and codecs and why we ended up with the codecs supported today. We then showed you a mechanism for switching to the most appropriate type of content for the browser to display, and we showed you how to make video accessible using WebVTT.
Next, we showed you how you can use control audio and video programmatically using the APIs and finally we looked at how you can use of the HTML5 audio and video in your applications.
In the next chapter, we'll show how you can use Geolocation to tailor your application's output to the whereabouts of your users with a minimal amount of code.