
![]()
According to US law, the term information security means protecting information and information systems from unauthorized access, use, disclosure, disruption, modification, or destruction in order to provide confidentiality, integrity, and availability, referred to as the CIA triad. Confidentiality is about preventing the disclosure of information to unauthorized entities. Integrity is about preventing modifications to the data by unauthorized entities. Availability is about the data and hence the information system that owns the data being available for legitimate users.
An entity, in this sense, refers to a user or an external system that uses an information system. To prevent the disclosure of information to unauthorized entities and to prevent modifications to the data by unauthorized entities, a system must be able to differentiate between authorized and unauthorized entities. In order to do that, a system must be able to identify an entity in the first place. Once the entity is identified, a system must be able to verify that identity by validating the credentials presented by the entity against an authority. Once a system is able to identify and authenticate an entity, it is in a position to control the access to the data it owns and hence to ensure confidentiality and integrity of data.
Availability, the third aspect of the CIA triad, from a security standpoint is mostly attributed to IT administration and operation activities involving specialized hardware and software, and is typically related to application programming in a limited sense. Though security is a team effort among the IT administration, operations, and development teams, this book is for programmers and hence the focus of this chapter is on the integrity and confidentiality aspects of the CIA triad from a programming perspective.
The topic of ASP.NET Web API security is very broad. I cover the security techniques related to ASP.NET Web API in-depth in my book Pro ASP.NET Web API Security: Securing ASP.NET Web API (Apress, 2013). This chapter covers the fundamentals and the key topics important for securing your ASP.NET Web API in order to provide a basic but solid understanding of the security concepts related to ASP.NET Web API.
10.1 Implementing Direct Authentication
In this exercise, you will implement the direct authentication pattern, in which a client application submits its credentials directly to your ASP.NET Web API. As an example, you will use the basic authentication scheme defined in Request for Comments (RFC) 2617, HTTP Authentication: Basic and Digest Access Authentication for this exercise.
Authentication is the process of an application such as your web API discovering the identity of a user through an identifier and verifying that identity by validating the credentials provided by the user against an authority (such as the membership store). Direct authentication is a common security pattern in which a client presents its credentials to a service directly. There is a trust relationship between the client application and your web API. Building a trust relationship is typically done out-of-band. For example, before using your web API, a user registers with the entity hosting your service and uses the credentials created in that process to authenticate from the client application.
Basic authentication is a simple scheme and works as follows:
- The client makes a request to the service, ASP.NET Web API in our case.
- If the resource requires the client to be authenticated, the service sends back a 401 - Unauthorized status code in the response, setting the response header to WWW-Authenticate: Basic. This response header can also contain a realm, which is a string that uniquely identifies an area within the server for which the server needs a valid credential to successfully process the request.
- The client now sends an authorization header like Authorization: Basic YmFkcmk6U2VjcmV0U2F1Y2U=, which contains the credentials. The authorization request header value is just a base64-encoded string of the user ID and password, separated by a colon, and is not encrypted in any way.
- If the credentials are valid, the service sends back the response and a 200 - OK status code, as illustrated in Figure 10-1.
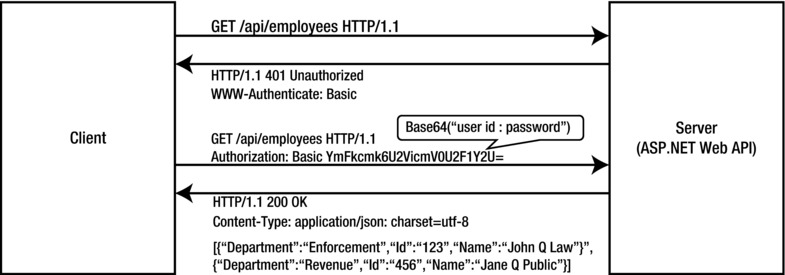
Figure 10-1. HTTP basic authentication
Take the following steps to implement basic authentication:
- You will use the solution from Chapter 9 for this exercise. For this reason, a prerequisite to start working on this chapter is that you complete all the exercises in Chapter 9.
- If you prefer, you can make a copy of the entire folder containing the solution and other files from Chapter 9 and start making changes for this chapter. Open the Robusta.TalentManager solution in Visual Studio 2012.
- In the Robusta.TalentManager.Domain project, create a class User, as shown in Listing 10-1. This class has three properties, UserName, Password, and Salt, respectively storing the username, the hashed password, and the salt used to hash the password. Hashing is the process by which arbitrary data (the password in this case) is converted into a fixed-length string. The fundamental problem with plain hashing is that the mapping of a specific output to the corresponding input can be precomputed, stored, and looked up to determine the original data given a hash. An easy solution to this problem is salting. A salt is just a random string that is added to the data before hashing so that the output cannot be mapped back to the input using precomputed mappings. We store the hashed password and the corresponding salt at the user level. The IsAuthentic method takes in a password and determines if it is a valid password for that user.
Listing 10-1. The User Domain Class
using System.Linq;
using System.Security.Cryptography;

public class User : IIdentifiable
{
    public int Id { get; set; }
    public string UserName { get; set; }
    public byte[] Password { get; set; }
    public byte[] Salt { get; set; }

    public bool IsAuthentic(string password)
    {
        byte[] storedPassword = this.Password;
        byte[] storedSalt = this.Salt;

        var pbkdf2 = new Rfc2898DeriveBytes(password, storedSalt);
        pbkdf2.IterationCount = 1000;
        byte[] computedPassword = pbkdf2.GetBytes(32);

        return storedPassword.SequenceEqual(computedPassword);
    }
} - In the Robusta.TalentManager.Data project, create a new mapping for User, as shown in Listing 10-2. Create the UserConfiguration class in the Configuration folder.
Listing 10-2. The UserConfiguration Class
using System.ComponentModel.DataAnnotations.Schema;
using System.Data.Entity.ModelConfiguration;
using Robusta.TalentManager.Domain;

public class UserConfiguration : EntityTypeConfiguration<User>
{
    public UserConfiguration()
    {
        HasKey(k => k.Id);

        Property(p => p.Id)
            .HasColumnName("user_id")
                .HasDatabaseGeneratedOption(DatabaseGeneratedOption.Identity);

        Property(p => p.UserName).HasColumnName("user_name");
        Property(p => p.Password).HasColumnName("password");
        Property(p => p.Salt).HasColumnName("salt");
    }
} - Modify the OnModelCreating method of the Context class in the Robusta.TalentManager.Data project, as shown in Listing 10-3.
Listing 10-3. The OnModelCreating Method of the Context Class
protected override void OnModelCreating(DbModelBuilder modelBuilder)
{
    modelBuilder.Conventions.Remove<PluralizingTableNameConvention>();

    modelBuilder.Configurations
        .Add(new EmployeeConfiguration())
        .Add(new UserConfiguration());
} - Open SQL Server Management Studio and create a new table named user in the talent_manager database. Locate the talent_manager database in the tree view on the left (choose Your Server ➤ Databases ➤ talent_manager). Right-click talent_manager and select New Query. Copy and paste the CREATE SQL statement in Listing 10-4 and press F5 to run the SQL statement. The column user_id is the primary key and is an identity column.
Listing 10-4. The CREATE SQL Statement for the User Table
CREATE TABLE [dbo].[user](
     [user_id] [int] IDENTITY(1,1) NOT NULL,
     [user_name] [char](8) NOT NULL,
     [password] [binary](32) NOT NULL,
     [salt] [binary](32) NOT NULL,
 CONSTRAINT [PK_Table_1] PRIMARY KEY CLUSTERED
(
     [user_id] ASC
) WITH (PAD_INDEX = OFF, STATISTICS_NORECOMPUTE = OFF, IGNORE_DUP_KEY = OFF, ALLOW_ROW_LOCKS = ON, ALLOW_PAGE_LOCKS = ON) ON [PRIMARY]
) ON [PRIMARY] - Also run the INSERT SQL statement in Listing 10-5 from SQL Server Management Studio, to seed the table with a record.
Listing 10-5. The INSERT SQL Statement
INSERT INTO [talent_manager].[dbo].[user] (user_name, password, salt) values
('jqhuman',
0x012E7C7B70462B9AF3C109E7CF565189D82D5697DD8645AEF67CA87F2B5795A7, 0x18E086233B60F812B41916A2D7F2EC73E76D26E980CD56F83606687EC778E89A) - The C# code that I used to come up with these 0x values is shown in Listing 10-6, just for your reference. You do not need to use this listing anywhere in this exercise. At the time the user ID is created, possibly as part of the user registration process, a salt is generated and the password entered by the user is hashed and stored. This typically happens in an application outside of ASP.NET Web API. For that purpose, code similar to Listing 10-6 can be used to insert the record in the user table.
Listing 10-6. C# Code to Insert a User Record
string data = "p@ssw0rd!"; // User-entered password
byte[] salt = new Byte[32];
using (var provider = new System.Security.Cryptography.RNGCryptoServiceProvider())
{
    provider.GetBytes(salt); // Generated salt
}

var pbkdf2 = new System.Security.Cryptography.Rfc2898DeriveBytes(data, salt);
pbkdf2.IterationCount = 1000;
byte[] hash = pbkdf2.GetBytes(32); // Hashed and salted password

var user = new User() { UserName = "jqhuman", Password = hash, Salt = salt };
var repository = new Repository<User>(uow);
repository.Insert(user);
uow.Save(); - In the Robusta.TalentManager.WebApi.Core project, we created a message handler named AuthenticationHandler, as part of Exercise 9-3. The class is located in the Handlers folder. Comment out the class definition. We will reuse the handler to implement basic authentication. Replace the class with the one shown in Listing 10-7.
Listing 10-7. The Basic Authentication Message Handler (Incomplete)
using System;
using System.Collections.Generic;
using System.Linq;
using System.Net;
using System.Net.Http;
using System.Net.Http.Headers;
using System.Security.Claims;
using System.Text;
using System.Threading;
using System.Threading.Tasks;
using System.Web;
using Robusta.TalentManager.Data;
using Robusta.TalentManager.Domain;

public class AuthenticationHandler : DelegatingHandler
{
    private const string SCHEME = "Basic";
    private readonly IRepository<User> repository = null;

    public AuthenticationHandler(IRepository<User> repository)
    {
        this.repository = repository;
    }

    protected async override Task<HttpResponseMessage> SendAsync(
                                     HttpRequestMessage request,
                                            CancellationToken cancellationToken)
    {
        try
        {
            // Perform request processing – Code from Listing 10-8 goes here

            var response = await base.SendAsync(request, cancellationToken);

            // Perform response processing – Code from Listing 10-9 goes here

            return response;
        }
        catch (Exception)
        {
            // Perform error processing – Code from Listing 10-10 goes here
        }
    }
}
We will now add code to the three appropriate places in the listing to handle the request, response, and error.
- First, for the request processing part, retrieve the user ID and password from the HTTP Authorization header and perform the authentication, as shown in Listing 10-8. Following are the steps:
- a. Get the payload of the HTTP Authorization request header, if the header is present.
- b. Split the payload by semicolon and take the trimmed first part as the user ID and the second part as the password.
- c. Perform the actual authentication by calling the IsAuthentic method on the domain object.
- d. Gather the claims, create a principal, and set it in Thread.CurrentPrincipal. If you web-host, you must also set the principal in HttpContext.Current.User.
- e. Up until this point, the project Robusta.TalentManager.WebApi.Core is a pure ASP.NET Web API project with no dependencies on hosting. Now, we must create a dependency on the System.Web assembly, since we access HttpContext.
- f. Add a reference to System.Web (choose Assemblies ➤ Framework). This is needed because when our web API runs in the ASP.NET pipeline, as in the case of web hosting, Thread.CurrentPrincipal will be overwritten at times and we must set HttpContext.Current as well. Do a null check before setting it, because it will be null in the case of self-hosting.
Listing 10-8. Request Processing
var headers = request.Headers;
if (headers.Authorization != null && SCHEME.Equals(headers.Authorization.Scheme))
{
    Encoding encoding = Encoding.GetEncoding("iso-8859-1");
    string credentials = encoding.GetString(
    Convert.FromBase64String(headers.Authorization.Parameter));

    string[] parts = credentials.Split(':'),
    string userName = parts[0].Trim();
    string password = parts[1].Trim();

    User user = repository.All.FirstOrDefault(u => u.UserName == userName);
    if (user != null && user.IsAuthentic(password))
    {
        var claims = new List<Claim>
        {
            new Claim(ClaimTypes.Name, userName)
        };

        var principal = new ClaimsPrincipal(new[] {
                                                new ClaimsIdentity(claims, SCHEME) });

        Thread.CurrentPrincipal = principal;

        if (HttpContext.Current != null)
            HttpContext.Current.User = principal;
    }
} - For the response processing part, check whether the HTTP status code is 401 - Unauthorized. If so, add the corresponding WWW-Authenticate response header, as shown in Listing 10-9. Per the HTTP specification, when a 401 status code is sent back to the client, the response must include the WWW-Authenticate header specifying the schemes the server supports for the client to authenticate itself.
Listing 10-9. Response Processing
if (response.StatusCode == HttpStatusCode.Unauthorized)
{
        response.Headers.WwwAuthenticate.Add(
                             new AuthenticationHeaderValue(SCHEME));
} - For the error processing part, if there is any exception in the message handler flow, set the status code to 401 - Unauthorized, and set the WWW-Authenticate header just as in the previous step, and return the response, short-circuiting the pipeline. See Listing 10-10.
Listing 10-10. Error Processing
var response = request.CreateResponse(HttpStatusCode.Unauthorized);
response.Headers.WwwAuthenticate.Add(
                                                new AuthenticationHeaderValue(SCHEME));
return response;
The preceding code is a great example for illustrating the power of message handlers. The HTTP status code can be set to 401 - Unauthorized by any component in the pipeline, including the Authorize filter. By registering AuthenticationHandler as the first handler to execute after HttpServer, we get the opportunity to inspect the response as late as possible and add the necessary WWW-Authenticate header(s).
- Configure the message handler in the Register method of WebApiConfig class in the Configuration folder of the Robusta.TalentManager.WebApi.Core project, as shown in Listing 10-11. Comment out the line from the previous chapter where we added AuthenticationHandler to the MessageHandlers collection.
Listing 10-11. The Configure Message Handler
using System.Web.Http;
using Robusta.TalentManager.Data;
using Robusta.TalentManager.Domain;
using Robusta.TalentManager.WebApi.Core.Handlers;

public static class WebApiConfig
{
    public static void Register(HttpConfiguration config)
    {
        config.Routes.MapHttpRoute(
            name: "DefaultApi",
            routeTemplate: "api/{controller}/{id}",
            defaults: new { id = RouteParameter.Optional }
        );

        //config.MessageHandlers.Add(new AuthenticationHandler());

        var repository = config.DependencyResolver
                        .GetService(typeof(IRepository<User>))
                                                as IRepository<User>;

        config.MessageHandlers.Add(new AuthenticationHandler(repository));

    }
} - In the Robusta.TalentManager.WebApi.Core project, the Get method of EmployeesController must have the Authorize attribute applied to it, like so:
[ Authorize] public HttpResponseMessage Get(int id) { ... }
from the previous chapter. Just ensure that the Authorize attribute is still applied on the action method.
- Rebuild the solution and make a GET request from Fiddler to the URI http://localhost/talentmanager/api/employees/1. This code uses the endpoint corresponding to the web host, but you can use the self-host endpoint as well. It makes no difference, since the same message handler is exercised. You will get a 401 status code. Since you have the Authorize filter applied on the Get method, the filter returns the 401 status code on seeing that the identity is not authenticated. The request and response messages are shown in Listing 10-12 (messages edited for brevity). Notice the WWW-Authenticate: Basic response header part of the response; this is how our web API indicates the authentication scheme to the client.
Listing 10-12. The Request and Response Messages (Failure Scenario)
Request
GET http://localhost/talentmanager/api/employees/1 HTTP/1.1
Host: localhost

Response
HTTP/1.1 401Unauthorized
Content-Type: application/json; charset=utf-8
WWW-Authenticate: Basic
Date: Mon, 22 Apr 2013 13:27:35 GMT
Content-Length: 61

{"Message":"Authorization has been denied for this request."} - Make another GET request from Fiddler to the URI http://localhost/talentmanager/api/employees/1, this time including the Authorization header: Authorization: Basic anFodW1hbjpwQHNzdzByZCE=. This is just the user ID and password separated by a colon, which is the string jqhuman:p@ssw0rd! in the base64-encoded format.
- This time, you get the JSON representation of the employee resource back. Since you have configured to run AuthenticationHandler in the pipeline, it is setting Thread.CurrentPrincipal with an authenticated identity, and that makes the Authorize filter on the Get method happy. It lets the execution proceed to the action method, and you get the JSON back. The request and response messages are shown in Listing 10-13 (some of the headers removed for brevity).
Listing 10-13. The Request and Response Messages (Success Scenario)
Request
GET http://localhost/talentmanager/api/employees/1 HTTP/1.1
Authorization: Basic anFodW1hbjpwQHNzdzByZCE=
Host: localhost

Response
HTTP/1.1 200 OK
Content-Type: application/json; charset=utf-8
Content-Length: 93

{"Id":1,"FirstName":"Johnny","LastName":"Human","DepartmentId":1,"RowVersion":"AAAAAAAAF3E="} - Open Internet Explorer and type http://localhost/talentmanager/api/employees/1 in the address bar.
You have just made a GET request. If you have Fiddler running, it will have captured a request and response exactly the same as in Listing 10-12.
- Internet Explorer, on receiving the WWW-Authenticate: Basic response header, pops up a dialog box and collects the username and password. Enter some username and password.
- Internet Explorer packages the credential in the basic scheme and retries the earlier GET. The message handler will receive the same user ID and password entered, and you can verify this by breaking the flow in the message handler.
![]() Caution In a real-world application, do not use basic authentication without SSL/TLS. HTTPS is a must for this scheme, without which anyone can sniff the traffic and get the credentials. Also, if your client is browser-based and you let the browser pop up the dialog box and collect the credentials from the end user, the credentials will be cached by the browser until you close it. If you make a request to a URI for which you are already authenticated, the browser automatically sends the credentials in the Authorize header, making this mechanism susceptible to cross-site request forgery (CSRF) attacks. For this reason, try to avoid basic authentication with browser-based clients.
Caution In a real-world application, do not use basic authentication without SSL/TLS. HTTPS is a must for this scheme, without which anyone can sniff the traffic and get the credentials. Also, if your client is browser-based and you let the browser pop up the dialog box and collect the credentials from the end user, the credentials will be cached by the browser until you close it. If you make a request to a URI for which you are already authenticated, the browser automatically sends the credentials in the Authorize header, making this mechanism susceptible to cross-site request forgery (CSRF) attacks. For this reason, try to avoid basic authentication with browser-based clients.
10.2 Implementing Brokered Authentication
In this exercise, you will implement the brokered authentication pattern, in which a client application submits the username-and-password credential to a broker, gets a JSON Web Token (JWT), and ultimately presents that token to your ASP.NET Web API as the credential for authentication.
The brokered authentication pattern introduces a broker or a centralized entity for authentication. Even if no trust is established between the client and the service, trust relationships are established between the client and the broker and between the service and the broker. In those cases where a client will be unable or unwilling to authenticate directly to a web API using the credentials, the client can authenticate against the central broker and receive a token and submit it to the web API as the credential for authentication.
For this exercise, the broker will be just an ASP.NET handler that implements IHttpHandler. The broker takes in a username and password from the request body, authenticates them, and returns a JWT. In practice, when you deal with an entity like a broker, which is external to your application, you will resort to some kind of standard protocol to communicate with the broker and get the token. In SOAP-based services, WS-Trust is one such specification used, and the broker in that case will be a Security Token Service (STS). In the case of REST-based services, the OAuth 2.0 protocol can be used. However, for the sake of brevity, we will not implement OAuth 2.0 or an STS based on WS-Trust in this exercise. We'll just use the ASP.NET handler that responds to HTTP POST. You can find more information related to OAuth 2.0 in my other book: Pro ASP.NET Web API Security: Securing ASP.NET Web API (Apress, 2013).
![]() Note If you need a prebuilt implementation that issues tokens through OAuth 2.0, Thinktecture.IdentityServer v2 (https://github.com/thinktecture/Thinktecture.IdentityServer.v2) is a good open source option to evaluate. IdentityServer is a lightweight STS built with .NET 4.5, MVC 4, Web API, and WCF. It supports multiple protocols (both WS-Trust and OAuth 2.0). IdentityServer can mint tokens of different formats (SAML 1.1/2.0, JWT) and integrates with ASP.NET membership, roles, and profile out-of-the-box.
Note If you need a prebuilt implementation that issues tokens through OAuth 2.0, Thinktecture.IdentityServer v2 (https://github.com/thinktecture/Thinktecture.IdentityServer.v2) is a good open source option to evaluate. IdentityServer is a lightweight STS built with .NET 4.5, MVC 4, Web API, and WCF. It supports multiple protocols (both WS-Trust and OAuth 2.0). IdentityServer can mint tokens of different formats (SAML 1.1/2.0, JWT) and integrates with ASP.NET membership, roles, and profile out-of-the-box.
- Run another instance of Visual Studio 2012 as administrator.
- Create a new ASP.NET Empty Web Application with a name of Robusta.Broker.
- Right-click References under the Robusta.Broker project and select Manage NuGet Packages. Search for System.IdentityModel.Tokens.Jwt, locate the package, and click Install. This package, named JSON Web Token Handler for the Microsoft .Net Framework 4.5, provides an assembly that contains the classes to validate, read, and mint JWT tokens.
- Add a reference to System.IdentityModel.
- Create a class BrokerHandler, deriving from IHttpHandler, as shown in Listing 10-14. The following steps show the logic implemented in the ProcessRequest method:
- a. We get the username and password from the request.
- b. For the sake of brevity, we do not authenticate the credentials. We simply assume the credentials are valid, if the username matches password. If so, we create a JWT using JwtSecurityTokenHandler part of the System.IdentityModel.Tokens.Jwt NuGet package.
- c. If authentication fails, that is, if the username does not match password, we send back a 401 status code.
- d. For signing the token, we use a shared symmetric key. As the name indicates, a shared symmetric key is shared between the sender and the receiver. The same key is used to sign the token and validate the signature. For the purpose of this exercise, we just use a hard-coded key but in practice, this will be the key corresponding to the audience.
- e. We create the token with only one claim: the name claim.
- f. Finally, the token is written into the HTTP response.
Listing 10-14. The BrokerHandler Class
using System;
using System.IdentityModel.Protocols.WSTrust;
using System.IdentityModel.Tokens;
using System.Security.Claims;
using System.Web;

public class BrokerHandler : IHttpHandler
{
    private const string ISSUER = "Robusta.Broker";
    private const string AUDIENCE = " http://localhost/talentmanager/api ";

    public bool IsReusable
    {
        get { return true; }
    }

    public void ProcessRequest(HttpContext context)
    {
        HttpRequest request = context.Request;

        string userName = request["username"];
        string password = request["password"];

        bool isAuthentic = !String.IsNullOrEmpty(userName) && userName.Equals(password);

        if (isAuthentic)
        {
            // I use a hard-coded key
            byte[] key = Convert.FromBase64String(
                                            "qqO5yXcbijtAdYmS2Otyzeze2XQedqy+Tp37wQ3sgTQ=");

            var signingCredentials = new SigningCredentials(
                                                            new InMemorySymmetricSecurityKey(key),
                                                             SecurityAlgorithms.HmacSha256Signature,
                                                                   SecurityAlgorithms.Sha256Digest);
            var descriptor = new SecurityTokenDescriptor()
            {
                TokenIssuerName = ISSUER,
                AppliesToAddress = AUDIENCE,
                Lifetime = new Lifetime(DateTime.UtcNow, DateTime.UtcNow.AddMinutes(5)),
                SigningCredentials = signingCredentials,
                Subject = new ClaimsIdentity(new Claim[]
                {
                    new Claim(ClaimTypes.Name, userName)
                })
            };

            var tokenHandler = new JwtSecurityTokenHandler();

            var token = tokenHandler.CreateToken(descriptor);

            context.Response.Write(tokenHandler.WriteToken(token));
        }
        else
            context.Response.StatusCode = 401;
    }
} - Register the handler in Web.config
, as shown in Listing 10-15, by creating the <system.webServer> element. We use IIS 7.5 and an integrated pipeline for this exercise, and hence the Web.config entry is all that is needed to register the handler. The handler is registered to handle only POST requests.
Listing 10-15. The Web.Config File
<?xml version="1.0"?>
<configuration>
        <system.web>
                <compilation debug="true" targetFramework="4.5" />
                <httpRuntime targetFramework="4.5" />
        </system.web>
        <system.webServer>
                <handlers>
                        <add name="BrokerHandler"
                                   path="jwt" verb=" POST"
                                        type="Robusta.Broker.BrokerHandler, Robusta.Broker" />
                </handlers>
        </system.webServer>
</configuration> - If you do not have the Robusta.TalentManager solution open, run another instance of Visual Studio as administrator and open the Robusta.TalentManager solution from Exercise 10.1.
- Right-click References under the Robusta.TalentManager.WebApi.Core project. Select Manage NuGet Packages. Search for the package System.IdentityModel.Tokens.Jwt, select the package in the search results, and click Install.
- To the Robusta.TalentManager.WebApi.Core project, add a reference to the .NET libraries System.ServiceModel and System.IdentityModel.
- In the Robusta.TalentManager.WebApi.Core project, create a new class in the Handlers folder with a name of JwtHandler, as shown in Listing 10-16.
- a. This handler expects the JWT to come in the bearer scheme in the Authorization request header.
- b. It retrieves the token from the header and uses JwtSecurityTokenHandler to validate the token. Validation includes checking for the audience: the entity to which the token has been issued, who the issuer is, and the integrity of the token. In this case, the audience in the token must be http://localhost/talentmanager/api and the issuer must be Robusta.Broker for the validation to succeed. For the integrity check, the signature is validated through the shared symmetric key. Here also, we use the same hard-coded key.
- c. If the token is valid, claims are extracted and a ClaimsPrincipal object is returned; we set this to Thread.CurrentPrincipal. If we are web hosting, the same object is set in HttpContext.Current.User as well.
Listing 10-16. The JwtHandler Class
using System;
using System.Collections.Generic;
using System.IdentityModel.Tokens;
using System.Net;
using System.Net.Http;
using System.Net.Http.Headers;
using System.ServiceModel.Security.Tokens;
using System.Threading;
using System.Threading.Tasks;
using System.Web;

public class JwtHandler : DelegatingHandler
{
    private const string ISSUER = "Robusta.Broker";
    private const string AUDIENCE = " http://localhost/talentmanager/api ";

    protected async override Task<HttpResponseMessage> SendAsync(
                                            HttpRequestMessage request,
                                                   CancellationToken cancellationToken)
    {
        byte[] key = Convert.FromBase64String(
                                  "qqO5yXcbijtAdYmS2Otyzeze2XQedqy+Tp37wQ3sgTQ=");

        try
        {
            var headers = request.Headers;
            if (headers.Authorization != null)
            {
                if (headers.Authorization.Scheme.Equals("Bearer"))
                {
                    string jwt = request.Headers.Authorization.Parameter;

                    JwtSecurityTokenHandler tokenHandler = new JwtSecurityTokenHandler();
                    TokenValidationParameters parms = new TokenValidationParameters()
                    {
                        AllowedAudience = AUDIENCE,
                        ValidIssuers = new List<string>() { ISSUER },
                        SigningToken = new BinarySecretSecurityToken(key)
                    };

                    var principal = tokenHandler.ValidateToken(jwt, parms);

                    Thread.CurrentPrincipal = principal;

                    if (HttpContext.Current != null)
                        HttpContext.Current.User = principal;
                }
            }

            var response = await base.SendAsync(request, cancellationToken);
            if (response.StatusCode == HttpStatusCode.Unauthorized)
            {
                response.Headers.WwwAuthenticate.Add(
                new AuthenticationHeaderValue("Bearer",
                "error="invalid_token""));
            }
            return response;
        }
        catch (Exception)
        {
            var response = request.CreateResponse(HttpStatusCode.Unauthorized);
            response.Headers.WwwAuthenticate.Add(
            new AuthenticationHeaderValue("Bearer", "error="invalid_token""));
            return response;
        }
    }
} - Configure the message handler in the Register method of the WebApiConfig class in the Configuration folder, as shown in Listing 10-17.
Listing 10-17. Registering JwtHandler
public static class WebApiConfig
{
    public static void Register(HttpConfiguration config)
    {
        config.Routes.MapHttpRoute(
            name: "DefaultApi",
            routeTemplate: "api/{controller}/{id}",
            defaults: new { id = RouteParameter.Optional }
        );

        //config.MessageHandlers.Add(new AuthenticationHandler());

        var repository = config.DependencyResolver
                        .GetService(typeof(IRepository<User>))
                                                as IRepository<User>;

        config.MessageHandlers.Add(new AuthenticationHandler(repository));
        config.MessageHandlers.Add(new JwtHandler());
    }
} - Rebuild both the Robusta.TalentManager and Robusta.Broker solutions.
- Make a POST request to the broker URI http://localhost:24890/handler/jwt from Fiddler. Adjust the port number to reflect the port Robusta.Broker project uses. Use Content-Type: application/x-www-form-urlencoded in the request header and username=jqhuman&password=jqhuman as the request body. You get back the JWT. The request and response messages are shown in Listing 10-18.
Listing 10-18. Request and Response Messages (Broker)
Request
POST http://localhost:24890/handler/jwt HTTP/1.1
Content-Type: application/x-www-form-urlencoded
Host: localhost:24890
Content-Length: 33

username=jqhuman&password=jqhuman

Response
HTTP/1.1 200 OK
Content-Length: 311

eyJ0eXAiOiJKV1QiLCJhbGciOiJIUzI1NiJ9.eyJhdWQiOiJodHRwOi8vbG9jYWxob3N0L3RhbGVudG1hbmFnZXIvYXBpIiwiaXNzIjoiUm9idXN0YS5Ccm9rZXIiLCJuYmYiOjEzNjY3MDc2MTQsImV4cCI6MTM2NjcwNzkxNCwiaHR0cDovL3NjaGVtYXMueG1sc29hcC5vcmcvd3MvMjAwNS8wNS9pZGVudGl0eS9jbGFpbXMvbmFtZSI6ImpxaHVtYW4ifQ.3jMam6VRXlDTspZfDtvwQMvdAopA4vqiqYOhdPhZgMI - The response message body is the JWT. You will need to send this in the Authorization header in the bearer scheme to the web API as the credential to authenticate.
- Make a GET to http://localhost/TalentManager/api/employees/1 with a request header of Authorization: Bearer <entire jwt string goes here> from Fiddler by copying and pasting the token from the response of the previous call to the broker endpoint.
- The message handler validates this token and establishes the identity based on the claims in this token. Since it establishes an authenticated identity, the Authorize filter on the Get action method is happy and lets the action method run, and you get the response back. The request and response messages are in Listing 10-19.
Listing 10-19. Request and Response Messages (Web API)
Request
GET http://localhost/TalentManager/api/employees/1 HTTP/1.1
Authorization: Bearer eyJ0eXAiOiJKV1QiLCJhbGciOiJIUzI1NiJ9.eyJhdWQiOiJodHRwOi8vbG9jYWxob3N0L3RhbGVudG1hbmFnZXIvYXBpIiwiaXNzIjoiUm9idXN0YS5Ccm9rZXIiLCJuYmYiOjEzNjY3MDc2MTQsImV4cCI6MTM2NjcwNzkxNCwiaHR0cDovL3NjaGVtYXMueG1sc29hcC5vcmcvd3MvMjAwNS8wNS9pZGVudGl0eS9jbGFpbXMvbmFtZSI6ImpxaHVtYW4ifQ.3jMam6VRXlDTspZfDtvwQMvdAopA4vqiqYOhdPhZgMI

Response
HTTP/1.1 200 OK
Content-Type: application/json; charset=utf-8
Date: Tue, 23 Apr 2013 09:06:02 GMT
Content-Length: 93

{"Id":1,"FirstName":"Johnny","LastName":"Human","DepartmentId":1,"RowVersion":"AAAAAAAAF48="}
![]() Note Since we have given a lifetime of 5 minutes for the token, you will need to make the preceding request to the web API within this time period from when the token was issued. Otherwise, the request will fail because of the expired token.
Note Since we have given a lifetime of 5 minutes for the token, you will need to make the preceding request to the web API within this time period from when the token was issued. Otherwise, the request will fail because of the expired token.
Thus, you were able to exchange your username and password for a JWT with the broker and submit the token to your web API as the credential, and you got the response back. You trust the broker, and your web API trusts the broker as well. The web API accepts the token you presented to it because it was issued by the broker the web API trusts.
Since we plugged in JwtHandler to the pipeline, in addition to the AuthenticationHandler, the web API at this point is capable of performing direct authentication based on the username and password you send through the basic scheme (shown in the previous exercise) as well as the authentication based on JWT.
HTTP MODULES VERSUS MESSAGE HANDLERS
By implementing your authentication code in an HTTP module, you can have that code execute even before your first all-route message handler runs. If you have a web API and other resources such as HTTP handlers, pages, or MVC controllers in the same application, and you want to establish an identity in one place and share it, an HTTP module is a great option. An HTTP module sees all requests that go through the ASP.NET pipeline. A message handler only sees requests that are routed to Web API.
The flip side of using an HTTP module is that your design is no longer host-agnostic, and you are creating a dependency on web hosting (IIS). I use message handlers throughout this chapter because they are host-agnostic, but you must be aware of the trade-offs involved in choosing between a message handler and an HTTP module.
10.3 Authorizing Requests
In this exercise, you will implement authorization for your web API. Authorization, sometimes abbreviated to AuthZ, is the process of an application determining whether an entity is allowed to perform a requested action. Once an authenticated identity is established for an entity, the application can control the entity’s access to the application resources based on this identity. An extremely simple and trivial application might authorize resource access purely based on the identity. But most practical applications authorize access based on attributes, such as roles, that are associated with the identity.
- In the Robusta.Broker project, modify the ProcessRequest method in BrokerHandler to return one more claim in addition to the name claim, as shown in Listing 10-20.
Listing 10-20. The ProcessRequest Method with an Additional Claim
public void ProcessRequest(HttpContext context)
{
    ...

        var descriptor = new SecurityTokenDescriptor()
        {
            TokenIssuerName = ISSUER,
            AppliesToAddress = AUDIENCE,
            Lifetime = new Lifetime(DateTime.UtcNow, DateTime.UtcNow.AddMinutes(5)),
            SigningCredentials = signingCredentials,
            Subject = new ClaimsIdentity(new Claim[]
            {
                new Claim(ClaimTypes.Name, userName),
                new Claim(ClaimTypes.Role, "HRManager")
            })
        };

        ...
} - In the Robusta.TalentManager.WebApi.Core project, modify the EmployeesController GET action method, as shown in Listing 10-21.
Listing 10-21. The EmployeesController GET Action Method
[Authorize(Roles="HRManager")]
public HttpResponseMessage Get(int id)
{
    var employee = repository.Find(id);
    if (employee == null)
    {
        var response = Request.CreateResponse(HttpStatusCode.NotFound, "Employee not found");

        throw new HttpResponseException(response);
    }

    return Request.CreateResponse<EmployeeDto>(
                        HttpStatusCode.OK,
                        mapper.Map<Employee, EmployeeDto>(employee));
} - Rebuild both the solutions and make a POST request to the broker URI http://localhost:24890/handler/jwt from Fiddler. Adjust the port number to reflect the port Robusta.Broker project uses. Use Content-Type: application/x-www-form-urlencoded in the request header and username=jqhuman&password=jqhuman as the request body. You’ll get back the JWT. Copy the entire token string.
- Make a GET to http://localhost/TalentManager/api/employees/1 with a request header of Authorization: Bearer <entire jwt string goes here> from Fiddler by pasting the token you copied in the previous step.
You will get the JSON response back, the same as the last time. What is different now is that we are authorizing the action method Get based on the role, using the Authorize attribute. We allow access only if the user is in the role of HRManager.
- Modify the Authorize attribute applied on the Get action method in EmployeesController so that it looks for the role of HRDirector:
[Authorize(Roles="HRDirector")] public HttpResponseMessage Get(int id) { ... } - Rebuild Robusta.TalentManager and repeat the previous GET before JWT expires. (You can always get a fresh JWT from the broker and retry the GET request, when in doubt.) Even with a fresh JWT, you will get 401 - Unauthorized, because Authorize will not allow the Get action method to run. It is configured to look for a user in the role of HRDirector, but the current user is in the role of HRManager.
- The current role check we do is simple. Suppose you want to extend the logic to allow access to the Get method, if the user is in a role of HRManager between the hours of 3 PM and 5 PM only. That may be a weird rule, but its purpose is only to demonstrate implementing something more complex than a simple role-based check.
- In the Robusta.TalentManager.WebApi.Core project, create a folder named Filters. Within this, create a class AuthorizeByTimeSlot, as shown in Listing 10-22.
Listing 10-22. The AuthorizeByTimeSlot Filter
using System;
using System.Web.Http;
using System.Web.Http.Controllers;

public class AuthorizeByTimeSlot : AuthorizeAttribute
{
    public int SlotStartHour { get; set; }
    public int SlotEndHour { get; set; }

    protected override bool IsAuthorized(HttpActionContext context)
    {
        if (DateTime.Now.Hour >= this.SlotStartHour &&
                    DateTime.Now.Hour <= this.SlotEndHour &&
                        base.IsAuthorized(context))
            return true;

        return false;
    }
} - Apply the filter on the Get method of EmployeesController, as shown in Listing 10-23. Also add the directive
using Robusta.TalentManager.WebApi.Core.Filters;
to EmployeesController.
Listing 10-23. The AuthorizeByTimeSlot Filter Applied to GET
[AuthorizeByTimeSlot(Roles="HRManager", SlotStartHour=15, SlotEndHour = 17)]
public HttpResponseMessage Get(int id)
{
    // Action method logic goes here
} - Rebuild the Robusta.TalentManager solution and make the GET request between the hours of 3 and 5 PM. The request will go through. At any other time of the day, it will be rejected with a 401.
Summary
Information security means protecting information and information systems from unauthorized access, use, disclosure, disruption, modification, or destruction in order to provide confidentiality, integrity, and availability, referred to as the CIA triad. Confidentiality is about preventing the disclosure of information to unauthorized entities. Integrity is about preventing modifications to the data by unauthorized entities. Availability is about the data and hence the information system that owns the data being available for legitimate users.
To prevent the disclosure of information to unauthorized entities and to prevent modifications to the data by such entities, a system must be able to differentiate between authorized and unauthorized entities. In order to do that, a system must be able to identify an entity in the first place. Once identified, a system must be able to verify the identity of the entity by validating the credentials presented by the entity against an authority; this process is called authentication. Once a system is able to identify and authenticate an entity, it is in a position to control the access to the data it owns, and this process is called authorization. Authentication and authorization are fundamental to ensure confidentiality and integrity.
Direct authentication is a common security pattern in which a client presents its credentials to a service directly. There is a trust relationship between the client and the service. Brokered authentication, on the other hand, is a pattern that introduces a central authentication entity, called the broker. Even if no trust is established between the client and the service, trust relationships are established between the client and the broker and between the service and the broker.
In the area of direct authentication, HTTP authentication schemes are commonly used. Request for Comments (RFC) 2617, HTTP Authentication: Basic and Digest Access Authentication, provides the specification for the HTTP authentication framework. The basic authentication scheme is based on the model that the client must authenticate itself with a user ID and a password. In the case of the brokered authentication pattern, in which a broker issues a token to a client application based on a protocol such as OAuth 2.0 or WS-Trust, the token with the claims set is presented to the service as the credential. In this chapter, we looked at one token format, which is JSON Web Token (JWT).