Chapter 4
Use of Visual Aids
When you prepare a presentation, you need to keep in mind how much information the audience can actually absorb through their senses. The amount of information an audience can retain will depend on the verbal aspect, the tone used, and the nonverbal aspect of your presentation.
In the 1960s, UCLA professor Dr. Albert Mehrabian conducted a series of experiments with college students. He wanted to test the power of body language, such as facial expressions, and how it compares to the words used in communicating the speaker’s attitude and feelings when there is an inconsistency between the verbal and nonverbal clues.
In the first series of experiments, only one recorded word was spoken to the students to communicate whether the speaker liked, disliked, or was neutral toward the listener. The experimental subjects listened to a total of nine such words. Three words, honey, dear, and thanks, were used to indicate the speaker liked the listener. Three other words, brute, don’t, and terrible, were used to denote that the speaker disliked the listener. Finally the words maybe, really, and oh were supposed to represent a neutral attitude. The speakers were instructed to vary their tone of voice three times while speaking each of these words. One time, the speaker’s tone of voice was to reflect disliking, another time liking, and still another time neutrality. The statistical results showed that tone of voice was far more important in influencing the subjects’ judgments of the true feelings of the speaker than the words themselves.
In another series of experiments, the researchers added another feature. The subjects were shown photographs with different facial expressions. The subjects were asked to guess the speaker’s feelings based on these facial expressions. This time the facial expressions were found to be the greatest influence in the subjects’ guessing the feelings behind the speaker’s communications of the words. In combining the statistical results of these studies, the researchers came up with the 55 percent, 38 percent, and 7 percent rule, meaning that in 55 percent of the cases, the listener’s judgment of the speaker’s real feelings is based on facial expression (or other body language); in 38 percent of cases, it is based on tone of voice; and in only 7 percent of the cases, it is based on the words themselves.
Mehrabian and his colleagues published the results in May and June 1967 in two journals: Journal of Personality and Social Psychology and the Journal of Consulting Psychology. Mehrabian also mentions these studies in two books he published: Silent Messages (1971) and Nonverbal Communication (1972).
Although some researchers believe the statistics have been misquoted and misused, other studies outlined in Mehrabian’s book Silent Messages suggested additional work that supported these results.
VALIDITY OF THE DATA
Although the validity of the actual numbers is questioned by some, what is agreed is that nonverbal communication and the tone of your voice has a much larger impact of the audience. What is also true is that all three clues in communicating with others are essential. Words, tone of voice, and body language not only must be consistent with one another but must actually support one another. If not, one may easily cancel out the other.
Although the application of these numbers to presentations has been discussed and debated by many people, most of the debate is focused around applying these numbers to all speaking situations. In all cases, people do agree that your nonverbal communication has a significantly higher influence on the listener than your words. If your nonverbal and verbal messages do not agree, you are sending a conflicting message. And when this is the case, most audiences will lean toward accepting the nonverbal message over the verbal message.
Think about it: how many times have you had a conversation with your significant other and you question what he or she is saying based on the conflict between what is being said and the expression on that person’s face?
Although the 7 percent, 38 percent, and 55 percent numbers have been quoted and misused by many people, the bottom line is to keep in mind that your nonverbal messages can have a bigger impact on your audience than your words. As a presenter, be careful in quoting numbers and statistics, unless you know that background of the data. What is twisted or slanted truth yesterday, very quickly can become the truth today. If as a presenter you do not know where the data come from, then do not use them as fact.
USE OF VISUAL AIDS
Why do we use visual aids during presentations? Visual aids are used to improve or enhance our verbal message. A presentation involving the use of visual aids typically is more effective than a presentation that does not. This does assume, for the moment, that the visual aid being used enhances the message and does not confuse the listener. Your visual aid and your verbal message must be in agreement with each other.
Let’s take a look at five important benefits of using visual aids and how they can help your presentations be more effective.
Figure 4.1 Dale’s Cone of Influence is a model that incorporates several theories related to instructional design and the learning process.
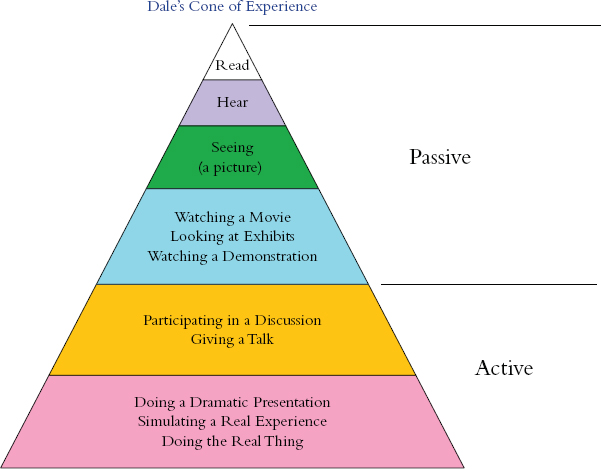
The percentages and the plot specifically have been passed around in the field from person to person for many years. People have changed the relative percentages and incorrectly cited sources for the numbers. What the cone of influence does suggest is that concept development can proceed from experiences with any specific instructional material. The more numerous and varied the media we employ during our presentations, the richer and more secure will be the concepts we describe. Since each of us has a preferred learning style, the percentages can vary from person to person and using one set of numbers for everyone is not appropriate. Your audience thinks more quickly than you speak, so their minds tend to wander during a presentation. Visual aids help keep your audience focused on your message. Visual aids also add variety and interest to the presentation.
Some people are visual learners, some people are auditory learners, and others are kinesthetic learners. You can be a more effective presenter if you can appeal to all learning styles of your listeners. I will be discussing learning styles in greater detail in Chapter 5.
TYPES OF VISUAL AIDS
As a presenter you have many types of visual aids available for use during your presentations. Depending on your presentation and what you are trying to accomplish, the type of visual aid you use can make a huge difference. There may be times when having an actual model or prop available is much more effective than showing a photograph.
On the following pages, I will discuss some of the more common types of visual aids along with their advantages and limitations. In addition, I have provided some specific tips on how to use each type of visual aid effectively.
Flip Charts
Flip charts, although not used as much today, still offer a simple and effective method to present information for small groups. Flip charts are very economical, are reusable, and do not require any electricity. Flip charts allow you to add color and spontaneity to your presentation. In our computer-loving world, flip charts may seem pretty low tech, but they are reliable and do not require any special skill to use. Flip charts are usually sold in packages of two and come with or without grids. I personally like those with grids because it makes it easier for me to print straight and I can use the grids to draw or sketch.
I still use flip charts in my presentation skills classes today. By having the participants in my class use flip charts during their presentations, it forces them to think about certain presentation skills concepts they forget when using PowerPoint.
Limitations
Flip charts are generally very large and are difficult to transport. They do have special easel cases you can use to carry them. If your flip charts are too small, they can cause visibility problems. Flip chart paper is often flimsy, and if it is too thin, there can be “see-through” distractions. Flip charts require notable preparation time.
Tips
Following are some specific tips and recommendations for using flip charts:
- Use only a few well-done charts.
- Make your charts simple and bold.
- Keep drawings basic. (Books are available that teach you flip chart drawing.)
- Practice on regular paper before drawing on the actual flip chart pad.
- Use flip chart markers designed for flip charts. Do not use whiteboard markers or permanent markers. Whiteboard markers do not write well on paper, and permanent makers bleed through the flip chart paper.
- When writing on the flip chart pad, first use pencil, then use flip chart markers.
- Use keyword phrases only. It is not necessary to use full sentences.
- Do not capitalize every letter. This makes is difficult to read.
- Add color, particularly dark colors such as blue and black. Avoid using yellow, pink, and orange. These colors are very difficult for the audience to see. Using one color and one accent color works best.
- You can lightly pencil in notes you need right on the flip charts. The audience won’t be able to see them. One example of a note you might include is what is on the next flip chart.
- Have a blank sheet of flip chart paper between each of your sheets. This will prevent the written information on the sheets that follow from “peeking through” the flip chart paper.
- Make sure the flip chart pad type you have fits the flip chart stand you will be using. The best type of flip chart stands have clamps at the top of the stand and work with any type of flip chart pad.
- Try to get flip chart pads that have a perforation at the top of the pad. This will allow you to easily remove any sheets as required.
- Many of the flip chart pads today also have nonstick glue on the back of each sheet near the top of the pad. This allows you to remove any sheets and tack them onto a wall.
- Do not talk as you write on the chart. You should always face the audience when talking.
- Properly store and transport your flip charts in a case or the box they came in to protect them from damage.
Making “prepared” flip charts can take a considerable amount of time. Make sure you start preparing your charts early enough that you have time to review them and make any changes or corrections before you actually use them. It takes practice to learn how to print neatly. If you do not have neat printing, ask someone who does print well to prepare them for you. A poorly prepared flip chart can be very distracting.
Overhead Transparencies
Overhead transparencies, although not used as much today, do still exist in many training classrooms. Most facilities still have overhead projectors in training rooms and classrooms. The overhead transparency can be used in a room with normal lighting, and this will increase audience attention and participation. The presenter can face the audience and observe the reactions during the presentation.
Overhead transparencies can be prepared quickly with easy-to-use material and readily available reproduction equipment. You can even buy special transparency sheet films that will allow you to print directly to them from your printer. There are different transparency films to use in your copier machine because the copy machine generates heat and can result in melting your other film types. Make sure you use the correct film type.
Limitations
Awkward changing of overhead transparencies can cause distractions. For the proper use of an overhead projector, an electrical outlet, a screen, and a table or stand are needed. For proper placement of the projector, sufficient space between the overhead projector and the screen must be allocated. Overhead transparencies are not appropriate for small audiences. Their use could seem like overkill. Transparencies get a lot of use and a lot of abuse.
Tips
Following are some specific tips and recommendations for using overhead transparencies:
- To avoid confusion, limit each transparency to one topic or concept.
- Have no more than seven words on a line of text; include no more than six or seven lines of text per transparency.
- Transparencies do not replace the presentation; include a few keywords or ideas.
- If you use transparency frames, you can write notes on the borders.
- Jot down notes on your own paper copies.
- Add color whenever possible.
- Make static transparencies more dynamic by using overlays.
- Choose landscape rather than portrait mode when designing transparency.
- Use a type size of at least 18 points. Figure 4.2 shows the minimum type size you should use based on viewing distance.
Figure 4.2 Font size recommendations based on distance from audience.

- Include illustrations, cartoons, and graphs whenever possible. Remember, however, that the subject matter must be important enough to merit charting in the first place.
- Use tinted transparencies to reduce the lamp glare and to make it easier on the audience’s eyes.
- Allow sufficient margins on the visual so that there is room for mounting.
- Number all your transparencies and mount them in frames. This will help in many respects. If you drop them, it will be easy to rearrange them in order. The frames eliminate the surrounding distracting white space. The frame will also prevent the overhead from sliding due to static buildup. Using frames also provides you somewhere to write some helpful notes about the current slide or what is on the next slide.
- When you need to make last-minute freehand overhead transparencies, place a piece of lined paper under a write-on transparency film. Use special overhead projector pens to write with. Regular marker pens do not write well on transparency films.
- Practice giving your presentation using your actual visual aids. Make sure they project well. Have a friend or colleague sit and watch your presentation and note any problems with your overheads. It takes practice to be able to change overheads smoothly.
- Practice on-site again just before your presentation.
- Make sure all equipment works and always make sure there is an extra bulb. Know how to change the bulb if you need to. Bring a small washcloth or towel to handle the hot bulb if you need to change it. Unplug the projector when changing the bulb.
- Stand off to one side of the projector. Too many speakers stand between the projector and the screen, causing a shadow. Instead, position yourself to allow the audience to see you well, without blocking their view of the overhead.
- Do not face the projected image on the screen. Face and talk to the audience.
- Explain every visual. Use a pointer for complex visuals.
- Never show a blank screen.
Whiteboards, Chalkboards
Most conference rooms have some kind of wall board, such as a chalkboard or whiteboard available to use for your presentation. Using a whiteboard or chalkboard allows your presentation to be very spontaneous and immediate. They are the most flexible visual aid tool because they allow you to easily modify, add, or subtract information. They are readily available and very inexpensive.
Limitations
Legibility can be a problem, especially if you do not draw or write neatly under pressure. It is not always possible to ensure visibility from all parts of the room. The visuals are also temporary and static. Writing and creating your visual aid takes up much of the overall presentation time.
Tips
Following are some specific tips and recommendations for using a whiteboard or chalkboard:
- Practice your handwriting and/or drawing in advance.
- Make sure you draw simply and neatly. People do not expect an artist.
- When writing, use large and legible letters.
- Show only the main points.
- Distinguish between ideas by using a bulleted format.
- Erase any previous visual.
- Keep the presentation flowing and avoid talking to the visual.
Handouts
Most business conferences and meetings involve the use of handouts. When people attend a presentation, they feel cheated if they do not receive a handout. The advantage of providing a handout is that is ensures everyone can see your main points and ideas. Handouts also serve as a reference for later hands-on study. They are economical and facilitate interaction between the presenter and the audience.
Limitations
Handouts can be a distraction during your presentation if they are handed out too early. Often, the audience is reading during your presentation and may even skip ahead of where you are. Color handouts can be expensive, but they are more common today than just a few years ago. If your audience is large, it is difficult to know exactly how many copies of the handout to have.
Tips
Following are some specific tips and recommendations for using handouts:
- Handouts call for more detail than do overhead transparencies or charts.
- Make sure your handouts can stand alone and still make sense several days or weeks after the presentation.
- Some people provide exact copies of the slides they use; take the time to provide more information in you handouts.
- More and more today, people are making their handouts online. Provide the audience with a link to your handout or slides; they will appreciate it. Many of the larger conferences and conventions I speak at no longer provide hardcopy handouts. They provide only a link to download a copy of the material. This saves the organizer and client time and money.
- At a minimum, provide your audience with a copy of the agenda. This allows them to easily follow along.
Photographs or Posters
There are times when the use of photographs or poster offers the best solution to presenting information. I work with many clients, such as architects, military personnel, consultants, and designers, for whom the best visual aid is a large photograph or poster board. This option can often have a bigger impact on your audience than other types of visual aids.
Limitations
Because photos can be small, it is best if the photos are enlarged for your audience to ensure everyone can see the visual. Reproducing large photographs or poster boards, although much easier today, does require time, special equipment, and money. You also do need to have a portfolio case to carry and protect the posters.
Tips
Following are some specific tips and recommendations for using photographs or posters:
- Be certain the quality of the poster or photograph is good.
- Do not use small photos (e.g., traditional 4 × 6 images) for a large group.
- If you have several posters or photos, consider using a slightly smaller size, which will work in most cases.
- Bring along or obtain a few easel boards to display the photos
Videos/Movies/Music
There are times when a video is the best visual you can use for your presentation. Videos or movies can engage the audience’s senses more effectively than some other visuals. You can use videos to capture live events that can then be used to make your point. Videos can also serve as a great learning tool. In my presentation skills workshops, I videotape each of the participants’ presentations and play them back during my workshop. I used to use a VHS recorder to tape the participants. In order to play these back, I need to have a VCR player and a monitor. I used this technology for several years.
I began using digital video cameras when they came out, and this allowed me to use a smaller video camera, making it more portable. I was then able to play the video back through my liquid crystal display (LCD) projector. This was a great improvement since the large VCR camera and large TV monitor was no longer required.
I now currently use a Flip camera and play the recorded videos back directly through my laptop computer. Fortunately, LCD projectors also have gotten smaller, lighter, and more durable, making it easier for me to travel with this equipment. I no longer have to rent or make special arrangements for this equipment. The Flip camera is very small and portable and is about the size of your cell phone or smartphone.
Limitations
I often see other trainers and speakers, including professional speakers, use personal copies of commercial tapes or DVDs such as movies or documentaries in their presentations or training classes. A word of caution here: Videos purchased for personal use can be used only for personal home viewing and use. You are not legally allowed to use these videos—even short clips—in your presentations or classroom without written permission from the author or copyright holder. Re-read the legal statements on the videos.
I have seen too many people use a personal copy of a commercial video during presentations. Many people think that just because they purchased and own a copy of the video, they can now legally play this video in a public forum. These videos are for personal home viewing only. You need to obtain written permission to use them in a public presentation.
The same applies to presenters using commercial cartoons, such as Dilbert and others, within their presentations. This is illegal unless the appropriate licensing fees have been paid and written permission obtained. Companies have been sued and have been required to pay millions of dollars in fines for violating these copyright and performance right laws.
The use of commercial music, whether in a training class, workshop, or seminar—and even if played only during a break—also requires licensing. Even hotels must pay a licensing fee from ASCAP and others to play music from the local radio station through their intercom system. Having music at breaks and other times can help and add to the atmosphere of your program; however, you can get yourself in serious legal trouble if you do not know the law.
You can purchase royalty-free music for this purpose. I have owned and used royalty-free music for years, and I use this music during breaks and even during exercises to provide a soothing background for my participants.
Make sure you are not violating any of the issues I’ve described, or you may find yourself on the wrong end of a lawsuit.
Tips
Following are some specific tips and recommendations for using videos, movies, or music:
- Never show a commercial film or video without written permission.
- Never show a film or video you have not previewed.
- If possible, have an assistant help you with the video equipment.
- If you decide to incorporate video clips into your PowerPoint presentation, make sure you know how to load and start the video and make sure the computer and system you are using is set up for sound.
- Always introduce the video before you use it and explain why you are showing it.
- Pay attention to the room’s lighting conditions.
- After watching the film or video, invite a discussion about what was just seen.
- Allow yourself plenty of time to set up your equipment prior to the presentation.
- Check all your cable connections and check the volume on the speakers.
- If you use a camera to record during your program, use a tripod.
Computer LCD Projectors
In today’s world of ever-changing technology, the use of PowerPoint and the LCD projector is commonplace. They are more common today due to the drastically reduced prices of this high-tech equipment. When LCD projectors first came out, they were very large, very heavy, and very, very expensive. Many of the first-generation projectors weighed more than 20 pounds and required a special travel case because the LCD projector bulb was so fragile—and expensive. When LCD projectors debuted, it was not unusual to have to pay $10,000 to $100,000 for this equipment. The projector bulbs inside typically lasted only a couple hundred hours and cost anywhere from $500 to $1,000 each to replace. The projectors would overheat easily, and the bulbs would burn out.
As technology improved, the projectors became smaller and smaller and the bulbs more durable. They eventually came out with the portable LCD projector that was much smaller, lighter, and more durable. My first LCD projector was an 800-lumens projector (lumens is a measure of the total “amount” of visible light emitted by a source). The projector weighed only six pounds, and the bulb was designed to last about 2,000 hours. When I invested (and believe me it was an investment) in my first portable LCD projector, I spent $3,999. This was a lot of money even by today’s standards. But I needed to make this investment because it was costing me even more to rent LCD projectors (many companies and clients did not own their own, so I needed to bring this equipment with me).
Fast-forward to today, where you can purchase a smaller portable LCD projector for less than $800. The LCD projectors today offer much brighter light at a very inexpensive cost. Many of the projectors used today in classrooms are 2,500- to 3,000- lumen projectors. When I first started traveling more internationally, I need to bring my 2,500-lumen LCD projector because they were not readily available in many countries. Many of the LCD projectors today are even wireless, making it possible to connect several input devices at the same time.
Limitations
As with any technology, there is a small learning curve to know how to connect and set these devices to your computer and the devices. If you need sound, then you need to connect the projector to some type of sound system. I travel with my small LCD projector and small set of portable speakers. The portable speakers plug into the USB port of my laptop and allow me to have louder volume than just using my laptop speakers. I project the image onto a movie screen, which is available in most training classrooms.
Tips
Following are some specific tips and recommendations for using computer LCD projectors:
- Familiarize yourself with the proper setup and operation of your equipment.
- The more technology you bring into a presentation, the more care and time you need to properly prepare.
- Read and understand the owner’s manual of your LCD equipment.
- Set up your equipment well in advance of your presentation.
- Always check out your equipment beforehand to make sure it is working.
- Understand how to toggle the function keys on your laptop to allow your computer to talk to the LCD projector. Different computer brands use different function keys, so know what you need to do to display your computer image through the LCD projector.
- Check the LCD projector bulb for available life span. Most modern LCD projectors have a menu option that allows you to check this information.
- Become familiar with the LCD projector menu options to ensure you know how to modify your setup. Options vary with each projector.
- Check that the LCD projector is placed or positioned the proper distance from the display screen. This will vary depending on the room size and the size of your audience.
- The larger the audience, the larger the room and the brighter LCD projector needs to be since you need to project the image farther onto a larger screen.
- Check your presentation color combinations. Many color combinations that look good on your laptop screen do not project well on the larger screen.
- Check the font size in your presentation and be sure it is appropriate and projects well. Participants in the back of the room should be able to easily read the text.
MORE ABOUT USING VISUAL AIDS
Regardless of the type of visual aids you use, you need to practice and rehearse using them with your presentation. Do not limit yourself to using only PowerPoint. Be creative and use a variety of props and visual aids during your presentation. If you plan to use a variety of visual aids, be sure to remember to bring them with you the day of your presentation. Make a checklist of the items you need to bring with you. You will be glad you did. I still use checklists today with all my presentations. I make a list of what I need to bring with me. On that same checklist I have a spot or box to check to make sure that I (1) remembered to include that item and (2) I actually packed that item with my equipment in preparations for my travel.
Following are some additional general tips to consider when using visual aids:
- Keep your visual aids simple, serviceable, and easily visible.
- Your visual aid should be an integral part of your subject and needed to support your presentation. Your presentation should be more clearly understood with their inclusion than by words alone.
- The visual aid you use needs to be suited to the subject.
- Talk to the audience after you have pointed to the screen or object. Face the audience when you speak and avoid speaking at the screen.
- Become so familiar with your visual aid that you only need to glance at it. There is no need to continually glance back at the same visual aid while you are talking.
- Do not stand in front of or obstruct the view of the visual aid.
- Do not fiddle with the visual aid once you introduce it. Do not continue to hold it in your hands any longer than you need to. Put the visual aid down to free up your hands.
- For optimal visibility, place your screen or flip charts off-center in the room. This allows you to remain on “center stage” and provides a better viewing angle for your audience.
- Use color to emphasize key points, but avoid using too many colors.
- Do not use so many visual aids that they become a crutch. Use them sparingly.
THE MOST IMPORTANT VISUAL AID
With all presentations, you have many options to use a variety of visual aids. The single most important visual aid is you, the presenter. Learn to use your body, gestures, and body language effectively because you are the focus of your presentation. I will be discussing in Chapter 6 more about using yourself as a visual aid when I discuss nonverbal messages.
For now, I will provide some last-minute tips to consider when you are the visual aid:
When You Are the Visual Aid