
Chapter 20
Automating Word
In this chapter, you will:
Use early and late binding to reference a Word object
Use the
Newkeyword to reference the Word applicationUse the
CreateObjectfunction to create a new instance of an objectUse the
GetObjectfunction to reference an existing instance of WordUse constant values
Be introduced to some of Word’s objects
Control form fields in Word
Word, Excel, PowerPoint, Outlook, and Access all use the same VBA language. The only difference is their object models. For example, Excel has a Workbooks object, and Word has Documents. Any one of these applications can access the object model of another application, as long as the second application is installed.
To access Word’s object library, Excel must establish a link to it by using either early binding or late binding. With early binding, the reference to the application object is created when the program is compiled. With late binding, the reference is created when the program is run.
This chapter provides an introduction to accessing Word from Excel.
![]() Note
Note
This chapter does not review Word’s entire object model or the object models of other applications. Refer to the VBA Object Browser in the appropriate application to learn about other object models.
Using early binding to reference a Word object
Code written with early binding executes faster than code with late binding. A reference is made to Word’s object library before the code is written so that Word’s objects, properties, and methods are available in the Object Browser. Tips such as a list of members of an object also appear, as shown in Figure 20-1.
The disadvantage of early binding is that the referenced object library must exist on the system. For example, if you write a macro referencing Word 365’s object library and someone with Word 2010 attempts to run the code, the program fails because it cannot find the Word 365 object library.
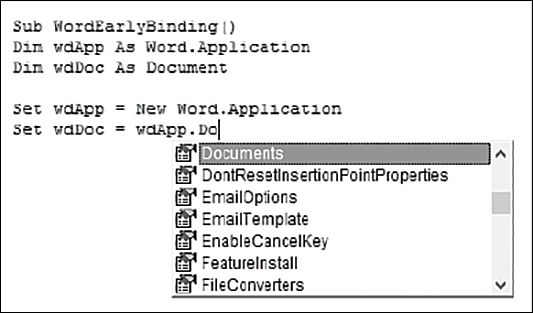
FIGURE 20-1 Early binding allows access to a Word object’s syntax.
You add the object library through the VB Editor, as described here:
Select Tools, References.
Check Microsoft Word 16.0 Object Library in the Available References list (see Figure 20-2). If the object library is not found, Word is not installed. If another version is found in the list, such as 14.0, another version of Word is installed, and you should check that.
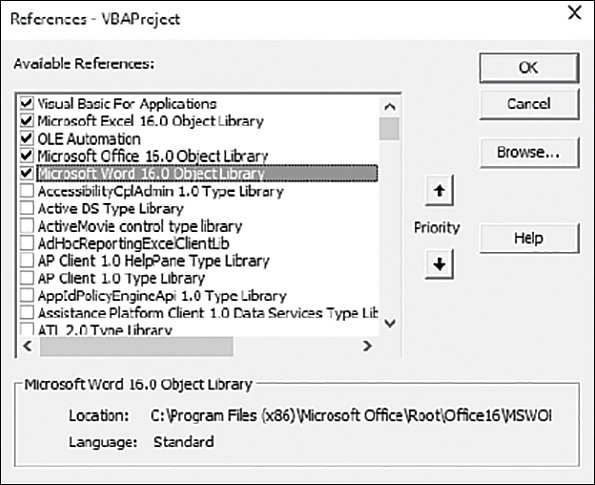
FIGURE 20-2 Select the object library from the Available References list.
Click OK.
After the reference is set, Word variables can be declared with the correct Word variable type, such as Document. However, if the object variable is declared As Object, this forces the program to use late binding. The following example creates a new instance of Word and opens an existing Word document from Excel using early binding:
Sub WordEarlyBinding()
Dim wdApp As Word.Application
Dim wdDoc As Document
Set wdApp = New Word.Application
wdApp.Visible = True 'make Word visible
Set wdDoc = wdApp.Documents.Open(ThisWorkbook.Path & _
 "Automating Word.docx")
Set wdApp = Nothing
Set wdDoc = Nothing
End Sub
The declared variables, wdApp and wdDoc, are Word object types. wdApp is used to create a reference to the Word application in the same way the Application object is used in Excel. New Word.Application is used to create a new instance of Word. If you are opening a document in a new instance of Word, Word is not visible. If the application needs to be shown, it must be unhidden (wdApp.Visible = True). When the program is done, release the connection to Word by setting the object, wdApp, to Nothing.
![]() Tip
Tip
Excel searches through the selected libraries to find the reference for the object type. If the type is found in more than one library, the first reference is selected. You can influence which library is chosen by changing the priority of the reference in the list of selected libraries.
When the process is finished, it’s a good idea to set the object variables to Nothing and release the memory being used by the application, as shown here:
Set wdApp = NothingSet wdDoc = Nothing
If the referenced version of Word does not exist on the system, an error message appears when the code is compiled. View the References list; the missing object is highlighted with the word MISSING, as shown in Figure 20-3.
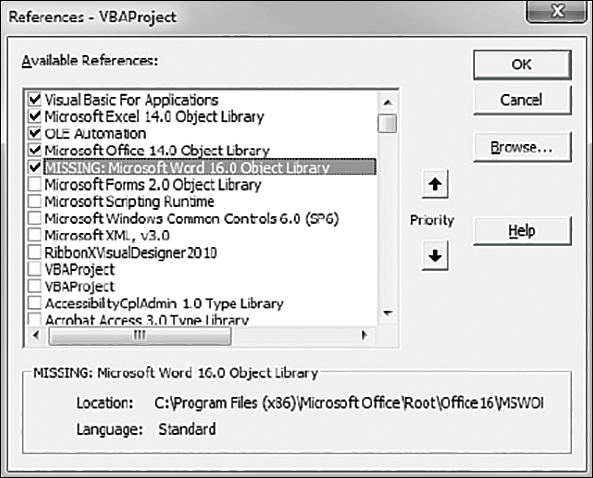
FIGURE 20-3 Excel won’t find the expected Word 365 object library if someone opens the workbook in Excel 2010.
If a previous version of Word is available, you can try running the program with that version referenced. Many objects are the same between versions.
Using late binding to reference a Word object
When using late binding, you create an object that refers to the Word application before linking to the Word library. Because you do not set up a reference beforehand, the only constraint on the Word version is that the objects, properties, and methods must exist. When there are differences between versions of Word, the version can be verified and the correct object used accordingly.
The disadvantage of late binding is that because Excel does not know what is going on, it does not understand that you are referring to Word. This prevents the IntelliSense from appearing when referencing Word objects. In addition, built-in constants are not available. This means that when Excel is compiling, it cannot verify that the references to Word are correct. After the program is executed, the links to Word begin to build, and any coding errors are detected at that point.
The following example creates a new instance of Word and then opens and makes visible an existing Word document:
Sub WordLateBinding()
Dim wdApp As Object, wdDoc As Object
Set wdApp = CreateObject("Word.Application")
Set wdDoc = wdApp.Documents.Open(ThisWorkbook.Path & _
"Automating Word.docx")
wdApp.Visible = True
Set wdApp = Nothing
Set wdDoc = Nothing
End SubAn object variable (wdApp) is declared and set to reference the application (CreateObject("Word.Application")). Other required variables are then declared (wdDoc), and the application object is used to refer these variables to Word’s object model. Declaring wdApp and wdDoc as objects forces the use of late binding. The program cannot create the required links to the Word object model until it executes the CreateObject function.
Using the New keyword to reference the Word application
In the early-binding example, the keyword New was used to reference the Word application. The New keyword can be used only with early binding; it does not work with late binding. CreateObject or GetObject would also work, but New is best for this example. If an instance of the application is running and you want to use it, use the GetObject function instead.
![]() Caution
Caution
If your code to open Word runs smoothly but you don’t see an instance of Word (and should because you code it to be Visible), open your Task Manager and look for the process Microsoft Word. If it exists, from the Immediate window in Excel’s VB Editor, type the following (which uses early binding):
Word.Application.Visible = True
If multiple instances of Microsoft Word are found, you need to make each instance visible and close the extra instance(s) of Microsoft Word.
Using the CreateObject function to create a new instance of an object
The earlier late-binding example uses the CreateObject function. However, you also can use this function in early binding. You use it to create a new instance of an object—in this case, the Word application. CreateObject has a class parameter, which consists of the name and type of the object to be created (Name.Type). For example, the examples in this chapter have used (Word.Application), in which Word is the Name and Application is the Type.
Using the GetObject function to reference an existing instance of Word
You can use the GetObject function to reference an instance of Word that’s already running. An error is generated if no instance of the application can be found. You can use the existence of the error to include code that creates an instance of the application.
The two parameters for GetObject are optional. The first parameter specifies the full path and file name to open, and the second parameter specifies the application program. The following example leaves off the application and allows the default program, which is Word, to open the document:
Sub UseGetObject()
Dim wdDoc As Object
Set wdDoc = GetObject(ThisWorkbook.Path & "Automating Word.docx")
wdDoc.Application.Visible = True
'more code interacting with the Word document
Set wdDoc = Nothing
End Sub
This example opens a document in an existing instance of Word, if there is one; otherwise, it creates one. It ensures that the Word application’s Visible property is set to True. Note that to make the document visible, you have to refer to the application object (wdDoc.Application.Visible) because wdDoc is referencing a document rather than the application.
![]() Note
Note
Although the Word application’s Visible property is set to True, this code does not make the Word application the active application. In most cases, the Word application icon stays in the taskbar, and Excel remains the active application on the screen.
The following example uses errors to learn whether Word is already open before pasting the selected chart at the end of a document. If Word is not open, it opens Word and creates a new document:
Sub IsWordOpen()
Dim wdApp As Word.Application 'early binding
ActiveChart.ChartArea.Copy
On Error Resume Next
Set wdApp = GetObject(, "Word.Application") 'returns Nothing if Word isn't open
If wdApp Is Nothing Then
    'because Word isn't open, open it
    Set wdApp = GetObject("", "Word.Application")
    With wdApp
        .Documents.Add
        .Visible = True
    End With
End If
On Error GoTo 0

With wdApp.Selection
    .EndKey Unit:=wdStory
    .TypeParagraph
    .PasteSpecial Link:=False, DataType:=wdPasteOLEObject, _
      Placement:=wdInLine, DisplayAsIcon:=False
End With
Set wdApp = Nothing
End Sub
Using On Error Resume Next forces the program to continue even if it runs into an error. In this case, an error occurs when you attempt to link wdApp to an object that does not exist. wdApp will have no value. The next line, If wdApp Is Nothing Then, takes advantage of this and opens an instance of Word, adds an empty document, and makes the application visible. Use On Error Goto 0 to return to normal VBA error-handling behavior.
![]() Tip
Tip
Note the use of empty quotes for the first parameter in GetObject("", "Word. Application"). This is how you use the GetObject function to open a new instance of Word.
Using constant values
The preceding example used constants, such as wdPasteOLEObject and wdInLine, that are specific to Word. When you are programming using early binding, Excel helps by showing these constants in the member list.
With late binding, IntelliSense doesn’t appear. So what can you do? You might write your program using early binding and then change it to late binding after you compile and test the program. The problem with this method is that the program will not compile because Excel doesn’t recognize the Word constants.
The words wdPasteOLEObject and wdInLine are just terms for your convenience as a programmer. Behind each of these text constants is the real value that VBA understands. The solution to this is to retrieve and use these real values with your late-binding program.
Using the Watches window to retrieve the real value of a constant
One way to retrieve the value of a constant is to add a watch for constants. Then you step through your code and check the value of the constant as it appears in the Watches window, as shown in Figure 20-4.
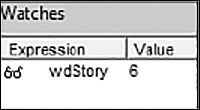
FIGURE 20-4 Use the Watches window to get the real value behind a Word constant.
![]() Note
Note
See “Querying by using a Watches window” in Chapter 2, “This sounds like BASIC, so why doesn’t it look familiar?,” for more information on using the Watches window.
Using the Object Browser to retrieve the real value of a constant
Another way to retrieve the value of a constant is to look up the constant in the Object Browser. However, you need the Word library to be set up as a reference to use this method. Once it is set up, right-click the constant and select Definition. The Object Browser opens to the constant and shows the value in the bottom window (see Figure 20-5).
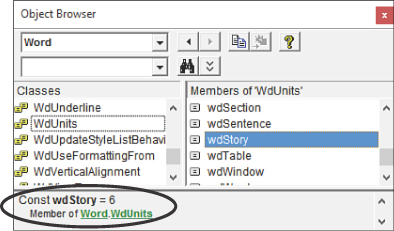
FIGURE 20-5 Use the Object Browser to get the real value of a Word constant.
![]() Tip
Tip
You can set up the Word reference library to be accessed from the Object Browser. However, you do not have to set up your code with early binding. When you do this, the reference is at your fingertips, but your code is still late binding. Turning off the reference library is just a few clicks away.
Replacing the constants in the earlier code example with their real values would look like this:
With wdApp.Selection
  .EndKey Unit:=6
  .TypeParagraph
  .PasteSpecial Link:=False, DataType:=0, Placement:=0, _
    DisplayAsIcon:=False
End With
However, what happens a month from now, when you return to the code and you try to remember what those numbers mean? The solution is up to you. Some programmers add comments to the code, referencing the Word constant. Other programmers create their own variables to hold the real value and use those variables in place of the constants, like this:
Const xwdStory As Long = 6
Const xwdPasteOLEObject As Long = 0
Const xwdInLine As Long = 0

With wdApp.Selection
 .EndKey Unit:=xwdStory
 .TypeParagraph
 .PasteSpecial Link:=False, DataType:=xwdPasteOLEObject, _
   Placement:=xwdInLine, DisplayAsIcon:=False
End With
Understanding Word’s objects
You can use Word’s macro recorder to get a preliminary understanding of the Word object model. However, much as with Excel’s macro recorder, the results will be long-winded. Keep this in mind and use the recorder to lead you toward the objects, properties, and methods in Word.
![]() Caution
Caution
Word’s macro recorder is limited in what it allows you to record. While the mouse can be used to move the cursor or select objects, it doesn’t record those movements. But there are no limits on what it records from keyboard movements.
This is what the Word macro recorder produces when you add a new, blank document by selecting File, New, Blank Document:
Documents.Add Template:="Normal", NewTemplate:=False, DocumentType:=0
You can make this more efficient in Word by using this:
Documents.Add
Template, NewTemplate, and DocumentType are optional properties that the recorder includes but that are not required unless you need to change a default property or ensure that a property is what you require.
To use the same line of code in Excel, a link to the Word object library is required, as you learned earlier. After that link is established, an understanding of Word’s objects is all you need. The next section provides a review of some of Word’s objects—enough to get you off the ground. For a more detailed listing, refer to the object model in Word’s VB Editor.
The Document object
Word’s Document object is equivalent to Excel’s Workbook object. It consists of characters, words, sentences, paragraphs, sections, and headers/footers. It is through the Document object that methods and properties affecting the entire document—such as printing, closing, searching, and reviewing—are accomplished.
Creating a new blank document
To create a blank document in an existing instance of Word, use the Add method, as shown here:
Sub NewDocument()
Dim wdApp As Word.Application

Set wdApp = GetObject(, "Word.Application")
wdApp.Documents.Add
'any other Word code you need here

Set wdApp = Nothing
End Sub
This example opens a new, blank document that uses the default template.
![]() Note
Note
You already learned how to create a new document when Word is closed. Refer to GetObject and CreateObject.
To create a new document that uses a specific template, use this:
wdApp.Documents.Add Template:="Interoffice Memo (Professional design).dotx"
This creates a new document that uses the Interoffice Memo (Professional design) template. Template can be either the name of a template from the default template location or the file path and name.
Opening an existing document
To open an existing document, use the Open method. Several parameters are available, including ReadOnly and AddtoRecentFiles. The following example opens an existing document as ReadOnly and prevents the file from being added to the Recent File List under the File menu:
wdApp.Documents.Open _Filename:="C:Excel VBA 365 by Jelen & Syrstad" & _"Chapter 8 - Arrays.docx", ReadOnly:=True, AddtoRecentFiles:=False
Saving changes to a document
After you’ve made changes to a document, most likely you’ll want to save it. To save a document with its existing name, use this:
wdApp.Documents.Save
If you use the Save command with a new document without a name, nothing happens. To save a document with a new name, you must use the SaveAs2 method:
wdApp.ActiveDocument.SaveAs2 _
 "C:Excel VBA 365 by Jelen & SyrstadMemoTest.docx"
SaveAs2 requires the use of members of the Document object, such as ActiveDocument.
![]() Note
Note
SaveAs still works, but it isn’t an IntelliSense option. SaveAs2 offers a compatibility mode argument. If you don’t need it, you can still use SaveAs.
Closing an open document
Use the Close method to close a specified document or all open documents. By default, a Save dialog box appears for any documents that have unsaved changes. You can use the SaveChanges argument to change this. To close all open documents without saving changes, use this code:
wdApp.Documents.Close SaveChanges:=wdDoNotSaveChanges
To close a specific document, you can close the active document, like this:
wdApp.ActiveDocument.Close
or you can specify a document name, like this:
wdApp.Documents("Chapter 8 - Arrays.docx").ClosePrinting a document
Use the PrintOut method to print part or all of a document. To print a document with the default print settings, use this:
wdApp.ActiveDocument.PrintOut
By default, the print range is the entire document, but you can change this by setting the Range and Pages arguments of the PrintOut method. For example, to print only page 2 of the active document, use this:
wdApp.ActiveDocument.PrintOut Range:=wdPrintRangeOfPages, Pages:="2"
The Selection object
The Selection object represents what is selected in the document, such as a word, a sentence, or the insertion point. It also has a Type property that returns the type that is selected, such as wdSelectionIP, wdSelectionColumn, or wdSelectionShape.
Navigating with HomeKey and EndKey
The HomeKey and EndKey methods are used to change the selection; they correspond to using the Home and End keys, respectively, on the keyboard. They have two parameters: Unit and Extend. Unit is the range of movement to make to either the beginning (Home) or the end (End) of a line (wdLine), document (wdStory), column (wdColumn), or row (wdRow). Extend is the type of movement: wdMove moves the selection, and wdExtend extends the selection from the original insertion point to the new insertion point.
To move the cursor to the beginning of the document, use this code:
wdApp.Selection.HomeKey Unit:=wdStory, Extend:=wdMove
To select the document from the insertion point to the end of the document, use this code:
wdApp.Selection.EndKey Unit:=wdStory, Extend:=wdExtend
Inserting text with TypeText
The TypeText method is used to insert text into a Word document. Settings, such as the ReplaceSelection setting, can affect what happens when text is typed into the document when text is selected. The following example first makes sure that the setting for overwriting selected text is turned on. Then it selects the second paragraph (using the Range object, described in the next section) and overwrites it:
Sub InsertText()
Dim wdApp As Word.Application
Dim wdDoc As Document
Dim wdSln As Selection
Set wdApp = GetObject(, "Word.Application")
Set wdDoc = wdApp.ActiveDocument

wdDoc.Application.Options.ReplaceSelection = True
wdDoc.Paragraphs(2).Range.Select
wdApp.Selection.TypeText "Overwriting the selected paragraph."

Set wdApp = Nothing
Set wdDoc = Nothing
End Sub
The Range object
The Range object uses the following syntax:
Range(StartPosition, EndPosition)
The Range object represents a contiguous area or areas in a document. It has a starting character position and an ending character position. The object can be the insertion point, a range of text, or the entire document, including nonprinting characters such as spaces or paragraph marks.
The Range object is similar to the Selection object, but in some ways it is better. For example, the Range object requires less code to accomplish the same tasks, and it has more capabilities. In addition, it saves time and memory because the Range object does not require Word to move the cursor or highlight objects in the document to manipulate them.
Defining a range
To define a range, enter a starting position and an ending position, as shown in the following code:
Sub RangeText()
Dim wdApp As Word.Application
Dim wdDoc As Document
Dim wdRng As Word.Range
Set wdApp = GetObject(, "Word.Application")
Set wdDoc = wdApp.ActiveDocument
Set wdRng = wdDoc.Range(0, 50)
wdRng.Select

Set wdApp = Nothing
Set wdDoc = Nothing
Set wdRng = Nothing
End Sub
Figure 20-6 shows the results of running this code. The first 50 characters are selected, including nonprinting characters such as paragraph returns.
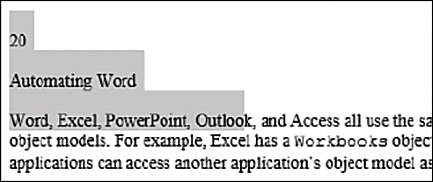
FIGURE 20-6 The Range object selects everything in its path.
![]() Note
Note
In Figure 20-6, the range was selected (wdRng.Select) for easier viewing. It is not required that the range be selected in order to be manipulated. For example, to delete the range, do this:
wdRng.Delete
The first character position in a document is always zero, and the last is equivalent to the number of characters in the document.
The Range object also selects paragraphs. The following example copies the third paragraph in the active document and pastes it into Excel. Depending on how the paste is done, the text can be pasted into a text box (see Figure 20-7) or into a cell:
Sub SelectSentence()
Dim wdApp As Word.Application
Dim wdRng As Word.Range
Set wdApp = GetObject(, "Word.Application")

With wdApp.ActiveDocument
    If .Paragraphs.Count >= 3 Then
         Set wdRng = .Paragraphs(3).Range
         wdRng.Copy
    End If
End With

'This line pastes the copied text into a text box
'because that is the default PasteSpecial method for Word text
Worksheets("Sheet2").PasteSpecial

'This line pastes the copied text into cell A1
Worksheets("Sheet2").Paste Destination:=Worksheets("Sheet2").Range("A1")

Set wdApp = Nothing
Set wdRng = Nothing
End Sub
FIGURE 20-7 Paste Word text into an Excel text box.
Formatting a Range
After a range is selected, you can apply formatting to it (see Figure 20-8). The following program loops through all the paragraphs of the active document and applies bold to the first word of each paragraph:
Sub ChangeFormat()
Dim wdApp As Word.Application
Dim wdRng As Word.Range
Dim count As Integer
Set wdApp = GetObject(, "Word.Application")

With wdApp.ActiveDocument
    For count = 1 To .Paragraphs.Count
        Set wdRng = .Paragraphs(count).Range
        With wdRng
            .Words(1).Font.Bold = True
            .Collapse 'deselects the text
        End With
    Next count
End With

Set wdApp = Nothing
Set wdRng = Nothing
End Sub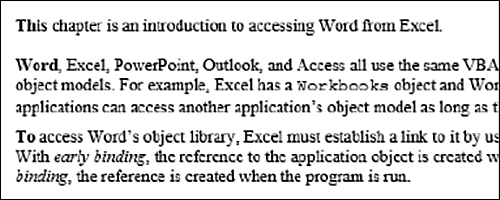
FIGURE 20-8 Format the first word of each paragraph in a document.
A quick way to change the formatting of entire paragraphs is to change the style (see Figures 20-9 and 20-10). The following program finds a paragraph with the Normal style and changes it to H3:
Sub ChangeStyle()
Dim wdApp As Word.Application
Dim wdRng As Word.Range
Dim count As Integer
Set wdApp = GetObject(, "Word.Application")

With wdApp.ActiveDocument
    For Count = 1 To .Paragraphs.Count
        Set wdRng = .Paragraphs(Count).Range
        With wdRng
            If .Style = "Normal" Then
                .Style = "H3"
            End If
        End With
    Next Count
End With

Set wdApp = Nothing
Set wdRng = Nothing
End Sub
FIGURE 20-9 Before: A paragraph with the Normal style needs to be changed to the H3 style.
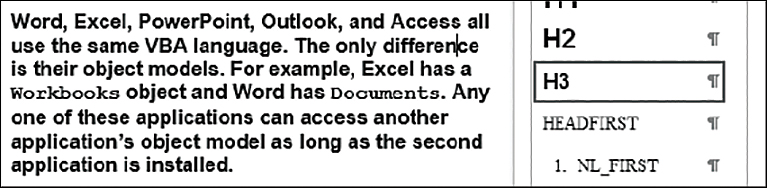
FIGURE 20-10 After: Apply styles with code to change paragraph formatting quickly.
Bookmarks
Bookmarks are members of the Document, Selection, and Range objects. They can make it easier to navigate around Word. Instead of having to choose words, sentences, or paragraphs, use bookmarks to manipulate sections of a document swiftly.
![]() Note
Note
You’re not limited to using only existing bookmarks. Instead, you can create bookmarks using code.
Bookmarks appear as gray I-bars in Word documents. In Word, go to File, Options, Advanced, Show Document Content and select Show Bookmarks to turn on bookmarks.
After you have set up bookmarks in a document, you can use the bookmarks to move quickly to a range to insert text or other items, such as charts. The following code automatically inserts text and a chart after bookmarks that were previously set up in the document. Figure 20-11 shows the results.
Sub FillInMemo()
Dim myArray()
Dim wdBkmk As String
Dim wdApp As Word.Application
Dim wdRng As Word.Range

myArray = Array("To", "CC", "From", "Subject", "Chart")
Set wdApp = GetObject(, "Word.Application")

'insert text
Set wdRng = wdApp.ActiveDocument.Bookmarks(myArray(0)).Range
wdRng.InsertBefore ("Warsky Jadelight")
Set wdRng = wdApp.ActiveDocument.Bookmarks(myArray(1)).Range
wdRng.InsertBefore ("Chraz Veralla")
Set wdRng = wdApp.ActiveDocument.Bookmarks(myArray(2)).Range
wdRng.InsertBefore ("Meredia Mayvin")
Set wdRng = wdApp.ActiveDocument.Bookmarks(myArray(3)).Range
wdRng.InsertBefore ("Fruit & Vegetable Sales")

'insert chart
Set wdRng = wdApp.ActiveDocument.Bookmarks(myArray(4)).Range
Worksheets("Fruit Sales").ChartObjects("Chart 1").Copy
wdRng.PasteAndFormat Type:=wdPasteOLEObject

wdApp.Activate
Set wdApp = Nothing
Set wdRng = Nothing

End Sub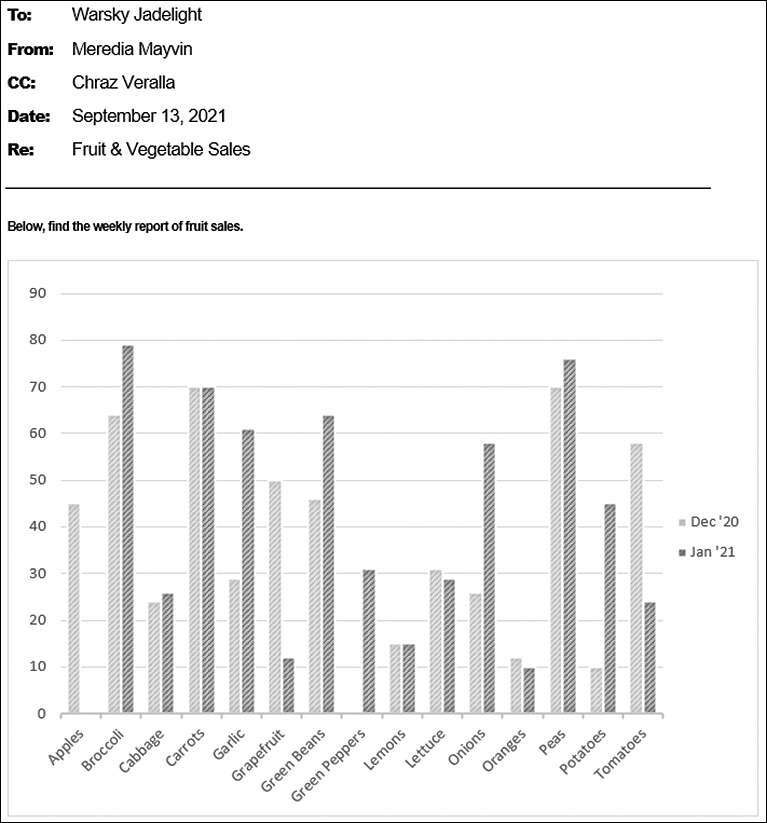
FIGURE 20-11 Use bookmarks to enter text or charts into a Word document.
Controlling form fields in Word
You have seen how to modify a document by inserting charts and text, modifying formatting, and deleting text. However, a document might contain other items, such as controls, that you can modify.
For the following example, a template named New Client.dotx was created, consisting of text and bookmarks. The bookmarks are placed after the Name and Date fields. Content control check boxes were also added. The controls are found in the Controls section of the Developer tab in Word, as shown in Figure 20-12. Unlike Legacy Tools, you can’t rename the control. Instead, go into the control’s properties and set the tag. To find a specific control, you’ll have to loop through all the controls and check the tag value, as shown in the code sample below.
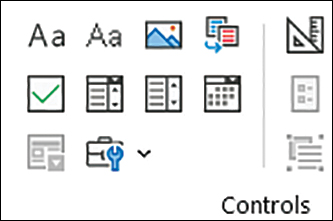
FIGURE 20-12 You can use the Content Control form fields to add check boxes to a document.
The questionnaire was set up in Excel, and it enables a person to enter free text in B1 and B2 but select from data validation in B3 and B5:B8, as shown in Figure 20-13.
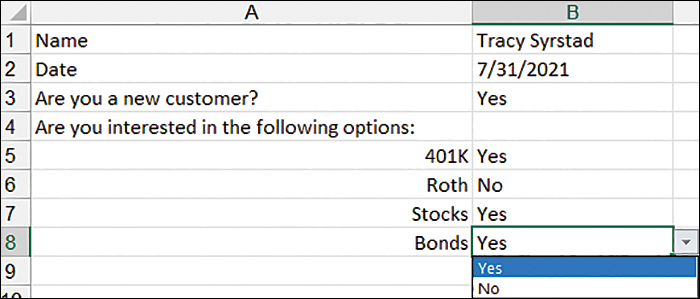
FIGURE 20-13 Create an Excel sheet to collect your data.
The following code goes into a standard module:
Sub FillOutWordForm()
Dim TemplatePath As String
Dim wdApp As Object
Dim wdDoc As Object

'Open the template in a new instance of Word
TemplatePath = ThisWorkbook.Path & "New Client.dotx"
Set wdApp = CreateObject("Word.Application")
Set wdDoc = wdApp.documents.Add(Template:=TemplatePath)

'Place our text values in document
With wdApp.ActiveDocument
   .Bookmarks("Name").Range.InsertBefore Range("B1").Text
   .Bookmarks("Date").Range.InsertBefore Range("B2").Text
End With

'Loop through all the controls to select the correct form object
For Each wdCtrl In wdDoc.ContentControls
   Select Case UCase(wdCtrl.Tag)
      Case Is = "CHKCUSTYES"
         If wks.Range("B3").Value = "Yes" Then wdCtrl.Checked = True
      Case Is = "CHKCUSTNO"
         If wks.Range("B3").Value = "No" Then wdCtrl.Checked = True
      Case Is = "CHK401K"
         If wks.Range("B5").Value = "Yes" Then wdCtrl.Checked = True
      Case Is = "CHKROTH"
         If wks.Range("B6").Value = "Yes" Then wdCtrl.Checked = True
      Case Is = "CHKSTOCKS"
         If wks.Range("B7").Value = "Yes" Then wdCtrl.Checked = True
      Case Is = "CHKBONDS"
         If wks.Range("B8").Value = "Yes" Then wdCtrl.Checked = True
   End Select
Next wdCtrl
wdApp.Visible = True

ExitSub:
   Set wdDoc = Nothing
   Set wdApp = Nothing
End Sub
The name and date go straight into the document. The check boxes use logic to verify whether the person selected Yes or No to confirm whether the corresponding check box should be checked. Figure 20-14 shows a sample document that has been completed.
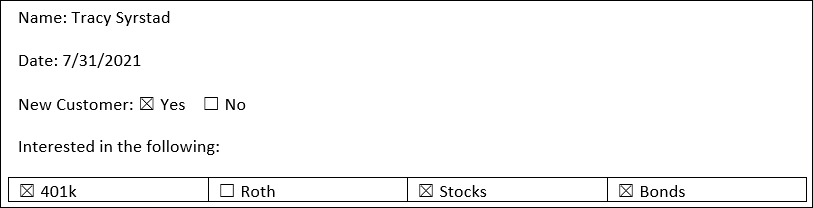
FIGURE 20-14 Excel can control Word’s form fields and help automate filling out documents.
Next steps
The ability to access object libraries of other applications lets you take advantage of the strengths of these applications, such as creating professional-looking reports in Word. Chapter 19, “Text file processing,” showed you how to read from a text file to import data from another system. In this chapter, you learned how to connect to another Office program and access its object module. In Chapter 21, “Using Access as a back end to enhance multiuser access to data,” you’ll connect to an Access database and learn about writing to Access multidimensional database (MDB) files. Compared to text files, Access files are faster; in addition, Access file are indexable and allow multiuser access to data.