Chapter 9
Creating classes and collections
In this chapter, you will:
Learn how to insert a class module
Trap application and embedded chart events
Create and use a custom object
Learn various methods of creating collections
Minimize the use of repeated code by using a collection
Learn about dictionaries
Create custom properties with user-defined types (UDTs)
Excel already has many objects available, but there are times when the job at hand requires a custom object. You can create custom objects that you use in the same way as Excel’s built-in objects. These special objects are created in class modules.
Class modules are used to create custom objects with custom properties and methods. They can also be used to trap application events, embedded chart events, ActiveX control events, and more.
Collections are a variable type that can hold groups of similar items, including custom objects. Each item in a collection has a unique key, and you can use that unique key to retrieve a value, including all the properties of an object, from the collection.
Inserting a class module
From the VB Editor, select Insert, Class Module. A new module, Class1, is added to the VBAProject workbook and is visible in the Project Explorer window (see Figure 9-1). Here are two things to keep in mind concerning class modules:
Each custom object must have its own module. (Event trapping can share a module.)
The class module should be renamed to reflect the custom object.
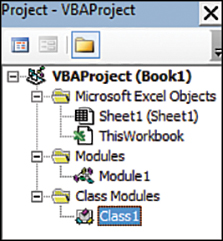
FIGURE 9-1 Custom objects are created in class modules.
Trapping application and embedded chart events
Chapter 7, “Event programming,” explains how certain actions in workbooks, worksheets, and nonembedded charts can be trapped and used to activate code. It briefly reviews how to set up a class module to trap application and chart events. The following text goes into more detail about what was shown in that chapter.
Application events
The Workbook_BeforePrint event is triggered when the workbook in which it resides is printed. If you want to run the same code in every workbook available, you have to copy the code to each workbook. Alternatively, you can use an application event, WorkbookBeforePrint, which is triggered when any workbook is printed.
The application events already exist, but a class module must be set up first so that the events can be seen. To create a class module, follow these steps:
Insert a class module into the project. Select View, Properties Window and rename it something that makes sense to you, such as
cAppEvents.Enter the following into the class module:
Public WithEvents xlApp As Application
The name of the variable,
xlApp, can be any variable name. TheWithEventskeyword exposes the events associated with the Application object.Select
xlAppfrom the class module’s Object drop-down menu and then click the Procedure drop-down menu to its right to view the events that are available for thexlApp’s object type (Application), as shown in Figure 9-2.
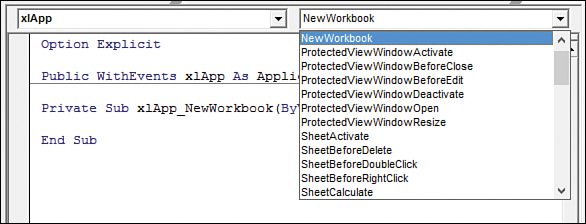
FIGURE 9-2 Events are made available after an object is created.
Any of the events listed can be captured, just as workbook and worksheet events were captured in Chapter 7. The following example uses the NewWorkbook event to set up footer information automatically. This code is placed in the class module, below the xlApp declaration line you just added:
Private Sub xlApp_NewWorkbook(ByVal Wb As Workbook)
Dim wks As Worksheet
With Wb
     For Each wks In .Worksheets
       wks.PageSetup.LeftFooter = "Created by: " & Application.UserName
       wks.PageSetup.RightFooter = Now
    Next wks
End With
End Sub
The procedure placed in a class module does not run automatically, as events in workbook or worksheet modules would. An instance of the class module must be created, and the Application object must be assigned to the xlApp property. After that is complete, the TrapAppEvent procedure needs to run. As long as the procedure is running, the footer is created on each sheet every time a new workbook is added. Place the following in a standard module:
Public clsAppEvent As New cAppEvents

Sub TrapAppEvent()
      Set clsAppEvent.xlApp = Application
End SubIn this example, the public clsAppEvent declaration was placed in a standard module with the TrapAppEvent procedure. To automate the running of the entire event trapping, all the modules could be transferred to the Personal.xlsb and the procedure transferred to a Workbook_Open event. In any case, the Public declaration of clsAppEvent must remain in a standard module so that it can be shared among modules.
Embedded chart events
Preparing to trap embedded chart events is the same as preparing to trap application events. Create a class module, insert the public declaration for a chart type, create a procedure for the desired event, and then add a standard module procedure to initiate the trapping. The same class module used for the application event can be used for the embedded chart event.
Place the following line in the declaration section of the class module:
Public WithEvents xlChart As Chart
The available chart events are now viewable (see Figure 9-3).
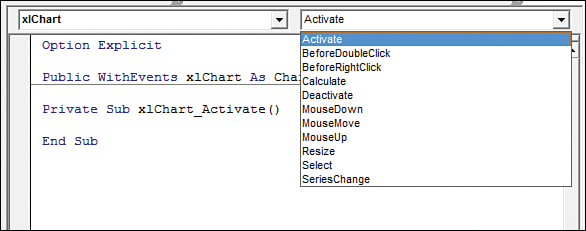
FIGURE 9-3 The chart events are available after the chart type variable has been declared.
Next, you’ll create a program to change the chart scale. You need to set up three events. The primary event, MouseDown, changes the chart scale with a right-click or double-click. Because these actions also have actions associated with them, you need two more events, BeforeRightClick and BeforeDoubleClick, which prevent the usual action from taking place.
The following BeforeDoubleClick event prevents the normal result of a double-click from taking place:
Private Sub xlChart_BeforeDoubleClick(ByVal ElementID As Long, _
     ByVal Arg1 As Long, ByVal Arg2 As Long, Cancel As Boolean)
     Cancel = True
End Sub
The following BeforeRightClick event prevents the normal result of a right-click from taking place:
Private Sub xlChart_BeforeRightClick(Cancel As Boolean)
    Cancel = True
End Sub
Now that the normal actions of the double-click and right-click have been controlled, MouseDown rewrites the actions initiated by a right-click and double-click:
Private Sub xlChart_MouseDown(ByVal Button As Long, _
     ByVal Shift As Long, ByVal x As Long, ByVal y As Long)
      If Button = 1 Then 'left mouse button
        xlChart.Axes(xlValue).MaximumScale = _
           xlChart.Axes(xlValue).MaximumScale - 50
      End If

      If Button = 2 Then 'right mouse button
          xlChart.Axes(xlValue).MaximumScale = _
            xlChart.Axes(xlValue).MaximumScale + 50
      End If
End Sub
After the events are set in the class module, all that is left to do is declare the variable in a standard module, as follows:
Public myChartEvent As New clsEvents
Then create a procedure that captures the events on the embedded chart:
Sub TrapChartEvent()
     Set myChartEvent.xlChart = Worksheets("EmbedChart"). _
        ChartObjects("Chart 2").Chart
End Sub
Creating a custom object
Class modules are useful for trapping events, but they also are valuable because you can use them to create custom objects. When you are creating a custom object, the class module becomes a template of the object’s properties and methods. To help you understand this better, in this section you create an employee object to track employee name, ID, hourly wage rate, and hours worked.
Insert a class module and rename it cEmployee. The cEmployee object has six properties and one method. Properties are variables in the object that you can assign a value to or read a value from. They can be private, in which case they are accessible only within the class module itself, or they can be public, which means they’re available from any module.
At the very top of the class module, place the following private variables. Notice that each line begins with the word Private. These variables will be used only within the class module itself. They receive their values from properties or functions within the class module:
Private m_employeename As String
Private m_employeeid As String
Private m_employeehourlyrate As String
Private m_employeeweeklyhours As String
Private m_normalhours As Double
Private m_overtimehours As Double
Property Let procedures are used to assign values to properties. By default, properties are public, so you don’t actually have to state that:
Property Let EmployeeName(RHS As String)
     m_employeename = RHS
End Property

Property Let EmployeeID(RHS As String)
     m_employeeid = RHS
End Property

Property Let EmployeeHourlyRate(RHS As Double)
     m_employeehourlyrate = RHS
End Property

Property Let EmployeeWeeklyHours(RHS As Double)
     m_employeeweeklyhours = RHS
     m_normalhours = WorksheetFunction.Min(40, RHS)
     m_overtimehours = WorksheetFunction.Max(0, RHS - 40)
End Property
These four object properties are writable. Place them after declaring the private variables. The argument, RHS, is the value being assigned to the property, which is then assigned to one of the private variables. I like to use RHS (Right Hand Side—easy to remember!) as a common argument name for consistency, but you can use what you want.
Property Get procedures are read-only properties of the class module:
Property Get EmployeeName() As String
     EmployeeName = m_employeename
End Property

Property Get EmployeeID() As String
     EmployeeID = m_employeeid
End Property

Property Get EmployeeWeeklyHours() As Double
      EmployeeWeeklyHours = m_employeeweeklyhours
End Property

Property Get EmployeeNormalHours() As Double
      EmployeeNormalHours = m_normalhours
End Property

Property Get EmployeeOverTimeHours() As Double
      EmployeeOverTimeHours = m_overtimehours
End Property
In addition to three of the properties you assign values to, two more are available to get values from: EmployeeNormalHours and EmployeeOverTimeHours. EmployeeHourlyRate is the one property that a value can be written to but not read from. Why? Imagine that you have another routine that reads all the values from a database into the program’s memory. A programmer using your class module doesn’t need to see this raw data. Using the Get property, you can control what data the programmer can access but still have the data available to the program.
Finally, you have the function that becomes an object method:
Public Function EmployeeWeeklyPay() As Double
     EmployeeWeeklyPay = (m_normalhours * m_employeehourlyrate) + _
       (m_overtimehours * m_employeehourlyrate * 1.5)
End Function
Like a normal function, it can have arguments, but in this case, you’ve previously set all the variables it needs by using Let.
You also can use subs in class modules. In this case, a function is used because you want to return a value. But if you want to do an action, like Range.Cut, then you use a sub.
The object is now complete. The next step is to use the object in an actual program.
Using a custom object
When a custom object is properly configured in a class module, it can be referenced from other modules. To access the properties and functions of the object, first declare a variable as the class module and then set a new instance of the object. You can then write the code, referencing the custom object and taking advantage of IntelliSense to access its properties and methods, as shown in Figure 9-4.
The following example uses the custom object created in the previous section, “Creating a custom object.” It sets the values of the properties and then generates a message box, retrieving some of those values and accessing the method you created:
Sub SingleEmployeePayTime()
'declare a variable as the class module/object
Dim clsEmployee As cEmployee
'set a new instance to the object
Set clsEmployee = New cEmployee
With clsEmployee
    .EmployeeName = "Tracy Syrstad"
    .EmployeeID = "1651"
    .EmployeeHourlyRate = 35.15
    .EmployeeWeeklyHours = 45
    MsgBox .EmployeeName & Chr(10) & Chr(9) & _
    "Normal Hours: " & .EmployeeNormalHours & Chr(10) & Chr(9) & _
    "OverTime Hours: " & .EmployeeOverTimeHours & Chr(10) & Chr(9) & _
    "Weekly Pay : $" & .EmployeeWeeklyPay
End With
End Sub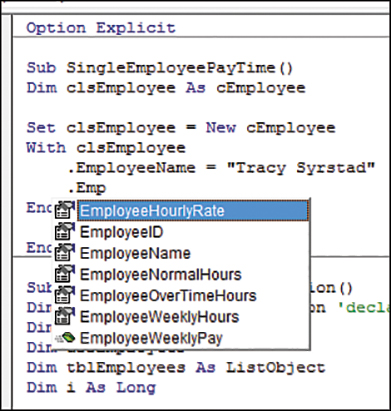
FIGURE 9-4 The properties and method of the custom object are just as easily accessible as they are for standard objects.
Using collections
A collection holds a group of similar items. For example, Worksheet is a member of the Worksheets collection. You can add, remove, count, and refer to each worksheet in a workbook by its item number.
Creating a collection
To use a collection, you first declare a variable as the collection and then set a new instance of the collection. You can then use the Add method to add items to it:
CollectionName.Add Item, Key, Before, After
The Add method has four arguments. Item is whatever information the collection holds. It can be anything from a string to an object such as a worksheet. The second value, which is optional, is Key. It is used to look up a member of the collection. It must be a unique string value. You can use Key to directly reference an item in a collection. If you don’t know Key, then the only way to find an item in a collection is to loop through the collection.
Before and After are optional arguments you can use to position an item in a collection. You can refer to the key or position of the item. The following example creates a collection with two items. The first item is added with a key; the second item is not.
Dim myFirstCollection as Collection
Set MyFirstCollection = New Collection
MyFirstCollection.Add Item1, "Key1" 'with a key
MyFirstCollection.Add Item2 'without a key
Notice that the key is a string. If you want to use numbers for the key, then force the number to be treated as a string, like this:
MyFirstCollection.Add Item3, CStr(1)
Creating a collection in a standard module
By setting up a collection in a standard module, you can access the four default collection methods: Add, Remove, Count, and Item. The following example reads a list of employees from a table into an array. It then loops through the array, supplying each property of the custom object with a value, and places each record in the collection, as shown in Figure 9-5.
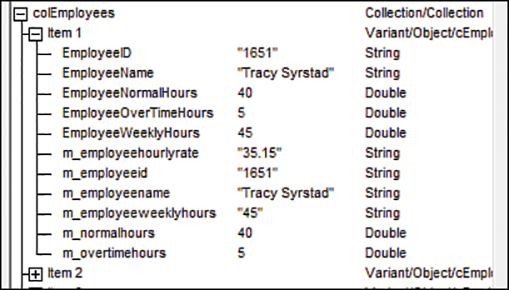
FIGURE 9-5 A collection can hold any type of variable, including a custom object’s properties.
Sub EmployeesPayUsingCollection()
Dim colEmployees As Collection 'declare a variable for the collection
Dim clsEmployee As cEmployee
Dim arrEmployees
Dim tblEmployees As ListObject
Dim i As Long
Dim FullName As String

Set colEmployees = New Collection 'set a new instance of the collection
Set tblEmployees = Worksheets("Employee Info").ListObjects("tblEmployees")

arrEmployees = tblEmployees.DataBodyRange

'loop through each employee, assign the values to the custom object properties
'then place the object into the collection using the employee id as the unique key
For i = 1 To UBound(arrEmployees)
    Set clsEmployee = New cEmployee
    With clsEmployee
       .EmployeeName = arrEmployees(i, 1)
       .EmployeeID = arrEmployees(i, 2)
       .EmployeeHourlyRate = arrEmployees(i, 3)
       .EmployeeWeeklyHours = arrEmployees(i, 4)
       colEmployees.Add clsEmployee, CStr(.EmployeeID)
     End With
Next i

'retrieve information from the custom object in the collection
'specifically, the second member of the collection
Set clsEmployee = colEmployees(2)
MsgBox "Number of Employees: " & colEmployees.Count & Chr(10) & _
 "Employee(2) Name: " & clsEmployee.EmployeeName

'retrieve information using the key
FullName = colEmployees("1651").EmployeeName
MsgBox Left(FullName, Len(FullName) - InStr(1, FullName, " ") - 2) & _
    "'s Weekly Pay: $" & colEmployees("1651").EmployeeWeeklyPay
Set colEmployees = Nothing
Set tblEmployees = Nothing
Set clsEmployee = Nothing
End Sub
The collection colEmployees is declared as a new collection, and the record clsEmployee is assigned as a new object of the class module cEmployee.
After the object’s properties are given values, the record clsEmployee is added to the collection. The second parameter of the Add method applies a unique key to the record, which, in this case, is EmployeeID. This allows a specific record to be accessed quickly, as shown by the second message box (colEmployees("1651").EmployeeWeeklyPay) (see Figure 9-6).
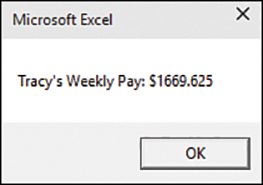
FIGURE 9-6 Individual records in a collection can be easily accessed.
Creating a collection in a class module
When you create a collection in a class module, the innate methods of the collection (Add, Remove, Count, Item) cannot be accessed outside the class module; you need to create your own methods and properties. The advantages of creating a collection in a class module are the following:
The entire code is in one module.
You have more control over what is done with the collection.
You can prevent access to the collection.
Insert a new class module for the collection and rename it cEmployees. Declare a private collection to be used within the class module:
Private m_AllEmployees As New Collection
Add the properties and methods required to make the collection work. The innate methods of the collection are available within the class module, and you can use them to create the custom methods and properties.
Insert an Add method for adding new items to the collection:
Public Sub Add(recEmployee As clsEmployee)
m_AllEmployees.Add recEmployee, CStr(recEmployee.EmployeeID)
End Sub
Insert a Remove method to remove a specific item from the collection:
Public Sub Remove(myItem As Variant)
m_AllEmployees.Remove (myItem)
End Sub
Insert a Count property to return the number of items in the collection:
Public Property Get Count() As Long
Count = m_AllEmployees.Count
End Property
Insert an Items property to return the entire collection:
Public Property Get Items() As Collection
Set Items = m_AllEmployees
End Property
Insert an Item property to return a specific item from the collection:
Public Property Get Item(myItem As Variant) As cEmployee
Set Item = m_AllEmployees (myItem)
End Property
Property Get is used with Count, Item, and Items because these are read-only properties. Item returns a reference to a single member of the collection, whereas Items returns the entire collection so that it can be used in For Each Next loops.
After the collection is configured in the class module, you can write a procedure in a standard module to use it:
Sub EmployeesPayUsingCollection()
'using a collection in a class module
Dim colEmployees As cEmployees
Dim clsEmployee As cEmployee
Dim arrEmployees
Dim tblEmployees As ListObject
Dim i As Long
Dim FullName as String

Set colEmployees = New cEmployees 'set a new instance of the collection
Set tblEmployees = Worksheets("Employee Info").ListObjects("tblEmployees")

arrEmployees = tblEmployees.DataBodyRange

'loop through each employee, assign the values to the custom object properties
'then place the object into the collection using the employee id as the unique
key
For i = 1 To UBound(arrEmployees)
     Set clsEmployee = New cEmployee
     With clsEmployee
         .EmployeeName = arrEmployees(i, 1)
         .EmployeeID = arrEmployees(i, 2)
         .EmployeeHourlyRate = arrEmployees(i, 3)
         .EmployeeWeeklyHours = arrEmployees(i, 4)
         'the key is added by the class module Add method
         colEmployees.Add clsEmployee
    End With
Next i

'retrieve information from the custom object in the collection
'specifically, the second member of the collection
Set clsEmployee = colEmployees.Item(2)
MsgBox "Number of Employees: " & colEmployees.Count & Chr(10) & _
      "Employee(2) Name: " & clsEmployee.EmployeeName

'retrieve information using the key
FullName = colEmployees("1651").EmployeeName
MsgBox Left(FullName, Len(FullName) - InStr(1, FullName, " ") - 2) & _
    "'s Weekly Pay: $" & colEmployees("1651").EmployeeWeeklyPay

Set colEmployees = Nothing
Set tblEmployees = Nothing
Set clsEmployee = Nothing
End Sub
This program is not too different from the one used with the standard collection, but there are a few key differences:
Instead of declaring
colEmployeesasCollection, you declare it as typecEmployees, the new class module collection.The array and collection are filled the same way, but the way the records in the collection are referenced has changed. When a member of the collection, such as employee record 2, is referenced, the
Itemproperty must be used.
Using dictionaries
The ability to use a key to look up values in a collection is a major plus. I often parallel collections and arrays to help find information in an array. For example, I use the key in the collection to look up a value, which is the location of a record in the array.
But a major downside to collections is that after you add an item to a collection, you can’t change it. So, if you need the advantages of a collection but also need to change the value, you should use a dictionary. A dictionary does everything a collection does and more, but it needs a little more setup because it’s part of the Microsoft Scripting Runtime Library.
Some of the other differences between collections and dictionaries include the following:
A dictionary requires a key.
A dictionary key can be any variable type except for an array.
A dictionary key can be changed.
You have to use the key to retrieve a value. You can’t use the item’s position.
You can change a value.
You can check for the existence of a key using a simple command.
In the following example, which declares the dictionary using late binding, data is placed into an array and processed, using the product name as the key. The summed quantities are then placed on the sheet, with the dictionary keys as labels, as shown in Figure 9-7.
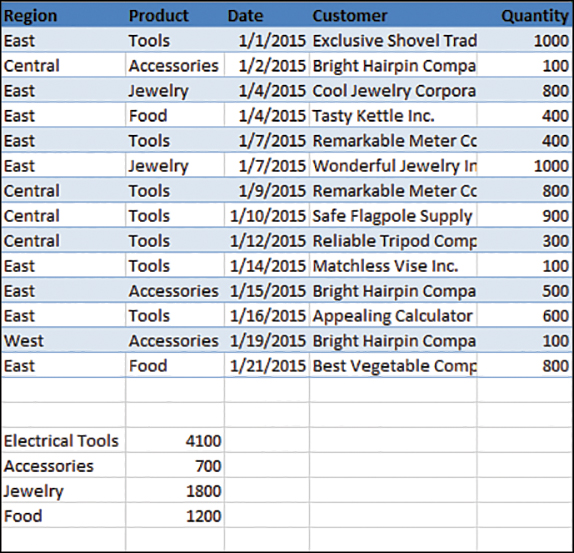
FIGURE 9-7 You can use a dictionary to hold values that could change multiple times as the code runs.
Sub UsingADictionary()
Dim dictData As Object
Dim bItemExists As Boolean
Dim tblSales As ListObject
Dim arrData, arrReport, arrHeaders
Dim i As Long
Dim rng As Range

'create the dictionary object
Set dictData = CreateObject("Scripting.Dictionary")
Set tblSales = Worksheets("Table").ListObjects("tblSales")

'put the data into an array for faster processing
arrData = tblSales.DataBodyRange

'loop through the array
For i = 1 To UBound(arrData)
     'if key exists, add to it, else create and add to it
     If dictData.Exists(arrData(i, 2)) Then
        dictData.Item(arrData(i, 2)) = dictData.Item(arrData(i, 2)) + _
          arrData(i, 5)
      Else
         dictData.Add arrData(i, 2), arrData(i, 5)
      End If
Next i

'rename a key, just for the heck of it
'the only way to rename a key is to know the name of it
dictData.Key("Tools") = "Electrical Tools"

'the location 2 rows beneath the table
Set rng = tblSales.Range.Offset(tblSales.Range.Rows.Count + 2).Resize(1, 1)

'put the dictionary keys and values each into an array
'then dump them on the sheet
arrHeaders = dictData.Keys
rng.Resize(dictData.Count, 1).Value = Application.Transpose(arrHeaders)
arrReport = dictData.Items
rng.Offset(, 1).Resize(dictData.Count, 1).Value = Application.Transpose(arrReport)
Set dictData = Nothing
Set tblSales = Nothing
Set rng = Nothing
End Sub
The Exists method allows you to check for the existence of a key. If the key exists, True is returned; otherwise, False is returned. You can rename a key simply by assigning a new name to it (dictData.Key("Tools") = "Electrical Tools"). Dictionaries also have two methods, Keys and Items, that allow you to dump those values into an array. Collections do not include those methods.
Using user-defined types to create custom properties
User-defined types (UDTs) provide some of the power of a custom object, but without the need for a class module. A class module allows for the creation of custom properties and methods, whereas a UDT allows only custom properties. However, sometimes that is all you need.
A UDT is declared with a Type...End Type statement. It can be public or private. A name that is treated like an object is given to the UDT. Within Type, individual variables are declared that become the properties of the UDT.
Within a procedure, a variable of the custom type is defined. When that variable is used, the properties are available, just as they are in a custom object (see Figure 9-10).
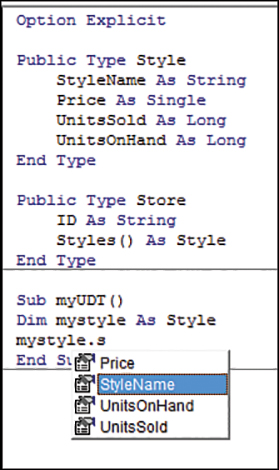
FIGURE 9-10 The properties of a UDT are available as they are in a custom object.
The following example uses two UDTs to summarize a report of product styles in various stores. The first UDT consists of properties for each product style:
Public Type Style
     StyleName As String
     Price As Single
     UnitsSold As Long
     UnitsOnHand As Long
End Type
The second UDT consists of the store name and an array whose type is the first UDT:
Public Type Store
    ID As String
    Styles() As Style
End Type
After the UDTs are established, the main program is written. Only a variable of the second UDT type, Store, is needed because that type contains the first type, Style (see Figure 9-11). However, all the properties of the UDTs are easily available. In addition, with the use of the UDT, the various variables are easy to remember—they are only a dot (.) away. Here is the main program:
Sub UDTMain()
Dim ThisStore As Long, ThisStyle As Long
Dim CurrRow As Long, i As Long
Dim TotalDollarsSold As Double, TotalDollarsOnHand As Double
Dim TotalUnitsSold As Long, TotalUnitsOnHand As Long
Dim StoreID As String
Dim tblStores As ListObject
Dim arrStores 'to hold the data from the table
ReDim Stores(0 To 0) As Store 'The UDT is declared as the outer array

Set tblStores = Worksheets("Sales Data").ListObjects("tblStores")
'ensure data is sorted by name
With tblStores
     .Sort.SortFields.Add .ListColumns(1).DataBodyRange, _
        xlSortOnValues, xlAscending
     .Sort.Apply
     .Sort.SortFields.Clear
End With
'put the data into an array so it's faster to process
arrStores = tblStores.DataBodyRange

'The following For loop fills both arrays.
'The outer array is filled with the
'store name and an inner array consisting of product details.
'To accomplish this, the store name is tracked, and when it changes,
'the outer array is expanded.
'The inner array for each outer array expands with each new product
For i = LBound(arrStores) To UBound(arrStores)
    StoreID = arrStores(i, 1)
    'Checks whether this is the first entry in the outer array
    If LBound(Stores) = 0 Then
        ThisStore = 1
        ReDim Stores(1 To 1) As Store
        Stores(1).ID = StoreID
        ReDim Stores(1).Styles(0 To 0) As Style
    Else
        'if it's not the first entry, see if the store has already been added
        For ThisStore = LBound(Stores) To UBound(Stores)
            'the store has already been added; no need to add again
            If Stores(ThisStore).ID = StoreID Then Exit For
        Next ThisStore
        'the store hasn't been added, so add it now
        If ThisStore > UBound(Stores) Then
            ReDim Preserve Stores(LBound(Stores) To _
            UBound(Stores) + 1) As Store
            Stores(ThisStore).ID = StoreID
            ReDim Stores(ThisStore).Styles(0 To 0) As Style
        End If
    End If
    'now add the store details
    With Stores(ThisStore)
        'check if the style already exists in the inner array
        If LBound(.Styles) = 0 Then
            ReDim .Styles(1 To 1) As Style
        Else
            ReDim Preserve .Styles(LBound(.Styles) To _
                UBound(.Styles) + 1) As Style
        End If
        'add the rest of the details for the Style
        With .Styles(UBound(.Styles))
            .StyleName = arrStores(i, 2)
            .Price = arrStores(i, 3)
            .UnitsSold = arrStores(i, 4)
            .UnitsOnHand = arrStores(i, 5)
        End With
    End With
Next i

'Create a report on a new sheet
Sheets.Add
Range("A1").Resize(, 5).Value = Array("Store ID", "Units Sold", _
       "Dollars Sold", "Units On Hand", "Dollars On Hand")
CurrRow = 2

'loop through the outer array
For ThisStore = LBound(Stores) To UBound(Stores)
   With Stores(ThisStore)
      TotalDollarsSold = 0
      TotalUnitsSold = 0
      TotalDollarsOnHand = 0
      TotalUnitsOnHand = 0
      'Go through the inner array of product styles within the array
      'of stores to summarize information
      For ThisStyle = LBound(.Styles) To UBound(.Styles)
        With .Styles(ThisStyle)
            TotalDollarsSold = TotalDollarsSold + .UnitsSold *.Price
            TotalUnitsSold = TotalUnitsSold + .UnitsSold
            TotalDollarsOnHand = TotalDollarsOnHand + .UnitsOnHand * _
              .Price
               TotalUnitsOnHand = TotalUnitsOnHand + .UnitsOnHand
         End With
      Next ThisStyle
      Range("A" & CurrRow).Resize(, 5).Value = _
         Array(.ID, TotalUnitsSold, TotalDollarsSold, _
         TotalUnitsOnHand, TotalDollarsOnHand)
   End With
   CurrRow = CurrRow + 1
Next ThisStore
Set tblStores = Nothing
End Sub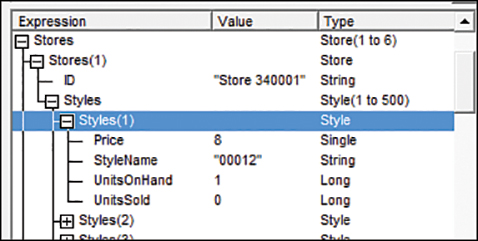
FIGURE 9-11 The Stores variable is of type Store, which includes the Styles variable array. This allows you to organize multiple pieces of data in a couple variables.
Next steps
Class modules are needed to capture application-level and embedded chart events. They can also be used to organize data, making the data easier to work with, especially when stored in a collection. Chapter 10 introduces the tools you can use to interact with users. You’ll find out how to prompt people for information to use in your code, warn them of illegal actions, and provide them with an interface to work with other than the spreadsheet.
