Chapter 6
Azure Data Share
Overview
Azure Data Share helps companies set up secure, automated, and easy-to-manage data-sharing services for global use with customers and partners. You can use this service to share multiple Azure data stores to schedule automatic data updates. With Azure Data Share, you can easily identify who shared the data, track when it was shared, and access detailed update and audit logs, making the service highly reliable.
Azure Data Share could be used in virtually any organization to securely share data for collaboration purposes, to improve efficiency, and to consolidate data sharing. For example:
A company could share up-to-date point-of-sales data with its suppliers on an hourly or daily basis to improve efficiency in the supply chain and to facilitate the planning of resources on the supplier end.
A government institution could share raw population-related data sourced from various agencies with a third party for research or data analytics. Analyzed data could then be shared with other parties or government institutions for better planning, modeling, and forecasting.
Key features
Key features of this service are as follows:
Ease of sharing, monitoring, and management Azure Data Share is extremely easy to set up, monitor, and manage. You can get the service online and ready to use in minutes, making it a great solution to address urgent and long-term sharing scenarios.
Secure data sharing Azure Data Share stores and shares all data securely. Stored data is encrypted at rest, data in transit is secured using TLS 1.2, and metadata is stored in encrypted storage.
Authentication using managed identities Azure managed identities manage access to source data. Managed identities ensure that no credentials are exchanged in the process, making it less susceptible to credential attacks.
Multiple sharing options Azure Data Share supports multiple sharing options, such as snapshot-based or in-place sharing. So, you can share or receive data based on your compliance or data-sharing requirements.
Supports both sending and receiving of data Azure Data Share supports sending and receiving data using various sharing options. This supports two-way data-sharing requirements—for example, in scenarios where you send raw data to a partner, who processes the data and sends it back to you.
Terms of use With Azure Data Share, you can specify your terms of usage and ensure that the receiving party accepts them before they receive data.
Scheduled snapshots With Azure Data Share, you can specify the frequency of snapshots that help update and share new data automatically.
Support for multiple Azure storage services Azure Data Share supports Azure data stores such as Azure Blob Storage, Azure Data Lake Storage (ADLS) Gen 1 and 2, Azure SQL Database, Azure Synapse Analytics, and Azure Data Explorer.
Azure subscription required Azure Data Store requires both parties—the sharer of the data and the consumer of the data—to have an Azure subscription. This ensures the security of the end-to-end data-sharing process.
Compatibility with the Azure portal and REST APIs All these capabilities are supported using the Azure portal or REST APIs.
Key concepts
Now that you have a basic overview of Azure Data Store and its key features, let’s discuss the key concepts underlying this service.
Data types
There are various types of data. Broadly speaking, there is raw data, which requires processing or analytics, and processed data, which is ready for consumption.
Data provider
At a minimum, data sharing involves two parties: the data provider and the data consumer. The data provider is the entity that shares the data. The data provider decides what data will be shared, with whom, and the sharing model used (discussed in a moment).
Data consumer
The data consumer is the party that receives data from the data provider. Based on the type of data received, the data consumer can either consume the data as is, or process and analyze it in some way before consuming or sharing it.
Sharing models
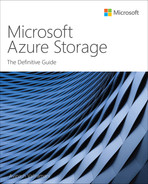
Azure Data Share supports two types of sharing models (see Figure 6-1):
In-place sharing With this model, the data provider shares data directly from the location where it is stored rather than sending a copy of the data to the data consumer. So, the data, and any changes made to that data, are available to the data consumer in real-time. This helps in scenarios in which a partner organization must process or analyze the source data in real time.
Snapshot-based sharing With this model, a snapshot of data captured at a specific moment is copied from the data provider’s Azure subscription to the data consumer’s Azure subscription. The data—which can arrive in CSV or Parquet form—is stored in the location of the data consumer’s choice: Azure Blob Storage, ADLS Gen 1 and ADLS Gen 2, Azure SQL Database, or Azure Synapse Analytics. In this scenario, the data provider can supply the data consumer with incremental updates on an hourly or daily basis, in an automated or manual manner. If this process is performed manually, then the data consumer must set up their Azure subscription to receive the incremental data.
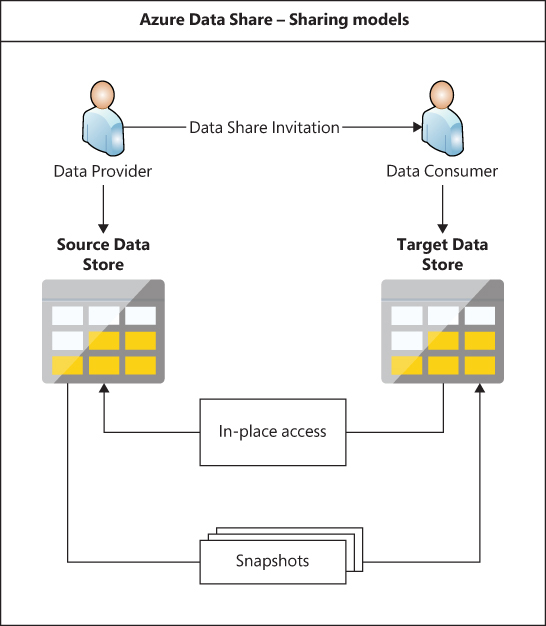
FIGURE 6-1 Azure Data Share sharing models.
Data stores
Azure Data Share supports the use of various Azure data stores to share and receive data. The source and destination data stores can be different, making the service extremely flexible to address different scenarios. Table 6-1 shows the various data stores supported by Azure Data Share for both the in-place and snapshot-based sharing models.
TABLE 6-1 List of available data stores
Azure data store | In-place sharing model | Snapshot-based sharing model |
|---|---|---|
Azure Blob Storage |
| Supported |
ADLS Gen 1 and Gen 2 |
| Supported |
Azure SQL Database |
| Supported |
Azure Synapse Analytics |
| Supported |
Azure Data Explorer | Supported |
|
Table 6-2 lists the various supported Azure data stores for receiving data based on the source data store.
TABLE 6-2 List of data stores for receiving data based on the source data store
Azure data store | Azure Blob Storage | ADLS Gen 1 | ADLS Gen 2 | Azure SQL Database | Azure Synapse Analytics (Workspace) | Azure Data Explorer |
|---|---|---|---|---|---|---|
Azure Blob Storage | Supported |
| Supported |
|
|
|
ADLS Gen 1 and Gen 2 | Supported |
| Supported |
|
|
|
Azure SQL Database | Supported |
| Supported | Supported | Supported |
|
Azure Synapse Analytics | Supported |
| Supported | Supported | Supported |
|
Azure Synapse Analytics (workspace) | Supported |
| Supported | Supported | Supported |
|
Azure Data Explorer |
|
|
|
|
| Supported |
Sharing caveats
When deciding whether to use Azure Data Share, you’ll want to consider the following caveats.
Storage services
Azure Data Share supports sharing across specific Azure data stores. The sharing options available for each service are as follows:
ADLS Gen 1 Files, folders, and file systems.
ADLS Gen 2 Files, folders, and file systems.
Azure Blob Storage Blobs, folders, and containers.
Snapshot-based sharing
When you use snapshot-based sharing to share containers, file systems, or folders, keep these points in mind:
The data consumer can choose to use incremental snapshots instead of ingesting a full copy of the shared data for each share operation, copying over only those files that are new or have been updated since the last snapshot.
The snapshot-based sharing model does not cause files deleted in the source location (data provider) to be deleted in the target location (data consumer).
Snapshots that fail or are interrupted for any reason—such as the cancellation of the snapshot operation, Azure back-end issues, or networking issues—will not be resumed. The next snapshot will ignore the failed snapshot and create an incremental snapshot from the last successful snapshot.
SQL-based source
The data provider can use Azure Data Share to share tables and views stored in Azure SQL Database and in a dedicated Azure Synapse Analytics SQL pool.
The data consumer, on the other hand, can accept and store data in tables, CSV files, or Parquet files, using any of the following services:
Tables Azure Synapse Analytics or Azure SQL Database.
CSV file Azure Blob Storage or ADLS Gen 2 storage.
Parquet file Azure Blob Storage or ADLS Gen 2 storage.
Each of these methods introduces some caveats of their own, however:
Tables If data is accepted and stored in a table in Azure Synapse Analytics or Azure SQL Database, any existing tables of the same name will be overwritten completely. In addition, if the snapshot fails at the source or if its transfer to the target location is interrupted, the subsequent snapshot will attempt a full copy of the entire table or view.
CSV or Parquet files If data is accepted and stored in Azure Blob Storage or ADLS Gen 2 storage, full snapshots overwrite all existing contents at the target location.
Azure Data Explorer
Azure Data Explorer supports sharing at a cluster, database, and table level using Azure Data Share. You can set this up using either the Azure portal or the Azure Data Share API. Depending on which option you choose, you can configure different levels of sharing. For example:
Azure portal In the Azure portal, you can set up sharing on two levels:
Cluster This establishes access for all current and future databases in the cluster.
Database This sets up access only for the databases you specify. If you want to share any additional new or existing databases, you must set those up as needed.
Azure Data Share API With the Azure Data Share API, you can set up sharing on the database-table level, only for the database tables you specify. If you want to share, any additional new or existing tables, you must set those up as needed.
Managed identities
You can create and use managed identities to exchange data using Azure Data Share. With managed identities, the data provider can share data without setting up and sharing any credentials with the data consumer. This reduces the risk of credential leaks that can expose sensitive data to third parties. To use managed identities, both the data provider and data consumer must configure their Azure subscriptions to ensure that Azure Data Share’s managed identity has access to read from the data source and write to the data target as needed.
Data provider
The data provider must configure the Azure Data Share data source to use managed identities. If your data source is Azure Blob Storage or ADLS Gen 2, you can do this in one of two ways:
Automatically If the user setting up the data share has owner or write access to the data source, the read permissions for the managed identity are added automatically.
Manually If the user setting up the data share does not have the requisite permissions on the data source, then a user with the appropriate permissions must set up the Storage Blob Data Reader Role for the Azure Data Share resource’s managed identity.
If your data source is Azure SQL Database or Azure Synapse Analytics, then this must be configured manually. This requires the user who sets up the data share to first create a SQL user with at least db_datareader permissions on the SQL database. This SQL username must match the Azure Data Share resource name in the source subscription.
Data consumer
Like the data provider, the data consumer must set up access to the target data storage for the Azure Data Share resource’s managed identity. The difference is, the service must have write access to ensure that the accepted data can be stored in the target destination. This can be achieved in much the same way as the data provider methods, with slight variations:
Azure Blob Storage or ADLS Gen 2 automatic provisioning If the user setting up the data share has owner or write access to the data source, the write permissions for the managed identity are added automatically.
Azure Blob Storage or ADLS Gen 2 manual provisioning If the user setting up the data share does not have the requisite permissions on the data source, then a user with the appropriate permissions must set up the Storage Blob Data Contributor Role for the Azure Data Share resource’s managed identity.
Azure SQL Database or Azure Synapse Analytics manual provisioning The user setting up the data share must first create a SQL user with db_datareader, db_datawriter, and db_ddladmin permissions on the SQL database. The SQL username must match the Azure Data Share resource name in the destination subscription.
Share and receive data with Azure Data Share
In this section, you will learn how to set up an Azure Data Share resource as a data source to share data. You’ll also discover how to set up an Azure Data Share resource to receive data.
In the case of the data provider, before you can set up an Azure Data Share data source, you must know what data you want to share and in what storage account that data is located. This might mean provisioning a new storage account before you begin. (In this example, we use data stored in an Azure Blob Storage account.)
You will also need to know where you plan to create the Azure Data Share for the data consumer to receive and store data shared by the data provider. As with the data provider, this might mean provisioning a new storage account before you begin. (Again, we use an Azure Blob Storage account in this example.)
Set up an Azure Data Share resource to share data walkthrough
The following section walks you through the process of setting up an Azure Data Share resource as a data source.
Using the Azure portal
To set up an Azure Data Share resource using the Azure portal, follow these steps:
Log in to the Azure portal, type data shares in the search box, and select the Data Shares option from the list that appears. (See Figure 6-2.)

FIGURE 6-2 Type data shares in the search box.
On the Azure Data Shares page, click the Create Data Share button. (See Figure 6-3.)

FIGURE 6-3 Create a data share.
In the Basics tab of the Create Data Share wizard (see Figure 6-4), enter the following information and click Next:
Subscription Select the subscription you want to use.
Resource Group Select the resource group you want to use to host the data share. Alternatively, click the Create New link and follow the prompts.
Location Select the Azure region you want to host the data share.
Name Choose a unique name for the data share resource.
In the Tags tab (see Figure 6-5), enter a name and value for any tags you want to associate with the data share, and click Next.

FIGURE 6-4 The Basics tab in the Create Data Share wizard.

FIGURE 6-5 The Tags tab in the Create Data Share wizard.
In the Review + Create tab (see Figure 6-6), review your settings, and click Review + Create to create the data share.
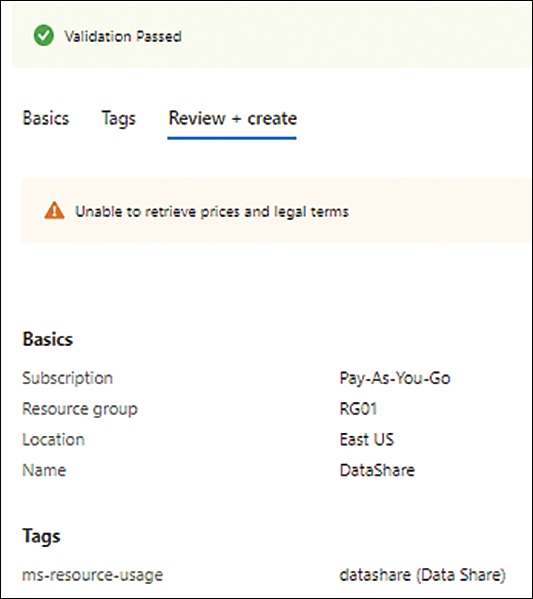
FIGURE 6-6 The Review + Create tab of the Create Data Share wizard.
In the Azure portal, navigate to the data share you just created (see Figure 6-7) and ensure its configuration is correct. Then click Start Sharing Your Data.

FIGURE 6-7 Data share overview.
On the data share’s Sent Shares page, click Create. (See Figure 6-8.)

FIGURE 6-8 Click Create on the data share’s Sent Shares page.
The Sent Shares wizard opens with the Details tab displayed. (See Figure 6-9.) Enter the following information and click Next:
Share Name Enter a unique name for the share.
Share Type Use the drop-down list to select a sharing model.
Description Type a detailed description to convey the purpose of this data share.
Terms of Use Optionally, enter your terms of use. This information will be shown to the data consumer.
FIGURE 6-9 The Details tab of the Data Sharing wizard.
In the Datasets tab, click the Add Datasets button. (See Figure 6-10.)

FIGURE 6-10 The Datasets tab of the Data Sharing wizard.
In the Select Dataset Type settings (see Figure 6-11), select the dataset type for the data you’ll place in this data share based on your needs. For this example, I’ll select Azure Blob Storage.

FIGURE 6-11 Choosing a dataset type.
In the Azure Blob Storage settings (see Figure 6-12), enter the following information and click Next:
Subscriptions Choose the subscription that contains the blob storage account you want to use.
Resource Groups Leave this set to All or choose the specific resource group that contains the blob storage account you want to use.
Storage Accounts Select the blob storage account you want to use from the drop-down list. (You can choose multiple accounts.)

FIGURE 6-12 Identify where the datasets you want to share are located.
In the Azure Blob Storage section of the Datasets tab (see Figure 6-13), select the check box next to the dataset that contains the data you want to share. (You can choose more than one dataset.)
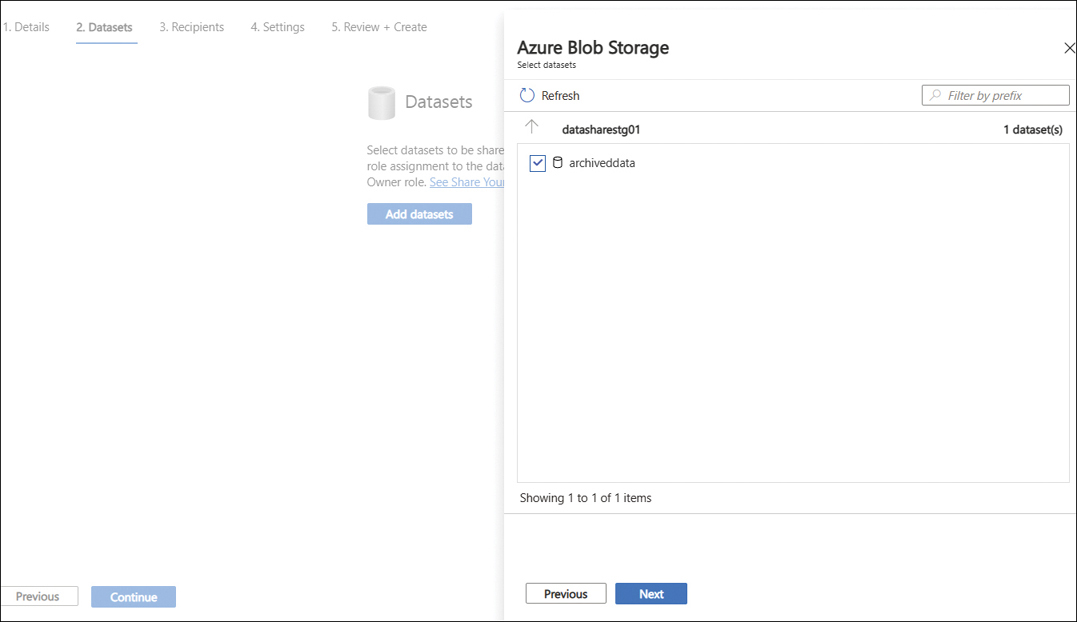
FIGURE 6-13 Choose the dataset you want to share.
Type a unique name for your dataset in the Dataset Name box. (See Figure 6-14.)
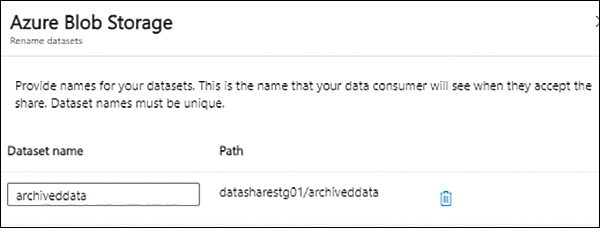
FIGURE 6-14 Rename the dataset.
Confirm that you’ve shared the correct dataset (see Figure 6-15) and click Next.

FIGURE 6-15 Confirm that you’re sharing the correct dataset.
In the Recipients tab (see Figure 6-16), in the Email box, type the email for the recipient(s) of the data in the share.

FIGURE 6-16 Specify who should receive the shared data.
Optionally, if you want to share the data for only a limited time, select the Share Expiration check box and use the calendar and clock settings to indicate the day and time the share should expire. Then click Next.
In the Settings tab (see Figure 6-17), enter the following information and click Next:
Snapshot Schedule Select this check box to enable a snapshot schedule.
Start Time Select the snapshot schedule’s start date and time.
Recurrence Specify how frequently the snapshot should occur.
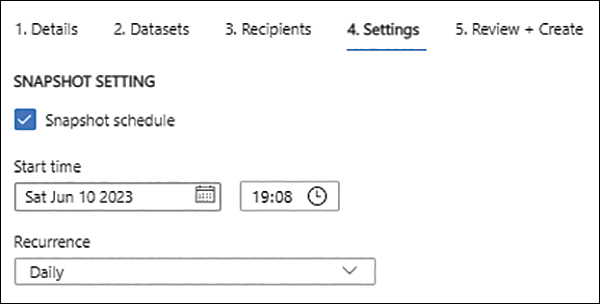
FIGURE 6-17 The Settings tab of the Data Sharing wizard.
In the Review + Create tab (see Figure 6-18), review your settings, and click Review + Create to create the data share.

FIGURE 6-18 The Review + Create tab of the Data Sharing wizard.
Verify the creation of the data share. (See Figure 6-19.)

FIGURE 6-19 The data share is created.
Set up an Azure Data Share resource to receive data walkthrough
The following section walks you through the process of setting up an Azure Data Share resource to receive and store data from a data share to which you have been granted access.
Using the Azure portal
To set up an Azure Data Share resource to receive and store data using the Azure portal, follow these steps:
In the email you received inviting you to access a data share, click the View Invitation button. (See Figure 6-20.)

FIGURE 6-20 Click View Invitation in the email invite.
The Data Share Invitations page in the Azure portal opens, showing the pending invitation. (See Figure 6-21.)

FIGURE 6-21 The Data Share Invitations page.
Click the link for the share (in this example, ArchivedDataShare).
In the Data Share Invitations page (see Figure 6-22), enter the following information:
Terms of Use Select this check box to accept the terms of use.
Subscription Select the subscription you want to use.
Resource Group Choose the resource group you want to use to store data from the data share. Alternatively, click the Create New link and follow the prompts.
Data Share Account Select an existing storage account to receive the incoming data or click Create New to create a new one. For this example, click Create New.

FIGURE 6-22 Accepting a data share invitation.
In the Create Data Share Account dialog box (see Figure 6-23), enter the following information and click Create:
Data Share Account Name Enter a unique name for the data share account you want to create.
Subscription This should be set automatically based on the information you provided in step 3.
Resource Group This should be set automatically based on the information you provided in step 3.
Location Select the Azure region you want to host the data share account.
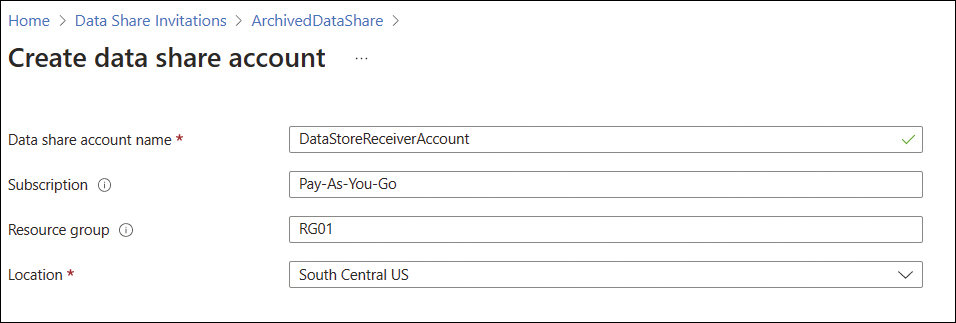
FIGURE 6-23 Create data share account.
Back in the Data Share Invitations page (refer to Figure 6-22), in the Received Share Name box, type a unique name for the data share from which you will receive data.
Click Accept and Configure.
A confirmation screen appears when the request is accepted. (See Figure 6-24.)

FIGURE 6-24 View details about the received share.
Next, you need to map the datasets on the data consumer subscription.
Click the Datasets tab (see Figure 6-25). Then click Map to Target.

FIGURE 6-25 Click Map to Target in the Datasets tab.
On the Map Datasets to Target page (see Figure 6-26), enter the following information and click Map to Target:
Target Data Type Choose the type of storage you plan to use to store the shared data (in this case, Azure Blob Storage).
Subscriptions This should be set automatically based on the information you provided in step 3.
Resource Groups This should be set automatically based on the information you provided in step 3.
Storage Accounts Select the storage account to host the data.
Path Select or enter the path to the location where the data should be stored.

FIGURE 6-26 The Map Datasets to Target page.
When the mapping is complete, click the Datasets tab. You should see the mapped dataset listed there. (See Figure 6-27.)

FIGURE 6-27 Mapped datasets.
To receive a snapshot from the data provider’s data share, click the Trigger Snapshot button and, because this is the first time you’re receiving a snapshot, choose Full Copy. (See Figure 6-28.)

FIGURE 6-28 Trigger a snapshot.
When the data transfer is complete, click the History tab to review the status of the snapshot operation. (See Figure 6-29.)

FIGURE 6-29 Click the History tab to view the status of the snapshot operation.
Navigate to your Azure Blob Storage page to verify that the snapshot has been transferred from the data provider’s data share. (See Figure 6-30.)

FIGURE 6-30 Verify that the snapshot appears in your Azure Blob Storage.
Best practices
Following are some general best practices regarding the Azure Data Share service:
Monitor invitations Monitoring invitations enables you to identify and act on invitations that haven’t been accepted for a period of time. Unaccepted invitations can indicate accidental sharing, unwanted access, or incorrect data consumer details.
Conduct regular audits of shared data It is highly recommended that you conduct regular audits of data shared using the Azure Data Share service. You can use these audits to identify and remove unwanted permissions or unused data shares.
Set up storage accounts with firewalls enabled This enables you to control access from known networks and services. Be sure to allow access to trusted Microsoft services in the storage account settings so the Azure Data Share service will function correctly.
Plan for disaster recovery Depending on the criticality of your data share, you should plan for disaster recovery (DR) to ensure continuity in services. The current strategy to achieve this is to set up a secondary data consumer share in a secondary DR region, and share data with that share before or at the time of a manual DR failover. (Be sure to inform data consumers which share is the primary share and when to use the secondary share.)
Store and analyze logs You can connect Azure Data Share logs with Log Analytics workspace to store logs for a longer time. It is a good practice to inspect these logs on a regular basis for anomalous logins and suspicious user behavior that can indicate compromised data consumer accounts. You can perform queries on log data to analyze the logs in an automated manner.