SCULPT
SCULPTING WITH 123D SCULPT AND MESHMIXER

THE VOICE SCULPTOR
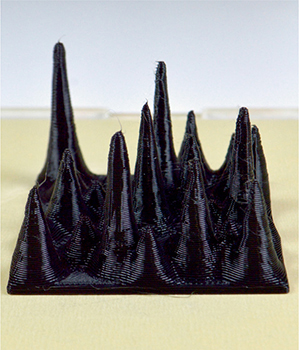
Industrial designers, engineers, and architects do not have a monopoly on 3D printing. The work “Barack Obama Next Industrial Revolution” is proof. Produced by Gilles Azzaro, a digital artist from Casablanca, this interactive sculpture materializes the invisible. Azzaro is fascinated by sound and this is not his first work using voice as the medium. However, with this creation of the US President’s voice-print from the February 2013 “State of the Union Address,” where Obama claims that 3D printing will head the next industrial revolution, the artist has entered the annals. In fact, the 3D printed sculpture was received by Obama himself during the White House Maker Faire in 2014.
The aesthetic of Gilles Azzaro’s work is unique in itself. The artist has deliberately used a very low print resolution on his sculpture to accentuate the strata effect by creating thick plastic layers.
To generate a three-dimensional interpretation of the voice, Gilles Azzaro uses various personal and patented technology. The peaks are created by algorithms related to the voice’s pitch.Several modeling software packages enable you to actually sculpt virtual material. ZBrush, Autodesk Mudbox, Cinema 4D, and Sculptris are the most used among professionals. Now there are also free solutions for PCs and iPads which enable intuitive creation of shapes. Meshmixer can merge, smooth and distort shapes from different sources while 123D Sculpt, 123D Creature (now merged in 123D Sculpt+) use touchpad tablets to take maximum advantage of natural hand movements. The following exercises show you how to use them.

Sculpture: Barack OBAMA:
The Next Industrial
Revolution
By: Gilles Azzaro
Source: www.gillesazzaro.com/
© Gilles Azzaro
Barack OBAMA: The Next
Industrial Revolution
By: Gilles Azzaro
Source: www.gillesazzaro.com/
© Gilles Azzaro
Gilles Azzaro in his lab
By: Gilles Azzaro
Source: www.gillesazzaro.com/
© Gilles Azzaro
SCULPTING WITH 123D SCULPT AND MESHMIXER
SCULPTING A MODEL WITH 123D SCULPT
For this exercise, you’ll need an iPad tablet, equipped with the free application 123D Sculpt. You must also have created a free account on the Autodesk 123D community.
We will try to recreate “manually” the stalagmite effect present in Gille Azzaro’s voice sculptures.
To begin with, open the 123D Sculpt app on your iPad. Create a new project by pressing the “+” symbol. This takes you to the shape templates library. There you will find the following families: Creatures, objects, and geometry. First, there are animal and human body forms. Second, primitive forms and third, vehicles, clothes, and other miscellaneous objects. Select “geometry” and choose the cube by touching it with your finger.

Place your cube in a forward facing view so that you see the top surface with a minimal incline.

Using the material removal tool (in the left column, eighth from the top), represented by a sphere and an arrow pointing outward, pull the surface above the cube. Decrease the tool’s “Size” to 30, then adjust the “Strength” to 100%. You should then have created a protrusion that looks like a stalagmite.

Vary the size and the strength of the tool to get a random look. Repeat several times over the entire surface, but leave some empty areas for the next tutorial.
When you are satisfied with the shape use the other sculpting tools to soften, flatten, or thicken the tips.

Save your model in your sculpture gallery, and send it to the 123D web community using the “Share” button. You will have to give your work a title.

Your model can be in either “Public” or “Private” mode.
From your computer, go to the www.123dapp.com site and log on to your account. Under your “Me” avatar at the top right, click on “Models”. Your latest creations should be displayed. If they are not there, make sure that your tablet is connected to the Internet or wait a few more minutes. Select the shape created on 123D Sculpt, then go to “Edit / Download”. There are several options, including “Order a 3D print”, “Send to 123D Make,” and “Print at home.”

Click instead on “Download 3D models”. A document in ZIP format containing an STL file and a colorful OBJ file should load onto your computer.
If the download options are displayed in gray, wait a few minutes. Your model might not have finished loading online.

SCULPTING A MODEL ON MESHMIXER
Open the STL file you have created in 123D Sculpt in Meshmixer. If you couldn’t make the previous exercice, you can always download the example file named “Sculpt exercise” from:
www.thingiverse.com/thing:442538

When your file opens, you can change the display options by pressing the “Space” key on your keyboard. You can choose your interface’s background color, and the “Mesh” display type.

You can also choose display colors and textures for your object using the “Shaders” tool.

With the “Plane Cut” function in the “Edit” tool, remove the remaining mass from the cube under the stalagmites.

Next click the “Select” tool and then, using the brush, select an area covering one of the peaks. The left window will change to show the new options. Go to “Convert to” and then “Convert to Open Part”. The shape will automatically be saved to your “Meshmix” library.
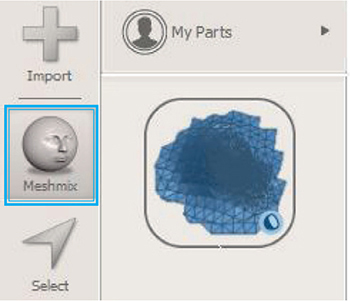
In Meshmix, go to “My parts”, then select the shape you’ve just saved. Slide the shape so that it fills the holes you left in the previous exercise.

The object as shown on the screen, is only 1 mm wide in reality. In the “Analysis” tool, select “Units / Scale” then change size X to 60 mm. The rest will adjust automatically.

Now, in the “Sculpt” tool, use the “Brush” called “Refine” to increase the density of the mesh areas where the polygons are most visible. To help you visualize your creation’s mesh go to the “View” menu, then “Toggle Wireframe” (keyboard shortcut W).

Note that from the “Sculpt” menu, you have access to almost all the modeling tools in 123D Sculpt. The “Drag,” “Spike,” and “Move” tools, for example, make it perfectly possible to create stalagmite forms similar to the ones we made on 123D Sculpt. It is therefore possible to use Meshmixer for sculpture, but without the tactile advantage of a touch screen tablet.

Run “Inspector” on your model to look for any repairs required before exporting your new STL file. Open it using your 3D printer’s software and start printing at a very low resolution (0.3 mm to 0.5 mm) to accentuate the layered effect. Supports and rafts are not needed.

Here is the result of a 3D print on a MakerBot Replicator 2 with 0.4mm layers.