Section 11
Wrap Up and Review
- Lesson 62: Bringing It All Together
- Appendix A: SSIS Component Crib Notes
- Appendix B: Problem and Solution Crib Notes
Chapter 62
Bringing It All Together
In the past 61 lessons, you’ve see most of the common SQL Server Integration Services (SSIS) components, but now it’s time to think a little out of the box, or maybe just make the box bigger, and try a complete solution. In this solution, you create a package that performs a load of a few dozen files into a table and audits the fact that you did this. You also build steps in the package to prevent you from loading the same file twice.
NOTE This lesson assumes that you’ve gone through the rest of the book to learn the components in a more detailed fashion than will be covered in this lesson. Some of the low-level details in this lesson have intentionally been left out for that reason, but you can see those steps in this lesson’s companion video.
To work the solution in this lesson, you need to download a few files from the book’s website at www.wrox.com. The files that accompany this lesson are as follows:
- Lesson62Create.sql—This is the file that creates the schema you’ll be using throughout this lesson.
- Lesson62Data.zip—This contains the data that you’ll be using to load.
- Lesson62DataNextDay.zip—This contains the data to simulate the next day’s data.
- Lesson62.dtsx—This is a completed version of the package for this lesson.
Lesson Requirements
The AdventureWorks, Inc., sales department wants to communicate with voters who signed a certain petition. They also want to ensure that you never load the same file twice, wasting the salesperson’s time. Filenames are unique. Your requirements are as follows:
- Unzip Lesson62Data.zip into a new folder called C:ProjectsSSISPersonalTrainerLesson62InputFiles.
- Load all the files from the C:ProjectsSSISPersonalTrainerLesson62InputFiles directory into the PetitionData table in the AdventureWorks2012 database.
- Log each time you load a file (filename), the number of rows loaded from the file, and when it was loaded (today’s date in your case) into the AdventureWorks2012 database in the [Lesson62VoterLoadAudit] table.
- As you load the data, ensure the ZIP codes are the standard 5-digit length—ZIP +4 must be truncated.
- Archive the file to a new directory called C:ProjectsSSISPersonalTrainerLesson62InputFilesArchive.
- You should be able to rerun the package multiple times and never load the same files twice even if the duplicate file is in the same directory.
- Whether or not you’ve already loaded the file, you want to archive the file to an archive folder after loading it or detecting it as a duplicate file.
NOTE The files have text qualifiers (double quotes) around the columns. You need to handle this in the connection manager.
- After your package successfully runs the first time, unzip Lesson62DataNextDay.zip into the C:ProjectsSSISPersonalTrainerLesson62InputFiles directory to test the duplicate file requirement and rerun your package.
Hints
To accomplish these goals:
- You need a Foreach Loop Container to loop over the files in the input directory, setting the FileName user variable value in each loop.
- Set an expression on your Flat File Connection Manager to set the connection string property to be equal to the variable that holds the filename.
- Load the flat file into the table by using a Data Flow Task and audit the row count with a Row Count Transform.
- Once loaded, audit the fact that the load occurred by using an Execute SQL Task.
- Lastly, place an Execute SQL Task as the first task to ensure that the same file can’t be loaded twice. The query in the Execute SQL Task should look something like the following: SELECT COUNT(*) from Lesson62VoterLoadAudit where FileName = ?. Set the necessary property to capture the single row returned from the query into a variable. Then connect the Execute SQL Task to the Data Flow Task and set the precedence constraint to evaluate the expression to prevent the double-loading of a file. If the audit record exists, then the file has been loaded before.
Step-by-Step
At this point, the step-by-step instructions aren’t going to be quite as detailed as before because it’s assumed that you know some of the simpler steps. If you still need more granular information, watch the video for this lesson on the accompanying DVD for very incremental steps or take a peek at the completed package. If you have any questions regarding specific tasks or transforms, please review the lessons focusing on them earlier in the book.
1. Run Lesson62Create.sql, which creates the necessary tables for this lesson.
2. Unzip Lesson62Data.zip into the C:ProjectsSSISPersonalTrainerLesson62InputFiles directory. Also create a C:Projects/SSISPersonalTrainerLesson62InputFilesArchive directory.
3. Create a new package called Lesson62.dtsx.
4. In the Control Flow tab, create two new variables as follows:
- Name—FileCount
- Data type—int32
- Default Value—0
- Name—RowCount
- Data type—int32
- Default Value—0
Make sure they are scoped to the package name.
5. Create an OLE DB Connection Manager to point to the AdventureWorks2012 database.
6. Create another connection manager, this time a Flat File Connection Manager, which points to any file in the C:ProjectsSSISPersonalTrainerLesson62InputFiles directory. The file is comma delimited and has a text qualifier of a double-quote.
7. Create a new Data Flow Task in the Control Flow window and name it DF - Load Petition Data. In the Data Flow tab, drag over a Flat File Source. Configure the Flat File Source to point to the Flat File Connection Manager you just created.
8. Add a Derived Column Transform and connect the Flat File Source to it. In the transform, add the following code to use only the first five characters for the Zip column:
SUBSTRING([ZIP],1,5)
Set the Derived Column drop-down box to Replace Zip column. This means that the new derived value will replace the value in the existing Zip column.
9. Drag a Row Count Transform over and connect the Derived Column Transform to it. Set the VariableName property to User::RowCount.
10. Drag an OLE DB Destination onto the design pane and connect the Row Count Transform to it. Point the destination to the Lesson62PetitionData table and set the mappings based on column names.
11. Run the package once to make sure the Data Flow works. You should have 4417 rows in the Lesson62PetitionData table. Delete the rows using the following command:
Delete
  FROM [AdventureWorks2012].[dbo].[Lesson62PetitionData]
12. Drag a Foreach Loop Container into the Control Flow tab. Drag the Data Flow Task into the container.
13. Double-click the Foreach Loop Container to open the Foreach Loop Editor. Go to the Collection page and complete it using the following information:
- Enumerator: Foreach File Enumerator
- Folder: C:ProjectsSSISPersonalTrainerLesson62InputFiles
- Files: *.*
In the Variable Mappings page, select <New variable> from the Variable drop-down box and type the new string variable of FileName.
14. Drag an Execute SQL Task into the Foreach Loop Container. Position it under the Data Flow Task and connect the Data Flow Task to it. Name the new task
SQL - Audit Load. Set the Connection property to AdventureWorks2012 and set the SQLStatement to the following statement:
INSERT INTO Lesson62VoterLoadAudit
    (LoadFile, LoadFileDate, NumberRowsLoaded)
    VALUES (?, GETDATE(), ?)
15. In the Parameter Mapping page, add two parameters, as shown in
Figure 62-2.
NOTE Remember that the Parameter Name is actually the parameter number for the OLE DB Connection Manager. Filename is the first “?” in the SQL statement and has a parameter number (Name) of 0. The second “?” in the SQL statement is a placeholder for the RowCount variable and has a parameter number of 1.
- Name—FileName
- Data type—Varchar
- Parameter Name—0
- Name—RowCount
- Data type—Long
- Parameter Name—1
16. Drag an Expression Task into the For Each Loop Container. Place it at the very top of the container. Set the properties as follows:
- Name—Initialize RowCount to 0
- Expression—@[User::RowCount]=0
17. Drag another Execute SQL Task into the Foreach Loop Container, positioned between the Expression Task and the Data Flow Task. Connect the Expression Task to this Execute SQL Task. Connect this Execute SQL Task to the Data Flow Task. Name the task
Has File been Previously Loaded. Inside the task configuration, set the connection to the AdventureWorks2012 Connection Manager and the ResultSet property to Single Row. Finally, set the SQLStatement to the following:
SELECT COUNT(*) From Lesson62VoterLoadAudit
WHERE LoadFile = ?
18. In the Parameter Mapping page, add a new parameter as follows:
- Variable Name—User::FileName
- Data type—Varchar
- Parameter Name—0
In the Result Set page, add a new result set:
- ResultName—0
- Variable Name—User::FileCount
19. Drag a File System Task into the For Each Loop Container in the Control Flow tab. Connect the last Execute SQL Task (SQL - Audit Load) to the new File System Task. Now configure the File System Task. To set the DestinationConnection property, click it and choose <New Connection> to create a connection manager. Set its Usage Type to Existing Folder, and use the folder C:ProjectsSSISPersonalTrainerLesson62InputFilesArchive. Set the properties as follows:
- OverwriteDestination—True
- Operation—Move file
- SourceConnection—Flat File Connection Manager
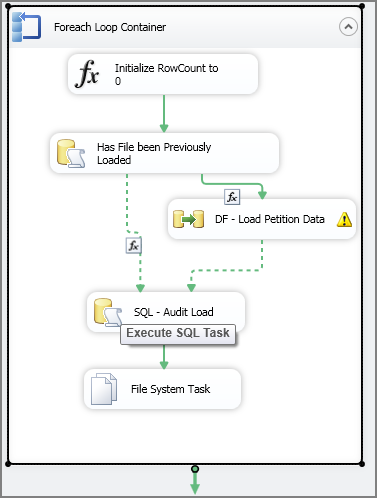
20. Drag a precedence constraint from the Has File been Previously Loaded Task to the SQL - Audit Load Task. Notice that the Has File been Previously Loaded Task now has two precedence constraints from it, as in
Figure 62-3.
Now you will direct the flow between the two precedence constraints. For each file, the Has File been Previously Loaded SQL Task counts the number of rows in the audit table for that file. If no rows are in the audit for this file (@FileCount=0), you should go to DF - Load Petition Data. If the file has already been loaded (@FileCount>0), skip the load and go directly to the SQL - Audit Load Task.
21. Double-click the precedence constraint between the first Execute SQL Task and the Data Flow Task. To make sure the Data Flow Task will execute only if the file hasn’t loaded yet, set the Evaluation Operator to Expression and Constraint and the expression to @[User::FileCount] == 0. Repeat the same step for the other precedence constraint coming out of the first Execute SQL Task, but this time set the Expression property to @[User::FileCount] > 0.
22. Next, make the Flat File Connection Manager filename dynamic by right-clicking the connection manager and choosing Properties. In the Properties window, click the ellipsis button next to the Expression property. Select the ConnectionString property from the Property drop-down box and type @[User::FileName] for the Expression property.
23. Finally, double-click the precedence constraint coming out of the Data Flow Task and change the Multiple Constraints property to a Logical Or. When you click OK, it will make both precedence constraints connecting into the second Execute SQL Task dotted.
24. Run the package and the final results should look like
Figure 62-4. You should see the petition rows in the database in Lesson62PetitionData. You should see an audit row for each file in the Lesson62VoterLoadAudit table. If you check the InputFiles folder (C:ProjectsSSISPersonalTrainerLesson62InputFiles), it should be empty, and all of the files should be copied to the archive subdirectory (C:ProjectsSSISPersonalTrainerLesson62InputFilesArchive).
25. Unzip the Lesson62DataNextDay.zip file into the C:ProjectsSSI2SPersonalTrainerLesson62InputFiles folder and run it again. This time, some of the files will process and others will skip the processing. Each file is logged into the audit, even if it was previously loaded. You can confirm that some files were previously loaded by looking at the audit table. Look at all the rows for 14395con.dat. You should see two rows, the initial load of 4417 rows, and the second attempt, which loaded 0 rows.