
Chapter 40
Creating a Master Package
The master package uses the Execute Package Task to run child packages. This process is covered in Lesson 46. Using a master package offers several advantages.
You must execute child packages in the proper order because some packages can depend on the success, failure, or completion of other packages. To do this, you can use the precedence constraints, invoking functions if you want (precedence constraints are covered in Lesson 9). You can use the master package to encapsulate multiple child packages for transactional consistency. Parameters and variables from the master package can be controlled globally and shared with the child packages. As you move the batch of packages from one environment to another, you can restrict your parameter and variable issues to the master package. (Environments are covered in Lesson 54 and deployment is covered in Lesson 53.) Master packages also enable you to control package parallelism, reducing processing time in the batch window. You can do this by setting the MaxConcurrentExecutables property of the parent package. The default value is –1, which means the number of logical or physical processors +2.
As you can see from the number of cross-references to other lessons you’ve already encountered in this lesson, when you are working on a master package, you will use many of the skills you have learned in those other lessons. However, the concept of a master package is quite simple. Think about a data warehouse example. You will have packages that load each dimension, a package to load each fact, and another package that processes each cube in Analysis Services. Part of designing a master package is an exercise is parallelism and dependency.
In the example here and in the Try It that follows later, we have two cubes, each with a single fact and two dimensions. The following bullets indicate which dimensions and facts are used by each cube:
- Sales Cube
- Product Dim
- Customer Dim
- Sales Fact
- Customer Support Cube
- Employee Dim
- Customer Dim
- Employee Customer Calls Fact
Take a look at Figure 40-1. It contains three dimension loads, two fact loads, and two cube builds in the master package. In this master package, each item is processed, one after the other.

It does implement some required ordering, as described in the following list:
However, this design can fall short in a couple of ways.
- Even though the tasks contained with each child package can run in parallel, only one package will run at a time. There is no parallelism at the package level. This can mean that the entire batch will run unnecessarily long, even when hardware resources like memory, disk throughput, and processor are available.
- The second issue relates to unnecessary dependencies. If the Load Product Dim Task fails, neither cube will be processed. The Customer Support Cube will not be processed, even though it does not use the Product Dim.
However, a smarter design will take care of both issues.
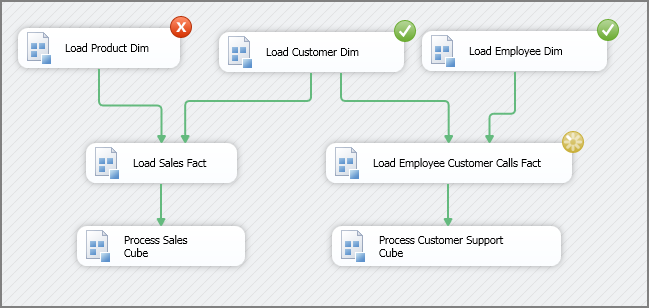
Now take a look at Figure 40-2. It contains the same Execute Package Tasks. When the Product and Customer Dim are loaded successfully, the Product Sales Fact can be loaded. When the Product Sales Fact is loaded successfully, the Process Sales Cube can begin. Customer and Employee Dim must load prior to loading the Customer Calls Fact. Once the Customer Calls Fact loads successfully, the Process Customer Support Cube will begin. In this design, if the Product Dim load fails, the Customer Support Cube path can continue and process successfully. Parallelism is improved also, because all three dimensions can be processed in parallel.

The way you should think about this is to allow as much as possible to complete, even when things are failing. Only put dependencies in the master package when actual data dependencies exist for the objects contained within.
Try It
In this Try It, you create a master package like the one mentioned earlier in this lesson. You replace the Process Cube Tasks with an Execute Package Task that does not require SQL Server Analysis Services. Each one of the packages you call from your master package does nothing but display a message box with the package name. The child packages will not complete until you OK the message boxes they present. This enables you to control when packages complete and offers you the opportunity to closely watch how this works. The purpose of this Try It is to walk you through creating a master package and to give you an easy view of parallelism and package failure results. After you complete this, you will be able to create master packages and control ordering and parallelism of the child packages.
You can download the source packages for this lesson from www.wrox.com.
Lesson Requirements
The only requirement for this lesson is that you download all of the source packages for this lesson, which are available on the book’s website at www.wrox.com.
Hints
- Use only the Execute Package Task.
- Run and observe the package behavior.
- Limit parallelism by setting the MaxConcurrentExecutables property.
- Force a package failure and observe the effect of dependency constraints on the flow.
- As each package runs, it stops and displays a message box with the package name. You must click OK in the message box for the package to continue.
Step-by-Step
- Lesson40LoadProductDim.dtsx
- Lesson40LoadCustomerDim.dtsx
- Lesson40LoadEmployeeDim.dtsx
- Lesson40LoadProductSalesFact.dtsx
- Lesson40LoadEmployeeCustomerCallsFact.dtsx
- Lesson40ProcessSalesCube.dtsx
- Lesson40ProcessCustomerSupportCube.dtsx

- Connect Load Product Dim to Load Sales Fact
- Connect Load Customer Dim to Load Sales Fact
- Connect Load Customer Dim to Load Employee Customer Calls Fact
- Connect Load Employee Dim to Load Employee Customer Calls Fact
- Connect Load Sales Fact to Process Sales Cube
- Connect Load Employee Customer Calls Fact to Process Customer Support Cube


Keeping and using a master package ensures that other packages are run in the correct order. A properly configured master package allows as many tasks as possible to complete, even when some packages fail.