Chapter 33
Making a Package Dynamic with Parameters
SQL 2012 introduced a new parameter paradigm. Parameters enable you to pass in new values for a specific package execution. When your packages are deployed to the new SSIS catalog, an interface is provided to enable you to change the values of parameters prior to running the package. Parameters are very similar to variables, except parameters are easier to change and configure using the new SQL Server Management Studio interface for SSIS.
A parameter, like a variable, is a placeholder that has a name, data type, scope, and value. The value provided in SQL Server Data Tools is called the default or design value. You can replace this value prior to execution. Parameters also have a sensitive property and a required property. When you mark a parameter as sensitive, its value is encrypted in the database and displayed as NULL or *****. When you mark a parameter as required, you must provide the parameter value prior to execution, rather than using the design parameter.
Parameters also have a scope. Parameters can have a package scope or a project scope. A parameter with a project scope can be used in all packages within the project. Package scoped parameters can only be used within the package in which they are defined.
To create a package scoped parameter, choose the Parameters tab in the SSIS designer and create a new parameter by clicking the icon in the top left. Then populate the fields Name, Data Type, Value, Sensitive, Required, and Description. Figure 33-1 shows the completed parameter.


To create a project scoped parameter, open the Solution Explorer window and double-click the Project.params item as in Figure 33-2.
The Project.params window opens, enabling you to create and manage project scoped parameters. See Figure 33-3.
Using the same example as in the previous lesson, you have an Execute SQL Task that is given the duty of deleting rows from the DimEmployee table in the AdventureWorksDW2012 database. The deleted rows should have an EmployeeNationalIDAlternateKey that is equal to a value in a parameter named EmployeeID. Create a package scoped variable name EmployeeID with an integer data type and a value of 2. Write the following query in an Execute SQL Task:
DELETE FROM DimEmployee
      WHERE EmployeeNationalIDAlternateKey = ?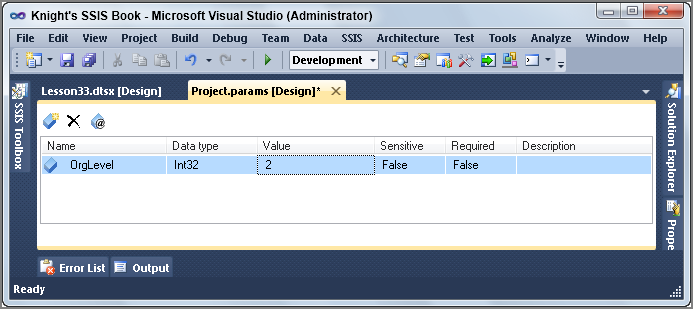
Next, click the Parameters button. On the Parameter Mappings tab, assign the $Package::EmployeeID variable to the value for the question mark placeholder. Select $Package::EmployeeID in the Variable Name field, and enter “0” in the Parameter Name field. The Parameter Name field value will be different for connection types other than OLE DB.
You can use parameters wherever you can use a variable. Why use a parameter instead of a variable? Parameters can be used to store and provide encrypted information for packages, like passwords. Additionally, it is much easier to provide runtime values for parameters. The greatest value of parameters is when you are running a package or using environments for configurations. You learn more about running packages from Management Studio in Lesson 57, and using parameters with environments in Lesson 54.
Try It
In this Try It, you recreate the extract from Lesson 32, except you use a parameter instead of a variable. You then export data from several levels in the organization without opening and changing the package. You do this by changing a project parameter.
The flat file export of employees is based on their level in the organization. After this lesson, you will have an understanding of how to make a package or all packages in a project dynamic using parameters.
This technique will become the foundation you will use for configuration of environments to deploy and move your packages safely from the development environment into the production environment.
You can download the completed Lesson33.dtsx from www.wrox.com.
Lesson Requirements
Create a project parameter named the OrgLevel. The export will contain the employees whose level within the organization is the same value as stored in OrgLevel parameter. Create a flat file named OrganizationLevel.txt that contains all employees with an organization level of 2.
Hints
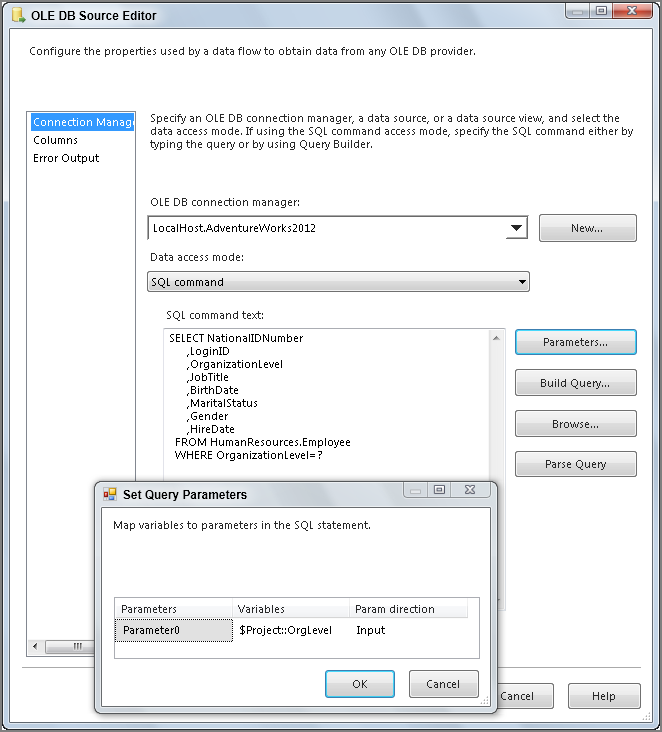
- Create a new project parameter that passes a value for the organization level to the OLE DB Source to return only employees with an organization level of 2.
- Create a flat file that has the following rows:
- NationalIDNumber
- LoginID
- OrganizationLevel
- JobTitle
- BirthDate
- MaritalStatus
- Gender
- HireDate
Step-by-Step

SELECT NationalIDNumber
,LoginID
,OrganizationLevel
,JobTitle
,BirthDate
,MaritalStatus
,Gender
,HireDate
  FROM HumanResources.Employee
  WHERE OrganizationLevel=?