
3. How Joomla! Works
Are you one of those people who likes to take things apart to see exactly how they work? Are you new to web programming and want to understand how it is different from other types of programming? Do you want to know how Joomla! is organized and why? If you answered yes to any of these, this chapter is for you!
On the other hand, if you just want to learn how to write a Joomla override or extension and you don’t need or want to know the inner workings of Joomla, you can just skim or skip this chapter for now and come back to it later, if needed.
In this chapter, we look inside Joomla to understand how it works and why it works that way. We explore the files and folders that make up a Joomla installation and discuss what they do.
Then we look in detail at a Joomla session and understand what is happening behind the scenes when you fill out forms and click the buttons or links.
We discuss places where you can—or need to—use special names for folders or files for your programs in order to have Joomla find them and run them at the right time in the program. We show you how to access frequently needed objects inside your Joomla programs. Finally, we take you on a brief tour of the Joomla database tables.
Tour of Joomla Folders
When you install Joomla, it installs the folders and files shown in Figure 3.1.
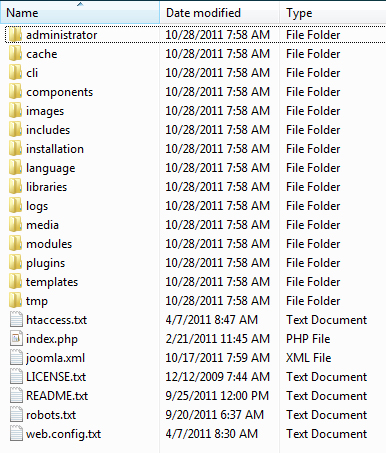
Figure 3.1. Joomla version 2.5 folders and files
After you install Joomla, a file called configuration.php will be created in the root folder. In a production version, the installation folder would normally be deleted, because keeping it around presents a security vulnerability. If you download Joomla using the Github or SVN repository, you will get a folder called tests that contains the automated unit and system test files, a folder called docs that includes information for creating documentation in PDF format, and a folder called build that includes the program for building the Joomla archive files. These are removed when Joomla is packaged for normal installation.
Front End versus Back End
If you have used Joomla, you are familiar with the concept of the front end and back end (sometimes called the administrative back end). We can think of these as completely separate applications that happen to share some common libraries.
If you look at the subfolders of the administrator folder, you will see many of the same folders that you see in the top-level folder. These include cache, components, includes, language, modules, and templates.
The administrator folder also has its own version of index.php. So when you enter the URL http://mywebsite.org/administrator it loads this file (administrator/index.php), which starts the administrator application. When you enter the URL http://mywebsite.org, it loads the index.php file from the top-level folder, which starts the front-end application.
Each of these folders is briefly discussed next. Since the administrator folder is similar in structure to the top level, we will discuss it last.
Cache
The cache folder is very easy to understand. This is just where we store our cached files. In a dynamic website, the system does a lot of work to pull together the information to display a page. For example, if the page is displaying a blog layout, the system has to access the database to get the articles for the blog, lay out the articles on the page, and load the desired modules for the page.
In many real-life websites, the information for a page might stay the same for hours or days. If you have 50 users requesting the same page per hour, and the information is only changing once per day, you would be getting the exact same information from the database about 1,200 times (50 × 24) before the information actually changed.
With caching enabled, we try to reduce the number of times we access the database to get exactly the same information. In our previous example, if we cache the page, we save a copy of the page in the cache folder for a specified period of time—perhaps 15 minutes. When the first user requests the page, it is compiled from the database in the normal manner, and a copy of the entire page is saved in the cache folder.
If a second user requests exactly the same information, the system first checks to see if there is a cached copy of the page that has not yet expired (less than 15 minutes old, in our example). If so, the page is read from the cached copy and we don’t have to access the database or assemble the page. This allows the page to load much faster and also reduces the amount of work the server must do.
On a busy website where the frequency of viewing is greater than the frequency of database changes, caching can improve overall system performance dramatically.
The files in this folder are deleted when you select Site → Maintenance → Clear Cache or Site → Maintenance → Purge Expired Cache. If you run a large production site, you may also run a system-level job to remove unneeded cache files from this folder.
CLI
The cli folder was added as a standard location for storing command-line-interface (CLI) applications. One of the great features of the Joomla platform is the ability to easily create CLI applications that interact with a Joomla website. CLI applications are well suited to running on a schedule—for example, using the Linux cron program. We demonstrate an example of this in Chapter 13.
Components
A component is normally the main thing on a given page and usually corresponds to a menu item. When you select an item from a menu, the page that loads contains the component defined by that menu item.
If we look at the subfolders for components, we see each of the core components for Joomla: com_banners, com_contact, com_content (for articles), com_finder (for Smart Search), com_mailto, com_media, com_newsfeeds, com_search, com_users, com_weblinks, and com_wrappers. As you have probably figured out by now, the component folders all start with the letters com_ followed by the component name. This is one example of strong naming conventions that are used throughout Joomla. We discuss these later in this chapter.
If we look at the options when you are creating a new menu item for the core components, we have the options shown in Figure 3.2.

Figure 3.2. Front-end core menu types
Most of these menu item types match up exactly to one of the folders. These include contacts, articles (which uses the com_content folder), news feeds, search, users, weblinks, and wrapper.
The components com_banners, com_mailto, and com_media do not correspond to menu item types. Banners are components but they get inserted into pages inside modules. When you click on the E-mail icon to e-mail an article to someone, the component com_mailto is called. The com_media component is called when you edit an article in the front end and you press the Image button to load the Media Manager.
These components do not display as the main thing on a page and therefore don’t fit the simple definition of a component. This brings us to the more detailed and technical definition of a component, which is this: A component is an extension that has to take some action other than displaying something. For example, when you click on a banner, it has to write to the database to record the click and then perhaps redirect you to another URL. Similarly, when you click the E-mail icon, it has to offer you a form to fill out and then send the e-mail. When you want to insert an image into an article, you are again taking actions, such as uploading an image to the web server.
So in all these cases, we need a component to handle these actions, even though these components will never be the central content of a page on our site.
Images
The images folder is one place where image files for the site can be stored. For example, in the core distribution, we have subfolders called banners and sampledata. As you would expect, the banners folder stores images for the example banners that are included in the core distribution. The sampledata folder stores images that are used in the sample data that you can install (optionally) when you install Joomla.
![]() Important Note about Index.html Files
Important Note about Index.html Files
You will notice that every subfolder in the Joomla distribution (except administrator and installation, which contain index.php files) contains a file called index.html. If you open this file in an editor, you will see the following content:
<!DOCTYPE html><title></title>
This is an HTML file with an <html> element and an empty <title> element. This file has no content and when displayed in a browser will show an empty page.
Why do we have these files everywhere? The answer is for security. If a user tries to browse to a folder, the web server looks for a file called index.php or index.html to load. If it can’t find either of these files, the browser instead shows a list of files and subfolders in that folder.
You can see an example of this by temporarily renaming the images/index.html to images/index1.html. Then if you browse to the URL “<your Joomla! root>/images”, you will see something similar to Figure 3.3.
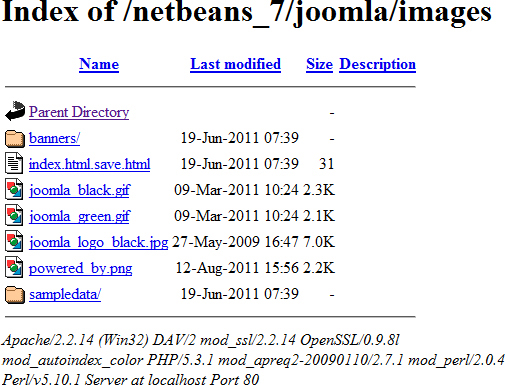
Figure 3.3. Browser window of images folder without index.html file
If you rename the file back to index.html, you will just see a blank page with this same URL.
Allowing an unauthorized user to see information about the files and folders on your server is considered a security risk. Someone who wants to hack your website can use this information to try to get more information and to probe the site for possible vulnerabilities. That is why every subfolder in the system should contain a blank index.html file.
The installation and administrator folders are the only ones that do not contain an index.html file. This is because they contain an index.php file that serves as the entry point for the installation process and the administrative back end. In this case, the index.html would prevent the index.php file from loading.
Includes
We mentioned earlier that the administrator folder, which controls the back end of the site, can be thought of as an entirely separate application from the front end of the site. For this reason, when we start a front-end or back-end session, we need to load different classes and constants into memory.
The includes folder contains the programs that are specific to either the front- or back-end application. So the top-level includes folder loads the files that we need to get a front-end session started, whereas the administrator/includes folder has files we need to load to get a back-end session started.
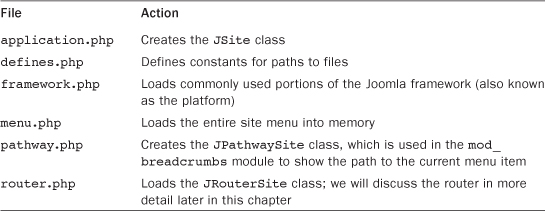
The includes folder contains the files shown in Table 3.1.
Table 3.1. Files in Root includes Folder
Installation
The installation folder is an entirely separate miniapplication that does one thing: the initial Joomla installation. When you initially start either a front- or back-end session, the system checks for the presence of a file called configuration.php in the root folder. If it doesn’t find this file, it assumes you need to run the installation and it loads the installation miniapplication.
Since this is a self-contained miniapplication, it has its own includes folder as well as other folders needed to run the installation process. One of the great things about Joomla is how easy it is to install. Everything is done for you, including creating the database. This cool stuff is done in the installation miniapplication.
Language
Joomla is designed to be run natively in any of 68 (and counting) languages. As discussed in Chapter 2, virtually all text in Joomla is translated before it is shown in the browser. This is done by way of language packs, which install a set of language files. The languages subfolder is where these language packs get installed.
With a standard English installation, we get two subfolders: en-GB and overrides. The first folder holds all the language files needed to translate the front end of the site into English. (The GB stands for Great Britain. The official English for Joomla is British English.)
The second folder is related to a new feature in version 1.6: language overrides. Language overrides allow you to change the value of any text string without having to replace the entire language file. We will show an example of this in Chapter 4.
Note that there are often two language files per extension, one ending in .sys.ini and one ending in just .ini. The .sys.ini files are loaded to get the name and description of the extension—for example, for showing in the Module Manager. We load the .ini file when we are actually working with the extension to show all the text used by this extension.
Libraries
A software library is a set of programs that are designed to be reused in different contexts. A library normally performs a specific task or set of related tasks. These software libraries are stored in subfolders of the libraries folder.
In version 1.5, Joomla used 14 libraries. Of these, 13 were external libraries from third-party developers and one was the Joomla library.
In version 2.5, this has been reduced to four. The three external libraries are phpmailer, used for sending e-mail; phputf8, used for some operations on UTF-8 text; and simplepie, used for RSS feeds.
The library folder we are most interested in is the joomla folder. This folder contains the Joomla platform classes. We will discuss this in detail later in this chapter. Starting with version 2.5, we have a folder called cms. This folder contains library files used for the Joomla content management system (CMS) but not applicable to the platform.
Logs
This folder is used to store log files generated by Joomla. Events are logged based on certain conditions. For example, any error condition will be logged in a file called error.log. In addition, turning on debug mode will cause some events to be logged.
Media
The media folder holds CSS, Javascript, and image files for some of the components, modules, and editors. The system subfolder contains, among other things, the MooTools JavaScript framework, which is used in Joomla to supply certain JavaScript functionality. We discuss JavaScript and MooTools in more detail in Chapter 12.
Modules
The modules folder contains a subfolder for each front-end module available. Figure 3.4 shows the subfolders on the left and a list of the Module Types you see when you create a new module in the Module Manager on the right.
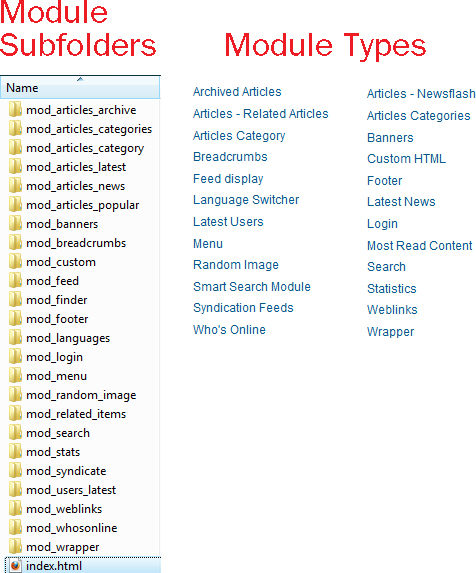
Figure 3.4. Module subfolders and module types
Each module type has its own subfolder. Table 3.2 shows which module names correspond with which subfolder names.
Table 3.2. Module Subfolders and Corresponding Types
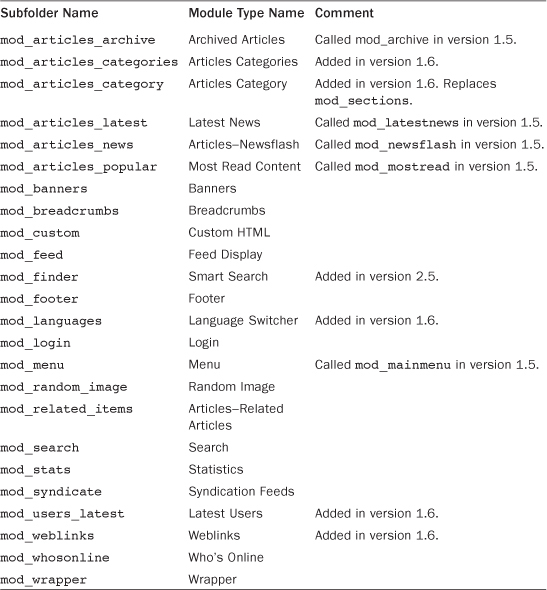
When you install module extensions, they get added as subfolders to the modules folder and become completely integrated into your Joomla application. We will discuss modules in detail in Chapter 6.
Plugins
The plugins folder holds the plugins extensions. In version 2.5, there are ten types of plugins, each with its own subfolder, as indicated in Table 3.3. Each plugin type deals with a specific type of activity on the site and responds to events that are triggered during these activities.
Table 3.3. Table of Plugin Types
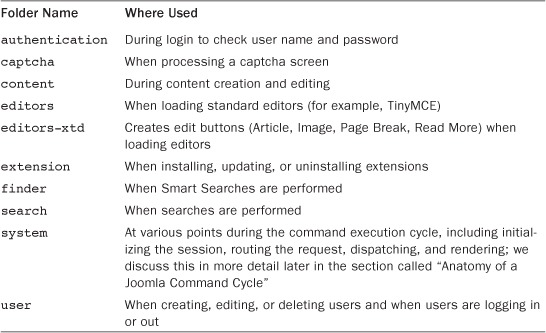
We will discuss plugins in more detail in Chapter 5.
Templates
In Joomla, the content of each web page is separated as much as possible from the way the page is presented on the screen. The presentation is controlled by extensions called templates.
The templates folder contains a subfolder for each front-end template that is installed on the system. In the default installation, this includes atomic, beez_20, and beez5. This folder also contains a system folder. The system template has some layout information that is shared by all the other templates and also is used by the system as a fallback in case a CSS class or file can’t be found in the named template.
We discuss the templates folders in more detail in Chapter 4.
Tmp
The tmp folder, as you might guess, is a place for the system to store files on a temporary basis. One of the most frequent uses of this folder is when extensions are installed. When a new extension is installed, a copy of the extension’s archive file is copied into the tmp folder and then is unpacked into the correct Joomla folders.
Administrator
As discussed earlier, Joomla can be thought of as two separate applications that share some of the same underlying code. These applications are the front end of the site and the administrative back end of the site.
This is evident when you look at the subfolders under the administrator folder. The administrator folder contains many of the same subfolders as the top-level folder, including cache, components, help, includes, language, modules, templates, and the file index.php (see Figure 3.5).
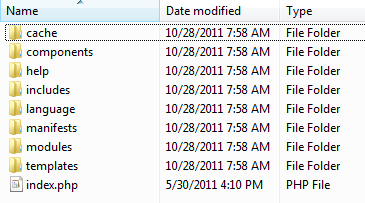
Figure 3.5. Contents of administrator folder
Adminstrator/Cache
This folder holds the cache files for the back end of the site. When back-end pages are cached, the temporary cache files are stored in this folder.
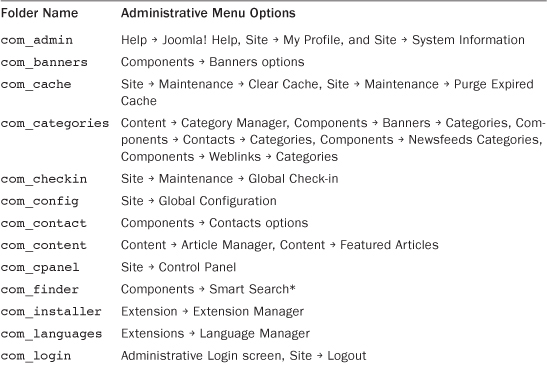
Administrator/Components
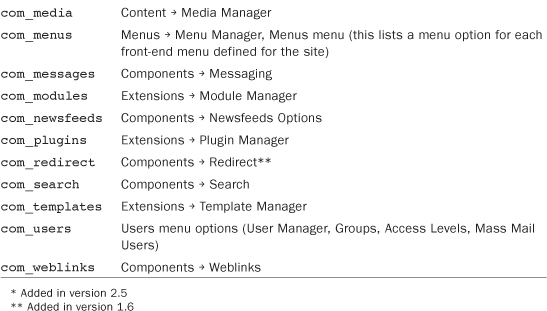
This folder contains all the components that are available in the back end of the website. Every menu choice in the back end is provided by one of these components. Table 3.4 lists each component and the back-end menu options that it provides.
Table 3.4. Front-End Components
Administrator/Help
This folder contains a file called helpsites.xml. This file contains the list of available online help sites. Normally, when you press the Help button, you are linked to the online help at docs.joomla.org.
There is also a folder called en-GB that contains an HTML file for each help topic. This allows for the option of having the help file on the local server. As shipped, the files in this folder simply redirect the user to the online help. But they can be overridden if desired to provide the help files locally.
Administrator/Includes
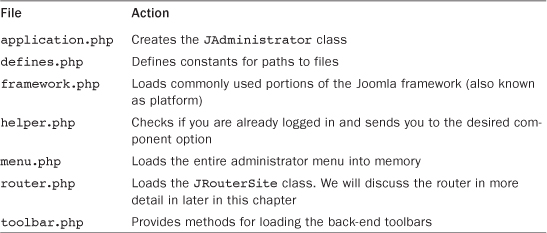
This folder serves the same purpose as the top-level includes folder discussed earlier. This folder holds the files we need to get a back-end session started, as shown in Table 3.5.
Table 3.5. Administrator includes Files
Administrator/Language
This is exactly the same as the top-level language folder, except that it is for the translation of the back end of the site. Each component, module, plugin, and template has its own language files.
Note that, like the front-end language files, we normally have a .sys.ini file and an .ini file for each extension. As discussed earlier, the .sys.ini file typically includes just the name and description of the extension for displaying in a list of extensions. The .ini file translates all the text strings used by the extension.
Administrator/Manifests
This is a new folder for version 1.6 to support the new one-click update feature. It contains three subfolders (files, libraries, and packages):
• The files folder contains a file called joomla.xml that lists all the top-level folders and files in a standard Joomla installation. It also contains a list of update servers (URLs) where the program can look for updated versions of these files. This XML file tell the updater which files to update for this application.
• The libraries folder contains an XML file for each library used in Joomla. These XML files list all the folders and subfolders in the library and, again, a URL where the program can check for updates to the library.
• The packages folder also contains a file called joomla.xml. This supports a method of updating the Joomla installation as a package instead of a set of files. This feature is not implemented for version 2.5 but may be added in a future version. It will support dependency relationships between extensions. For example, if you request to update or install extension A and that extension requires extensions B and C, these will automatically be included in the installation or update.
See the website (http://joomlaprogrammingbook.com) for more information on setting up one-click updates.
Administrator/Modules
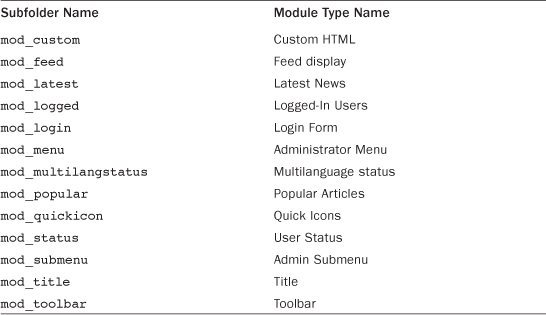
This folder serves the same purpose for the back end as the top-level modules folder serves for the front end. In contains one subfolder for each back-end module. These are shown in Figure 3.6. Each module type has its own subfolder. Table 3.6 shows which module names correspond with which subfolder names.
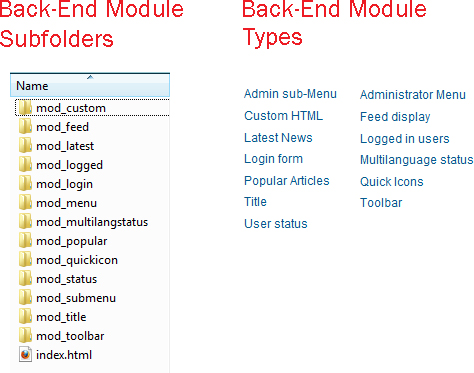
Figure 3.6. Back-end modules
Administrator/Templates
This folder holds the templates used to display the back-end pages. Two templates are included with the standard implementation: Bluestork and Hathor. Bluestork is the default template; Hathor is a template designed especially for accessibility. For example, Hathor is designed to work well with screen readers (used by people with visual impairments), without using the mouse (for those who might have difficulty using a mouse).
As with the front end, we also include a system template that is used for common displays and as a fallback if the assigned template is missing.
Administrator/index.php
This file is loaded automatically by the web server when your browser points to the administrator folder. It is the entry point for the back end of Joomla. It controls the back-end command cycle in the same way that the top-level index.php file controls the front-end command cycle. Note that because we want the system to load this file, we don’t have an index.html file here.
Files
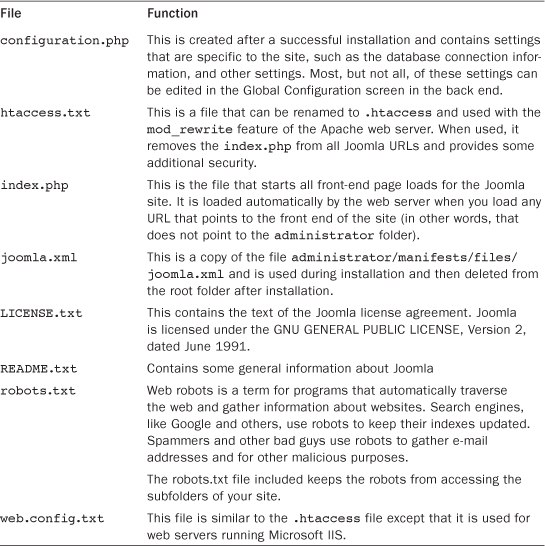
The files shown in Table 3.7 are found in the top-level Joomla folder. The table describes their purpose.
Table 3.7. Top-Level Files and Descriptions
Joomla Platform
We can think of the Joomla CMS as a platform for building applications. We can also view the Joomla CMS as an application that sits on top of something even more fundamental, something that forms the foundation on which everything in Joomla is built. That something is the Joomla platform. It has been previously called “the Joomla framework,” “the Joomla libraries,” and probably many other things. What we are talking about, though, are the programs inside the libraries folder of the Joomla distribution.
Prior to version 1.5 of Joomla, the foundational classes and functions that made Joomla run were all jumbled up in a handful of files within the includes folder. For Joomla 1.5, it was decided to create a cleaner, more maintainable way of keeping the foundation code organized. We wanted things to look and feel familiar to someone coming from a professional development background where frameworks are relied upon to provide foundational logic. For example, we wanted Joomla development to be more comfortable for people coming from a Java or .NET background. Because of this, we set out to build what is now known as the Joomla platform.
When you first look in the libraries folder, you see five folders and four PHP files (along with the obligatory HTML file). Within the loader.php file there is an important class and two very important functions. The class is called JLoader and this is the class that handles including platform programs so that you can use them in your projects. The two functions are jexit() and jimport().
The jexit() function is a wrapper around the PHP exit function (actually a language construct). It exists to make unit testing easier and you should always use it in your scripts instead of using exit() directly. The jimport() function is a shorthand way of calling JLoader::import() and is intended to provide a similar syntax to the import statement in Java or the using statement in C#. The general idea is that you give the jimport() method a dot-separated path to the library you want to use and then the platform makes sure it is available to you when you use it.
The folders are joomla, cms, phpmailer, phputf8, and simplepie. The three that are not Joomla are third-party library packages that the Joomla CMS uses to provide various functionalities:
• phpmailer is a package for handling complex e-mail sending written in PHP.
• phputf8 is a package for making PHP more UTF8 friendly and is used to augment the native PHP functionality for dealing with UTF-8 strings.
• simplepie is a package to handle parsing XML feeds such as ATOM and RSS. The joomla folder contains all the libraries that compose the Joomla platform.
The cms folder was added in version 2.5. It holds Joomla library classes needed by the Joomla CMS but not applicable to the Joomla platform.
There are two PHP files directly in the libraries/joomla folder.
• factory.php contains a static class called JFactory and provides an easy way to get various system objects from a common interface.
• methods.php contains some static helper classes for interacting with URLs and translating text.
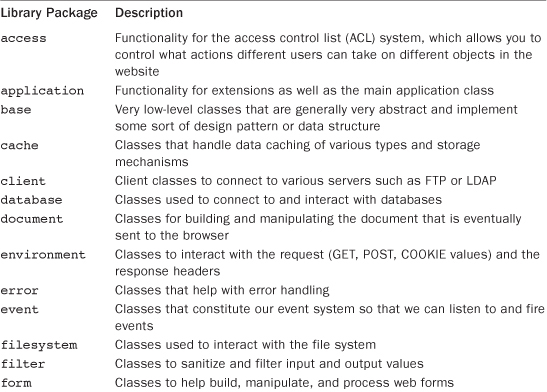
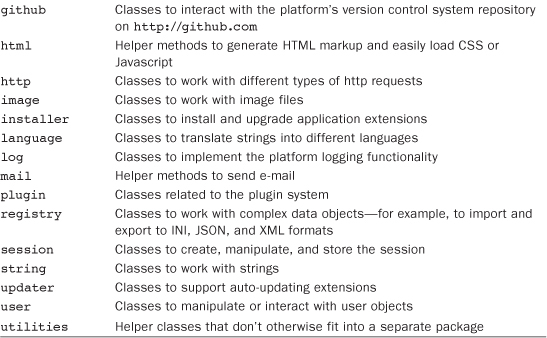
The folders found inside libraries/joomla are known as library packages and are grouped logically around the type of functionality they provide (see Table 3.8).
Table 3.8. Joomla Platform Packages
Web Programming versus “Normal” Programming
Two important factors distinguish dynamic web programming, like what we see in Joomla, from what we’ll call “normal” programming—for example, a typical desktop application such as a spreadsheet program. These have to do with how the state of the program is maintained and what type of command validation is required.
Maintaining the State of the Program
The first difference is how the state of the program is maintained during the execution of the program. By state, we mean what the program knows about itself and its environment as stored in the working memory of the computer. We can think of state as a software program’s version of consciousness: its awareness of who it is and what has been going on. Let’s compare how a desktop spreadsheet program works with how Joomla works with respect to how it maintains state.
Let’s illustrate this by thinking of our software programs as Aladdin with his magic lamp. Imagine that when we issue a software command, inside the computer Aladdin is actually getting a software genie to do the work. The spreadsheet genie is happy to grant as many wishes as we like. By contrast, the Joomla genie only grants one wish each time.
With our spreadsheet program, the first thing we do is load the software by clicking on a desktop icon. Aladdin sees this and rubs the lamp to make the genie appear. The genie comes out of the lamp and Aladdin commands, “Display the spreadsheet software on the user’s screen!” The genie does this and awaits Aladdin’s next command.
Next, we tell the software to open the “budget” file. Aladdin transmits this command to the genie and the file is opened. This process continues until we close the program. At this time, Aladdin tells the genie, “You are no longer needed. Go back into the lamp!” and the spreadsheet genie disappears back into the lamp.
Now let’s see how this works with Aladdin and the Joomla genie. We start the process by loading the URL for our home page into our browser. Aladdin sees this and rubs the lamp. The Joomla genie appears and Aladdin commands, “Display the URL!” The genie does his magic and our home page shows in the browser. However, since the Joomla genie only does one command at a time, he immediately disappears back into the bottle!
Now we click a menu item in the home page to display the Parks article. Aladdin has to rub the lamp again, and again the genie appears. Aladdin commands, “Load the Parks article!” The genie loads the new page into the browser and then immediately disappears back in the lamp.
This process continues until eventually we close down the browser or navigate out of the Joomla site. At that time, Aladdin doesn’t have to do anything, since the genie is already back in the lamp. This is very important. With web programming, we can’t rely on the user to nicely close down the program. Fortunately, we don’t need to.
Tables 3.9 and 3.10 show these examples step by step.
Table 3.9. Command Sequence with Spreadsheet Genie
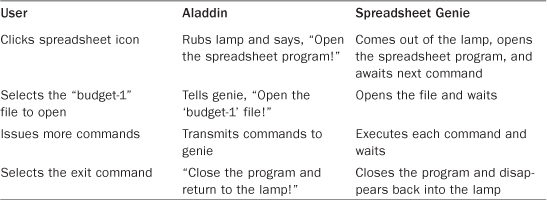
Table 3.10. Command Sequence with Joomla Genie
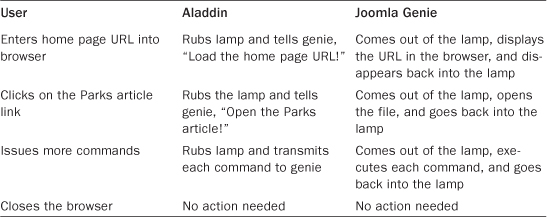
With a web program like Joomla, each time you click a link or a form submit button, you are starting what we call a new request or command cycle. The URL, any form data, and other information related to the request is packaged up by the browser and sent to the web server.
With Joomla (or any other web program), nothing is remembered in the computer’s working memory between request cycles. Each cycle has to start over to create all the program objects. The Joomla genie starts from scratch each time.
Given this, how does the Joomla genie “remember” important information from one request cycle to the next? For example, the genie needs to know who the user is so he can check what actions the user is allowed to do. If the genie’s mind is a complete blank at the start of each cycle, how can he do this?
We have several ways to store data across cycles. The most common one is the session variable. This is maintained on the server and is specific to the user for this session. It is stored on the server’s disk and is available to Joomla. Normally, the session file is automatically deleted or disabled after a period of inactivity (for example, 15 minutes). From the session, for example, the Joomla genie can identify the current user without requiring that the user log in each time. It can also “remember” where the user was in the last command cycle and what options the user might have entered (for example, how a column was sorted in a screen).
The database is another way to save information from one command cycle to the next. It is updated as we make changes to the site—for example, by adding articles or other component items, or by changing our user profile. When we access the database in future cycles, we will see the updated information.
Using the session and the database allows Joomla to find information from previous command cycles. This allows the user to experience the different command cycles as a continuous program flow. However, it is important to keep in mind that each request cycle has to stand alone. We will see as we go along that this has important consequences for how things are done in the code.
Controlling and Checking the Commands
There is another difference between these two types of programming that has important consequences for security. With a self-contained desktop program, all the possible commands are typically predefined in the program. Commands are typically entered via a mouse click from a list. Even if commands can be typed in directly, they are normally validated against a fixed list of possible commands and an error shows if the command is not valid.
With a web program like Joomla, we have two challenges that a desktop program normally doesn’t have. First of all, we are exposing our site to the entire online world, which unfortunately includes people with bad intentions. We have to expect that someone will try to hack our website. This could include someone trying to steal our administrative password, to deface the site (perhaps by putting in their own file for one of ours), or to try to bring the site down by altering the database. We need to practice defensive programming to guard against this.
The second challenge is that we cannot control or limit the commands that come in as part of the request. Normally, the command will be a combination of a URL and possibly some field values from an HTML form. Most users will enter commands simply by clicking a link or a form submit button and will therefore always enter valid commands.
It is possible, however, that a user has deliberately entered a command to try to do something that they shouldn’t do—for example, by manually typing in a URL or altering the HTML form inside their browser. Unfortunately, there is no way for the web server to tell whether a user has clicked a link or manually entered in a URL. Likewise, there is no across-the-board way to tell whether a user has simply filled out the form and pressed submit or whether they have modified the form to submit some malicious data.
To be safe, we must always assume that commands coming in with the request could be designed to attack or hack the site and we must examine them accordingly before we execute them.
We will talk more about security and defensive programming as we go along. However, the subject is important enough to warrant an example now to illustrate the point.
Let’s say we have a simple comments system where users can enter comments about articles. We let anyone submit a comment, but we only allow authorized users to approve comments. A comment is not shown on the site unless it is approved, so we protect against inappropriate comments being shown on the site.
For this example, we have two fields: the comment and whether or not it is approved. We might implement this as follows. When we display the form, we check if a user is authorized or not. If they are, we show the form as it appears in Figure 3.7.
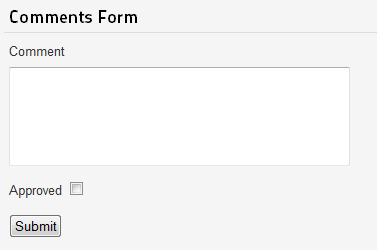
Figure 3.7. Example comments form
Before we show the form, we check whether the current user is authorized to approve the comments. If they are not authorized, we simply omit the Approved field on the form and only show the Comment field. So unauthorized users will never see the Approved field and therefore won’t be able to check the box.
Now we might think with this design we have prevented unauthorized users from approving comments. But we have not. Someone with knowledge about how the application works could very easily use a program like Firebug or Web Developer to edit the HTML on the page to include the missing Approved field and set its value to Approved. Then, when the form is submitted, it would be approved as if the user were authorized. The web server doesn’t know whether the form was altered before the submit button was pressed. It just sees the form data in the request information.
So this design has a serious security hole. How can we fix it?
One way would be to add a check before the database is updated. Even though normally an unauthorized user would not submit the form with the approved field set to yes, we would nevertheless check this again before posting the comment to the database. In this example, before we update the database we would test that the user is authorized. If not, we would always set the approved field to no and then save the data. That way, even if an unauthorized user adds the approved field to the form, the invalid data won’t get saved in the database, so no harm will be done.
We will discuss other examples of security issues and how to fix them as we go along.
Anatomy of a Joomla Execution Cycle
Now let’s look at a typical Joomla execution cycle in more detail.
You do NOT need to understand all of this in order to write Joomla programs. However, this section will give you an insider’s view of how Joomla works and help you better understand the various parts of the core code base. In this section, we will be looking at specific blocks of code. If you are not familiar with PHP and object-oriented programming (OOP), you have the following options:
• Read along and not worry about the specifics of the code for now. We will introduce specific PHP and OOP topics as needed in the following chapters.
• Refer to Appendix A, “Crash Course on PHP and OOP,” as you look at the code blocks to help you figure out what each line of code is doing.
• Skip this section for now and come back to it once you are more familiar with PHP code.
Load the Index.php File
Let’s start our session by typing a URL that points to an article in the front page of our site, something like http://myjoomlasite.org/index.php/my-article-name.
The first thing that happens depends on the web server (Apache or IIS), not Joomla. The web server doesn’t know that we are pointing to a dynamic Joomla website. It first tries to find a file or folder called my-article-name in a folder called index.php. Failing that, it goes up to the next segment of the URL and tries to find a file called index.php. Since that file exists, that file is executed. Since all URLs for the front end will start the same way, every front-end command cycle starts with the web server loading the index.php file.
If we have our site configured to use Apache’s mod_rewrite module, we can leave out the index.php in the URL and it still takes us to that same file. In this case, Apache still executes the front-end index.php file for any URL starting with our base URL (in this case, http://myjoomlasite.org).
The same process applies to the back-end URLs, except that these point to the index.php file in the administrator folder. Any URL that starts with http://myjoomlasite.org/administrator will execute the back-end index.php file, since that will be the first file it finds that it can execute.
In short, any URL we enter that begins with our home page URL will cause the web server to load the site’s index.php file, which is the common starting point for any front-end command cycle.
Check the Execution Environment
So now the web server has loaded our front-end index.php file. Let’s look at this file. The first section of this code is shown in Listing 3.1.
Listing 3.1. Start of Front-End index.php File
<?php
/**
* @package Joomla.Site
* @copyright Copyright (C) 2005 - 2012 Open Source Matters, Inc. All rights reserved.
* @license GNU General Public License version 2 or later; see LICENSE.txt
*/
// Set flag that this is a parent file.
define('_JEXEC', 1);
The first comment section is called the doc block. These lines are (or should be!) present in every core PHP file in Joomla. The @package is the name of the file package. The package is normally Joomla.Site for front-end files and Joomla.Administrator for back-end files. The @copyright and @license lines are the same for every file.
The next line, define('_JEXEC', 1);, is important. This line defines a constant called '_JEXEC'. Every other PHP file in the system (except for the administrator index.php file) contains a line at the beginning like this: defined('_JEXEC') or die;. This checks that the _JEXEC constant is defined, which means that we entered the application from the index.php file.
If someone tries to run a PHP file directly, outside the application, the '_JEXEC' constant won’t be defined and the file will not be executed. If you include a PHP file in the application that does not have the defined line at the start, someone could enter the path to the file directly in the browser. In many cases, if you execute a Joomla PHP file outside the CMS, you will get a PHP error (for example, because a constant or class is not defined). In the PHP error message, the full path to the PHP file will show. This is considered a security risk, because it gives a would-be attacker information about your server and folders.
To see an example, remove the 'defined('_JEXEC') or die;' from the file components/com_banners/banners.php. Then enter this URL into your browser: http:<your-joomla-site>/components/com_banners/banners.php. You should get an error message similar to what’s shown in Figure 3.8.
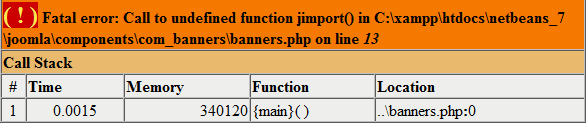
Figure 3.8. Full path disclosure example
Notice that in the error message it shows the full path to our Joomla installation. If we restore the “defined” line to that file and try it again, we just get a blank screen that doesn’t reveal any information about our site.
Define the File Locations
The next section of the index.php file, as shown in Listing 3.2, defines a number of constants that we need to find our way around.
Listing 3.2. Loading of defines.php File
define('DS', DIRECTORY_SEPARATOR);
if (file_exists(dirname(__FILE__) . '/defines.php')) {
include_once dirname(__FILE__) . '/defines.php';
}
if (!defined('_JDEFINES')) {
define('JPATH_BASE', dirname(__FILE__));
include_once JPATH_BASE.DS.'includes'.DS.'defines.php';
}
First we define the DS constant. This is actually being phased out, since it is no longer needed. It defines the directory separator character, which is the forward slash (“/”) for Linux and Mac systems and the back slash (“”) for Windows systems. However, since PHP for Windows can now work correctly with the forward slash, the DS constant will be removed.
The next two if code blocks give us two possible ways to define a set of constants. Joomla includes a standard file called includes/defines.php. In the index.php file, the first if block looks for a defines.php file in the top-level folder. In a standard installation, there is no such file. So the first if block is not executed and, since the constant 'JPATH_BASE' is not yet defined, the standard includes/defines.php file is executed using the PHP include_once command.
The includes/defines.php file defines the constants shown in Listing 3.3.
Listing 3.3. Standard defines.php File
//Global definitions.
//Joomla! framework path definitions.
$parts = explode(DS, JPATH_BASE);
//Defines.
define('JPATH_ROOT', implode(DS, $parts));
define('JPATH_SITE', JPATH_ROOT);
define('JPATH_CONFIGURATION', JPATH_ROOT);
define('JPATH_ADMINISTRATOR', JPATH_ROOT.DS.'administrator'),
define('JPATH_LIBRARIES', JPATH_ROOT.DS.'libraries'),
define('JPATH_PLUGINS', JPATH_ROOT.DS.'plugins' );
define('JPATH_INSTALLATION', JPATH_ROOT.DS.'installation'),
define('JPATH_THEMES', JPATH_BASE.DS.'templates'),
define('JPATH_CACHE', JPATH_BASE.DS.'cache'),
define('JPATH_MANIFESTS', JPATH_ADMINISTRATOR.DS.'manifests'),
Each constant is used to find the folder where the various types of core Joomla files can be found. If you want to override the standard defines.php, you can simply create a file called defines.php at the top level and make sure it defines the required constants. If this file is executed and defines the JPATH_BASE constant, then the standard includes/defines.php file won’t be executed.
This is our first example where Joomla gives you a simple way to override the standard setup. If you wanted to move the files to different folders in your installation, you could easily do that and just create your own custom defines.php file to point to the new folders.
The use of PHP constants allows us to define each of these locations once for the entire application. When we need to find these files in other parts of the application, we can refer to the constant and be confident that it will point to the correct location for our setup.
Let’s Ask Louis: Including PHP Files
Mark: Louis, I am confused about the way in which other PHP files get executed or included. I mean, we start with our one index.php file, and the next thing you know, we are running a whole bunch of other files. What’s the deal?
Louis: The ability to include other files is a really cool feature of PHP. It lets us keep our files relatively small and focused on one task and then put them together as needed. I mean, we could have the entire Joomla application be one giant script file, but how easy would that be to read?
Mark: OK, you have me there. I guess a bunch of small files makes things easier to understand and maintain. But I still don’t understand something about the way this is done. If you look at the code, we use at least four different commands to include files. I’ve seen include_once, require_once, jimport, and require. Don’t they all basically do the same thing and just execute the PHP file?
Louis: Yes and no. I mean, they all execute the named PHP file. But they have important differences.
For example, include_once will not halt the execution of the program if the file is not found, whereas require_once will. jimport is used when the files being included use our Joomla library naming conventions. This command does some other cool Joomla-specific stuff along the way, like checking for helper class names. So there are generally good reasons to use the different commands.
The include_once and require_once commands don’t load the same file twice. This is really important if your file contains a class declaration and might already have been included. If you try to run a class declaration a second time, you will get a PHP error. On the other hand, with these commands, PHP has to check to see if the file has already been included. On some systems—especially large servers that use storage array networks (SANs)—this can really slow down the performance of Joomla.
Mark: So when I’m writing my own extensions, how do I know which command to use?
Louis: I’m really glad you asked. We really should not be using require_once or include_once anywhere in Joomla, since they are slow on some platforms. It turns out that it is much faster if we just keep track of the classes that are loaded in the application instead of asking PHP to keep track of the files that have been loaded.
Most of the time when we are including other files, we are actually loading classes. And we already have a great method for including class files in the file libraries/loader.php, called JLoader::register. The cool thing about this method is that it uses the PHP autoloader feature to load classes into memory only when they are needed. So this method just adds the class file to the list of files that PHP can load automatically if they are called. However, if it turns out we don’t need that file, it doesn’t get loaded into memory.
This method for loading classes is much faster than using require_once, at least on some hardware platforms.
Mark: OK, big shot. A lot of the Joomla PHP files are just class declarations and don’t actually do anything when you do a jimport, require_once, or include_once command. What’s that all about?
Louis: As you know, with PHP you can write procedural scripts or you can write files that create classes. If a file only contains a class declaration (meaning it declares a class with fields and methods), then no code is actually executed when that file is included. The code is only executed when you create an object of that type or execute one of the methods of the class.
That’s why the JLoader::register() method is great. Because, with that method, it doesn’t even use memory to include a class file unless you actually need to execute one of its methods. If we really wanted to, we could even automatically register every class in Joomla with this method during the initialization routine and then all the core classes would be available without any further work. The only reason not to do this is that it uses some computer memory to store all the class and file names.
Mark: OK, that makes sense, I guess. What about the autoload feature that was added in Joomla version 2.5? What is an autoloader?
Louis: The autoloader is another step toward making life as easy as possible for the Joomla developer. The basic idea is very simple. If you try to use a standard Platform or CMS class that isn’t already loaded into memory, the autoloader automatically loads the class and the developer doesn’t have to use jimport or JLoader. So, for most Platform classes, you don’t have to deal with any of these include or load commands.
Load the Joomla Framework
The next line of code loads the Joomla framework via the includes/framework.php file:
require_once JPATH_BASE.DS.'includes'.DS.'framework.php';
The framework.php file does some important tasks. It loads the file libraries/joomla/import.php, which in turn loads some important classes, including JFactory (libraries/joomla/factory.php).
It makes sure we have a configuration.php file. If we don’t have one, it forces us to the installation application to try to install Joomla. If the installation files cannot be found, it shows an error message and quits.
Finally, it imports the framework classes. This is done in the lines of code shown in Listing 3.4.
Listing 3.4. Importing the Joomla Framework Classes
//
// Joomla! library imports.
//
jimport('joomla.application.menu'),
jimport('joomla.environment.uri'),
jimport('joomla.utilities.utility'),
jimport('joomla.event.dispatcher'),
jimport('joomla.utilities.arrayhelper'),
Note that the libraries/joomla/import file was already executed earlier in the framework.php file. This script loaded the JLoader class, which in turn provides the jimport method. So we can then use the jimport method to import the other framework classes.
Recall from the earlier discussion about command cycles that each command cycle has to entirely stand alone. That is why we have to load all these classes into memory for each cycle.
Whew! At this point, we have done a lot, but we are still just getting started. The real Joomla work can start now that we have the framework loaded.
Start or Continue the Session
If we return to index.php, the next lines we see are shown in Listing 3.5.
Listing 3.5. Index.php getApplication() and initialise()
// Mark afterLoad in the profiler.
JDEBUG ? $_PROFILER->mark('afterLoad') : null;
// Instantiate the application.
$app = JFactory::getApplication('site'),
// Initialise the application.
$app->initialise();
// Mark afterIntialise in the profiler.
JDEBUG ? $_PROFILER->mark('afterInitialise') : null;
We can ignore the two JDEBUG statements. In normal operation, these are skipped. They are used to help evaluate the performance of different parts of the code.
So the two things we do in this section are create the application object ($app) and then execute its initialise() method. (Note the British spelling for the word “initialise,” since that is the official language of Joomla.)
When we create the application object, we end up loading the JSite class from the file includes/application.php. This class extends the JApplication class. A similar JAdministrator class in administrator/includes/application.php is used when you create a back-end application object.
At this point, we get our session. We either load the existing session or create a new one if one isn’t found. Recall that Joomla doesn’t know anything about what has happened in prior command cycles except for what has been saved in the session or the database. So finding the existing session is critical to carrying over information from one cycle to the next.
At this point, we also load the configuration.php file, which gives us access to the Joomla database and other settings for this specific website.
Another small but helpful thing that happens here is to create a field called requestTime. This is a time stamp field in the JApplication class that contains the date and time in GMT that the request cycle was started. If you need a current time stamp field, this is a simple way to get it ($app->requestTime or JFactory::getApplication()->requestTime). Unlike using the now() method, this value will stay constant during this entire command cycle.
Next, we run the initialise() method for the application. Since we are in the JSite class, we are running the method from the includes/application.php file. The most important thing this method does is to figure out which language the user needs and loads this language object so that the text strings can be translated correctly. Near the end of the method, it also calls the parent’s initialise() method (parent::initialise($options);). This calls the initialise() method from the JApplication class in the file libraries/joomla/application/application.php, which figures out which editor is the right one for this user.
Route the URL
The next section of code in the index.php file is shown in Listing 3.6.
Listing 3.6. Application route() Method
// Route the application.
$app->route();
// Mark afterRoute in the profiler.
JDEBUG ? $_PROFILER->mark('afterRoute') : null;
In Joomla jargon, a router is a class that translates between a URL and an array of commands. A router has two public methods, parse() and build(). The parse() method takes a JURI object as input and returns an array of commands. The build() method reverses the process and takes an array of commands and turns it into a JURI object.
Let’s see how this works in more detail. Recall that $app is a JSite object. Looking at the route() method for JSite (includes/application.app), we see what’s shown in Listing 3.7.
Listing 3.7. JSite route() Method
public function route()
{
parent::route();
$Itemid = JRequest::getInt('Itemid'),
$this->authorise($Itemid);
}
Recall that JSite extends JApplication (libraries/joomla/application/application.php). JApplication also has a route() method. So the route() method in JSite overrides the one in JApplication.
The first thing this does is call the route() method of the parent (JApplication), with the command parent::route(). If we look at the route() method in JApplication, we see the code shown in Listing 3.8.
Listing 3.8. JApplication route() Method
public function route()
{
// Get the full request URI.
$uri = clone JURI::getInstance();
$router = $this->getRouter();
$result = $router->parse($uri);
JRequest::set($result, 'get', false);
// Trigger the onAfterRoute event.
JPluginHelper::importPlugin('system'),
$this->triggerEvent('onAfterRoute'),
}
This code gets the current JURI object. The clone command tells the system to make a copy of the JURI object instead of using the original one. This is done because we don’t want to inadvertently modify the actual request URI when we are working with the JURI object. By making a clone of it, we can work with the clone, and perhaps modify it, without changing the original.
That gives us the URL we need to parse. The next line gets the actual router class. In this case, we are in the front end, also known as the site, so when we execute the command $this->getRouter(), we get a JRouterSite object (includes/router.php).
Then we execute the parse() method of the router, which gives us an associative array of commands. In our example, the JURI object would contain the URL information for the article menu item (http://myjoomlasite.org/index.php/my-article-name) and turn it into a command array as follows:
• Itemid: 123 (id of the menu item)
• option: com_content (name of the component)
• view: article (name of the view)
• id: 234 (id of the article)
Then we put this information back into the PHP $_GET variable using the JRequest::set() method. Finally, we trigger the onAfterRoute system event so that we can execute any system plugins for this event. We talk more about events and plugins in Chapter 5.
At this point, we have finished with the parent’s route() method and return to the route() method of JSite. Here, we get the Itemid, which is the id column in the database for the menu item we are going to display. Then we check whether or not the current user is authorized to view this menu item, with the $this->authorise() method.
Last, we return to the index.php file and run a DEBUG command to mark the end of the routing process.
Execute the Component
Now we know what we are supposed to do. The URL entered by the user (for example, by clicking on a menu item link) has been checked and translated into an array of commands and saved in the PHP $_GET variable. We are now ready to execute the component.
Returning to index.php, we see the next section of code, as shown in Listing 3.9.
Listing 3.9. Dispatch() Method
// Dispatch the application.
$app->dispatch();
// Mark afterDispatch in the profiler.
JDEBUG ? $_PROFILER->mark('afterDispatch') : null;
The dispatch() method actually executes the component. Let’s look at how this works. Listing 3.10 shows the code for the dispatch() method.
Listing 3.10. JSite dispatch() Method
public function dispatch($component = null)
{
try
{
// Get the component if not set.
if (!$component) {
$component = JRequest::getCmd('option'),
}
$document = JFactory::getDocument();
$user = JFactory::getUser();
$router = $this->getRouter();
$params = $this->getParams();
switch($document->getType())
{
case 'html':
// Get language
$lang_code = JFactory::getLanguage()->getTag();
$languages = JLanguageHelper::getLanguages('lang_code'),
// Set metadata
if (isset($languages[$lang_code]) && $languages[$lang_code]->metakey) {
$document->setMetaData('keywords', $languages[$lang_code]->metakey);
} else {
$document->setMetaData('keywords', $this->getCfg('MetaKeys'));
}
$document->setMetaData('rights', $this->getCfg('MetaRights'));
if ($router->getMode() == JROUTER_MODE_SEF) {
$document->setBase(htmlspecialchars(JURI::current()));
}
break;
case 'feed':
$document->setBase(htmlspecialchars(JURI::current()));
break;
}
$document->setTitle($params->get('page_title'));
$document->setDescription($params->get('page_description'));
$contents = JComponentHelper::renderComponent($component);
$document->setBuffer($contents, 'component'),
// Trigger the onAfterDispatch event.
JPluginHelper::importPlugin('system'),
$this->triggerEvent('onAfterDispatch'),
}
// Mop up any uncaught exceptions.
catch (Exception $e)
{
$code = $e->getCode();
JError::raiseError($code ? $code : 500, $e->getMessage());
}
}
First, note that this entire method is done inside what is called a try/catch block. This means that the code executes as follows:
• The code inside the curly braces after the try statement (called the try block) is executed as normal.
• If any statement in the try block generates an error, program control transfers to the first line of the catch block at the end of the method.
We discuss try/catch blocks more in Chapter 8.
Inside the try block, we get the component name from the option command that we got when we parsed the URL. Then we create a new document. The $document object will be used to store everything about the page that will eventually be sent back to the browser.
There are a couple of important things to understand about the document. First of all, since it is an object in memory, we don’t have to build it sequentially. We can insert portions of the document in any order we find convenient. We take advantage of this and build the document in a nonsequential order. For example, we will add the component first and then later insert the modules.
A second important point about the document is that Joomla supports different document types. When we are browsing a site, the type is normally html. For this type, we do some special processing. We get the language for the page, set the metadata, and set the base if we are using SEF URLs. If the document is a news feed (type = "feed"), we skip most of this and just set the document base. If the document is any other type, we skip all this special processing.
After setting the page title and description, we get to the heart of the matter with this line of code:
$contents = JComponentHelper::renderComponent($component);
This executes our component and places the output into the $contents variable. Let’s see how this works.
Here we are running a static method called renderComponent() from the JComponentHelper class (libraries/joomla/application/component/helper.php). Listing 3.11 shows the first part of this code.
Listing 3.11. JComponentHelper render() Method Part I
public static function renderComponent($option, $params = array())
{
// Initialise variables.
$app = JFactory::getApplication();
// Load template language files.
$template = $app->getTemplate(true)->template;
$lang = JFactory::getLanguage();
$lang->load('tpl_'.$template, JPATH_BASE, null, false, false)
|| $lang->load('tpl_'.$template, JPATH_THEMES."/$template", null, false, false)
|| $lang->load('tpl_'.$template, JPATH_BASE, $lang->getDefault(), false, false)
|| $lang->load('tpl_'.$template, JPATH_THEMES."/$template", $lang->getDefault(), false, false);
if (empty($option)) {
// Throw 404 if no component
JError::raiseError(404, JText::_('JLIB_APPLICATION_ERROR_COMPONENT_NOT_FOUND'));
return;
}
// Record the scope
$scope = $app->scope;
// Set scope to component name
$app->scope = $option;
// Build the component path.
$option = preg_replace('/[^A-Z0-9_.-]/i', '', $option);
$file = substr($option, 4);
// Define component path.
define('JPATH_COMPONENT', JPATH_BASE . '/components/' . $option);
define('JPATH_COMPONENT_SITE', JPATH_SITE . '/components/' . $option);
define('JPATH_COMPONENT_ADMINISTRATOR', JPATH_ADMINISTRATOR . '/components/' . $option);
// Get component path
if ($app->isAdmin() && file_exists(JPATH_COMPONENT . '/admin.'.$file.'.php')) {
$path = JPATH_COMPONENT . '/admin.'.$file.'.php';
} else {
$path = JPATH_COMPONENT . '/' . $file.'.php';
}
// If component is disabled throw error
if (!self::isEnabled($option) || !file_exists($path)) {
JError::raiseError(404, JText::_('JLIB_APPLICATION_ERROR_COMPONENT_NOT_FOUND'));
}
$task = JRequest::getString('task'),
// Load common and local language files.
$lang->load($option, JPATH_BASE, null, false, false)
|| $lang->load($option, JPATH_COMPONENT, null, false, false)
|| $lang->load($option, JPATH_BASE, $lang->getDefault(), false, false)
|| $lang->load($option, JPATH_COMPONENT, $lang->getDefault(), false, false);
Here we are loading the template and the template language. Then we save the component name in a field of the JSite object called scope ($app->scope = $option). This is a handy field. It means that, at any point in the cycle, we can check this field to see what component is being run. We might, for example, make use of this when running a plugin that should only run for selected components.
The line with the preg_replace command just makes sure that the $option variable only has letters, numbers, and underscores. It replaces any other characters with dashes. That way we know that there are no characters that will cause problems inside a file name. The next line says “use the part of the $option name after position 4 as the file name.” This is the naming convention for components. In our example, the component is called com_content, so the file we will execute is called content.php. We’ll see more about other naming conventions in the next section.
We are almost ready to actually execute our component! The next section of code defines the path to the component’s front-end and back-end files and we set the $path variable based on whether this component is a front-end (site) or back-end (administrator) component.
Then we make sure the component is enabled. Finally we use the or trick again to load the language from one of the four possible file locations.
Notice we have some tricky code in the four lines with $lang->load near the beginning of Listing 3.10 and again in the last four lines. These lines load the language using the boolean or operator (||). We frequently use this inside an “if” statement when we want to check if more than one condition is true. However, this operator does something interesting: It stops processing as soon as it hits an expression that evaluates to the boolean true.
The load() method of the JLanguage class returns a boolean true if the load is successful and a boolean false otherwise. So this is a quick (and tricky) way to say, “try loading the language file starting with the JPATH_BASE, then JPATH_THEMES, and so on. And, by the way, stop as soon as one of the loads is successful.”
The next section of code actually loads our component file, as shown in Listing 3.12.
Listing 3.12. JComponentHelper render() Method Part II
// Handle template preview outlining.
$contents = null;
// Execute the component.
$contents = self::executeComponent($path);
This code block clears out anything that might have been in the $contents variable. Then we call the executeComponent() method. Note that we use the key word “self” when calling this method. That is because executeComponent() is a static method of our current class. See Appendix A for more information about the “self” key word.
The code for the executeComponent() is as follows:
protected static function executeComponent($path)
{
ob_start();
require_once $path;
$contents = ob_get_contents();
ob_end_clean();
return $contents;
}
The ob_start() command tells PHP to turn on output buffering. So everything the component outputs will be saved in memory. Then we load the component file with require_once $path. In our example, it loads the file components/content.php.
We will cover components and the Joomla model-view-controller (MVC) design pattern in Chapters 7 and 10. The important thing here to understand is that the only thing that Joomla actually does to execute the component is to load this one file (the file in the $path variable). The rest is up to the component.
This means, for example, that a component does not have to follow the MVC pattern or even use classes and objects. It could be a single script, as long as it follows the naming convention. Having said that, there are very good reasons for following the MVC pattern for components we discuss when we build our component.
You can do a quick experiment to prove to yourself how this works by creating your own com_test component according to the instructions on the Joomla documentation site here: http://docs.joomla.org/Testing_Checklists#Testing_Code_Snippets. By entering in ?option=com_test in your URL, it executes the test.php file in your components/com_test folder.
Once the component has finished executing, we store the buffer contents of the buffer back into the $clean variable using the ob_get_contents() method. Finally, we clean out the buffer with the ob_end_clean() method.
At this point, our component has been executed and its output is in the $contents variable. The last part of the JComponentHelper render() method is shown in Listing 3.13.
Listing 3.13. JComponentHelper render() Method Part III
// Build the component toolbar
jimport('joomla.application.helper'),
if (($path = JApplicationHelper::getPath('toolbar')) && $app->isAdmin()) {
// Get the task again, in case it has changed
$task = JRequest::getString('task'),
// Make the toolbar
include_once $path;
}
// Revert the scope
$app->scope = $scope;
return $contents;
}
It checks to see if we need to show a toolbar and shows it if needed. Then it sets the $app->scope variable back to its previous value. Finally, we return the $contents variable to the calling method, which was the dispatch() method in JSite.
The next line in the dispatch() method of JSite is as follows:
$document->setBuffer($contents, 'component'),
This loads the $contents into the component part of the document. Finally, we trigger the onAfterDispatch event for system plugins and, if we are debugging, we mark the afterDispatch point. Now we have the output of the component in the document and are ready to put in the other pieces of the page.
Render the Page
The next part of the index.php file is as follows:
// Render the application.
$app->render();
At this point, we have the output from the component, but we don’t have any formatting and we don’t have other page content, such as modules or messages.
Listing 3.14 shows what the $app->render() method looks like.
Listing 3.14. JSite render() Method
public function render()
{
$document = JFactory::getDocument();
$user = JFactory::getUser();
// get the format to render
$format = $document->getType();
switch ($format)
{
case 'feed':
$params = array();
break;
case 'html':
default:
$template = $this->getTemplate(true);
$file = JRequest::getCmd('tmpl', 'index'),
if (!$this->getCfg('offline') && ($file == 'offline')) {
$file = 'index';
}
if ($this->getCfg('offline') && !$user->authorise('core.admin')) {
$uri = JFactory::getURI();
$return = (string)$uri;
$this->setUserState('users.login.form.data', array( 'return' => $return));
$file = 'offline';
JResponse::setHeader('Status', '503 Service Temporarily Unavailable', 'true'),
}
if (!is_dir(JPATH_THEMES.DS.$template->template) && !$this->getCfg('offline')) {
$file = 'component';
}
$params = array(
'template' => $template->template,
'file' => $file.'.php',
'directory' => JPATH_THEMES,
'params' => $template->params
);
break;
}
// Parse the document.
$document = JFactory::getDocument();
$document->parse($params);
// Trigger the onBeforeRender event.
JPluginHelper::importPlugin('system'),
$this->triggerEvent('onBeforeRender'),
$caching = false;
if ($this->getCfg('caching') && $this->getCfg('caching',2) == 2 && !$user->get('id')) {
$caching = true;
}
// Render the document.
JResponse::setBody($document->render($caching, $params));
// Trigger the onAfterRender event.
$this->triggerEvent('onAfterRender'),
}
Here we start by getting the document, the user, and the document type or format. Based on the format, we do some processing in the switch statement. In our example, our type is html, so we get the template and set the $params array.
After the switch statement, we call the document’s parse() method, as shown in Listing 3.15. Note that, since the type is html, the document object is of type JDocumentHTML (libraries/joomla/document/html/html.php).
Listing 3.15. JDocumentHTML parse() Method
public function parse($params = array()) {
return $this->_fetchTemplate($params)->_parseTemplate();
}
The first part of the command loads the template and corresponding language file. Because the _fetchTemplate() method returns the current object, we can use method chaining to then call the _parseTemplate() method. We discuss method chaining in Appendix A. The _parseTemplate(), shown in Listing 3.16, examines the template’s index.php file and creates an array of all the jdoc:include elements.
Listing 3.16. JDocumentHTML_parseTemplate() Method
protected function _parseTemplate()
{
$matches = array();
if (preg_match_all('#<jdoc:include type="([^"]+)" (.*)/>#iU', $this->_template, $matches))
{
$template_tags_first = array();
$template_tags_last = array();
// Step through the jdocs in reverse order.
for ($i = count($matches[0]) - 1; $i >= 0; $i--)
{
$type = $matches[1][$i];
$attribs = empty($matches[2][$i]) ? array() : JUtility::parseAttributes($matches[2][$i]);
$name = isset($attribs['name']) ? $attribs['name'] : null;
// Separate buffers to be executed first and last
if ($type == 'module' || $type == 'modules')
{
$template_tags_first[$matches[0][$i]] = array('type' => $type, 'name' => $name, 'attribs' => $attribs);
}
else
{
$template_tags_last[$matches[0][$i]] = array('type' => $type, 'name' => $name, 'attribs' => $attribs);
}
}
// Reverse the last array so the jdocs are in forward order.
$template_tags_last = array_reverse($template_tags_last);
$this->_template_tags = $template_tags_first + $template_tags_last;
}
return $this;
}
The key to understanding this method is the preg_match_all statement. This is a complex statement to create, but what it does is easy to explain. This statement creates three arrays. The first one is a list of all the jdoc:incude elements in the template file. This is put into $matches[0]. The second is a list of the type attribute for each of these elements. This is put into $matches[1]. The type will normally be head, modules, messages, debug, or component. The third is a list of the other attributes that come after the type attribute in the element. This is stored in $matches[2].
The for loop creates an associative array of type, name, and attribs using this information and stores it into the _template_tags field of the $document as $this->_template_tags.
Now we are ready to actually put the page together, placing each of the parts of the page into the right location on the template.
Returning now to the render() method of the JSite class, we trigger the onBeforeRender system event and then check to see if this page is cached.
Then we execute this line of code:
JResponse::setBody($document->render($caching, $params));.
Here we set the field of the JResponse object using the render() method of the JDocumentHTML class. That method contains the code shown in Listing 3.17.
Listing 3.17. JDocumentHTML render() Method
public function render($caching = false, $params = array())
{
$this->_caching = $caching;
if (!empty($this->_template))
{
$data = $this->_renderTemplate();
}
else
{
$this->parse($params);
$data = $this->_renderTemplate();
}
parent::render();
return $data;
}
The key line of code here is the highlighted line of code that calls the _render Template() method. This method reads through the array we created earlier in the $document->_template_tags, as shown in Listing 3.18.
Listing 3.18. JDocumentHTML _renderTemplate() Method
private function _renderTemplate() {
$replace = array();
$with = array();
foreach($this->_template_tags AS $jdoc => $args)
{
$replace[] = $jdoc;
$with[] = $this->getBuffer($args['type'], $args['name'], $args['attribs']);
}
return str_replace($replace, $with, $this->_template);
}
$with[] = $this->getBuffer($args['type'], $args['name'], $args['attribs']);
Recall that the template_tags field contains an array with the component, modules, head, messages, and debug element information. Each of these is processed in this loop and loaded into the $with array.
The component has already been rendered, so it is just copied from the $contents field. The jdoc:include elements for modules normally are done by position. If so, then each module assigned to that position for that menu item is executed and its output is placed into the $with array. Similarly, the head, messages, and debug elements are processed.
Then the last line does a string replace statement to “inject” the actual rendered text output for each module, component, message, head, and debug element into the actual template file. At this point, the elements of the page are formatted inside the template and ready to be sent to the browser.
One important result of the way this is done is that a module is only executed if it is assigned to a position in the template. So there is no performance penalty for modules that are assigned to other positions or menu items.
Now we return to the render() method from JDocumentHTML above and execute the render() method of its parent class, JDocument (libraries/joomla/document/document.php). This method simply sets the modified date and content type for the document header. Then it returns the $data variable, which is the template’s index.php file with the page contents taking the place of the jdoc:include elements.
Recall that we started this part of the program with the following line of code from the render() method of the JSite class:
JResponse::setBody($document->render($caching, $params));
At this point, we have completed the $document->render($caching, $params) portion of the statement. The last thing to do is to pass the result of this to the JResponse::setBody() method. This method is shown in Listing 3.19.
Listing 3.19. Response setBody() Method
public static function setBody($content)
{
self::$body = array((string) $content);
}
This simply places the resulting text into the $body field of this class.
The last thing done by the render() method is to fire the onAfterRender system event. At that point, we return to our top-level index.php file.
Output the Page
The last thing we need to do is actually send the output to the browser. Looking at the end of the index.php file, we see the code shown in Listing 3.20.
Listing 3.20. End of the index.php File
// Mark afterRender in the profiler.
JDEBUG ? $_PROFILER->mark('afterRender') : null;
// Return the response.
echo $app;
The JDEBUG statement, as before, simply marks the afterRender point for profiling the application. The last line, echo $app, has a trick to it. Recall that $app is a JSite object. The PHP echo command is used to send text to the browser. What does it mean to echo an object?
The answer is simple. If an object has a special method called __toString(), this method is executed automatically when you use the echo command with an object. If not, the echo just returns the name of the class.
If we look at the JSite class ('includes/application.php'), we don’t find a __toString() method. Not to worry. If we look at the parent class of JSite, which is JApplication (libraries/joomla/application/application.php), we see that it has a __toString() method that JSite inherits, as shown in Listing 3.21.
Listing 3.21. JApplication __toString() Method
public function __toString()
{
$compress = $this->getCfg('gzip', false);
return JResponse::toString($compress);
}
This method in turn calls the toString() method of JResponse, which does what’s shown in Listing 3.22.
Listing 3.22. JResponse toString() Method
public static function toString($compress = false)
{
$data = self::getBody();
// Don't compress something if the server is going to do it anyway. Waste of time.
if ($compress && !ini_get('zlib.output_compression') && ini_get('output_handler')!='ob_gzhandler') {
$data = self::compress($data);
}
if (self::allowCache() === false) {
self::setHeader('Cache-Control', 'no-cache', false);
// HTTP 1.0
self::setHeader('Pragma', 'no-cache'),
}
self::sendHeaders();
return $data;
}
1. Puts the body of the page in the $data variable
2. Checks whether to compress the page or not
3. Checks the caching and sets the page header accordingly
4. Sends the page headers
5. Returns the $data containing the entire page
The contents of $data are then fed back to the PHP echo command, which sends it to the browser.
Summary of Joomla Session
Whew! That was a lot of work to display the page. What did we learn?
We saw that the first few steps in the process were just getting the file locations figured out, loading the Joomla framework, and figuring out if we are starting or continuing a session. Then we found and executed the component. Then we ran all the modules and put everything into the template file. Finally, we sent it all to the browser.
Along the way, we triggered events that can work with plugins.
Even though there is a lot of code involved in each step, it is organized into a relatively small number of high-level methods, each of which can drill down to lower-level methods as needed. The high-level methods are set up in a structured way so that, at any given stage in the process, we are working on one task in the process. This process is diagramed in Figure 3.9.
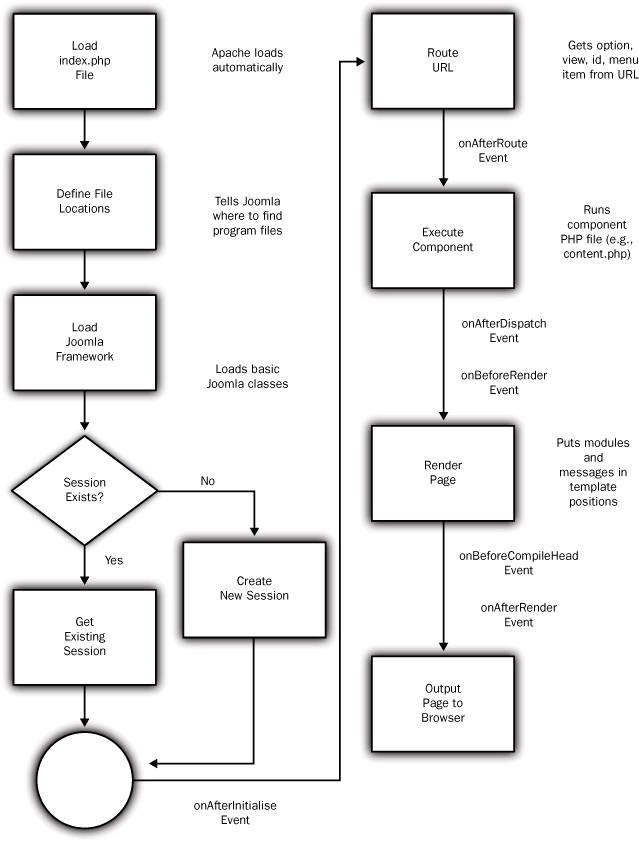
Figure 3.9. Joomla execution cycle flowchart
We can also see from this overview how Joomla is designed to easily fit extensions into the framework provided by the CMS. Components, modules, plugins, and the template are executed at well-defined points in the process, and there is absolutely no distinction made between core extensions included in the standard installation, on the one hand, and extensions provided by third-party developers, on the other. All are treated exactly the same way, which allows for the seamless operation of extensions.
Naming Conventions (Conventional Wisdom?)
One strategy that makes it easier to read and understand the Joomla code base is to use naming conventions for files and folders. We saw one example in the previous section. Recall that we got the component name from the route() method—in our example, com_content. Once we knew this, Joomla “knew” to look for a file called content.php in the components folder. This logic is hard-coded into Joomla. So, for any component, we know the file that gets loaded to start the component’s execution.
Once we know about this convention, it is easy to investigate existing components and also to understand how to make a new component. We know to look for a folder called something like com_mycomponentname and a file called mycomponentname.php in that folder. We also know that when Joomla encounters a URL that routes to an option called com_mycomponentname, this file will be executed.
This type of naming convention is used in many places in Joomla. We highlight these as we discuss the various extension types in future chapters.
Global Objects
Some of the objects in Joomla are used in so many places in the code that it makes sense to have them be readily available at all times. The JFactory class (libraries/joomla/factory.php), as mentioned earlier, is loaded when the includes/framework.php script loads the libraries/joomla/import.php script.
JFactory give us quick access to a number of objects at almost any point in the program. These are listed in Table 3.11.
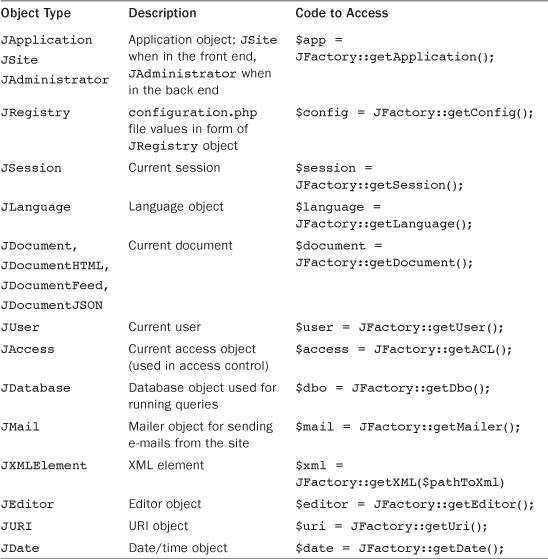
Except for JDate, each of these classes should only have one object for that class. For example, there should only be one application object, JSite if you are in the front end and JAdministrator if you are in the back end. Similarly, there should only be one JSession, JUser, JDatabase, and so on.
In object-oriented programming, when we have a situation like this, we often use what is called the “singleton” and “factory” design patterns to ensure that we only have one object of a given type in existence at one time. The way it works is actually very simple.
Let’s look at an example of how this works using the application object. The JFactory class contains a field called $application that stores the one application object we want to use for this entire execution cycle. When we need the application object, we use the command JFactory::getApplication().
When we do that command, JFactory first checks to see if there is already an object in the $application field. If so, it just returns that object. If the $application field is empty, it means this is the first time in this cycle that we have tried to access it. In this case, we create the new application object, store it in the $application field in the JFactory class, and then we return the $application field. That way, it is in the JFactory class field the next time we need it. So we ensure that we only create one application object and that it is available whenever we need it.
Overview of Database Tables
Joomla uses a database (normally run with the MySQL database program) to store all the data for the site. The standard Joomla database for version 2.5 contains 34 tables. In this section, we will give a brief description of each table and its role in the program.
Note about Table Prefixes
When you install Joomla, you can select a prefix for the table names in the database. When you see a table accessed inside the PHP code, you will normally see it with the generic prefix #__. The query() method of the JDatabaseMySQLi class calls a method called replacePrefix() that replaces the generic prefix with the actual one from the configuration.php file.
For the purposes of this book, we will use the #__ prefix for the table names (for example, #__content; see Table 3.12). However, the tables that you see for your database will use the prefix that was entered when Joomla was installed.
Table 3.12. List of Joomla Database Tables
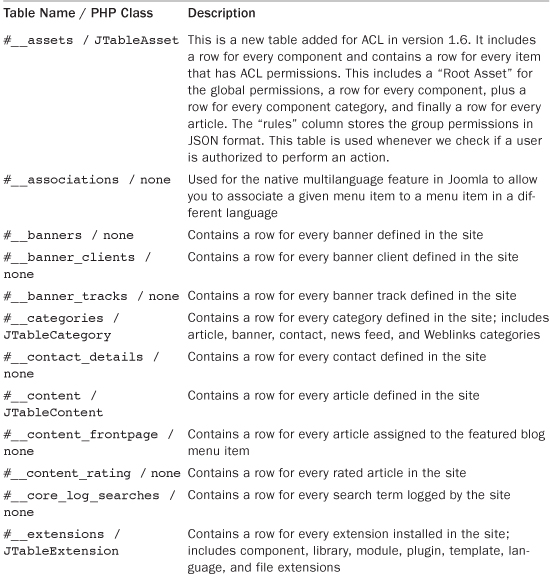
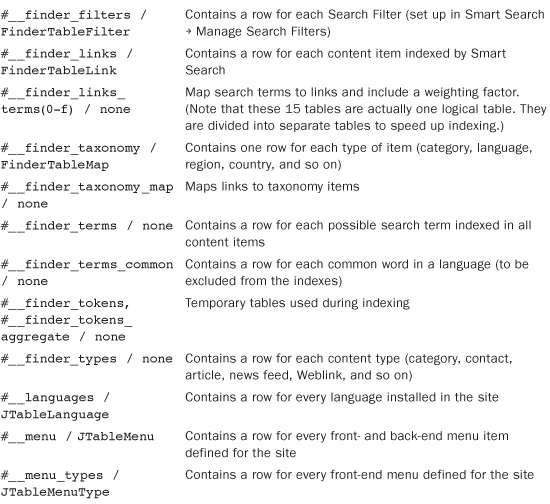
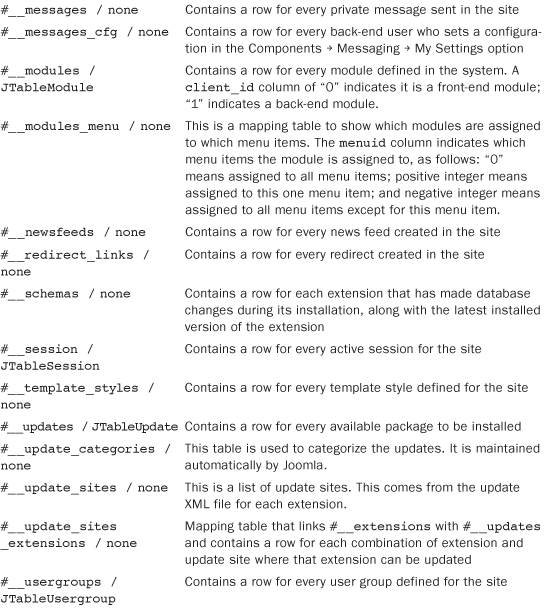
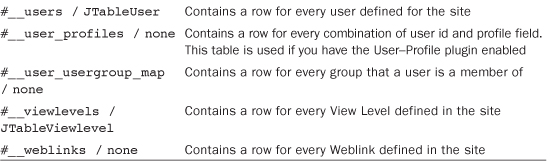
Some tables have an associated JTable class. This is generally done when rows for the table will be edited by a user. By creating a JTable class for a table, most of the code for editing table rows is done for us. We see how this works when we create our custom component in Chapter 9.
Summary
In this chapter, we learned a lot about the inner workings of Joomla. First, we explored the folder and file structure for the Joomla front and back end. Then we discussed some general concepts that make web programming different from programming a desktop application, including the need for guarding against hackers.
Then we took a detailed look at the code that controls a typical Joomla execution cycle. We also discussed how naming conventions are used in Joomla to make life easier for the developer.
Finally, we discussed how to find a number of useful global objects when writing code and we briefly described the tables that make up a standard Joomla installation.