
Lesson 15
Adding Interfaces
In the previous lessons, we've covered a number of different types that Go supports. Go supports another type as well: interfaces. In its basic form, an interface in Go is a named collection of method signatures without any implementation.
CREATING AN INTERFACE
If you have worked with object-oriented languages before, then you might already be familiar with the concept of an interface. In Go we can define an interface type using the type and interface keywords:
type Name interface {// methods}
After creating an interface, we can create variables based on that interface. The values stored in those variables implement the methods of the interface.
In other programming languages, such as Java, we normally use the implements keyword to implement an interface. In Go programming, we use the simple convention that the value of an interface type can only hold values of a type that implements the methods of the interface. To understand the concept of interfaces, consider the code in Listing 15.1.
Go ahead and run this listing. You should see the following output:
initial value: <nil>Account Balance: 1350Account Number: C13443533535Account Balance: 2350Account Number: C13443533535
Let's take a closer look at what the code is doing.
First, you create an interface called AccountOperations with three method signatures: withdraw, deposit, and displayInfo. Here you simply list the methods the interface will use, without providing details about their implementation.
Next, you create a struct type account that includes two fields: number and balance. This represents a basic banking account.
You also define the three methods included in the interface, withdraw, deposit, and displayInfo, on the account struct. This is where you define each method's implementation. Note that you use a pointer receiver of type account for the three methods, which allows each method to change values in the struct directly. You could use value receivers instead, but you would have to add additional steps to update the values stored in the struct.
Finally, in the main function, you first create a variable named ao of type AccountOperations, which will initially hold the zero value of the interface type. As you see in the output, the default value for an interface is nil.
Once you create an interface variable, the variable can hold any type that implements the methods defined in the interface. In this case, because the account type implements all three methods, you can assign a pointer for an account value to the variable ao. You create the account type using an account number of C13443533535 and a balance of 1,500.
You can then execute the methods from the AccountOperations interface to update the account balance using withdraw or deposit. Using the displayInfo method, you can see that the balance in the struct updates to reflect the method used.
INTERFACES AND CODE REUSABILITY
Interfaces promote code reusability because you can use the same interfaces across different packages but allow each package to have its own implementation of the interface. To understand the power of interfaces in another example, consider the code in Listing 15.2.
In this listing, you create two structs that implement the same method in the AccountOperations interface. This helps us ensure that both SavingsAccount and CheckingAccount behave in the same way. This example includes only one method in the interface, but you could include more. When you execute this listing, you'll see the following output:
savings interest: 0.005checking interest: 0.001
In the main function of the listing, you create two variables, acct and acct2, of type CheckingAccount and SavingsAccount, respectively. Using the same logic as the previous example, you store the values of acct and acct2 in two interface variables, ao1 and ao2. This allows you to execute the displayInterest method from the interface.
This is an example of how to use interfaces to enforce a certain behavior across different struct types as well as other types. In this case, you are making sure the different types of accounts support similar methods.
STATIC VS. DYNAMIC INTERFACE TYPES
You are probably wondering at this point how an interface created with a specific type (AccountOperations, for example) can hold another type like SavingsAccount or CheckingAccount. The reason is that an interface in Go has two different types: one is static, and one is dynamic. The static type is the type of the interface itself. For example, the static type of the interface AccountOperations is AccountOperations. The dynamic type is the type that implements the interface.
Internally, an interface is represented by a tuple, which in turn represents the dynamic type of the interface and the value of that dynamic type. To see this internal representation, look at Listing 15.3.
This listing includes another function, display, which displays the internal representation of the interfaces ao1 and ao2. As the comments in the listing indicate, the describe function uses a call to Printf to display information about the interface that is provided. Note that this is using Printf, not Println. The Printf function allows you to add escape codes to your output. In this case, you use %T to display the dynamic type of ao and %v to display the dynamic value. The output looks like this:
ao1 type:Interface type *main.SavingsAccount value &{S21345345345355 159 0}ao2 type:Interface type *main.CheckingAccount value &{C218678678345345355 2000 0}
You can see the following in the results:
- The dynamic type of
ao1isSavingsAccount. - The dynamic type for
ao2isCheckingAccount. - The dynamic value stored is essentially the value of
acctandacct2.
EMPTY INTERFACES
An empty interface in Go is an interface without any methods, known as interface{}. By default, all types in Go implement the empty interface. Listing 15.4 shows an example.
In this listing, you define an empty interface called s. You then use Println to display the contents of the empty interface. Finally, you use Printf to show the type and value of s as well. In all cases, the type and contents are empty, as indicated by the value nil. The output is:
<nil>s is nil and has type <nil> value <nil>
CHECKING AN INTERFACE TYPE
If you want to check the type of a variable, you can use the reflect package. In fact, Go supports switch statements on values (the usual switch), but it also supports the use of a switch statement to check against various data types (both built-in and custom).
In other words, you can use a switch statement to check the underlying type of an interface. This is illustrated in Listing 15.5 once again using our SavingsAccount and CheckingAccount structs with our AccountOperations interface.
Most of this listing is the same as the previous one; however, a new function was added called CheckType, which will be used by the main function to print the type of ao1 and ao2. Within CheckType, the received variable is used within a switch statement. The switch receives the type of the variable:
switch i.(type)
The cases within the switch are then pointers to the different types that you are interested in comparing against. In this listing, you are comparing the type of the passed-in value to a SavingsAccount and a CheckingAccount. The final output is:
Result for ao1This is a savings accountResult for ao2This is a checking account
Again, keep in mind that the statement i.(type) will only work within a switch statement and cannot be used on its own. If you want to check the type of a variable, you can use the reflect package.
MULTIPLE INTERFACES
A type in Go can implement multiple interfaces. Listing 15.6 shows the use of multiple interfaces with the same variable.
In this listing you again focus on creating a banking account. You create the SavingsAccount structure you created before with an account number and balance, but this time you add an interest rate. You then create two different interfaces that you'll use. The first is an AccountOperations interface that will compute the interest rate with the method computeInterest and display account information with the displayInfo method. The second is a UserOperations interface that will be used to change the account number using the method named changeANumber.
The main function creates a SavingsAccount called acct in the same way that you've used before. An account number and balance of 159 are assigned to acct. This is followed by declaring an interface called ao1 of type AccountOperations and applying it to your account. The displayInfo method of the interface is then called, which displays the account information. Up to this point, everything is exactly as you saw earlier in this lesson.
The listing then prints a simple dashed line to make it easier to see the before and after data. A second interface, uo1 of type UserOperations, is then created. In the same manner used for ao1, the interface uo1 is assigned to acct:
uo1 = &acct
With uo1, you can now access changeANumber to change the number of your account. You can still access the methods from the original interface, ao1, as can be seen by the call once again to displayInfo, which prints the account information. The full output of the listing is:
S2134534534535515900.005-------------X99999999991590
The key thing to note is that multiple interfaces are being applied to acct at the same time. acct has both the AccountOperations (ao1) and the UserOperations (uo1) interfaces providing access.
EMBEDDED INTERFACES
Go supports a concept similar to inheritance in object-oriented programming through the use of embedded interfaces. That is, you can define interfaces using the definition of other interfaces. Listing 15.7 shows how this works.
In this code, you first create two interfaces: AccountOperations and UserOperations. You then create a third interface, BankingOperations. Because the third interface calls the first two interfaces, its methods are the methods of the first two interfaces combined.
You then create a series of methods that execute the appropriate interface to handle the account defined in the struct.
In the main function, you use acct to implement the method of the BankingOperations interface, which effectively implements both AccountOperations and UserOperations. This then allows you to use displayInfo from AccountOperations without having to call it through an AccountOperations type. The output from running the listing is:
S2134534534535515900.005
Note that the use of multiple interfaces in this manner is similar to inheritance in object-oriented programming, where an inherited class includes all the properties of its parent's class, even if they aren't specified when the subclass is called.
SUMMARY
The use of interfaces is common in object-oriented languages. The Go language also supports interfaces. As you saw, an interface in Go is a named collection of method signatures without any implementation. In this lesson you learned how to create and use interfaces. This includes using multiple interfaces on a struct as well as embedding interfaces.
EXERCISES
The following exercises are provided to allow you to experiment with the tools and concepts presented in this lesson. For each exercise, write a program that meets the specified requirements and verify that the program runs as expected. The exercises are:
- Exercise 15.1: Rectangle Sides
- Exercise 15.2: Rectangle Space
- Exercise 15.3: Rectangle Borders
- Exercise 15.4: Triangles and Rectangles
- Exercise 15.5: Circles and Other Shapes
Exercise 15.1: Rectangle Sides
Create a struct for a rectangle similar to what is shown in Figure 15.1.
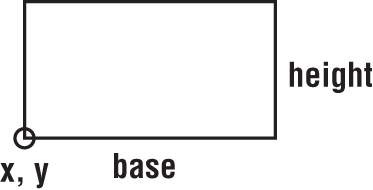
This structure can contain x, y, base, and height fields. Create a display method in your struct that displays the values for the four fields.
Create an interface called sides that lists two methods, one for updating the base and one for updating the height.
In your program, create two rectangles and assign them different values. Apply the sides interface to your rectangle and use it to double the base and height of both rectangles. Print the new values to show the update.
Exercise 15.2: Rectangle Space
Update your program from Exercise 15.1 with a second interface. This interface should be called area. Within the interface create a method to return the area of the rectangle (base times height) and a second method to display the area. You can call these methods getArea and displayArea. Add the code for the two methods using a rectangle receiver.
In your main program, apply the new interface along with the previous sides interface to your two rectangle structures. Print the information on each rectangle along with its area.
Exercise 15.3: Rectangle Borders
Continuing with the code in Exercise 15.2, create a third interface called circumference. Define it with two methods, getBorder and displayBorder. Update the main section of the program to also print the length of the border along with the area and other information for each rectangle. Once completed, you should be using three interfaces with your rectangle structure.
Exercise 15.4: Triangles and Rectangles
Create a new struct to hold a triangle. Similar to the rectangle struct, the triangle struct should contain x, y, base, and height. This structure should be added to the listing you created in Exercise 15.3.
In your main program, create two variables using your triangle struct. Using the same interfaces, display the values from the two triangles along with their area and circumference.
Exercise 15.5: Circles and Other Shapes
Update Listing 15.4 to work with other shapes. You can include a circle, an oval, and a trapezoid. Use the same interfaces.