
Lesson 12
Accessing Slices
The data type of an array includes the size of the array. This means that once you have created an array, you cannot change its size. In some cases, though, having fixed-size arrays can be limiting.
Go supports variable-sized data structures through the use of slices. Unlike arrays, the slice data type does not depend on its length, so a slice is a dynamic and powerful tool, with more flexibility than an array. Essentially, a slice is a subset of values in an array. In this lesson, we will dive into slices to understand how they work.
HOW SLICES WORK
A slice is an abstraction built on top of the array type. This means that it allows you to use the same logic you would with an array, but with more powerful features and flexibility.
A slice is a subset of an array. In other words, you can formally create an array and then create a slice that references only some elements of that array. Because each element of an array must be the same data type, it follows that each element of a slice must also be the same data type.
A slice consists of a pointer to an element in an array, the length of the segment, and its capacity (the maximum number of elements the slice can hold, which depends on the underlying array). To understand these three factors, consider the visualization in Figure 12.1.
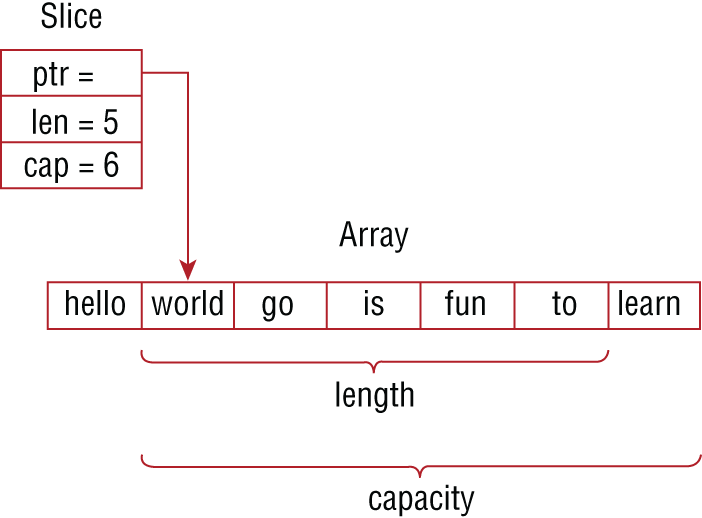
Figure 12.1: Visualization of a slice
In Figure 12.1, we start with an array that includes seven string elements, whose index values are 0–6. The slice references that array with three values:
- The pointer (
ptr) points to a specific element in the original array, using the index value for that element. In the figure, its value is 1, so it points to the second element in the array. - The length (
len) of the slice is 5. This means that it references five elements in the array (1–5), starting at the pointer's value. - The capacity (
cap) refers to the largest size of the slice based on the pointer value and the size of the array. In this case, because the array includes seven elements and the slice starts at the second element, the capacity is 6.
SLICE AN ARRAY
To understand the relationship between a slice and an array, let's look at an example where you first create an array and then create a slice of that array. Listing 12.1 creates an array of seven integers. It then creates a slice of that array, using the values in positions 0 through 4 of the original array.
This listing starts by defining an array called numbers that contains seven ints, which are assigned on the declaration. This array is then printed, followed by using the TypeOf method in the reflect package to show that numbers is indeed an array:
array value: [0 1 2 5 798 43 78]array type: [7]int
The listing then declares s to be equal to a slice of the numbers array using the following line of code:
s := numbers[0:4]
The slice includes the pointer 0 (referencing the first element in the array) and the next three elements. With the slice defined, you then use two more print statements. This time you print the values in s followed by the type of s:
slice value: [0 1 2 5]slice type: []int
Notice in the output that the array type explicitly includes the size of the array (7), while the size is not included in the slice type. The full output from the listing is:
array value: [0 1 2 5 798 43 78]array type: [7]intslice value: [0 1 2 5]slice type: []int
Using len and cap
We mentioned that the length of the s slice in Listing 12.1 is 4; however, we didn't mention the capacity. You can use the len and cap functions to compute the length and capacity of the slice. Listing 12.2 uses these functions to determine the length and capacity of a slice.
In this case, the slice called mySlice starts with the second element in the array and includes four elements starting from that point:
- The pointer is 1 because that is the first element you include from the original array.
- The length is 4 because you specifically include four elements. You start at index position 1 of the array and go to index position 5. Five minus 1 is 4.
- The capacity is determined by the size of the array itself. In this case, you exclude the first element in the array because you started the slice with index position 1, so the capacity is 6 because the array includes 7 elements.
The output confirms these statements:
[0 1 2 5 798 43 78][1 2 5 798]Length of slice: 4Slice capacity: 6
Using Shortcuts
You can use shortcut notations to define the size and elements of a slice. The basic syntax includes both a pointer and a length, but Go has a default value for each. Listing 12.3 presents three ways to define a slice.
This listing presents three separate ways or options for creating a slice by creating three separate slices. Let's look at the slices that were created:
slice:1: The notation[0:4]was used, which tells Go to go to the item at index position 0 and take all the elements up to, but not including, the item in index position 4. This is a total of 4 items, at index positions 0, 1, 2, and 3. (The pointer is 0.)slice:2: The notation[1:]defines the pointer as 1, so the slice starts with the second element in the original array (which is index position 1 of the array). Because you do not define the length, Go will use all remaining elements in the array, through len − 1.slice:3: If no pointer is defined, Go will use 0 by default. The notation[:5]tells Go to start at index position 0 of the array and retrieve 5 values.
When you execute this listing, the following output is generated:
Numbers array: [0 1 2 5 798 43 78]slice:1: [0 1 2 5]slice:2: [1 2 5 798 43 78]slice:3: [0 1 2 5 798]
CHANGING THE SIZE OF A SLICE
Because a slice is not defined by its size in the same way an array is, you can create slices of different lengths from the original array. In the example in Listing 12.4, you create a slice called s from the numbers array, using four elements from the original array. You then replace the slice with a slice whose length is equivalent to the capacity of the original slice.
The first part of this listing is similar to the previous listings in defining the array of numbers and an initial slice from those numbers. The initial slice starts with position 1 and goes through position 5, so it contains four values. You can see this when you print the initial array and the slice along with the length and capacity of the slice:
[0 1 2 5 798 43 78][1 2 5 798]Length of slice: 4Slice capacity: 6
After you print this information, a new value is assigned to your slice using the following line of code:
s = s[:cap(s)]
Note here that the pointer of the slice did not change when you redefined the slice because you did not include a pointer value when you updated it. In the original slice, you defined the pointer as the second element in the original array (the element with index 1). When you redefined the slice, you did not change the pointer; you simply redefined how many elements the slice should include. In this case you use cap(s) to determine the highest index value of the array you were pointing to. This successfully changes the length of the slice from 4 to 6, which can be verified by looking at the last two lines of the full output:
[0 1 2 5 798 43 78][1 2 5 798]Length of slice: 4Slice capacity: 6Revised slice: [1 2 5 798 43 78]Length of slice: 6
ITERATING THROUGH A SLICE
You can use a for loop to iterate through the elements of a slice. Listing 12.5 creates an array and then creates a slice based on that array. A for loop is then used to print the values of the slice.
In this listing, a simple for loop is used to print each element of the array on a separate line. This is done after print statements are used to print the entire array and the slice. The output is:
[0 1 2 5 798 43 78][0 1 2 5]Element 0 is 0Element 1 is 1Element 2 is 2Element 3 is 5
It is important to note that the index used to access individual items in the slice starts at 0. You can change the slice in Listing 12.5 to the following:
s := numbers[2:4]
When you run the listing with the slice using [2:4], the output becomes:
[0 1 2 5 798 43 78][2 5]Element 0 is 2Element 1 is 5
You can see that s[0] contains the first item in the slice.
THE MAKE FUNCTION
As we covered earlier, a slice always depends on an array; thus, each element in a slice must have the same data type. Additionally, while you define the initial size of the slice when you declare it, the size is not a fixed part of the definition.
Two or more slices can reference the same conceptualized array. If you assign one slice to another slice, both slices will refer to the same array, even in the absence of a formally defined array.
Go also allows you to simply create a slice without having to first create an array by using the built-in make function. When you use the make function, the compiler creates an array internally and then creates a slice that refers to that array, as shown in Listing 12.6.
In this listing, an int slice named s is created with 10 elements. The slice is created using make. In this case, make receives two arguments. The first is the array type associated with the slice ([]int), and the second is the length of the slice (10). After the slice is created, it is printed:
[0 0 0 0 0 0 0 0 0 0]
Because you did not assign any values to the slice elements and because the type is int, Go automatically assigns the default value of 0 to each element in the slice.
CREATING A SLICE VARIABLE WITH VAR
We can also use var to create a slice variable, using the syntax:
var variableName[]dataType
In Listing 12.7, you create an empty slice variable and then display the slice and its type. You do this using var.
The output is:
[]Slice type: []int
Go does not assign default values to slices, and because you do not define a length for the slice, the slice itself is empty. You must, however, include a data type for the slice. That data type is reflected in the slice's type. In this case, even though the slice is technically empty, you could only add integer values to the slice because of the slice's data type.
WORKING WITH SLICE ELEMENTS
While a slice depends on an array (explicitly or implicitly), each element in the slice is identified using an index value based on that slice, where the first element is index 0, regardless of the index values in the original array.
As with other data structures, you can identify individual elements by referencing their index values in the slice. You saw this illustrated earlier in Listing 12.5, when the values of the slice named s were printed.
Replacing an Element in a Slice
Accessing individual elements within a slice allows you to make changes to them. This includes being able to replace the values of individual elements in a slice, as shown in Listing 12.8.
In this listing, you create a slice called s using the make function. The slice is created to include 10 integer elements. Because you defined the slice as int, Go assigns the default value of 0 to each element. Once the slice is defined, you print the values stored in the slice:
Original slice: [0 0 0 0 0 0 0 0 0 0]
You then replace the first value with a different value. In this case, you assign the value 99. After the update is made in index 0, the slice uses the value of 99 for the first element. The full output is:
Original slice: [0 0 0 0 0 0 0 0 0 0]Updated slice: [99 0 0 0 0 0 0 0 0 0]
Working with Empty Slices
It's worth mentioning that if the slice is empty, you cannot add elements to it using indexes. In Listing 12.8, you specified that the slice should include 10 elements, so the slice is not empty. If you do not specify the number of elements in a slice, the slice remains empty until you add something to it, as illustrated in Listing 12.9.
You can see that s is created as an empty slice that will hold int values. When you try to add a value to the slice (even using index 0), the program throws a runtime error. This can be seen in the output presented when the listing is run:
[]panic: runtime error: index out of range [0] with length 0
Working with a Section of a Slice
You've seen how to print a single element from a slice using the slice name and an index value. For example, the following prints the first element in mySlice:
fmt.Println(mySlice[0])
You can also print a section of elements in a slice by including the starting element and ending element indexes, separated by a colon. For example, the following prints the elements from index positions 0 up to but not including 3 of mySlice:
fmt.Println(mySlice[0:3])
Listing 12.10 creates a slice of strings. Within this listing, the entire slice is printed, then a single element, and finally a range of elements.
This listing illustrates what has been shown before. It uses make to create an empty slice that can contain eight strings. Values are then assigned individually to elements within the slice before printing. The first print shows all the values in the slice. The second print shows an individual element—the element at mySlice[2], which is "Grumpy". Finally, the third print uses [2:5], which displays a section of the slice that starts with the element in the second index position up to, but not including, the element in the fifth position. The full output is:
[Happy Sneezy Grumpy Bashful Doc Sleepy Dopey Fred]Grumpy[Grumpy Bashful Doc]
Using range with Slices
In Listing 12.5 you looped through the elements of a slice called numbers and printed each value. You used the length of the slice to determine when the looping should end. You can also use the range keyword to loop through a slice, as shown in Listing 12.11.
You can see in this listing that the for loop has been simplified by using range. In this example, range returns two values, i and v. The variable i contains the index value of the slice element, and v will contain the value of the element.
APPENDING TO A SLICE USING THE APPEND FUNCTION
While you cannot append a value to an array, you can append a value to a slice. The append function adds a new element to the end of a slice. If the slice is empty, the element will be placed in index 0. If the slice is not empty, it will add the value to the first available position. In Listing 12.12 you create an empty slice named s and then add two elements to it.
The output is:
[][10][10 11]
As you can see in the output, the initial slice is empty. Each value you append to the slice adds a new element to the slice, changing the size of the slice.
COPYING A SLICE
The content of one slice can be copied into another slice by using the copy function. In Listing 12.13 you create one slice with two elements as well as an empty slice. You then copy the first slice into the second slice.
The output is:
Slice s: [10 11]Number of elements copied: 2Slice c: [10 11]
Note that when you create the second slice, you specify that its length should be equal to the length of the first slice:
c := make([]int, len(s))
You could use a hard-coded value (like 2) instead, but this approach guarantees that the new slice is large enough to hold the copied elements. If this value is too low (including even an empty slice with a length of 0), the copy operation will not work as expected.
The copy function itself performs two separate tasks:
- It copies the elements from one slice to another.
- It returns the number of elements successfully copied, which is equivalent to the lowest value of the length of the two slices.
In this case, the copy function copies two elements and then returns the value 2. However, if the length of the destination slice is lower than the length of the original slice, then only the lower number of elements will be copied. For example, if you use the following instruction to create the destination slice:
c := make([]int, 1)
Go will copy only the first element from s to c:
Slice s: [10 11]Number of elements copied: 1Slice c: [10]
CREATING A SLICE USING THE NEW KEYWORD
It is also possible to create a slice using the new keyword. In this case, you can use the following statement:
var newSlice = new ([capacity] type)(startingElement:length)
For example, the following code creates a pointer to a slice with a capacity of 10 int elements and a length of five elements:
var mySlice = new([10]int)[0:5]
With this declaration, the elements in the slice will have default values assigned. In this case, because the elements are of int type, all the elements of the slice will have the value 0.
Assigning and using the slice is similar to what you have seen before. You can assign values to the first two elements of the slice using the index value:
mySlice[0] = 1mySlice[1] = 2
Additionally, you can print the slice using Println by passing the name of the slice:
fmt.Println(mySlice)
Listing 12.14 is similar to Listing 12.10. The only difference is that, instead of using make, the new keyword is used to declare mySlice.
In this listing, mySlice is creating a new slice of string elements. This is confirmed by using the reflect.TypeOf function to print the slice's type in the output. The slice is defined to have a capacity of 10. The slice, however, starts in position 0 of that capacity and contains eight elements. These elements are assigned just as they were in the previous listing, and various portions of the slice are also printed the same as before with Listing 12.10. The full output is:
slice type: []string[Happy Sneezy Grumpy Bashful Doc Sleepy Dopey Fred]Grumpy[Grumpy Bashful Doc]
As you should recall, in Lesson 11, “Organizing with Structs,” you used the new keyword to create structs. At that time, you learned that the new keyword actually created a pointer to the struct that is created. The same is true with using the new keyword to create a slice. The new keyword is returning a pointer to the slice that is being created. This means that if the slice is passed to a function, the function would not be using a copy of the slice, but rather would be referencing the original slice that was created.
REMOVING AN ITEM FROM A SLICE
There is a not a built-in function in Go that allows an item from a slice to be easily removed. Instead, you can use the concept of re-slicing. That is, you construct a new slice from the original slice, while removing the item you don't want or need.
Let's first consider the following function, RemoveIndex. The function takes as input a slice inSlice and an index (the index of the element you want to remove) and returns a new slice:
func RemoveIndex(inSlice []int, index int) []int {return append(inSlice[:index], inSlice[index+1:]…)}
Within the function, you are simply using the append function to concatenate two slices. The first slice is the one defined as inSlice[:index], which will contain all the elements prior to the element you want to remove. The second slice is defined as inSlice[index+1:], which contains all the elements after the element you want to remove. When you use the append function, a new slice will be created and then returned by the RemoveIndex function.
Listing 12.15 uses the RemoveIndex function. In this case, an element from the middle of a slice is removed.
In this listing, you create a new slice called mySlice and assign different values to its five elements. Next, you use the RemoveIndex function to remove the third element from the slice (index 2). You print the slice before and after the call to RemoveIndex to show that the correct element is indeed removed. As you can see, the new slice does not include the third element of the original slice:
[1 2 3 4 5][1 2 4 5]
SUMMARY
In this lesson you learned about slices and how they differ from arrays. You learned several ways to create slices as well as how to manipulate the data within them. This includes adding, removing, and changing values. You also learned about using the new keyword to create a pointer to a slice. Finally, you learned how to remove an element from a slice.
EXERCISES
The following exercises are provided to allow you to experiment with the tools and concepts presented in this lesson. For each exercise, write a program that meets the specified requirements and verify that the program runs as expected. The exercises are:
- Exercise 12.1: Alphabet
- Exercise 12.2: Count the Letters
- Exercise 12.3: An Average Word
- Exercise 12.4: Student Names
- Exercise 12.5: No Blanks
- Exercise 12.6: Slicing Numbers Together
Exercise 12.1: Alphabet
Create an array that contains the entire alphabet. After creating the array, create two slices. In the first slice, place all the consonants from the alphabet array. In the second, place all the vowels.
Exercise 12.2: Count the Letters
Create two functions using the slices from Exercise 12.1. The functions should take a string and return either the number of vowels or the number of consonants that the string contains. You can determine the number by comparing each letter in the string to the values stored in either the consonant or vowel slices.
Create a program to prompt the user to enter a string. Print the number of characters, vowels, and consonants that are in the string.
Exercise 12.3: An Average Word
Create a program that prompts the user for a series of a fixed number of words and store each word in an array. You may choose the length of the initial array, but its size should be at least 10. After obtaining the array of words, do the following:
- Calculate the average length of each word in the array.
- Identify all words that are longer than the average length and store the results in a slice.
- Identify all words that are shorter than the average length and store the results in a slice.
- Display the original collection of words as well as both slices, with appropriate feedback to the user.
Additional requirements:
- All output words should be in lowercase, regardless of the case used to enter the initial values.
- Use functions where appropriate.
Exercise 12.4: Student Names
Create a program that prompts a user to enter names. Use the append function to add these names to a slice. Continue to add names until the user enters Quit.
Exercise 12.5: No Blanks
Add the following code to a program:
mySlice := make([]string, 8)mySlice[0] = "Happy"mySlice[1] = "Sneezy"mySlice[2] = "Grumpy"mySlice[3] = "Fred"mySlice[4] = "Doc"mySlice[5] = "Sleepy"mySlice[6] = "Dopey"mySlice[7] = "Bashful"
This code creates a slice and adds eight values to it. Within your program, write the code necessary to remove "Fred" from the slice. More importantly, also remove any blank elements from the slice.
Exercise 12.6: Slicing Numbers Together
Create a program that includes the following features:
- A function that creates a slice with a collection of random numbers between 0 and 100
- A function that sorts a slice in place (ascending and descending depending on an input parameter)
- A function that takes as input two sorted slices and combines the slices into a single sorted slice
- In the
mainfunction:- Create two slices.
- Sort the two slices.
- Combine and sort the two slices.
Additional requirements:
- Display all slices to the user, with appropriate feedback to identify each slice.
- Do not use any built-in functions.