
1.5. Dynamic Formatting
Crystal Reports makes it easy to control the format of each element in a report. At the section level, you can conditionally suppress a section, print the section at the bottom of the page, page break before or after the section, re-set the page number, keep the section together, suppress a blank section, or underlay following sections. To view these options, you can right-click on the section in Design view and select "Section Expert" from the menu. You will see the dialog shown in Figure 18.
Figure 18. Figure 18
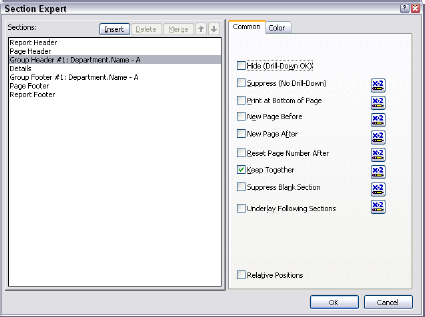
You can check the box next to any of the options on the Common tab to set the condition by default. The real power is when you click on the button to the right of each item. Clicking on this button opens the Format Formula Editor dialog box. You simply need to create a formula that returns true or false. For example, let's say you want to re-set the page number after every fifth page. Highlight Group Header #1 in the Sections list, and click on the Formula Editor button next to the "Reset Page Number After" option. Enter the following formula:
Remainder (PageNumber, 5) = 0
Click Save and Close, and then click OK on the Section Expert dialog. Preview the report, and you should see the page number in the footer of page 6 set to 1 again. Not so hard, huh?
Let's now change the report so that each department prints on a new page and so that if a department's employee list is longer than one page, the department name should repeat at the top of the subsequent pages:
Right-click on GroupFooterSection1 and select "Section Expert" from the menu. Make sure that "Group Footer #1" is selected in the Sections list.
Check the box next to "New Page After." This will cause a page break after the group footer.
Click OK.
Right-click on GroupHeaderSection1 and select "Group Expert" from the menu.
Click on the Department.Name field in the "Group By" list.
Click Options.
The Change Group Options dialog box should appear. Click on the Options tab.
Check the box next to "Repeat Group Header On Each Page."
Click OK and then click OK again.
Preview the report again. There should be a total of eight pages. Scroll through to page 4, which is the start of the Production department. This department has three pages of employees. Pages 5 and 6 have the Production Group Header repeated on each page.
Not only can you format sections and groups, but you can also dynamically format a field. For this report, let's set the background color of the last name field to red for any employee who works the night shift. To accomplish this feature, follow these steps:
Switch to Main Report view.
Right-click on the Last Name field in the Details section and select "Highlight Expert" from the menu. The Highlight Expert, shown in Figure 19, allows you to build a formula graphically to set the font, font color, background, and border.
Click New. The Item Editor frame should now be enabled.
In the "Value of" dropdown list, select "Other Fields" from the list. The Choose Field dialog box should appear.
Scroll down to the EmployeeDepartmentHistory table and click on the ShiftID field. Click OK.
The third dropdown list is now populated with the values in the ShiftID field. Select "3" from this list. The first three dropdown lists should say "EmployeeDepartmentHistory.ShiftID is equal to 3."
Change the Background dropdown list to Red. Click OK.
Figure 19. Figure 19

If you preview the report, you should notice people in the Production Department who now have their last name fields in red.