
11. Client-Side Storage
The persistence of information in the visitor’s browser has historically been limited to keys and values in cookies. Cookie storage is limited in size and structure, and cookies are passed with each request to their corresponding websites, creating unnecessary overhead. Certain sets of data could improve the user experience if cookies could be stored and retrieved locally, instead of being retrieved by web servers each time they are used. In HTML5, two client-side storage facilities have been added: web storage, which includes session and local storage, and database storage. In this chapter, you will learn about these new client-side storage options and work through some recipes to get you started with storing data locally in the browser.
Client-Side Storage Overview
To start talking about the new storage APIs, let’s first look at what we previously had available in browsers to store information locally. Typically, to store information that could be retrieved at a later time in a visitor’s browser, you had to create a cookie. Information stored may have included user preferences, form information, user keys, or the like. However, the storage of cookies is limited to approximately 4KB, contains only simple key/value pairs, and increases overhead by sending the cookie with each request to the server.
The session and local web storage options provided in HTML5 are similar to cookies in that the structure is in key/value format, in which string values can be assigned to string-based keys. A value can be accessed in the session or local storage by asking for the appropriate key in the storage object. The difference between the session and local options is simply the scope of the object in the visitor’s session. In session storage, the data is stored only for that particular session with the website. Once the session has ended, through closing the window or tab in the browser, the storage will be removed. When the user returns, the session storage will be empty. If, instead, you want the data to be available across sessions, whether at the same time in another window or a new session at a later date, then you can use the local storage, which is persisted even after closing the current session.
Key/value pairs limit storing more complex information (or at least make it difficult). Thus, a third type of storage has been added to provide data storage like you would normally use on the server side: database storage. Database storage leverages a SQLite database or IndexedDB and allows you to store more complex data objects, as you will see later in the chapter. Like local storage, database storage persists across sessions. Which storage mechanism you use in your website or application depends on the type of information you need to store, the scope of the data, and how long you need the data to be persisted. Table 11.1 provides a quick way to determine the appropriate storage type.
Table 11.1 Client Storage Types and Properties

Data Security
When we discuss data storage, we must also discuss security. Like storing information in a server database of a web application, similar security guidelines should be applied to database storage on the client side. This is especially true since unlike a server where you may have control over the firewalls, users, passwords, and other security features, a visitor’s browser is outside the immediate network. This makes it that much more important to be vigilant about what is stored in the client browser and how it is stored. Encryption may be a consideration depending on the data you are storing, but if you are considering encryption of the data, you may want to reconsider storing it in the first place.
The storage options in HTML5 employ “origin-based” security by limiting access to session, local, and database client-side storage to pages that originate from the same domain from which the storage was created. In this manner, pages from other sites or applications cannot access the data. However, the “origin” security implementation uses the page’s origin as the determining factor for access to the session and local storage lists of key/value pairs. Because of this, there is the potential for storage to be exposed to embedded scripts. This makes knowing the actions that the external files you use in your pages that much more important.
Note
Data you store using the local, session, or database objects is limited to the specific browser that is being used by the visitor at the time. If the user returns to your site or application using a different browser or a different computer, then the storage will not be accessible. Data that you would like accessible anywhere will still need to be stored on your database server or in the cloud.
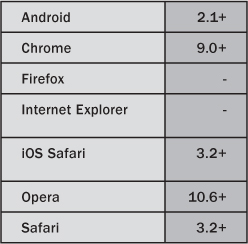
Client-side storage is being adopted rapidly by the different browser platforms, and Chrome is the leader in this support. There is still debate about the implementation of the best database storage mechanism by the different browsers, but Table 11.2 lists the current support of the client-side storage objects by various browsers.
Table 11.2 Client-Side Storage Browser Availability

Keys and Values: sessionStorage and localStorage
The session storage and local storage objects are similar in their implementations and differ only in the scope and persistence of the data that is written, as shown in Table 11.1. The browser provides a built-in storage interface for each storage type, sessionStorage and localStorage, and each uses a list of key/value pairs to store the data. You can set a value to a key and then retrieve the value by asking for the key. Both storage objects provide methods to set values, get values, remove a key, retrieve a key for a position in the list, and clear all the key/value pairs in the storage object. The methods and properties of each storage object type are the same, because they are inherited from the same Storage interface defined in the Web Storage specification:
• setItem(key,value): Sets the key/value pair passed as parameters. If the key exists, then the value is updated with the value passed.
• getItem(key): Returns the value for the key passed as a parameter.
• removeItem(key): Removes the key/value pair as defined by the key passed.
• key(n): Returns the name of the key for the index provided.
• clear: Removes all key/value pairs.
• length: Provides the number of key/value pairs in the storage list.
To set an item, you call setItem and provide a key and a value to be set:
setItem(key, value)
• key: The key to file the string value under
• value: The value to be stored with the file
The value is a string, so if you are storing a number, it will be treated as a string in the storage and will need to be converted back to the proper data type when retrieved. The key and value will then be stored in no particular order in the list of key/value pairs in the browser storage for the domain that the page has been loaded from.
If you set the item with a key that already exists, then the value of that key will be updated with the new value provided. Thus, the setItem method acts as both a create method and an update method. To store the value “book” under the key “source” in the session storage, you would make the following call in JavaScript:
sessionStorage.setItem('source', 'book'),
The setItem method does not have a return value, so to protect against possible storage errors, you can enclose the call in a try-catch block.
To retrieve the value of a key from either the session storage or the local storage, you call getItem with the key that you are interested in. The return will be a string value, which you can then use in your script:
string getItem(key)
Here key is the string key to retrieve the corresponding value.
To retrieve the value stored in the previous example, you would ask for the “source” key from the session storage by performing the following call:
textSource = sessionStorage.getItem('source'),
Since the session and local storage are based around storage objects, you can also use object dot notation to access stored values of keys by using the key as the property name, as shown here:
textSource = sessionStorage.source;
Now that we have briefly discussed the get and set methods of the session and local storage, we’ll show a basic recipe in action. We will start the recipes with the session object and then move to local storage.
Tip
In browsers such as Firefox, the user can disable storage. To validate that storage is available, your code should attempt to write and then retrieve a value. If the value cannot be retrieved, then storage may be disabled in the browser.
Beginner Recipe: Getting and Setting Session Storage
In this recipe, the HTML page will use the getItem and setItem methods of the sessionStorage object to store and retrieve the number of times that a visitor views a page in the session. This number is incremented with each refresh of the page and displayed to the visitor. Perform the following steps to create the page in Listing 11.1:
1. Create a blank HTML page with a div titled divVisits.
2. Add the init function in a set of script tags with the code from Listing 11.1.
3. Add the window.addEventListener event handler to launch the init function after the page loads.
Listing 11.1 Displaying Page Visits Using Session Storage
<!DOCTYPE html>
<html>
<head>
<meta charset="UTF-8" />
<title>11.1 Session Storage Page Visits</title>
<script>
function init() {
// reference the div for display
var divVisits = document.getElementById('divVisits'),
// check if our browser supports sessionStorage
if (window.sessionStorage) {
var visits; // number of visits to this page
// check to see if our variable exists using dot notation
if (sessionStorage.visits) {
// retrieve key and convert to int
visits = parseInt(sessionStorage.getItem('visits'));
// increment the visits
visits++;
} else {
// default to first visit
visits = 1;
}
// update our visits variable
sessionStorage.setItem('visits',visits);
// display the number of session visits
divVisits.innerHTML = 'Session page visits: ' + visits;
} else {
// sessionStorage not available
divVisits = 'Window sessionStorage is not available';
}
}
// onload launch our init function
window.addEventListener('load',init,false);
</script>
</head>
<body>
<div id="divVisits"></div>
</body>
</html>
When you load the page created in Listing 11.1 in your browser, the init function will be launched. The init function will first check to see whether the sessionStorage object is available in the window by checking for window.sessionStorage. If the sessionStorage object is not available, then you will display a message in your div on the page.
Assuming that the session Storage object is available, the JavaScript code then checks to see whether the key “visits” exists by asking for the value through the dot notation: sessionStorage.visits. If the key “visits” exists, then the value will be returned, and the check will pass. Otherwise, you know that this is the first time for this session and will start the “visits” count at 1. If the key is in session storage, then to demonstrate the get method of retrieving values, you will retrieve the value of the key via the getItem method. When the value is retrieved, you convert the “visits” string value to an integer data type with parseInt. This conversion must be done because all values in web storage are stored as basic strings. If your script is storing and then retrieving other data types, you will want to convert these strings to their proper types.
After you have either retrieved the number of visits and incremented it by 1 or set the initial value to 1, the script will then update the “visits” key in the session storage with the setItem method. If the key was not in session storage previously, then setItem will add the key/value pair, but if the “visits” key was already in session storage, then the value will be updated with the new number of visits.
Chrome Developer Tools for Viewing Storage
You may wonder after loading the page created in Listing 11.1 in your browser how you can validate what is happening behind the scenes in the local session storage as the script runs. The Google Chrome browser has a set of tools titled Developer Tools that you may already be familiar with. If you open these tools in your browser window and refresh your page, you will be able to see the session storage key/value pairs under the Resources section, as shown in Figure 11.1.
Figure 11.1 Viewing the session storage key/value pairs in Chrome’s Developer Tools

In Figure 11.1, the domain that has stored keys is shown on the left under Session Storage, and on the right are the key/value pairs that are currently stored. In this case, the current value of visits is 2, and the JavaScript has displayed this to the user. The Developer Tools of Chrome are useful for working with the session and local storage because you can confirm not only that your script is working correctly but also add, update, and remove key/value pairs through the user interface. In the current version of the Developer Tools, you will need to refresh the storage key/value view pane with the Refresh button at the bottom if you change a key/value pair.
Tip
Any object that has a toString built-in method can be stored in the value field of the key/value pairs of session and local storage. Even more complex JSON structured objects can be stored by using the JSON.stringify(yourObject) and JSON.parse(itemRetrieved) methods to convert the JSON object to a string and then convert the string retrieved back to your object.
This recipe performed a very simple setting and getting of a key/value pair in session storage. The next recipe will include error handling and show the availability of session storage across pages.
Beginner Recipe: Styling from Session Storage
In this recipe, you will provide the visitor to your page with the opportunity to select a theme color for the background of the pages. The visitor’s selection will be stored in the session storage and retrieved on a second page to control the background color. A theme reset option is provided, which will remove the stored background key/value pair from the session storage. The following is the removeItem method that will be used in this recipe:
removeItem(key)
Here key is the key string to be removed.
Like any data storage mechanism, session and local storage have size limitations in place to protect the browser and the client’s machine. Each browser sets its own size limitation, but unlike cookies, which are limited to a rather small 4KB, the sizes allocated for session and local storage are much larger. At the time of writing this book, Internet Explorer 9, for example, has a 10MB limitation. If your script attempts to set or update a value for a key and hits this ceiling, an error will be thrown. To prevent your script from abruptly ending because of this error, you should wrap your setItem method calls in a try-catch block. In this recipe, we will show you how to catch this error if it were to happen. The following steps and Listing 11.2 will allow you to create page 1 of the recipe:
1. Create the page in Listing 11.2 with the style, script, and body tags.
2. Add the themeContent and themeSettings divs, as shown in Listing 11.2 with the corresponding HTML.
3. Add the initTheme, setTheme, resetTheme, and applyTheme functions to your script.
4. Add the window.addEventListener statement to trigger the initTheme function.
Listing 11.2 Setting a Theme in Session Storage
<!DOCTYPE html>
<html>
<head>
<meta charset="UTF-8" />
<title>11.2 Theme Selector - Page 1</title>
<style>
#themeContent {
background-color:#FFF;
border-style:solid;
border-width:2px;
}
#themeSettings {
margin:10px;
}
</style>
<script>
var themeDiv; // output display div
// function to initialize the theme
function initTheme() {
// set our div reference for output
themeDiv = document.getElementById('theme'),
// check if our browser supports sessionStorage
if (window.sessionStorage) {
// set the button handler
var btnResetTheme = document.getElementById('resetTheme'),
btnResetTheme.addEventListener('click',resetTheme,false);
// set the select list change handler
var selThemeColor = document.getElementById('themeColor'),
selThemeColor.addEventListener('change',setTheme,false);
// check if we have previously set the theme color
if (sessionStorage.themeColor) {
// set the initial theme color
var themeColor = sessionStorage.getItem('themeColor'),
document.getElementById(themeColor).selected = true;
applyTheme(themeColor);
}
} else {
themeDiv.innerHTML = 'sessionStorage is not supported.';
}
}
// set the chosen theme
function setTheme() {
// retrieve the theme color selected
var themeColor = document.getElementById('themeColor').value;
// use our try catch and set the theme color
try {
sessionStorage.setItem('themeColor',themeColor);
applyTheme(themeColor);
}
catch(err){
// error code 22 QUOTA_EXCEEDED_ERR says we ran out of space
if(err.code == QUOTA_EXCEEDED_ERR){
themeDiv.innerHTML = 'sessionStorage ran out of memory.';
// perform any other handling we want to here
}
}
}
// function to reset the theme color
function resetTheme() {
// remove the item from the session storage
sessionStorage.removeItem('themeColor'),
// reset display
document.getElementById('default').selected = true;
document.body.style.backgroundColor = '';
themeDiv.innerHTML = 'Theme reset.';
}
// apply a theme to the page
function applyTheme(themeColor) {
document.body.style.backgroundColor = themeColor;
themeDiv.innerHTML = 'Theme ' + themeColor + ' applied. ';
}
// initialize our window
window.addEventListener('load',initTheme,false);
</script>
</head>
<body>
<div id="themeContent">
<div id="themeSettings">
<H1>Page 1</H1>
Choose Theme:
<select id="themeColor">
<option id="default" value="">Select color...</option>
<option id="blue" value="blue">Blue</option>
<option id="red" value="red">Red</option>
<option id="yellow" value="yellow">Yellow</option>
<option id="green" value="green">Green</option>
</select>
<button id="resetTheme">Reset Theme</button><br><br>
<div id="theme"></div><br><br>
<a href="11_3_theme_page_2.html">Go To Page 2</a>
</div>
</div>
</body>
</html>
After setting the theme on page 1, which is in Listing 11.2, you can verify that the theme has been stored by loading a different page that reads the storage and uses the theme information to set the proper theme. Use the following steps and Listing 11.3 to create the second page to show the theme color previously selected:
1. Create a new page based on Listing 11.3 with the appropriate sections.
2. Modify the page’s a tag in both pages to correspond to the name of your pages so that you can navigate back and forth between the pages.
Listing 11.3 Showing the Theme Page 2
<!DOCTYPE html>
<html><head>
<meta charset="UTF-8" />
<title>11.3 Showing the Theme - Page 2</title>
<style>
#themeContent {
background-color:#FFF;
border-style:solid;
border-width:2px;
}
#themeSettings {
margin:10px;
}
</style>
<script>
// initialize our page
function init() {
// retrieve the saved theme color
var themeColor = sessionStorage.getItem('themeColor'),
applyTheme(themeColor);
}
// apply the theme to the page
function applyTheme(themeColor) {
document.body.style.backgroundColor = themeColor;
var themeDiv = document.getElementById('theme'),
themeDiv.innerHTML = themeColor + ' theme.';
}
// initialize the page
window.addEventListener('load',init,false);
</script>
</head>
<body>
<div id="themeContent">
<div id="themeSettings">
<H1>Page 2</H1>
<div id="theme"></div>
<br><br>
<a href="11_2_theme_page_1.html">Go To Page 1</a>
</div>
</div>
</body>
</html>
When page 1 is loaded into your browser, the page first retrieves the currently stored theme color from the session storage. The first time the page is run, there is no theme, and the return value is empty, so the theme is set to the browser’s default. On subsequent loads of the page, the color would be retrieved, set to the background color, and set as the selected value in the color select control.
Note
To run recipes involving session storage, you will need to upload the pages to a server instead of running them in “local mode.” The reason is that in local mode some browsers will throw an error saying that the operation is not supported. For example, in Firefox, an “Operation is not supported” code 9 error will be thrown.
Once loaded, the visitor can change the drop-down list of options to another color, which will change the page background color and store the color in session storage under the key themeColor. In the script, this setItem call to store the setting has been wrapped in a try-catch block. If triggered because of the size constraints, the code informs the visitor that the session storage is full, but you could perform whatever actions are needed when this scenario occurs. After setting the theme color, the visitor can click Go To Page 2, which will load the second page. Since the second page is in the same session as the first page, it will also have access to the session storage key/value pair saved on page 1. The second page then retrieves this item and sets the background to the stored color.
In Listing 11.2, you also added the option for the visitor to reset the theme. In this case, the recipe removes the key/value pair from the session storage with the removeItem method. The recipe could have also updated the key by calling setItem with an empty string value.
At the beginning of this chapter, we discussed how session storage allows you to store data for that session only. If you load the page created in Listing 11.2 into two tabs or windows in the same browser and then select different colors, each tab will have its own background color since there is a different session for each tab or window. To have the values available across browser windows or tabs, and even after the browser is closed and reopened, you will need to use the local storage object. We will look at the local storage object in the next recipe.
Intermediate Recipe: Storing Forms with Local Storage
Session storage, as shown in the previous recipes, provides you with a method to store items for the period of the visitor’s session, which can be beneficial for short-term storage. At times, though, you will want to store data in the visitor’s browser for use when they return or even across currently active sessions. This is where local storage is valuable. Local storage uses the same key/value pair list to store data with the getItem, setItem, and removeItem web storage methods. The important factor is that the data you store in local storage persists even after the session is closed.
This recipe shows an example of remembering form data that a visitor has previously filled out. A visitor could come to your site, start a form, and then navigate away or close their browser. Typically, the visitor would have found the form empty when they returned to the site. In this recipe, as the visitor fills out the form, the JavaScript catches the changes and stores the form fields and values in the local storage. Then if the page is closed and reloaded, the page checks local storage to see whether there is stored form data and automatically populates the form with the information. A similar implementation could even handle collecting form data from a multipage form and storing it locally until the entire form has been completed.
Two new concepts with the session and local storage are employed in this recipe: key and length. The key method allows you to retrieve the name of the key stored by supplying an index value to the key method:
DOMString key(index)
Here, index is the index of the key/value pair to return the key string for.
The recipe also uses the length property of the session and local storage, which returns the number of key/value pairs in the session or local storage. To return the number of key/value pairs, you would use a call like the following:
var numItems = localStorage.length;
In this recipe, you will use both the key method and the length property to loop through the localStorage key/value pairs. Let’s do the following steps to get started with Listing 11.4:
1. Create a blank HTML file and add the body HTML from Listing 11.4, which holds the form and form fields you will be using. For simplicity sake, we have used onchange inline for the form fields, but you could replace these with event listeners for each of the fields.
2. Add the script tags in the head of the HTML file with the window.addEventListener function to launch the checkStorage function when the page is loaded.
3. Add the checkStorage function in the script, as shown in Listing 11.4.
4. Add the changeField function in the script, as shown in Listing 11.4, which will handle the form field changes.
5. Load the file in your Chrome browser with the Developer Tools open to the local storage area, and enter information in the fields.
Listing 11.4 Storing Form Changes in localStorage
<!DOCTYPE html>
<html>
<head>
<meta charset="UTF-8" />
<title>11.4 Storing Form Data with Local Storage</title>
<script>
// function to read storage and init form
function checkStorage() {
// check if local storage available
if (window.localStorage) {
var key, value, field;
// loop through local storage
for (var i = 0; i < localStorage.length; i++) {
// retrieve the key
key = localStorage.key(i);
// set the field from the key
field = document.getElementById(key);
// check for field and assign value
if (field) {
// retrieve the value
value = unescape(localStorage.getItem(key));
// set the field value
field.value = value;
}
} // end for loop
} // end local storage check
} // end function
// set the localStorage with the changed field
function changeField(formField) {
// check if local storage available
if (window.localStorage) {
var key, value;
// set key to form field id
key = formField.id;
// set value to form field value
value = escape(formField.value);
// try to set item in local storage
try {
localStorage.setItem(key, value);
}
catch (err) {
if (err.code == QUOTA_EXCEEDED_ERR) {
alert('localStorage ran out of memory.'),
}
}
} else {
alert('localStorage is not supported.'),
}
}
// initialize our form from storage
window.addEventListener('load',checkStorage,false);
</script>
</head>
<body>
<h1>My Form</h1>
<form id='myForm'>
<table>
<tr>
<td>First Name:</td>
<td><input type="text" id="firstName" onchange="changeField(this);" /></td>
</tr>
<tr>
<td>Last Name:</td>
<td><input type="text" id="lastName" onchange="changeField(this);" /></td>
</tr>
<tr>
<td>Email:</td>
<td><input type="email" id="email" onchange="changeField(this);" /></td>
</tr>
<tr>
<td>Telephone:</td>
<td><input type="tel" id="phone" onchange="changeField(this);" /></td>
</tr>
</table>
</form>
</body>
</html>
After you enter your first name in the firstName field and tab to the next field, the onchange event will fire for the firstName field. The changeField function will then execute with the form field of firstName passed as a parameter. The changeField function will then store the field data in a key/value pair in localStorage. The function uses the ID of the form field for the key and the value as the value in the key/value pair. So, if you have Developer Tools open in Chrome when you are doing this, you should now see the key firstName with the value of the text entry you supplied.
To see the real power of localStorage, close your tab or browser window and then reopen it to this form page. When you reopen the page, the checkStorage function will execute on page load. This function is designed to check whether you have previously stored any form information in local storage and retrieve this information. The function will retrieve each key/value pair by looping through the localStorage list, check to see whether there is a form field ID that matches the key name, and if so set the field value to the value retrieved.
In this recipe, you use simple text fields to show the power of localStorage, but this could be used for other types of form inputs as well. The changeField and checkStorage functions would need to be updated to handle different logic for different field types such as a select list or a radio button, but the value could be stored like the regular text input in local storage.
After the page is finished with the stored form information and the form is ultimately submitted to the server, you would ideally want to remove the fields. Besides the removeItem method that you saw before, the storage API provides a method for clearing the entire session or local storage: clear. The clear method takes no parameters nor does it return any result and “clears” all key/value pairs for the page’s domain out of the list. The following is an example of the call:
localStorage.clear();
The execution of this line will clear all key/value pairs from the local storage list no matter which page added them or when they were added. Because this is an all-or-nothing type of method, you should be absolutely positive you want to clear the contents of the session storage or the local storage.
In the recipes to this point, you learned about the basics of adding, updating, and removing stored data for a site on the client machine. This assumes the visitor is on a single page interacting with the site at the time. If the stored information was changed from another page in the browser, you have had no way to automatically handle that change on a previously open page. The client-side storage API provides an event structure for session storage and local storage updates that you can catch and handle on an open page. This next recipe combines the methods you have seen along with storage update events to refresh your page content.
Advanced Recipe: Catching Events in Local Storage
In this recipe, you will use the local storage methods and properties to implement a notes sidebar, which will allow the visitor to take notes as they browse through the site. The notes are stored in the local storage of the visitor’s browser, and the order of the notes is maintained. The visitor can add a new note, update a note, remove a note, or remove all their notes. In addition, if the visitor is viewing the site in multiple tabs or browser instances, the notes will automatically update on all pages when a change happens on one page.
To automatically update the list of notes on a browser tab or window based on a change in the list of the notes by the visitor on another tab or window, you will need to employ the storage event mechanism. Like other events you have seen, a storage event is raised when the session storage or local storage is modified. The event could occur when a new key/value pair is added, updated, or removed. A handler on the page can listen for these events and perform actions based on the receipt of the event. The storageEvent contains attributes that will help determine the actions that need to be taken (Table 11.3). In this recipe, you will catch the event, verify that it is from local storage, alert the visitor of the change, and then refresh the notes list so that you are showing the current list.
Table 11.3 The storageEvent Attributes

Let’s get started with the following steps for Listing 11.5:
1. Create a blank HTML page with the HTML body and style tags, as shown in Listing 11.5.
2. Add the script tags and keyCode variable declaration. This variable holds a key that you will prefix each stored note with.
3. Add the window.addEventListener line and the initNoteBoard and updateNoteBoard functions.
4. Add the note functions: addNote, changeNote, updateNote, and removeNote. The changeNote function loads the note into the update form, while updateNote modifies the note in local storage.
5. Add the clearAllNotes function to allow the visitor to reset the note board.
6. Add the event handler function, onStorageEvent, which will catch any storage events.
Listing 11.5 Storing Notes in Local Storage
<!DOCTYPE html>
<html>
<head>
<meta charset="UTF-8" />
<title>11.5 Storing Notes in Local Storage</title>
<style>
* {margin: 0; padding: 0;}
body {padding: 20px;}
h1 {font-size: 120%; margin: 0 0 .5em;}
section {width: 300px;}
#noteBoard, textarea {
-moz-border-radius: 10px;
-webkit-border-radius: 10px;
border-radius: 10px;
-moz-box-shadow: 0px 0px 4px rgba(0,0,0,.4);
-webkit-box-shadow: 0px 0px 4px rgba(0,0,0,.4);
box-shadow: 0px 0px 4px rgba(0,0,0,.4);}
#noteBoard {
background: #FCFABA;
float: right;
padding: 10px 20px;}
#noteBoard div {
border-bottom: 1px dashed #CCC;
margin: 0 0 5px;
padding: 5px 0;
width: 100%;}
#noteBoard div.buttons {border: none;}
#addNote, #updateNote {float: left;}
#addNote {
border-right: 1px dashed #ccc;
margin: 0 50px 0 0;
padding: 0 50px 0 0;}
#updateNote { display:none;}
textarea {
border: none;
clear: both;
height: 150px;
margin: 0 0 10px;
padding: 10px;
width: 280px;}
input[type="text"] {margin: 0 0 10px; padding: 4px; }
button {padding: 5px;}
</style>
<script>
// note prefix for storage entries
var keyCode = 'note';
// initialize our note board
function initNoteBoard() {
// set our listener for storage changes
window.addEventListener('storage', onStorageEvent, false);
// set listeners for new and update note
var btnAddNote = document.getElementById('btnAddNote'),
var btnUpdateNote = document.getElementById('btnUpdateNote'),
btnAddNote.addEventListener('click',addNote,false);
btnUpdateNote.addEventListener('click',updateNote,false);
// update the display
updateNoteBoard();
}
// our storage event handler
function onStorageEvent(eventObj) {
if (eventObj.storageArea == localStorage) {
// alert visitor of change
alert(eventObj.key + ' changed from "' +
eventObj.oldValue +
'" to "' +
eventObj.newValue + '".'),
// update the display
updateNoteBoard();
}
}
// add a note function
function addNote() {
// retrieve the number of notes we have
var numNotes = parseInt(localStorage.getItem('numNotes'));
if (isNaN(numNotes)) {
numNotes = 0;
}
// set our key and value
var noteKey = keyCode+numNotes;
var noteValue = document.getElementById('note').value;
// set our note
localStorage.setItem(noteKey, noteValue);
// update the number of notes
numNotes++;
localStorage.setItem('numNotes', numNotes);
// update our note board
updateNoteBoard();
// reset our note entry
document.getElementById('note').value = '';
}
// function to load the note to be updated
function changeNote(noteKey) {
// set our key and value in the update form
document.getElementById('oldKey').value = noteKey;
document.getElementById('oldNote').value = localStorage.getItem(noteKey);
// show our update note area
document.getElementById('updateNote').style.display = 'block';
}
// function to update the note
function updateNote() {
// retrieve our new values for the note
var key = document.getElementById('oldKey').value;
var note = document.getElementById('oldNote').value;
// update the key/value pair
localStorage.setItem(key, note);
// clear our update area
document.getElementById('updateNote').style.display = 'none';
document.getElementById('oldKey').value = '';
document.getElementById('oldNote').value = '';
// update our display
updateNoteBoard();
}
// function to remove a note
function removeNote(noteKey) {
// retrieve our number of notes
var numNotes = parseInt(localStorage.getItem('numNotes'));
// extract our note key index from the note key
keyIdx = parseInt(noteKey.substring(keyCode.length,noteKey.length));
// loop through notes and move each down the list
for (var i = keyIdx; i < numNotes; i++) {
localStorage.setItem(keyCode+i,localStorage.getItem(keyCode+(i+1)));
}
// update our number of notes
numNotes--;
localStorage.setItem('numNotes',numNotes);
// remove the last note that is now a duplicate
localStorage.removeItem(keyCode + numNotes);
// update our display
updateNoteBoard();
}
// function to remove all notes
function clearAllNotes() {
// retrieve the number of notes
var numNotes = parseInt(localStorage.getItem('numNotes'));
if (isNaN(numNotes)) {
numNotes = 0;
}
// loop through note key/value pairs and remove
for (var i = 0; i < numNotes; i++) {
localStorage.removeItem(keyCode+i);
}
// update our number of notes to 0
localStorage.setItem('numNotes','0'),
// update the display
updateNoteBoard();
}
// display our notes
function updateNoteBoard() {
// set our display area
var noteBoard = document.getElementById('noteBoard'),
// retrieve our number of notes
var numNotes = parseInt(localStorage.getItem('numNotes'));
// set default to 0 if no notes
if (isNaN(numNotes)) {
numNotes = 0;
}
var notes = '<div>My Notes:</div>';
var key = '';
var value = '';
// loop through the notes
for (var i = 0; i < numNotes; i++) {
// create our key with our prefix
key = keyCode + i;
// retrieve our key
value = localStorage.getItem(key);
// build our display for this note
notes += '<div><p>'+value+'</p><div class="buttons">'+
'<button onclick="changeNote(''+key+''),">Change</button>'+
'<button onclick="removeNote(''+key+''),">Remove</button>'+
'</div>'+
'</div>';
}
// finish off our display
notes += '<div style="float:right;"><button id="clearAllNotes">Remove All Notes</button></div>';
// set the list to the display
noteBoard.innerHTML = notes;
// set listener for clearing all notes
var btnClearAllNotes = document.getElementById('clearAllNotes'),
btnClearAllNotes.addEventListener('click',clearAllNotes,false);
}
// initialize our note board
window.addEventListener('load',initNoteBoard,false);
</script>
</head>
<body>
<h1>Note Board</h1>
<section id="noteBoard"></section>
<section id="addNote">
<h1>Add a new note here:</h1>
<textarea name="note" id="note"></textarea>
<button id="btnAddNote">Add Note</button>
</section>
<section id="updateNote">
<h1>Update the note</h1>
<input type="text" name="oldKey" id="oldKey" disabled />
<textarea name="oldNote" id="oldNote"></textarea>
<button id="btnUpdateNote">Update Note</button>
</section>
</body>
</html>
When the page loads, the initialization launches the initNoteBoard function. This function attaches the event listener to catch any events that are storage events and will launch the storageEvent handler. Next, the initNoteBoard updates the display of notes by checking local storage. In the updateNoteBoard function, the script will first retrieve the key numNotes, which is a count of the number of notes that you have stored previously. Then, using numNotes, the script will loop through and retrieve each key/value pair using the keyCode, “note” with the index starting at 0. So, to retrieve the first note, the page calls getItem with the key note0. The keyCode and numNotes keys are used for two reasons. First, using them will ensure that you do not have to cycle through any other key/value pairs that may be stored in local storage for the site, and second, this will allow you to keep your notes in order. Remember that for session and local storage there is no specific order to the key/value pairs in the list. The browser will insert them using setItem in no particular order (see Figure 11.2).
Figure 11.2 Sample output showing multiple key/value pairs in local storage

The real power of this recipe is in the event handling. If you load the page into two browser tabs or windows and add a new note in one of the windows, the event handler will be triggered. In this case, the onStorageEvent function will be called, and the function will perform two actions. First, the function alerts the visitor that there has been a change and provides the visitor with a little information on the update. Second, the event handler calls the update display function to show the updated list of notes. If you play around with the addition, update, and removal of notes, you will see how this event handling behaves.
If you remove a note, the event handler will show you multiple changes happening in local storage. The reason for this is how the order of the notes is maintained. To maintain the order of the list, the script uses an algorithm by which entries after the one to be removed are pushed down the list and the last entry is then removed. Remember that the clear method will not only remove the key/value pairs you are interested in but will remove all key/value pairs in the storage.
Note
Storage events do not get triggered on the same page that made the session or local storage modification. Instead, storage events are propagated notices to other browser windows or tabs. To catch a change on the page that made the change, you will need to call the logic directly when the change is made.
In this recipe, you used a specific key, numNotes, to hold the number of notes that had been entered. In addition, to keep the notes ordered, you used a key prefix with an incrementing number such as note0, note1, and note2. What if the script needed to sort the list based on different criteria or needed to catalog your notes into categories? You could devise your own method using JavaScript and objects, but with HTML5 and its definition of the Web SQL Database API, this task becomes quite simple, as you will see in this chapter’s final recipe.
Web SQL Database API
As you saw in the previous recipes of this chapter, the Session and Local Storage APIs allow for the storage of simple data in the client browser. If you want to store more complex objects, properties, and relationships, you will need to leverage the new Web SQL Database API or IndexedDB API. Like other APIs, these are not part of HTML5 core specification but a set of additional specifications being adopted by browsers. In general, the Web SQL Database API is currently supported by several browsers, while the IndexedDB API is still being defined and has limited support. Over time, it is expected that the IndexedDB will be more widely supported, but we will focus on the Web SQL Database API in this chapter for demonstration.
If you have had the opportunity to work on server-side pages and database access, most likely you have used a similar SQL-based database. And if not, then here is your opportunity to have a powerful data management storage system right in the browser. Table 11.4 shows the browser support for the Web SQL Database API.
Table 11.4 Web SQL Database Browser Availability
The Web SQL Database API specification is based on SQLite, so if you have already used SQLite in a mobile environment such as iOS development, then it will be familiar. At the same time, if you have used a server-side database such as MySQL, the basic commands and structure will be recognizable. If you have no SQL experience, then you may want to seek some resources on SQL commands, but we will cover the basic create, read, update, and delete commands in the next recipe. Like session and local storage, the web database is available only to the pages in the same origin from which it was created for security purposes; however, unlike session and local storage, the web database can store complex data with relationship information.
Note
Currently, there is some debate as to the underlying database format for use with the Web SQL Database API. SQLite is listed in the W3 Web Database specification and has been implemented by several browsers. However, until there is general acceptance, the web database group of the W3C has put the specification on hold for further development. This has resulted in further pushing of the IndexedDB specification, which is gaining traction.
To interact with the web database, the API provides three core asynchronous commands. The reason these commands are typically asynchronous is so that the rendering of the browser page does not get “blocked” while waiting for a database call to return. Depending on the amount of data requested in a transaction, the page could have to wait several seconds for the set of data to be returned. The three core commands allow you to open (or create a database), create a transaction, and execute SQL statements within the transaction:
• openDatabase: Opens a present database or creates a database based on the parameters passed if the database is not present.
• Transaction: Encompasses the commands to the database so that you can perform a rollback on the entire transaction if needed. There is a read-only version available, readTransaction.
• executeSql: The method to run an actual SQL command on the open database.
The openDatabase method opens an established database, or if the database is not present, the method will automatically create the database described in the parameters and then open the database as follows:
WindowDatabase openDatabase(name, version, displayName, estimatedSize [, creationCallBack])
The parameters of the openDatabase method are as follows:
• name: The name of the database
• version: A version number you assign to the database
• displayName: A user-friendly display name for the database
• estimatedSize: An estimated size for the database
• creationCallBack: (Optional) The function called when the database has been created for the first time
A WindowDatabase object is returned that will then be used to perform transactions with. The database is automatically closed when the browser window or tab is closed.
Tip
The version number of the openDatabase method is a value that you can use to track versions of your database structure and data. This can be helpful if you are using the database to provide quick, local lookups of data. When your lookup data changes and the user comes back to your website, you could check this version by having stored the value in a table in a master web database. If the lookup database was not up-to-date, then a new one could be installed. Or, you could use the error code when opening to validate that it is the wrong version.
To query the database, a transaction request must be performed. The transaction method wraps one or more executeSql commands to create a single transaction for the database to act on. The transaction can be used for rollback purposes if any of the SQL queries fail. The callback parameter of the transaction encompasses the inline function for the executeSql methods, as shown here:
transaction(callback [, errorCallback] [, successCallback])
The parameters of the transaction method are as follows:
• callback: The functionality to perform within the transaction
• errorCallback: (Optional) The function to handle any errors that occurred
• successCallback: (Optional) The success function called if all processes within the transaction were successful
The executeSql method takes your SQL query command as the first parameter and can include an array or optional arguments, a successful callback, and an optional error callback, as shown here:
executeSql(sqlStatement [, arguments] [, callback] [, errorCallback])
The parameters of executeSql method are as follows:
• sqlStatement: A SQL statement to be executed
• arguments: (Optional) An array of optional arguments
• callback: (Optional) The functionality to perform if the SQL statement execution is successful
• errorCallback: (Optional) The functionality to perform if the SQL statement execution creates an error
The error handler parameter option for the database API methods is used to catch any errors that could occur in interacting with the database. This could include instances such as an error in your SQL or an issue in accessing the database:
• UNKNOWN_ERR (0): An unknown error beyond the ones listed here occurred.
• DATABASE_ERR (1): An error occurred in the database that is not covered by an error category.
• VERSION_ERR (2): The version stated in the command does not match the version of the database.
• TOO_LARGE_ERR (3): The resulting data set from the database to your request was too large to be returned.
• QUOTA_ERR (4): There is no remaining storage space or the user declined to allocate more for your database.
• SYNTAX_ERR (5): The request failed because of a syntax error.
• CONSTRAINT_ERR (6): The request failed because it violated a constraint in the structure of the database.
• TIMEOUT_ERR (7): The transaction failed because it could not establish a database lock in a timely manner.
A common error seen is SYNTAX_ERR, which signifies there is a syntax issue in your SQL command. The message portion of the error object passed to your error handler will be critical in giving you more specifics about the particular error code.
At this point, you may be asking how this all works together to store and retrieve information in a database. The next recipe puts these core methods together to do exactly that.
Advanced Recipe: Using a Web Database for a Grocery List
This recipe will use the interfaces for the web database that we have just reviewed to create a shopping list that will be stored completely in the browser’s database resource. The visitor will be able to add items to the list, including a quantity and name, and select from a drop-down the grocery department the item is found in. Whenever an item is added, the grocery list will be updated and displayed. The list will be grouped by department to make a shopping trip easier. The visitor can remove items from the list and clear the list completely. If the visitor leaves and returns to the page, the page will show the stored items.
The database that is created by this recipe will have two tables: a groceryitems table to hold the items in the list and a departments table, which will be a lookup table with a predefined list of departments. When the page first loads, the database and tables will be created, and the departments table will be populated with the department information. The groceryitems table will have four fields, as defined in Table 11.5.
Table 11.5 The groceryitems Table Structure

The departments table will have two fields, as defined in Table 11.6.
Table 11.6 The departments Table Structure

By default when the departments table is created, the script will add four departments into the departments table.
Like with session storage and local storage, the Chrome Developer Tools provide a proficient way to view the SQLite database as your JavaScript executes. You can find the Database section under the Resources section in the Developer Tools window. Unlike session storage and local storage items, the database tables and data cannot be edited in Developer Tools, but this functionality may be added in the future.
For debugging purposes, a Remove Database button is also put on the page so that you can remove the database. Currently, the web database specification does not contain a method to remove a database. To work around this, and remove a database, you will have to “drop” the tables that have been created in the database, and your database will be empty. As you develop using the web database API, re-creating the database will be useful to verify your SQL database creation transactions.
To create the grocery list page, follow these steps:
1. Create the basic structure of the page with the HTML body, the shoppingdb var declaration, the window.addEventListener load event handler, and the init JavaScript function.
2. Add the JavaScript functions that are called from the init function: openShoppingDb and dbPresent.
3. To finish the initialization of the database, add the initShoppingDb, onDbError, and nullHandler functions. The initShoppingDb function creates the tables and inserts the departments. The onDbError function is a generic function to handle database errors that may occur as the script perform transactions, and the nullHandler is used to catch successful transaction events. If you load the page at this point, you should see the database being created by your script in the Chrome Developer Tools.
4. You need to display the grocery items when the page is shown by adding the initPage, getDepartments, and showDepartments functions. The “get and show” technique will be common because the transaction requests are asynchronous and will need a callback function to handle the results. In this case, the getDepartments performs the request to get the departments from the departments table and then the showDepartments function to display them. The showDepartments will create the options for our select list.
5. To finish the display on initialization, you need to show any grocery items that have been previously stored in the database, so add getGroceryItems and showGroceryItems from Listing 11.6.
6. To add an item, the addGroceryItem function is called, which will take the inputs of the input fields and insert them into the groceryitems table. If successful, the page will display the new list of grocery items. To remove an item, add the deleteItem method.
7. To complete the page, add the resetGroceryList method to clear the grocery list and the debug function of removeDatabase to drop the database tables.
Listing 11.6 Creating a Grocery List with a Client Database
<!DOCTYPE html>
<html>
<head>
<meta charset="UTF-8" />
<title>11.6 Database Grocery List</title>
<style>
section {
margin-bottom:20px;
}
</style>
<script>
var shoppingdb = null; // our database reference
// function kick off init of page
function init() {
// check to see if database support available
if (window.openDatabase) {
// set the button click handlers
var btnAddGroceryItem = document.getElementById('addGroceryItem'),
var btnResetGroceryList = document.getElementById('resetGroceryList'),
var btnRemoveDatabase = document.getElementById('removeDatabase'),
btnAddGroceryItem.addEventListener('click',addGroceryItem,false);
btnResetGroceryList.addEventListener('click',resetGroceryList,false);
btnRemoveDatabase.addEventListener('click',removeDatabase,false);
// open the database
openShoppingDb();
// check if we have reference to database
if (shoppingdb) {
// check if the database initialized or not
dbPresent();
}
} else {
alert('Databases are not supported in this browser'),
}
}
// open database function
function openShoppingDb() {
// try to open our database
try {
var dbSize = 5000000; // 5MB size
shoppingdb = openDatabase('shoppingdb', '1.0', 'shopping list', dbSize);
} catch (err) {
// Error occurred opening database
shoppingdb = null;
console.log('Error opening database: ' + err.code + ' - ' + err.message);
return;
}
}
// function check to see if database tables present
function dbPresent() {
// start our transaction
shoppingdb.readTransaction(function(tx) {
// execute sql to pull first record
// if successful, then initialize the page
// if not, then initialize the database
tx.executeSql('SELECT 1 FROM departments', [],
initPage, initShoppingDb);}
);
}
// function initialize the page
function initPage() {
// get the departments
getDepartments();
// load any grocery items present
getGroceryItems();
}
// initialize the shopping database
function initShoppingDb() {
// start our database transaction
shoppingdb.transaction(function(tx) {
// create tables for database
tx.executeSql('CREATE TABLE IF NOT EXISTS ' +
'groceryitems(itemid INTEGER NOT NULL PRIMARY KEY, quantity INTEGER, itemname TEXT, deptid INTEGER)',
[], nullHandler, onDbError);
tx.executeSql('CREATE TABLE IF NOT EXISTS ' +
'departments(deptid INTEGER NOT NULL PRIMARY KEY, deptname TEXT)',
[], nullHandler, onDbError);
// Fill our departments table
tx.executeSql('INSERT INTO departments(deptname) VALUES (?)',
['Fresh Produce'], nullHandler, onDbError);
tx.executeSql('INSERT INTO departments(deptname) VALUES (?)',
['Deli'], nullHandler, onDbError);
tx.executeSql('INSERT INTO departments(deptname) VALUES (?)',
['Bakery'], nullHandler, onDbError);
tx.executeSql('INSERT INTO departments(deptname) VALUES (?)',
['Grocery'], initPage, onDbError);
});
}
// standard db error function
function onDbError(tx, err) {
alert('Database error occurred: ' + err.code + '|' + err.message );
}
// our null handler for success
function nullHandler(tx, r) {
return;
}
// function get the department list
function getDepartments() {
// begin our database transaction
shoppingdb.readTransaction(function(tx) {
// execute our sql to retrieve the departments
tx.executeSql('SELECT * FROM departments ORDER BY deptname ASC', [],
showDepartments, onDbError);
});
}
// function show the departments retrieved
function showDepartments(tx, rs) {
// get reference to the department select
var selectObj = document.getElementById('department'),
// loop through department recordset and add to select
for (var i=0; i < rs.rows.length; i++) {
row = rs.rows.item(i);
selectObj.options[selectObj.options.length] =
new Option(row.deptname, row.deptid, false, false);
}
}
// function to get the grocery items
function getGroceryItems() {
// start our database transaction
shoppingdb.readTransaction(function(tx) {
// retrieve the list of items
tx.executeSql('SELECT * FROM groceryitems, departments WHERE groceryitems.deptid=departments.deptid ORDER BY deptname ASC',
[], showGroceryItems, onDbError);
});
}
// function to show the grocery item list
function showGroceryItems(tx, rs) {
var myShoppingList = document.getElementById('myShoppingList'),
var tableRow = '<table>';
var row = null;
// set table headings
tableRow += '<tr><td>Quantity</td><td>Item</td><td>Department</td><td>Delete</td></tr>';
// loop through record set returned
for (var i=0; i < rs.rows.length; i++) {
// retrieve our row
row = rs.rows.item(i);
// build our table row
tableRow += '<tr><td>' + row.quantity + '</td>' +
'<td>' + row.itemname + '</td>' +
'<td>' + row.deptname + '</td>' +
'<td><button onclick="deleteItem(' +
row.itemid + '),">X</button></td></tr>';
}
tableRow += '</table>';
// set our info in the div
myShoppingList.innerHTML = tableRow;
}
// add a grocery item to our database groceryitems table
function addGroceryItem() {
// open our database transaction async call
shoppingdb.transaction(function(tx){
// retrieve our data for the grocery item
var itemname = document.getElementById('item').value;
var quantity = parseInt(document.getElementById('quantity').value);
var deptid = parseInt(document.getElementById('department').value);
// perform our executeSql insert
tx.executeSql('INSERT INTO groceryitems(quantity, itemname, deptid) VALUES (?,?,?)',
[quantity, itemname, deptid], getGroceryItems, onDbError);
});
}
// function remove an item from the list
function deleteItem(id) {
// start our transaction
shoppingdb.transaction(function(tx) {
// execute sql to delete the item from the database
tx.executeSql('DELETE FROM groceryitems WHERE itemid=?',
[id], getGroceryItems, onDbError);
}
);
}
// function reset grocery list
function resetGroceryList() {
// start our transaction
shoppingdb.transaction(function(tx) {
// execute our sql to drop the grocery item table
tx.executeSql('DROP TABLE groceryitems', [], nullHandler, onDbError);
});
}
// function remove database
function removeDatabase() {
// start our transaction
shoppingdb.transaction(function(tx) {
// drop our tables
tx.executeSql('DROP TABLE departments', [], nullHandler, onDbError);
tx.executeSql('DROP TABLE groceryitems', [], nullHandler, onDbError);
});
}
// call init on load
window.addEventListener('load',init,false);
</script>
</head>
<body>
<section>
Quantity:<input type="number" id="quantity" />
Item:<input type="text" id="item" placeholder="Milk" />
Department:<select id="department"></select>
<button id="addGroceryItem">Add Item</button>
</section>
<section id="myShoppingList"></section>
<section>
<button id="resetGroceryList">Reset Grocery List</button>
<button id="removeDatabase">Remove Database</button>
</section>
</body>
</html>
When the page is loaded in your browser, the init function will check that the Web SQL Database API is available by verifying that the window.openDatabase method is available. If available, the openDatabase method is called with the database parameters. In this case, the script sets roughly 5MB for the size because the browsers appear not to confirm with the user for database creations of this size or smaller. If your database exceeds this size at creation or later, the browser will confirm with the user to allocate more space. If this is the first time that you have run the code, then the database will be created and the handle returned; otherwise, the database will be opened.
Since the recipe uses the departments table values to load the select list of departments, you need to make sure that if this is a new database instance that you populate the departments table with your lookup information. To check whether you need to create the tables, the script checks for the presence of the database tables by doing a simple query and tries to select the first row in the department table in the dbPresent method. If the table does not exist yet, then the script creates both tables and inserts the department values into the departments table in the initShoppingDb method. After the database is loaded, the script loads the departments into the select list from the database and displays any stored grocery items by calling the getGroceryItems method. The getGroceryItems method will open another transaction to request all items from the groceryitems table and, if successful, pass the resulting data set of rows to the showGroceryItems method. The show method will then loop through the grocery items and display them in the myShoppingList section of the page.
The transaction method is used for SQL commands that require write permissions in the database. By requiring write permission, the transaction puts a write lock on the database, preventing others from writing to the database at that time. If you are performing only read commands on the database, you should use the readTransaction method. The readTransaction method is called the same way as the transaction method.
Once the page is initialized and the database and the departments are populated, the visitor can then enter a quantity and item and select the department for the new item for their shopping list. The addGroceryItem will then take this information, create a database transaction, and perform a SQL insert to add the item in an inline function call. If the insert fails, you will call the error handler, onDbError, that will display our error. If successful, then the script will call getGroceryItems and subsequently showGroceryItems to display the resulting set of rows returned from the groceryitems table. Figure 11.3 shows the output after having entered several items.
Figure 11.3 Sample output after adding several grocery items

When the getGroceryItems function is called, the script will call the readTransaction method with an inline function call to executeSql. The SQL command selects from the groceryitems table all records, groups them by department, and sorts them by department alphabetically. In addition, the SQL command joins the groceryitems table and departments table on the deptid so that the return set will also include the department name to display. If the executeSql call is successful, the script will return the results to showGroceryItems, passing the transaction reference and recordset of results. To display the results from the recordset, the script loops through the recordset rows. Each row represents a record returned by the SQL query, and you can reference each field via dot notation.
To remove an item, the visitor clicks the X button, which calls the deleteItem method with the item ID passed. The page then uses the item ID passed to delete the item from the groceryitems table. If the call is successful, then the list is refreshed through the get and show grocery items functions. Lastly, the visitor can reset the grocery list, which will delete all items from the groceryitems table.
This recipe is a quick sample of integrating client web databases into your websites and applications. The recipe covered writing, retrieving, updating, and deleting records along with the initial creation of the database. This functionality provides the building blocks needed to implement your own database storage.
Summary
In this chapter, you learned about some of the exciting new methods to store data on the client browser. Previously, client browser technology was limited to the use of cookies. With the addition of session storage, local storage, and web databases, there is now a robust platform, albeit young, on which you have several options to store simple key/value pairs or complex data structures. With these storage options, you can create powerful offline applications, reduce round-trips to your server for data, and store robust information across browser sessions at the client.