
7. Embedding Video with HTML5
Unless you have been living under a rock for the past five years or so, we are sure you have used sites like YouTube and Vimeo, in other words, sites with video embedded on the page. Although those sites are the primary ones for video sharing, we have been putting videos online in some way or another for the best part of ten years. The problem has been that there is no standard for video presentation, so we have had to use plug-ins such as Flash or use the object element to play QuickTime files.
You may think there is no problem because these work most of the time. The issue is that you should not have to rely on third-party plug-ins to deliver video. In HTML5, you now have a new and standard way to natively render video in a web page. You can use the video element.
In this chapter, you will learn about the basics of the video element, before looking at some codecs and, as usual, some cross-browser issues. You will also learn about how you can improve video accessibility with subtitles and captions, and finally you will use the new HTML5 media API to create your own video player and controls.
Beginner Recipe: Including Video with the video Element
For a very basic example of how to put a video on a page using the new video element, take a look at the code in Listing 7.1.
Listing 7.1 Basic Use of the video Element
<!DOCTYPE html>
<html lang="en">
<head>
<meta charset="utf-8">
<title>7_1 Basic Use of the Video Element</title>
</head>
<body>
<video src="mymovie.mp4"></video>
<!--
video is a self-closing element so can also be used as:
<video src="mymovie.mp4" />
-->
</body>
</html>
Easy, isn’t it? At its basic level, that is all you need to get the video element working with HTML5. Sadly, though, in reality it is not quite as straightforward as that. But now that we have whetted your appetite, there are a few issues you need to know about before you start using video.
Browser and Device Support
Table 7.1 lists browser compatibility with the video element. It assumes the latest version of the browser at the time of writing and every release of the browser since then.
Table 7.1 Support for the video Element
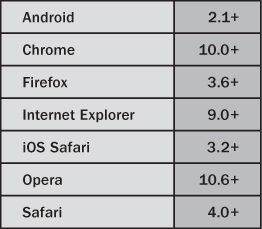
So, on one hand, there is very good support for the video element across current browsers, but on the other hand, Internet Explorer versions 6, 7, and 8 do not support the video element natively, and they have a massive market share between them. Later in the chapter, we will show how to provide fallback content for browsers and devices that do not support the video element yet. But before we get to that, you need get your head around the different video types and codecs.
HTML5 and Video Codecs
HTML5 video has met with great success, particularly with big video sites such as YouTube and Vimeo, in beginning to create HTML5 video content. However, HTML5 video has a big challenge to overcome: the issue of codecs.
If you have ever uploaded videos to YouTube, you might not have taken notice what file format you uploaded because YouTube accepts pretty much any video file format and converts the video for you. But in HTML5, you have, at the moment, three main codecs and video formats to consider (see Table 7.2).
Table 7.2 Codecs and Browser Support

In the early days of the HTML5 specification, it was intended that all browsers should support the Ogg Theora codec (Ogg Theora is the video codec; Ogg Vorbis is the audio codec). However, Apple and Nokia had issues with this, and so the codecs were removed from the specification, never to return and with no other codec suggestion in place.
Currently, Chrome and Firefox support Ogg Theora natively in the browser. Safari has native support for the H.264 codec only at the moment. The H.264 codec is also supported in Chrome and on the iPhone, the iPad, and Android (2.3) devices.
In May 2010, Google announced the development of another multimedia format, the webM (also known as VP8) project. This is an open source codec and was quickly supported by the Chrome, Firefox, and Opera browsers.
Internet Explorer 9 supports the H.264 codec natively and will support webM only via a separately installed codec, which is not ideal.
Why Should You Care About Codecs?
The codec issues are going to be hanging around for some time to come. The biggest issue is with the H.264 codec. H.264, also known as MPEG-4, requires that vendors and users of the product, which is you if you host it on your site, are required to pay patent licensing royalties. In August 2010, it was announced that users would not be charged for using H.264 videos, but this has been disputed, and it is fair to say that things are not crystal clear when it comes to the licensing of this codec.
Ogg and webM, however, are both royalty-free, open sourced codecs and are considered to be the formats of the “open web.” Prior to January 2011, Chrome did have support for H.264, but in January 2011 Google turned the video battle up a notch and announced that support for the H.264 codec would be dropped and instead Google would support the webM video codec. This book will not get into all the details of this decision, but there are various theories about why Google made this decision. It is worth mentioning that YouTube (owned by Google) will continue to convert videos to H.264 format, but it might convert all videos to webM, and at this stage there is no word what Android (also owned by Google) devices will do regarding the H.264 format. Mobile video is large and is only going to get bigger, so we strongly suggest keeping an eye on this topic.
As you can tell, with so many browsers and devices and with such politics going on, codecs are a big challenge. The effects of Google’s decision could be far-reaching, but we do not really know how far yet. And we do not know how Internet Explorer 9 is going to handle all this, so there is a lot for you to think about and keep up-to-date with.
Do not let these codec issues put you off, though, because there is still plenty you can do with HTML5 video.
Tip
OK, so you have heard about the different formats, but how do you create them? Well, the popular video software packages currently do not export to either Ogg or webM but will export a H.264 file. The iPhone exports a .mov file, and most digital cameras will export to .mov or .avi files. There is various software available to convert your videos, including Firefogg, a Firefox extension that encodes Ogg video, or Handbrake for encoding H.264 video. But we suggest using MiroVideoConverter (http://mirovideoconverter.com), an easy-to-use, and free, bit of software that converts to several different video types.
Intermediate Recipe: Enabling Video for All Browsers
As we mentioned in the first recipe of this chapter, the simplest use of the video element is with the following markup:
<video src="mymovie.mp4"></video>
Because of browser and codec issues, you have to provide different formats of video within the one video element, which is done using multiple source elements.
To get your video working in the latest versions of the key browsers, you need to specify a file in .mp4 format and in .webm or .ogv format, which is what you are doing in Listing 7.2.
Listing 7.2 Using the Source Element to Display Different Video Formats
<video width="640" height="480" controls>
<source src="video.mp4" type="video/mp4" />
<source src="video.webm" type="video/webm" />
<source src="video.ogv" type="video/ogg" />
</video>
In an ideal world, browsers and devices would just pick the first file they could play. While this typically works on the main desktop and laptop browsers, there is a bug on the iPad browser that stops the browser from loading anything but the first source video. Therefore, the .mp4 file must be first, as in Listing 7.2.
The video element has a height and width value, though you can use CSS to set a height and width. The element also has a controls attribute that displays the default video controls. In Listing 7.2, inside the video element are three source elements, and each source element links to a single video. There is a type attribute for each source because this attribute tells the browser what type of file is being provided. If the browser does not recognize the type, then it will not download the file, which is important because it will save bandwidth, and the page will load faster. The browser will pick the first file it is able to play.
Listing 7.2 provides video in Chrome, Firefox, Internet Explorer 9, and Safari and on an iPad, an iPhone, and the latest Android (2.3) devices, all without the need for a third-party component, which is awesome. But what can you give to users using Internet Explorer 6, 7, and 8, which do not support at this time the video tag?
Adding Fallback Content for Older Browsers
After the source elements, you can put in content that alerts users when their browsers cannot handle the video element. You put that content inside the video element, and you have various options as to what message you provide. You could offer some plain message, as shown here:
<p>Sorry, your browser is really old. Please upgrade.</p>
Or you could be more helpful and offer a direct download of the video:
<a href="video.mp4">Download our movie in MP4 format</a>
<a href="video.webm">Download our movie in WebM format</a>
<a href="video.ogv">Download our movie in Ogg format</a>
Providing a direct download option is a good idea anyway and something you should probably offer to all users, regardless of their devices, so we will put that code in our final code solution.
Mainly, we are aiming this fallback content at users who are surfing with old versions of Internet Explorer. Because Flash has a massive market share and is installed on a very high percentage of machines, you can relatively safely offer Flash content as a fallback. There are a couple of possible options for this: You can upload the video to YouTube, or you can use your own Flash Player. Going with the YouTube option makes things very easy while it sorts out the hosting issues. YouTube also provides you with the HTML code you need to embed the movie in your page, as shown in Listing 7.3.
Listing 7.3 YouTube Video Embed Code
<object width="480" height="385">
<param name="movie" value="http://www.youtube.com/v/VIDEO_ID"></param>
<param name="allowFullScreen" value="true"></param>
<param name="allowscriptaccess" value="always"></param>
<embed src="http://www.youtube.com/v/VIDEO_ID" type="application/x-shockwave-flash" allowscriptaccess="always" allowfullscreen="true" width="480" height="385">
</embed>
</object>
So, putting all this together gives you the code in Listing 7.4, which provides video in all current main browsers, either via the native video element or using a Flash fallback.
Listing 7.4 Cross-Browser Video Including Fallback
<!DOCTYPE html>
<html lang="en">
<head>
<meta charset="utf-8">
<title>7_4 Cross-Browser Video Including Fallback</title>
</head>
<body>
<video width="640" height="480" controls>
<!-- video for Safari and IE9. MP4 must be first for iPad -->
<source src="cablecar.mp4" type='video/mp4; codecs="avc1.42E01E, mp4a.40.2"' />
<!-- video for Chrome, Firefox and Opera -->
<source src="cablecar.webm" type="video/webm" />
<source src="cablecar.ogv" type='video/ogg; codecs="theora, vorbis"' />
<!-- fallback for older, less-capable browsers -->
<object width="480" height="385">
<param name="movie" value="http://www.youtube.com/v/ZR-H-FQDenw"></param>
<param name="allowFullScreen" value="true"></param>
<param name="allowscriptaccess" value="always"></param>
<embed src="http://www.youtube.com/v/ZR-H-FQDenw" type="application/x-shockwave-flash" allowscriptaccess="always" allowfullscreen="true" width="480" height="385">
</embed>
</object>
</video>
</body>
</html>
You do not have to choose YouTube as a video host; you can host the file yourself and use your own Flash movie to play the video. You could make one yourself or use one of the many available on the Internet, such as the popular and customizable JW Player, as shown in Listing 7.5.
Listing 7.5 Non-YouTube Fallback Video
<video width="640" height="480" controls> <!-- video for Safari and IE9. MP4 must be first for iPad -->
<source src="video.mp4" type="video/mp4" />
<!-- video for Chrome, Firefox and Opera -->
<source src="video.webm" type="video/webm" />
<source src="video.ogv" type="video/ogg" />
<!-- JW Player fallback for older, less-capable browsers -->
<script type='text/javascript' src='swfobject.js'></script>
<div id='mediaplayer'></div>
<script type="text/javascript">
var so = new SWFObject('player.swf','playerID','480','270','9'),
so.addParam('allowfullscreen','true'),
so.addParam('allowscriptaccess','always'),
so.addVariable('file', 'video.mp4'),
so.write('mediaplayer'),
</script>
</video>
Tip
One issue that may crop up in your HTML5 video development is the issue of MIME types. When developing examples for this book, we ran into an issue getting the .ogv and .webm files to play in Firefox when uploaded to a web server. These videos played fine on our local machine, and when put on a web server (Apache), they ran fine in Opera and Chrome; however, the .ogv and .webm files did not play in Firefox. This is because Firefox needs to know the server supports the specific MIME type. Not all servers support these new video types yet, and to support them, you must make the appropriate configuration changes such as adding the following lines to your .htaccess or httpd.conf file, depending on your server platform:
AddType video/mp4 .mp4
AddType video/ogg .ogv
AddType video/webm .webm
So, now you have the full code for offering video to all the main browsers and devices, but several additional new attributes are available.
New Video Attributes
Several new attributes are available for the video element. In the earlier examples, you used the width and height attributes, which are not required, but we recommend setting these values because it helps with loading time. Setting these will stretch or skew your video because the video element puts the video in the middle of the box, so if you set the height and width to be 200 by 1000, then the browser will shrink down the video accordingly but keep it in proportion.
The src Attribute
Listing 7.1 at the start of the chapter shows a very basic example of the video element, and it contains a src attribute. But using src means you are limited to one video file, and because of the codec and browser issues, this makes it pretty useless for the time being. Instead of using src, consider choosing the source element within video, as used in Listing 7.4, so you can then make the video work across the browsers.
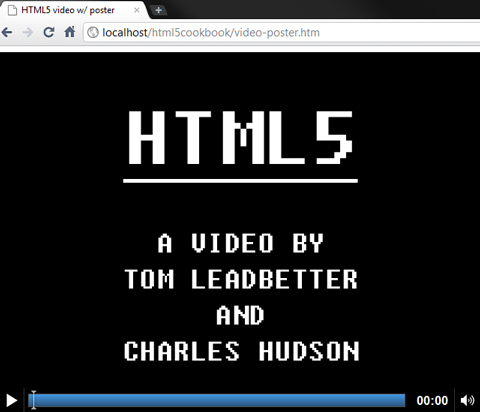
The poster Attribute
The poster attribute is used to display a single image in place of the video while the video is downloading or just waiting to be started. The poster image is intended to give the viewer an idea of what the video is like or what it is about. The image can be a .gif, .jpg, or .png file (although transparent PNGs will not overlay the video).
If there is no poster, then the browser just shows the first frame of the video, which may be suitable for your needs. If not, here is how to set the poster image, and Figure 7.1 shows you how it looks on page load:
<video width="640" height="480" poster="poster.gif">
Figure 7.1 A poster image displayed in Google Chrome
A possible development to keep an eye on is whether you should provide alt text for the poster image. Nothing is set in stone yet, but there are some accessibility concerns, so there may be changes ahead for the poster attribute.
The preload Attribute
If you have a relatively large video on the page or you are confident the user is going to want to watch the video you have embedded (such as a YouTube page), then you can get the browser to start downloading the video when the page loads. There are three possible values for the preload attribute:
preload="auto"
auto, or you can just put preload, tells the browser to download the video when the page loads.
preload="none"
preload="none" tells the browsers not to download the video. Only when the user starts the video will it start to download. At the moment, though, only Firefox 4 seems to support this.
preload="metadata"
The metadata attribute retrieves information (metadata) about the video, including video duration, first frame, video dimensions, and track list. The browser should not download the video itself until the user starts it.
The audio Attribute (Not Currently Supported)
Although browsers do not currently support it, the audio attribute exists so you can control the default volume of the video. Currently, it has only one specified value: muted. When used, it looks like this:
<video height="300" width="300" audio="muted">
...
</video>
The idea is that if this attribute was used, then the video would be muted by default, and the user would have to turn the volume up. There is a possibility in the future that you will be able to put other values there, such as audio="2" or audio="low", to control the default audio volume. In a later recipe, you will see how you can change the volume through JavaScript.
The loop Attribute
If the video has a loop attribute, then when the video finishes playing, it will loop back to the start and play again. It is a Boolean attribute, so it is either on or off. All the main browsers support this, except, strangely, the current beta versions of Firefox 4.
The autoplay Attribute
A Boolean attribute, autoplay will force the browser to start downloading and playing the video when the page loads. For example, YouTube does this, and video advertisements often start playing automatically. There are accessibility and usability concerns about videos playing automatically, not to mention how annoying it can be, but the reason this is in the specification is because you now have a standard way of doing it if you really needed. You do not have to resort to various JavaScript hacks to achieve the effect. Note that there are already various browser extensions available to download that disable autoplay.
Note
The autoplay and preload attributes have been deliberately disabled in the iOS. This is because of potential costs and loading speed issues to the user. No data is downloaded until the user manually chooses to start the video. There are some techniques, well, hacks, to get around this. But because they are unofficial methods, they should not be used and are not covered in this book.
The controls Attribute
The controls attribute adds default browser-specific controls to your video, which include a Play/Pause button, seek bar, duration/time-played information, and volume controls.
The attribute is a Boolean attribute, so you either include the attribute or not. The following is an example:
<video height="300" width="300" controls>
...
</video>
If it is not included, then the first frame of the video or the poster will display. The user will have to right-click the video and choose from the list of options. So, it is better to provide controls with the controls attribute. You can use your own controls if you want, and we will talk about that later in this chapter. Figure 7.2 shows the default controls in the major browsers.
Figure 7.2 Default controls in Chrome (top), Firefox, Internet Explorer 9, Opera, and Safari

Note
Strangely, in Firefox, if you do not have JavaScript enabled, then the controls do not appear. Other browsers, correctly, have the controls without JavaScript.
Intermediate Recipe: Creating a Video with Subtitles and Captions
You can do some things to increase the accessibility of the video. For example, you can enable subtitles, captions, and descriptions to help those who are deaf or hard of hearing.
There is a track element available with which you can use different types of files. Here it is in its basic use:
<track src="subtitles.vtt" kind="subtitles" srclang="en" label="English">
There are different values you can use with the kind attribute:
• subtitles: The transcription or translation of the dialogue
• captions: Similar to subtitles, but also include sound effects and other audio information
• descriptions: Intended to be a separate audio file that describes the video
• chapters: Intended to help the user navigate through the video
• metadata: Information and content about the video, which isn’t intended to be displayed to the viewer
The track element is a very recent addition to the HTML5 specification, and the standard for the subtitles/captions was originally WebSRT but is now Web Video Text Track (WebVTT). Because this technology is new and it is such a massive field of work, there are no working examples or browser implementations of this yet. However, you can display subtitles with JavaScript and using a WebVTT (.vtt) file. Listing 7.6 is a basic example with some sample data from a WebVTT file (based on the current specification). You can create and edit .vtt files with a basic text editor such as Notepad. The .vtt file contains a step, then a time period for it to be displayed, and then the content that should be displayed.
Listing 7.6 Sample .vtt File Contents
0
00:00:0,000 --> 00:00:2,000
This is the first bit of the subtitles
1
00:00:3,000 --> 00:00:5,000
This is the second bit
2
00:00:7,000 --> 00:00:15,000
And as you might have guessed, this is the third bit of the subtitles
Because no browser natively supports the track element yet, you need a JavaScript plug-in to do the work for you. In Listing 7.7, you are using a jQuery plug-in called VideoSub, available from http://github.com/icelab/jquery-videosub, which is based on an original MooTools script by Thomas Sturm (http://storiesinflight.com/js_videosub). The plug-in wraps the video in a div and then adds an additional div that contains the subtitles. In this example, you hide the subtitles by default and add a link to toggle the subtitle display. Figure 7.3 shows an example of subtitles in action. The complete code is in Listing 7.7.
Figure 7.3 Subtitles displayed on a video

<!DOCTYPE html>
<html lang="en">
<head>
<meta charset="utf-8">
<title>7_7 Video Subtitles</title>
<script src="http://ajax.googleapis.com/ajax/libs/jquery/1.4.4/jquery.min.js"></script>
<script src="jquery.videosub.js"></script>
<script>
$(function(){
$('video').videoSub({
containerClass : 'videosub-container',
barClass : 'videosub-bar',
useBarDefaultStyle : false
});
$('.videosub-container').append('<a title="show/hide video subtitles" id="subtitlestoggle" href="#">Show subtitles</a>'),
$('.videosub-bar').hide();
$('#subtitlestoggle').click(function() {
$(this).text($(this).text() == 'Show subtitles' ? 'Hide subtitles' : 'Show subtitles'),
$('.videosub-bar').toggle();
});
});
</script>
<style>
body {
font-family: arial, Arial, Helvetica, sans-serif;
}
.videosub-container {
width: 640px;
}
.videosub-bar {
background: black;
bottom: 40px;
color: yellow;
font-size: 1.3em;
font-weight: bold;
padding: 10px 20px;
position: absolute;
text-align: center;
width: 560px;
}
a#subtitlestoggle {
background: black;
color: yellow;
display: block;
font-weight: bold;
padding: 10px;
position: absolute;
right: 0;
text-decoration: none;
top: 0;
}
a#subtitlestoggle:hover {
text-decoration: underline;
}
</style>
</head>
<body>
<video width="640" height="480" controls>
<!-- video for Safari and IE9. MP4 must be first for iPad -->
<source src="video.mp4" type="video/mp4" />
<!-- video for Chrome, Firefox and Opera -->
<source src="video.webm" type="video/webm" />
<source src="video.ogv" type="video/ogg" />
<track src="subtitles.vtt" kind="subtitles" srclang="en" label="English">
<!-- fallback for rubbish browsers (youTube, etc -->
</video>
<p>Download the video: <a href="video.mp4">MP4 file, 3MB</a>; <a href="video.webm">webM file, 3MB</a>; <a href="video.ogv">Ogg file, 3MB</a></p>
<p>Download the subtitles: <a href="subtitles.vtt">VTT file, 1 KB</a>; <a href="subtitles.txt">plain-text file, 1 KB</a></p>
</body>
</html>
Other Subtitle Styling Options
Listings 7.6 and 7.7 showed a basic example of WebVTT, the jQuery plug-in, and some basic CSS to display and style the subtitles. There are some alternatives that will one day be supported in browsers. First, you can add bold, italic, or underlined styles to subtitles using inline b, i, and u tags:
1
00:00:0,000 --> 00:00:2,000
<b>This is</b> the <i>first bit</i> of the <u>subtitles</u>
You can also apply a CSS class if you wanted to do something other than bold, italic, or underline. For example, you could use a custom font. To do this, you add an inline c tag with a CSS class:
1
00:00:0,000 --> 00:00:2,000
<c.myclassname>This is</c> the first bit of the subtitles
There are more options such as text position and text size. For more information on this developing standard, check out http://delphiki.com/webvtt.
The Media API
HTML5 provides a vast and exciting API for multimedia. Using the API and JavaScript, you can manipulate the video in your web pages. The following is a list of the available API events:
abort
canplay
canplaythrough
canshowcurrentframe
dataunavailable
durationchange
emptied
empty
ended
error
loadeddata
loadedmetadata
loadstart
pause
play
playing
progress
ratechange
seeked
seeking
suspend
timeupdate
volumechange
waiting
Many media properties are also available:
audioTracks
autoplay
buffered
controls
controller
currentSrc
currentTime
defaultMuted
defaultPlaybackRate
duration
ended
error
initialTime
loop
muted
networkState
paused
preload
played
playbackRate
readyState
seekable
seeking
startOffsetTime
src
textTracks
videoTracks
volume
Not all of these events and properties are available for use yet, but most of them are, including the important ones that allow you to create your own video player controls. We will not explain all the API options, just the ones needed to create your own player, but if you are interested in learning more about the API, we recommend the API demonstration at http://w3.org/2010/05/video/mediaevents.html and the very detailed specification at http://w3.org/TR/html5/video.html#mediaevents.
Advanced Recipe: Making Your Own Custom Controls
HTML5 provides a JavaScript media API for the video and audio elements. There are lots of methods and events, as shown in the previous section, for you to plug in so you can create our own video player and custom controls.
This recipe takes the video code from Listing 7.4 and adds a Play/Pause button, a seek bar, volume controls, time display, and fast-forward and rewind buttons. As we will explain later, there are some browser quirks, so the example created in this recipe is best viewed in Opera or Chrome, as shown in Figure 7.4.
Figure 7.4 Video with custom controls, viewed in Opera 11

The essential features you need for your own controls are the Play button, but you can create much more than that with JavaScript and the media API, as you can do using the code from Listing 7.8.
1. Wrap a <div id="video-wrapper"> around the video element, and add <div id="controls">, which contains the buttons, sliders, and other things you need for the controls display. We have included this HTML from the start in this recipe so it is easier to read, but really you should avoid having such controls in the main markup and create them on-the-fly with JavaScript, so only users with JavaScript get these controls.
2. Declare the video element as an object so it can be referenced, and then remove the default browser controls by deleting the controls attribute that has been specified for non-JavaScript users. The Play button is disabled until the video is ready to be played.
3. For better performance and cross-browser friendliness, you wait until the video is ready and then can collect information such as its duration. And when the video is ready to play, the Play button is enabled.
4. Add functions and listeners for the buttons, other controls, and displays.
Listing 7.8 Custom Video Controls
<!DOCTYPE html>
<html lang="en">
<head>
<meta charset="utf-8">
<title>7_8 Custom Video Controls</title>
<style>
body {
font: bold .8em Arial, Helvetica, sans-serif;
}
video {
display: block;
}
#video-wrapper {
-moz-box-shadow: 0 0 20px rgba(0, 0, 0, .8);
-webkit-box-shadow: 0 0 20px rgba(0, 0, 0, .8);
box-shadow: 0 0 20px rgba(0, 0, 0, .8);
display: block;
margin: 20px auto;
overflow: hidden;
position: relative;
width: 568px;
}
#controls {
background: rgba(0, 0, 0, .3);
bottom: 0;
height: 30px;
left: 0;
padding: 35px 10px 10px;
position: absolute;
width: 548px;
z-index: 1;
}
button {
background: rgba(255, 255, 255, .7);
border: none; -moz-border-radius: 15px;
-webkit-border-radius: 15px;
border-radius: 15px;
cursor: pointer;
padding: 5px
}
#play {
width: 70px;
}
#time, #duration {
color: #fff;
position: absolute;
top: 0;
}
#time {
left: 10px;
}
#duration {
right: 10px;
text-align: right
}
input[type="range"] {
position: absolute;
}
#seekbar {
top: 8px;
width: 465px;
left: 50px;
}
#volume {
width: 50px;
}
#mute {
float: right;
width: 60px;
}
label[for="volume"] {
color: #fff;
float: right;
margin: 5px 55px 0 15px;
}
button.speed {
font-size: .8em
}
</style>
<script>
var video = null;
var seekbar = null;
var playBtn = null;
// initialize the page
function init() {
// get video container
video = document.getElementsByTagName('video')[0];
// reference the range inputs
seekbar = document.getElementById('seekbar'),
volume = document.getElementById('volume'),
// set bar range change handlers
seekbar.addEventListener('change',seek,false);
volume.addEventListener('change',changeVolume,false);
// reference the buttons
playBtn = document.getElementById('play'),
muteBtn = document.getElementById('mute'),
rewindBtn = document.getElementById('rewind'),
ffBtn = document.getElementById('ff'),
fullscreenBtn = document.getElementById('fullscreen'),
// set button click handlers
playBtn.addEventListener('click',playPause,false);
muteBtn.addEventListener('click',mute,false);
rewindBtn.addEventListener('click',rewind,false);
ffBtn.addEventListener('click',fastforward,false);
fullscreenBtn.addEventListener('click',fullscreen,false);
// remove default browser controls
video.removeAttribute('controls'),
// initialize the video player information
if (video.readyState > 0) {
var durationText = document.getElementById('duration'),
durationText.innerHTML = (formatTime(video.duration));
var durationRounded = Math.round(video.duration);
seekbar.setAttribute('max', durationRounded);
playBtn.disabled = false;
seekbar.value = 0;
}
// listener event while the video is playing
video.addEventListener('timeupdate', function() {
var currentTime = document.getElementById('time'),
currentTime.innerHTML = formatTime(video.currentTime);
seekbar.value = video.currentTime;
}, false);
video.addEventListener('ratechange', function() {
//you could alternatively display the current playback speed
//console.log(video.playbackRate);
}, false);
video.addEventListener('play', function() {
playBtn.innerHTML = 'Pause';
}, false);
video.addEventListener('pause', function() {
playBtn.innerHTML = 'Play';
}, false);
//detects when the video has finished
video.addEventListener('ended', function(){
playBtn.innerHTML = 'Play again';
}, false);
}
function playPause() {
if (ifPlaying()) {
video.pause();
playBtn.innerHTML = 'Play';
} else {
video.play();
playBtn.innerHTML = 'Pause';
}
};
//toggle the mute status of the video
function mute(){
var muteBtn = document.getElementById('mute'),
if (!video.muted){
video.muted = true;
muteBtn.innerHTML = 'Un-mute';
}
else {
video.muted = false;
muteBtn.innerHTML = 'Mute';
}
}
//change the volume
function changeVolume() {
video.volume = volume.value;
}
//seekbar controls
function seek(){
video.currentTime = seekbar.value;
}
//fast-forward the video
function fastforward() {
video.playbackRate = video.playbackRate + 2;
}
//rewind the video
function rewind() {
video.playbackRate = video.playbackRate - 2;
}
//go fullscreen (webkit only)
function fullscreen() {
video.webkitEnterFullscreen()
}
//check if video is playing or not
function ifPlaying() {
if(video.paused || video.ended) {
return false;
} else {
return true;
}
};
//format the time to something nice and readable
function formatTime(seconds) {
seconds = Math.round(seconds);
minutes = Math.floor(seconds / 60);
minutes = (minutes >= 10) ? minutes : '0' + minutes;
seconds = Math.floor(seconds % 60);
seconds = (seconds >= 10) ? seconds : '0' + seconds;
return minutes + ':' + seconds;
}
// initialize the page when loaded
window.addEventListener('load',init,false);
</script>
</head>
<body>
<div id="video-wrapper">
<div id="controls">
<button id="play">Play</button>
<p id="time">0:00</p>
<p id="duration">0:00</p>
<label for="volume"> Vol:<input id="volume" name="volume" type="range" min="0" max="1" step="0.1" required /></label>
<button id="mute">Mute</button>
<input id="seekbar" name="seekbar" type="range" min="0" max="1" step="0.1" required />
<button id="rewind" class="speed">Rewind</button>
<button id="ff" class="speed">Fast-forward</button>
<button id="fullscreen">Fullscreen</button>
</div>
<video width="568" height="320" controls>
<!-- video for Safari and IE9. MP4 must be first for iPad -->
<source src="cablecar.mp4" type="video/mp4" />
<!-- video for Chrome, Firefox and Opera -->
<source src="cablecar.webm" type="video/webm" />
<source src="cablecar.ogv" type="video/ogg" />
</video>
</div>
</body>
</html>
First in the code is some CSS for some basic styles and the positioning of the buttons. We haven’t gone overboard with CSS here, but with CSS and the JavaScript API you could create pretty much any video player layout you want.
Now, on to the JavaScript. First you need to associate variables to some of the elements: the video itself, the seek bar, and the Play button. For non-JavaScript users, we have included the controls attribute on the video, so you remove that with your JavaScript because you do not want the default controls to show.
After that comes an important detection. You need to wait for the browser to get enough information about the video before you can start playing it. If you try to get the video duration, some browsers will fail because they are still downloading parts of the video. So, if you have a large video file, then you could be waiting a while before the browser is ready to play it. In this recipe, you are detecting the readyState value. readyState has five possible values:
• have_nothing (0)
• have_metadata (1)
• have_current_data (2)
• have_future_data (3)
• have_enough_data (4)
The value have_nothing means that the browser has no information about the video, and the other values mean that the browser has various information about the video including the duration, height and width, current position, and next frame. So, in this recipe, you are looking for when the value of readyState is greater than 0, and when it is, you then detect the duration and update the duration value on the screen. You also enable the Play button so the user can start the video. In this recipe, you are only doing a couple of things when the video is ready, but this could be the point at which you create the controls on the video or show/hide a loading graphic or maybe even show the video at all.
Alternatively, you could use the loadeddata event listener, which will fire when the browser has enough information about the video to allow playback to start:
video.addEventListener("loadeddata", function(){//do stuff}, false);
Now you know the duration, so using video.duration, you get the total length of the video clip, which you can then assign to the input[type="range"] seek bar, so it has an endpoint. Then you put the start point of the slider to the start (zero seconds).
You use some addEventListener events to detect when the play time of the video has updated (timeupdate), and when it has, you update the playback display and the seek bar.
Even though you have removed the default video controls and you have your own control buttons including Play and Mute, if the user right-clicks the video, depending on the browser, they may have options there to play/pause, show controls, mute, save the video, and more. You can’t remove or change these browser defaults, but you can hook into these events as well. In this recipe, you have code that listens for a play or pause, and when these happen, the button text is changed.
You also want to know when the video has ended so you can change the text of the Play button. This event is useful because you could do several things when a video has finished, such as start another video from a playlist. You detect the video has ended by detecting the ended event using an event listener:
video.addEventListener("ended", function(){//do stuff}, false);
After the addEventListeners, you have various functions that you use for other video functions, such as checking whether the video is playing; setting the volume (video.volume = volume.value); making the video play in full-screen mode (video.webkitEnterFullscreen()), which works only in a WebKit browser); and checking the playback rate (playbackRate). You also add playback functionality so the user can control the position and direction of the video: There is a seek bar so the user can jump to a place on the timeline (video.currentTime = seekbar.value), as well as fast-forward and rewind buttons.
As you will have discovered, browsers have various quirks when dealing with custom controls:
• Currently, the only way to make the video full-screen is to use the webkitEnterFullscreen function, and this currently works only in Safari. As you can tell from the name, this is not yet a standard way of making videos full-screen; in fact, there may not ever be one in the specification. However, browser vendors know that this is something users want, so it is likely that there will be nonstandard, browser-specific ways of doing this in the future. There are other ways of making a video full-screen with a combination of JavaScript and CSS. However, several browsers have a full-screen mode when you right-click the video itself anyway.
• Only Safari, Chrome, and Opera currently support <input type="range">, and only Opera allows this element to have a transparent background, so it looks a little ugly in Chrome, and in Safari it just is not visible. Firefox and IE9 default to a text box, which shows the time updating within it.
• The fast-forward button does not work in Firefox, and it is very jerky in IE9. The rewind button doesn’t work in any browser yet.
Because of such browser inconsistencies both in the display of controls and in how they work with the API, you might want to consider using other controls. For example, in Figure 7.5, the video controls are created with a jQuery slider. Several other video players are available to download, such as those available from http://sublime-video.net and http://videojs.com.
Figure 7.5 Video with custom jQuery controls, viewed in Firefox 4

Summary
In this chapter, you learned about the various issues of the video elements such as browser support, but the biggest issue is that of codec support, so it worth keeping an eye on the development of the codec wars.
But aside from the codecs, you learned about ways to get videos natively playing in all the current major browsers, without the need for a third-party plug-in such as Flash. For older browsers that do not support the video element, you can fall back to a link or to an embedded Flash file. You also created a video player with subtitles using the latest standard of WebVTT files, though this is an emerging standard, so be sure to keep abreast of any changes and practices.
Finally, we covered several components of the media API available for creating custom controls, which you can style with CSS.