
Chapter 2
Posting and Interacting
In This Chapter
![]() Creating status updates
Creating status updates
![]() Using replies in business pages
Using replies in business pages
![]() Editing updates and comments
Editing updates and comments
![]() Interacting with others on Facebook
Interacting with others on Facebook
![]() Understanding the follow feature
Understanding the follow feature
The crux of Facebook is sharing real-time information with family, friends, and colleagues. Facebook offers several ways for you to share content with others and to respond to content from others. This chapter explains how you can create and interact with status updates using your personal Facebook account. We also show you how you can use the follow feature to share updates with people who aren’t your friends.
 If you’re looking for info on interacting on your business page, flip over to Book IV, Chapter 3.
Creating a Status Update
A status update, also called a story, is a short explanation of something you want to share with your Facebook friends. A status update can include just about anything, such as text, pictures, video, and links to a website. Status updates are the main way you share information with others. (You can also use private messages, chat, and comments, but this section focuses on basic status updates.)
To create a status update, you type in the status update text box. You find that box in your news feed and your personal timeline. In your news feed, click the Update Status link at the top of the page. In the text box that appears, you can type your status update, tag people, include your location, attach a file (photo or video), choose a “what are you doing” emoticon, and customize who can see your update.
The status update text box in your timeline, shown in Figure 2-1, offers a little more customization. In addition to tagging, adding a location, attaching files, adding emoticons, and customized sharing, you can add a year or signify that this update is a life event.
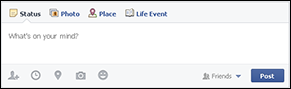
Figure 2-1: Use the status update text box to share content with friends.
As Figure 2-1 shows, you can post a status update as any of the following:
- Status: This option allows you to post a regular text status update. You can include a link to a blog or website in the update; a preview of the web page will appear with the status update. As we explain in Table 2-1, you also have the option here to tag others, add a year, assign a geographic place, and set the share settings.
- Photo: If you want to add photos or video, click the Photo icon at the top of the text status update box or the icon below it. We explain how to share photos and video in Book II, Chapters 3 and 4, respectively.
- Place: You can choose to relate your update to a specific address or general location when you click the Place icon. You can achieve the same thing by creating a regular status update and changing your Place option (see Table 2-1).
- Life Event: When you click the Life Event icon, you see a menu with the following options:
- Work & Education
- Family & Relationships
- Home & Living
- Health & Wellness
- Travel & Experiences
Because life events are usually more important than an average text status update, each of these options has its own submenu that leads to a form to fill out with additional information. You can include pictures, dates, location, and a complete story with each life event update. The life event option is particularly useful as you update and complete your timeline. Book I, Chapter 3 explains how the timeline works in general and why you may want to add events to your timeline.
When you click in the status update text box, icons appear at the bottom of the box, as shown in Figure 2-1 and listed in Table 2-1.
Table 2-1 Status Update Icons
|
Icon |
What You Can Do |
 |
Tag people. Click this icon and start typing the names of people you want to tag in your update. |
 |
Add the year. Click this icon to include the year in your status update. If the year is different than the current year, the status update will appear in the correct chronological place on your timeline rather than being posted as a current update. You can also choose the month, hour, and minute if you want to be exact. |
 |
Add a location. Click this icon and make a selection from the list of locations that appears. If you don't see your location, you can type it. You can type the name of a business (say, a restaurant), a city, a state, or even a specific address. |
 |
Share what you’re feeling or doing. Click this icon and select from a list of emotions or activities (and accompanying icons) to represent what you are feeling or doing at the moment. |
 |
Customize your share settings. Click this icon to customize how you share an update, before or after you've posted your update. You can share or restrict access to yourself, any person, or any list. |
Adjusting how you share content
If you want to change the privacy of a piece of content, you can do that before and after an item is published. When you initially publish something (for example, a text update or link), you can click the share drop-down list to adjust who sees your content. The share list sports two silhouettes (Friends), a globe (Public), a lock (Only Me), or a gear (Custom), depending on your current settings. From the menu, choose to share your update, choose a specific list or specific people, or otherwise customize how you share the item. If you want to change the shares setting for an item you previously published, just click the share icon and change the share setting. Yes, it’s that easy!
 Everything you share ends up in your friends’ news feeds. If you post too much or post uninteresting things, your friends may choose to hide you from their stream or unfriend you.
You can change your notification options right from your news feed. When you see an update from that person, move your cursor over the story, and then click the arrow in the top-right corner. When the menu appears, choose whether you want to get notifications from this specific post. If you want to hide the post, you can choose the I Don’t Want to See This option. If you want to be friends but unfollow the person so that you don’t see his or her updates in your timeline, click Unfollow. The person will still be able to see your updates, but you won’t see his or hers. (And no, Facebook doesn’t tell people when they have been unfollowed.)
Adjusting individual privacy settings
When you post a status update, you may want to choose a privacy setting that is different than your default setting. For example, perhaps you want to share a picture with only the people who appear in that picture.
To adjust your privacy settings for an individual post, click the share drop-down list and select Custom. The dialog box show in Figure 2-2 appears. Select the people or groups with whom you want to share that specific content.
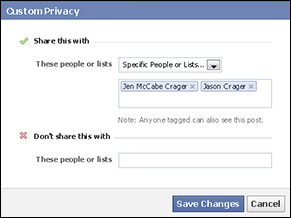
Figure 2-2: Custom privacy settings.
The new privacy setting becomes the default for your next status update and will appear beside each update. You can change the setting at anytime.
Using hashtags to make content discoverable
A hashtag uses the # (number sign) in front of a word, phrase, or topic to change it into a clickable link. If you post something with a hashtag, you or your friends and followers can click that link and see posts on Facebook that include that hashtag. For example, if I click #Houston or #blazefly:
Flying to #Houston for #blazefly meetings.
I see a feed that contains all the posts and status updates from friends and people I follow that contain those words. You can also search for a hashtag using the search bar at the top of any page.
Note: Not all users have the hashtag feature.
Tagging friends and business pages
Tagging is when you write a status update and provide a link to someone’s personal timeline or business page. When you tag a person or page, that person or business is alerted that you’ve shared something. Figure 2-3 shows a status update in which I tagged my wife Jen. When people see the update, they can click Jen’s name to visit her personal timeline. (If I had tagged a business, you could click the business name to visit the business page.) Facebook will alert Jen that I tagged her in a status update.
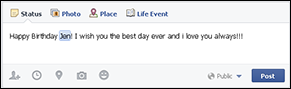
Figure 2-3: An example of how tags look in a status update.
If you tag a friend in a status update, that doesn’t mean everyone has access to his or her information. What people see when they click to your friend's timeline will depend on your friend's current privacy settings. (See Book I, Chapter 4 for advice on your privacy settings.)
Tagging a person or page in an update is easy. Type @ and then start typing the name of the person or page you want to tag. For example, if you want to tag Wright’s Media in an update, start typing @Wright’s, and Facebook displays a list of related people and business pages for you to choose from, as shown in Figure 2-4.

Figure 2-4: Use the list Facebook creates to choose whom to tag.
Here are a few tips about tagging:
- You can tag up to fifty people or pages in a single status update.
- When using your timeline, you can tag people when writing a status update or when commenting on a status update.
- You can tag business pages even if you haven’t Liked them.
- Business pages can’t tag individuals in a status update.
- Business pages can tag other pages even if the page hasn’t been Liked. (See Book IV, Chapter 3 to find out more about how pages can interact with other pages and individual fans.)
- Business pages can tag an individual in a comment if that individual left a previous comment in the thread. For instance, suppose someone comments on a post at the Crowdshifter business page. If you aren't Facebook friends with this person, you can’t write a new status update and tag that commenter. However, because the person commented on a status update, you can now respond to him or her in the comments section of that same thread and tag that person. Facebook lets the person know that he or she was tagged and can read the response.
It’s best to tag people only if you know they won’t mind. It’s especially important to ask people if you can tag them when you’re using Facebook’s check-in feature (see Chapter 6 of this minibook for an explanation of Facebook places and check-ins).
If you’d like to control whether people can tag you, adjust your privacy settings. Click the gear icon, click Settings, and then click Timeline and Tagging. You can adjust a variety of settings that help keep Facebook in line with your preferences. (Check out Book I, Chapter 4 for a discussion of your Facebook privacy.)
Allowing Replies to Business Pages
You can give people permission to reply directly to comments left on your business page and start conversation threads, as shown in Figure 2-5. This feature makes it easy to start a discussion or build a community.
When a friend, follower, or fan visits your page, the most active conversations will be featured at the top of your posts. Note that conversation threads are shown in relevance to each viewer and may appear differently based on their connections.
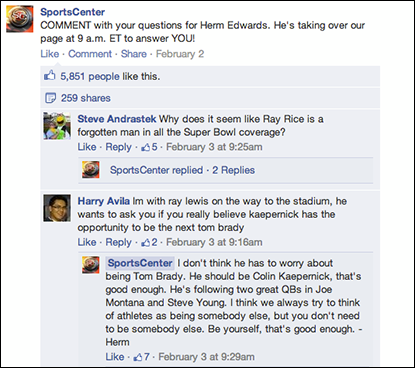
Figure 2-5: Using replies on your business page.
To turn on comment replies, follow these steps:
- At the top of your business page, click Edit Page and choose Edit Settings from the menu that appears.
The Settings page appears.
- Click Replies.
- Select the Allow Replies to Comments on My Page check box.
- Click Save Changes.
Removing and Editing Updates and Comments
You may find yourself rethinking something you shared and wanting to remove it. Perhaps, as you update your timeline, you want to remove some past updates as your circle of friends grows or your life changes. Or maybe you commented on someone’s status update and you wish you’d been a little more eloquent.
Although you can delete comments (yours as well as those from others on your updates), think first about your reasons for doing so. Social media is about sharing and accessibility. It’s about discourse and presenting all sides of a story or an issue. Ideally, that discourse will be respectful, but sometimes it gets out of hand. No one likes to have his or her voice (or, in this case, comment) removed, but sometimes that action is best to keep the peace. On the other hand, if you remove a comment (either yours or someone else’s), be prepared for the possibility of being called out for censoring the conversation.
Your timeline is your space, and you decide what is or isn’t appropriate for that space. It’s important to explain your stance to your circle of friends so they understand your point of view. Remember, though, that when you post content to Facebook, you’re inviting people to interact with you and share their opinions on that content. If you choose to remove comments you disagree with, others may not feel welcome to comment on your updates.
If you administrate a business page, removing comments becomes an even bigger issue. Some businesses remove inflammatory or unflattering comments, but that can be a mistake. Your customers expect your business page to be a place where they can interact with you — both positively and negatively. If you whitewash your Facebook business page, allowing good comments and deleting anything questionable, your followers and fans will rebel. (We explain the etiquette and overall management of business pages in further detail in Book IV.)
If you find that you really do need to edit a status update or remove a status update or comment, follow these instructions:
- Find the status update or comment on your timeline (or go to your timeline and click the Activity Log button).
- Click the arrow in the top-left corner and select edit or delete.
- Edit or delete a comment as follows:
- To remove your own comment: Click the pencil icon and choose Edit or Delete.
- To remove a comment from someone else: Click the X.
 When you delete a post or comment, it’s permanently deleted. You can’t get it back. If you don’t want to permanently delete a post, you can always change its share settings or hide it from your timeline instead.
Interacting with Other People’s Updates
When you share content on Facebook, you’re probably doing it so others will interact with it. Let’s face it, if everyone just broadcast updates, pictures, and video without receiving feedback, the experience would be boring — and not fulfilling. When we share something, our intent is to have friends comment or Like the content. That interaction is validation that others agree or disagree with us — or an acknowledgment that someone else noticed that we’re around and sharing stuff. Either way, we get a sense of satisfaction from those interactions.
Depending on how interesting you found an update, you can interact in the following ways:
- Like: Clicking the Like button is the easiest way to interact with content on Facebook. When you click Like, you’re basically acknowledging that you agree with the status update or like the content of it (whether it’s text, a link, a picture, or a video). And if you can’t respond right away, clicking Like in a comment is a way to let commenters know you’ve seen their input.
- Comment: Responding with a typed message takes a bit longer, but trust us when we say that everyone loves a comment. It’s especially nice when those comments lead to a civil discourse on interesting subjects — or build on each other for humorous observations.
- Share: The ultimate in validation is when you like something enough to share it with your own circle. The person or business page that originally shared an item can see how many times it’s been shared.
You can do most of your content interaction via your news feed or the feed for a specific list (see Book I, Chapter 4 for information on lists); you don’t have to click to someone’s personal timeline or business page to interact with their updates. As you see something in your news feed, you can Like, comment, or share at will.
To share an item, follow these instructions:
- Click the Share link below the content.
The Share This window appears.
- Use the drop-down list to choose where to share the content.
You can share it on your own timeline, on a friend’s timeline, in a Facebook Group you belong to, on a business page you administer, or via a private message.
- Set the share settings for your update.
- Write a status update introducing the content.
- Click the Share Link button.
When you share something, it appears on your timeline and in your friends’ news feeds (depending on who you shared the update with, of course), and others can see where you found the shared content, as shown in Figure 2-6.
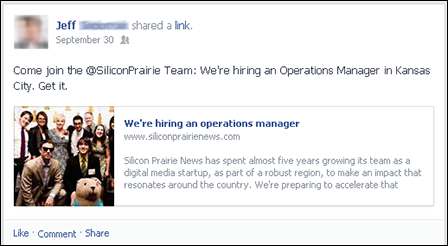
Figure 2-6: Sharing a link.
Understanding How the Follow Feature Works
The follow feature allows a person to follow your public updates without being your Facebook friend. Likewise, you can follow others’ public updates if they’ve enabled the public follow feature. Your account is already set up for following, in fact your Facebook friends already follow you, but you can enable it so anyone can follow you.
The follow feature is handy if you’re a celebrity or public figure who may have quite a following but who likes to keep your Facebook friends private or at least confined to those people you’ve met in person. Or maybe you like to be available to network but still want to keep some things private.
If you have the public follow feature enabled for your account, any time you post content and set the share settings to Public, your followers will see your updates. Those followers will not see any updates that have customized share settings (such as Friends Only).
Adjusting the follow feature settings for your account
To adjust the follow feature settings on your account, just do this:
- Click the gear icon on the blue Facebook toolbar and choose Settings from the menu.
The General Account Settings page appears.
- Click the Followers link in the left sidebar.
The Follower Settings page appears.
- In the Who Can Follow Me section, select Friends or Everybody.
You can select who can comment on your updates, adjust notifications, and add a Follow plugin to your website to attract more followers.
Anyone who clicks the Follow button, whether they are connected to you on Facebook or not, will see your public updates. However, followers will not see your personal data (such as your birthday).
Following other people’s updates
You can follow someone's updates as long as that person has selected the Everybody follow option. Just go to the person's timeline and click the Follow button, located in the lower-right of the cover photo. You’ll start receiving the person's public updates immediately.