
Chapter 7. Portable Library and HTML/JavaScript
The client-side development experience dramatically changed when Microsoft released Windows 8 and continues to change as HTML5 gains full traction in web development. In this chapter, I will describe how to write F# portable library for Windows Store apps as well as web applications based on HTML/JavaScript.
Developing Windows Store Applications with F#
Windows Store is a platform for distributing Windows Runtime (WinRT) and desktop applications. WinRT is a cross-platform architecture for Windows 8. WinRT supports development in C++/CX, JavaScript, and managed languages such as C# and Visual Basic .NET. The portable library support makes F# another choice for library development for Windows Store apps. The Portable Class Library project was introduced with Microsoft Visual Studio 2012. The MSDN documentation (http://msdn.microsoft.com/en-us/library/gg597391.aspx) describes it like this:
The Portable Class Library project supports a subset of assemblies from the .NET Framework, Silverlight, .NET for Windows Store apps, Windows Phone, and Xbox 360, and provides a Visual Studio template that you can use to build assemblies that run without modification on these platforms. If you don’t use a Portable Class Library project, you must target a single app type, and then manually rework the class library for other app types. With the Portable Class Library project, you can reduce the time and costs of developing and testing code by building portable assemblies that are shared across apps for different devices.
There are different .NET frameworks available. The desktop application uses the traditional .NET Framework. Silverlight and Windows Store apps use a different, more limited, version of the .NET Framework. If you create applications for different platforms, the cost to maintain these different code versions is very high. The portable class library (or simply, portable library) is the best choice when you are developing an application or library with the intent of targeting multiple platforms. For the core business logic that does not change across platforms, the portable library is a suitable choice. That’s also the recommended way to use an F# portable library. The portable library does have a limitation: it cannot contain a reference to a platform-specific project or binary file.
If you’re planning to create a Windows Store application using F#, creating an F# portable library is the way to do it. The back-end business logic can be hosted in an F# portable library, and the UI can be built as a C# project.
Creating an F# Portable Library
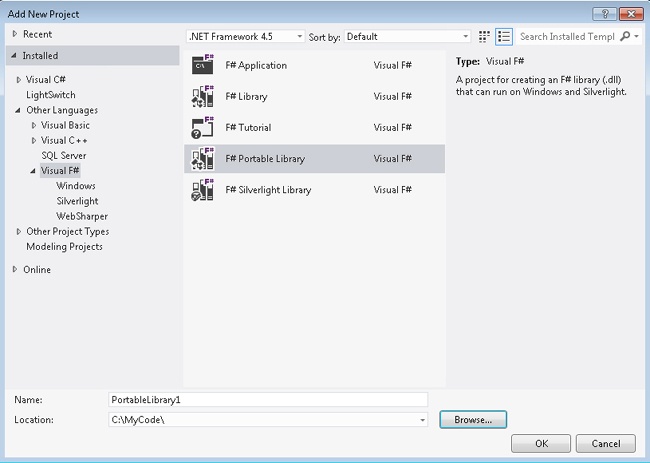
You can create a portable library with Visual Studio 2012. Start by clicking New Project. The portable library is shown under the Visual F# node, as shown in Figure 7-1. The project creates an F# library (.DLL) that can be executed on Windows and Silverlight.
The default for the project is simple: it contains one class with one member. Because the library is most likely invoked by another language, a namespace is used. The default code is shown in Example 7-1.
namespace PortableLibrary1
type Class1() =
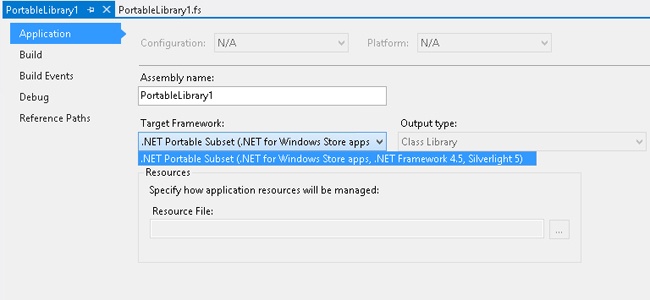
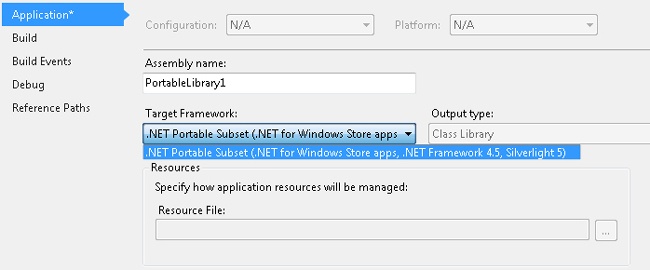
member this.X = "F#"After the project is created, you can go to the properties for the project, which offer more detailed information about the supported platform, as shown in Figure 7-2. The F# portable library is supported for .NET for Windows Store apps, .NET Framework 4.5 for desktop applications, and Silverlight 5.
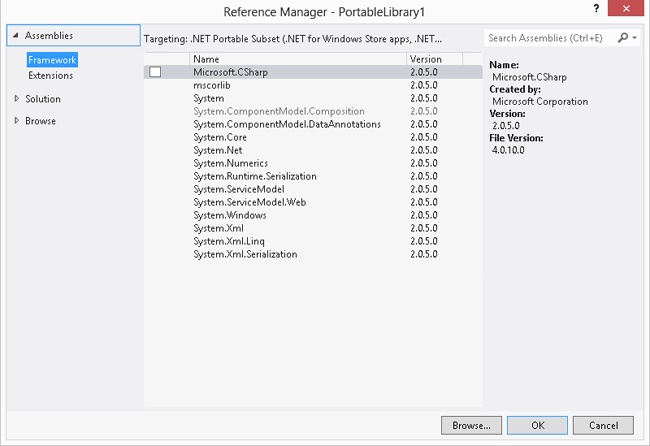
Once the code is compiled, the generated DLL is a portable library. The portable library project can only reference a smaller number of .NET assemblies. In Visual Studio, adding a reference to a project is performed by using Reference Manager. The Reference Manager dialog box is shown in Figure 7-3.
Later in this chapter, I’ll show you how to use F# to perform HTML5 programming by using WebSharper. For XAML-based application development, the easiest approach for developing the UI aspects is to use tooling provided for other languages, such as C#.
One commonly used pattern to accomplish the separation between the business logic and UI is known as Model-View-ViewModel (MVVM). MVVM is an architectural design pattern that was proposed by Microsoft. It is in the family of architectural patterns that include Model-View-Controller (MVC), Model-View-Presenter (MVP), and Model-View-PresentationModel (MVPM). MVVM is targeted at modern UI development, such as HTML5+JavaScript (with frameworks like Knockout.js), Windows Presentation Foundation (WPF), and Silverlight. Here are a few of the MVVM frameworks that can be used to help implement MVVM within your XAML-based applications:
WPF toolkit from Microsoft (http://wpf.codeplex.com/)
Josh Smith is the first advocator of the pattern, and his framework is presented at http://mvvmfoundation.codeplex.com/.
Microsoft Prism framework at http://compositewpf.codeplex.com/
MVVM Light Toolkit at http://www.galasoft.ch/mvvm/.
Now it’s time to show you some code and demonstrate how to write a portable library in F#.
Using the CompiledName Attribute
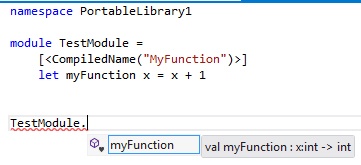
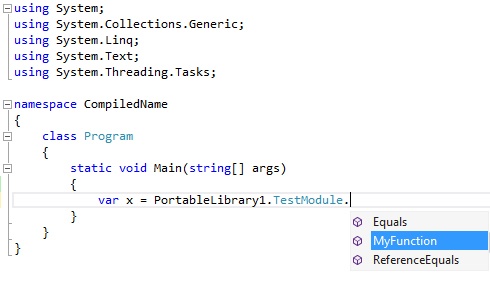
As you’ve seen, a common way to use F# functions in a Windows Store app is to invoke the F# portable library from a C# project. However, this can cause inconsistencies when it comes to naming conventions for methods and functions. The F# function naming convention follows the camelCase format, where the first character of the function name is lowercase. On the other hand, the C# and .NET naming conventions require the method names to be PascalCase, where the first character is uppercase. This causes a conflict when a function needs to be invoked both from F# and C#. To resolve this, F# provides the CompiledName attribute. Example 7-2 shows a function named myFunction. The CompiledName attribute sets the function name to use PascalCase within the compiled binary. This attribute can be applied to any value or function inside an F# module.
namespace PortableLibrary1

module TestModule =
    [<CompiledName("MyFunction")>]
    let myFunction x = x + 1
Figure 7-4 and Figure 7-5 show the different behaviors when invoking the same code from F# and C# in a Portable Class Library project.
Exploring the Portable Library Samples
As previously mentioned, the portable library supports only a subset of the assemblies provided by .NET. This presents a good opportunity for you to apply F# features to some complex problems. In this section, algorithm and data structure samples, which are the foundation to implementing complex business logic, are presented. When solving these complex problems, I will also demonstrate how to use F# features to improve the overall coding experience. I do not believe that code should always be written in the same way. Different strokes for different folks. You should be able to recognize the features that are most useful to you with your existing skill set and apply them to your daily work.
Note
This section does not discuss algorithm design. If you are interested in this topic, I encourage you to reference other sources, such as The Algorithmist website at http://www.algorithmist.com/index.php/Main_Page.
Let’s start with a small number-cracking problem. Imagine that you did not have the modulo operator available to you. How would you check whether a number is divisible by 7? The math required for determining this, as illustrated by Example 7-3, is a number in the following form:
10a + b is divisible by 7 if and only if a – 2b is divisible by 7
 let rec ``7?`` x =
    match x with
    | 0
    | 7 -> true
    | _ when x > 0 && x < 10 -> false
    | _ when x < 0 -> ``7?`` -x
    | _ ->
        let a = x / 10
        let b = x - x / 10 * 10

``7?`` (a  2 * b)

let data = [-100..100]

let resultData = data |> List.filter ``7?``

// test data
let oracle =
        data
        |> List.filter (fun n -> n % 7 = 0)

let c = resultData = oracle
Note
This sample shows how to use a special character in the function name. Except for requiring that the active pattern name be started with an uppercase letter, F# does not impose many restrictions on names. You can even use Unicode characters in a function name.
You can use F# Interactive (FSI) to print out a list of characters. You can use Alt+<number key in the number keyboard> to type in the character, and FSI will figure out the characters. A sample is shown here. The first character is Alt + 900, and the last character is Alt + 980. If your keyboard does not have a number keypad, you can use the other software such as Microsoft Word to generate these characters.
> ['ä'..'╚'];;
val it : char list =
  ['ä'; 'å'; 'æ'; 'ç'; 'è'; 'é'; 'ê'; 'ë'; 'ì'; 'í'; 'î'; 'ï'; 'ð'; 'ñ'; 'ò';
   'ó'; 'ô'; 'õ'; 'ö'; '÷'; 'ø'; 'ù'; 'ú'; 'û'; 'ü'; 'ý'; 'Þ'; 'ÿ'; 'Ā'; 'ā';
   'Ă'; 'ă'; 'Ą'; 'ą'; 'Ć'; 'ć'; 'Ĉ'; 'ĉ'; 'Ċ'; 'ċ'; 'Č'; 'č'; 'Ď'; 'ď'; 'Đ';
   'đ'; 'Ē'; 'ē'; 'Ĕ'; 'ĕ'; 'Ė'; 'ė'; 'Ę'; 'ę'; 'Ě'; 'ě'; 'Ĝ'; 'ĝ'; 'Ğ'; 'ğ';
   'Ġ'; 'ġ'; 'Ģ'; 'ģ'; 'Ĥ'; 'ĥ'; 'Ħ'; 'ħ'; 'Ĩ'; 'ĩ'; 'Ī'; 'ī'; 'Ĭ'; 'ĭ'; 'Į';
   'į'; 'İ'; 'ı'; 'IJ'; 'ij'; 'Ĵ'; 'ĵ'; 'Ķ'; 'ķ'; 'ĸ'; 'Ĺ'; 'ĺ'; 'Ļ'; 'ļ'; 'Ľ';
   'ľ;'; 'Ŀ'; 'ŀ'; 'Ł'; 'ł'; 'Ń'; 'ń'; 'Ņ'; 'ņ'; 'Ň'; ...]
Developing the WinRT Application
In Visual Studio 2012, F# is shipped with a new template called the F# Portable Library. This template is used for developing the WinRT application. When developing a WinRT application, you can use an F# portable library to host the business logic. C# can provide a UI for the portable library.
The portable library is the intersection of three .NET frameworks: Silverlight, the desktop, and WinRT. Because the portable library is the subset of these .NET frameworks, moving an application from a desktop environment to a portable library does not work in some cases. For example, System.IO.File is not present in the portable library because the Silverlight .NET framework does not support System.IO.File.
If you want to develop business logic for WinRT applications, F# portable library is a good choice. The F# portable library is designed to be executed from within Windows Store applications, Silverlight applications, and desktop applications. You will now create a Windows Store application that will serve as the test UI container for the examples in the rest of this chapter.
When creating a new project, you can expand the C# node and select the Windows Store node in Visual Studio 2012 on Windows 8. Blank App is the template you are going to use, as shown in Figure 7-6.
Note
The initial release of F# 3.0 with Visual Studio 2012 did not include some important settings, which caused the Windows 8 verification process to fail for Windows 8 applications that used F#. This Windows 8 verification bug has been fixed in the Visual Studio Update. If installing the Visual Studio Update is not an option, you can resolve the problem by editing the fsproj file for the portable DLL project and adding the following at the end of the first PropertyGroup:
<PropertyGroup Condition=" '$(Configuration)|$(Platform)' == 'Release|AnyCPU' ">
    <OtherFlags>--staticlink:FSharp.Core</OtherFlags>
  </PropertyGroup>
  <PropertyGroup>
    <RunPostBuildEvent>OnOutputUpdated</RunPostBuildEvent>
    <PostBuildEvent>if "$(ConfigurationName)"=="Release" (
"C:Program Files (x86)Microsoft SDKsWindowsv8.0AinNETFX 4.0 Toolsildasm.exe" /
linenum
/nobar /out="$(TargetName).il" $(TargetFileName)

powershell "$lines = '}','} /*','} */'; $matchCount = 0; $clashCount = 0; filter GetOutput
{ if
($_ -eq '  } // end of method MatchFailureException::.ctor') { $lines[$matchCount++] }
else { if
($_ -eq '    } // end of method Clash::.ctor') { $lines[$clashCount++] } else { $_ } } };
(Get-Content
$(TargetName).il) | GetOutput | Set-Content $(TargetName).il"

"C:WindowsMicrosoft.NETFrameworkv4.0.30319ilasm.exe" /dll /debug=opt /quiet
$(TargetName).il

copy /y $(TargetName).* ....objRelease
)
    </PostBuildEvent>
  </PropertyGroup>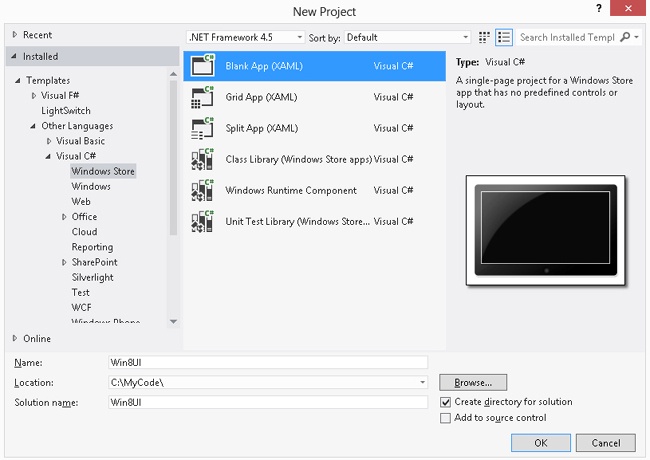
An example of the generated solution structure is shown in Figure 7-7.

From the project properties page, the F# portable library can be configured to target WinRT, .NET 4.5, and Silverlight 5. See Figure 7-8.
You can now add a text block to the main form, as shown in Example 7-4.
<Page
x:Class="Win8UI.MainPage"
xmlns=http://schemas.microsoft.com/winfx/2006/xaml/presentation
xmlns:x=http://schemas.microsoft.com/winfx/2006/xaml
xmlns:local="using:Win8UI"
xmlns:d=http://schemas.microsoft.com/expression/blend/2008
xmlns:mc=http://schemas.openxmlformats.org/markup-compatibility/2006
mc:Ignorable="d">
<Grid Background="{StaticResource ApplicationPageBackgroundThemeBrush}">
<TextBlock x:Name="result_box" Text="Result"/>
</Grid>
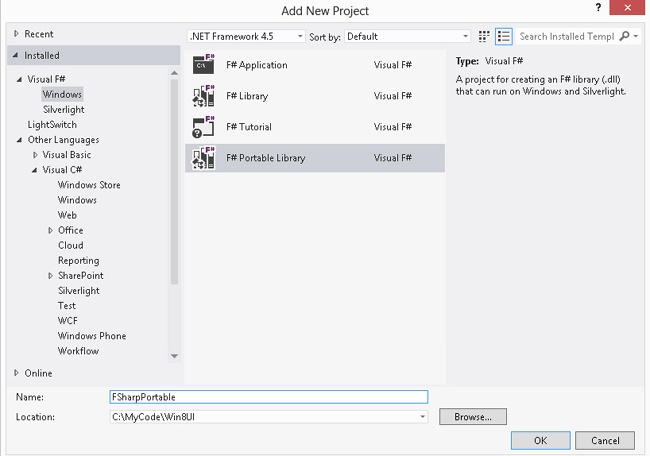
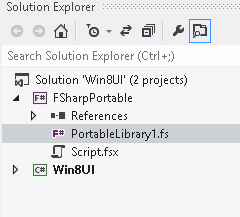
</Page>The F# portable library project can now be created in the same solution, as shown in Figure 7-9.
The new solution structure with the F# Portable Class Library project is shown in Figure 7-10.
For brevity, I am not going to go through a complete MVVM implementation. Instead, I will provide just enough of an implementation to enable data binding to be done. The first modification that is required is to add the Result member to Class1 in the PortableLibrary1.fs file, as shown in Example 7-5.
namespace FSharpPortable

type Class1() =
    member this.Result = "F#"
The UI project can now be enhanced to bind to our F# portable library. In this step, DataContext is set to Class1 and the UI XAML code is changed to bind to the Result property, as shown in Example 7-6.
XAML code change
<Page
    x:Class="Win8UI.MainPage"
    xmlns=http://schemas.microsoft.com/winfx/2006/xaml/presentation
    xmlns:x=http://schemas.microsoft.com/winfx/2006/xaml
    xmlns:local="using:Win8UI"
    xmlns:d=http://schemas.microsoft.com/expression/blend/2008
    xmlns:mc=http://schemas.openxmlformats.org/markup-compatibility/2006
    mc:Ignorable="d">

    <Grid Background="{StaticResource ApplicationPageBackgroundThemeBrush}">
        <TextBlock x:Name="result_box" Text="{Binding Result}"/>
    </Grid>
</Page>
C# code change to set DataContext
using System;
using System.Collections.Generic;
using System.IO;
using System.Linq;
using Windows.Foundation;
using Windows.Foundation.Collections;
using Windows.UI.Xaml;
using Windows.UI.Xaml.Controls;
using Windows.UI.Xaml.Controls.Primitives;
using Windows.UI.Xaml.Data;
using Windows.UI.Xaml.Input;
using Windows.UI.Xaml.Media;
using Windows.UI.Xaml.Navigation;

// The Blank Page item template is documented at http://go.microsoft.com/
fwlink/?LinkId=234238

namespace Win8UI
{
    /// <summary>
    /// An empty page that can be used on its own or navigated to within a Frame.
    /// </summary>
    public sealed partial class MainPage : Page
    {
        public MainPage()
        {
            this.InitializeComponent();
        }

        /// <summary>
        /// Invoked when this page is about to be displayed in a Frame.
        /// </summary>
        /// <param name="e">Event data that describes how this page was reached.  The
Parameter
        /// property is typically used to configure the page.</param>
        protected override void OnNavigatedTo(NavigationEventArgs e)
        {
            this.DataContext = new FSharpPortable.Class1();
        }
    }
}
Note
You can also create a Silverlight project and enable data binding. The steps and code are very similar.
Now you have the UI bound to the portable library. The portable F# code in the rest of this chapter can be placed in the Result property to allow the result to be shown in the UI.
Note
Although the portable library can be referenced from the Windows Store, Silverlight, and desktop applications, a console application is still a convenient way to test small code snippets.
Now that you know what the portable library is. The major application for F# portable library is to implement algorithms.. The next several sections provide samples of common algorithms implemented with F#. These algorithms are perfect examples of what can be put into the back-end library In addition, if you take a second look these familiar algorithms and how to use F# to implement them, you can get a better understanding of F#.
Using an Array, List, and Seq
In this section, I will present several examples related to collection data structures, such as arrays, lists, and sequences. One of the most common problems for processing these collection data structures is sorting.
Sorting data types
The first example demonstrates how to use the built-in sorting functions to do sorting. This is shown in Example 7-7. The portable library does not support the printfn statement, so the testing of this code is performed in a console application.
open System

// type alias for IEnumerable
type IE = System.Collections.IEnumerable

// define record type
type MyRecord = { X : int; Y : string }

// define DU type
type MyDU =
    | Case1 of string
    | Case2 of int

// define a class
type MyClass() =
    member val MyProperty = 0 with get, set
    member val MyProperty2 = String.Empty with get, set
    override this.ToString() =
        sprintf "(%A, %A)" this.MyProperty this.MyProperty2

type DataSource() =
    let random = Random()

    // define data sequence
    let seq0 = [2; 3; 4; 5; 10; 10; 11; 13; 14; 19]
    let seq1 = seq0 |> Seq.map (fun x -> float x)
    let seq2 = seq0 |> Seq.map (fun x -> bigint x)
    let seqTuple = Seq.zip seq0 (seq0 |> Seq.map (sprintf "%A"))
    let seqRecord = seqTuple |> Seq.map (fun (i, s) -> {X = i; Y = s})
    let seqDU = seqTuple |> Seq.map (fun (i, s) -> Case2(i))
    let seqDU2 = seqTuple |> Seq.map (fun (i, s) -> Case1(s))
    let seqClass = seqTuple |> Seq.map (fun (i, s) -> MyClass(MyProperty = i, MyProperty2
= s))

    // define data list; this list is an F# list type
    let list0 = seq0 |> Seq.toList
    let list2 = seq2 |> Seq.toList
    let listTuple = seqTuple |> Seq.toList
    let listRecord = seqRecord |> Seq.toList
    let listDU = seqDU |> Seq.toList
    let listClass = seqClass |> Seq.toList

    let toString x =
        let seq =
            x
            |> Seq.toList
            |> List.map (fun n -> sprintf "%A" n)
        String.Join(",", seq)

    member this.Seqs : list<IE> =
            [ seq0
              seq1
              seq2
              seqTuple
              seqRecord
              seqDU
              seqDU2
              seqClass ]

    member this.Lists : list<IE> =
            [ list0
              list2
              listTuple
              listRecord
              listDU
              listClass ]

    member this.TestSeq() =
        let seq0 = seq0 |> Seq.sort |> toString
        let seq1 = seq1 |> Seq.sort |> toString
        let seq2= seq2 |> Seq.sort |> toString

        let seqTuple=seqTuple |> Seq.sort |> toString
        let seqRecord=seqRecord |> Seq.sort |> toString
        let seqDU=seqDU |> Seq.sort |> toString
        let seqDU2=seqDU2 |> Seq.sort |> toString
        let r =
            [ seq0
              seq1
              seq2
              seqTuple
              seqRecord
              seqDU
              seqDU2 ]
        r
        |> Array.ofList

    member this.TestList() =
        let list0 =list0 |> Seq.sort  |> toString
        let list2 =list2 |> Seq.sort |> toString
        let listTuple=listTuple|> Seq.sort |> toString
        let listRecord=listRecord|> Seq.sort |> toString
        let listDU=listDU|> Seq.sort |> toString
        let r =
            [ list0
              list2
              listTuple
              listRecord
              listDU ]
        r
        |> Array.ofList

    member this.TestSeqSortBy_Tuple() =
        let r = seqTuple |> Seq.sortBy (fun (i, s) -> i) |> toString
        r

    member this.TestSeqSortBy_Record() =
        let r = seqRecord |> Seq.sortBy (fun n -> n.X) |> toString
        r

    member this.TestSeqSortBy_DU() =
        let r = seqDU |> Seq.sortBy (fun (Case2(n)) -> n) |> toString
        r

    member this.TestSeqSortBy_Class() =
        let r = seqClass |> Seq.sortBy (fun n -> n.MyProperty2) |> toString
        r
Console application code to test the portable library
let data = DataSource()
printfn "test seq"
let join (x:'T array) = System.String.Join("
", x)

[ join (data.TestSeq());
join (data.TestList());
data.TestSeqSortBy_Class();
data.TestSeqSortBy_DU();
data.TestSeqSortBy_Record();
data.TestSeqSortBy_Tuple() ]
|> Seq.iter (printfn "%A")
Execution result from console testing
test seq
"2,3,4,5,10,10,11,13,14,19
2.0,3.0,4.0,5.0,10.0,10.0,11.0,13.0,14.0,19.0
2,3,4,5,10,10,11,13,14,19
(2, "2"),(3, "3"),(4, "4"),(5, "5"),(10, "10"),(10, "10"),(11, "11"),(13, "13"),(14,
"14"),(19,
"19")
{X = 2;
 Y = "2";},{X = 3;
 Y = "3";},{X = 4;
 Y = "4";},{X = 5;
 Y = "5";},{X = 10;
 Y = "10";},{X = 10;
 Y = "10";},{X = 11;
 Y = "11";},{X = 13;
 Y = "13";},{X = 14;
 Y = "14";},{X = 19;
 Y = "19";}
Case2 2,Case2 3,Case2 4,Case2 5,Case2 10,Case2 10,Case2 11,Case2 13,Case2 14,Case2 19
Case1 "10",Case1 "10",Case1 "11",Case1 "13",Case1 "14",Case1 "19",Case1 "2",Case1
"3",Case1
"4",Case1 "5""
"2,3,4,5,10,10,11,13,14,19
2,3,4,5,10,10,11,13,14,19
(2, "2"),(3, "3"),(4, "4"),(5, "5"),(10, "10"),(10, "10"),(11, "11"),(13, "13"),(14,
"14"),(19,
"19")
{X = 2;
 Y = "2";},{X = 3;
 Y = "3";},{X = 4;
 Y = "4";},{X = 5;
 Y = "5";},{X = 10;
 Y = "10";},{X = 10;
 Y = "10";},{X = 11;
 Y = "11";},{X = 13;
 Y = "13";},{X = 14;
 Y = "14";},{X = 19;
 Y = "19";}
Case2 2,Case2 3,Case2 4,Case2 5,Case2 10,Case2 10,Case2 11,Case2 13,Case2 14,Case2 19"
"(10, "10"),(10, "10"),(11, "11"),(13, "13"),(14, "14"),(19, "19"),(2, "2"),(3, "3"),(4,
"4"),(5,
"5")"
"Case2 2,Case2 3,Case2 4,Case2 5,Case2 10,Case2 10,Case2 11,Case2 13,Case2 14,Case2 19"
"{X = 2;
 Y = "2";},{X = 3;
 Y = "3";},{X = 4;
 Y = "4";},{X = 5;
 Y = "5";},{X = 10;
 Y = "10";},{X = 10;
 Y = "10";},{X = 11;
 Y = "11";},{X = 13;
 Y = "13";},{X = 14;
 Y = "14";},{X = 19;
 Y = "19";}"
"(2, "2"),(3, "3"),(4, "4"),(5, "5"),(10, "10"),(10, "10"),(11, "11"),(13, "13"),(14,
"14"),(19,
"19")"Using a quick-sort algorithm
The quick sort is a common sorting algorithm. Compared to a C# implementation, the F# code in Example 7-8 is more concise and readable. This sample uses pattern matching. If the code in Example 7-3 makes you think the match is nothing but a switch, you will now see that this is far from the truth. Notice the head::tail line of code. This pattern causes the data list to be automatically decomposed into a head and a tail. The head is the first element in the list, and the tail is a list that contains all elements from the original list except the head element. You do not even have to declare the variable. The type and value are handled by the F# compiler automatically. If you are wondering how to decompose the data into a customized format—such as head, last elements, and a tail collection—I will show you a sample later in this chapter.
The @ operator does almost the opposite of ::. It concatenates two lists. It is used at the end of the function to combine the results of the two branches of recursion.
let rec quickSort (data:int list) =
    match data with
    | [] -> []
    | [a] -> [a]
    | head::tail ->
        let l0 =
            tail
            |> List.filter ((<=) head)
        let l1 =
            tail
            |> List.filter ((>) head)
        quickSort(l0) @ [head] @ quickSort(l1)

quickSort [-2; -3; 4; -1; 0; 1; 5; 7; -2]
Note
If the (<=) in the eighth line is replaced with (<), the result will not contain duplicated elements.
When you execute this sample with the Win8UI project provided as the front end, it will not show all the elements on the UI. This can be solved by using the Seq.fold function to aggregate the result:
quickSort [-2; -3; 4; -1; 0; 1; 5; 7; -2]
|> Seq.fold (fun state t -> (string t) + "," + state) ""
The (<=) and (>) in the code shows that the operator in F# is also a function. I am using the higher-order function feature in F# to generate a new function from (<=) by applying a value to it.
Performing a merge sort
The merge sort is used to perform sorting in two stages:
Divide the unsorted list into n sublists, each containing only one element.
Merge repeated sublists into new sublists until there is only one sublist remaining.
Example 7-9 once again shows pattern matching. Note that in this section of the merge function, two cases have the same name but different data.
| [], list
| list, [] -> list
One case is from list0, and the other is from list1. The pattern matching not only gives you the ability to decompose the data, but also the ability to unify the data as long as the cases have the same name.
open System

// merge two list into one list
let rec merge list0 list1 =
    match list0, list1 with
    | [], [] -> []
    | [], list
    | list, [] -> list
    | h0::t0, h1::t1 ->
        if h0 < h1 then
            [h0] @ merge t0 list1
        else
            [h1] @ merge list0 t1

// merge sort algorithm function
let rec mergeSort list =
    match list with
    | [] -> []
    | [a] -> [a]
    | [a; b] -> [ min a b; max a b ]
    | _ ->
        let firstHalf =
            list
            |> Seq.take (list.Length / 2)
            |> Seq.toList
        let secondHalf =
            list
            |> Seq.skip (list.Length / 2)
            |> Seq.toList

        let sortedFirstHalf = mergeSort firstHalf
        let sortedSecondHalf = mergeSort secondHalf

        merge sortedFirstHalf sortedSecondHalf

mergeSort [1;3;9;2;4;7;6;5]
Finding a sum from an array
Example 7-10 finds all elements in an array that add up to a certain number. This sample shows F# code written in an imperative style. The for loop iterates through the list and uses the yield keyword to output the list element.
let findElement (list:int list) start target =
    list
    |> Seq.skip start
    |> Seq.tryFind ((=) target)

let find sum (list:int list)  =
    [ for i in [0..list.Length-4] do
        for j in [i + 1..list.Length-3] do
            for k in [j + 1..list.Length-2] do
                let rest = sum - (list.[i] + list.[j] + list.[k])
                let result = findElement list (k+1) rest
                match result with
                | Some n -> yield (list.[i], list.[j], list.[k], n)
                | None -> ()
    ]

find 23 [10; 2; 3; 4; 5; 9; 7; 8]
Execution result
val it : (int * int * int * int) list =
  [(10, 2, 3, 8); (10, 2, 4, 7); (2, 4, 9, 8); (2, 5, 9, 7); (3, 4, 9, 7);
   (3, 5, 7, 8)]
Merging two sorted arrays
You saw how to perform a merge sort on one array. This next algorithm (Example 7-11) is used to perform a merge operation on two sorted arrays. The merge operation is performed in-place, taking advantage of the fact that in F#, array elements are automatically mutable.
let (|Exhausted|_|) i =
    if i < 0 then
        Some()
    else
        None

let array1 = [| 1; 3; 4; 6; 9; 0; 0; 0; 0; 0; |]
let array2 = [| 2; 3; 5; 8; 10; |]

let rec merge (i, j, k) =
    match i, j with
    | Exhausted, Exhausted
    | _, Exhausted ->
        ()
    | Exhausted, _ ->
        array1.[k] <- array2.[i]
        let i, j, k = i, (j - 1), (k - 1)
        merge (i, j, k)
    | _ ->
        if array1.[i] > array2.[j] then
            array1.[k] <- array1.[i]
            let i, j, k = (i - 1), j, (k - 1)
            merge(i, j, k)
        else
            array1.[k] <- array2.[j]
            let i, j, k = i, (j - 1), (k - 1)
            merge(i, j, k)

merge (4, 4, array1.Length - 1)
Finding the maximum sum of an array
Example 7-12 finds the largest sum of contiguous subarrays within a one-dimensional array of numbers. The Kadane algorithm is the typical solution for this problem. The execution result is 7. This sample once again shows how to create F# code using the imperative programming style.
let kadane data =
    let mutable maxV, max_currentPoint = 0, 0
    for i in data do
        max_currentPoint <- max 0 (max_currentPoint + i)
        maxV <- max maxV max_currentPoint

    maxV

kadane [-2; -3; 4; -1; -2; 1; 5; -3; ]
If the source array can be iterated as a circle, you have to consider a second case where the maximum value is achieved through wrapping. Example 7-13 solves this problem. The second case is used to find the range that affects the array sum the most. The rest of the array is a range that passes the array boundary. If the sum of the range is greater than the range that does not cross the boundary, this is the result you are looking for.
let kadane data =
    let mutable maxV, max_currentPoint = 0, 0
    for i in data do
        max_currentPoint <- max 0 (max_currentPoint + i)
        maxV <- max maxV max_currentPoint

    maxV

let kadaneCircle data =
    // normal case
    let kadaneValue = kadane data

    // 2nd case
    let sum = Seq.sum data
    let invertMax =
        data
        |> List.map ((*) -1)
        |> kadane

    let ``2ndCase`` = sum + invertMax

    max kadaneValue ``2ndCase``

kadaneCircle [12; -5; 4; -8; -2; 11]val kadane : data:seq<int> -> int val kadaneCircle : data:int list -> int val it : int = 23
Finding the median of two sorted arrays
If the array can be envisioned as a sample data set, the sum is one attribute of the array. The median is another important attribute for a one-dimensional data set. The median is the value at which half of the array values are below and half of the values are above. Example 7-14 shows how to find the median value from two sorted arrays.
let findMedian (list0:int list) (list1:int list) =
    let totalCount = list0.Length + list1.Length

    let rec findFunction (list0:int list) list1 count =
        if count > 1 then
            match list0, list1 with
            | [], [] -> failwith "not possible, check empty first"
            | head::tail, [] -> findFunction tail [] (count - 1)
            | [], head::tail -> findFunction [] tail (count - 1)
            | h0::t0, h1::t1 ->
                if h0 < h1 then
                    findFunction t0 list1 (count-1)
                else
                    findFunction list0 t1 (count-1)
        else
            match list0, list1 with
            | [], [] -> failwith "not possible, check empty first"
            | head::tail, []
            | [], head::tail ->
                let pre = head
                let now = tail.Head
                if totalCount % 2 = 0 then
                    (float (pre + now)) / 2.
                else
                    float now
            | h0::t0, h1::t1 ->
                if totalCount % 2 = 0 then
                    (float (h0 + h1)) / 2.
                else
                    float (max h0 h1)

    if list0.IsEmpty && list1.IsEmpty then
        failwith "please input valid data"

    findFunction list0 list1 ((list0.Length + list1.Length) / 2)

findMedian [1] [2; 4; 5; 6; 7; 8; 10]
Note
This sample uses a recursive function instead of a for/while loop. For some people, it is easy to understand, while others do not think it’s so easy. The recursive function is very useful if you want to write code that’s free from side effects.
Here’s another way to get the medians from two arrays. If both medians are the same, you hit the jackpot and the median is the final result. If the median from array0, which is called median0, is smaller, the final result should be bigger and the search should continue on the elements equal to or greater than median0. If median0 is bigger, the search should continue on the elements equal to or smaller than median0, as you can see in Example 7-15.
So let’s get back to the question I posed when I presented the quick-sort sample in Example 7-8: how do you decompose a data set in a customized way? The Median pattern used in Example 7-15 decomposes the array into three parts:
The left part, which contains all elements smaller than the median
The median value
The right part, which contains all elements greater than the median
let getMedian (list:float array) =
    let len = list.Length
    if len % 2 = 0 then
        (list.[len / 2 - 1] + list.[len / 2]) / 2.
    else
        list.[len / 2]

let (|Median|) (list:float array) =
    let median = getMedian list
    let len = list.Length
    if len % 2 = 0 then
        (list.[0..len / 2 - 1], median, list.[len / 2..])
    else
        (list.[0..len / 2], median, list.[len / 2..])

let rec getMedianFromTwo (list0:float array) (list1:float array) =
    match list0, list1 with
    | [||], [||] -> 0.
    | [|a|], [|b|] -> (a + b) / 2.
    | [|a0; a1|], [|b0; b1|] -> ((max a0 b0) + (min a1 b1)) / 2.
    | Median(l0, m0, r0), Median(l1, m1, r1) ->
        if m0 = m1 then
            m0
        elif m0 < m1 then
            getMedianFromTwo r0 l1
        else //m0 > m1
            getMedianFromTwo l0 r1

let list0 = [|1.; 4.; 7.; 8.; 9.; 10.|]
let list1 = [|2.; 4.; 6.; 7.; 9.; 10.|]

let c = getMedianFromTwo list0 list1
Dealing with the Dutch national flag problem
This is a categorizing problem. Given a (low, high) tuple, you need to arrange the elements in an array into three categories. The first category of elements are smaller than low, the second category of elements are between low and high, and the last category is larger than high. See Example 7-16.
type CompareResult =
    | Higher
    | Lower
    | Middle

let compare = function
    | low,current,_ when current <= low -> Lower
    | _, current,high when current >= high -> Higher
    | _ -> Middle

let dutchFlag (list: _ array) (low, high) =
    let swap (i,j) =
        let temp = list.[i]
        list.[i] <- list.[j]
        list.[j] <- temp

    let mutable i = 0
    let mutable lowPointer = 0
    let mutable highPointer = list.Length - 1

    while i<highPointer do
        let value = low, list.[i], high
        match compare value with
        | Lower ->
            swap (lowPointer, i)
            lowPointer <- lowPointer + 1
            i <- i + 1
        | Higher ->
            swap (highPointer, i)
            highPointer <- highPointer - 1
        | Middle ->
            i <- i + 1

let arr = [| 1; 9; 8; 2; 4; 3; 6; 7; 5; 0; |]
dutchFlag arr (3, 7)
Finding the longest increasing sequence
To determine the longest increasing sequence (LIS), you use a array variable (named DP) to hold the current LIS up to the current index. For example, if the value in DP.[10] is 3, the LIS for array.[0..9] is 3. The value of DP.[i] is updated only when the new value (DP.[j] + 1) is higher than the current value (DP.[i] < DP.[j] + 1) and the value is still increasing (array.[i] > array.[j]). See Example 7-17.
let list = [|10; 22; 9; 33; 21; 50; 41; 60; 80|]
let DP = Array.create list.Length 1

let findMax () =
    let mutable maxLength = 1
    for i = 1 to list.Length - 1 do
        for j = i - 1 downto 0 do
            if list.[i] > list.[j] &&
               DP.[i] < DP.[j] + 1 then
               DP.[i] <- DP.[j] + 1

        maxLength <- max maxLength DP.[i]

    maxLength

findMax()
Creating a Tree Structure
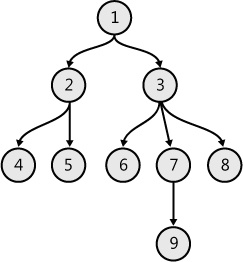
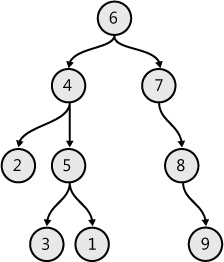
A tree is a basic data structure in computer science. It is a hierarchy indicated by a tree-like structure that has some nodes within it. A typical tree structure is shown in Figure 7-11, and the sections that follow it describe variations in this structure.
F# tree representation and traversal
The F# representation of the tree structure in Figure 7-11 is shown in Example 7-18. This structure is created with the help of a discriminated union (DU).
type NodeType = int

// DU definition for a tree structure
type Tree =
    | Node of NodeType * Tree list

let createTree() =
    Node(1, [ Node(2, [Node(4, []);
                       Node(5, [])
                      ]);
              Node(3, [Node(6, []);
                       Node(7, [Node(9,[])]);
                       Node(8, [])
                      ])
            ])
Pre-order and post-order tree traversal are two basic tree operations. Pre-order traversal processes the tree from the current node and then processes subtrees starting from the root node. Post-order traversal processes the tree from the subtrees and then processes the current node starting from the root node. Example 7-19 shows both processes.
let rec preOrder visit tree =
    match tree with
        | Node(value, children) ->
            visit value
            children
            |> Seq.iter (preOrder visit)

let rec postOrder visit tree =
    match tree with
        | Node(value, children) ->
            children
            |> Seq.iter (postOrder visit)
            visit value

let mutable result = []
let sum v =
    result <- result @ [v]
preOrder sum (createTree())

result <- []
postOrder sum (createTree())
Execution result for pre-order
val it : NodeType list = [4; 5; 2; 6; 9; 7; 8; 3; 1]
Execution result for post-order
val it : NodeType list = [1; 2; 4; 5; 3; 6; 7; 9; 8]
Note
As previously stated, the portable library does not support the printfn function, but you can always use FSI to evaluate the function.
Note
In Example 7-19, visit is the function used to access the tree node.
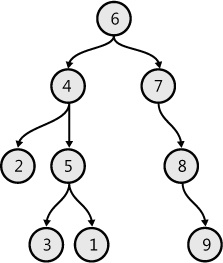
F# binary tree and in-order traversal
The binary tree, shown in Figure 7-12, is a special tree in which each node has a maximum of two child nodes. One child is called the left child, and the other is called the right child. A binary tree is shown in Figure 7-12. As in the previous example, a DU is applied in Example 7-20 to implement the binary tree structure.
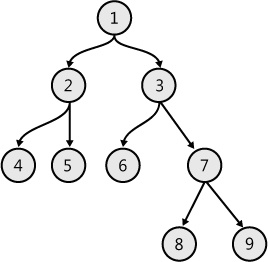
type NodeType = int

type BinaryTree =
    | Nil
    | Node of NodeType * BinaryTree * BinaryTree

let createBinaryTree() =
    Node(1, Node(2, Node(4, Nil, Nil),
                    Node(5,  Nil, Nil)),
              Node(3, Node(6, Nil, Nil),
                    Node(7, Node(9, Nil, Nil),
                            Node(8, Nil, Nil))
            ))

let rec inOrder visit tree =
    match tree with
        | Nil -> ()
        | Node(v, left, right) ->
            inOrder visit left
            visit v
            inOrder visit right

let mutable result = []
let sum v =
    result <- result @ [v]

inOrder sum (createBinaryTree())
Execution result for in-order traversal
val it : NodeType list = [4; 2; 5; 1; 6; 3; 9; 7; 8]
In addition to using pre-order, in-order, and post-order traversals, you can traverse a tree structure by layer. For the tree in Figure 7-12, the result of layer traversal is [1; 2; 3; 4; 5; 8; 6; 7; 9]. Layer traversal uses the queue data structure, as shown in Example 7-21.
type NodeType = int

type BinaryTree =
    | Nil
    | Node of NodeType * BinaryTree * BinaryTree

let createBinaryTree() =
    Node(1, Node(2, Node(4, Nil, Nil),
                    Node(5,
                            Node(6, Nil, Nil),
                            Node(7, Nil, Nil))),
            Node(3,
                    Nil,
                    Node(8,
                            Nil,
                            Node(9, Nil, Nil)))
        )

let mutable queue : BinaryTree list = []
let enqueue x = queue <- [x] @ queue
let dequeue() =
    let result = Seq.last queue
    queue <-
        queue
        |> Seq.take (queue.Length - 1)
        |> Seq.toList
    result
let queueEmpty() = queue.Length = 0

let mutable result = []
let visit v = result <- result @ [v]

let layerTree tree =
    enqueue tree
    while not <| queueEmpty() do
        let tree = dequeue()
        match tree with
        | Nil -> ()
        | Node(v, left, right) ->
            visit v
            enqueue left
            enqueue right

layerTree (createBinaryTree())
Note
The parentheses around createBinaryTree() are necessary. If these are not provided, layerTree will treat createBinary and () as two parameters and generate a compile error.
A portable library does support System.Collections.Generic.Queue. If you want to, you can replace the queue operation in Example 7-21 with System.Collections.Generic.Queue.
Binary search tree
A binary search tree (BST), shown in Figure 7-13, is a special tree that has a node value greater than any value on its left subtree and smaller than any value on its right subtree. Example 7-22 creates the sample BST.
type NodeType = int

type BinaryTree =
    | Nil
    | Node of NodeType * BinaryTree * BinaryTree

let createBinaryTree() =
    Node(6, Node(4, Node(2,
                            Node(1, Nil, Nil),
                            Node(3, Nil, Nil)),
                    Node(5,  Nil, Nil)),
            Node(7,
                    Nil,
                    Node(9, Nil, Nil))
        )
When checking whether a tree is a BST, a common mistake is to check only two child nodes rather than the whole subtree. For example, the child’s right tree could contain a node with more than two children. From the definition of a BST, the in-order traversal generates an ordered sequence. You can use this property to validate the BST. The validation function is used to order the result, check whether or not the result is in order, or both. See Example 7-23.
type NodeType = int

type BinaryTree =
    | Nil
    | Node of NodeType * BinaryTree * BinaryTree

let createBinaryTree() =
    Node(6, Node(4, Node(2,
                            Node(1, Nil, Nil),
                            Node(3, Nil, Nil)),
                    Node(5,  Nil, Nil)),
            Node(7,
                    Nil,
                    Node(9, Nil, Nil))
        )

let rec checkInOrder value list =
    match list with
    | [] -> true
    | head::tail ->
        if value<head then
            checkInOrder head tail
        else
            false

let rec inOrder visit tree =
    match tree with
        | Nil -> ()
        | Node(v, left, right) ->
            inOrder visit left
            visit v
            inOrder visit right

let mutable result = []
let sum v =
    result <- result @ [v]

inOrder sum (createBinaryTree())

checkInOrder System.Int32.MinValue result
Note
The match statement has an interesting advantage over the if statement: it can generate a warning if there are any unhandled paths in your logic.
A tree is a complex structure. In addition to the common tree traversal operations I just described, there are other operations you can perform related to tree structures.
Delete a tree
You can delete a tree without using recursion, as Example 7-24 demonstrates. After execution, all the nodes are tagged with a 0 (zero).
type NodeType = { mutable X: int }

type Tree =
    | Node of NodeType * Tree list

let mutable stack : Tree list = []

let createTree() =
    Node({X=1}, [ Node({X = 2}, [Node({X = 4}, []);
                               Node({X = 5}, [])
                      ]);
                    Node({X = 3}, [Node({X = 6}, []);
                       Node({X = 7}, [Node({X = 9},[])]);
                       Node({X = 8}, [])
                      ])
            ])

let push x =
    stack <- [x] @ stack
let pop () =
    match stack with
    | [] -> None
    | head::tail ->
        stack <- tail
        Some head
let isEmpty() = Seq.isEmpty stack

let tagAsDelete (x:NodeType) = x.X <- 0

let deleteTree tree =
    push tree
    while not <| isEmpty() do
        let node : Tree option = pop()
        match node with
        | None -> ()
        | Some(Tree.Node(v, list)) ->
             list |> Seq.iter push
             tagAsDelete v

let tree = createTree()
deleteTree treeBuild a tree from pre-order and in-order sequences
The tree-traversal result does not preserve the structure information, but a binary tree can be built from a pre-order and in-order sequence. The pre-order traversal accesses the root first. The in-order traversal yields the root after finishing the left subtree. The root node from pre-order can help divide the in-order traversal sequence into a left subtree and a right subtree. You can easily find these elements in the pre-order sequence. The sequence from pre-order can show the root for a subtree. Repeating this process until all elements in the sequence have been exhausted will eventually build the tree.
The following sequences are generated from the tree in Example 7-22. Example 7-25 builds a binary tree from a pre-order sequence and an in-order sequence.
Pre-order sequence [6; 4; 2; 1; 3; 5; 7; 9]
In-order sequence [1; 2; 3; 4; 5; 6; 7; 9]
type NodeType = int

type BinaryTree =
    | Nil
    | Node of NodeType * BinaryTree * BinaryTree

let getLeftPart inorder head =
    inorder
    |> Seq.takeWhile(fun n -> n <> head)
    |> Seq.toList

let getRightPart inorder head =
    inorder
    |> Seq.skipWhile(fun n -> n <> head)
    |> Seq.skip 1
    |> Seq.toList

let getPreOrderLeftPart preorder inorderLeft =
    let len = inorderLeft |> Seq.length
    preorder
    |> Seq.skip 1
    |> Seq.take len
    |> Seq.toList

let getPreOrderRightPart preorder inorderLeft =
    let len = inorderLeft |> Seq.length
    preorder
    |> Seq.skip 1
    |> Seq.skip len
    |> Seq.toList

let rec buildTree inorder preorder =
    match preorder with
    | [] -> Nil
    | head::tail ->
        let inorderLeft = getLeftPart inorder head
        let inorderRight = getRightPart inorder head
        let preorderLeft = getPreOrderLeftPart preorder inorderLeft
        let preorderRight = getPreOrderRightPart preorder inorderLeft
        Node(head,
             buildTree inorderLeft preorderLeft,
             buildTree inorderRight preorderRight)

buildTree [1; 2; 3; 4; 5; 6; 7; 9] [6; 4; 2; 1; 3; 5; 7; 9]BinaryTree =
Node
(6,Node (4,Node (2,Node (1,Nil,Nil),Node (3,Nil,Nil)),Node (5,Nil,Nil)),
Node (7,Nil,Node (9,Nil,Nil)))Build a BST from a pre-order iteration list
The sample in the previous section shows how to build a binary tree. In this section, I demonstrate how to get a BST from a pre-order iteration list. Building a tree is useful for finding the root, left subtree, and right subtree. Because the left subtrees are all smaller than the root, the pre-order iteration list can be divided into the following three parts (as shown in Example 7-26):
The root node is the first element of the iteration list.
The left subtree list contains elements immediately following the root node. The left subtree nodes are smaller than the root node.
The right subtree list contains elements listed after the left subtree list. The right subtree nodes are larger than the root node.
type NodeType = int

type BinaryTree =
    | Nil
    | Node of NodeType * BinaryTree * BinaryTree

let rec buildBSTfromPreOrder (l:NodeType list) =
    match l with
    | [] -> Nil
    | [a] -> Node(a, Nil, Nil)
    | h::t ->
        let smaller =
                   t
                   |> Seq.takeWhile (fun n -> n < h)
                   |> Seq.toList
        let bigger =
                   t
                   |> Seq.skipWhile (fun n -> n < h)
                   |> Seq.toList
        Node(h, buildBSTfromPreOrder(smaller), buildBSTfromPreOrder(bigger))

let input = [10; 5; 1; 7; 40; 50]
buildBSTfromPreOrder inputval it : BinaryTree =
Node
(10,Node (5,Node (1,Nil,Nil),Node (7,Nil,Nil)),
Node (40,Nil,Node (50,Nil,Nil)))Check that a BST has only one child
Usually, one sequence from the traversal is not enough to reveal the binary tree internals. The algorithm in this section is used to determine if every node in the BST has only one child. All of the descendants of a node must either be larger or smaller than the node. The following are steps to check each node in a loop:
Find the next child, and denote it as A.
Find the last pre-order node, which is the last element of the pre-order sequence, and denote it as B.
If both A and B are larger or smaller than the current node, then continue. Otherwise, return false.
The sample code is shown in Example 7-27; a C# version is also provided. You might notice that the C# version breaks the loop in the middle when certain conditions are met. For F#, it is not possible to break the loop in the middle. Instead, the F# version uses lazy evaluation as well as other seq functions to mimic the return/break functionality in the loop. The F# code can be read as a preparation for all the data for the pre-order sequence, and then you can check whether any data is Diff. If the data meets the Diff criteria, the function returns FALSE. The sequence generation can move the code filtering and processing function out of the sequence-generation loop. I find that this can make the code more readable than the C# imperative version.
let (|Diff|_|) (a, b) =
    if (a * b < 0) || (a * b = 0 && a + b < 0) then Some true
    else None

let checkOneChild (preorder : int list) =

    seq {
        for i=0 to preorder.Length - 2 do
            let a = preorder.[i]-preorder.[i + 1];
            let b = preorder.[i]-preorder.[preorder.Length - 1];
            yield (a, b)
    }
    |> Seq.forall (fun (a, b) -> match a, b with
                                 | Diff _ -> false
                                 | _ -> true)

let list = [20; 10; 11; 13; 12;]

checkOneChild list
C# version
bool checkOneChild(int[] preorder)
    {
        for (int i = 0; i < preorder.Length - 2; i++)
        {
            int a = preorder[i] - preorder[i + 1];
            int b = preorder[i] - preorder[preorder.Length - 1];
            if ( (a * b < 0) || (a * b == 0 && a + b < 0) )
            {
                return false;
            }
        }

        return true;
}Find the common elements from two BSTs
The previous sample examines the property of a single BST. Example 7-28 finds the common elements in two BSTs.
type NodeType = int

type BinaryTree =
    | Nil
    | Node of NodeType * BinaryTree * BinaryTree

let bst1 = Node(10,
                Node(7,
                    Node(5, Nil, Nil),
                    Node(9, Nil, Nil)),
                Node(12,
                    Node(11, Nil, Nil),
                    Nil))

let bst2 = Node(10,
                Node(7,
                    Node(4, Nil, Nil),
                    Node(9, Nil, Nil)),
                Node(12,
                    Node(11, Nil, Nil),
                    Nil))

let result = System.Collections.Generic.List<NodeType>()

let rec findCommon (tree0, tree1) =
    match tree0, tree1 with
    | Nil, Nil
    | Nil, _
    | _, Nil -> ()
    | Node(v0, l0, r0), Node(v1, l1, r1) ->
        if v0 = v1 then
            result.Add(v0)
            findCommon(l0, l1)
            findCommon(r0, r1)
        elif v0 < v1 then
            findCommon(tree0, l1)
        else //v0 > v1
            findCommon(l0, tree1)

findCommon (bst1, bst2)

result |> Array.ofSeq
Execution result
[| 10; 7; 9; 12; 11 |]
Find the tree diameter
The tree is a structure with a shape, and the tree diameter is the maximum value of the following three values:
The diameter of the left tree.
The diameter of the right tree.
The longest path between nodes through the tree root. The longest path value can be computed by the tree height.
A sample tree is shown in Figure 7-14, with code for it shown in Example 7-29. The diameter for the tree shown in the figure is 7.
type NodeType = int

type BinaryTree =
    | Nil
    | Node of NodeType * BinaryTree * BinaryTree

let createBinaryTree() =
    Node(1, Node(2, Node(4, Nil, Nil),
                    Node(5,
                            Node(6, Nil, Nil),
                            Node(7, Nil, Nil))),
            Node(3,
                    Nil,
                    Node(8,
                            Nil,
                            Node(9, Nil, Nil)))
        )

let rec treeHeight tree =
    match tree with
    | Nil -> 0
    | Node(v, left, right) ->
        let leftHeight = treeHeight left
        let rightHeight = treeHeight right
        (max leftHeight rightHeight) + 1

let rec treeDiameter tree =
    match tree with
    | Nil -> 0
    | Node(v, left, right) ->
        let leftHeight = treeHeight left
        let rightHeight = treeHeight right
        let leftDiameter = treeDiameter left
        let rightDiameter = treeDiameter right
        max (leftHeight + rightHeight + 1)
            (max leftDiameter rightDiameter)

treeDiameter (createBinaryTree())Find the lowest common ancestor
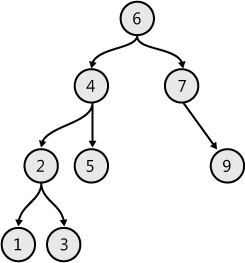
Given two nodes in a binary tree, one common operation is used to find the lowest common ancestor (LCA) for these two nodes. For example, the ancestors for 2 and 1 in Figure 7-15 are 6 and 4, respectively, but 4 is lower than 6, so the LCA for 2 and 1 is 4. Example 7-30 takes two nodes and returns the LCA of these two nodes.
type NodeType = int

type BinaryTree =
    | Nil
    | Node of NodeType * BinaryTree * BinaryTree

let createBinaryTree() =
    Node(1, Node(2, Node(4, Nil, Nil),
                    Node(5,
                            Node(6, Nil, Nil),
                            Node(7, Nil, Nil))),
            Node(3,
                    Nil,
                    Node(8,
                            Nil,
                            Node(9, Nil, Nil)))
        )

let findLCA (node0, node1) root =
    let rec commonAncestor (node0, node1) root =
        match root with
        | Nil -> None
        | Node(v, left, right) ->
            match left, right with
            | Nil, Nil -> None
            | Node(v, _, _), _ when v = node0 || v = node1 -> Some root
            | _, Node(v, _, _) when v = node0 || v = node1 -> Some root
            | _ ->
                let l = left |> commonAncestor (node0, node1)
                let r = right |> commonAncestor (node0, node1)
                match l, r with
                | None, None -> None
                | Some(_), Some(_) -> Some root
                | Some(_) as n, None -> n
                | None, (Some(_) as n) -> n

    match root with
    | Nil -> None
    | Node(v, left, right) when v=node0 || v=node1 -> Some root
    | Node(v, left, right) -> commonAncestor (node0, node1) root

let tree = createBinaryTree()
type ResultRecord = { Nodes : NodeType*NodeType; Ancestor : NodeType }
let output r pair =
    match r with
    | Some(Node(v, _, _)) -> { Nodes = pair; Ancestor = v }
    | _ -> { Nodes = pair; Ancestor = -1 }

let pairsToFindAncestor = [
    (2, 3)
    (1, 8)
    (1, 2)
    (3, 8)
    (8, 7)
    (4, 6)
    (4, 7) ]

let r =
    pairsToFindAncestor
    |> List.map (fun pair -> pair, (tree |> findLCA pair))
    |> List.map (fun (pair, result) -> pair |> output result)
Execution result
[{Nodes = (2, 3); Ancestor = 1;};
 {Nodes = (1, 8); Ancestor = 1;};
 {Nodes = (1, 2); Ancestor = 1;};
 {Nodes = (3, 8); Ancestor = 1;};
 {Nodes = (8, 7); Ancestor = 1;};
 {Nodes = (4, 6); Ancestor = 2;};
{Nodes = (4, 7); Ancestor = 2;}]If the tree is a BST, finding LCA will be easier because the LCA is the first node whose value is between two given values. The sample code that creates the tree structure shown in Figure 7-16 and finds the LCA in it is shown in Example 7-31.

type NodeType = int

type BinaryTree =
    | Nil
    | Node of NodeType * BinaryTree * BinaryTree

let createBinaryTree() =
    Node(20, Node(8, Node(5, Nil, Nil),

                     Node(12,
                            Node(11, Nil, Nil),
                            Node(15, Nil, Nil))),
            Node(30,
                    Node(21, Nil, Nil),
                    Node(32, Nil, Nil))
        )

let tree = createBinaryTree()

let rec findLCAInBST (n0, n1) root =
    match root with
    | Nil -> None
    | Node(v, left, right) ->
        if v >= n0 && v <= n1 then
            Some v
        elif v > n0 && v > n1 then
            findLCAInBST (n0, n1) left
        else
            findLCAInBST (n0, n1) right

tree |> findLCAInBST (3, 15)
Validate the sum of all child nodes
If the tree has some value, you can validate whether the value is the sum of all its children. The sample is shown in Example 7-32.
type NodeType = int

type BinaryTree =
    | Nil
    | Node of NodeType * BinaryTree * BinaryTree

let createBinaryTree() =
    Node(32, Node(9, Node(4, Nil, Nil),
                    Node(5,  Nil, Nil)),
            Node(23, Node(6, Nil, Nil),
                    Node(17, Node(10, Nil, Nil),
                            Node(7, Nil, Nil))
            ))
let rec checkTree root =
    match root with
    | Nil -> true, None
    | Node(v, left, right) ->
        let leftResult, leftSum = checkTree left
        let rightResult, rightSum = checkTree right
        match leftSum, rightSum with
        | None, None -> true, Some v
        | _ ->
            let leftS = match leftSum with Some(n) -> n | None -> 0
            let rightS = match rightSum with Some(n) -> n | None -> 0
            let result = leftResult && rightResult && (leftS + rightS = v)
            result, Some v

createBinaryTree() |> checkTree |> fst
Calculate the tree boundary
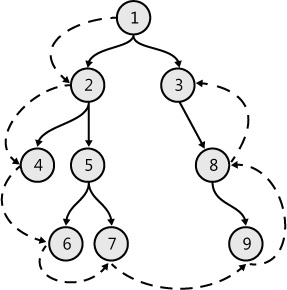
The tree’s boundary can be calculated with code such as that shown in Example 7-33 (for the tree structure defined in Figure 7-17). The dashed line shows how the boundary is visited.
type NodeType = int

type BinaryTree =
    | Nil
    | Node of NodeType * BinaryTree * BinaryTree

let createBinaryTree() =
    Node(1, Node(2, Node(4, Nil, Nil),
                        Node(5,
                            Node(6, Nil, Nil),
                            Node(7, Nil, Nil))),
            Node(3,
                    Nil,
                    Node(8,
                            Nil,
                            Node(9, Nil, Nil)))
        )

let mutable result = []
let add x =
    result <- result @ [x]

let rec visitLeaf root =
    match root with
    | Nil -> ()
    | Node(v, Nil, Nil) -> add v
    | Node(v, left, right) ->
        visitLeaf left
        visitLeaf right

let rec visitLeftBoundary root =
    match root with
    | Nil -> ()
    | Node(v, Nil, Nil) -> ()
    | Node(v, Nil, right) ->
        add v
        visitLeftBoundary right
    | Node(v, left, _) ->
        add v
        visitLeftBoundary left

let rec visitRightBoundary root =
    match root with
    | Nil -> ()
    | Node(v, Nil, Nil) -> ()
    | Node(v, left, Nil) ->
        visitRightBoundary left
        add v
    | Node(v, _, right) ->
        visitRightBoundary right
        add v

let getBoundary root =
    match root with
    | Nil -> ()
    | Node(v, left, right) ->
        add v
        visitLeftBoundary left
        visitLeaf left
        visitLeaf right
        visitRightBoundary right

let tree = createBinaryTree()

getBoundary tree> result;; val it : NodeType list = [1; 2; 4; 6; 7; 9; 8; 3;]
Using String Operations
String is probably the most commonly used data type next to integer. Although .NET provides a great many build-in methods for processing strings, you may find it useful to see how string processing algorithms can be expicitly coded in F#.
Substring
Example 7-34 shows how to decompose a string into substrings consisting of one or more repeats of the same character. If the input is "34445", the function will return "3", "444", and "5".
let str = "34445"
let getSub (str:string) =
    [
        let result = ref ""
        for c in str do
            if !result = "" then
                result := string c
            elif (!result).EndsWith(string c) then
                result := !result + string c
            else
                yield !result
                result := string c
        yield !result]

getSub str
Palindrome in a string
This sample is used to find the largest palindrome in a string. For example, the palindrome in the string "yabadabadoo" is "abadaba". The straightforward but slowest algorithm is shown in Example 7-35. (Note the use of double back-quotes to allow us to use end as a value name, even though it is an F# keyword.)
let getPalindrome (str:string) =
    let rec isStringPalindrome (str:string) =
        if str.Length = 0 || str.Length = 1 then true
        else
            let start, ``end`` = 0, str.Length-1
            if str.[start] = str.[``end``] then isStringPalindrome(str.[start+1..``end`` -
1])
            else false
    let mutable result = System.String.Empty

    for i = 0 to str.Length - 1 do
        let subStr = str.[i..str.Length - 2]
        for explore = i + 1 to str.Length - 1 do
            let strToCheck = str.[i..explore]
            if isStringPalindrome(strToCheck) then
                result <- if result.Length > strToCheck.Length then result else strToCheck

    sprintf "%s" result

getPalindrome "abab"
getPalindrome "sambabmiv"
getPalindrome "aa"
getPalindrome "aaa"
getPalindrome "yabadabadoo"bab mbabm aa aaa abadaba
Note
A suffix tree is a more efficient way to solve this problem. You can find related material on the web at http://en.wikipedia.org/wiki/Suffix_tree.
Permutations of a string
Example 7-36 shows how to get all permutations of a string. For example, the permutations of the string "abc" will be "abc", "acb", "bca", "bac", "cab", and "cba".
open System

let rec permute (str:string) =
    let chList =
        str
        |> List.ofSeq
    match chList with
    | [] -> []
    | [ch] -> [ string ch ]
    | head::tail ->
        let ch = head
        let tail = String.Join("", tail)
        let subStringList = permute tail
        [ for (subString:string) in subStringList do
            for i = 0 to subString.Length do
                let resultString = subString.Insert(i, string ch)
                yield resultString]

permute "abcd"val it : string list = ["abcd"; "bacd"; "bcad"; "bcda"; "acbd"; "cabd"; "cbad"; "cbda"; "acdb"; "cadb"; "cdab"; "cdba"; "abdc"; "badc"; "bdac"; "bdca"; "adbc"; "dabc"; "dbac"; "dbca"; "adcb"; "dacb"; "dcab"; "dcba"]
String interleaving
String interleaving is a restricted permutation. An interleaved string of two strings keeps the order of the characters in the strings. If two given strings are "a" and "bc", "abc", and "bac" are valid string interleaving results, but "cba" is not because the "cb" is in the wrong order. The code to implement string interleaving is shown in Example 7-37.
open System

let (| AllEmpty | Str0NotEmpty | Str1NotEmpty | Both |) (str0, str1) =
    let b0 = String.IsNullOrEmpty(str0)
    let b1 = String.IsNullOrEmpty(str1)
    match b0, b1 with
    | true, true -> AllEmpty
    | false, true -> Str0NotEmpty
    | true, false -> Str1NotEmpty
    | false, false -> Both

let mutable result = []
let add x =
    result <- result @ [x]

let interLeaving str0 str1 =
    let rec interLeavingStrs str0 str1 current =
        match str0, str1 with
        | AllEmpty _ -> ()
        | Str1NotEmpty -> add (current+str1)
        | Str0NotEmpty -> add (current+str0)
        | Both ->
            interLeavingStrs (str0.Substring(1)) str1 (current + string str0.[0])
            interLeavingStrs str0 (str1.Substring(1)) (current + string str1.[0])

    interLeavingStrs str0 str1 ""

interLeaving "ab" "cd"> result;; val it : string list = ["abcd"; "acbd"; "acdb"; "cabd"; "cadb"; "cdab"]
KMP string search algorithm
Imagine that you have two strings and that you want to find all occurrences of a target string. The KMP string search algorithm is an algorithm you can use to do this. The search algorithm complexity is O(n), where n is the length of the source string. In addition to demonstrating the algorithm, the code also shows how to use an F# record, a type alias, and extension methods. Also note the use of a match statement in which the branching logic is implemented solely by ‘when’ guards, all the actual patterns being ‘_’. The sample code is shown in Example 7-38.
type List = System.Collections.Generic.List<int>

let kmp ( w: string ) =
    let t = List([1..w.Length])
    let mutable pos = 2
    let mutable cnd = 0
    t.[0] <- -1
    t.[1] <- 0

    while pos < w.Length do
        match pos, cnd with
        | _ when w.[pos - 1] = w.[cnd] ->
            cnd <- cnd + 1
            t.[pos] <- cnd
            pos <- pos + 1
        | _ when cnd > 0 ->
            cnd <- t.[cnd]
        | _ ->
            t.[pos] <- 0
            pos <- pos + 1

    t |> List.ofSeq

type ResultType =
    { mutable Result : int; mutable Found : bool }
        with
        member this.SetFound(b) = this.Found <- b
        member this.SetResult(c) = this.Result<- c
        static member InitialValue = { Result = -1; Found = false }

let kmpSearch (s:string) (w:string) : int =
    let mutable m = 0
    let mutable i = 0
    let t = kmp w
    let v = ResultType.InitialValue
    while (i + m) < s.Length && not v.Found do
        if w.[i] = s.[m + i] then
            if i = w.Length - 1 then
                v.SetFound true
                v.SetResult m
            i <- i + 1
        else
            m <- m + i + t.[i]
            i <- if t.[i] > -1 then t.[i] else 0

    v.Result

let s = "ABCABCDABABCDABCDABDE"
kmpSearch s "ABCDABD"
Using the Graph Library
The graph library is used to implement a graph structure that contains nodes and edges. (We are using the formal mathemetical definition of graph here: a representation of a set of nodes where some nodes are connected by links (edges). This is nothing to do with graphs in the sense of a graphical chart or plot.) Each node in the library has outgoing edges and an incoming edge collection. The graph operation is performed by the Graph class, which also maintains lists of all nodes and edges. (See Example 7-39.) This library shows how flexible the F# library is. There are no constraints on the node ID’s type. The type inference system will make sure everything is assigned the appropriate type.
open System

type Graph() =
    let mutable nodes = []
    let mutable edges = []

    member this.Nodes = nodes
    member this.Edges = edges

    member this.CreateNode id =
        match this.FindNode id with
            | Some n -> None
            | None ->
                let node = Node(this, ID = id)
                nodes <- nodes @ [ node ]
                Some node
    member this.CreateEdgeFromNode(from:Node, ``to``:Node, id) =
        match this.FindEdge id with
        | Some edge -> None
        | None ->
            let edge = Edge(this, from, ``to``, ID = id)
            from.AddOutgoingEdge(edge)
            ``to``.AddIncomingEdge(edge)

            edges <- edges @ [edge]
            Some edge

    member this.CreateEdgeFromID(from, ``to``, id) =
        let fromNode = this.FindNode(from)
        let toNode = this.FindNode(``to``)
        match fromNode, toNode with
            | Some n0, Some n1 -> this.CreateEdgeFromNode(n0, n1, id)
            | _ -> None

    member this.FindNode id =
        (nodes:Node list) |> Seq.tryFind(fun n -> n.ID = id)
    member this.FindEdge id =
        (edges:Edge list) |> Seq.tryFind(fun edge -> edge.ID = id)

    member this.RemoveEdge(edge:Edge) =
        (edge.FromNode:Node).RemoveOutgoingEdge(edge)
        (edge.ToNode:Node).RemoveIncomingEdge(edge)
        edges <- edges |> List.filter (fun n -> n <> edge)
    member this.RemoveNode(node:Node) =
        node.OutgoingEdges @ node.IncomingEdges |> List.iter this.RemoveEdge
        nodes <- nodes |> List.filter (fun n -> n<>node)

and Node(g) =
    let mutable incomingEdges = []
    let mutable outgoingEdges = []

    member val ID = Unchecked.defaultof<_> with get, set
    member val Data = Unchecked.defaultof<_> with get, set

    member this.IncomingEdges = incomingEdges
    member this.OutgoingEdges = outgoingEdges

    member this.AddIncomingEdge(edge:Edge) =
        if edge.ToNode = this then
            incomingEdges <- incomingEdges |> List.append [edge]
    member this.AddOutgoingEdge(edge:Edge) =
        if edge.FromNode = this then
            outgoingEdges <- outgoingEdges |> List.append [edge]

    member this.RemoveIncomingEdge(edge:Edge) =
        incomingEdges <- incomingEdges |> List.filter (fun n -> n <> edge)
    member this.RemoveOutgoingEdge(edge:Edge) =
        outgoingEdges <- outgoingEdges |> List.filter (fun n -> n <> edge)

    override this.ToString() =
        sprintf "Node(%A)" this.ID
and Edge(g, from:Node, ``to``:Node) =
    member val ID = Unchecked.defaultof<_> with get, set
    member val Data = Unchecked.defaultof<_> with get, set

    member this.FromNode = from
    member this.ToNode = ``to``

    override this.ToString() =
        sprintf "Edge(%A, %A -> %A)" this.ID this.FromNode this.ToNode
In Visual Studio, a DGML format file supports the representation of a graph. Example 7-40 shows how to deserialize a graph from a DGML file using portable library functions. The portable library does not support creating a StreamReader. The StreamReader is passed in from the nonportable project. The sample code needed to invoke the DGMLReader is the following:
let g = DGMLGraph.MyClass(new System.IO.StreamReader(@"<your DGML file path>"))
type DGMLReader(textReader:TextReader) =
    let doc = XDocument.Load(textReader:TextReader)
    let graph = Graph()
    do
        let nodes = doc.Descendants() |> Seq.filter (fun n -> n.Name.LocalName = "Node")
        let graphNodes =
            nodes
            |> Seq.map (fun node -> graph.CreateNode(node.Attribute(XName.Get("Id")).
Value))
            |> Seq.toList
        let edges = doc.Descendants() |> Seq.filter (fun n -> n.Name.LocalName="Link")
        edges
        |> Seq.iteri (fun i edge->
                        let fromNode = edge.Attribute(XName.Get("Source")).Value
                        let toNode = edge.Attribute(XName.Get("Target")).Value
                        ignore <| graph.CreateEdgeFromID(fromNode, toNode, i)
                        ())

    member this.Graph = graph
Note
You need to add references to System.Xml and System.Xml.Linq to the Portable Class Library project to run this sample.
With the graph structure in hand, I can now implement several graph algorithms.
Depth-first search
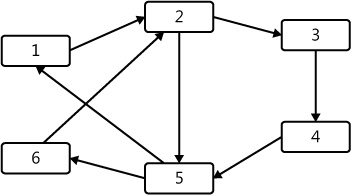
Depth-first search (DFS) is a search algorithm that traverses the tree down a single branch as far as possible before backtracking. The sample code for the DFS graph is shown in Example 7-41. The code executed on the graph in Figure 7-18 generates a result such as [Node("1"); Node("2"); Node("3"); Node("4"); Node("5"); Node("6")].
DFS code in the Portable Class Library project
type NodeStack = System.Collections.Generic.Stack<Node>
type VisitedList = System.Collections.Generic.List<Node>

let stack = NodeStack()
let visited = VisitedList()

let visit node =
    visited.Add(node)

let (| Visited | _ |) node =
    if visited.Contains(node) then
        Some node
    else
        None

let dfsGraph graph (start:Node)=
    stack.Push(start)
    visited.Clear()

    while stack.Count <> 0 do
        let currentNode = stack.Pop()
        match currentNode with
        | Visited(_) -> ()
        | _ ->
            visit currentNode
            let nodes =
                currentNode.OutgoingEdges
                |> Seq.map (fun edge -> edge.ToNode)
                |> Seq.distinctBy (fun node -> node.ID)
                |> Seq.toList
            nodes
|> Seq.iter (fun node -> stack.Push node)let g = DGMLGraph.DGMLReader(new
System.IO.StreamReader(@"C:MyCodeConsoleApplication1Graph1.dgml"))
let (Some startNode) = g.Graph.FindNode("1")
DGMLGraph.dfsGraph g startNode
printfn "%A" (Seq.toList <| DGMLGraph.visited)Breadth-first search
Breadth-first search (BFS) is different from DFS only in how it stores nodes. DFS uses a stack, and BFS uses a queue. Example 7-42 provides a BFS sample.
type NodeQueue = System.Collections.Generic.Queue<Node>
type VisitedList = System.Collections.Generic.List<Node>

let queue = NodeQueue()
let visited = VisitedList()

let visit node =
    visited.Add node

let (| Visited | _ |) node =
    if visited.Contains node then
        Some node
    else
        None

let dfsGraph graph (start:Node)=
    queue.Enqueue start
    visited.Clear()

    while queue.Count <> 0 do
        let currentNode = queue.Dequeue()
        match currentNode with
        | Visited(_) -> ()
        | _ ->
            visit currentNode
            let nodes =
                currentNode.OutgoingEdges
                |> Seq.map (fun edge -> edge.ToNode)
                |> Seq.distinctBy (fun node -> node.ID)
                |> Seq.toList
            nodes
            |> Seq.iter (fun node -> queue.Enqueue node)
Find all paths in a graph
Another way to represent a graph is to use a matrix. Example 7-43 shows how to access the graph and find all possible paths from one point to another. If the element in the matrix is 1, that is a passage. If the element in the matrix is 0, it is a blocker. The sample code finds all of the paths from (0,0) to (4,2).
type Location = { X : int; Y : int }
type Path = Location list

let graph = [
        [1;1;1;1;0]
        [0;1;0;1;0]
        [0;1;0;1;1]
        [0;1;1;1;0]
        [0;1;0;1;0]
            ]

let getNeighbors (point:Location) =
    let getLeft (point:Location) =
        if point.X = 0 then None
        else Some { X = point.X - 1; Y = point.Y }
    let getTop (point:Location) =
        if point.Y = 0 then None
        else Some { X = point.X; Y = point.Y - 1 }
    let getRight (point:Location) =
        if point.X = 4 then None
        else Some { X = point.X + 1; Y = point.Y }
    let getBottom (point:Location) =
        if point.Y=4 then None
        else Some { X = point.X; Y = point.Y + 1 }
    let result =
        [getLeft point;
         getTop point;
         getRight point;
         getBottom point]
    result
    |> List.filter (fun n -> match n with Some _ -> true | None -> false )
    |> List.map (fun (Some n) -> n)
    |> List.filter (fun n -> graph.[n.Y].[n.X] <> 0)

let rec findAllPath (startPoint:Location) (endPoint:Location) (path:Path)=
    if startPoint = endPoint then
        [ path ]
    else
        let neighbours =
            getNeighbors startPoint
            |> List.filter (fun n -> path |> List.exists (fun x -> x=n) |> not)
        [ for n in neighbours do
            for path in findAllPath n endPoint (path@[n]) do
                if path.Length > 0 then
                    yield path
                else
                    () ]
let start = { X = 0; Y = 0 }
let endPoint = { X = 4; Y = 2 }

let path = [start]
let c = findAllPath start endPoint pathA* algorithm
The A* (pronounced A star) algorithm is another graph algorithm. The graph is represented in a matrix, where 0 cannot be passed. There is an openList and a closedList. The openList keeps track of the unvisited nodes and the closedList keeps nodes that have already been processed. The openList is sorted by the node cost F. The node cost F is computed from two parts: H and MoveCost. MoveCost is the move cost from previous nodes, while H is a heuristic cost that is an estimated cost from the current node. The H part is only an estimate. Imagine that you are going from your current location to particular destination. On the way to your destination, you have a feeling of whether next move is closer to or further from the destination. This is how the A* algorithm works. The H value is your estimate from your current location to your destination; this value plays a role in your decision when making a move closer to your destination.
The algorithm starts from the openList with a starting point, and the TotalCost set to 0. During each iteration in the algorithm, the minimum TotalCost node is taken from the openList and denoted as the currentNode. The neighbor nodes are retrieved and put on the openList, as long as they are not visited and on the closedList. The MoveCost value of neighbor nodes is computed from the current node. If the cost is less than the current value, which means the current node is a better choice, the node’s PreviousNnode is set to CurrentNnode and the MoveCost cost is updated accordingly. The whole process is terminated when all of the target nodes are in closedList or openList is empty, as shown in Example 7-44.
type Location = { X : int; Y : int }

[<System.Diagnostics.DebuggerDisplay("({Location.X},{Location.Y})")>]
type Node() as this =
    member val IsBlock = false with get, set
    member val PreviousNode = this with get, set
    member val Location = {X = 0; Y = 0} with get, set
    member val H = 0 with get, set
    member val MoveCost = 1000 with get, set
    member this.TotalCost = this.MoveCost + this.H

type Path = Location list
let graph = [
        [1;1;1;1;1;1;1]
        [1;1;1;0;1;1;1]
        [1;1;1;0;1;1;1]
        [1;1;1;0;1;1;1]
        [1;1;1;0;1;1;1]
        [1;1;1;1;1;1;1]
        [1;1;1;1;1;1;1]
            ]

let nodeGraph =
    graph
    |> List.mapi (fun y row ->
                    row
                    |> List.mapi (fun x n ->
                        let loc = {X = x; Y = y}
                        Node(IsBlock= (if n = 1 then false else true),
                             Location = loc))
                )

let rightMax = 6

let getNeighbors (point:Location) =
    let getLeft (point:Location) =
        if point.X = 0 then None
        else Some { X = point.X - 1; Y = point.Y }
    let getTop (point:Location) =
        if point.Y = 0 then None
        else Some { X = point.X; Y = point.Y - 1 }
    let getRight (point:Location) =
        if point.X = rightMax then None
        else Some { X = point.X + 1; Y = point.Y }
    let getBottom (point:Location) =
        if point.Y=rightMax then None
        else Some { X = point.X; Y = point.Y + 1 }
    let getLeftTop (point:Location) =
        if point.X = 0 || point.Y = 0 then None
        else Some { X = point.X - 1; Y= point.Y - 1 }
    let getRightTop (point:Location) =
        if point.X = rightMax || point.Y = 0 then None
        else Some { X = point.X + 1; Y=point.Y - 1 }
    let getRightBottom (point:Location) =
        if point.X = rightMax || point.Y = rightMax then None
        else Some { X = point.X + 1; Y = point.Y + 1 }
    let getLeftBottom (point:Location) =
        if point.X = 0 || point.Y = rightMax then None
        else Some { X = point.X - 1; Y=point.Y + 1 }
    let result =
        [(10, getLeft point); (10, getTop point); (10, getRight point); (10, getBottom
point);
         (14, getLeftTop point); (14, getRightTop point); (14, getRightBottom point);
         (14, getLeftBottom point);
        ]
    let result =
        result
        |> List.filter (fun (cost, n) -> match n with Some _ -> true | None -> false )
        |> List.map (fun (cost, (Some n)) -> cost,n)
        |> List.filter (fun (cost, n) -> nodeGraph.[n.Y].[n.X].IsBlock |> not)
        |> List.map (fun (cost, n) -> cost, nodeGraph.[n.Y].[n.X])
    result

let mutable openList : Node list = []
let mutable closedList : Node list = []

let addOpenList node =
    openList <- openList @ [node]

let addClosedList node =
    closedList <- closedList @ [node]

let closedListContain (endPoint:Node) =
    closedList
    |> Seq.exists (fun n -> n.Location = endPoint.Location)

let openListContain (node:Node) =
    openList
    |> Seq.exists (fun n -> n.Location = node.Location)

let ``a*`` start (endPoint:Node) =
    addOpenList start
    nodeGraph
    |> List.iter (fun list ->
                    list
                    |> List.iter (fun n ->
                                    n.H <- 10 * (abs (n.Location.X - endPoint.Location.X)
                                           + abs (n.Location.Y - endPoint.Location.Y))))
    while not <| closedListContain endPoint && openList.Length > 0 do
        let currentNode::tail = openList |> List.sortBy (fun n -> n.TotalCost)
        openList <- tail
        addClosedList currentNode

        let neighbours:(int*Node) list =
                getNeighbors currentNode.Location
                |> List.filter (fun (_, node) -> node |> closedListContain |> not)
        for cost, node in neighbours do
            if node.MoveCost > currentNode.MoveCost + cost then
                node.PreviousNode <- currentNode
                node.MoveCost <- currentNode.MoveCost + cost
            if not <| openListContain node then
                addOpenList node

let start = nodeGraph.[0].[0]
start.MoveCost <- 0
let endPoint = nodeGraph.[2].[5]

``a*`` start endPoint
Dijkstra algorithm
The Dijkstra algorithm is another algorithm you can use to find the shortest path from a given point to all other nodes in the graph. In Example 7-45, the graph library is changed to host the shortest distance from the starting point.
module DGMLGraph

open System

type Graph() =
    let mutable nodes = []
    let mutable edges = []

    member this.Nodes with get() = nodes
    member this.Edges with get() = edges
    member this.CreateNode (id) =
        match this.FindNode (id) with
        | Some (n) -> None
        | None ->
            let node = Node(this, ID = id)
            nodes <- nodes @ [ node ]
            Some node
    member this.CreateEdgeFromNode(from:Node, ``to``:Node, id) =
        match this.FindEdge id with
        | Some (edge) -> None
        | None ->
        let edge = Edge(this, from, ``to``, ID = id)
        from.AddOutgoingEdge (edge)
        ``to``.AddIncomingEdge (edge)
        edges <- edges @ [edge]
        Some edge
    member this.CreateEdgeFromID(from, ``to``, id) =
        let fromNode = this.FindNode (from)
        let toNode = this.FindNode (``to``)
        match fromNode, toNode with
        | Some(n0), Some(n1) -> this.CreateEdgeFromNode(n0, n1, id)
        | _ -> None
    member this.FindNode (id) =
        (nodes:Node list) |> Seq.tryFind(fun n -> n.ID = id)
    member this.FindEdge (id ) =
        (edges:Edge list) |> Seq.tryFind(fun edge -> edge.ID = id)
    member this.RemoveEdge(edge:Edge) =
        (edge.FromNode:Node).RemoveOutgoingEdge (edge)
        (edge.ToNode:Node).RemoveIncomingEdge (edge)
        edges <- edges |> List.filter (fun n -> n<>edge)
    member this.RemoveNode(node:Node) =
        node.OutgoingEdges @ node.IncomingEdges |> List.iter this.RemoveEdge
        nodes <- nodes |> List.filter (fun n -> n<>node)

and Node(g) =
    let mutable incomingEdges = []
    let mutable outgoingEdges = []
    member val ID = Unchecked.defaultof<_> with get, set
    member val Data = Unchecked.defaultof<_> with get, set
    member this.IncomingEdges with get() = incomingEdges
    member this.OutgoingEdges with get() = outgoingEdges
    member this.AddIncomingEdge(edge:Edge) =
        if edge.ToNode = this then
        incomingEdges <- incomingEdges |> List.append [edge]
    member this.AddOutgoingEdge(edge:Edge) =
        if edge.FromNode = this then
        outgoingEdges <- outgoingEdges |> List.append [edge]
    member this.RemoveIncomingEdge(edge:Edge) =
        incomingEdges <- incomingEdges |> List.filter (fun n -> n <> edge)
    member this.RemoveOutgoingEdge(edge:Edge) =
        outgoingEdges <- outgoingEdges |> List.filter (fun n -> n <> edge)
    override this.ToString() =
        sprintf "Node(%A)" this.ID

and Edge(g, from:Node, ``to``:Node) =
    member val ID = Unchecked.defaultof<_> with get, set
    member val Data = Unchecked.defaultof<_> with get, set
    member this.FromNode with get() = from
    member this.ToNode with get() = ``to``
    override this.ToString() =
        sprintf "Edge(%A, %A -> %A)" this.ID this.FromNode this.ToNode

open System.IO
open System.Xml.Linq

type DGMLReader(textReader:TextReader) =
    let doc = XDocument.Load(textReader:TextReader)
    let graph = Graph()
    do
        let nodes = doc.Descendants() |> Seq.filter (fun n -> n.Name.LocalName = "Node")
        let graphNodes =
                nodes
                |> Seq.map (fun node ->
                        let (Some graphNode) =
                            graph.CreateNode(node.Attribute(XName.Get("Id")).Value)
                        graphNode.Data <- System.Int32.MaxValue)
                |> Seq.toList
        let edges = doc.Descendants() |> Seq.filter (fun n -> n.Name.LocalName = "Link")
        edges
        |> Seq.iteri (fun i edge->
                let fromNode = edge.Attribute(XName.Get("Source")).Value
                let toNode = edge.Attribute(XName.Get("Target")).Value
                let (Some graphEdge) = graph.CreateEdgeFromID(fromNode, toNode, i)
                graphEdge.Data <- Convert.ToInt32 ( edge.Attribute(XName.Get("Label")).Value )
                ())
    member this.Graph with get() = graph

type Path = System.Collections.Generic.List<Node>
let openList = Path()
let closedList = Path()

open System.Collections.Generic
open System.Linq

let getNeighbors (currentNode:Node) =
    currentNode.OutgoingEdges
    |> List.map (fun edge -> edge.ToNode)
    |> List.filter (fun node -> not <| closedList.Contains(node))

let getCost (node:Node, currentNode:Node) =
    let (Some edge) =
        currentNode.OutgoingEdges
        |> List.tryFind (fun edge -> edge.ToNode = node)
    edge.Data

let ``Dijkstra's algorithm`` startPoint =
    openList.Add (startPoint)
    startPoint.Data <- 0
    while openList.Count > 0 do
         let currentNode = openList |> Seq.minBy (fun n -> n.Data)
         let neighbors : Node list = getNeighbors currentNode
         neighbors
         |> List.iter (fun node ->
                 let distance = getCost (node, currentNode)
                 node.Data <- min (currentNode.Data + distance) node.Data)
         openList.AddRange (neighbors)
         ignore <| openList.Remove (currentNode)
closedList.Add (currentNode)Examining Other Samples
This section gives you other useful options to try.
Combination
Combination is an approach used to select several items out of a larger collection. Unlike the permutation approach, combination does not care about the order. Example 7-46 shows how to get a combination from a collection of elements.
let getCombination (list:int list) elementNeeded =
    let rec getCombinationFunction (list:int list) elementNeeded currentList =
        if elementNeeded = 0 then
            [ currentList ]
        else
            [ for n in list do
                let newList =
                    list
                    |> Seq.skipWhile (fun x -> x<>n)
                    |> Seq.skip 1
                    |> Seq.toList
                let newElementNeeded = elementNeeded - 1
                for l in getCombinationFunction newList newElementNeeded (currentList@[n])
do
                    yield l ]

    getCombinationFunction list elementNeeded []

getCombination [1; 2; 3; 4] 3val getCombination : list:int list -> elementNeeded:int -> int list list val it : int list list = [[1; 2; 3]; [1; 2; 4]; [1; 3; 4]; [2; 3; 4]]
Phone keyboard
The telephone keyboard enables you to input non-numeric characters as well as number characters. Example 7-47 demonstrates how to get the character sequence from number inputs.
let letters =
    [
    '0', ['0']
    '1', ['1']
    '2', ['2'; 'A'; 'B'; 'C']
    '3', ['3'; 'D'; 'E'; 'F']
    '4', ['4'; 'G'; 'H'; 'I']
    '5', ['5'; 'J'; 'K'; 'L']
    '6', ['6'; 'M'; 'N'; 'O']
    '7', ['7'; 'P'; 'Q'; 'R'; 'S']
    '8', ['8'; 'T'; 'U'; 'V']
    '9', ['9'; 'W'; 'X'; 'Y'; 'Z']
    ]
    |> Map.ofList

let mutable currentState = ('0', -1)
let mutable result = System.Collections.Generic.List<_>()

let output() =
    let char, times = currentState
    if times >=0 then
        let l = letters.[char]
        let len = l.Length
        let c = l.[times%len]
        result.Add(c)
    else
        ()

let getInput (chs:char seq) =
    chs
    |> Seq.iter (fun ch ->
                    let char, times = currentState
                    if ch=char then
                        currentState <- (ch, times+1)
                    else
                        output()
                        currentState <- (ch, 0))

    output()

    result |> Seq.toList

getInput "12224444444210"Shuffle algorithm
The algorithm in Example 7-48 shuffles a sequence and generates a randomly shuffled list. In the algorithm code, it does not specify the type of the sequence. The use of an underscore (_) indicates that the sequence element type can be inferred from the code usage. For instance, an integer is passed to the algorithm, F# will infer that the data is an integer seq, and the result is a List<int>.
open System

let rand = Random()
let shuffleYateFisher (data:seq<_>) =
    let result = System.Collections.Generic.List<_> ()
    data
    |> Seq.iter (fun n ->
                    let index = rand.Next(0, result.Count)
                    if index = result.Count then
                        result.Add(n)
                    else
                        result.Add(result.[index])
                        result.[index] <- n)

    result
let seq = seq { for i = 0 to 10 do yield i }

for i=0 to 5 do
    let l = shuffleYateFisher seq
    l |> Seq.iter (printf "%A ")
printfn ""Reservoir sampling
Reservoir sampling is related to the processing of large amounts of data. This algorithm is another random-selection algorithm. The algorithm is trying to get N elements from a large data set, which is so big that it is not possible to hold it in memory. In the sample code, I will use a sequence as the incoming data structure.
The algorithm first tries to fill the result set whose size is resultSize. Once the elements are successfully retrieved, the rest of the elements are selected randomly based on a uniform distribution from 0 to the current index value. If the generated random number is in the range of [0, resultSize), you can replace the result set’s element with the new element, as shown in Example 7-49.
let rand = System.Random()

let (|InReservoirRange|_|) i resultSize =
   if i < resultSize then
     Some()
   else
     None

type ResultList<'a> = System.Collections.Generic.List<'a>
let result = ResultList<_>()

let reservoirSampling data resultSize =
   let (|InReservoirRange|_|) i = (|InReservoirRange|_|) i resultSize
   data
   |> Seq.iteri (fun index n ->
           match index with
           | InReservoirRange->
             result.Add(n)
           | _ ->
             let newIndex = rand.Next(index)
             match newIndex with
             | InReservoirRange ->
               result.[newIndex] <- n
             | _ -> ())

let seq = seq { for i = 0 to 100 do yield i }
reservoirSampling seq 5
Note
This sample shows the parameterized partial active pattern and how to generate a new active pattern from an existing pattern. The active pattern provides a way to give more precise meaning to the data. Like its name suggests, the InReservoirRange indicates the value is in the reservoir range.
If the data set is large, a bigint number generator and a Seq.iteri using bigint are needed. A sample bigint random-number generator is shown here:
open System

let rand = Random()
type Random with
    member this.RandomBigInt() =
        let len = 20
        let getRandByte() =
            let arr = Array.create 1 0uy
            rand.NextBytes arr
            arr.[0]
        let arr = Array.init len (fun _ -> getRandByte())

        let big = bigint arr
        big

printfn "%A" (rand.RandomBigInt())
Check intersecting line segments
Another common use of an active pattern is to check whether two line segments can intersect. The sample takes two line segments on a two-dimensional (2D) surface. The line segment is represented by two points. In Example 7-50, a tuple is used to represent the point.
let (|Vertical|_|) ((x1, y1), (x2, y2)) = if x1 = x2 then Some() else None
let assertFunction a b = if a <> b then failwith "fail test"

let checkIntersect (p0, p1, p2, p3) =
    let x1, y1 = p0
    let x2, y2 = p1
    let x3, y3 = p2
    let x4, y4 = p3

    match (p0, p1), (p2, p3) with
    | Vertical, Vertical -> x1 = x3
    | Vertical, _ ->
        let delta (x, y) = (y3 - y4) / (x3 - x4) * (x - x3) + y3 - y
        (x1 - x3) * (x1 - x4) <= 0 &&
        delta (x2, y2) * delta (x1, y1) <= 0

    | _, Vertical
    | _ ->
        let delta (x, y) = (y1 - y2) / (x1 - x2) * (x - x1) + y1 - y
        (x3 - x1) * (x3 - x2) <= 0 &&
        delta (x3, y3) * delta (x4, y4) <= 0

// one line is a normal line from (0, 0) to (5, 5)
assertFunction true <| checkIntersect ( (0, 0), (5, 5), (0, 5), (5, 0) )
assertFunction false <| checkIntersect ( (0, 0), (5, 5), (0, 5), (1, 4) )
assertFunction false <| checkIntersect ( (0, 0), (5, 5), (5, 0), (4, 1) )
assertFunction true <| checkIntersect ( (0, 0), (5, 5), (1, 0), (1, 5) )
assertFunction false <| checkIntersect ( (0, 0), (5, 5), (4, 0), (4, 2) )
assertFunction true <| checkIntersect ( (0, 0), (5, 5), (4, 0), (4, 5) )
assertFunction false <| checkIntersect ( (0, 0), (5, 5), (0, 4), (1, 4) )
assertFunction true <| checkIntersect ( (0, 0), (5, 5), (0, 4), (5, 4) )
assertFunction false <| checkIntersect ( (0, 0), (5, 5), (5, 4), (5, 4) )
assertFunction true <| checkIntersect ( (0, 0), (5, 5), (5, 5), (5, 5) )
Find triangles
The last sample presented here, in Example 7-51, is a combination problem. The problem is to find the number of triangles that can be formed by three different elements in the array. The array contains positive integers. If three numbers can form a triangle, the sum from any two of them should be larger than the third.
let getTriangle (l:_ list) =
    let len = l.Length
    [
        for i = 0 to len - 1 do
            for j = i + 1 to len - 1 do
                for k = j + 1 to len - 1 do
                    if l.[i] + l.[j] > l.[k] &&
                       l.[j] + l.[k] > l.[i] &&
                       l.[k] + l.[i] > l.[j] then yield l.[i], l.[j], l.[k] ]

getTriangle [10; 21; 22; 100; 101; 200; 300]
Execution result
val it : (int * int * int) list =
  [(10, 21, 22); (10, 100, 101); (21, 100, 101); (22, 100, 101);
   (100, 101, 200); (101, 200, 300)]
Neural network
In Chapter 6, I presented a generic algorithm implementation. In computational intelligence research, other than a genetic algorithm, there is another famous algorithm called the neural network. If the neural network (NN) is not a familiar concept, the following definition from Wikipedia (http://en.wikipedia.org/wiki/Neural_network) can be helpful to understanding neural networks:
A neural network is an interconnected group of natural or artificial neurons that uses a mathematical or computational model for information processing based on a connectionistic approach to computation. In most cases a NN is an adaptive system that changes its structure based on external or internal information that flows through the network. In more practical terms neural networks are non-linear statistical data modeling or decision making tools. They can be used to model complex relationships between inputs and outputs or to find patterns in data.
Example 7-52 implements a simple neural network that simulates the XOR operator. Its structure is shown in Figure 7-19. The Neuron class in the code represents the neuron node. The edge between the neuron nodes is NeuralFactor. The whole neural network has three layers: an input layer, a hidden layer, and an output layer. The input value is set at the top-level nodes, and the output is generated from the bottom node.
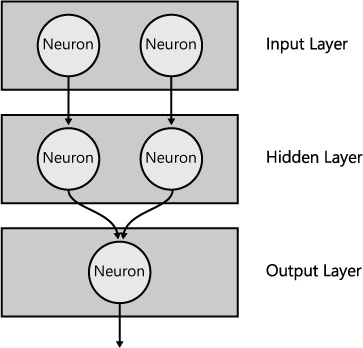
namespace FSharp.NN

open System
open System.Collections.Generic

// linkage between neurons
type NeuralFactor(weight:float) =
    member val HVector = 0. with get, set
    member val Weight = weight with get, set

    member this.SetWeightChange rate =
        this.Weight <- this.Weight + this.HVector * rate

    member this.Reset() =
        this.HVector <- 0.

    override this.ToString() =
        sprintf "(HVector=%A, Weight=%A)" this.HVector this.Weight

type Map = Dictionary<Neuron, NeuralFactor>

// neuron in the neural network
and Neuron(bias) =
    let sigmoid v = 1. / (1. + exp(-v))

    member val Bias = NeuralFactor(bias) with get, set
    member val Error = 0. with get, set
    member val Input = Map() with get, set
    member val LastError = 0. with get, set


    member val Output = 0. with get, set

    member this.Pulse() =
        this.Output <- 0.
        for item in this.Input do
            this.Output <- this.Output + item.Key.Output * item.Value.Weight
        this.Output <- this.Output + this.Bias.Weight
        this.Output <- sigmoid this.Output

    member this.ApplyLearning rate =
        for value in this.Input.Values do
            value.SetWeightChange rate

        this.Bias.SetWeightChange rate

    member this.Initialize() =
        this.Input.Values
        |> Seq.iter (fun value -> value.Reset())

        this.Bias.Reset()

    override this.ToString() =
        sprintf "(Bias=%A, Error=%A, Output=%A)" this.Bias this.Error this.Output

// layer in the neural network
type NeuralLayer() =
    inherit List<Neuron>()
    member this.Pulse() =
        this
        |> Seq.iter (fun n->n.Pulse())
    member this.Apply rate =
        this
        |> Seq.iter (fun n->n.ApplyLearning rate)
    member this.Initialize() =
        this
        |> Seq.iter (fun n->n.Initialize())

// neural network
type NeuralNet()=
    let sigmoidDerivative v = v * ( 1. - v)
    let rand = new Random()

    member val LearningRate = 3.0 with get, set
    member val InputLayer = NeuralLayer() with get, set
    member val HiddenLayer = NeuralLayer() with get, set
    member val OutputLayer = NeuralLayer() with get, set

    member this.Initialize(inputNeuronCount, hiddenNeuronCount, outputNeuronCount) =
        [1..inputNeuronCount] |> Seq.iter (fun _ -> this.InputLayer.Add(Neuron(0.)))
        [1..outputNeuronCount] |> Seq.iter (fun _ -> this.OutputLayer.Add(Neuron(0.)))
        [1..hiddenNeuronCount] |> Seq.iter (fun _ -> this.HiddenLayer.Add(Neuron(0.)))

        for hiddenNode in this.HiddenLayer do
            for inputNode in this.InputLayer do
                hiddenNode.Input.Add(inputNode, new NeuralFactor(rand.NextDouble()))

        for outputNode in this.OutputLayer do
            for hiddenNode in this.HiddenLayer do
                outputNode.Input.Add(hiddenNode, new NeuralFactor(rand.NextDouble()));

    member this.Pulse() =
        [ this.HiddenLayer; this.OutputLayer]
        |> Seq.iter (fun n -> n.Pulse())

    member this.Apply() =
        [ this.HiddenLayer; this.OutputLayer]
        |> Seq.iter (fun n -> n.Apply(this.LearningRate))

    member this.InitializeLearning() =
        [ this.HiddenLayer; this.OutputLayer]
        |> Seq.iter (fun n -> n.Initialize())

    member this.Train(input: float list list, expected: float list list, iteration) =
        [1..iteration]
        |> Seq.iter (fun n ->
                        this.InitializeLearning()
                        for i = 0 to input.Length - 1 do
                            this.BackPropagation(input.[i], expected.[i])
                        this.Apply())

    member this.Prepare(input) =
        Seq.zip this.InputLayer input
        |> Seq.iter (fun (a, b) -> a.Output <- b)

    member this.Calculate() =
        for outputNode in this.OutputLayer do
            for hiddenNode in this.HiddenLayer do
               outputNode.Input.[hiddenNode].HVector <-
                   outputNode.Input.[hiddenNode].HVector + outputNode.Error * hiddenNode.
Output
            outputNode.Bias.HVector <-
                   outputNode.Bias.HVector + outputNode.Error * outputNode.Bias.Weight

        for hiddenNode in this.HiddenLayer do
            for inputNode in this.InputLayer do
                hiddenNode.Input.[inputNode].HVector <-
                    hiddenNode.Input.[inputNode].HVector + hiddenNode.Error * inputNode.
Output;
            hiddenNode.Bias.HVector <-
                    hiddenNode.Bias.HVector + hiddenNode.Error * hiddenNode.Bias.Weight;

    member this.CalculateErrors desiredResults =
        Seq.zip this.OutputLayer desiredResults
        |> Seq.iter (fun (outputNode, v) ->
                        outputNode.Error <-
                            (v - outputNode.Output) * sigmoidDerivative(outputNode.
Output))

        for hiddenNode in this.HiddenLayer do
            hiddenNode.Error <-
                this.OutputLayer
                |> Seq.sumBy (fun n ->
                                     let weight = n.Input.[hiddenNode].Weight
                                     (n.Error * weight) * sigmoidDerivative(hiddenNode.
Output))

    member this.BackPropagation(input, expected) =
        this.Prepare(input)
        this.Pulse()
        this.CalculateErrors(expected)
        this.Calculate()

    member this.Inputs with get(i) = this.InputLayer.[i]
    member this.Output with get(i) = this.OutputLayer.[i]

    member this.GetOutputs() =
        [ for output in this.OutputLayer do yield output.Output ]

    member this.PrepareInput(input:float list) =
        Seq.zip this.InputLayer input
        |> Seq.iter (fun (a, b) -> a.Output <- b)
Example 7-53 shows how to create, train, and test the neural network. The test module creates the neural network. The neural network needs to be trained first. The neural network is trained using the input and output data set. The training data helps the neural network build up the relationship between input and output. Once this relationship is established, it can generate correct results even when the input data is not in the training data set.
module Test =
    let high = 0.99
    let low = 0.01
    let mid = 0.5
    let rate = 3.4
    let input = [ [high; high]; [low; high]; [high; low]; [low; low] ]
    let output = [ [low]; [high]; [high]; [low] ]
    let mutable cont = true

    let net = NeuralNet()
    net.Initialize(2, 2, 1)
    let mutable count = 0
    while cont do
        count <- count + 1
        net.Train(input, output, 5)

        net.PrepareInput([low; low])
        net.Pulse()
        let [ll] = net.GetOutputs()

        net.PrepareInput([high; low])
        net.Pulse()
        let [hl] = net.GetOutputs()

        net.PrepareInput([low; high])
        net.Pulse()
        let [lh] = net.GetOutputs()

        net.PrepareInput([high; high])
        net.Pulse()
        let [hh] = net.GetOutputs()

        cont <- hh > (mid + low) / 2.
                    || lh < (mid + high) / 2.
                    || hl < (mid + low) / 2.
                    || ll > (mid + high)/2.

    net.PrepareInput([high; low])
    let [v] = net.GetOutputs()
    let result = v < 0.5
Using the Continuation Passing Style
Continuation passing style (CPS) is a way to rewrite recursive functions to avoid stack overflow problem. Many samples in this chapter use recursive functions. Recursive functions make the code tidy and easy to understand; however, careless use of them can cause stack overflow problems. A stack overflow occurs when a function call continuously adds elements to the stack until the limited memory that is allocated to the stack is depleted.
One way to solve the stack overflow problem is to make sure the function is a tail call. A tail call is a function at the tail position. According to the F# team blog (http://blogs.msdn.com/b/fsharpteam/archive/2011/07/08/tail-calls-in-fsharp.aspx), the tail position is defined recursively as
The body of a function or method
The body of an action in a match expression, where the match expression is in the tail position
The body of an if, elif, or else branch, where the conditional expression is in the tail position
The last expression in a sequence, where the sequence is in the tail position
The body of a let or let rec binding, where the binding expression is in the tail position
The tail call can be executed without allocating extra function frames on the call stack, and it will not have stack overflow problems at runtime. And it can be optimized by the compiler and converted to a loop. Example 7-54 shows a few tail-position samples.
fun x -> tailCallFunction x

fun x -> if <BooleanExpression> then
               tailCallFunction()
           else
               tailCallFunction2()
Note
The tail position does not imply that the tail call is at the end of the function. The function sum in the following sample is not in the tail position. The last operation in the function is + and invoking the sum will create an extra function frame on the call stack (resulting in a stack overflow in certain scenarios):
let rec sum = function
    | [] -> 0
    | h::t -> h + sum t
Another solution is to use continuation passing style (CPS). CPS passes the control explicitly in the form of a continuation. From the definition from Wikipedia (http://en.wikipedia.org/wiki/Continuation-passing_style), a function written in CPS takes an extra argument called a continuation. When the CPS function has computed its result value, it returns by invoking the continuation function.
Example 7-55 shows how to use recursion to find the sum of a list of numbers. It has three modules. The first module is a recursive version that can run into a stack overflow problem. The second module is a tail-call version. The last module, CPSModule, is CPS version, which also uses tail calls.
Recursive version
module RecursiveModule =
    let l = [1..1000000]

    let rec sum l =
        match l with
        | [] -> 0
        | h::t -> h + sum t

    sum l
Tail call and CPS version
module TailCallModule =
    let l = [1..1000000]

    let rec sum l acc =
         match l with
         | [] -> acc
         | h::t -> sum t (acc + h)

    let res() = sum l 0

module CPSModule =
    let l = [1..1000000]

    let rec sum l cont =
        match l with
        | [] -> cont 0
        | h::t ->
            let afterSum v =
                cont (h+v)
        sum t afterSum

    sum l id
Note
The recursive version generates a stack overflow exception when processing a large list.
The tail-call and CPS versions can be executed in FSI without generating a stack overflow. When the CPS code is compiled in Visual Studio, make sure the Generate Tail Calls check box in the project properties is selected:
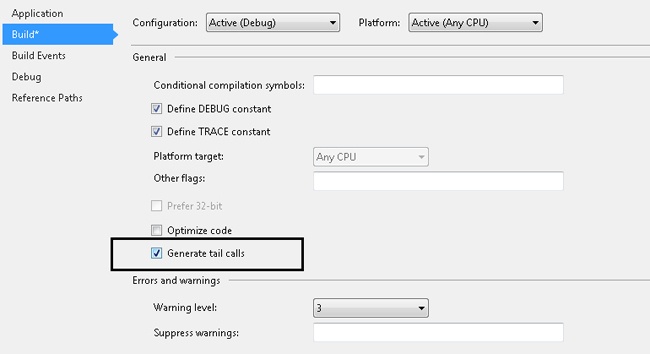
Now I’ll demonstrate how to convert from the recursive version to the CPS version. During the conversion process, the intermediate code at some steps might not compile. (See Example 7-56.)
Step 1 uses a variable to hold the function return value.
Step 2 adds the continuation function to the sum function and converts the return statement
h+rtocont(h+r).Step 3 is used to convert the recursive function call inside. It consists of three substeps:
Define the afterSum function.
Move
cont (h+v)inside the afterSum functionUse
sum t afterSumto replacecont(h+v),which has already been moved inside afterSum.
Step 1: Introduce a variable
module RecursiveModule =
    let l = [1..1000000]

    let rec sum l =
        match l with
        | [] -> 0
        | h::t ->
            let r = sum t
            h + r

    sum l
Step 2: Add the continuation function to the sum
module RecursiveModule =
    let l = [1..1000000]

    let rec sum l cont =
        match l with
        | [] -> 0
        | h::t ->
            let r = sum t
            cont (h + r)

    sum l
Step 3: Convert the recursive function
module RecursiveModule =
    let l = [1..1000000]

    let rec sum l cont =
        match l with
        | [] -> cont 0
        | h::t ->
          let afterSum v =
              cont (h + v)
          sum t afterSum

    sum l id
Now you can look at a more complex problem: converting a tree traversal to CPS. In a complex scenario such as this, tail recursion isn’t an option, but CPS comes to your rescue. Example 7-57 is used to get the sum of all the node values in a binary tree. It has both a recursive version and a CPS version. The deepTree variable in Example 7-57 is a tree structure; the tree structure is shown in Figure 7-20. If N is set to 1,000,000, the tree is very deep and makes the non-CPS code generate a stack overflow exception.
type NodeType = int

type BinaryTree =
    | Nil
    | Node of NodeType * BinaryTree * BinaryTree

let tree n =
    let mutable subTree = Node(1, Nil, Nil)
    for i=0 to n do
        subTree <- Node(1, subTree, Nil)
    subTree

let deepTree = tree 1000000

module TreeModule =
    let rec sum tree =
        match tree with
        | Nil -> 0
        | Node(v, l, r) ->
            let sumL = sum l
            let sumR = sum r
            v + sumL + sumR

    sum deepTree

module TreeCSPModule =
    let rec sum tree cont =
        match tree with
        | Nil -> cont 0
        | Node(v, l, r) ->
            let afterLeft lValue =
                let afterRight rValue =
                    cont (v + lValue + rValue)
                sum r afterRight
            sum l afterLeft

    sum deepTree id
Now I’ll demonstrate how to convert from the recursive version to the CPS version; see Example 7-58. During the conversion process, the intermediate code at some steps might not compile.
Step 1: Add a continuation function
module TreeModule =
    let rec sum tree cont =
       match tree with
       | Nil -> 0
       | Node(v, l, r) ->
           let sumL = sum l
           let sumR = sum r
           cont (v + sumL + sumR)

    sum deepTree id
Step 2: Introduce afterRight, and use it as a continuation
module TreeModule =
    let rec sum tree cont =
       match tree with
       | Nil -> 0
       | Node(v, l, r) ->
           let sumL = sum l
           // let sumR = sum r
           let afterRight rValue =
               cont (v + sumL + rValue)
           sum r afterRight

    sum deepTree id
Step 3: Introduce afterLeft, and use it as a continuation
module TreeModule =
    let rec sum tree cont =
        match tree with
        | Nil -> 0
        | Node(v, l, r) ->
            //let sumL = sum l
            let afterLeft lValue =
                let afterRight rValue =
                    cont (v + lValue + rValue)
                sum r afterRight
          sum l afterLeft

sum deepTree idUsing the preceding steps, you can convert the recursive Fibonacci function to a CPS version. Both versions are shown in Example 7-59.
module FibModule =
    let rec fib x =
        match x with
        | _ when x = 1I -> 1I
        | _ when x = 2I -> 1I
        | _ -> ( fib (x - 1I) ) + (fib (x - 2I) )

    fib 30I

module FibCPSModule =
    let rec fib x cont =
        match x with
        | _ when x = 1I -> cont 1I
        | _ when x = 2I -> cont 1I
        | _ ->
            let after1 a =
                let after2 b =
                    cont(a + b)
                fib (x - 2I) after2
            fib (x - 1I) after1

    fib 30I id
Working with HTML5 and WebSharper
In addition to using F# for portable library development, you can use it to build modern web applications. One great option for building web applications with F# is a framework named WebSharper. WebSharper can be downloaded from http://www.websharper.com/home. It supports not only web development, but also development of mobile applications. Let’s start with a simple ASP.NET web sample.
Creating an ASP.NET Website with WebSharper
After you successfully install WebSharper, a bunch of new project templates appear under the Visual F# node in the New Project dialog box, as shown in Figure 7-21.
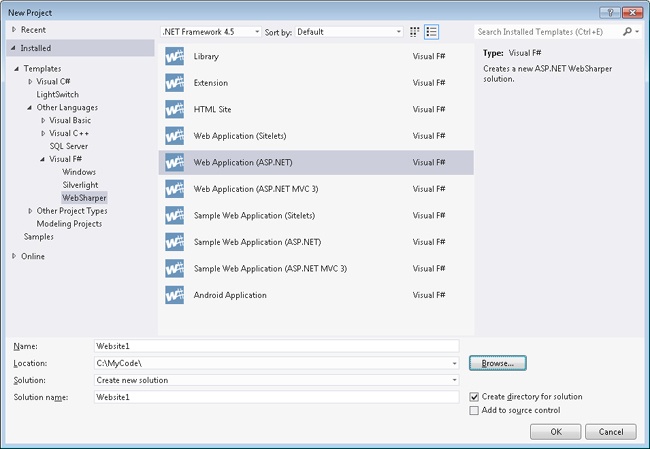
The generated solution contains two projects. One is the website, and the other is the F# class library where you can define how the webpage will look. The solution structure is shown in Figure 7-22.

The first task is to implement an interactive webpage that takes input and generates output. When a user clicks the button, the input string is shown in a label on the page. The code is shown in Example 7-60. The Main function in the ScriptModule module defines elements that will be shown on the page. The input is a text box that takes the user input, and output is where the output should be shown. The Button’s OnClick event is triggered when a user clicks the button. This event causes the value entered in the text box to be displayed in the output label. The execution result is shown in Figure 7-23.
namespace Website

open IntelliFactory.WebSharper
open IntelliFactory.WebSharper.Html

module ScriptModule =
    [<JavaScript>]
    let Main() =
        let input = Input [Attr.Type "Text"]
        let output = Label []
        Div [
            input
            Button [Text "Click Me!"]
            |>! OnClick (fun e args ->
                        output.Text <- input.Value)
            output
        ]

type MyControl() =
    inherit Web.Control()

    [<JavaScript>]
    override this.Body = ScriptModule.Main() :> _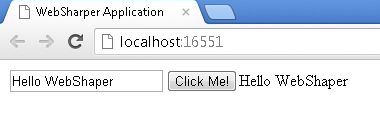
It is illusory that F# code is executed in this example. In reality, most of the F# code in Example 7-61 is translated to JavaScript during the compilation process. This generated JavaScript is placed in a file located under the WebScripts folder of the web project. The content of the file WebSite.dll.js that was generated from our example is shown in the listing.
(function()
{
 var Global=this,Runtime=this.IntelliFactory.Runtime,Website,ScriptModule,WebSharper,Html,
Default,List,T,EventsPervasives;
 Runtime.Define(Global,{
  Website:{
   MyControl:Runtime.Class({
    get_Body:function()
    {
     return ScriptModule.Main();
    }
   }),
   ScriptModule:{
    Main:function()
    {
     var input,_this,output,x,_this1,x1,f,x2;
     input=Default.Input(List.ofArray([(_this=Default.Attr(),_this.
NewAttr("type","Text"))]));
     output=(x=Runtime.New(T,{
      $:0
     }),(_this1=Default.Tags(),_this1.NewTag("label",x)));
     return Default.Div(List.ofArray([input,(x1=Default.Button(List.ofArray([Default.
Text("Click
Me!")])),(f=(x2=function()
     {
      return function()
      {
       return output.set_Text(input.get_Value());
      };
     },function(arg10)
     {
      return EventsPervasives.Events().OnClick(x2,arg10);
     }),(f(x1),x1))),output]));
    }
   }
  }
 });
 Runtime.OnInit(function()
 {
  Website=Runtime.Safe(Global.Website);
  ScriptModule=Runtime.Safe(Website.ScriptModule);
  WebSharper=Runtime.Safe(Global.IntelliFactory.WebSharper);
  Html=Runtime.Safe(WebSharper.Html);
  Default=Runtime.Safe(Html.Default);
  List=Runtime.Safe(WebSharper.List);
  T=Runtime.Safe(List.T);
  return EventsPervasives=Runtime.Safe(Html.EventsPervasives);
 });
 Runtime.OnLoad(function()
 {
 });
}());
Using a Formlet Type to Get Input and Generate Output
Example 7-60 showed how to use basic input and output with WebSharper. In this section, Example 7-62 shows how to use a formlet. The UI in Figure 7-24 consists of two parts. One part, which is bound to the value named formlet, is a form with a name input and country selection. The other part is the output, which is used to show the process result. The variable output is the control showing the result. The formlet can be further broken down to two formlets: nameF and countryF. Because of the declarative nature of F# code, nameF is a control receiving input and being enhanced with validation logic, a Validation icon, and a TextLabel. The data received by nameF and countryF are passed into the callback function defined in Formlet.Yield (fun name data -> {Name = name; Country = data}). The callback function takes two parameters, which return from nameF and countryF and form a Person record defined at the beginning of the source code.
namespace Website

open IntelliFactory.WebSharper
open IntelliFactory.WebSharper.Html
open IntelliFactory.WebSharper.Formlet
open IntelliFactory.WebSharper.Formlet.Controls

module ScriptModule =
    type Person = {
        Name: string
        Country: string
    }

    [<Rpc>]
    let countries() =
        [ "USA", "From USA"; "Canada", "From Canada"; "UK", "From United Kingdom" ]

    [<JavaScript>]
    let PersonFormlet () : Formlet<Person> =
        let nameF =
            Controls.Input ""
            |> Validator.IsNotEmpty "Empty name not allowed"
            |> Enhance.WithValidationIcon
            |> Enhance.WithTextLabel "Name"
        let countryF =
            Select 0 (countries())
            |> Enhance.WithTextLabel "Country"
        Formlet.Yield (fun name data -> {Name = name; Country = data})
        <*> nameF
        <*> countryF
        |> Enhance.WithSubmitAndResetButtons
        |> Enhance.WithLegend "Add a New Person"
        |> Enhance.WithFormContainer

    [<JavaScript>]
    let Main () =
        let p = PersonFormlet()
        let output = Label []
        let formlet = Formlet.Run (fun data -> output.Text <- string data.Name + ":" +
string
 data.Country) p
        Div [
            formlet
            output :> _
        ]

type MyControl() =
    inherit Web.Control()

    [<JavaScript>]
    override this.Body = ScriptModule.Main() :> _
Note
The segment output :> _ is used to convert the output to a Formlet type. The segment :> _ tells the F# type inference system to figure out the type.
Because sprintf is not supported in WebSharper, you need to use code such as the following to convert to a string:
string data.Name + ":" + string data.Country
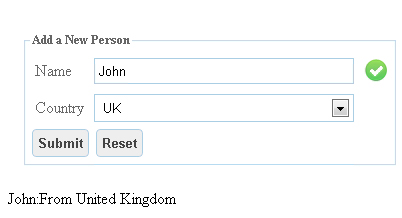
Using a Formlet Type as a Wizard
In this section, you will expand the previous sample to get more personal information, such as phone number and ID number. The ID number of a person from the USA is the Social Security Number (SSN), while Canada and UK use the Social Insurance Number (SIN) and National Insurance number (NI). Depending on the input from the user, the UI changes appropriately. The execution results are shown in Figure 7-25 and Figure 7-26. If the user selects Canada, the next page will show SIN as the ID type. The MorePersonalInfo formlet takes an ID name and uses it to display the appropriate label on the UI. The Rpc attribute in the code provides a seamless way to interact with the server. (See Example 7-63.)
namespace Website

open IntelliFactory.WebSharper
open IntelliFactory.WebSharper.Html
open IntelliFactory.WebSharper.Formlet
open IntelliFactory.WebSharper.Formlet.Controls

module ScriptModule =

    type Person = {
        Name: string
        Country: string
        Phone: string
        IDNumber: string
    }
    with
        member this.Output() =
            let output = "("
                            + string this.Name + "; "
                            + string this.Country + ";"
                            + string this.Phone + ";"
                            + string this.IDNumber + ";"
                        + ")"
            output


    [<Rpc>]
    let countries() =
        [ "USA", "SSN"; "Canada", "SIN"; "UK", "NI" ]

    [<JavaScript>]
    let PersonFormlet () : Formlet<Person> =
        let nameF =
            Controls.Input ""
            |> Validator.IsNotEmpty "Empty name not allowed"
            |> Enhance.WithValidationIcon
            |> Enhance.WithTextLabel "Name"
        let countryF =
            Select 0 (countries())
            |> Enhance.WithTextLabel "Country"
        Formlet.Yield (fun name data -> {Name = name; Country = data; Phone=""; IDNumber =
""})
        <*> nameF
        <*> countryF
        |> Enhance.WithLegend "Add a New Person"
        |> Enhance.WithFormContainer

    [<JavaScript>]
    let MorePersonalInfo idName : Formlet<Person> =
        let phoneF =
            Controls.Input ""
            |> Validator.IsNotEmpty "Please input phone number"
            |> Enhance.WithValidationIcon
            |> Enhance.WithTextLabel "Phone"

        let idF =
            Controls.Input ""
            |> Validator.IsNotEmpty "Please give your id number"
            |> Enhance.WithValidationIcon
            |> Enhance.WithTextLabel idName

        Formlet.Yield (fun phone id -> {Name = ""; Country = ""; Phone=phone; IDNumber =
id})
        <*> phoneF
        <*> idF
        |> Enhance.WithLegend "Add a New Person"
        |> Enhance.WithFormContainer

    [<JavaScript>]
    let Main () =
        let output = Label []
        let fc = {
                    Enhance.FormContainerConfiguration.Default  with
                        Header = "Sample" |> Enhance.FormPart.Text |> Some
                 }

        let personF =
            PersonFormlet()
            |> Enhance.WithSubmitAndResetButtons
            |> Enhance.WithCustomFormContainer {
                    fc with
                        Description = "Step1"
                        |> Enhance.FormPart.Text
                        |> Some
            }

        let idF nationality =
            MorePersonalInfo nationality
            |> Enhance.WithSubmitAndResetButtons
            |> Enhance.WithCustomFormContainer {
                    fc with
                        Description = "Step2"
                        |> Enhance.FormPart.Text
                        |> Some
            }

        Formlet.Do {
                    let! p = personF
                    let! i = idF (p.Country)
                    return!
                        Formlet.OfElement (fun () -> Div [Text "Thank you!"])
                        |> Formlet.Map (fun _ -> {Name = p.Name;
                                                       Country = p.Country;
                                                       Phone = i.Phone;
                                                       IDNumber = i.IDNumber})
                    }
        |> Formlet.Flowlet
        |> Formlet.Map ignore

type MyControl() =
    inherit Web.Control()

    [<JavaScript>]
    override this.Body = ScriptModule.Main() :> _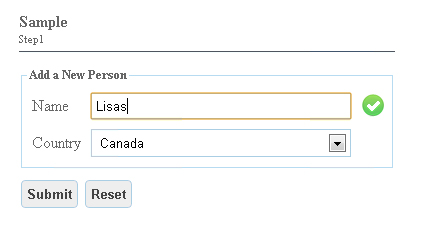
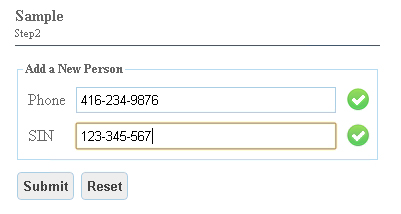
Creating an HTML5 Page
As previously mentioned, WebSharper supports generating HTML5 pages. Example 7-64 shows how to draw two rectangles on an HTML5 Canvas element, as shown in Figure 7-27.
namespace Website

open IntelliFactory.WebSharper
open IntelliFactory.WebSharper.Html
open IntelliFactory.WebSharper.Html5

module ScriptModule =

    [<JavaScript>]
    let example1 (ctx: CanvasRenderingContext2D) =
            ctx.FillStyle <- "rgb(100, 0, 0)"
            ctx.FillRect(10., 10., 50., 50.)
            ctx.FillStyle <- "rgba(0, 0, 100, 0.5)"
            ctx.FillRect(30., 30., 50., 50.)

    [<JavaScript>]
    let Main() =
        let element = HTML5.Tags.Canvas []
        let canvas  = As<CanvasElement> element.Dom
        canvas.Height <-100
        canvas.Width <- 100
        example1(canvas.GetContext "2d")
        Div [Attr.Style "float: center"] -< [
            element
        ]

type MyControl() =
    inherit Web.Control()

    [<JavaScript>]
    override this.Body = ScriptModule.Main() :> _
The combination of WebSharper and F# can provide nice animations. In Example 7-65, a rectangle is drawn and moved progressively from the left side to the right.
open System
open IntelliFactory.WebSharper
open IntelliFactory.WebSharper.Html
open IntelliFactory.WebSharper.Html5

module CanvasAnimation =
    [<JavaScript>]
    let AnimatedCanvas draw width height caption =
        let element = Tags.NewTag "Canvas" []
        let canvas  = As<CanvasElement> element.Dom
        canvas.Width  <- width
        canvas.Height <- height
        let ctx = canvas.GetContext "2d"
        let timeStep = ref 0
        let rec loop =
            async {
                do! Async.Sleep 50
                do draw(ctx, !timeStep)
                do timeStep := !timeStep + 1
                do! loop
            }
        draw(ctx, !timeStep)
        Async.Start loop
        Div [ Width (string width); Attr.Style "float:left" ] -< [
            Div [ Attr.Style "float:center" ] -< [
                element
                P [Align "center"] -< [
                    I [Text <| "Example " + caption]
                ]
            ]
        ]

    [<JavaScript>]
    let Main () =
        let example1 (ctx: CanvasRenderingContext2D, time:int) =
            ctx.Save()
            let previous = time - 1
            ctx.ClearRect(float previous, 20., 20., 20.)
            ctx.Rect(float time, 20., 20., 20.)
            ctx.FillRect(float time, 20., 20., 20.)
            ctx.Restore()

        Div [
            AnimatedCanvas example1 150 150 "1"
            Div [Attr.Style "clear:both"]
        ]

type MyCanvasAnimationViewer() =
    inherit Web.Control()
    [<JavaScript>]
override this.Body = CanvasAnimation.Main () :> _WebSharper provides a nice way to use F# to build web solutions. However, WebSharper enables complex algorithms designed in F# and renders the result with HTML5. Here are the benefits of using WebSharper:
It’s a single language used for the full web stack. Image you have some existing .NET or F# algorithm implementation. WebSharper can make the development much easier and more efficient.
The inconsistency between the browsers is taken care of by the framework.
It automatically takes advantage of emerging technologies such as HTML5.