Chapter 10
Wrangling External Data with Macros
IN THIS CHAPTER
![]() Working with external data connections
Working with external data connections
![]() Connecting to external databases
Connecting to external databases
![]() Using macros to pull external data
Using macros to pull external data
![]() Working with external text files
Working with external text files
External data is exactly what it sounds like: data that isn’t located in the Excel workbook in which you’re working. Some examples of external data sources are text files, CSV files, Access tables, and even SQL Server tables.
There are numerous ways to get data into Excel. In fact, between the functionality found in the UI and the VBA/code techniques, there are too many techniques to focus on in one chapter. Instead, this chapter focuses on a handful of techniques that you can implement in most situations and that don’t come with a lot of pitfalls and gotchas.
Working with External Data Connections
Every Excel workbook has the ability to store syntax that allows the workbook to pull in data from external databases, files, and websites. This ability is made possible by Excel’s External Data Connection feature. You can create any number of data connections to retrieve the needed external data.
There are two main ways to get external data into Excel: PowerQuery and legacy wizards. PowerQuery is a relatively new method and is beyond the scope of this book. The legacy wizards are not on the Ribbon by default. To add the legacy wizards, choose File ⇒ Options ⇒ Data and select the legacy wizards you want to add to the Ribbon. Figure 10-1 shows the Excel Options dialog box with the From Text (Legacy) and From Access (Legacy) options checked.

FIGURE 10-1: Show legacy wizards in the Ribbon.
This next section walks you through the ins and outs of working with external data connections.
Manually creating a connection
Excel has made it easy to manually connect to external data sources such as Microsoft Access, SQL Server, or any other ODBC connection you regularly use. For example, you can connect to an Access database by following these steps:
 Follow along by using the Facility Services.accdb Access database found on the book's website. The DynamicDataConnection.xlsm file contains the sample macros found in this section.
- Open a new Excel workbook and click the Data tab on the Ribbon.
In the Get & Transform Data group, choose Get Data ⇒ Legacy Wizards ⇒ From Access (Legacy).
The Select Data Source dialog box opens, as shown in Figure 10-2. If the database from which you want to import data is local, browse to the file’s location and select it. If your target Access database resides on a network drive at another location, you need the proper authorization to select it.
Navigate to your sample database and click Open.
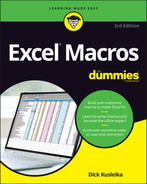
The Select Table dialog box shown in Figure 10-3 opens. This dialog box lists all the available tables and queries in the selected database.
The Select Table dialog box contains a column called Type. You can work with two types of Access objects: views and tables. View indicates that the dataset listed is an Access query, and Table indicates that the dataset is an Access table. In this example, Sales_By_Employee is actually an Access query. This means that you import the results of the query. This is true interaction at work; Access does all the back-end data management and aggregation, and Excel handles the analysis and presentation.
Select your target table or query and click OK.
 In cases when your Access database is password protected, Step 3 starts a series of Data Link Properties dialog boxes asking for credentials (that is, username and password). Most Access databases don’t require logon credentials, but if your database does require a username and password, type them in the Data Link Properties dialog box.
The Import Data dialog box shown in Figure 10-4 opens. Here you define where and how to import the table. You have the option of importing the data into a Table, a PivotTable Report, or a PivotChart. You also have the option of creating only the connection, making the connection available for later use.
Note that if you choose PivotChart or PivotTable Report, the data is saved to a pivot cache without writing the actual data to the worksheet. Thus your PivotTable can function as normal without you having to import potentially hundreds of thousands of data rows twice (once for the pivot cache and once for the spreadsheet).
- Select Table as the output view and define cell A1 as the output location, as shown in Figure 10-4.
- Click OK.
Your reward for all your work is a table (see Figure 10-5) that contains the imported data from your Access database.

FIGURE 10-2: Choose the source database that contains the data you want imported.
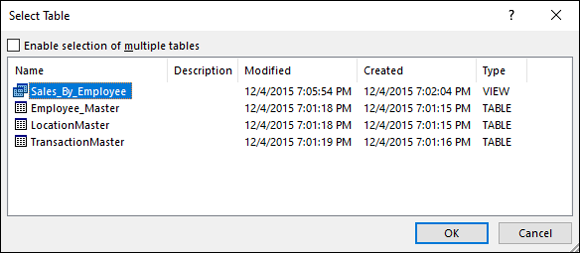
FIGURE 10-3: Select the Access object you want to import.
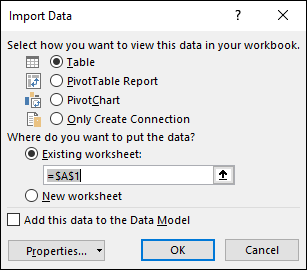
FIGURE 10-4: Choosing how and where to view your Access data.
FIGURE 10-5: Data imported from Access.
The incredibly powerful thing about importing data this way is that it’s refreshable. That’s right. If you import data from Access using this technique, Excel creates a table that you can update by right-clicking it and selecting Refresh, as shown in Figure 10-6. When you update your imported data, Excel reconnects to your Access database and imports the data again. As long as a connection to your database is available, you can refresh with a mere click of the mouse.
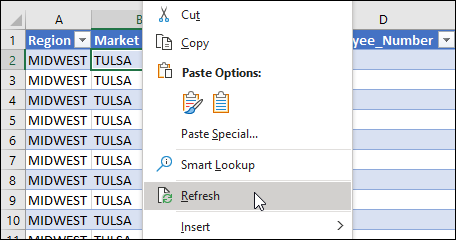
FIGURE 10-6: As long as a connection to your database is available, you can update your table with the latest data.
Again, a major advantage to using the Get & Transform Data group is that you can establish a refreshable data connection between Excel and Access. In most cases, you can set up the connection one time and then just update the data connection when needed. You can even record an Excel macro to update the data on some trigger or event, which is ideal for automating the transfer of data from Access.
Manually editing data connections
Once you have a connection, you can use the connection properties to point to another database table or query. You can even write your own SQL statements. SQL (Structured Query Language) is the language that relational database systems (such as Microsoft Access) use to perform various tasks. You can pass instructions right from Excel by using SQL statements. This can give you more control over the data you pull into your Excel model.
Although a detailed discussion of SQL is beyond the scope of this book, you can edit your external data connection using a simple SQL statement to pull in a different set of data.
- Right-click anywhere in the table and choose Table ⇒ Edit Query to show the Edit OLE DB Query dialog box as shown in Figure 10-7.
- Change the Command Type property to SQL and then enter your SQL statement. In this case, you can enter:
SELECT * FROM [Sales_By_Employee]
WHERE ([Market] = 'Tulsa')
This statement tells Excel to pull in all records from the Sales_By_Employee table where the Market equals Tulsa.
Click OK to confirm your changes and close the Edit OLE DB Query dialog box.
Excel immediately triggers a refresh of your external connection, bringing in your new data.
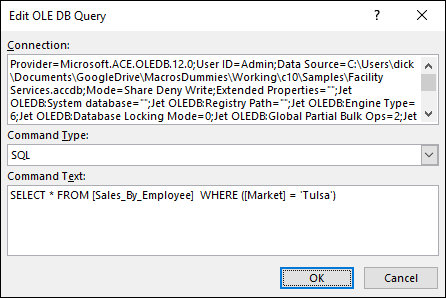
FIGURE 10-7: Select the SQL command type and enter your SQL statement.
Using Macros to Create Dynamic Connections
By now, you should have noticed that you haven’t used any macros yet. So far, you have simply hard-coded the criteria for your connection. For example, in Figure 10-7, Tulsa is specified directly into the SQL statement WHERE clause. This obviously would cause the data being returned to always be data for Tulsa.
But what if you wanted to select a market and have the SQL statement dynamically change to respond to your selection? Well, you can use a bit of VBA to change the SQL statement on the fly. Follow these steps:
Designate a cell in your worksheet that will catch the dynamic selection for your criteria.
For example, in Figure 10-8, cell C2 will be the place that users can select a market. You would typically give users a way to select criteria with either a Combo Box or a Data Validation list.
- Press Alt+F11 to open the VBE and choose Insert ⇒ Module from the menu bar.
- Enter the following code in the newly created module:
Sub RefreshQuery()

  Dim sSql As String
  Dim sh As Worksheet
  Dim lo As ListObject

  Set sh = ActiveWorkbook.Worksheets("Sheet1")
  Set lo = sh.ListObjects("Table_Facility_Servicess.accdb")

  sSql = "SELECT * FROM [Sales_By_Employee]"
  sSql = sSql & " WHERE ([Market] = '"
  sSql = sSql & sh.Range("C2").Value & "')"

  lo.QueryTable.CommandText = sSql

  lo.QueryTable.Refresh

End Sub
A new macro called RefreshQuery is created. This macro uses one variable to hold a reference to the worksheet and another variable to hold a reference to the ListObject on that sheet. It changes the CommandText property of the QueryTable of the ListObject.
A third variable holds the SQL statement that it assigns to the CommandText property. In this example, the command text selects from the [Sales_By_Employee] table and sets the criteria for the [Market] field to the value in cell C2. The code then refreshes the QueryTable.
- Close the VBE and place a new command button on your worksheet. To do this, click the Developer tab, select the Insert drop-down list, and add a Button Form control.
Assign the newly created RefreshQuery macro to the command button.
See Chapter 1 if you need help on assigning the macro to a command button.
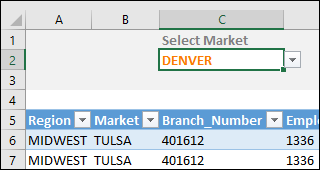
FIGURE 10-8: Designate a cell that will trap the criteria selection.
If all went smoothly, you have a mechanism that allows for the dynamic extraction of data from your external database based on the criteria you specified (see Figure 10-9).
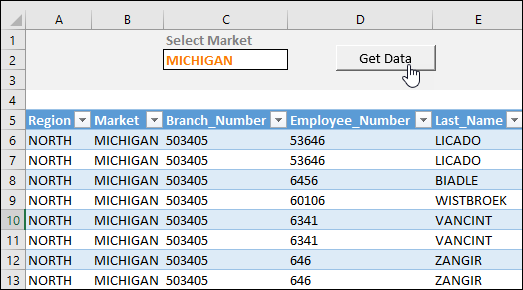
FIGURE 10-9: You now have an easy-to-use mechanism to pull external data for a specified market.
Iterating through All Connections in a Workbook
You can use the Workbook.Connections collection to iterate through all the connection objects in a workbook and examine or modify their properties. For example, say you have a workbook with multiple external data connections. You can use this macro to populate a worksheet with a list of all connection objects in the current workbook, along with their associated connection strings and command texts:
Sub ListConnections()

'Step 1:  Declare your variables.
  Dim i As Long
  Dim Cn As WorkbookConnection

'Step 2:  Add a worksheet with header for
    'Connection Name, Connection String, and Command Text.
  Worksheets.Add
  With ActiveSheet.Range("A1:C1")
    .Value = Array("Cn Name","Connection String","Command Text")
    .EntireColumn.AutoFit
  End With

'Step 3: Iterate through each connection and write the
'needed properties to the newly created worksheet.
  For Each Cn In ThisWorkbook.Connections
   i = i + 1

   Select Case Cn.Type
    Case Is = xlConnectionTypeODBC

    With ActiveSheet
     .Range("A1").Offset(i,0).Value=Cn.Name
     .Range("A1").Offset(i,1).Value=Cn.ODBCConnection.Connection
     .Range("A1").Offset(i,2).Value=Cn.ODBCConnection.CommandText
    End With

    Case Is = xlConnectionTypeOLEDB

    With ActiveSheet
     .Range("A1").Offset(i,0).Value=Cn.Name
     .Range("A1").Offset(i,1).Value=Cn.OLEDBConnection.Connection
     .Range("A1").Offset(i,2).Value=Cn.OLEDBConnection.CommandText
    End With

   End Select

  Next Cn
End Sub
- Declares two variables: a Long integer variable that ensures the data for each connection string is written on its own row, and a Workbook Connection object that exposes the properties you are looking for.
- Adds a new worksheet along with column headers for each connection property you want to document.
Iterates through all the connections in the workbook, outputting the specified properties for each connection.
 This step checks the kind of connection currently in focus. There are two types of connections: xlConnectionTypeODBC and xlConnectionTypeOLEDB. Because the syntax for getting their properties are slightly different, you need to test to check which type you are working with.
Check out Dynamic Data Connection.xlsm for a working version of this macro.
Using ADO and VBA to Pull External Data
Another technique for working with external data is to use VBA with ADO (ActiveX Data Objects). Using the combination of ADO with VBA allows you to work with external data sets in memory. This comes in handy when you need to perform complex, multilayered procedures and checks on external data sets, but you don’t want to create workbook connections or return those external data sets to the workbook.
When working with complex Excel workbooks that pull data from external sources, you will periodically encounter code (written by others) that uses ADO. It’s important you recognize and understand the basics of ADO so you can deal with this kind of code. The next few sections walk you through some of the fundamental concepts of ADO and show you how to construct your own ADO procedures to pull data. Keep in mind that ADO programming is a broad topic that cannot be fully covered here. If you find that you need to work extensively with ADO and external data in your Excel application, you'll probably want to invest in one or more books that cover this topic in detail.
Understanding ADO syntax
When trying to grasp the basics of ADO, it helps to think of ADO as a tool that helps you accomplish two tasks: connect to a data source and specify the dataset to work with. The following section explores the fundamental syntax you need to know to do just that.
The connection string
The first thing you must do is connect to a data source. To do this, you must give VBA a few pieces of information. This information is passed to VBA in the form of a connection string. Here is an example connection string that points to an Access database:
"Provider=Microsoft.ACE.OLEDB.12.0;" & _
"Data Source= C:MyDatabase.accdb;" & _
"User ID=Administrator;" & _
"Password=AdminPassword"
Don’t be intimidated by all the syntax here. A connection string is fundamentally nothing more than a text string that holds a series of variables (also called arguments), which VBA uses to identify and open a connection to a data source. Although connection strings to either Access or Excel can get pretty fancy with a myriad of arguments and options, Ayou only need to focus on a handful of commonly used arguements: Provider, Data Source, Extended Properties, User ID, and Password.
- Provider: The Provider argument tells VBA what type of data source you are working with. When using Access or Excel as the data source, the Provider syntax reads:
Provider=Microsoft.ACE.OLEDB.12.0. - Data Source: The Data Source argument tells VBA where to find the database or workbook that contains the data needed. With the Data Source argument, you pass the full path of the database or workbook. For example:
Data Source=C:MydirectoryMyDatabaseName.accdb. - Extended Properties: The Extended Properties argument is typically used when connecting to an Excel workbook. This argument tells VBA that the data source is something other than a database. When working with an Excel workbook, this argument would read:
Extended Properties=Excel 12.0. - User ID: The User ID argument is optional and only used if a user ID is required to connect to the data source:
User Id=MyUserId. - Password: The Password argument is optional and only used if a password is required to connect to the data source:
Password=MyPassword.
Take a moment now to re-examine the syntax previously shown. You can easily pick out the arguments in the connection string.
"Provider=Microsoft.ACE.OLEDB.12.0;" & _
"Data Source= C:MyDatabase.accdb;" & _
"User ID=Administrator;" & _
"Password=AdminPassword"
Declaring a Recordset
In addition to building a connection to your data source, you need to define the data set you need to work with. In ADO, this dataset is referred to as the Recordset. A Recordset object is essentially a container for the records and fields returned from the data source. The most common way to define a Recordset is to open an existing table or query using the following arguments:
Recordset.Open Source, ConnectString, CursorType, LockType
- The Source argument specifies the data to be extracted. This is typically a table, query, or an SQL statement that retrieves records.
- The ConnectString argument specifies the connection string used to connect to your chosen data source.
- The CursorType argument defines how a Recordset allows you to move through the data to be extracted. In terms of pulling external data into Excel, the setting for this argument is adOpenForwardOnly. This CursorType is the most efficient type because it only allows you to move through the Recordset one way: from beginning to end. This is ideal for reporting processes where data only needs to be retrieved.
- The LockType argument lets you specify whether the data returned by the Recordset can be changed. This argument is typically set to adLockReadOnly (the default setting) to indicate that there is no need to edit the data returned. Alternatively, this argument can be set to adLockOptimistic, which allows for the free editing of the data returned (in the Recordset, not the source database).
The following shows the syntax for declaring a Recordset and opening the Products table:
MyRecordset.Open "Products", _
MyConnection, adOpenForwardOnly, adLockReadOnly
Using ADO in a macro
With these basic ADO fundamentals under your belt, you’re ready to create your own ADO procedure. But before you do anything with ADO, you need to first set a reference to the ADO object library. Just as Excel has its own set of VBA objects, properties, and methods, so does ADO. Because Excel does not inherently know the ADO object model, you need to point Excel to the ADO reference library.
- Open a new Excel workbook and open the VBE.
Once you are in the VBE, choose Application ⇒ Tools ⇒ References.
The References dialog box, shown in Figure 10-10, opens.
Scroll down until you locate the latest version of the Microsoft ActiveX Data Objects Library.
It’s normal to have several versions of the same library displayed in the References dialog box, and generally best to select the latest version available.
- Click OK to confirm your selection.
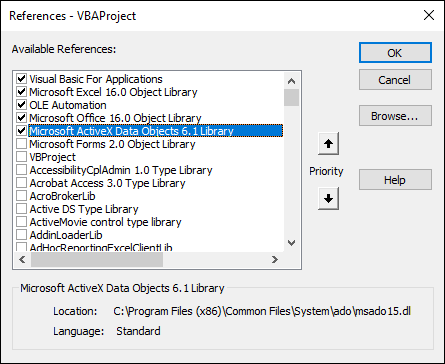
FIGURE 10-10: Select the latest version of the Microsoft ActiveX Data Objects Library.
You can open the References dialog box again to ensure that your reference is set. You knows that your selection took effect when the Microsoft ActiveX Data Objects Library appears near the top of the References dialog box with a check next to it.
The references you set in any given workbook or database are not applied at the application level. This means that you need to repeat these steps with each new workbook or database you create.
Now you can bring together everything in a macro. The following example uses ADO to connect to an Access database and retrieve the Products table:
Sub GetAccessData()

'Step 1: Declare your variables.
  Dim Cn As String
  Dim Rs As ADODB.Recordset

'Step 2: Define your connection string and open recordset.
  Cn = "Provider=Microsoft.ACE.OLEDB.12.0;" & _
    "Data Source=C:MyDirMyDatabaseName.accdb"

  Set Rs = New ADODB.Recordset

  Rs.Open "LocationMaster", _
  Cn, adOpenStatic, adLockReadOnly

'Step 3: Copy data from recordset to spreadsheet.
  Sheets("Sheet3").Range("A2").CopyFromRecordset Rs

'Step 4: Add data labels.
  With Sheets("Sheet3").Range("A1:C1")
    .Value = Array("Product", "Description", "Segment")
    .EntireColumn.AutoFit
  End With

End Sub
- Declares two variables: a string variable to hold the connection string, and a Recordset object to hold the results of the data pull. In this example, the variable called Cn holds the connection string identifying the data source. Meanwhile, the variable called Rs holds the data returned by the procedure.
- Defines the connection string for the ADO procedure. In this scenario, you are connecting to the MyDatabaseName.accdb file found in the C:MyDir directory. Once you have defined your data source, you can open your Recordset and use MyConnect to return static read-only data.
- Uses Excel’s CopyFromRecordset method to get the data out of the RecordSet and into your spreadsheet. This method requires two pieces of information: the location of the data output and the Recordset object that holds the data. In this example, you are copying the data in the Rs object onto the sheet called Sheet3 (starting at cell A2).
- Forces one final action where column headers are added by defining them in an array and writing them to the active sheet. (Otherwise, the CopyFromRecordset method doesn’t return column headers or field names.)
With ADO and VBA, you can build all the necessary components one time in a nicely packaged macro, and then simply forget about it. As long as the defined variables in your code (that is, the data source path, the Recordset, the output path) do not change, then your ADO-based procedures require virtually zero maintenance.
See Dynamic Data Connection.xlsm for a working version of this macro.
Working with Text Files
VBA contains a number of statements that allow for manipulation of files. These input/output (I/O) statements give you much more control over files than Excel's normal text file import and export options.
Opening a text file
The VBA Open statement opens a file for reading or writing. Before you can read from or write to a file, you must open it. When you use the Open statement, you can't see the file open like when you open it in Notepad. Instead, VBA loads the file into memory so it can access it.
The VBA Open statement is not the same as the Open method of the Workbook object. VBA’s Open statement has its own set of arguments (shown as follows in bold). Here is the required syntax for the Open statement:
Open [pathname] For [mode] As [#]filenumber
- pathname: The pathname part of the Open statement simply contains the name and path (the path is optional) of the file to be opened.
- mode: The mode part of the Open statement specifies if and how the file can be edited or written to. This argument is a required field that can be any one of the following:
- Append: This mode allows the file to be read and the data to be appended to the end of the file.
- Input: This mode allows the file to be read but not written to.
- Output: This mode always creates a new file that can be read from and written to.
- Binary: A random-access mode that allows data to be read or written to on a byte-by-byte basis.
- Random: A random-access mode that allows data to be read or written in units determined by an optional reclength argument of the Open statement.
- filenumber: This required argument is a file number ranging from 1 to 511. You can use the FreeFile function to get the next available file number.
The following example uses the Open statement to open a text file called MyFile as a read-only file designated as file #1:
Open "myfile.txt" For Input As #1
Reading the opened text file
After a text file has been opened, you typically want to either read the file or write to the file.
You can tell VBA to read a text file in three different ways. These statements are used for reading data from a sequential text file:
- Input: Reads a specified number of characters from a file.
- Input #: Reads data as a series of variables, with variables separated by a comma.
- Line Input #: Reads a complete line of data (delineated by a carriage return character, a linefeed character, or both).
Two statements are used for writing data to your opened text file:
- Write #: Writes a series of values, with each value separated by a comma and enclosed in quotes.
- Print #: Writes a series of values, with each value separated by a tab character.
A practical example: Logging workbook usage in a text file
If you’re completely confused, don’t worry. Things should clear up with a practical example. Say you want to log each time Excel is opened. You can create a macro that writes data to a text file every time Excel is opened and closed.
For this example to work reliably, the macro must be located in a workbook that’s opened every time you start Excel. Storing the macro in your Personal Macro Workbook is an excellent choice.
The Personal Macro Workbook is loaded whenever you start Excel. In the VBE Project Explorer, it is named personal.xlsb.
- Press Alt+F11 to open the VBE.
- In Project Explorer, find the personal.xlb project/workbook name and click the plus sign next to it and then click the plus sign next to the Microsoft Excel Objects folder to see all the objects.
- Double-click ThisWorkbook.
- Select the Open event in the Event drop-down list.
- Type or paste the following code:
Private Sub Workbook_Open()

  Open Application.DefaultFilePath & _
    "excelusage.txt" For Append As #1

  Print #1, "Excel Started " & Now

  Close #1

End Sub
See Excel Usage Log.xlsm for a working version of this macro.
This macro first opens a text file called excelusage.txt in your Windows Documents directory (Application.DefaultFilePath). If the text file does not exist, Excel creates it. After the text file is open, this macro appends a new line containing the current date and time and closes the file. The inserted line might look something like this:
Excel Started 4/5/2022 2:37:13 PM
A practical example: Importing a text file to a range
The example in this section opens and reads the TextFile.CSV. It then stores the values from the text file beginning at the active cell in the active worksheet. The code reads each character and essentially parses the line of data, ignoring quote characters and looking for commas to delineate the columns.
Sub ImportRange()

  Dim ImpRng As Range
  Dim Filename As String
  Dim r As Long, c As Long
  Dim txt As String, Char As String * 1
  Dim Data As String
  Dim i As Long
  Set ImpRng = ActiveCell
  On Error Resume Next
  Filename = Application.ThisWorkbook.Path & "	extfile.csv"

  Open Filename For Input As #1
  If Err <> 0 Then
    MsgBox "Not found: " & Filename, vbCritical, "ERROR"
    Exit Sub
  End If
  r = 0
  c = 0
  txt = ""

  Application.ScreenUpdating = False

  Do Until EOF(1)
    Line Input #1, Data
    For i = 1 To Len(Data)
      Char = Mid(Data, i, 1)
      If Char = "," Then 'comma
        ActiveCell.Offset(r, c) = txt
        c = c + 1
        txt = ""
      ElseIf i = Len(Data) Then 'end of line
        If Char <> Chr(34) Then txt = txt & Char
          ActiveCell.Offset(r, c) = txt
          txt = ""
      ElseIf Char <> Chr(34) Then
        txt = txt & Char
      End If
    Next i
    c = 0
    r = r + 1
  Loop

  Close #1
  Application.ScreenUpdating = True

End Sub
The preceding macro works with most data, but it has a flaw: It doesn't handle data that contains a comma or a quote character. But commas resulting from formatting are handled correctly (they’re ignored). In addition, an imported date is surrounded by number signs: for example, #2022-12-12#.