
Chapter 5. Test coverage and development
I don’t think anybody tests enough of anything.
James Gosling
This chapter covers
- Measuring test coverage
- Writing testable code
- Practicing test-driven development
In the previous chapters, we introduced testing software and started exploring testing with JUnit. We also presented various test methodologies.
Now that we’re writing test cases, it’s time to measure how good these tests are by using a test coverage tool to report what code is exercised by the tests and what code is not. We also discuss how to write code that’s easy to test. We finish by looking at test-driven development (TDD).
5.1. Measuring test coverage
Writing unit tests gives you the confidence to change and refactor an application. As you make changes, you run tests, which gives you immediate feedback on new features under test and whether your changes break existing tests. The issue is that these changes may still break existing untested functionality.
In order to resolve this issue, we need to know precisely what code runs when you or the build invokes tests. Ideally, our tests should cover 100 percent of our application code. Let’s look in more detail at what benefits test coverage provides.
5.1.1. Introduction to test coverage
Using black box testing, we can create tests that cover the public API of an application. Because we’re using documentation as our guide and not knowledge of the implementation, we don’t create tests, for example, that use special parameter values to exercise special conditions in the code.
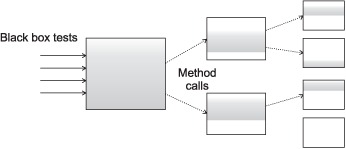
One metric of test coverage would be to track which methods the tests call. This doesn’t tell you whether the tests are complete, but it does tell you if you have a test for a method. Figure 5.1 shows the partial test coverage typically achieved using only black box testing.
Figure 5.1. Partial test coverage with black box tests
You can write a unit test with intimate knowledge of a method’s implementation. If a method contains a conditional branch, you can write two unit tests, one for each branch. Because you need to see into the method to create such a test, this falls under white box testing. Figure 5.2 shows 100 percent test coverage using white box testing.
Figure 5.2. Complete test coverage using white box tests
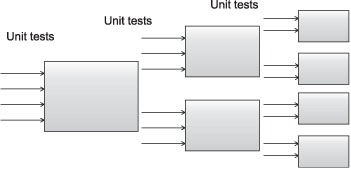
You can achieve higher test coverage using white box unit tests because you have access to more methods and because you can control both the inputs to each method and the behavior of secondary objects (using stubs or mock objects, as you’ll see in later chapters). Because you can write white box unit tests against protected, package-private, and public methods, you get more code coverage.
5.1.2. Introduction to Cobertura
Cobertura is a code coverage tool that integrates with JUnit. Cobertura provides the following features:
- Is free and open source
- Integrates with Ant and Maven; also callable from a command line
- Generates reports in HTML or XML
- Sorts the HTML results by various criteria
- Computes the percentage of code lines and code branches covered for each class, package, and the entire project
In order to measure test coverage, Cobertura creates instrumented copies of class files you specify. This process, called byte-code instrumentation, adds byte codes to existing compiled code to enable logging of what executed byte codes. Instead of, or in addition to, running the normally compiled unit tests, you run the compiled and instrumented tests. Let’s now get started with Cobertura.
Download Cobertura from http://cobertura.sourceforge.net/ and extract the archive. Define a COBERTURA_HOME environment variable and add it to the execution PATH environment variable. The COBERTURA_HOME folder contains several command-line scripts we use in this section. Although our examples drive Cobertura from the command line, note that the program also provides Ant tasks.
We start by compiling our test cases with the following command:
>javac -cp junit-4.6.jar -d uninstrumented src*.java
We instrument our classes with the following command:
>cobertura-instrument --destination instrumented
    uninstrumentedCalculator.class
The --destination parameter specifies where to place the instrumented classes. The application argument specifies the path to the precompiled classes, in our case, uninstrumentedCalculator.class.
Next, we run the unit tests against the instrumented code. Cobertura integrates with JUnit and Ant, but it’s also tool agnostic and can work with any other testing framework. To run your tests, you need to place two resources on your CLASSPATH:
- Cobertura.jar
- The directory containing the instrumented classes before the directory containing the uninstrumented classes. You can run
the tests from the command line or Ant, with identical results. For example, the following runs tests from the command line:
>java -cp junit-4.6.jar;$COBERTURA_HOME cobertura.jar;instrumented;uninstrumented;
-Dnet.sourceforge.cobertura.datafile=
cobertura.ser org.junit.runner.JUnitCore TestCalculator
The net.sourceforge.cobertura.datafile property points to a file where Cobertura will store the code coverage results. If you don’t specify this property, Cobertura will create a file called cobertura.ser in the current directory.
5.1.3. Generating test coverage reports
After you run these scripts, you’ll get your instrumented classes in the instrumented folder and a code coverage file for a given test run. To produce an HTML report, use the cobertura-report script.
>cobertura-report --format html --datafile cobertura.ser
    --destination reports src
The destination parameter specifies the output directory for the report. The reports folder contains the HTML report shown in figure 5.3.
Figure 5.3. A Cobertura code-coverage report
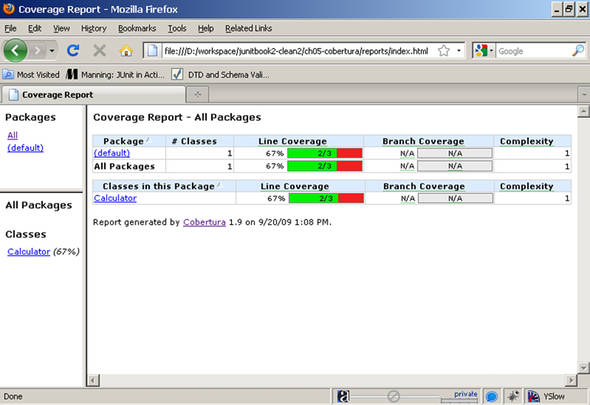
Cobertura shows code coverage not only by package but also by class. You can select any of the classes in the report to see the extent to which that particular class was tested. Figure 5.4 shows the report for one class.
Figure 5.4. Class code coverage with Cobertura
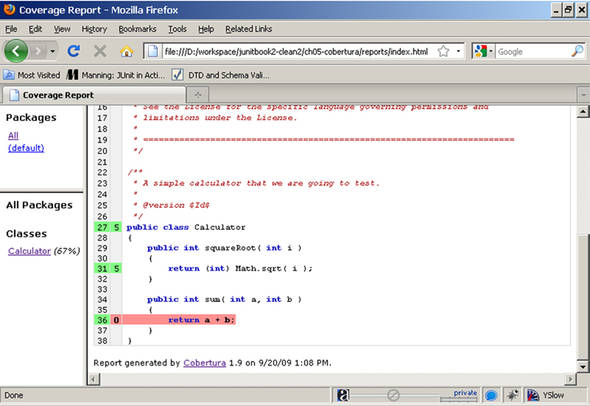
The report shows good test coverage of the squareRoot method in the Calculator class. The numbers next to the line number show that the tests called the method 10 times, covering all lines in the method (there’s only one line in this case.) On the other hand, we have zero executions of the sum method. Overall, we have 67 percent code coverage of the Calculator class, indicating that developers need to create more tests.
Depending on how you compose your application, it might not be possible to reach all code in the test environment. You may consider refactoring your code to allow for better coverage in combination with the use of mock objects or stubs.[1] Whether you choose this approach to reach 100 percent code coverage is a policy decision your team can review through the development cycle.
1 You’ll learn about stubs in the next chapter and about mocks in chapter 7.
5.1.4. Combining black box and white box testing
If we can achieve higher test coverage with white box unit tests, and we can generate reports to prove it, do we need to bother with black box tests?
If you think about the differences between figure 5.1 and figure 5.2, there’s more going on than how many methods the tests execute. The black box tests in figure 5.1 are verifying interactions between objects. The white box unit tests in figure 5.2, by definition, don’t test object interactions. If a white box test does interact with another object, that object is usually a stub or a mock object designed to produce specific test behavior (see chapters 6 and 7).
If you want to thoroughly test your application, including how runtime objects interact with each other, you need to use black box integration tests as well as white box tests.
We’ve completed our overview of code coverage and Cobertura to see precisely which parts of an application unit tests exercise. Let’s now move on to how different implementation techniques affect how to write tests for an application.
5.2. Writing testable code
This chapter is dedicated to best practices in software testing. We introduced JUnit (in chapters 1, 2, and 3) and discussed different types of tests (in chapter 4). We’re now ready to get to the next level: writing code that’s easy to test. Sometimes writing a single test case is easy, and sometimes it isn’t. It all depends on the level of complexity of the application. A best practice avoids complexity as much as possible; code should be readable and testable. In this section, we discuss some best practices to improve your architecture and code. Remember that it’s always easier to write easily testable code than it is to refactor existing code to make it easily testable.
5.2.1. Public APIs are contracts
One of the principles in providing backward-compatible software states says that you “never change the signature of a public method.” An application code review will show that most calls are made to public APIs. If you change the signature of a public method, then you need to change every call site in the application and unit tests. Even with refactoring wizards in tools like Eclipse, you must always perform this task with care.
In the open source world, and for any API made public by a commercial product, life can get even more complicated—many people use your code, and you should be careful of the changes you make to stay backward compatible.
Public methods become the articulation points of an application among components, open source projects, and commercial products that usually don’t even know of one another’s existence.
Imagine a public method that takes a distance as a double parameter and a black box test to verify a computation. At some point, the meaning of the parameter changes from miles to kilometers. Your code still compiles, but the runtime breaks. Without a unit test to fail and tell you what’s wrong, you may spend a lot of time debugging and talking to angry customers. This example illustrates that you must test all public methods. For nonpublic methods, you need to go to a deeper level and use white box tests.
5.2.2. Reduce dependencies
Remember that unit tests verify your code in isolation. Your unit tests should instantiate the class you want to test, use it, and assert its correctness. Your test cases should be simple. What happens when your class instantiates, directly or indirectly, a new set of objects? Your class now depends on these classes. In order to write testable code, you should reduce dependencies as much as possible. If your classes depend on many other classes that need to be instantiated and set up with some state, then your tests will be complicated—you may need to use some complicated mock-objects solution (see chapter 6 for mock objects).
A solution to reducing dependencies is to separate your code between methods that instantiate new objects (factories) and methods that provide your application logic. Consider listing 5.1.
Listing 5.1. Reduce dependencies
class Vehicle {

   Driver d = new Driver();
boolean hasDriver = true;

private void setHasDriver(boolean hasDriver) {
      this.hasDriver = hasDriver;
   }
}
Every time we instantiate the Vehicle object, we also instantiate the Driver object. We’ve mixed the concepts. The solution would be to have the Driver interface passed to the Vehicle class, as in listing 5.2.
Listing 5.2. Pass the Driver to the Vehicle
class Vehicle {

   Driver d;
boolean hasDriver = true;

   Vehicle(Driver d) {
this.d = d;
   }

private void setHasDriver(boolean hasDriver) {
      this.hasDriver = hasDriver;
   }
}
This allows us to produce a mock Driver object (see chapter 6) and pass it to the Vehicle class on instantiation. Furthermore, we can mock any other type of Driver implementation—JuniorDriver, SeniorDriver, and so on—and pass it to the Vehicle class.
5.2.3. Create simple constructors
By striving for better test coverage, we add more and more test cases. In each of these test cases, we do the following:
- Instantiate the class to test
- Set the class into a particular state
- Assert the final state of the class
By doing work in the constructor (other than populating instance variables), we mix the first and second points in our list. It’s a bad practice not only from architectural point of view (we’ll do the same work every time we instantiate our class) but also because we always get our class in a predefined state. This code is hard to maintain and test.
5.2.4. Follow the Principle of Least Knowledge
The Law of Demeter, or Principle of Least Knowledge, is a design guideline that states that one class should know only as much as it needs to know. For example, consider listing 5.3:
Listing 5.3. Law of Demeter violation
class Car {
private Driver driver;

   Car(Context context) {
this.driver = context.getDriver();
   }
}
In this example, we pass to the Car constructor a Context object. This is a violation of the Law of Demeter, because the Car class needs to know that the Context object has a getDriver method. If we want to test this constructor, we need to get hold of a valid Context object before calling the constructor. If the Context object has a lot of variables and methods, we could be forced to use mock objects (see chapter 7) to simulate the context.
The proper solution is to apply the Principle of Least Knowledge and pass references to methods and constructors only when we need to do so. In our example, we should pass the Driver to the Car constructor, as in the following:
Car(Driver driver) {
this.driver = driver;
}
That illustrates a key concept: Require objects, don’t search for objects, and ask only for objects that your application requires.
5.2.5. Avoid hidden dependencies and global state
Be careful with global state because global state makes it possible for many clients to share the global object. This can have unintended consequences if the global object is not coded for shared access or if clients expect exclusive access to the global object.
For instance, consider the example in listing 5.4.
Listing 5.4. Global state in action
public void reserve() {
DBManager manager = new DBManager();
manager.initDatabase();
    Reservation r = new Reservation();
    r.reserve();
}
The DBManager implies a global state. Without instantiating the database first, you won’t be able to make a reservation. Internally, the Reservation uses the DBManager to access the database. Unless documented, the Reservation class hides its dependency on the database manager from the programmer because the API doesn’t give us a clue. Listing 5.5 provides a better implementation.
Listing 5.5. Avoiding global state
public void reserve() {
    DBManager manager = new DBManager();
    manager.initDatabase();
    Reservation r = new Reservation (manager);
    r.reserve();
}
In this example, the Reservation object is constructed with a given database manager. Strictly speaking, the Reservation object should be able to function only if it has been configured with a database manager.
Avoid global state; when you provide access to a global object, you share not only that object but also any object to which it refers.
As Miško Hevery[2] says in his blog:
You can live in a society where everyone (every class) declares who their friends (collaborators) are. If I know that Joe knows Mary but neither Mary nor Joe knows Tim, then it is safe for me to assume that if I give some information to Joe he may give it to Mary, but under no circumstances will Tim get hold of it. Now, imagine that everyone (every class) declares some of their friends (collaborators), but other friends (collaborators which are singletons) are kept secret. Now you are left wondering how in the world did Tim got hold of the information you gave to Joe.
Here is the interesting part. If you are the person who built the relationships (code) originally, you know the true dependencies, but anyone who comes after you is baffled, since the friends which are declared are not the sole friends of objects, and information flows in some secret paths which are not clear to you. You live in a society full of liars.
5.2.6. Singletons pros and cons
Although we just discouraged you from using global state, the Singleton[3] is a useful design pattern that ensures a class has only one instance. You can extend the concept of singleton to provide several instances of a class. Most often, the implementation defines a private constructor and a static variable. For example, the simplest singleton implementation is
3 You can find more on the Singleton pattern in Design Patterns: Elements of Reusable Object-Oriented Software, by Erich Gamma, Richard Helm, Ralph Johnson, and John M. Vlissides.
public class Singleton {
  public static final Singleton INSTANCE = new Singleton();
  private  Singleton() {}
}
Here, you access the singleton with the static final field INSTANCE. Alternatively, the class can use lazy initialization to create the instance, for example:
public class Singleton {
  private  static Singleton INSTANCE;
  private  Singleton() {}
  public static Singleton getInstance() {
     if(INSTANCE == null) {
        INSTANCE = new Singleton();
     }
     return INSTANCE;
  }
}
The Singleton design pattern needs to make sure the object is instantiated only once. To ensure this, we hide the constructor by making it private. As with a private method, you can’t call and test a private constructor explicitly. You have a choice: you can rely on code coverage to check that all private methods are tested, or you change access modifiers to open the class to explicit testing of those methods.
The obvious drawback of a singleton is that it introduces global state into your application. The INSTANCE field in the first example is a global variable. Use this design pattern with care.
5.2.7. Favor generic methods
Static methods, like factory methods, are useful, but large groups of utility static methods can introduce issues of their own. Recall that unit testing is testing in isolation. In order to achieve isolation you need some articulation points in your code, where you can easily substitute your code with the test code. These points use polymorphism. With polymorphism (the ability of one object to appear as another object) the method you’re calling isn’t determined at compile time. You can easily use polymorphism to substitute application code with the test code to force certain code patterns to be tested.
The opposite situation occurs when you use nothing but static methods. Then you practice procedural programming, and all of your method calls are determined at compile time. You no longer have articulation points that you can substitute.
Sometimes the harm of static methods to your test isn’t big, especially when you choose some method that ends the execution graph, like Math.sqrt(). On the other hand, you can choose a method that lies in the heart of your application logic. In that case, every method that gets executed inside that static method becomes hard to test.
Static code and the inability to use polymorphism in your application affect your application and tests equally. No polymorphism means no code reuse for both your application and your tests. This can lead to code duplication in the application and tests, something we try to avoid.
5.2.8. Favor composition over inheritance
Many people choose inheritance as a code-reuse mechanism. We think composition can be easier to test. At runtime, code can’t change an inheritance hierarchy, but we can compose objects differently. We strive to make our code as flexible as possible at runtime. This way we can be sure that it’s easy to switch from one state of our objects to another, and that makes our code easily testable.
For example, because we consider it bad practice for all servlets to extend AuthenticatedServlet, we always need to instantiate the credentials for a test user in our tests. On the other hand, we could add a Credentials instance variable to those servlets that need it and make our classes easier to test by instantiating the Credentials variable only when we need it.
5.2.9. Favor polymorphism over conditionals
As mentioned previously, we do only the following in our tests:
- Instantiate the class to test
- Set the class into a particular state
- Assert the final state of the class
Difficulties may arise at any of these points. For example, it could be difficult to instantiate our class if it’s too complex.
One of the main ways to decrease complexity is to try to avoid long switch and if statements. Consider listing 5.6.
Listing 5.6. Example of a bad design with conditionals
public class DocumentPrinter {
  [...]
public void printDocument() {
switch (document.getDocumentType()) {
case Documents.WORD_DOCUMENT:
                printWORDDocument();
break;
case Documents.PDF_DOCUMENT:
                printPDFDocument();
break;
case Documents.TEXT_DOCUMENT:
                printTextDocument();
break;
default:
                printBinaryDocument();
break;
        }
     }
   [...]
}
This implementation is awful for several reasons. This code is hard to test and maintain. Every time we want to add a new document type, we add additional case clauses. If that happens often in your code, you’ll have to change it in every place that it occurs.
Every time you see a long conditional statement, think of polymorphism. Polymorphism is a natural object-oriented way to avoid long conditionals, by breaking a class into several smaller classes. Several smaller components are easier to test than one large complex component.
In the given example, we can avoid the conditional by creating different document types like WordDocument, PDFDocument, and XMLDocument, each one implementing a printDocument() method. This will decrease the complexity of our code and will make it easier to read.
5.3. Test-driven development
In chapter 3, we designed an application controller and quickly wrote some tests to validate your design. As we wrote the tests, the tests helped improve the initial design. As you write more unit tests, positive reinforcement encourages you to write them earlier. As you design and implement, it becomes natural to wonder about how you’ll test a class. Following this methodology, more developers are making the leap from test-friendly designs to test-driven development.
Definition
Test-driven development (TDD) is a programming practice that instructs developers to write new code only if an automated test has failed and to eliminate duplication. The goal of TDD is “clean code that works.”
Let’s move on and see how we can adapt our development lifecycle to enforce the test-driven development approach.
5.3.1. Adapting the development cycle
When you develop code, you design an application programming interface (API) and then implement the behavior promised by the interface. When you unit test code, you verify the promised behavior through a method’s API. The test is a client of the method’s API, just as your domain code is a client of the method’s API.
The conventional development cycle goes something like this: code, test, (repeat), commit. Developers practicing TDD make a seemingly slight but surprisingly effective adjustment: test, code, (repeat), commit. (More on this later.) The test drives the design and becomes the method’s first client.
Listing 5.7 illustrates how unit tests can help design the implementation. The getBalanceOk method shows that the getBalance method of Account returns the account balance as a long and that this balance can be set in the Account constructor. At this point, the implementation of Account is purely hypothetical, but writing the unit tests allows you to focus on the design of the code. As soon as you implement the class, you can run the test to prove that the implementation works. If the test fails, then you can continue working on the implementation until it passes the test. When the test passes, you know that your code fulfills the contract.
Listing 5.7. Unit tests as a design guide
import org.junit.Test;
import static org.junit.Assert.assertEquals;

public class TestAccount {
   @Test
public void getBalanceOk () {
long balance = 1000;
     Account account = new Account(balance);
long result = account.getBalance();

     assertEquals(balance, result);
   }
}
When you use the test as the method’s first client, it becomes easier to focus purely on the API. Writing the tests first provides the following:
- Means to design the code
- Documentation as to how the code works
- Unit tests for the code
Someone new to the project can understand the system by studying the functional test suite (high-level UML diagrams also help). To analyze a specific portion of the application in detail, they can drill down into individual unit tests.
5.3.2. The TDD two-step
Earlier, we said that TDD tweaks the development cycle to go something like test, code, (repeat), and ship. The problem with this chant is that it leaves out a key step. It should go more like this: test, code, refactor, (repeat), and ship. The core tenets of TDD are to
- Write a failing automatic test before writing new code
- Eliminate duplication
Eliminating duplication ensures that you write code that’s not only testable but also maintainable. When you eliminate duplication, you tend to increase cohesion and decrease dependency. These are hallmarks of code that’s easier to maintain over time.
Other coding practices have encouraged us to write maintainable code by anticipating change. In contrast, TDD encourages us to write maintainable code by eliminating duplication. Developers following this practice have found that test-backed, well-factored code is, by its very nature, easy and safe to change. TDD gives us the confidence to solve today’s problems today and tomorrow’s problems tomorrow. Carpe diem!
If you take the TDD development pattern to heart, an interesting thing happens: before you can write any code, you must write a test that fails. Why does it fail? Because you have not written the code to make it succeed.
Faced with this situation, most of us begin by writing a simple implementation to let the test pass. Now that the test succeeds, you could stop and move on to the next problem. Being a professional, you’d take a few minutes to refactor the implementation to remove redundancy, clarify intent, and optimize the investment in the new code. But as long as the test succeeds, technically you’ve finished.
The end game? If you always test first, you’ll never write a line of new code without a failing test.
Now that we’ve described the cycle—test, code, refactor, (repeat), and ship—of test-driven development, we show next how testing fits into development overall.
5.4. Testing in the development cycle
Testing occurs at different places and times during the development cycle. We first introduce a development lifecycle and then use it as a base for deciding what types of tests are executed when. Figure 5.5 shows a typical development cycle we’ve used effectively in both small and large teams.
Figure 5.5. A typical application development lifecycle using the continuous integration principle
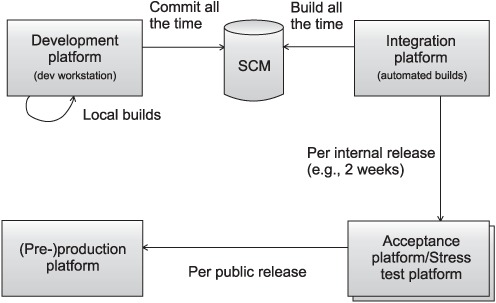
We divide the lifecycle into the following platforms:
- Development platform— This is where coding happens, on developers’ workstations. One important rule is usually to commit (aka check in), up to several times per day, to your Source Control Management (SCM) system (SVN, CVS, ClearCase, and the like). Once you commit, others can begin using your work. But it’s important to commit only something that “works.” To ensure this, you run a local build with Ant or Maven. You can also watch the results of an automated build based on the latest changes to the SCM repository (see chapters 9, 10, and 11.)
- Integration platform— This platform builds the application from its various components (which may have been developed by different teams) and ensures that they all work together. This step is extremely valuable, because problems are often discovered here. It’s so valuable that we want to automate it. It’s then called continuous integration (see http://www.martinfowler.com/articles/continuousIntegration.html) and can be achieved by automatically building the application as part of the build process (more on that in chapter 11 and later).
- Acceptance platform/stress test platform— Depending on the resources available to your project, this can be one or two platforms. The stress test platform exercises the application under load and verifies that it scales correctly (with respect to size and response time). The acceptance platform is where the project’s customers accept (sign off on) the system. It’s highly recommended that the system be deployed on the acceptance platform as often as possible in order to get user feedback.
- (Pre-)production platform— The preproduction platform is the last staging area before production. It’s optional, and small or noncritical projects can do without it.
We now show how testing fits in the development cycle. Figure 5.6 highlights the different types of tests you can perform on each platform.
Figure 5.6. The different types of tests performed on each platform of the development cycle
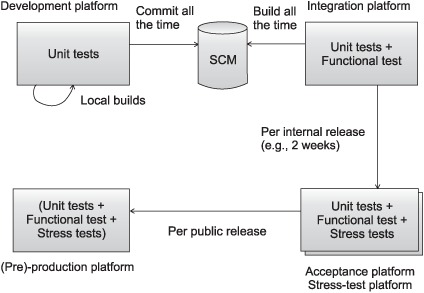
- On the development platform, you execute logic unit tests (tests that can be executed in isolation from the environment). These tests execute quickly, and you usually execute them from your IDE to verify that any change you’ve brought to the code has not broken anything. They’re also executed by your automated build before you commit the code to your SCM. You could also execute integration unit tests, but they often take much longer, because they need some part of the environment to be set up (database, application server, and the like). In practice, you’d execute only a subset of all integration unit tests, including any new integration unit tests you’ve written.
- The integration platform usually runs the build process automatically to package and deploy the application and then executes unit and functional tests. Usually, only a subset of all functional tests is run on the integration platform, because compared to the target production platform, it’s a simple platform that lack elements (for example, it may be missing a connection to an external system being accessed). All types of unit tests are executed on the integration platform (logic unit tests, integration unit tests, and functional unit tests). Time is less important, and the whole build can take several hours with no impact on development.
- On the acceptance platform/stress test platform, you reexecute the same tests executed by the integration platform; in addition, you run stress tests (performance and load tests). The acceptance platform is extremely close to the production platform, and more functional tests can also be executed.
- It’s always a good habit to try to run on the (pre-)production platform the tests you ran on the acceptance platform. Doing so acts as a sanity check to verify that everything is set up correctly.
Human beings are strange creatures, always tending to neglect details. In a perfect world, we’d have all four platforms to run our tests on. In the real world, however, most of the software companies try to skip some of the platforms we listed—or the concept of testing as a whole. As a developer who bought this book, you already made the right decision: more tests, less debugging!
Now, again, it’s up to you. Are you going to strive for perfection, stick to everything that you learned so far, and let your code benefit from that?
Most tests are written for the here and now. You write a new feature, and you write a new test. You see whether the feature plays well with others and whether the users like it. If everyone is happy, you can lock the feature and move on to the next item on your list. Most software is written in a progressive fashion: you add one feature and then another.
Most often, each new feature is built over a path paved by existing features. If an existing method can service a new feature, you reuse the method and save the cost of writing a new one. It’s never quite that easy. Sometimes you need to change an existing method to make it work with a new feature. When this happens, you need to confirm that all the old features still work with the amended method.
A strong benefit of JUnit is that the test cases are easy to automate. When a change is made to a method, you can run the test for that method. If that test passes, then you can run the rest. If any fail, you can change the code (or the tests) until all tests pass again.
Using old tests to guard against new changes is a form of regression testing. Any kind of test can be used as a regression test, but running unit tests after every change is your first, best line of defense.
The best way to ensure that regression testing takes place is to automate your test suites. See part 3 of the book for more about automating JUnit.
5.5. Summary
This chapter was mainly dedicated to some advanced techniques in unit testing: checking your test coverage and improving it, designing your code to be easily testable, and practicing test-driven development (TDD). These advanced techniques come naturally once you’ve completed the introduction to testing (chapters 1 and 2) and have learned about software testing (chapter 3) and software tests (chapter 4).
The next chapter will take you to the next level of testing your code. This next level involves using not only JUnit as a testing framework but also including other frameworks and tools, and it introduces the concept of mocking.