
In this recipe we are going to create a RabbitMQ cluster on Amazon AWS. We will create the cluster inside a VPC (http://aws.amazon.com/vpc/). A VPC is a private network on the cloud, protected from the outside network, so we don't need to configure any firewall.
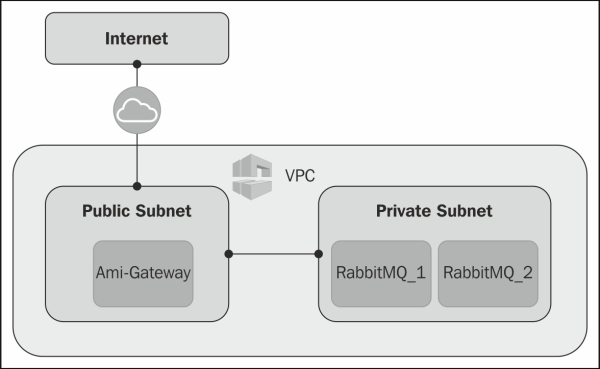
The schema we are going to create contains one VPC with the following two subnets:
- A public subnet accessible from the Internet
- A private subnet that contains two machines configured as a RabbitMQ cluster
- The subnets are shown in the following diagram:
In order to create the schema, AWS provides a ready VPC template that you can use. Perform the following steps:
- Open the AWS console and go to the VPC dashboard.
- Create your VPC, follow the wizard, and select the second option, which is shown in the following screenshot:

- Open the SSH port on the private subnet Security Group to allow the connection from the EC2 NAT instance (that is, the AMI gateway in the previous screenshot):

- Copy your key pair to the EC2 NAT instance using the following command:
scp -i rabbitmqkey.pem rabbitmqkey.pem ec2-user@yourstaticip:/tmp
Store the key locally.
- Launch two RabbitMQ instances from your image repository as we saw in the Creating a master image recipe
- Bind the RabbitMQ instances to the private subnet.
- Now you can configure the RabbitMQ cluster as we saw in the Creating a simple cluster recipe in Chapter 6, Developing Scalable Applications.
To create a RabbitMQ cluster on AWS, you can use two public EC2 instances, but we prefer to use a VPC to protect the instances. The VPC ensures the right security and contains some important features to easily create a cluster:
- Fixed IPs: These IPs are different from the public EC2 instances that take random IPs; the machines inside a VPC always maintain the same internal IP.
- No need to configure the internal firewall: By default, the security group inside the VPC allows the connection between the machines without restrictions that is optimal for the cluster.
- Improved security: It's not possible to access the VPC instances from the Internet directly. You need a VPN or a public gateway to access them.
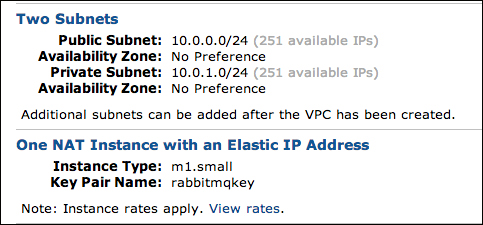
Well, on the last wizard (step 2) you will have two subnets, one EC2 NAT instance and one Elastic IP as shown in the following screenshot:
Tip
The wizard will automatically select the availability zone for the subnets. Visit http://docs.aws.amazon.com/AWSEC2/latest/UserGuide/using-regions-availability-zones.html for more details.
After finishing the wizard, you will be able to connect to the EC2 NAT instance via SSH using the public IP we just created (step 4).
Now you can launch two RabbitMQ instances from your image (step 5), and choose the VPC private network in this wizard step:

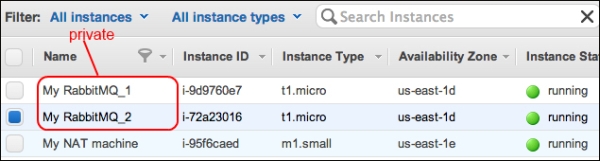
After completing the step 6 you should have a situation as shown in the following screenshot:
In our case the internal machines have the following IPs:
- 10.0.1.132
- 10.0.1.174
You can access the two private EC2 instances only from the EC2 NAT instance machine, using:
[ec2-user@natmachine key]$ sudo ssh -i rabbitmqkey.pem [email protected] (or 10.0.1.174).
Inside the VPC, it's possible to use VPC's private DNS and create the cluster you have to execute by using the following code:
rabbitmqctl join_cluster rabbit@ip-10-0-1-132 Clustering node 'rabbit@ip-10-0-1-174' with 'rabbit@ip-10-0-1-132' ...
...done.
Ok, now your private cluster is ready, and you can use it only from the public subnet.
Tip
As you know the RabbitMQ cluster must have the same .erlang.cookie file. If you use a master EC2 image, you don't need to change anything because the file is stored on the image. If you don't use the image, remember to copy the .erlang.cookie file (as we saw in the Creating a simple cluster recipe in Chapter 6, Developing Scalable Applications).
In order to access the VPC from the outside, it's needed either to have a proxy on the gateway host, or to use a VPN so that you can use it as your private RabbitMQ cluster on the cloud. Alternatively, as we will see in the next recipe, it's possible to access the RabbitMQ cluster from the Internet through a public load balancer.
Read the VPC Whitepaper and Security Whitepaper PDF documents from http://aws.amazon.com/vpc/.