
In this recipe, we will appreciate some steps useful to obtain the maximum performance from RabbitMQ. We will cover the following topics:
- The
vm_memory_high_watermarkconfiguration (http://www.rabbitmq.com/memory.html) - Erlang High Performance Erlang (HiPE) (http://erlang.org/doc/apps/hipe/)
The vm_memory_high_watermark configuration is the maximum percentage of the system memory used to cache messages before they are consumed or cached to the disk.
Before the limit is reached, by default, at fifty percent of vm_memory_high_watermark, (or properly setting the vm_memory_high_watermark_paging_ratio parameter, set to 0.5 by default), RabbitMQ will start to move messages from memory to on-disk paging space.
If neither this paging mechanism, nor the consumers are able to keep pace with the producers, the limit will be reached, and then RabbitMQ will block the producers.
In some cases, it is possible to enlarge these parameters, in order to avoid starting to page messages to the disk too early. In this recipe, we will see how to do it in conjunction with HiPE. There are two different aspects, but the steps needed to accomplish them are very similar.
You can use the code from the book repository in the directory Chapter08/Recipe02.
To try this recipe, you need to start with RabbitMQ and have the management plugin installed. Then, you need Java 1.7 or higher and Apache maven.
In order to obtain the maximum performance from RabbitMQ, you can perform the following steps:
- Configure the watermark using:
rabbitmqctl set_vm_memory_high_watermark 0.6Or directly in the rabbitmq.config file using:
[{rabbit, [{vm_memory_high_watermark, 0.6}]}]. - Change the Linux
ulimitparameter modifying the/etc/default/rabbitmq-serverfile. Then, you can improve RabbitMQ itself by using HiPE. - Install the latest version of Erlang from http://www.erlang.org/download.html.
- Install HiPE in your system.
- Check that HiPE is correctly activated; if not, you need to install Erlang from the sources and activate it.
- Activate Erlang HiPE in the RabbitMQ configuration file. Create the
rabbitmq.configfile with this option or add it if the file already exists:[ {rabbit, [{hipe_compile, true}]} ]. - Restart RabbitMQ.
- Check that in the RabbitMQ log file there is not a warning showing that HiPE has not been activated:
=WARNING REPORT==== 6-Oct-2013::00:38:23 ===Not HiPE compiling: HiPE not found in this Erlang installation.
The watermark is the maximum memory used by RabbitMQ, by default it's 0.4 which means 40 percent of the installed physical memory. When the memory reaches the watermark the broker stops accepting new connections and messages. The watermark value is approximate; in some cases it could be overcome by the default 40 percent. Anyway, when the server has lots of RAM, you can increase the value, for example, to 60 percent, just to tolerate the spikes. With rabbitmqctl the change is temporary; when you modify the rabbitmq.config file, the option is set permanently.
The ulimit parameter by default is 1024. Increase the value to increase the number of files and of sockets available to RabbitMQ.
Tip
A too high value could impact negatively the system. Read about the ulimit parameter at https://wiki.debian.org/Limits.
Using Erlang HiPE is currently considered experimental. If it works, we can use it. In case the system is unstable, you need to disable it.
However, using it you can obtain a consistent 40 percent of CPU usage improvement of the RabbitMQ server, in case this is your bottleneck. For example, in the following screenshot, you can see the behavior of the broker in a standard configuration with a producer and a consumer on localhost:
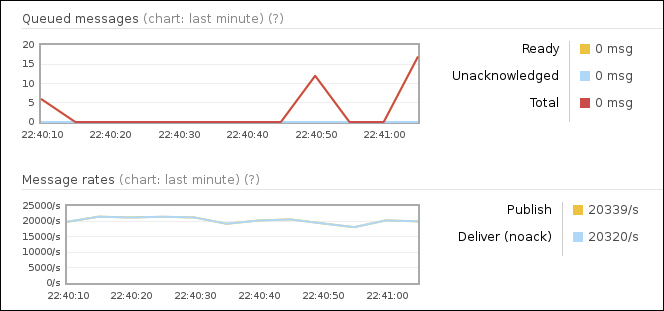
In this example, we have run both the producer and the consumer on the localhost, sending 32 byte messages for 300 seconds, letting the consumer consume all the messages in real time.
After HiPE has been activated, as shown with details in the following screenshot, the same test behaves considerably better:

Before you activate HiPE in the RabbitMQ configuration file, you can check if your local Erlang installation has it by just invoking the erl command as follows:
# erlErlang R15B03 (erts-5.9.3.1) [source] [64-bit] [smp:2:2] [async-threads:0] [hipe] [kernel-poll:false]

EshellV5.9.3.1  (abort with ^G)1>
In case HiPE is present, you will see [hipe] among the options shown at startup.
Otherwise, you need to install it from an external package or from the Erlang source code by downloading it from http://www.erlang.org/download.html and installing it; remember to specify the --enable-hipe option at the configure step.
Once RabbitMQ has been configured too (in step 6), you will notice that the restart of the server will take a long time; typically several minutes.
At this point, the RabbitMQ broker is HiPE-activated. The most demanding parts are not interpreted anymore but compiled at startup into native machine code.
You can further check that in the log file you don't see any message as follows:
=WARNING REPORT==== 6-Oct-2013::00:38:23 ===Not HiPE compiling: HiPE not found in this Erlang installation.
Tip
By default, on Linux RabbitMQ, log files are placed in /var/log/rabbitmq. You can find more information in Chapter 12, Managing RabbitMQ Error Conditions.
Since HiPE is an experimental option, we discourage its usage from the beginning, given that usually the optimization effort needs to address the application side optimization and scalability.
However, by enabling it, you can reduce the CPU usage and power consumption of your servers; so this is an option you can consider when optimizing your architecture.