In this example we are seeing how to send the same message to a possibly large number of consumers.
This is a typical messaging application, broadcasting to a huge number of clients. For example, when updating the scoreboard in a massive multiplayer game, or when publishing news in a social network application.
In this recipe we are discussing both the producer and consumer implementation.
Since it is very typical to have consumers using different technologies and programming languages, we are using Java, Python, and Ruby to show interoperability with AMQP.
We are going to appreciate the benefits of having separated exchanges and queues in AMQP.
You can find the source in Chapter01/Recipe06/.
To use this recipe you will need to set up Java, Python and Ruby environments as described in the Introduction section.
To cook this recipe we are preparing four different codes:
- The Java publisher
- The Java consumer
- The Python consumer
- The Ruby consumer
To prepare a Java publisher:
- Declare a
fanoutexchange:channel.exchangeDeclare(myExchange, "fanout");
- Send one message to the exchange:
channel.basicPublish(myExchange, "", null, jsonmessage.getBytes());
Then to prepare a Java consumer:
- Declare the same
fanoutexchange declared by the producer:channel.exchangeDeclare(myExchange, "fanout");
- Autocreate a new temporary queue:
String queueName = channel.queueDeclare().getQueue();
- Bind the queue to the exchange:
channel.queueBind(queueName, myExchange, "");
- Define a custom, non-blocking consumer, as already seen in the Consuming messages recipe.
- Consume messages invoking
channel.basicConsume()
The source code of the Python consumer is very similar to the Java consumer, so there is no need to repeat the needed steps. Just follow the steps of the Java consumer, looking to the source code in the archive of the recipes at:
Chapter01/Recipe06/Python_6/PyConsumer.py
In the Ruby consumer you need to use require "bunny" and then use the URI connection. Check out the source code at:
Chapter01/Recipe06/Ruby_6/RbConsumer.rb
We are now ready to mix all together, to see the recipe in action:
- Start one instance of the Java producer; messages start getting published immediately.
- Start one or more instances of the Java/Python/Ruby consumer; the consumers receive only the messages sent while they are running.
- Stop one of the consumers while the producer is running, and then restart it; we can see that the consumer has lost the messages sent while it was down.
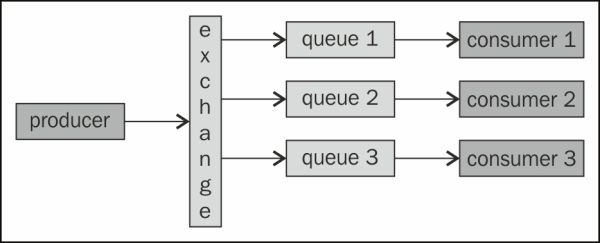
Both the producer and the consumers are connected to RabbitMQ with a single connection, but the logical path of the messages is depicted in the following figure:

In step 1 we have declared the exchange that we are using. The logic is the same as in the queue declaration: if the specified exchange doesn't exist, create it; otherwise, do nothing.
The second argument of exchangeDeclare() is a string, specifying the type of the exchange, fanout in this case.
In step 2 the producer sends one message to the exchange. You can just view it along with the other defined exchanges issuing the following command on the RabbitMQ command shell:
rabbitmqctl list_exchanges
The second argument in the call to channel.basicPublish() is the
routing key, which is always ignored when used with a fanout exchange. The third argument, set to null, is the optional message property (more on this in the Using message properties recipe). The fourth argument is just the message itself.
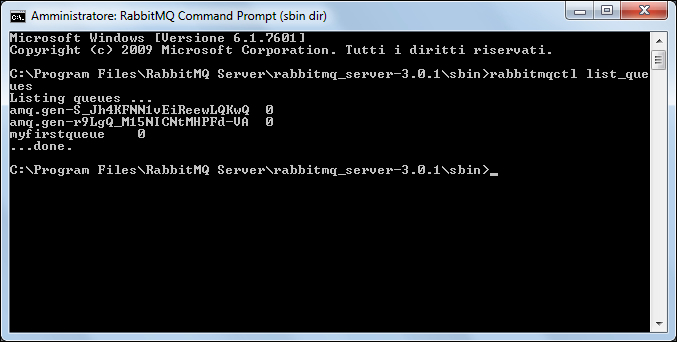
When we started one consumer, it created its own temporary queue (step 9). Using the channel.queueDeclare() empty overload, we are creating a nondurable, exclusive, autodelete queue with an autogenerated name.
Launching a couple of consumers and issuing rabbitmqctl list_queues, we can see two queues, one per consumer, with their odd names, along with the persistent myFirstQueue used in previous recipes as shown in the following screenshot:

In step 5 we have bound the queues to myExchange. It is possible to monitor these bindings too, issuing the following command:
rabbitmqctl list_bindings
The monitoring is a very important aspect of AMQP; messages are routed by exchanges to the bound queues, and buffered in the queues.
The fanout exchange routes messages by just placing a copy of them in each bound queue. So, no bound queues and all the messages are just received by no one consumer (see the Handling unroutable messages recipe for more details).
As soon as we close one consumer, we implicitly destroy its private temporary queue (that's why the queues are autodelete; otherwise, these queues would be left behind unused, and the number of queues on the broker would increase indefinitely), and messages are not buffered to it anymore.
When we restart the consumer, it will create a new, independent queue and as soon as we bind it to myExchange, messages sent by the publisher will be buffered into this queue and pulled by the consumer itself.
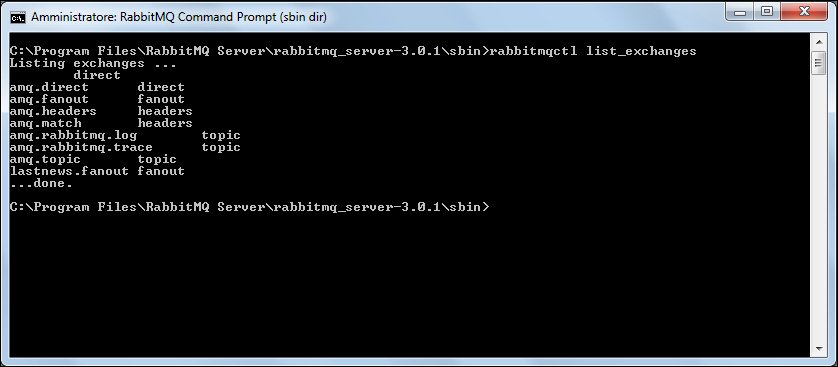
When RabbitMQ is started for the first time, it creates some predefined exchanges. Issuing rabbitmqctl list_exchanges we can observe many existing exchanges, in addition to the one that we have defined in this recipe:

All the amq.* exchanges listed here are already defined by all the AMQP-compliant brokers and can be used instead of defining your own exchanges; they do not need to be declared at all.
We could have used amq.fanout in place of myLastnews.fanout_6, and this is a good choice for very simple applications. However, applications generally declare and use their own exchanges.
With the overload used in the recipe, the exchange is non-autodelete (won't be deleted as soon as the last client detaches it) and non-durable (won't survive server restarts). You can find more available options and overloads at http://www.rabbitmq.com/releases/rabbitmq-java-client/current-javadoc/.
