Chapter 2: Governance and Security
Before digging deep into technical features that help to secure and protect your cloud environments on Azure, we first need to stop, reflect, plan, and act accordingly. Governance is essential and you need guardrails in the cloud. When talking about cloud computing, customers often exhibit a kind of let's get started mentality. That's great, but in the cloud, there also need to be rules. In addition to that, you surely don't want to end up with a cloud construct that does not entirely fit your company's needs, do you?
With this chapter, we want to help you design the foundation for a secure cloud strategy and act according to your plan by leading you through the following topics:
- Understanding governance in Azure
- Using common sense to avoid mistakes
- Using management locks
- Using management groups for governance
- Understanding Azure Policy
- Defining Azure blueprints
- Azure Resource Graph
Understanding governance in Azure
If we take a deeper look at what governance actually means, we find a good definition in the online business dictionary. The first part of this definition is as follows:
To read the entire definition, go to the following link: http://www.businessdictionary.com/definition/governance.html
The most important words in this definition are policies, monitoring, and implementation. If you switch implementation for deployment, you get three aspects that are essential for security. So, you could say that governance is essential for security!
What's true in real life is true within the context of IT, too. I'm talking about rules. Rules only really work if they are enforced by policies. You can tell your administrators what they are not allowed to do. But if they can do what they are not allowed to, they are still able to accidentally break your rules. So, you need to define policies that help you to enforce or to monitor your corporate rules.
Monitoring is the second important part in terms of security. If you don't see what happens, you have no chance to react or make the right decisions. This is why monitoring is so important and there is no way around it. In later chapters, we will cover some monitoring best practices for Azure that will help you to get the right amount of information for your environments.
Finally, there is implementation. You can use the Azure portal to manually deploy Azure resources. However, with that approach, you will definitely need a tight set of policies that enforce your rules so that manual deployments will not break them. If you want to make sure that all environments will strictly adhere to your rules, automatic deployments are your way to go. With a robust governance plan with policies and role-based access controls (RBAC), and by using deployments from a DevOps pipeline, such as Azure DevOps, you can make sure that your deployments and the target environment will be consistent. If you then make sure that changes to your environment can only be done from your DevOps pipeline tool, but never manually from the Azure portal, you are on your way to protecting your environments from inadvertent changes. You can use PowerShell for imperative deployments or Azure Resource Manager (ARM) templates, and Terraform for declarative deployments. Whatever best fits your needs, use it!
Important Note: Different deployment models
If you're using imperative scripting languages such as PowerShell to deploy resources, you need to explicitly describe what should be done in order to get the infrastructure you want. You need to define the steps in the correct order. With declarative languages such as ARM templates or Terraform, you only describe what resources have to be deployed to your target environment, so it's not about the how but about the what. We will cover examples for all of these languages later in this book.
With Azure, and with cloud computing in general, we need new approaches for security and management on the one hand, but, on the other hand, there are traditional, decades-old industry principles that still are valid. There is the principle of least privilege, or POLP. This principle states that programs or users should have the least number of privileges necessary to complete their tasks.
Segregation of duties, or SoD, is another principle that is still valid even in the cloud era. SoD is the concept of having more than one person required to complete a task. For example, you might have a team that is responsible for creating and managing accounts in Azure Active Directory, but another team that is responsible for Office 365 Management, and thus for creating user mailboxes. A third team might take care of Azure resources. In this resource team, there are administrators who manage databases, other people that take care of networks, and then there are your VM specialists managing only compute resources. SoD is also part of multi-step approvals. For example, when one of your administrators requests a role they are eligible for, someone else has to approve that request:
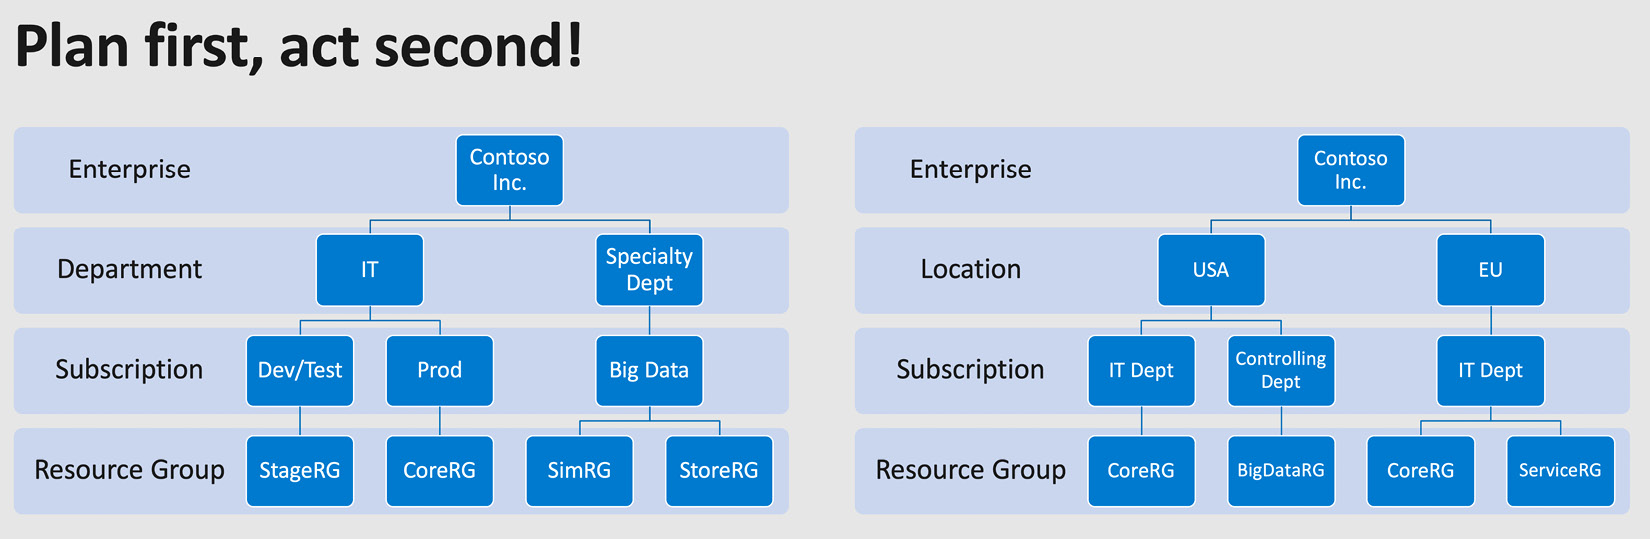
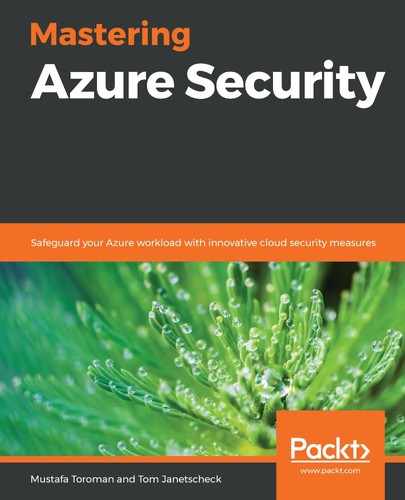
Figure. 2.1 – Plan first, act second – defining a possible Azure hierarchy
When starting your cloud journey with Microsoft Azure, the first thing to do is plan your Azure hierarchy, which describes how Azure subscriptions, tenants, and directories depend on each other in an enterprise environment. The idea is to have only one contract for one enterprise, but to have several Azure subscriptions. Every Azure subscription is tied to exactly one Azure Active Directory tenant (of which you ideally also only have one!). What you may want to do is divide your company into locations, such as Europe and North America. Alternatively, you may want to divide your company based on departments, such as IT and finance departments. You may want to do both – or you could even choose another hierarchy. Whatever fits your needs, go for it and do it before actually starting. There are three high-level hierarchy patterns: functional, in which subscriptions are created based on enterprise departments, such as IT and accounting; business unit, which can be used to differentiate between business units, such as aerospace and automotive; and geographic, in which subscriptions are created based on a company's geolocations. The hierarchy you go for should match your enterprise's management and geographics so that it supports you in granting access and billing according to your company's needs.
Now that you know what governance is and why it is important, let's move on and see what tools we have to make our lives easier in terms of governance and security.
Using common sense to avoid mistakes
I have often been asked how I make sure that an Azure administrator does not accidentally delete productive resources in the cloud. The answer, besides the use of technical features to be discussed in the next section, is that common sense helps a lot! You don't accidentally walk into your on-premises data center and pull one of your servers out of its rack and throw it out of a window, do you? You usually do not run a nuke all script against your Hyper-V farm just to wonder where all your VMs have gone later that day, do you? And you surely do not accidentally erase your productive SAN! On Azure, you cannot accidentally delete a resource group.
Well, you can, if you accidentally confirm the "Are you sure?" dialog and then accidentally enter the resource group's name into the prompt. Resources are even more easily removed – either by accident or by intention. So, we need something that helps us to reduce the risk of accidents. Common sense and a good sense of caution are the first steps toward a successful governance approach in the cloud.
However, even when being careful, you can still accidentally delete stuff that you shouldn't. For example, you could accidentally delete single resources, such as a storage account, a key vault, or whatever else. I remember one summer afternoon about 10 years ago when I was running a Linux firewall distribution on a small-sized hardware mainboard, comparable with today's Raspberry Pi's. I used this tiny piece of hardware as my home firewall solution and it was doing a great job. It had three local area network connections for three different networks, there was even a Wi-Fi-module onboard, and the OS was installed on a CF card. Only the RAM was limited and since the CF card was exclusively reserved for the OS installation, all logs were written on a RAM disk. This is why I had to regularly delete log files from the /var/log/* directories. I did not want to enable log rotation, but rather I wanted to export logs to another Linux server that was running in my environment. Well, long story short, what I can tell you is that running the following command while having elevated rights works pretty well – even if you have not changed your working directory to the intended one:
rm -rf *
So, I had one more Saturday afternoon reinstalling and reconfiguring the firewall. Next time, think before you act! Lesson learned.
In the next section, we will explore a technical feature to prevent administrators from accidentally deleting Azure resources.
Using management locks
Of course, there is a technical feature that prevents you from accidentally deleting anything on Azure – a feature called management locks. There are two different types of lock in Azure:
- Delete locks ensure that no one can delete resources from your Azure subscription, by accident or on purpose. Authorized users can still read and modify a resource, but they can no longer delete it.
- ReadOnly locks make sure that only authorized users are able to read a resource, but also that they cannot modify it nor delete it.
In every subscription I create, I usually use a core resource group to which I deploy resources that are used across several other resource groups. For example, if I have a virtual network that is used by several services across an entire subscription, or a key vault in which I store administrative credentials as secrets, then these types of resources are created in one of my core resource groups. As you can imagine, the resources there are very important, and so I always use a Delete lock on the scope of this core resource group.
When talking about scopes in this chapter, we are talking about management hierarchies. Locks, policies, and access rights always apply to a particular scope and they are always applied from the top down:

Figure. 2.2 – Azure scope from the top down: management group, subscription,
resource group, and single resource
If you create a lock at the subscription level, it will apply to all resource groups and to all resources within that particular subscription. If you create it at the resource group level, it will only apply to resources within that particular resource group:
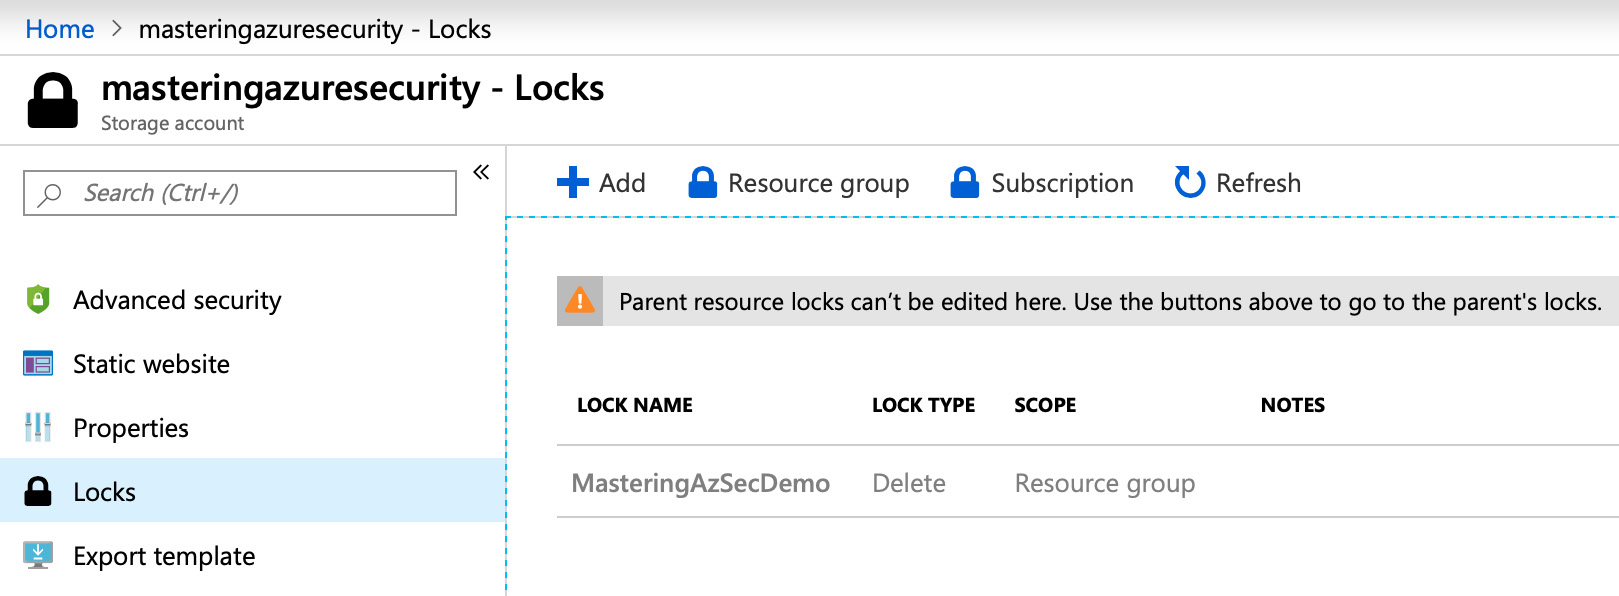
Figure. 2.3 – Azure management locks on a resource group
To demonstrate, I have created a storage account, masteringazuresecurity, in one of my core resources groups. If you selected Locks in the left management pane, you would see that someone has created a Delete lock with the name MasteringAzSecDemo at the resource group level. When you now try to delete the storage account, the following message will appear:
Figure. 2.4 – Warning message when trying to delete a locked resource
Important Note:
You can only create or delete management locks when you have access to the Microsoft.Authorization/* or Microsoft.Authorization/locks/* management actions. There are several built-in roles in Azure, of which only Owner and User Access Administrator are granted those particular management actions.
Now you know how management locks are used in Azure and about the scopes that can be used to create them. In the next section, we will explore using management groups, one of the most important levels of scope, and how you can leverage them to define your cloud governance.
Using management groups for governance
As mentioned previously, it is essential to have a plan and stick to it in terms of governance, guardrails, rules, and policies. Organizations that use many subscriptions need an efficient way to manage access, policies, and compliance rules for all their subscriptions. With Azure management groups, we are given a level of scope above the subscription level:
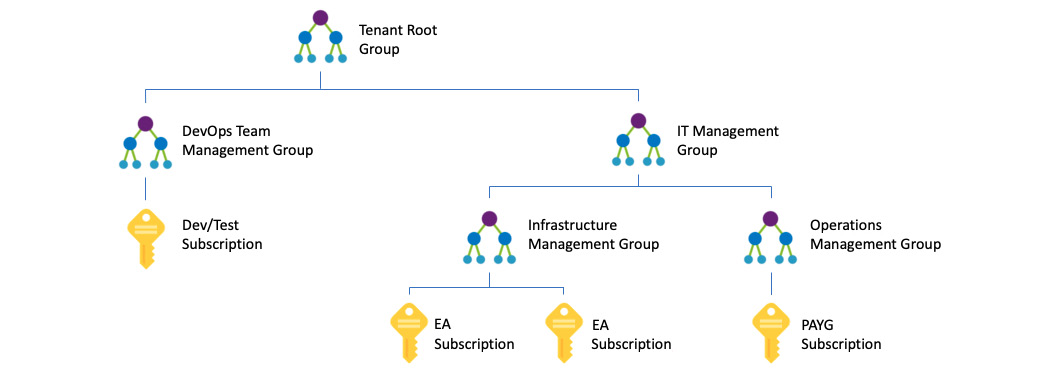
Figure. 2.5 – Example of a management group hierarchy
With management groups, we can configure different management scopes that allow us to granularly manage all governance settings with little effort. The preceding diagram shows a possible management group hierarchy. As you can see, a management group can contain both subscriptions and other management groups. The example shows a hierarchy in which several types of subscriptions have been created and attached to different management groups. You can have pay-as-you-go (PAYG) subscriptions, enterprise agreement (EA) subscriptions, and dev/test subscriptions in a single tenant and attach them to any of your management groups.
Maybe you want to make sure that all the resources you create in Azure for production are only stored in both of the European Azure regions, West Europe and North Europe. In this scenario, you can create a management group that contains all your production subscriptions and then apply a policy to the management group that limits resource creation to only those regions. Another scenario for management groups might be to provide user access to several Azure subscriptions at once instead of managing access for every single subscription individually.
Each Azure AD directory is given a top-level management group called a root management group. All subscriptions and management groups that are created for this Azure tenant belong to this root group. The root management group enables customers to create global policies and role assignments that are valid for all Azure subscriptions within an Azure tenant's scope.
The root group's default display name is Tenant Root Group. Here are some important facts that you should know regarding a tenant root group:
- Only user accounts that have been assigned Owner or Contributor roles on the tenant root group are able to change their display name.
- The root group cannot be deleted or moved to another management group.
- In an Azure hierarchy, all subscriptions and management groups fold up to the one tenant root group in the respective directory. There is only one tenant root group, and all other management groups, subscriptions, and resources are child objects within this tenant root group. That said, all resources within all subscriptions fold up to the tenant root group for global management. New subscriptions are automatically attached to the tenant root group when created.
- No one is given default access to the tenant root group. Only Azure AD global administrators have the right to elevate themselves to gain access and to make changes if necessary.
You might want to give your security administrators read access to all resources that are created within the scope of your Azure AD tenant as they need to see all your subscriptions and management groups. Alternatively, you want to give application access to all your Azure subscriptions; for example, the ability to automatically deploy resources or to gather information about billing. Therefore, you might want to change some settings on your tenant root group so that you only have to manage access rights once. As no one is able to access a tenant root group by default, you first need to elevate access for an Azure AD Global administrator.
When elevating access for an Azure AD Global administrator, the account is assigned the User Access Management role in Azure at the root scope (/). This role at the root scope allows the account to view all resources and assign access to any subscription or management group in the whole directory!
To elevate access, carry out the following steps:
- Sign in to the Azure portal or Azure Active Directory Admin Center as a Global administrator.
- Click Azure Active Directory and then Properties in the navigation list:
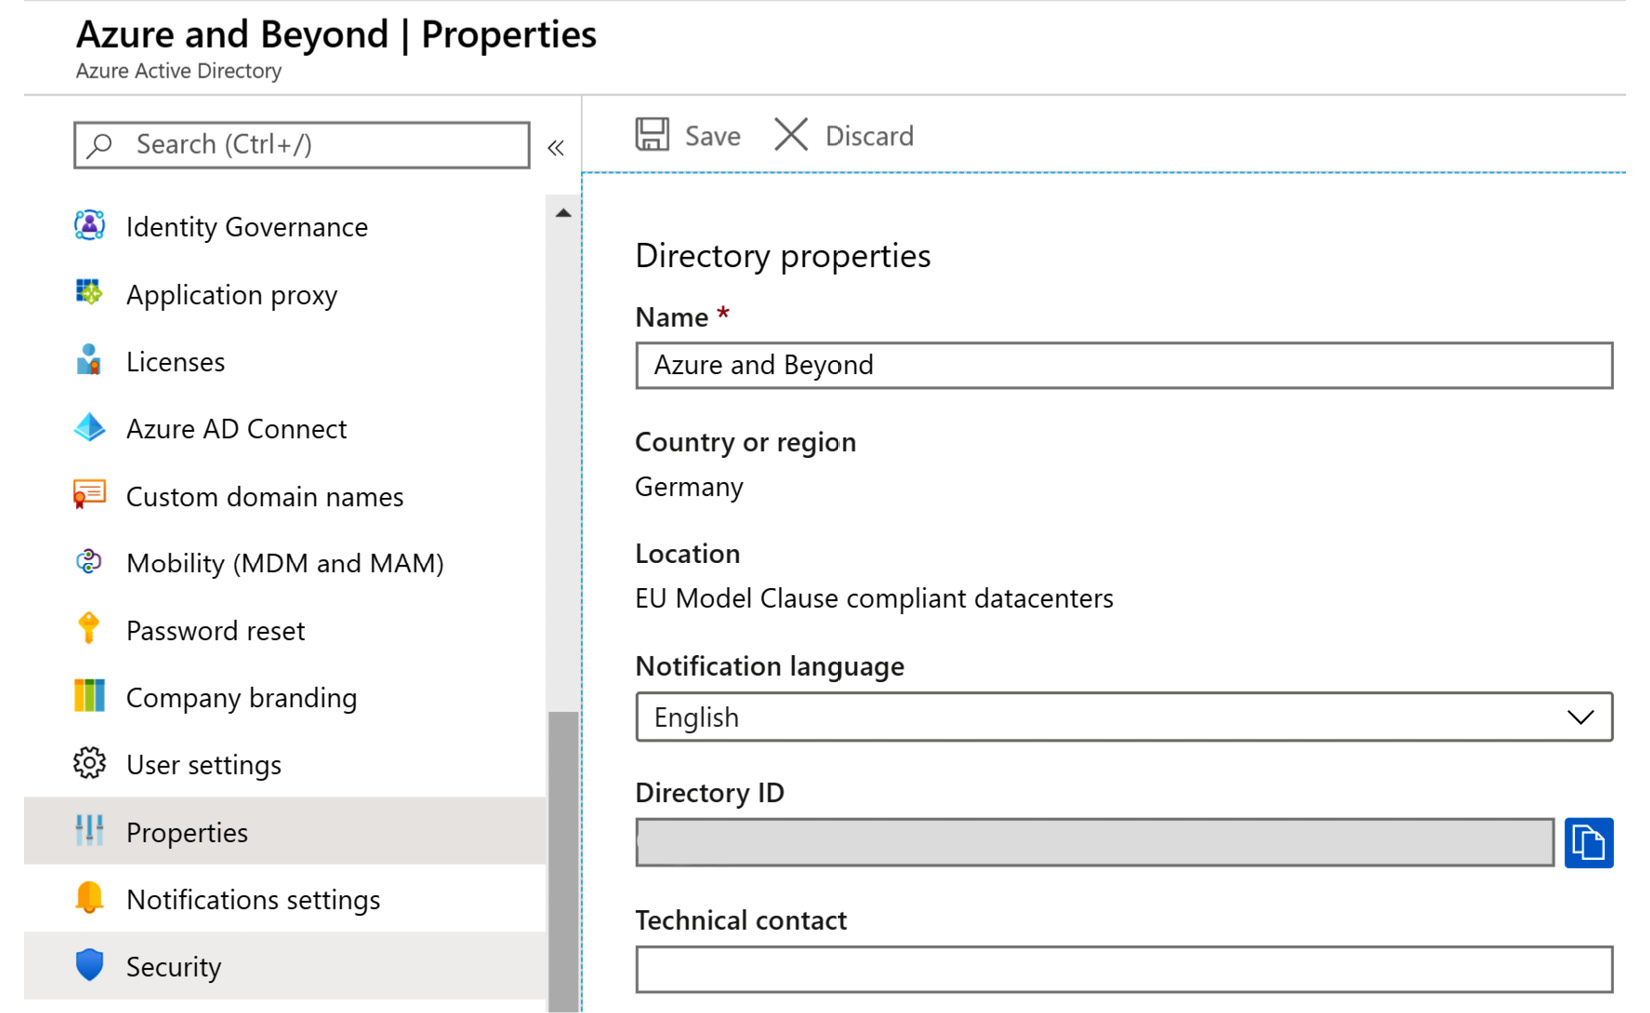
Figure. 2.6 – Azure Active Directory – Properties
- Under Access management for Azure resources, set the toggle switch to Yes:

Figure. 2.7 – Enable access management for all Azure resources
Tip
Access rights should always be as restrictive as possible, and they should only be granted when needed. That said, be sure to remove elevated access once you have made your changes to the tenant root group.
To remove elevated access, either set the toggle switch back to No or use PowerShell to remove the User Access Administrator role assignment from the root scope:
Remove-AzRoleAssignment -SignInName <[email protected]> `
-RoleDefinitionName "User Access Administrator" -Scope "/"
Important Note:
In order to be able to execute this PowerShell command, you need to install the latest version of the Az PowerShell module. As you cannot have both the old AzureRM and new Az PowerShell modules installed in parallel, you first need to uninstall the AzureRM module. For more information, please refer to https://docs.microsoft.com/en-us/powershell/azure.
You just learned how management groups are used for governance. In the next section, we will look at Azure Policy, the service that enforces your rules.
Understanding Azure Policy
Rules are important, but to be sure that they are not broken, you either need to monitor their application or you need to enforce them. With Azure Policy, you get a service that you can use to achieve both. Azure Policy allows you to create, assign, and manage policies. Policies that you define enforce different rules for resources that you create in a policy's scope.
The Azure Policy service evaluates resources for non-compliance with assigned policies and then applies a defined action. For example, you may want to only allow your Azure administrators to create Azure resources in the North Europe and West Europe Azure regions, or you may only want to have a certain VM SKU size in one of your Azure subscriptions. In these cases, you can create a policy. Once this policy is created and activated, new and existing resources are evaluated for policy compliance. New resources are prevented from being created if they are non-compliant and existing resources can be brought into compliance if needed.
There are four different effect types that you can define for your policies:
- Disabled is useful when testing the effect of a new policy definition or when you want to disable only one assignment instead of all assignments of a particular policy definition.
- Append is used to add additional fields to a requested resource during resource creation or a resource update. With an append policy, you can, for example, add tags to a resource such as resourceOwner or costCenter.
- Deny is used to deny a resource request that does not match your compliance standard. The resource request will fail after evaluation. With a deny policy, you can, for example, prevent your administrators from creating resources in Azure regions that you do not allow, or prevent them from deploying VM SKU sizes you have not approved.
- Audit is used to create a warning event in the activity log when evaluating a non-compliant resource. The resource request will not be stopped, but you will be able to be informed about non-compliance.
When using Azure Policy, you might need to create a custom policy definition or use one of the built-in policy definitions that already come with Azure, such as any of these:
- Allowed Locations: This policy definition restricts the available locations for new resources. It is used to enforce your geo-compliance requirements.
- Audit VMs that do not use managed disks: This policy audits VMs that do not use managed disks. A warning event for every VM will be generated in the activity log.
- Allowed Virtual Machine SKUs: This definition specifies a set of VM SKUs that you can deploy.
Policy definitions describe resource compliance and what effect to use when a resource is, or becomes, non-compliant. The schema for policy definitions is documented at https://schema.management.azure.com/schemas/2018-05-01/policyDefinition.json. Policy definitions are created in JSON.
A policy definition contains the following elements:
- Mode
- Parameters
- Display name (as it is found in the Azure portal or in the CLI)
- Description (what this policy is actually doing, when to use it, and so on)
- Policy rule (the rule definition)
- Logical evaluation: What is the condition for resource compliance?
- Effect: What happens if a resource is non-compliant?
Mode
The policy mode determines which resource types are evaluated by the policy. There are two modes supported:
- all: All resource groups and resource types are evaluated.
- indexed: Only resource types that support tags and locations are evaluated.
If you create a policy through the Azure portal, the mode is always set to Apply. If you use PowerShell or the Azure CLI, you can specify the mode parameter manually.
Important Note:
If your custom policy definition does not include a mode value, it defaults to all in PowerShell and to null in the Azure CLI. The null value is the same as using indexed for backward-compatibility reasons.
Parameters
Parameters in a policy definition help to reduce the number of policy definitions. You can think of them as fields in a form, such as name, surname, and street address. The parameters always stay the same; only their values change depending on who fills the form out. By including parameters in your policy definition, you can reuse the policy and just change the values accordingly.
Parameter properties
A parameter has the following properties:
- name: The name of your parameter.
- type: The parameter type can be a string, array, object, boolean, integer, float, or datetime.
- metadata: The parameter's sub-properties used by the Azure portal to display user-friendly information about the parameter.
- description: An explanation of what the parameter is used for.
- display name: A friendly name for the parameter shown in the Azure portal.
- strongType: (Optional) This property is used when assigning the policy through the Azure portal. A current list of supported strongType options is published at https://docs.microsoft.com/en-us/azure/governance/policy/concepts/definition-structure#strongtype.
- assignPermissions: (Optional) If this value is set to true, the Azure portal will create role assignments during policy assignment. This option can be useful if you want to assign permissions outside the policy's assignment scope.
- defaultValue: (Optional) If no value is specified during policy assignment, this value is used. defaultValue is mandatory if you update an existing policy definition that is already assigned.
- allowedValues: (Optional) This property provides an array of values that the parameter will accept during policy assignment.
You may want to restrict Azure resource creation to only a few Azure regions. In a policy that is used to only allow resource creation in European Azure regions, you could define a parameter called allowedLocations. With each policy assignment, this parameter would be used and evaluated. With the strongType value defined, you would get an additional field in the Azure portal when assigning the policy:
"parameters": {
"allowedLocations": {
"type": "array",
"metadata": {
"description": "The list of allowed locations for resources.",
"displayName": "Allowed locations",
"strongType": "location"
},
"defaultValue": [ "westeurope" ],
"allowedValues": [
"northeurope",
"westeurope"
]
}
}
The preceding code shows the parameter definition section in an Azure policy definition. The allowedLocations parameter, in this case, is an array that contains two allowed values, northeurope and westeurope. The default value is set to westeurope, which means that this is the location that is taken by default if you do not set the parameter to another value. Then, in the policy rule, the parameter is referenced as follows:
"policyRule": {
"if": {
"not": {
"field": "location",
"in": "[parameters('allowedLocations')]"
}
},
"then": {
"effect": "deny"
}
}
The whole policy definition for this purpose might look like this:
{
"properties": {
"mode": "all",
"parameters": {
"allowedLocations": {
"type": "array",
"metadata": {
"description": "The list of locations that can be specified when deploying resources",
"strongType": "location",
"displayName": "Allowed locations"
},
"defaultValue": [ "westeurope " ]
"allowedValues": [
"northeurope",
"westeurope"
]
}
},
"displayName": "Allowed locations",
"description": "With this policy you can restrict resource creation to Azure regions your organization allows.",
"policyRule": {
"if": {
"not": {
"field": "location",
"in": "[parameters('allowedLocations')]"
}
},
"then": {
"effect": "deny"
}
}
}
}
Policy assignments
When you create a policy definition, you need to assign it to a specific scope for the policy to take effect. This is what Microsoft calls a policy assignment. The scope for a policy assignment can be anything from a management group over a subscription down to a resource group. Policy assignments are passed on from parent to child resources. So, policies that are assigned to a management group or a subscription are also applied to all downstream resources within that scope. But you can also exclude a subscope from the policy assignment. For example, say you want to prevent your administrators from creating resources outside Europe. However, you have one resource group in which you need to create IoT resources outside Europe. In this case, you could create a policy definition that only allows resource creation in one of the European Azure regions. This policy is assigned to the management group so it will be applied to all subscriptions, resource groups, and resources within that scope. Then, you exclude the one resource group with the exception from the policy assignment so the policy will not be applied to that group.
Initiative definitions
Policies are used to enforce exactly one rule. Initiatives are collections of several rules that belong together. For example, there is a pre-configured initiative definition that comes with Azure Security Center. In this initiative definition, you will find all the audit policies that will reflect in the recommendations section of Azure Security Center, which is covered later in this book. Initiatives are used to simplify policy assignments. With initiatives, you do not need to assign several policies. You assign one initiative and add the corresponding policies to it.
Initiative assignments
Just like with policies, initiatives need to be assigned to a specific scope in order to be applied. The scope for initiative assignments is identical to a policy assignment's scope.
Policy best practices
When it comes to policy, there are some best practices that you should keep in mind:
- Define policies and initiatives at the management group level. By doing so, you can assign them to all child subscriptions and resource groups without needing to redefine them. If you define policies and initiatives at the subscription level, you can only assign them to this single subscription. So, in short, definitions should be created at the management group level, while assignments can be at the management, subscription, or resource group level.
- As always, before blocking your users from working, you should first test your new policies. You can do so by defining audit policies instead of starting with a deny policy. With the audit effect, you can get a feeling for the impact your policy definition will make. A deny policy could break your DevOps deployment chain and, with an audit effect, you will get an idea of what your policy will do later.
- It is a good idea to create initiative definitions, even if you only want to create a single policy definition. If you have an initiative, you can easily add further policies later if you need to do so.
- All policies within an initiative definition are evaluated when the initiative definition is evaluated. If you have a particular policy you do not want to be evaluated within that context, you should remove it from the definition and assign it individually.
In the preceding sections, you have learned about governance in general, scopes, policies, and locks. In the next section, you will learn how to bring it all together by defining Azure blueprints.
Defining Azure blueprints
Now that you know how to define your Azure hierarchy and how to work with locks and policies, you might want to create a template that is valid for all your subscriptions and for those that are yet to be created as well. With the Azure blueprints service, you get exactly what you need for this purpose. A blueprint, in this case, is a repeatable template that you define once and then use during the creation of all your Azure subscriptions in the future. The good thing here is that you can define organizational sets of rules and automatically apply them to all your subscriptions while accelerating the deployment process at the same time. With Azure Blueprints, you can declaratively deploy Azure resources and artifacts to all your subscriptions, such as the following:
- Role assignments
- Policy assignments
- ARM templates
- Resource groups
- Locks
In the section about management locks in this chapter, I explained that I usually have a core resource group in all of my subscriptions and my customers' subscriptions. These resource groups are usually locked so they are protected from accidental deletion. In larger organizations, you might want to give your developers or specialty departments options for creating their own environments without breaking your rules. No matter what it is, as soon as you want to automate complex deployments of standardized Azure environments, Azure Blueprints is your service of choice!
Blueprint definitions
Azure blueprints are defined by so-called artifacts. An artifact can currently be one of the following:
- Resource group: A resource group that is created by a blueprint can be used by other artifacts within the scope of the blueprint. For example, you can create a resource group in a blueprint and then reference an ARM template to this new resource group.
- Policy assignment: You can assign an existing policy to a subscription or resource group that a blueprint is assigned to. For example, you can assign the only-European-Azure-locations policy from one of the preceding chapters in this book.
- Role assignment: You can assign management access to a subscription that this blueprint is assigned to. For example, you can automatically assign contributor rights to new subscriptions for your infrastructure administrators.
- ARM template: With an ARM template, you can declaratively deploy complex Azure environments. ARM templates can be used within the scope of Azure blueprints. For example, you can automatically create a new Log Analytics workspace in a core resource group that is created within the scope of a blueprint.
Important Note:
A blueprint definition can be saved either to a management group or a subscription. If you create a blueprint definition at the management group level, you can use the blueprint for assignment on all child subscriptions within the scope of this particular management group.
Blueprint publishing
Every new blueprint that is created will initially be in draft mode. After finishing all configurations, the blueprint needs to be published. When publishing a blueprint, you need to define a version string and optional change notes. When additional changes are made to this blueprint, the published version will still exist and changes are done in draft mode, again.
When changing a blueprint (and saving the changes), several versions of the same blueprint will exist to make sure that you can still assign old versions and that published versions are not touched when applying changes to the blueprint.
You can start by creating a new blank blueprint or selecting one of the blueprint examples from the Azure portal. For example, there are blueprint definitions that assign policies that are necessary to address specific NIST SP 800-53 R4 or ISO 27001 controls:
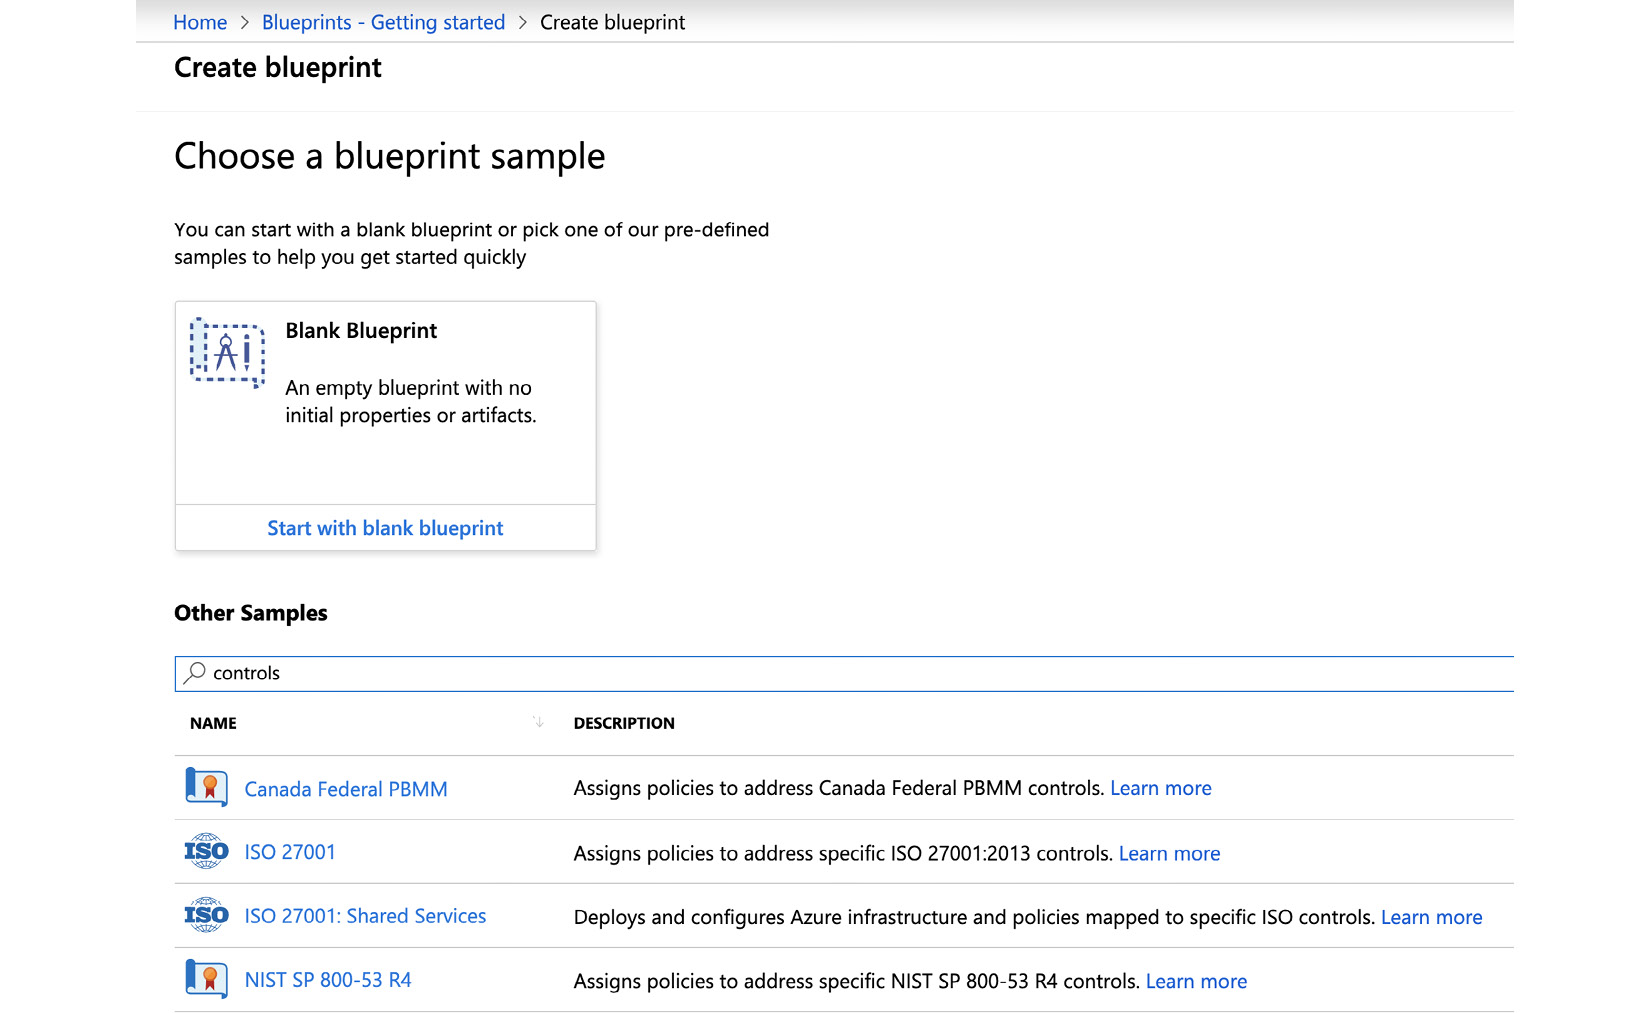
Figure. 2.8 – When creating a blueprint definition, you can choose one of the predefined sample blueprints
To start creating a blueprint definition, do the following:
- Navigate to All Services -> Blueprints.
- Select Create.
- When the wizard appears, you need to give your blueprint a name and then select the location to save your blueprint definition. In the following screenshot, I decided to save the blueprint in my Tenant Root Group to be able to use the blueprint in all subscriptions that are or may later be attached to my Azure AD tenant:
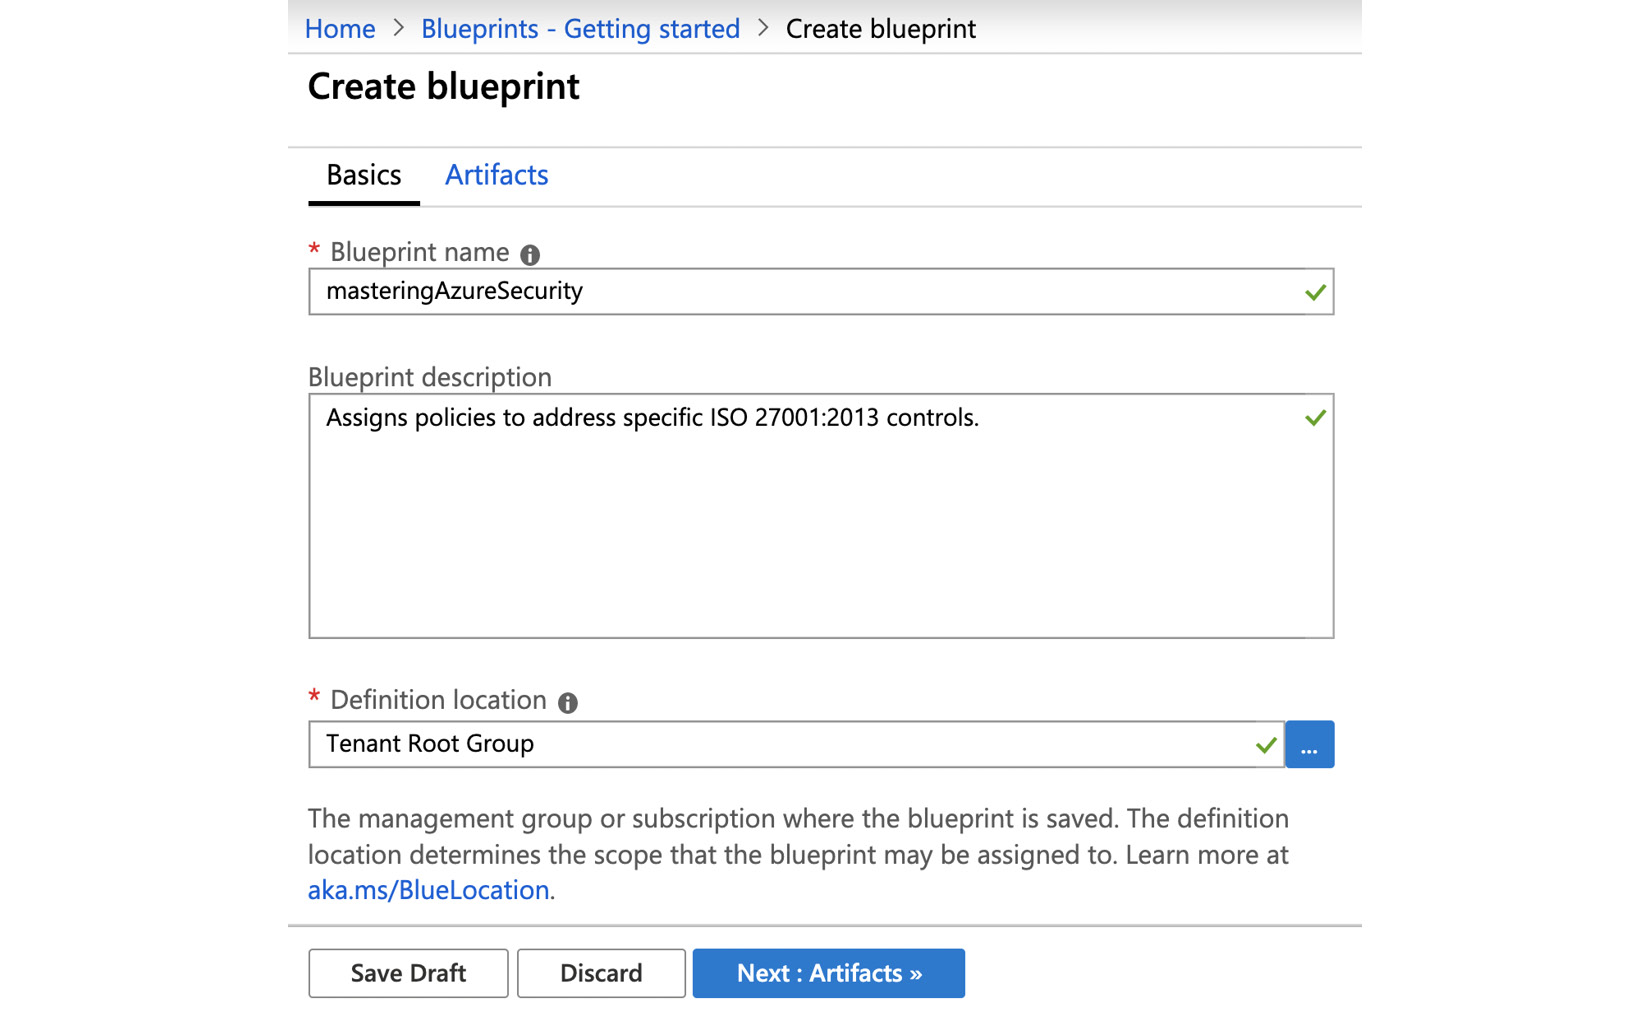
Figure. 2.9 – Creating a blueprint – basic information
I decided to use the ISO 27001 blueprint sample for this demonstration. On the second tab, the Artifacts tab, you can add, remove, or edit artifacts according to your needs. You can save your draft anytime and come back later if you want to change, add, or remove anything:
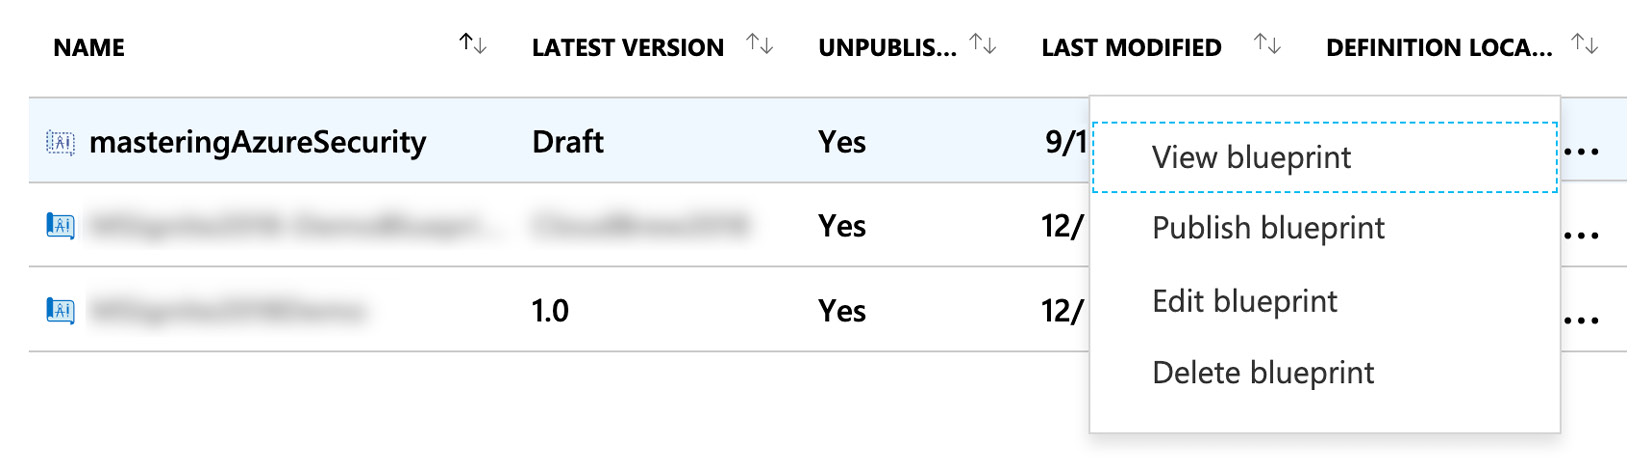
Figure. 2.10 – Context dialog after saving the blueprint in draft mode
- When you are done, you need to publish your blueprint definition to a new version. The version is basically a custom text field that you need to define. It makes sense to select version numbers so that you can easily iterate through your versions. However, you can use whatever blueprint version names fit your needs. I decided to name the blueprint version 0.1:
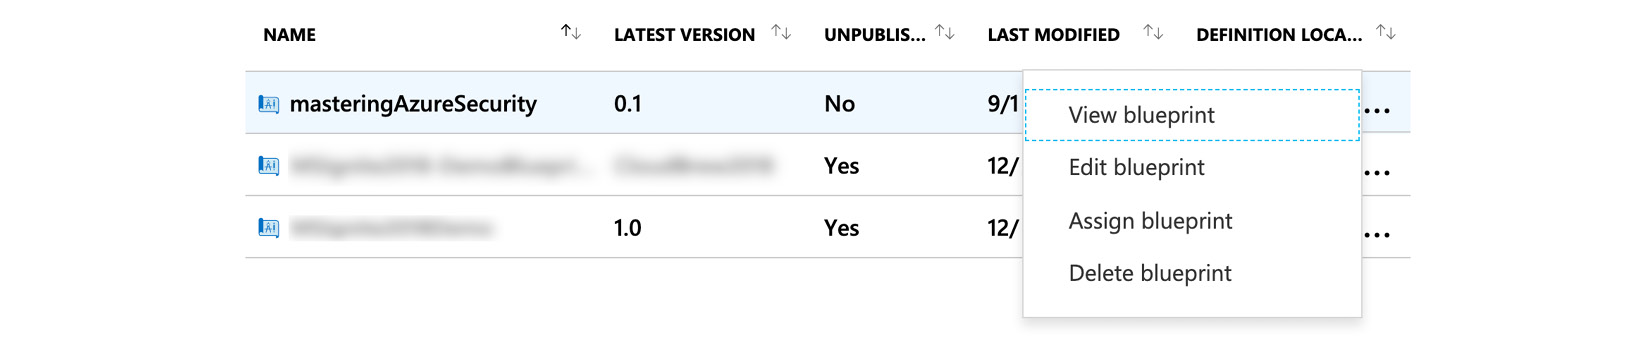
Figure. 2.11 – Context dialog after publishing the new blueprint
After publishing your blueprint, the context dialog changes and gives you a new menu option, Assign blueprint.
- You can now assign your new blueprint to any of your existing subscriptions or choose to create a new subscription right from the dialog:
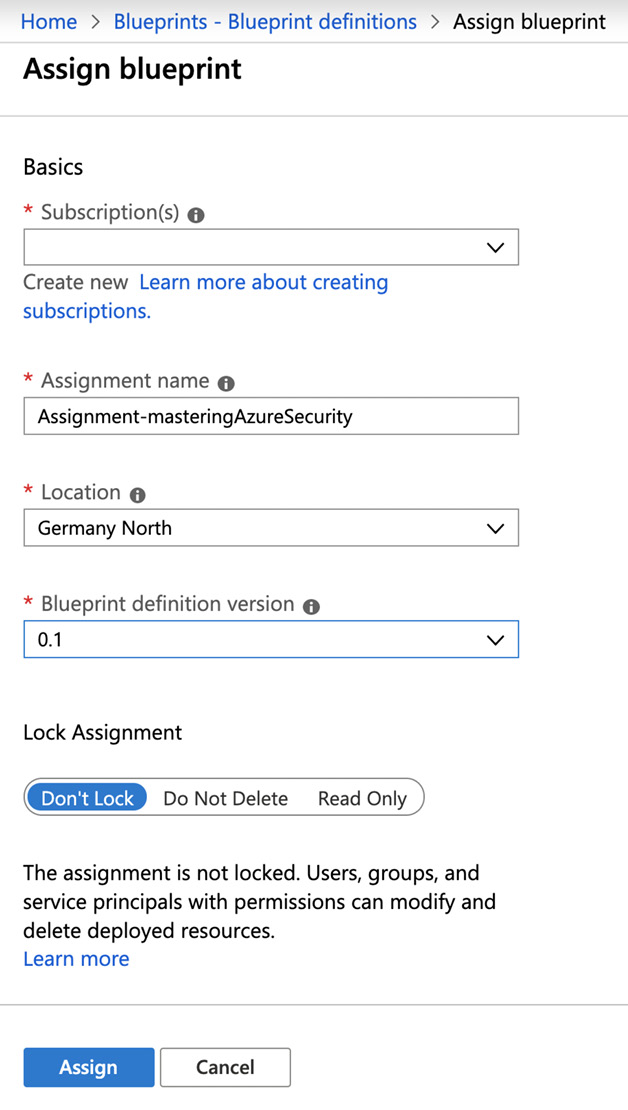
Figure. 2.12 – New blueprint assignment
As soon as you assign your blueprint, the policies you defined in the blueprint definition are applied, and resource groups and resources are created. You can also assign a lock when assigning a blueprint. If you apply a lock during blueprint assignment, you can only remove it when unassigning the blueprint.
Important Note:
You can assign a management lock when assigning a blueprint to a subscription. However, if you do so, the lock cannot simply be removed by a subscription owner but only when unassigning the blueprint from the subscription.
You need to define a location for your blueprint assignment. This is because blueprints use Managed Identity (MI) to deploy the artifacts you define in your blueprint definition, such as resources and resource groups. You can either use a system-assigned MI or decide to use a user-assigned MI. If you use a system-assigned MI, which is the default, this MI is temporarily granted owner rights on the subscription(s) within the scope of your blueprint assignment. Owner access is needed to make sure that all your artifacts and locks can properly be created and set by the Blueprints service. When the blueprint assignment process is finished, owner access for the system-assigned MI is automatically removed from your subscription(s).
Depending on the artifacts you have defined in your blueprint definition, you might have to define your artifact parameters during the assignment process:
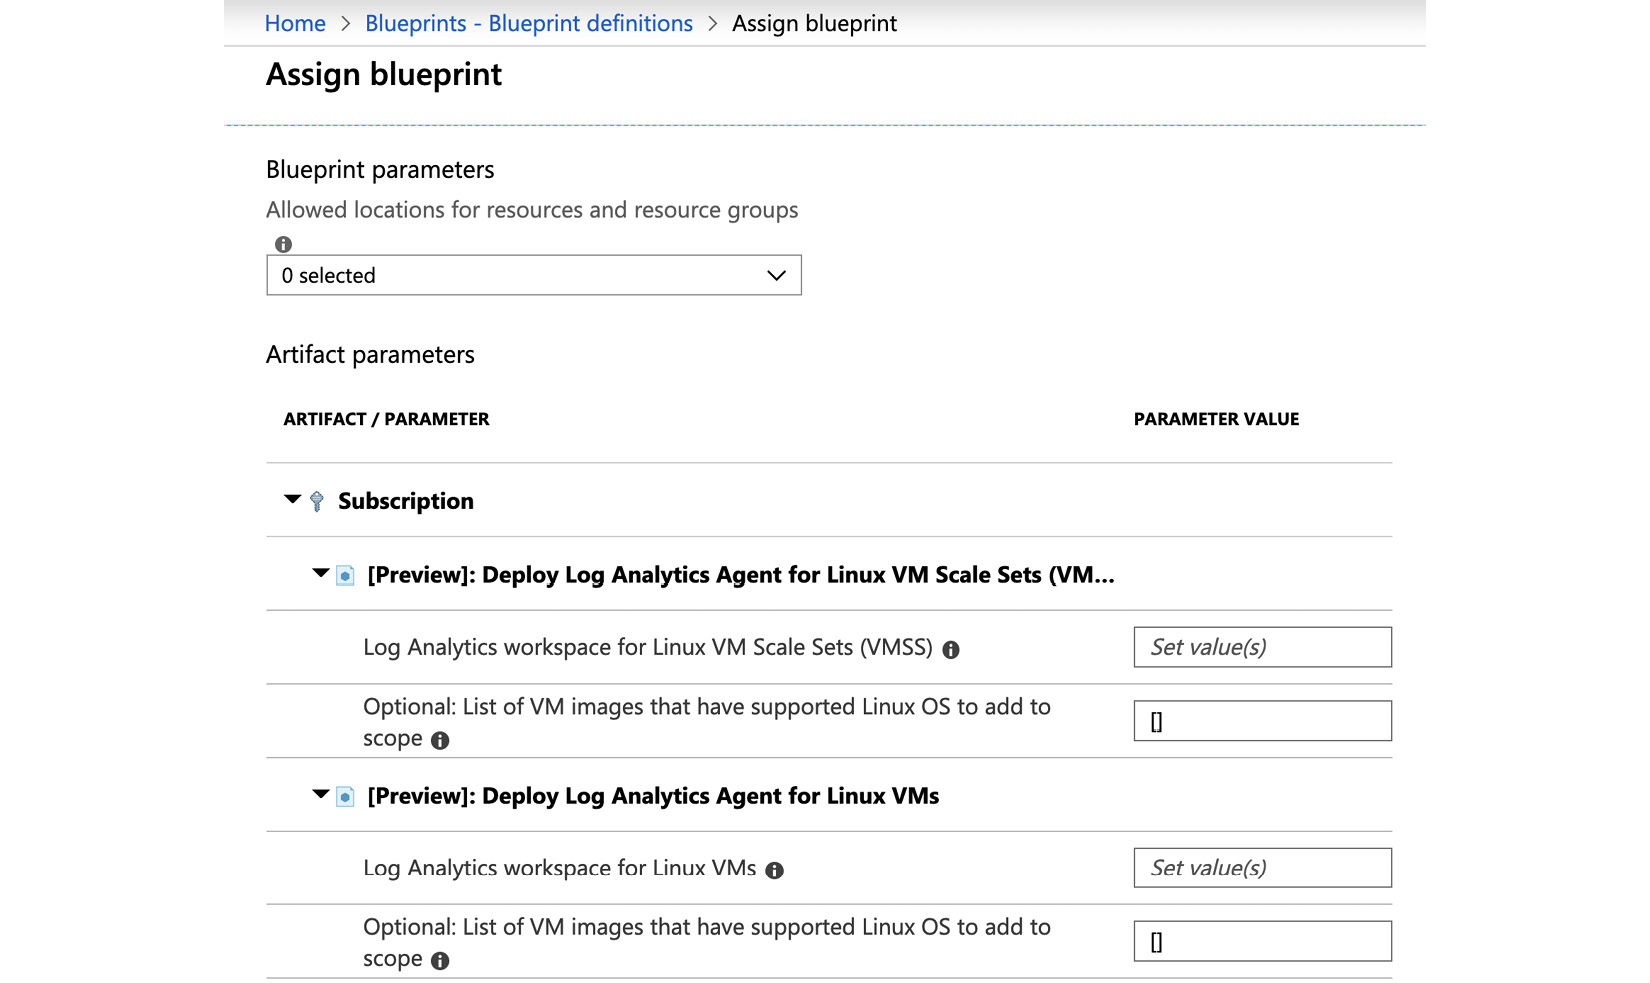
Figure. 2.13 – Artifact parameters are configured during blueprint assignments
In our example, we started with the ISO 27001 blueprint example. This blueprint definition contains several policies, such as policies for restricting resource deployment to only a few Azure regions or for deploying Azure Log Analytics agents to Windows and Linux VMs. All parameters for these policies could have been defined in the blueprint definition already. However, if we had done so, all parameters would always be the same for all subscriptions and could not be defined depending on the subscription you assign a blueprint to. This might be great for corporate restrictions that need to be enforced for every system environment, but it would restrict the blueprint/policy flexibility.
The best practice for this case is to define all parameters that can never be changed in the blueprint definition. For example, this could be useful if there are only certain Azure regions that are permitted for your company's resources. But for Log Analytics, it makes sense to deploy a separate workspace to every Azure region, so as to avoid being charged for cross-region network traffic. This would ideally be defined during blueprint assignment.
Tip
Best Practice: Define artifact parameters that are valid for all your subscriptions in the blueprint definition. Define artifact parameters that only fit specific subscriptions during blueprint assignment.
Now that you know how to define your governance concepts and how all the features we have today work together, we will take a close look at Azure Resource Graph, an engine that helps you to gather information about all the resources you have created within the scope of your Azure tenant.
Azure Resource Graph
Have you ever tried to get information about all the Azure resources that are deployed outside of Europe? Or what about listing all the Azure VMs across all your subscriptions? In the Understanding Governance in Azure section, I mentioned that monitoring is essential for security and that you are clueless if you do not have effective monitoring practices. Now, if you tried to get information such as the information we have discussed when covering Azure Resource Manager (ARM), you might end up waiting forever. You might not even have the ability to get all the information you need at once.
Azure Resource Graph is a relatively new service that helps you to gather information about all your Azure resources across all your tenants' Azure subscriptions. Sounds great, doesn't it? Well, it is great.
You can think of Azure Resource Graph as a large index database for all your resources that can be queried using Kusto Query Language (KQL). As soon as you create a new or update an existing resource, ARM notifies Azure Resource Graph of this change and the Azure Resource Graph database is updated. To make sure that there is no notification missed, and in case you update resources outside of ARM, Azure Resource Graph regularly runs a full scan of your resources in addition to receiving the notifications, so that the database is kept current.
In order to be able to use Azure Resource Graph to query your resources, you need to have at least read access to the resources you want to query. In other words, you are presented with results only for the resources that you are allowed to see. So, query results always depend on the account that is currently logged in to the Azure portal, the Azure CLI, PowerShell, or the REST API.
Querying Azure Resource Graph with PowerShell
If you want to use PowerShell to query Azure Resource Graph, follow these steps:
- Install the Az.resourcegraph PowerShell module with the following commands.
First, install the PowerShell module for Azure Resource Graph:
install-module Az.resourcegraph
Then, import the module into your current PowerShell session:
import-module Az.resourcegraph
- Make sure that the module was properly installed by using the following PowerShell command:
get-command -module Az.resourcegraph
You should see the following output:
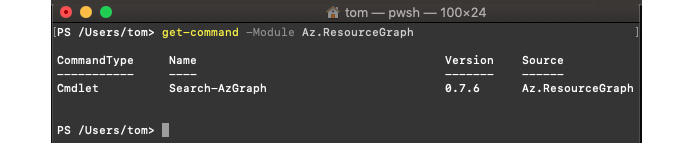
Figure. 2.14 – The Az.ResourceGraph module was successfully installed and imported
Currently, the Az.ResourceGraph PowerShell module online contains one cmdlet, which is Search-AzGraph. This might be subject to change in the future, so make sure to always use the latest version of the PowerShell module.
You can now start to query Azure Resource Graph with PowerShell. Let's, for example, get a list of all Azure resources that contain the word "core" in their name. We want to limit the output to five results. Now, the interesting thing is that the Search-AzGraph cmdlet already gives you the database column, which is to be queried, so for the query, you only need to define your filter logic.
A KQL query usually looks like this:
database |
where <filter logic> |
project columnname1, columname2 |
limit n
Since the database name is given by Search-AzGraph, we only need to define the filter logic. So, for the result just described, your PowerShell command, including the query, could be as follows:
Search-AzGraph -Query 'project name, type | where name contains "core" | limit 5'
This command will give you up to five results that contain the word core anywhere in the resource name:
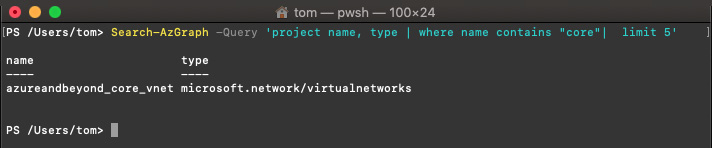
Figure. 2.15 – Your first Azure Resource Graph query result with PowerShell
You've now learned how to use Powershell to query Azure Resource Graph. In the next section, you will learn how to leverage Azure CLI for the same results.
Querying Azure Resource Graph with the Azure CLI
As you might have recognized from the preceding screenshot, I am using PowerShell Core in a macOS Bash terminal. This works absolutely fine, and since I am into both PowerShell and macOS, for me this is a great way to go. However, with the Azure CLI, the Python-based command-line interface that can be run on Windows, macOS, and Linux, you can also easily query Azure Resource Graph. If you have already installed the latest version of the Azure CLI, you just need to interactively log in with the following command:
az login
You will then be informed that there is a browser window open that you can use to enter your credentials, beat the MFA challenge, and handle all the other security stuff that comes with Azure AD (and which we will address in the next chapter of this book). As soon as you have logged in, the Azure CLI will give you an overview of all the subscriptions that your account has access rights to:

Figure. 2.16 – Azure CLI – interactive login successful
If you now try to get help for az graph (which is the starting command to get access to Azure Resource Graph), you will see an error message because the graph extension needs to be added to your Azure CLI environment first:

Figure 2.17 – Error message when the Azure Resource Graph extension has not yet been enabled in the Azure CLI
So, let's add the graph extension:
- Enter the following command into the Bash session:
az extension add --name resource-graph
- You can now run the same query you have run in PowerShell (but with the Azure CLI syntax):
az graph query -q "project name, type | where name contains 'core' | limit 5"
Running this query will give you the following output:
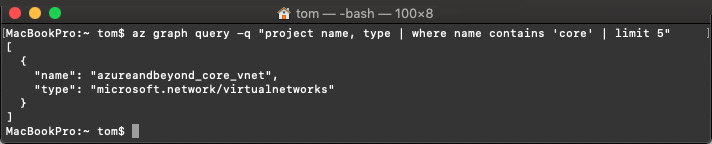
Figure 2.18 – Your first Azure Resource Graph query result with the Azure CLI
So, the query itself will stay the same. It is only wrapped in the Azure CLI syntax instead of PowerShell.
Advanced queries
Now that you know how to run queries against Azure Resource Graph with the Azure CLI and PowerShell, you may be interested in running some advanced queries, right? So, here you go. The queries you find here can be run in both the Azure CLI and Powershell.
First, let's try to get more information about a resource – not just the name and type, and without limiting the output to a number of results; let's filter for a particular subscription. The query might be as follows:
where subscriptionId == 'your subscription ID' and name contains 'core'
The command for the Azure CLI is as follows:
az graph query -q "where subscriptionId == 'your subscription ID' and name contains 'core'"
For PowerShell, you enter the following command:
Search-AzGraph -Query "where subscriptionId == 'your subscription ID' and name contains 'core'"
You will see, depending on your access rights and the resource type, that the results of your query will now give you a lot of information. A screenshot of the single resource that shows up as the result in my environment, a virtual network, would take up about two pages of this book. The nice thing is that even if there are lots of resources returned by your query, you will get your results in near-real time because you query the Azure Resource Graph database instead of Azure Resource Manager, which would have to "talk" to each and every resource first.
Summary
In this chapter, you have learned why governance is essential for security and what features Azure has to offer to help you in building a governance concept for your company. You've learned how to group and organize subscriptions and resources, how to enforce policies and all the best practices to ensure that you do so effectively and without breaking your system, and how to create consistent and repeatable environments. We know that it is not easy to find a way through this jungle of options, but when you stop, think, plan, act, and repeat, you will be on a good path to finding what fits your needs perfectly.
In the next chapter, you will not only learn how to keep track of access rights and monitor any anomalies in user behavior by learning how to manage cloud identities, but you will also learn about strategies to protect identities and how to reduce the attack surface of privileged accounts.
Questions
- What are the most important parts of governance?
A. Policies
B. Monitoring
C. Implementation
D. All of the above
- What needs to be defined in governance when deployment is in question?
A. We need to define what can be deployed
B. We need to define deployment steps
C. We need to define both what and how
D. This depends on the deployment method
- Which feature prevents the accidental removal of resources?
A. Resource locks
B. Delete locks
C. Management locks
- What is the top level of a group hierarchy?
A. Tenant
B. Management group
C. Subscription
D. Resource group
- At which level are Azure Blueprints applied?
A. Resource
B. Subscription
C. Resource group
- What can we define with Azure Blueprints?
A. Role assignments
B. Policy assignments
C. Both of the above
D. None of the above
- What is Azure Resource Graph?
A. A service to control deployments
B. A service to gather information
C. Both of the above
D. None of the above