
13
Ethereum Development Environment
This chapter introduces the Ethereum development environment. Several examples will be presented in this chapter to complement the theoretical concepts provided in the earlier chapters. This chapter will mainly cover the setup of the development environment and how to use relevant tools to create and deploy smart contracts using the Ethereum blockchain.
The first task is to set up an Ethereum development environment. This involves setting up a private net and installing tools that aid the development of a decentralization application on Ethereum. We will also look at testnets, which can play a vital role in testing the smart contracts before deploying on the mainnet. Ethereum has several testnets. A common testnet is called Ropsten and is used by developers or users as a test platform to test smart contracts and other blockchain-related proposals. Then, we will look at the private net option in Ethereum, which allows the creation of an independent private network. This private network can be used as a shared distributed ledger between participating entities and for the development and testing of smart contracts. While there are other clients available for Ethereum, Geth is the leading client for Ethereum and the standard tool of choice, and as such, this chapter uses Geth for the examples.
There are various ways to perform development for Ethereum blockchain. We will see some of the most popular options in this chapter. The topics that we will cover in this chapter are listed here:
- Test networks
- Private network components
- Starting up the private network
- Mining on the private network
- Remix IDE
- MetaMask
- Using MetaMask and Remix IDE to deploy a smart contract
Overview
There are multiple ways to develop smart contracts on Ethereum. A usual and sensible approach is to develop and test Ethereum smart contracts either in a local private net or a simulated environment like Ganache. Then it can be deployed on a public testnet. After all the relevant tests are successful on a public testnet, the contracts can then be deployed to the public mainnet. There are, however, variations in this process. Many developers opt to only develop and test contracts on a local simulated environment and then deploy on to the public mainnet or their private/enterprise production blockchain networks. Developing first on a simulated environment and then deploying directly to a public network can lead to faster time to production, as setting up private networks may take longer compared to setting a local development environment with a blockchain simulator. We will explore all these approaches in Chapter 14, Development Tools and Frameworks and Chapter 15, Introducing Web3.
There are new tools and frameworks available, like Truffle and Ganache, which make development and testing for Ethereum easier. We will look into these tools in more depth in Chapter 14, Development Tools and Frameworks, but first, we will use a manual approach whereby we develop a smart contract and deploy it manually via the command line to the private network. This will allow us to see what actually happens in the background. Also, we will cover the use of MetaMask, as it has become the tool of choice for developers.
Frameworks and tools make development easier, but hide most of the finer "under the hood" details that are useful for beginners to understand to build a strong foundation of knowledge. Therefore, first we will demonstrate development using the native tools available in Ethereum, and once we have understood all the foundational knowledge, we can start using development frameworks like Truffle, which indeed makes development and testing very easy.
Let us start by connecting to a test network.
Test networks
The Ethereum Go client (https://geth.ethereum.org), Geth, can be connected to the test network using the following command:
$ geth --testnet
This command will connect to the Ropsten network, which is a pre-configured proof of work (PoW) test network.
Geth installation was described in Chapter 12, Further Ethereum. Please refer back to this chapter for more detail.
A sample output is shown in the following screenshot. The screenshot shows the type of the network chosen and various other pieces of information regarding the blockchain download:

Figure 13.1: The output of the geth command connecting to Ethereum testnet Ropsten
A blockchain explorer for testnet is located at https://ropsten.etherscan.io and can be used to trace transactions and blocks on the Ethereum test network.
There are other test networks available too, such as Rinkeby and Görli (also referred to as Goerli). Geth can be issued with a command-line flag to connect to the desired network:
--testnet Ropsten network: pre-configured proof-of-work test network
--rinkeby Rinkeby network: pre-configured proof-of-authority test network
--goerli Görli network: pre-configured proof-of-authority test network
Now let us experiment with building a private network and then we will see how a contract can be deployed on this network using Mist and command-line tools.
Components of a private network
A private net allows the creation of an entirely new blockchain usually on a local network. This is different from testnet or mainnet in the sense that it uses its own genesis block and network ID. In order to create a private net, three components are needed:
- Network ID
- The genesis file
- Data directory to store blockchain data
Even though the data directory does not strictly need to be mentioned, if there is more than one blockchain already active on the system, then the data directory should be specified so that a separate directory is used for the new blockchain.
On the mainnet, the Geth Ethereum client is capable of discovering boot nodes by default as they are hardcoded in the Geth client, and connects automatically, but on a private network, Geth needs to be configured by specifying appropriate flags and configurations in order for it to discover, or be discoverable by, other peers. We will see how this is achieved shortly.
In addition to the previously mentioned three components, it is desirable that you disable node discovery so that other nodes on the internet cannot discover your private network and so that it is secure. This can be achieved by running Geth with the flag --nodiscover, which disables the peer discovery mechanism. If other networks happen to have the same genesis file and network ID, they may connect to your private net, which can result in security issues. The chance of having the same network ID and genesis block is very low, but, nevertheless, disabling node discovery is a good practice, and is recommended. Another network or node connecting to your private network can result in security breaches, information leakage, and other undesirable security incidents. However, note that private networks are usually run within the enterprise environments and are protected by usual enterprise security practices such as firewalls.
Disabling peer discovery also allows us to define a list of static peers that we have on our network. This gives us the additional ability to control who can join our private network.
Just before we move onto creating our private network, let's get some theoretical aspects covered that are related to discovery and understand what actually happens when we disable node discovery. For this, first we'll see how a node normally discovers other nodes on an Ethereum network and what protocols are involved to do so. The suite of protocols that is responsible for node discovery and communication between Ethereum nodes is called RLPx.
Note that RLPx is named after RLP, the serialization protocol introduced in Chapter 11, Ethereum 101. However, it is not related to the serialization protocol RLP, and the name is not an acronym.
Ethereum node discovery is based on the Kademlia protocol. Kademlia is a UDP-based distributed hash table (DHT) protocol for distributed peer-to-peer networks.
The Ethereum network consists of four elements or layers: Discovery, RLPx, DevP2P and application level sub-protocols:
- The Discovery protocol is responsible for discovering other nodes on the network by using node discovery mechanism based on Kademlia protocol's routing algorithm. This protocol works by using UDP. In Ethereum there are two discovery protocols, named DiscV4 and DiscV5. DiscV4 is currently production ready and implemented in Ethereum whereas DiscV5 is in development.
Specification for DiscV4 can be found here: https://github.com/ethereum/devp2p/blob/master/discv4.md.
Specification for DiscV5 can be found here: https://github.com/ethereum/devp2p/blob/master/discv5/discv5.md.
For discovery, a new Ethereum node joining the network makes use of hardcoded bootstrap nodes, which provide an initial entry point into the network, from where which further discovery processes then start. This list of bootstrap nodes can be found here in the
bootnodes.gofile: - RLPx is a TCP-based transport protocol responsible for enabling secure communication between Ethereum nodes. It achieves this by using an asymmetric encryption mechanism called Elliptic Curve Integrated Encryption Scheme (ECIES) for handshaking and key exchange.
Handshaking is a term used in computing to refer to a mechanism of exchanging initial information (signals, data, or messages) between different devices on a network to establish a connection for communication as per the protocol in use.
More information on ECIES and the RLPx specification can be found here: https://github.com/ethereum/devp2p/blob/master/rlpx.md.
- DEVP2P (also called the wire protocol) is responsible for negotiating an application session between two nodes that have been discovered and have established a secure channel using RLPx. This is where the
HELLOmessage is sent between nodes to provide each other with details of the version of the DevP2P protocol: the client name, supported application sub-protocols, and the port numbers the nodes are listening on.PINGandPONGmessages are used to check the availability of the nodes andDISCONNECTis sent if a response from a node is not received. - Finally, the fourth element of the Ethereum network stack is where different Ethereum sub-protocols exist. After discovering and establishing a secure transport channel and negotiating an application session, the nodes exchange messages using so-called "capability protocols" or application sub-protocols. This includes Eth (versions 62, 63, and 64), Light Ethereum Sub-protocol (LES), Whisper, and Swarm. These capability protocols are responsible for different application-level communications: for example, Eth is responsible for block synchronization. It makes use of several protocol messages such as
Status,Transactions,GetBlockHeaders, andGetBlockBodiesmessages to exchange blockchain information between nodes. Note that Eth is also referred to as "Ethereum wire protocol."More detail on the Eth capability protocol can be found here: https://github.com/ethereum/devp2p/blob/master/caps/eth.md.
All four of these elements can be visualized in the following diagram:

Figure 13.2: Ethereum node discovery, RLPx, DevP2P, and capability protocols
So here in our example, when we use the --nodiscover flag, it disables the peer discovery mechanism described previously. We can then add nodes manually to the network by maintaining a static list of peers.
Now, after this introduction to understand some underlying theory, all the parameters required for creating a private network will be discussed in detail.
Network ID
The network ID can be any positive number except any number that is already in use by another Ethereum network. For example, 1 and 3 are in use by Ethereum mainnet and testnet (Ropsten), respectively.
A list of Ethereum networks is maintained here https://chainid.network and network IDs chosen already should not be used to avoid conflict.
Network ID 786 has been chosen for the example private network discussed later in this section.
The genesis file
The genesis file contains the necessary fields required for a custom genesis block. This is the first block in the network and does not point to any previous block. The Ethereum protocol performs checking in order to ensure that no other node on the internet can participate in the consensus mechanism unless they have the same genesis block. Chain ID is usually used as an identification of the network.
A custom genesis file that will be used later in the example is shown here:
{
    "nonce": "0x0000000000000042",
    "timestamp": "0x00",
    "parentHash": "0x0000000000000000000000000000000000000000000000000000000000000000",
    "extraData": "0x00",
    "gasLimit": "0x8000000",
    "difficulty": "0x0400",
    "mixhash": "0x0000000000000000000000000000000000000000000000000000000000000000",
    "coinbase": "0x3333333333333333333333333333333333333333",
    "alloc": {
    },
    "config": {
        "chainId": 786,
        "homesteadBlock": 0,
        "eip150Block": 0,
        "eip155Block": 0,
        "eip158Block": 0
    }
}
This file is saved as a text file with the JSON extension; for example, privategenesis.json. Optionally, Ether can be pre-allocated by specifying the beneficiary's addresses and the amount of Wei, but this is usually not necessary, as being on the private network, Ether can be mined very quickly.
In order to pre-allocate an account with Ether, a section can be added to the genesis file, as shown here:
"alloc": {
        "0xcf61d213faa9acadbf0d110e1397caf20445c58f ":
            {"balance": "100000"},
}
Now let's see what each of these parameters means.
nonce: This is a 64-bit hash used to prove that PoW has been sufficiently completed. This works in combination with themixhashparameter.timestamp: This is the Unix timestamp of the block. This is used to verify the sequence of the blocks and for difficulty adjustment. For example, if blocks are being generated too quickly, that difficulty goes higher.parentHash: Being the genesis (first) block, this is always zero as there is no parent block.extraData: This parameter allows a 32-bit arbitrary value to be saved with the block.gasLimit: This is the limit on the expenditure of gas per block.difficulty: This parameter is used to determine the mining target. It represents the difficulty level of the hash required to prove the PoW.mixhash: This is a 256-bit hash that works in combination withnonceto prove that a sufficient amount of computational resources has been spent in order to complete the PoW requirements.coinbase: This is the 160-bit address where the mining reward is sent as a result of successful mining.alloc: This parameter contains the list of pre-allocated wallets. The long hex digit is the account to which the balance is allocated.config: This section contains various configuration information defining the chain ID and blockchain hard fork block numbers. This parameter is not required to be used in private networks.
Data directory
This is the directory where the blockchain data for the private Ethereum network will be saved. For example, in the following example, it is ~/etherprivate/.
In the Geth client, a number of parameters are specified in order to run the Ethereum node, fine-tune the configuration, and launch the private network. These flags are listed in the following section.
If connectivity to only specific nodes is required, which is usually the case in private networks, then a list of static nodes is provided as a JSON file. This configuration file is read by the Geth client at the time of starting up and the Geth client only connects to the peers that are present in the configuration file.
Flags and their meaning
The following are the flags used with the Geth client:
--nodiscover: This flag disables the peer discovery mechanism, which allows you to add specific peers manually.--maxpeers: This flag is used to specify the number of peers allowed to be connected to the private net. If it is set to0, then no one will be able to connect, which might be desirable in a few scenarios, such as private testing.--rpc: This is used to enable the RPC interface in Geth.--rpcapi: This flag takes a list of APIs to be allowed as a parameter. For example,eth, web3will enable the Eth and Web3 interface over RPC.--rpcport: This sets up the TCP RPC port; for example,9999.--rpccorsdomain: This flag specifies the URL that is allowed to connect to the private Geth node and perform RPC operations.CORSin––rpccorsdomainmeans cross-origin resource sharing.--port: This specifies the TCP port that will be used to listen to the incoming connections from other peers.--identity: This flag is a string that specifies the name of a private node.
Static nodes
In the case of private networks, usually the connectivity is limited to a specific set of peers. In order to configure this list, the node IDs of these nodes are added to a configuration file called static-nodes.json. This file is usually placed in the data directory of the Geth (Ethereum client) executable. This directory is also where the chaindata (database) and keystore files are saved. By default, the data directory is located at <user's home directory>/Library/Ethereum but can be configured by using the flag --datadir.
The filename should be static-nodes.json under the data directory. This is valuable in a private network because this way the network is limited to only known nodes. An example of the static-nodes.json file is shown as follows:
[
"enode:// 44352ede5b9e792e437c1c0431c1578ce3676a87e1f588434aff1299d30325c233c8d426fc5 7a25380481c8a36fb3be2787375e932fb4885885f6452f6efa77f@xxx.xxx.xxx.xxx:TCP_PORT"
]
Here, xxx is the IP address and TCP_PORT can be any valid and available TCP port on the system. The long hex string is the node ID.
As we now understand the various aspects and components required to set up a private network, including the genesis file and other relevant configuration files, let's now move on to actually setting up our own private network using Ethereum.
Starting up the private network
First, let's start up our private network and prepare it for use. The first step is to create a directory named etherprivate under the home directory of the user.
$ mkdir ~/etherprivate
This command will create the directory. Once the directory is created, place the privategenesis.json file shown earlier in The genesis file section. At this point, stored under the home directory of the user, we have a directory named ~/etherprivate, which contains the genesis file called privategenesis.json. We are ready to start our network. The initial command to start the private network is shown as follows:
$ geth init ~/etherprivate/privategenesis.json --datadir ~/etherprivate
This will produce an output similar to what is shown in the following screenshot:

Figure 13.3: Private network initialization
This output indicates that a genesis block has been created successfully. In order for geth to start, the following command can be issued:
$ ./geth --datadir ~/etherprivate/ --networkid 786 --rpc --rpcapi 'web3,eth,net,debug,personal' --rpccorsdomain '*'
This will produce the following output:

Figure 13.4: Starting Geth for a private network
An important part of the output to note is the following log lines:
INFO [07-09|19:49:01.504] IPC endpoint opened
url=/Users/drequinox/etherprivate/geth.ipc
INFO [07-09|19:49:01.504] HTTP endpoint opened
url=http://127.0.0.1:8545
INFO [07-09|19:49:05.734] Etherbase automatically configured
address=0xc9Bf76271b9E42E4bF7E1888e0F52351bDb65811
These lines show the information about the Inter-Process Communications (IPC) endpoint, HTTP endpoint, and Etherbase (coinbase) account information. This information is useful for the examples provided later in this section.
IPC is a mechanism to allow communication between processes running on the computer locally. More information on this can be found here:
Now Geth can be attached via IPC to the running Geth client on a private network using the following command:
$ geth attach ~/etherprivate/geth.ipc
As shown in Figure 13.5, this will open the interactive JavaScript console for the running private net session:

Figure 13.5: Starting Geth to attach with private net 786
Note that the time of the last block creation is also shown, seen in the preceding output:
at block: 5906 (Sat, 23 May 2020 13:49:16 BST).
You may notice that a warning message appears when Geth starts up:
WARNING: No etherbase set and no accounts found as default.
This message appears because there are no accounts currently available in the new test network and no account is set as etherbase to receive mining rewards. This issue can be addressed by creating a new account and setting that account as etherbase. This will also be required when mining is carried out on the test network.
This is shown in the following commands. Note that these commands are entered in the Geth JavaScript console, which is shown in the preceding screenshot. The following command creates a new account. In this context, the account will be created on the private network ID 786:
> personal.newAccount("Password123")
"0xc9bf76271b9e42e4bf7e1888e0f52351bdb65811"
Once the account is created, the next step is to set it as an etherbase/coinbase account so that the mining reward goes to this account. This can be achieved using the following command:
> miner.setEtherbase(personal.listAccounts[0])
true
Currently, the etherbase account has no balance, as can be seen by using the following command:
> eth.getBalance(eth.coinbase).toNumber();
0
In this section, we created a private network with a custom genesis file. Also, we created a new account in our private network. Now we are ready to start mining on our private network.
Mining on the private network
Now that we have started up our private network, mining can start by simply issuing the following command. This command takes one parameter: the number of threads. In the following example, two threads will be allocated to the mining process by specifying 2 as an argument to the start function:
> miner.start()
true
Here we can also provide an integer parameter. For example, if we provide 1, it will only use one CPU core for mining, which helps with performance issues, if using all CPU resources is reducing system performance. An example command of using only one CPU is miner.start(1). On systems where there is only one CPU, issuing the preceding command will inevitably use only one CPU. However, on a multicore system, providing the number of cores that can be used for mining helps to address any performance concerns.
After the preceding command is issued as preparation for mining, the DAG generation process starts, which produces an output similar to the one shown here:
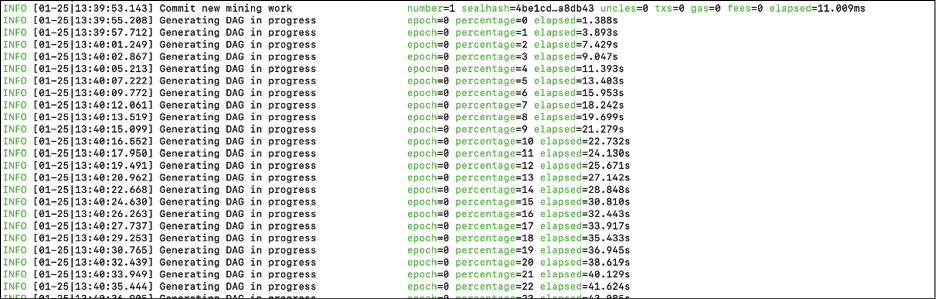
Figure 13.6: DAG generation
DAG stands for Directed Acyclic Graph. We briefly introduced this when discussing Ethash in Chapter 12, Further Ethereum. In the context of Ethereum's Ethash PoW algorithm, DAG refers to Dagger, which is a memory-hard PoW algorithm based on moderately connected directed acyclic graphs. The aim of the Dagger algorithm is to provide an ASIC-resistant memory-hard PoW algorithm. The Dagger algorithm works by generating a DAG of a few gigabytes every 30,000 blocks. This DAG serves as a resource for PoW where the PoW mechanism needs to choose subsets from the DAG, which is dependent on the nonce and the block header. This is in contrast to Bitcoin PoW, which is based on calculating SHA-256, which is not resistant to specialized hardware such as ASICs.
Once DAG generation is finished, the mining process starts and blocks are produced. Geth will produce an output similar to that shown in the following. It can be seen that blocks are being mined successfully with the mined potential block message:
INFO [01-25|13:58:07.405] Successfully sealed new block
number=96 sealhash=02334c…f691fe hash=75302b…a016d5 elapsed=1.336s
INFO [01-25|13:58:07.405]  mined potential block
number=96 hash=75302b…a016d5
INFO [01-25|13:58:07.405] Commit new mining work
number=97 sealhash=4d4e6d…2906a8 uncles=0 txs=0 gas=0 fees=0 elapsed=250.982µs
INFO [01-25|13:58:18.527] Successfully sealed new block
number=97 sealhash=4d4e6d…2906a8 hash=817c8f…8012f6 elapsed=11.121s
INFO [01-25|13:58:18.529] Commit new mining work
number=98 sealhash=9e8370…008b58 uncles=0 txs=0 gas=0 fees=0 elapsed=1.762ms
INFO [01-25|13:58:18.529]  mined potential block
number=97 hash=817c8f…8012f6
INFO [01-25|13:58:18.634] Successfully sealed new block
number=98 sealhash=9e8370…008b58 hash=caba0f…cc206e elapsed=105.266ms
mined potential block
number=96 hash=75302b…a016d5
INFO [01-25|13:58:07.405] Commit new mining work
number=97 sealhash=4d4e6d…2906a8 uncles=0 txs=0 gas=0 fees=0 elapsed=250.982µs
INFO [01-25|13:58:18.527] Successfully sealed new block
number=97 sealhash=4d4e6d…2906a8 hash=817c8f…8012f6 elapsed=11.121s
INFO [01-25|13:58:18.529] Commit new mining work
number=98 sealhash=9e8370…008b58 uncles=0 txs=0 gas=0 fees=0 elapsed=1.762ms
INFO [01-25|13:58:18.529] mined potential block
number=97 hash=817c8f…8012f6
INFO [01-25|13:58:18.634] Successfully sealed new block
number=98 sealhash=9e8370…008b58 hash=caba0f…cc206e elapsed=105.266ms
Mining can be stopped using the following command:
> miner.stop()
null
Now, before the further exploration of different methods, let's understand some basics of using the JavaScript console.
In the JavaScript console, we can perform several operations. A general tip is that if two spaces and two tabs on the keyboard are pressed in a sequence, a complete list of the available objects will be displayed. This is shown in the following screenshot:

Figure 13.7: Available objects
Furthermore, when a command is typed, it can be autocompleted by pressing Tab twice. If two tabs are pressed, then the list of available methods is also displayed. This is shown in the following screenshot:

Figure 13.8: Available methods
In addition to the previously mentioned command, in order to get a list of available methods of an object, after typing a command, a semicolon, ;, is entered. An example is shown in the next screenshot, which shows a list of all the methods available for net:

Figure 13.9: List of methods
There is also the eth object available, which has several methods. While there are several methods under this object, the most common is getBalance, which we can use to query the current balance of Ether. This is shown in the following example.
> eth.getBalance(eth.coinbase)
550000000000000000000
After mining, a significant amount can be seen here. Mining is extremely fast as it is a private network with no competition for solving the PoW, and also in the genesis file, the network difficulty has been set to quite low.
The preceding balance is shown in Wei. If we want to see the output in ether, we can use the web3 object, as shown here.
> web3.fromWei(eth.getBalance(eth.coinbase), "ether")
550
There are a few other commands that can be used to query the private network. Some examples are shown as follows:
- Get the current gas price:
> eth.gasPrice 1000000000 - Get the latest block number:
> eth.blockNumber 110debugcan come in handy when debugging issues. A sample command is shown here; however, there are many other methods available. A list of these methods can be viewed by typingdebug. - The following method will return the RLP of block 0:
> debug.getBlockRlp(0)
"f901f8f901f3a00000000000000000000000000000000000000000000000000000000000000000a01dcc4de8dec75d7aab85b567b6ccd41ad312451b948a7413f0a142fd40d49347943333333333333333333333333333333333333333a056e81f171bcc55a6ff8345e692c0f86e5b48e01b996cadc001622fb5e363b421a056e81f171bcc55a6ff8345e692c0f86e5b48e01b996cadc001622fb5e363b421a056e81f171bcc55a6ff8345e692c0f86e5b48e01b996cadc001622fb5e363b421b9010000000000000000000000000000000000000000000000000000000000000000000000000000000000000000000000000000000000000000000000000000000000000000000000000000000000000000000000000000000000000000000000000000000000000000000000000000000000000000000000000000000000000000000000000000000000000000000000000000000000000000000000000000000000000000000000000000000000000000000000000000000000000000000000000000000000000000000000000000000000000000000000000000000000000000000000000000000000000000000000000000000000000000000000000000000000820400808408000000808000a00000000000000000000000000000000000000000000000000000000000000000880000000000000042c0c0"
The preceding output shows the block
0in RLP-encoded format. - Create a new account. Note that
Password123is the password chosen as an example, but you can choose any:> personal.newAccount("Password123") "0xd6e364a137e8f528ddbad2bb2356d124c9a08206" - Unlock the account before sending transactions:
> personal.unlockAccount("0xd6e364a137e8f528ddbad2bb2356d124c9a08206") Unlock account 0xd6e364a137e8f528ddbad2bb2356d124c9a08206 Password: true - We use
allow unsecure unlocking, otherwise the accounts cannot be unlocked with HTTP access. If that is the case you will see an error message as follows:> personal.unlockAccount("0xd6e364a137e8f528ddbad2bb2356d124c9a08206") Unlock account 0xd6e364a137e8f528ddbad2bb2356d124c9a08206 Password: Error: account unlock with HTTP access is forbidden
To circumvent the error, restart Geth using the –allow-insecure-unlock flag.
$ geth --datadir ~/etherprivate/ --allow-insecure-unlock –networkid 786 –rpc –rpcapi 'web3,eth,net,debug,personal' --rpccorsdomain '*'
Now we unlock both accounts that we created earlier with the personal.newAccount() command at the start of the private network we're creating, and just before the unlockAccount() command on this page. The first account we created at the start of our private network is "0xc9bf76271b9e42e4bf7e1888e0f52351bdb65811" and another one "0xd6e364a137e8f528ddbad2bb2356d124c9a08206" just at the start of this page.
> personal.unlockAccount("0xc9bf76271b9e42e4bf7e1888e0f52351bdb65811")
Unlock account 0xc9bf76271b9e42e4bf7e1888e0f52351bdb65811
Password:
true
> personal.unlockAccount("0xd6e364a137e8f528ddbad2bb2356d124c9a08206")
Unlock account 0xd6e364a137e8f528ddbad2bb2356d124c9a08206
Password:
true
Now once we have these accounts unlocked we can issue some further command to query the balances they hold. First, let's check the balance of our account that we created earlier when we started our private network the first time.
> web3.fromWei(eth.getBalance("0xc9bf76271b9e42e4bf7e1888e0f52351bdb65811"), "ether")
550
As this account is also our coinbase account, which is the default account that receives the mining reward, we can also query the balance slightly differently by specifying eth.coinbase in the command , as shown here.
> web3.fromWei(eth.getBalance(eth.coinbase), "ether")
550
Finally, we check the balance of the other account that we created. As this has not received any mining reward, the balance is 0 as expected.
> web3.fromWei(eth.getBalance("0xd6e364a137e8f528ddbad2bb2356d124c9a08206"), "ether")
0
Now let's try to send transactions from one account to another. In this example we'll send ether from account 0xc9bf76271b9e42e4bf7e1888e0f52351bdb65811 to 0xd6e364a137e8f528ddbad2bb2356d124c9a08206 using the sendTransaction commands shown as follows.
First, we send a value of 100:
> eth.sendTransaction({from: "0xc9bf76271b9e42e4bf7e1888e0f52351bdb65811" to: "0xd6e364a137e8f528ddbad2bb2356d124c9a08206", value: 100})
This command outputs the transaction hash, which is a unique identifier used to identify a specific transaction. The output is shown as follows:
"0xe88e0cc21d59832c4aeabad7a2028fee036e6be17ba04491aa2bf30d1eef7152"
This command will transfer 100 Wei (the smallest ether unit) to the target account. To transfer the value in ether, in our example 100 ETH, we can use the command slightly differently and use web3.toWei, which will convert the value from ether into Wei. To achieve this we issue the command as shown here:
> eth.sendTransaction({from: "0xc9bf76271b9e42e4bf7e1888e0f52351bdb65811" to: "0xd6e364a137e8f528ddbad2bb2356d124c9a08206", value:web3.toWei(100, "ether") })
This command outputs the transaction hash as shown here:
"0xa39eba9403b623477c90cdeaa4733c056cb9f3d9066b9ec3d8c6caa50e43df14"
The preceding command makes use of web3.toWei, which takes two parameters, value which is 100 in our example, and a string, ether, which is the unit of value. This means that 100 ETH will be converted into its equivalent Wei and will be used in the sendTransaction command. The result of this command will be transferring 100 ETH from our source account to the target account. Also notice, in the logs in the other console/terminal window from where we ran the Geth command to run our private network earlier at the start of the private network, the log message:
INFO [01-25|14:36:27.458] Submitted transaction
fullhash=0xa39eba9403b623477c90cdeaa4733c056cb9f3d9066b9ec3d8c6caa50e43df14 recipient=0xd6E364A137e8f528DdbAD2BB2356D124c9a08206
This message shows that the transaction has been submitted, but it needs to be mined first in order for the transaction to take effect. As we stopped mining earlier, for this transaction to go through we need to start mining again, otherwise the transaction won't be processed:
> miner.start()
true
Now check in the logs that the mining has started to work:
INFO [01-25|14:36:34.322] Updated mining threads
threads=4
INFO [01-25|14:36:34.324] Transaction pool price threshold updated price=1000000000
INFO [01-25|14:36:34.325] Commit new mining work
number=121 sealhash=0c1d94…a39646 uncles=0 txs=0 gas=0 fees=0 elapsed=326.664µs
INFO [01-25|14:36:34.325] Commit new mining work
number=121 sealhash=6826a1…4bdc64 uncles=0 txs=1 gas=21000 fees=2.1e-05 elapsed=1.050ms
INFO [01-25|14:36:50.554] Successfully sealed new block
number=121 sealhash=6826a1…4bdc64 hash=8bc2d3…ff29d6 elapsed=16.228s
INFO [01-25|14:36:50.556] Commit new mining work
number=122 sealhash=df3cd3…d28edc uncles=0 txs=0 gas=0     fees=0       elapsed=2.111ms
INFO [01-25|14:36:50.557]  mined potential block
number=121 hash=8bc2d3…ff29d6
mined potential block
number=121 hash=8bc2d3…ff29d6
Note that the amount of funds has been transferred.
> web3.fromWei(eth.getBalance("0xd6e364a137e8f528ddbad2bb2356d124c9a08206"), "ether")
100.0000000000000001
> web3.fromWei(eth.getBalance("0xc9bf76271b9e42e4bf7e1888e0f52351bdb65811"), "ether")
634.9999999999999999
Remember that as the mining has progressed, you will see slightly different numbers and more ether in the source account (coinbase) and the target account will now have 100 ETH, which we transferred.
It could be a bit cumbersome to type all these account IDs. Instead of typing these long account IDs, we can also use the listAccounts[] method, which takes an integer parameter to address the account. For example, 0, which represents the first account that we created.
As listAccounts[] returns all the account addresses of all the keys in the keystore, by providing [0] as a parameter we can refer to the first account that we created.
Now let's see an example of using the listAccounts[] method, as shown here:
> eth.sendTransaction({from: personal.listAccounts[0], to: personal.listAccounts[1], value: 1000})
"0xd8e1911a3783d1976a21018be9981ade7adb4f38c09d4ec5587c4abd710acb37"
We can also now query information about the transaction that we executed earlier. Remember how it returned a transaction hash? We can use that to find out details about the transaction.
> eth.getTransactionReceipt("0xa39eba9403b623477c90cdeaa4733c056cb9f3d9066b9ec3d8c6caa50e43df14")
This will produce the output shown as follows:

Figure 13.10: Get Transaction Receipt (getTransactionReceipt)
Notice the root in the preceding output, the transaction root, which will be available in the block header as the Merkle root of the transaction trie.
Similarly, we can query more information about the transaction using the getTransaction method.
> eth.getTransaction("0xa39eba9403b623477c90cdeaa4733c056cb9f3d9066b9ec3d8c6caa50e43df14")
This will produce the output shown as follows:
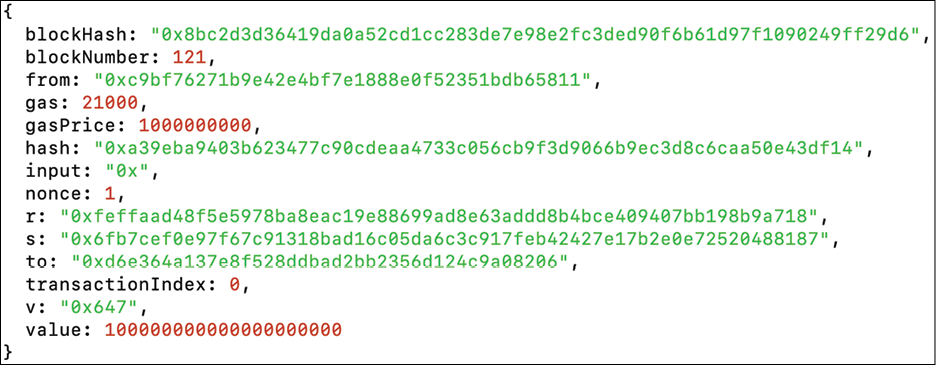
Figure 13.11: Get Transaction (getTransaction)
In this section, we covered how to start mining on a private network and ran some transactions. We also saw how transactions can be created and balance can be queried and performed an ether transfer transaction from one account to another. We also covered how the transaction results can be queried using a transaction receipt and other relevant methods available via RPC in the Geth client.
We've seen in the examples previously that there is a rich interface available with hundreds of methods to interact with the blockchain. While this console- / terminal-based mechanism is quite useful, it can become a bit difficult to manage and deploy smart contracts using the command-line console. For this, we need better alternatives, which we will discuss next. Just like any other development ecosystem in IT, the Ethereum ecosystem has come a long way toward providing high-quality and user-friendly development tools.
We will introduce some of these in the next section.
Remix IDE
There are various Integrated Development Environments (IDEs) available for Solidity development. Most of the IDEs are available online and are presented via web interfaces. Remix (formerly browser Solidity) is the most commonly used IDE for building and debugging smart contracts. It is discussed here.
Remix is the web-based environment for the development and testing of contracts using Solidity. It is a feature-rich IDE that does not run on a live blockchain; in fact, it is a simulated environment in which contracts can be deployed, tested, and debugged. It is available at https://remix.ethereum.org.
An example interface is shown as follows:

Figure 13.12: Remix IDE
On the left-hand side, there is a column with different icons. These icons represent various plugins of the Remix IDE. When you run Remix for the first time, it won't show any of the plugins. In order to add plugins to Remix IDE, you need to access the plugin manager to activate the plugins you need. This is shown in the following figure.

Figure 13.13: Remix IDE with default plugins on the first start
There are a number of plugins available. A sample screenshot is shown here.

Figure 13.14: Remix Plugin Manager
Once activated, the plugins will appear in the left-most column of the IDE, as shown in the following image. Again note that this will only show the plugins that are activated, and other plugins or local plugins can be activated as required. The following screenshot provides more details of different elements of the Remix IDE.

Figure 13.15: Remix IDE with plugins
On the right-hand side, there is a code editor with syntax highlighting and code formatting, and on the left-hand side, there are a number of plugins available that can be used to deploy, debug, test, and interact with the contract.
Various features, such as transaction interaction, options to connect to the JavaScript VM, the configuration of an execution environment, debugger, formal verification, and static analysis are available. They can be configured to connect to execution environments such as the JavaScript VM, injected Web3—where Mist, MetaMask, or a similar environment has provided the execution environment—or the Web3 provider, which allows connection to the locally running Ethereum client (for example, geth) via IPC or RPC over HTTP (Web3 provider endpoint).
Remix also has a debugger plugin for EVM that is very powerful and can be used to perform detailed level tracing and analysis of the EVM bytecode. An example is shown here:

Figure 13.16: Remix IDE, debugging
The preceding screenshot shows different elements of the Remix IDE when DEBUGGER is running. On the right-hand side, the source code is shown. Below that is the output log, which shows informational messages and data related to compilation and the execution status, and transaction information of the transaction/contract.
The following screenshot shows the Remix debugger in more detail. It has the source code decoded into EVM instructions. The user can step through the instructions one by one and examine what the source code does when executed:

Figure 13.17 Remix Debugger
Note that in the preceding screenshot the opcodes are displayed, along with memory, state, and stack information. Notice that Solidity state has a value of 10, assigned to the variable x after the execution of the transaction. There are also a number of other related information points shown in the debugger. This is a very useful feature and comes in handy, especially in complex code debugging.
In the next section, we'll be using MetaMask, a browser extension that serves as a cryptocurrency wallet and an interface to blockchains and DApps.
MetaMask
MetaMask allows interaction with Ethereum blockchain via the Firefox and Chrome browsers. It injects a web3 object within the running websites' JavaScript context, which allows immediate interface capability for DApps. This injection allows DApps to interact directly with the blockchain.
It is available at https://metamask.io/.
Further information is available at https://github.com/MetaMask/metamask-plugin.
MetaMask also allows account management. This acts as a verification method before any transaction is executed on the blockchain. The user is shown a secure interface to review the transaction for approval or rejection before it can reach the target blockchain.

Figure 13.18: MetaMask
It allows connectivity with various Ethereum networks as shown in the following screenshot. This is a screenshot of the MetaMask User Interface (UI), where it allows users to select the network of their choice:

Figure 13.19: MetaMask networks as shown in the MetaMask UI
An interesting feature to note is that MetaMask can connect to any Ethereum blockchain via the custom RPC connection. It can connect to not only remote blockchains but also to locally running blockchains. All it needs is an RPC connection exposed by a node running on the blockchain. If it's available, MetaMask can connect and will allow a web browser to connect to it via the web3 object. MetaMask can also be used to connect to a locally running test (or simulated) blockchain like Ganache and TestRPC.
MetaMask allows account management and also records all transactions for these accounts. This is shown in the following screenshot:
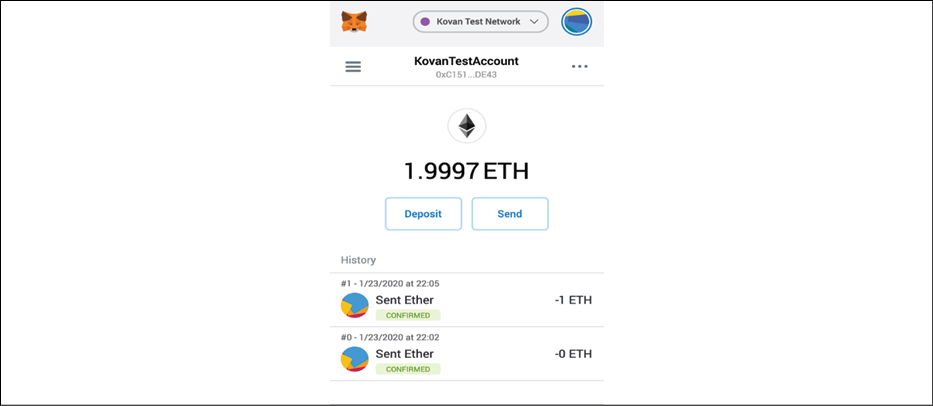
Figure 13.20: MetaMask accounts and transactions view
As we now understand what MetaMask is, we can now delve deeper and see how the Remix IDE can deploy smart contracts through MetaMask.
Using MetaMask and Remix IDE to deploy a smart contract
MetaMask was introduced in Chapter 12, Further Ethereum. It is an interface between the Ethereum blockchain and the web browser. It enables easy access to the blockchain and is quite useful for development activities.
As MetaMask injects a web3 object into the browser, we can use it with Remix IDE to deploy contracts to the blockchain.
It is very easy to deploy new contracts using MetaMask and Remix. Remix IDE provides an interface where contracts can be written in solidity and then deployed on to the blockchain.
We will use Remix IDE and MetaMask to deploy a sample smart contract to the local running private blockchain that we just created in the last section.
In the exercise, a simple contract that can perform various simple arithmetic calculations on the input parameter will be used. As we have not yet introduced Solidity, the aim here is to demonstrate the contract deployment and interaction process only.
More information on coding and Solidity will be provided later in Chapter 14, Development Tools and Frameworks and Chapter 15, Introducing Web3, after which the following code will become easy to understand. Those of you who are already familiar with JavaScript or any other similar language such as the C language will find the code almost self-explanatory.
Now, let's look at some examples of how MetaMask can be used in practice with the private net that we have created earlier in this chapter.
Adding a custom network to MetaMask and connecting Remix IDE with MetaMask
First ensure that you have MetaMask available as we set it up in Chapter 12, Further Ethereum. If not, you can refer back to the previous chapter for an installation guide. In this section, we will add our local private network in MetaMask and then interact with it using Remix IDE.
Open the Google Chrome web browser, where MetaMask is installed. Select Localhost 8545, where the Geth instance of our private net is listening on:

Figure 13.21: MetaMask network selection
Navigate to Remix IDE for Ethereum smart contract development on your browser at https://remix.ethereum.org.
Once on the website, notice the DEPLOY & RUN TRANSACTIONS option in the left-hand column. Choose Injected Web3 as the Environment. This is shown in the following screenshot on the left-hand side:

Figure 13.22: Remix IDE and interaction with MetaMask
A MetaMask window will open as shown in the preceding screenshot, on the right-hand side.
Note that when Remix IDE is connected to MetaMask, it will show network information, such as Custom (786) network, and account information, as shown in the following screenshot.

Figure 13.23: Network information and account information in Remix
In this section, we saw how Remix can connect to MetaMask using the injected Web3 environment. MetaMask can be connected to the mainnet or any other network (local or test network) but from Remix's point of view, as long as the injected Web3 object is available, it will connect to it.
In our example, as we are using a private network, we have connected to our private network through MetaMask, and Remix is connecting to MetaMask using the injected Web3 environment. Now even if we have this connectivity available, MetaMask does not know about the accounts that we have created in our private network. In order for MetaMask to operate on existing accounts, we need to import them from the existing keystore, in our case, the private network 786 keystore. We will see how this is done in the next section.
Importing accounts into MetaMask using keystore files
We can import existing Ethereum accounts into MetaMask by importing the keystore files generated by Geth as a result of creating accounts. To demonstrate how this works we will now import the accounts from our private network blockchain, named 786, into MetaMask.
In MetaMask, the Import Account option is available under the My Accounts menu, as shown in the following screenshot.

Figure 13.24: MetaMask Import Account option
Now let's import the accounts. Remember we created two accounts earlier in our private network 786:
> eth.accounts
["0xc9bf76271b9e42e4bf7e1888e0f52351bdb65811", "0xd6e364a137e8f528ddbad2bb2356d124c9a08206"]
We can import these accounts into MetaMask using their associated keystore JSON files.

Figure 13.25: MetaMask JSON import file
The steps are as follows.
First, choose the JSON file from the privatenet keystore directory, ~/etherprivate/keystore.
We discussed keystore files and their formats in Chapter 12, Further Ethereum.
The keystore files for our privatenet are listed here:
UTC--2020-01-25T13-38-31.465900000Z--c9bf76271b9e42e4bf7e1888e0f52351bdb65811
UTC--2020-01-25T14-17-28.553531000Z--d6e364a137e8f528ddbad2bb2356d124c9a08206
Simply browse to the key store and select the keystore file, then enter the password (earlier, when we created the accounts for the first time, we set the password as Password123) and click Import.
It may take a few seconds to import. When imported, the account will be visible in the MetaMask window as shown here:

Figure 13.26: Account imported in MetaMask
Similarly, we can import the other account, by selecting the keystore file and importing it. Finally, we will have two accounts listed in MetaMask, as shown in the following image:

Figure 13.27: MetaMask – two accounts imported
Now that our accounts have been imported successfully, we can move onto using MetaMask to deploy a contract in our private network.
Deploying a contract with MetaMask
In this section, we will write a simple smart contract and deploy it on our private network using MetaMask. First, in Remix, we create a new file:

Figure 13.28: Creating a new file in Remix
Enter the code shown for SimpleContract2 as follows:
pragma solidity 0.5.0;
contract SimpleContract2
{
  uint z;
  function addition(uint x) public returns (uint y)
  {
    z=x+5;
    y=z;
  }
  function difference(uint x) public returns (uint y)
  {
    z=x-5;
    y=z;
  }
  function division(uint x) public returns (uint y)
  {
    z=x/5;
    y=z;
  }

  function currValue() public view returns (uint)
  {
    return z;
  }
}
The code will look like this in Remix.

Figure 13.29: SimpleContract2 in Remix
Now we compile the smart contract SmartContract2 by clicking on the Compile SimpleContract2.sol button, as shown here:

Figure 13.30: The Compile option in Remix
Once compiled successfully, we deploy the smart contract in the private net:
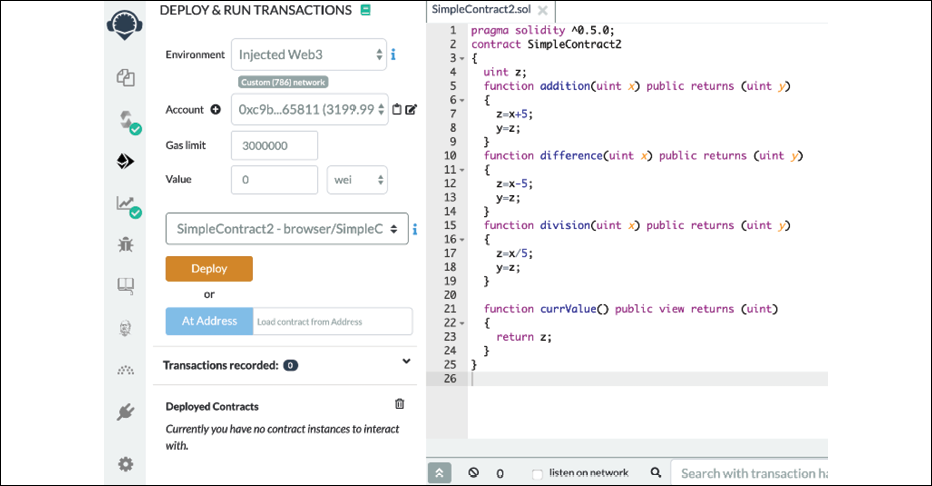
Figure 13.31: Smart contract deployment
When we click Deploy, the following window is displayed (shown on the left-hand side). Also, in the DATA tab, you can see the contract code (shown on the right-hand side).

Figure 13.32: MetaMask contract deployment
Notice how in the Geth logs, we see Submitted contract creation, which means that a contract creation transaction has been submitted and acknowledged as a result of the deploy action from the Remix IDE and the Confirm action from MetaMask. Note that it also shows the full hash and contract address.
INFO [01-25|20:03:54.560] Setting new local account
address=0xc9Bf76271b9E42E4bF7E1888e0F52351bDb65811
INFO [01-25|20:03:54.562] Submitted contract creation
fullhash=0x626b57a4f2661587ffe0ea0342029ad3cdc59b2f1e21a573f06f98712243ab48 contract=0x3cfeb5eF40F9DF20b69A7Ee52346065e2140ad34
Now we start mining again, by issuing the following command in the JavaScript console of Geth. If mining is already running, this step is not required.
> miner.start()
null
Once the contract is mined and deployed, you can see it in Remix, under the Deployed Contracts view:
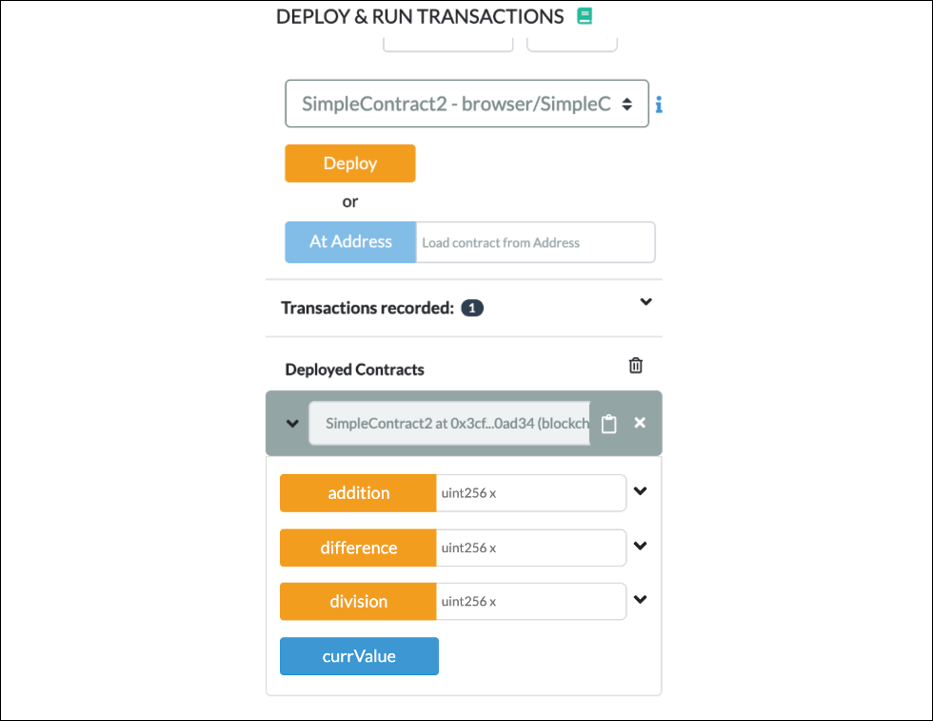
Figure 13.33: MetaMask deployed contract
With this, we have successfully deployed our example smart contract on the private network. Next, we'll see how we can interact with this contract using Remix IDE and MetaMask.
Interacting with a contract through MetaMask using Remix IDE
Now we can interact with the contract using MetaMask. We run the addition option, enter a value of 100 in the box, and click on the addition button, as shown in the following screenshot, on the left-hand side. This will invoke the MetaMask window, as shown in the following screenshot, on the right-hand side.

Figure 13.34: MetaMask contract interaction
Click Confirm, and the transaction will be mined as usual because we have a miner running the background in Geth.
Now click on the currValue button, which will read the contract to find the current value, which is, as expected, 105. This value is the result of the addition operation being performed.
Recall that we provided a value of 100 and in the smart contract we have already hardcoded 5 in the addition function, as shown here.
  function addition(uint x) public returns (uint y)
  {
    z=x+5;
    y=z;
  }
This means that 100 provided by us as input is added to 5, which is hardcoded in the smart contract addition function, and the result of this calculation is 105, as expected.

Figure 13.35: Retrieve the current value from the smart contract
This is a very simple program, but the aim of this exercise is to demonstrate the use of MetaMask and how it can connect with the local private chain using the localhost RPC provider running in Geth on port 8545.
Pay special attention to the Solidity compiler settings. Choose the appropriate compiler version and the EVM version according to your source code and your Geth client's EVM version. If this is not selected appropriately, you can run into issues. For example, if an incorrect version of EVM (as shown in the following screenshot) is chosen, then when interacting with the contract, you may see the error message shown in the second screenshot with the caption Gas estimation failed error.

Figure 13.36: Remix compiler and EVM options

Figure 13.37: Gas estimation failed error
Similarly, if an incorrect EVM version is chosen, then you will also see an error message in the Remix window, as shown in the following screenshot.

Figure 13.38: Invalid EVM version requested
It's best to configure the settings correctly, which can be left as defaults in most cases, unless there are specific features of an EVM version that you are testing.
Compiling for the wrong version of the EVM can result in incorrect and failing behavior. For example, if you have chosen the EVM version as petersburg (as shown in Figure 13.38) and you've used some opcodes that were introduced in Istanbul (a later release), then even if the compilation is successful, the bytecode at runtime will fail to run correctly and will report an error saying that the opcode is invalid. In some other cases, the runtime may even fail silently or with little indication in the Geth logs about what happened, leading to hours of wasted time in debugging. This is especially true in private networks, therefore make sure that the correct EVM version that matches with the Geth client release is used.
Also notice in the following screenshot that the compiler version is set to 0.5.0 automatically. This is due to the compiler version specified in Solidity source code as 0.5.0, in the line pragma solidity 0.5.0. Also notice the EVM version, which is set to default, which is the latest EVM release.

Figure 13.39: Remix EVM version and compiler settings
In the MetaMask view, you can also see the transaction history of the contract.

Figure 13.40: Transaction history in MetaMask
The preceding diagram shows a number of different elements. On the left-hand side, we have the DEPLOY & RUN TRANSACTIONS window, which is part of the Remix IDE. The middle window is where we see the contract's source code. The window just below that is a log window where the result of the transactions and any interaction and results are shown. It can also optionally listen to the network, if listen on network is selected.
On the right-hand side, we have the MetaMask windows, which is not part of the Remix IDE, but is just superimposed on top of the Remix IDE to show the MetaMask transaction history.
Another way to connect to the local privatenet (Geth node) is to directly connect using the Web3 provider. This will allow direct communication with the blockchain through Remix via RPC without requiring an injected Web3 environment.
One advantage of this method is that it is a quick and easy method to connect Remix with the underlying blockchain (Geth node). There is no need for any additional tools, all you need is Remix IDE (which is also browser-based) and your local running Geth node. The disadvantage, however, is that this method is not very secure.
This can be achieved using the following option, available in Remix:

Figure 13.41: Remix Web3 provider
Notice in the preceding screenshot that Environment is set to Web3 Provider, which simply connects to http://localhost:8545.
Notice that our geth process is running with the required parameters already, which allows Web3 provider connection, as shown here.
$ geth --datadir ~/etherprivate/ --networkid 786 --rpc --rpcapi 'web3,eth,net,debug,personal' --rpccorsdomain '*'
Notice that in the preceding command, we have the --rpccorsdomain flag set. If we didn't have this flag set, then the only option would have been to connect via injected Web3, which in fact is a more secure way to connect to the chain using MetaMask. As such, we use that as a standard, but if you have a simple local test network, you can always use the Web3 Provider option to quickly interact with the blockchain using Remix IDE.
Do not use the --rpccorsdomain flag with * on public networks especially if you have ETH and/or private keys stored locally on your node. This flag used with * will allow all remote connections to your Ethereum node via the exposed RPC endpoint, which can result in security breaches.
Using the flag –rpccorsdomain with the wildcard (--rpccorsdomain '*') is not advisable. Using the wildcard * will allow everyone to connect to the node. Therefore, it is recommended that the access is restricted by specifying only trusted URLs. For example, --rpccorsdomain 'https://remix.ethereum.org' . However, --rpccorsdomain with the wildcard * can be used with a local test chain with test accounts. Always specify the URL in the case of real accounts or on the mainnet.
Now, we can stop the miner:
> miner.stop()
null
With this example, we have now covered how MetaMask can be used to connect to the local network and how Remix and MetaMask, or only Remix, can be used to connect to the local network and deploy smart contracts. We also saw how to interact with a deployed contract.
Remix is a very feature-rich IDE and we have not covered everything: however, this chapter has included a formal introduction to Remix, describing most of the main features in detail, and we will keep using it in the chapters to come.
It is also useful to have a mechanism to view a consolidated list and details of all the transactions in the blockchain. For this purpose, block explorers are used. There are many services available for public blockchains on the internet. For more details on how to use a local block explorer go to the companion website of this book at https://static.packt-cdn.com/downloads/Altcoins_Ethereum_Projects_and_More_Bonus_Content.pdf.
Summary
In this chapter, we have explored Ethereum test networks and how to set up private Ethereum networks. After the initial introduction to private network setup, we also saw how the Geth command-line tool can be used to perform various functions and how we can interact with the Ethereum blockchain. We also saw how MetaMask and Remix can be used to deploy smart contracts. We also introduced how block explorers play a vital role in monitoring the blockchain networks and saw a basic example of installing and using an open source block explorer.
In the next chapter, we will see in greater detail what tools, programming languages, and frameworks are available for the development of smart contracts on Ethereum.