
4
Getting Started with the Basics
In the previous chapter, Common Tools and Frameworks, we gained sufficient context on the various tools that an automation engineer will use day-to-day. We will extend that journey in this chapter by diving deeper into some advanced Git topics in the first part. Then, we will look at how to download and set up an Integrated Development Environment (IDE). Finally, we will expand our learning to include the basics of JavaScript. The following is the list of topics we will be going over:
- Getting more familiar with Git
- Using an IDE
- Introduction to JavaScript
Technical requirements
In this chapter, we will continue looking at working examples of Git through the Command-Line Interface (CLI). We will be using the Terminal software on the Mac for our examples. Windows users can use the built-in PowerShell to execute these commands. We will also be downloading and exploring VS Code, which is an IDE. Please check this page for the download requirements: https://code.visualstudio.com/docs/supporting/requirements. We also expect you to know the basics of HTML to follow along with the next section on JavaScript.
All the code snippets can be found in the GitHub repository: https://github.com/PacktPublishing/B19046_Test-Automation-Engineering-Handbook in the src/ch4 folder.
Getting more familiar with Git
For quality engineers, being proficient in Git and its usage is as important as their knowledge of test automation frameworks. Committing changes and managing branches are critical tasks that they should know by rote. It not only boosts their productivity but also makes the collaboration with the rest of the engineers seamless. In the next section, let us look a little deeper into committing a change and what goes into a commit message.
Committing a change
In the previous chapter, we briefly looked at what a Git commit command does. The commit command helps save all the changes made in the local repository.
Now, let’s look at the importance of writing a descriptive commit message.
Importance of a commit message
More often than not, every software engineer views the commit history to understand what changes went in and why they were made. Anyone viewing a commit message should be able to get adequate context on why a certain change was made. If the commit messages are incomplete, then the engineers have to endure the tedious process of going through each code difference in a commit. For a large and complex commit, this can be very cumbersome. It is, therefore, tremendously important to get into the habit of taking the time to write clean and concise commit messages.
There are a few commonly used flags with this command. Let us look at them in action next.
Commonly used flags
We will look at three of the frequently used flags with the commit command in this section:
- -m: This flag associates a message with the commit. We learned about the usage of this flag in the previous chapter. Figure 4.1 illustrates adding multiline comments using the git commit command with the –m flag:

Figure 4.1 – git commit multiline comment
Figure 4.2 shows the view of this commit in GitHub:
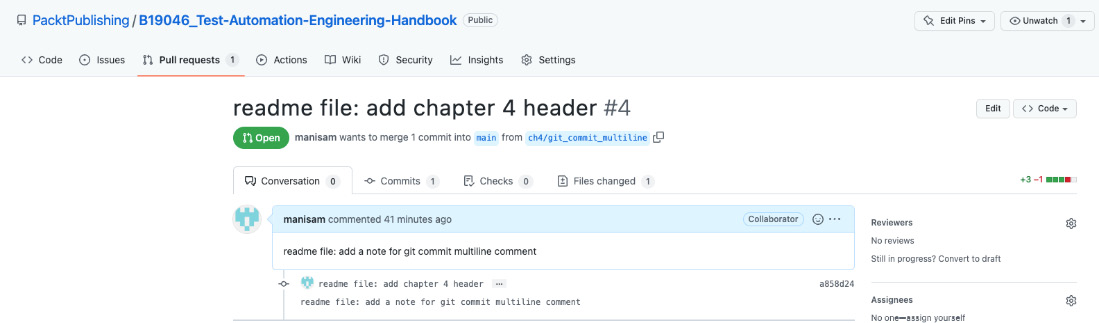
Figure 4.2 – GitHub multiline commit view
- --amend: This flag helps modify the most recent commit in the local repository instead of creating a new commit. Figure 4.3 demonstrates an example where a new file was added in an initial commit. Then, using the --amend and --no-edit flags, a second file is added to complete the commit. The --no-edit flag allows you to complete the commit without editing the commit message:

Figure 4.3 – git commit with the --amend flag
- -a: This flag automatically commits all the modified and deleted files. Figure 4.4 demonstrates a commit where one of the files was modified and another deleted. The –a flag is being used here to stage and commit both these changes in a single step:

Figure 4.4 – git commit with the -a flag
In the next section, let us look at an example of resolving a merge conflict when pushing and pulling changes to/from the remote repository.
Resolving merge conflicts
Merge conflicts happen when changes have transpired in the same region of a file and Git cannot automatically merge the changes in the file. It is possible that two different engineers are working on the same file and tried to push their changes to the remote repository. In such cases, Git fails the merge processes and forces manual resolution of the merge conflict. Without an IDE, this process can get really messy easily and might end up consuming a lot of the programmer’s time. Resolving merge conflicts without an IDE usually involves viewing/editing multiple files through a CLI editor and identifying and fixing the parts of the file that are in conflict. This is a tedious process, but IDEs provide an interface to deal with conflicts and it is usually completed with a few clicks after manual file inspection.
Let us now look at how to resolve a merge conflict step by step. Figure 4.5 illustrates a ch4/merge_conflict_branch_1 branch where the git_amend_2.txt file was updated and this change was pushed to the remote repository and merged with main through a pull request.

Figure 4.5 – The git_amend_2.txt file updated and merged
In another branch, let us try to merge the changes from Figure 4.4, where the git_amend_2.txt file was deleted. It is evident that these two changes contradict each other. Figure 4.6 shows the merged changes being fetched from the main branch:

Figure 4.6 – Fetched merged changes from main
Figure 4.7 shows the result when the conflicting branch is being rebased with the main. Rebasing is the process of combining a chain of commits and applying it on top of a new base commit. Git automatically creates the new commit and applies it on the current base. Frequent rebasing from the main/master branch helps keep a sequential project history. At this point in the process, the conflicts have to be resolved manually. The engineer has to look through the file and accept or reject others’ changes based on the project’s needs.
-

Figure 4.7 – Merge conflict message
In this case, let’s resolve the merge conflict by accepting the incoming changes from the remote rather than pushing the delete. This is simpler when done through an IDE, as shown in Figure 4.8. On navigating to the source control pane in the IDE and by right clicking the file, the user is shown an option to accept the incoming changes:

Figure 4.8 – Accept incoming changes
Figure 4.9 shows the result of staging the accepted changes, which results in the deleted file being retained with the modified contents from the main branch:

Figure 4.9 – Stage the accepted changes
Now that the merge conflict is resolved, the rebase can be continued using git rebase --continue to complete the commit and merge process subsequently. It is important to remember to pull from remote or other branches (if necessary) before beginning any new work on the local code base. This keeps the branch updated, thereby reducing merge conflicts. It is also vital to have continued communication with the rest of the team when deciding which changes to accept/reject when resolving merge conflicts. Next, let’s look at a few additional Git commands that might help you save a lot of time.
Additional Git commands
Let us familiarize ourselves with a few additional commands that will help boost the productivity of the engineers:
- git bisect: This command helps identify a certain commit that is buggy or caused certain tests to fail. It uses binary search to narrow down the search to a single commit from hundreds of commits. The reference for the individual commits can be found using the git log command.
- git cherry-pick: This command helps pick changes from a specific branch and apply them to the local branch being worked on. It is very helpful in the case when you don’t need to apply the changes that aren’t relevant to your work or when you would like to test your local branch with changes from another remote branch.
- git rebase: This command was already used in some of the previous examples, and it helps simplify the merging process into the master or the main branch. It modifies the base of the local branch to the most recent commit in the main branch.
- git revert: This command provides a safe way to reverse the specified changes. Instead of deleting changes, it creates a new commit with inverse changes. This helps maintain revision history for future reference.
- git reset: This is a powerful command that helps move the repository back to an older commit by removing all the changes after that commit. It does this by moving the current head of the branch back to the older commit.
- git reflog: Git keeps track of changes to branches by maintaining reference logs, and this command helps to view those logs.
This concludes our section on the deeper dive into Git commands. Let us now start understanding what an IDE is and begin working with one.
Using an IDE
Quality engineering work demands working with various tools, and the right set of tools tends to make the engineer’s job extremely efficient and productive. An IDE ranks among the top in helping engineers write and deploy high-quality code with speed and reliability. Before getting into the nitty-gritty of an IDE, let us try to understand what makes them so powerful. Apart from IDEs, some programmers prefer using text editors for writing code, and they are nothing more than tools that help edit text. Programmers regularly spend an enormous amount of time dealing with formatting and syntax details. There are text editors that come with syntax highlighting and color-coding that make their lives easier. These are usually apt for an experienced programmer. An IDE is a powerful tool that provides debugging, build management, and IntelliSensing features. It helps the programmer get up and running with a complex project really quickly. There is usually some learning curve with using an IDE and all its capabilities. But once we get familiarized with the features, it can be a great ally for our daily programming tasks. At the end of the day, it is the individual’s preference on choosing to work with an editor or an IDE.
Let us consider, in the next section, some crucial factors in selecting an IDE.
Choosing an IDE
Not all IDEs are made equal, and there is a whole array of options available for engineers to choose from. Let us review some important features to look for in an IDE before settling on one:
- GitHub integration: This is a no-brainer and an absolute must-have since every engineer works with Git and needs integration with some form of remote code repository such as GitHub. This mainly provides the comfort of keeping the local code changes synchronized with the rest of the organization from within the IDE.
- Debugging capabilities: Running a program locally step-by-step to identify points of failure is a critical task that every engineer performs. IDEs should be able to support debugging in a variety of programming languages and provide options to view the runtime values of various aspects of the program, such as variables, objects, and so on.
- Build tools integration: The ability to package and execute all the dependencies from within the tool helps the quality engineers immensely in quickly making changes and retesting specific parts of the application. Integration with build tools reduces the split between the build process and testing the changes.
- Plugins support: There are numerous plugins usually available via a Marketplace to be downloaded and used within an IDE. These plugins or extensions provide valuable features such as intelligent code completion, live reload, bracket analyzer, and more, and they help save time on redundant tasks.
- Cost versus speed: A lot of the available IDEs are open source but sometimes need a compromise on the speed. It is important to gauge the scale of the project being worked on and choose a licensed or well-supported open source tool. The last thing an engineer would want is to work on an unstable IDE.
- Coupling with languages/frameworks: It is important to review which languages and technologies the IDE can support before selecting one. It should be compatible with the tech stack that the programmer will work on most of the time.
Let us now look at downloading and setting up VS Code, an open source IDE.
Downloading and setting up VS Code
In this section, we will be going over the process of downloading VS Code, which can run on macOS, Linux, and Windows. All the code examples cited in the rest of this book will use VS Code. You are free to use an IDE of your choice. Let us now go through the steps for manually installing VS Code on macOS. At the end of this section, you are provided with a shell script to perform this installation via the CLI:
- Review this link for the necessary system requirements to download and set up VS Code: https://code.visualstudio.com/docs/supporting/requirements.
- Click on the download link on the installation page to download the executable file:
macOS and Mac: https://code.visualstudio.com/docs/setup/mac
Linux: https://code.visualstudio.com/docs/setup/linux
Windows: https://code.visualstudio.com/docs/setup/windows
- Extract the downloaded archive file and move the Visual Studio Code application file to the Applications folder.
- Double-click the VS Code icon in the Applications folder to open the VS Code IDE.
- Use the Settings option in the Preferences menu for additional configuration. VS Code has inherent support for Git provided Git is installed on the machine.
VS Code comes as a lightweight installation and in most cases, engineers would need additional components installed through the Extensions option in the Preferences menu.
- Click the Extensions option and search for Prettier, which is a particularly useful tool for code formatting.
- Select the Prettier - Code formatter extension and click on the Install button, as shown in Figure 4.10. This should complete the installation of the extension from the Marketplace.

Figure 4.10 – Installing Prettier - Code formatter
There are hundreds of helpful extensions available for installation from the Marketplace. These extensions have a wide community of users supporting them, thereby creating a strong ecosystem. Users are strongly encouraged to browse through the available extensions and install them as necessary.
If you prefer using the CLI for installation, the following shell script can be used for installing VS Code on macOS. This example uses Homebrew (https://brew.sh/) for CLI installation:
#!/bin/sh
/bin/bash -c "$(curl -fsSL https://raw.githubusercontent.com/Homebrew/install/HEAD/install.sh)"
brew tap homebrew/cask
brew install --cask visual-studio-code
This concludes our section on setting up the IDE. Let us now move on to learning the basics of JavaScript.
Introduction to JavaScript
JavaScript is the most common web programming language, and it is imperative for quality engineers to familiarize themselves with the basics. With minor exceptions, we will be using JavaScript to automate various levels of the application stack in the rest of this book. Let us start with the question of why we should learn JavaScript.
Why learn JavaScript?
One of the primary reasons to learn JavaScript is its complete integration with HTML/CSS and that it is enabled to work on all browsers. This makes it extremely easy to create and execute scripts. It is also a loosely typed language that provides engineers with great flexibility when writing applications. Its event-driven architecture helps engineers perform rigorous read/write operations with ease at a scale. Even though it was initially created to run only on browsers, it is currently being used extensively for building server-side applications. JavaScript, as a programming language, caters to beginner, intermediate, and advanced engineers. We will start with the basics in this section and learn about quite a few intermediate and advanced JavaScript topics throughout this book in the subsequent chapters. JavaScript also supports both functional and object-oriented programming paradigms. It is also useful to know that JavaScript conforms to ECMAScript, which is a standard used to ensure the interoperability of web pages between browsers.
Knowing all these advantages, let us start working on JavaScript in the next section.
Running a JavaScript program
In this section, let us explore how to run a basic JavaScript program from within our IDE. We will start by installing the Node.js runtime environment.
Installing Node.js
One of the easiest ways to execute a JavaScript program is to run it using Node.js. Node.js is a JavaScript runtime environment created to execute JavaScript code outside of a browser. Use https://nodejs.org/en/ to download Node.js and navigate through the wizard to complete the installation of the latest stable version of Node.js. Check the installation using the node --version command. Alternatively, you can use Homebrew on macOS or winget on Windows to download it via the CLI. At the time of writing this book, the latest stable node version is 18.12.1:
➜ cli_demo node --version
v18.12.1
➜ cli_demo
Now that we have Node.js installed, let us execute our first JavaScript program.
Executing the JavaScript program
We will be using the VS Code IDE to execute the programs for the rest of this book. Let us go through step by step to execute a simple Hello World program written in JavaScript:
- The console.log command outputs the message in the parenthesis to the console. Create a new hello_world.js file and save it with the contents, console.log('hello world');.
- Open a new Terminal window by selecting the New terminal option from the Terminal menu. In the Terminal window, navigate to the folder in which the hello_world.js file exists and run the node hello_world.js command. This prints out the text hello world in the console:
➜ B19046_Test-Automation-Engineering-Handbook git:(main) ✗ cd src/ch4
➜ ch4 git:(main) ✗ node hello_world.js
hello world
➜ ch4 git:(main) ✗
We have set up our IDE and are able to execute a simple JavaScript program using Node.js. It is now time to get started with the basics.
JavaScript basics
Let us start by adding comments in a JavaScript file. Single-line comments can be added using // and multiline can be added by enclosing within /* */, as shown in Figure 4.11:

Figure 4.11 – Adding comments in a JavaScript file
Let us look at variables in the next section.
Variables
Variables are references to the storage location. var was the standard declaration command until ES6. But in ES6, some of the scoping and hoisting issues with var were addressed, and the common ways to set variables in JavaScript became let and const. The main difference is that let allows the variable to be assigned a different value later in the program, but const does not. Figure 4.12 demonstrates the code where the variable temperature is being created and reassigned using let. It also shows the error when attempting to reassign the value of city, which is declared as const:

Figure 4.12 – Variable types, let and const
Note
It is better to use const to declare variables unless there is a need to reassign the value of the variable.
Next, let us take a look at data types.
Data types
Data types fall into two categories: primitives and objects. In primitive data types, the data is assigned directly to memory. Let us look at the primitive type in this section and devote the next section to objects.
Figure 4.13 shows the code snippet with variable assignment for each of the primitive data types. string, number, boolean, null, and undefined form the most used primitive data types. Strings must be defined using double or single quotes. Boolean can contain only true or false values. Also, note that there isn’t a separate data type for decimal values; it is also a number. Null means an empty variable with no value. Any variable that is initialized without a value has an undefined type. Variable types can be tested using typeof followed by the name of the variable:

Figure 4.13 – Data types
Note
You might have noticed from Figure 4.13 that null has a typeof object. This is considered a bug in JavaScript. The explanation for this can be found in this link: https://developer.mozilla.org/en-US/docs/Web/JavaScript/Reference/Operators/typeof#typeof_null.
In the next section, let us look at strings in a little more detail, as they are a widely used primitive data type.
Working with strings
There are a few common string usages and methods that engineers should be aware of.
Figure 4.14 illustrates the concatenation of two strings to produce a meaningful statement. Backticks can be used to enclose the string with a dollar sign followed by curly brackets with the variable name:

Figure 4.14 – String concatenation
Let us now familiarize ourselves more with strings by working on some properties and methods. A method is a function that is associated with an object. Methods must be invoked with parenthesis, while properties do not need them:
- length: This property returns the number of characters in the string
- toUpperCase()/toLowerCase(): These methods convert the given string to uppercase or lowercase
- substring(): This method takes in start and end indices and returns a substring matching the indices
- split(): This method splits the given string into arrays based on the provided splitter parameter
Figure 4.15 summarizes how these properties and methods are used with strings:
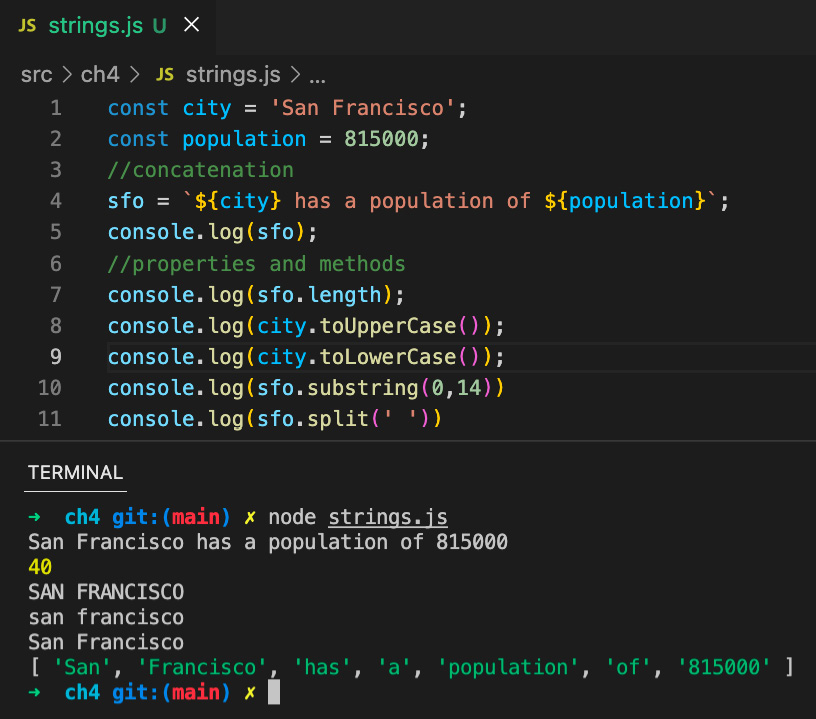
Figure 4.15 – Working with strings
With this introduction to variables and data types, let us now take on the topic of objects in JavaScript.
Getting to know the JavaScript objects
In JavaScript, an object is a collection of properties. Objects are first initialized using a variable name and assigned to a set of properties. Objects further provide methods to update these properties. Properties can be of any data type, sometimes even other objects. This enables building complex objects in JavaScript. Let us start learning about objects with arrays in the next section.
Using JavaScript arrays
Arrays are one of the most frequent data structures and are built-in objects in JavaScript. Arrays are nothing but variables that can hold multiple values. The first element of an array is indexed by 0 and the subsequent indices are incremented by 1. The size of the arrays can be changed by adding or deleting elements, and they can contain a mix of data types. Arrays can be initialized by enclosing the elements in square brackets, []. Subsequently, the elements can be accessed by plugging the index within []. Let’s look at some commonly used array methods:
- push(element): Adds an element at the end of the array.
- unshift(element): Adds an element at the beginning of the array.
- pop(): Removes the last element of the array.
- indexOf(element): Returns the index of the element in the array. Returns –1 if the element is not found in the array.
- length(): Returns the number of elements in the array.
Figure 4.16 shows these array operations in action:

Figure 4.16 – Array operations
Figure 4.17 shows the corresponding outputs. We begin by creating the array and printing it to the console. Then, we add elements to the end and beginning of the array. Subsequently, we work with the indices of the array, and finally, get the length of the array:

Figure 4.17 – Array operation outputs
Unlike a lot of other programming languages, arrays in JavaScript do not throw an Array Out of Bounds error when trying to access an index greater than or equal to the length of the array. JavaScript simply returns undefined when trying to access the non-existent index array. Arrays come with a wide variety of built-in methods, and I would strongly encourage you to browse through them at https://developer.mozilla.org/en-US/docs/Web/JavaScript/Reference/Global_Objects/Array. Next, let us look at work with object literals.
Working with object literals
Object literals allow properties to be defined as key-value pairs. Values of the properties can be other objects as well. Dot (.) or square bracket ([]) notations can be used to retrieve the value of a property. The code snippet demonstrated in Figure 4.18 shows an object and array nested within the movie object. In such cases, the object name can be chained subsequently with the call to a nested data structure. Adding an extra property to the object is very simple and looks like a variable assignment. To further our example, it would be movie['producer']='Danny DeVito:

Figure 4.18 – Objects
const prevents reassigning the variable but does not prevent modifying values within an object:
const a = { message: "hello" };
a.message = "world"; // this will work
Having learned the basics of JavaScript objects, let us now look at how to destructure one.
Destructuring an object
Object destructuring is used in JavaScript to extract property values and assign them to other variables. It has various advantages such as assigning multiple variables in a single statement, accessing properties from nested objects, and assigning a default value when a property doesn’t exist. We use the same example as in the previous section but as shown in Figure 4.19, we destructure the movie object by specifying the name and awards variables within {}. On the right-hand side of the expression, we specify the movie object. We could also assign them to a variable within the curly brackets to fetch data from nested objects. Object destructuring was introduced in ECMAScript 6 and prior to this, extracting and assigning properties in such a way required a lot of boilerplate code.
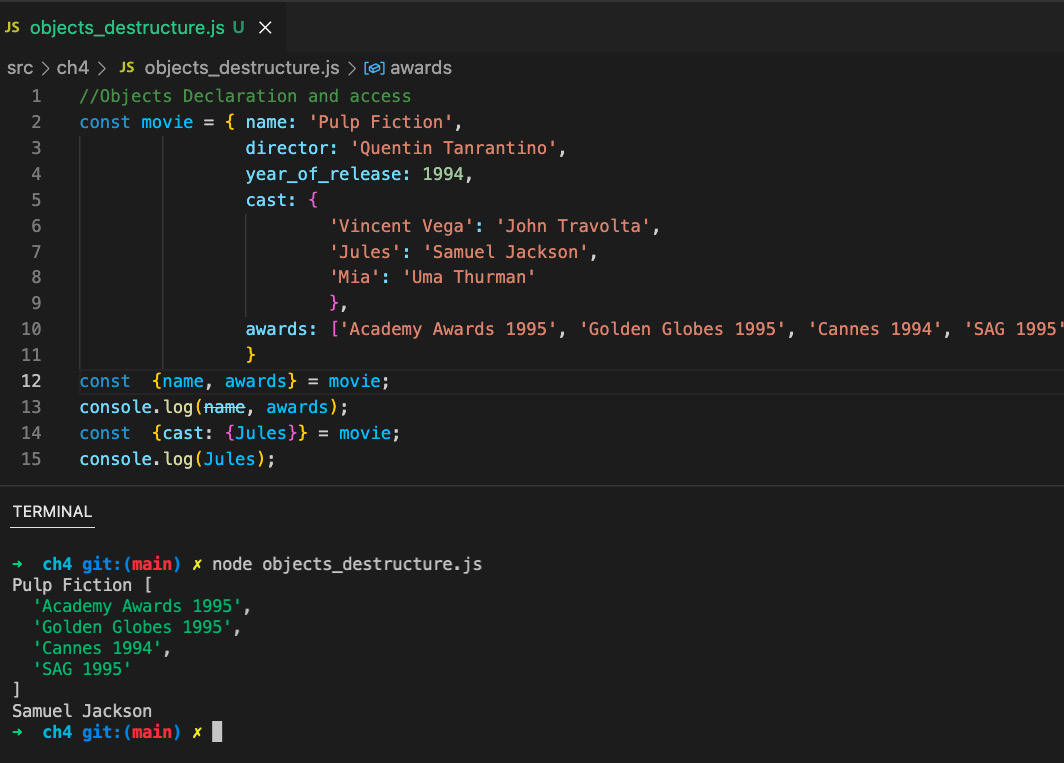
Figure 4.19 – Object destructuring
Let us next work with an array of objects.
Arrays of objects
Working with arrays of objects is crucial for quality engineers as a lot of times, the API response payloads in JSON format have multiple objects embedded within an array and their format is identical to JavaScript object literals. Let us consider an example where multiple movie objects are embedded within the movies array. We could use the JSON.stringify method to create a JSON string. The code snippet in Figure 4.20 demonstrates how to access nested elements in an array of objects and how to create a JSON string from a JavaScript object:

Figure 4.20 – Arrays of objects
In the next section, let us learn how to operate with loops and conditional statements.
Loops and conditionals
Loops and conditional statements form a basic pillar of any programming language. They help reduce runtime and make the program look cleaner. Let us look at each one of them and understand how they operate in the next sections, starting with loops.
Working with loops
One of the most frequently used loops is the for loop. A for loop contains three parameters: iterator assignment, condition, and increment. The code enclosed within the loop executes until the specified condition is met. In the simple example illustrated in Figure 4.21, we start with 0 and print the value of i until it meets the i<10 condition:

Figure 4.21 – A simple for loop
Note
One of the common pitfalls while looping through an array is to accidentally exceed the last index of the array. The condition to check the array should be i<array.length or i<=array.length-1.
The while loop operates similarly to the for loop, but we set the variable outside of the loop. It is a common mistake to miss the increment or incorrectly specify the condition. Doing so would result in an infinite loop. Figure 4.22 shows the same logic in the while loop:

Figure 4.22 – A simple while loop
Now, let us loop through the array of objects we created in Figure 4.20. For this purpose, we will use the for..of loop, which is much more readable than the regular for loop. In Figure 4.23, we have the code snippet that iterates over each of the objects in the movies array and prints the name and director. We create a temporary variable to hold the current entry of the array in the loop and use that variable to print the properties:

Figure 4.23 – A for..of loop
We looked at some very useful examples of loops in this section. Let us move on next to conditional statements.
Using the conditional statements
Conditional statements are used to separate the logic into different code blocks based on one or more conditions. The most common conditional statement is the if...else statement. This is better understood by referring to the code snippet in Figure 4.24. Here, we use conditional statements to assign a grade based on the student’s score. We start with the if statement and check for the highest grade and then use a series of else if statements followed by the else statement to check for any score less than 60. The else if statements are useful to extend the logic to include additional conditions. It is important to remember that in the absence of an else statement, JavaScript ignores the conditional code block when the if condition is not true:

Figure 4.24 – Conditional statements
Table 4.1 summarizes the most common conditional operators in JavaScript:
|
Operator |
Description |
|
== |
Equal to |
|
=== |
Equal value and equal type |
|
!= |
Not equal to |
|
!=== |
Not equal value and not equal type |
|
> |
Greater than |
|
< |
Less than |
|
>= |
Greater than or equal to |
|
<= |
Less than or equal to |
Table 4.1 – Conditional operators
In the next section, let us learn about JavaScript functions and how to use them to make the code more reusable.
Functions in JavaScript
Functions are used to package reusable code blocks to avoid redundancy. In JavaScript, the function is declared using the function keyword, followed by its name, parameters, and body. A function can accept zero or more parameters. Parameters must be separated by a comma if there is more than one. Functions can also return a value using the return statement followed by an expression or a value. Within the function, you can use the argument object to access the arguments as an array.
Figure 4.25 illustrates a function that computes the area based on the number of arguments sent:

Figure 4.25 – Functions
In the next section, let’s look at how and where to continue our journey of learning JavaScript.
Exploring JavaScript further
The topics we have surveyed so far in JavaScript are a humble beginning and there are tons more to explore in this topic. ECMAScript 6 was a huge upgrade to JavaScript, and it has provided various efficient ways of performing routine programming tasks such as writing loops, defining functions, and more. We will be learning some of these more effective and newer ways in the subsequent chapters as needed. In the meantime, the MDN docs for JavaScript, located at https://developer.mozilla.org/en-US/docs/Web/JavaScript, can be used as a standard reference to get additional details on any concepts.
Summary
This chapter encompassed a considerable number of hands-on skills that a quality engineer uses daily. We started the chapter by looking into the various aspects of selecting an IDE. We moved on to downloading and setting up VS Code on macOS. We also learned how to search and use an extension from the VS Code Marketplace. We commenced our JavaScript learning in the subsequent section by understanding why we should learn it and laid a solid foundation with concepts such as variables and data types. We then learned about string operations before getting introduced to JavaScript objects. We dealt in detail with arrays and object literals.
We concluded our introduction to JavaScript by gaining knowledge about loops, conditionals, and functions. We grasped a little more detail on Git topics such as commits and merge conflicts. We closed out that section by learning some additional Git commands.
This sets us up excellently for the next chapter, Test Automation for Web. You will use your gained knowledge of JavaScript to automate a test using the Cypress tool. We will also look at the various considerations for web automation.
Questions
- What are some factors to consider when choosing an IDE?
- What is the difference between creating a variable using let and const?
- How can we check whether an element is present in an array?
- What are the advantages of object destructuring?
- How are functions defined in JavaScript?
- What does a git bisect command do?
- What are some ways to avoid merge conflicts?
- Why is a git commit message important?