Chapter 5: Azure Key Vault
When talking about cloud computing, discussions are often directed to data protection, encryption, compliance, data loss (and data loss prevention), trust, and other buzzwords that center around the same group of topics. What they all have in common is the need for a trusted service that helps them to secure cloud data without giving a cloud vendor access to both your data and the corresponding encryption keys. Let's imagine that you want to create an Azure resource, such as a VM, that you will need admin credentials for. In this case, you don't want to hardcode usernames and passwords in your deployment script or template, do you? This is a scenario where Azure Key Vault comes into play. In this chapter, we will cover the following topics:
- Understanding Azure Key Vault
- Understanding service-to-service authentication
- Using Azure Key Vault in deployment scenarios
Understanding Azure Key Vault
Azure Key Vault is a secure, cloud-based storage solution for keys, secrets, and certificates. Tokens, passwords, certificates, API keys, and other secrets can be securely stored and access to them can be granularly controlled using Azure Key Vault. The service can also be used as a key management solution. Azure Key Vault makes it easy to create and control the encryption keys that are used to encrypt your data. Another usage scenario is Secure Sockets Layer/Transport Layer Security (SSL/TLS) certificate enrollment and management. You can use Azure Key Vault to address certificate life cycle management for both Azure and internally connected resources. Secrets and keys that are stored in Azure Key Vault can be protected either by software or hardware security modules (HSMs) that are FIPS 140-2 Level 2 validated.
As you have already learned, you can use Azure Key Vault to manage keys, secrets, and certificates. The following list explains what each of these artifacts can be used for:
- A cryptographic key is used for data encryption. Azure Key Vault represents keys as JSON Web Key (JWK) objects, which are declared as soft or hard keys. A hard key is processed in a hardware security module (HSM), whereas a soft key is processed in the software by Azure Key Vault. A soft key is still encrypted at rest using a hard key, which is stored in an HSM. Clients can either request Azure Key Vault to generate a key or import an existing RSA or elliptic curve (EC) key. RSA and EC are the algorithms that are supported by Azure Key Vault.
- A secret is basically a string that is encrypted and stored in Azure Key Vault. A secret can be used to securely store passwords, storage account keys, and other highly valuable strings.
- A certificate in Azure Key Vault is an x509 certificate that is issued by a public key infrastructure (PKI). You can either let Azure Key Vault request a certificate from a supported public certification authority (CA), which today are DigiCert and GlobalSign, or you can create a certificate signing request (CSR) within Azure Key Vault and manually let this CSR be signed by any public CA of your choice.
Azure Key Vaults are offered in two different service tiers, further referred to as SKUs:
- The standard service tier offers encryption based on software-protected keys.
- The Premium service tier offers HSM-protected keys for encryption.
Besides vaults, the service also offers managed HSMs that provide single-tenant, zone-redundant, and highly resilient HSMs to store and manage cryptographic keys. Every managed HSM will only be used for one single customer, helping you to meet compliance and regulatory requirements.
In this chapter, you will learn how to work with key vault entities. But first, let's look at service-to-service authentication in Azure Key Vault, which is needed to enable other Azure services to leverage Azure Key Vault during deployment or resource-management operations.
Access to an Azure key vault is granted by RBAC. That said, you need to have an Azure AD account to get access to the service, which means that you can use all the protective options for interactive authentications that were discussed in Chapter 3, Managing Cloud Identities. Furthermore, access to items protected by Azure Key Vault can be restricted to only single aspects of Azure Key Vault. For example, an account could be granted access just to secrets, but not to keys or certificates, or you could grant an account just a subset of permissions, but for all entities stored in a key vault. This granular rights management, in addition to RBAC, which will only grant access to an Azure key vault (being an Azure resource), is implemented by access policies. Let's look at these policies in a little more detail in the next section.
Understanding access policies
With access policies, you can granularly define who will get what level of access rights to a single Azure Key Vault instance and its artifacts.

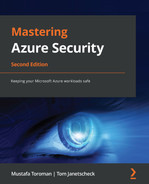
Figure 5.1 – Azure Key Vault access policies
As you can see in Figure 5.1, there are two different user accounts called Tom Janetscheck that have been granted several permissions to access keys, secrets, and certificates in the Access policies settings section of Azure Key Vault called MasteringAzSec. Besides that, you can enable access to keys and secrets for Azure VMs, ARM, and Azure Disk Encryption. These options are necessary if you want to grant Azure VMs in your tenant read access to secrets so that they can be retrieved during VM deployments or if you want to enable Azure Resource Manager to retrieve secrets so they can be used in a template deployment. The third option specifies whether Azure Disk Encryption—a service that encrypts Azure VMs' disks using BitLocker or dm-crypt, depending on the operating system used in the Azure VM—is allowed to retrieve secrets from Azure Key Vault and unwrap values from stored keys.
Understanding service-to-service authentication
As we mentioned before, access to an Azure key vault and its entities is usually granted on a per-user basis. So, to enable service-to-service authentication, you could create an Azure AD application with associated credentials and use this service principal to get an access token for your application. It's quite an easy process:
- Navigate to Azure Active Directory | App registrations in the Azure portal and select New registration to start the wizard.

Figure 5.2 – Creating a new app registration
- Enter a name and confirm your choice.
- Create a client secret by navigating to the Certificates & secrets option in app registration and then select New client secret.

Figure 5.3 – Creating a new client secret
- Enter a description and decide whether the secret will expire in 3, 6, 12, 18, or 24 months, or enter a custom period. After confirming your choices and leaving the wizard, you are presented with the new client secret and its value, which you can copy and then use for authentication.

Figure 5.4 – Your client secret
An easier and quicker method is to use the Azure CLI. With the following command, you can simply create a new service principal with the name MasteringAzSecSP:
az ad sp create-for-rbac --name MasteringAzSecSP
The engine will use default settings for the account creation, and once the process is finished, you will find the username (appId) and the client secret (password) in the CLI window, as shown in the following screenshot:

Figure 5.5 – Using the Azure CLI to create a new service principal
The service principal behaves similarly to a user account in terms of access management, which means that you can use the username (the application or client ID) as a principal when granting access to the key vault and its entities.
While this approach works great, two caveats come with it:
- When creating the application credentials, you will get the app ID and the client secret, which are usually hardcoded in your source code. It's a dilemma because you cannot store these credentials in Azure Key Vault as they are needed to authenticate before being granted access to the key vault.
- Application credentials expire and the renewal process may cause application downtime. You don't want to use a client secret that will never expire and that is hardcoded in your source code.
So, for automated deployments, we need another approach, which is where the Managed identities for Azure resources service comes into play. Let's move one step further and learn how this service can address the dilemma.
Understanding managed identities for Azure resources
Needing credentials to get access to services is a common problem that you will often encounter. Azure Key Vault is an important part of your application design because you can use it to securely store and manage credentials for other services. But Azure Key Vault itself is a service that requires authentication before you are granted access. With managed identities for Azure resources, a free feature of Azure Active Directory, you can solve this dilemma. The service provides other Azure services with an automatically managed identity in Azure AD.
There are two different types of managed identities within the service:
- A system-assigned managed identity is directly enabled on an instance of an Azure service. When the managed identity is enabled, Azure AD automatically creates an identity for the particular service in Azure AD that is automatically trusted by the Azure subscription that the service instance is created in. Credentials are automatically provided to the service instance after the identity is created. The identity's life cycle is directly tied to the service's life cycle, which means that a system-assigned managed identity is automatically removed from Azure AD when the service is deleted.
- A user-assigned managed identity is a manually created Azure resource. When creating a user-assigned managed identity, Azure AD will create a service principal in the Azure AD tenant that is trusted by the Azure subscription you are currently using. After creating the identity, you can assign it in one or several Azure service instances. The user-assigned managed identity's life cycle is organized separately from the services' life cycles that the identity is assigned to. In other words, when an Azure resource with a user-assigned managed identity is deleted, the managed identity is not automatically removed from Azure AD.
The relationship between a system-assigned managed identity and an Azure resource is 1:1, which means that an Azure resource can only have one system-assigned managed identity and this identity is only usable by the particular service it was created for.
The relationship between the user-assigned managed identity and the Azure resource is n:n, which means that you can use several user-assigned managed identities with one Azure resource at the same time and that a single user-assigned managed identity can be used by several different Azure resources.
Important Note
Microsoft provides a list of Azure services that currently support system-assigned, user-assigned, or both types of managed identities at https://docs.microsoft.com/azure/active-directory/managed-identities-azure-resources/services-support-managed-identities.
The creation process of a system-assigned managed identity in the Azure portal is very easy. All Azure resources that currently support managed identities have an Identity option in the Settings section of the resource.

Figure 5.6 – Activating a system-assigned managed identity for a Logic app
The following steps explain how to activate a system-assigned managed identity for a Logic app:
- On the Logic app's Identity page, you can choose whether you want to activate a system-assigned managed identity or whether you want to assign a user-assigned managed identity. To activate a system-assigned managed identity, you just have to set the Status toggle switch to On and then save your selection, as shown in Figure 5.6.
- You will then be informed that once you confirm this configuration, a managed identity for your resource will be registered in Azure AD and that once the process has finished, you can grant permissions to that particular managed ID. In the preceding example, I have enabled a system-assigned managed identity for a Logic app called Block-BruteForceAttack.
- When creating a new Key Vault access policy, you can now select the identity with the same name to grant access to the Key Vault's entities.
If you want to assign a user-assigned managed identity to your resource, you first have to navigate to the managed identity service and create a new one in the Azure portal:
- In the portal's top search bar, enter Managed Identities and select the service.
- Click on Create.
- As mentioned before, a user-assigned managed identity is a new Azure resource and therefore needs to be created in an Azure subscription and stored in an Azure resource group, as shown in Figure 5.7:

Figure 5.7 – Creating a user-assigned managed identity
- Click on Review + create, and after the final validation is passed, click Create. Once the user-assigned managed identity is created, you can assign it to your Azure resource, like the Logic app's system-assigned managed identity we used in the preceding scenario.
Managed identities can also be used for Azure DevOps or Terraform authentication against your Azure environment.
Note
You can use a managed identity for Terraform authentication against Azure AD; however, in this case, the managed identity is created for an Azure VM and Terraform needs to be started from within the VM so that it can make use of the ID.
Let's assume that you only want to allow Azure resource creation via a DevOps pipeline with all related processes, such as pull requests and authoring. From a technical point of view, Azure DevOps is nothing but an application that needs to be granted access to an Azure subscription (or management group). Therefore, Azure DevOps needs a service principal that is either manually managed as an application registration with all its downsides, or that can be automatically managed using a managed identity. The same applies to Terraform, which is also just an application that needs rights to be granted in an Azure environment.
Note
You can use the Azure CLI, PowerShell, ARM templates, and Terraform to create managed identities in Azure. You can find examples of these methods in the GitHub repository that has been created for this book at https://github.com/PacktPublishing/Mastering-Azure-Security-Second-Edition.
Now that you know how managed identities work and what options you have for service-to-service authentication, let's move one step forward and see how you can use Azure Key Vault in your deployment scenarios.
Using Azure Key Vault in deployment scenarios
Azure Key Vault is a nice service when it comes to securely storing and retrieving credentials that are needed during resource creation. It also helps you to encrypt Azure resources, such as Azure storage accounts or VM disks, with your own encryption key. In this section, we will cover several options for how to use Azure Key Vault in deployment scenarios. You will find examples for PowerShell, ARM templates, and Terraform, as these are the most common deployment tools when it comes to creating Azure resources.
Important Note
The first step you will always have to go through is to authenticate with Azure AD using a principal that has been assigned the appropriate set of access rights in the Azure environment that you want to deploy resources to, depending on the task you want to perform and the resource that is affected by it.
Are you ready? Then let's start by creating a new Azure key vault and a secret that can later be used in a VM deployment scenario in the following section.
Creating an Azure Key Vault and secret
As with all Azure resources, you can use the Azure portal to create and manage an Azure key vault. Although it might be convenient to click through the portal, it is a better idea to use a scripting or template language for this. Azure Key Vault is a critical resource when it comes to automated deployments. Today, there is no way to granularly grant access to single items of the same type within the same key vault. You can manage levels of access to keys, secrets, and certificates, but only on a key-vault level, not on an item level. This is why you might want to create several key vaults in the same Azure subscription. Using deployment automation, you can make sure that all key vaults in your environment adhere to the rules and policies you have defined.
Key Vault creation in PowerShell
With PowerShell being an imperative scripting language, you need to define all the steps that are necessary in the correct order:
- The first thing you need to do is to log in with an account that has the appropriate set of access rights to create a new resource group and Azure key vault instance in your Azure subscription:
# Login to your Azure subscription
Connect-AzAccount
- You will then be prompted to enter your Azure login credentials, which are used by PowerShell to go through the next steps. After logging in, you either create a new resource group or refer to an existing one.
- We will now assume that a new resource group will be created using the following code snippet. Before we do so, it makes sense to define all values for variables that are then used in the following script sections:
# Define variable values
$rgName = "myResourceGroup"
$azRegion= "WestEurope"
$kvName = "myAzKeyVault"
$secretName = "localAdmin"
$localAdminUsername = "myLocalAdmin"
# Create a new resource group in your Azure subscription
$resourceGroup = New-AzResourceGroup '
-Name $rgName '
-Location $azRegion
- Now, you can move on and create a new Azure key vault:
# Create a new Azure Key Vault
New-AzKeyVault '
-VaultName $kvName '
-ResourceGroupName $rgName '
-Location $azRegion '
-EnabledForDeployment '
-EnabledForTemplateDeployment '
-EnabledForDiskEncryption '
-Sku standard
In the preceding script, there are some mandatory and optional parameters listed. It is mandatory to use the following parameters when creating a new Azure key vault:
- VaultName defines the name of the Azure key vault. We are using the $kvName variable, which is defined at the beginning of the script.
- ResourceGroupName defines the Azure resource group that the key vault will be created in.
- Location defines the Azure region where the key vault will be created.
Some optional parameters are defined in the preceding section:
- EnabledForDeployment enables the Microsoft.Compute resource provider to retrieve secrets from the Azure key vault during resource creation —for example, when deploying a new VM.
- EnabledForTemplateDeployment enables the Azure Resource Manager (ARM) to get secrets for an Azure key vault when it is referenced in a template deployment, such as when you are using ARM or Terraform.
- EnabledForDiskEncryption enables the Azure Disk Encryption service to get secrets and unwrap keys from an Azure key vault to use them in the disk encryption process.
- SKU defines the Azure key vault's SKU (standard or premium), with standard being the default.
- After the Azure key vault has been created, you need to create an access policy. In the following example, we grant access rights to secrets in the new Azure key vault for the currently logged-in user account:
# Grant your user account access rights to Azure Key Vault secrets
Set-AzKeyVaultAccessPolicy '
-VaultName $kvName '
-ResourceGroupName $rgName '
-UserPrincipalName (Get-AzContext).account.id '
-PermissionsToSecrets get, set
- You can then create a new key vault secret. In the following snippet, you enter the secret as a secure string in the PowerShell session:
# Create a new Azure Key Vault secret
$password = read-host -assecurestring
Set-AzKeyVaultSecret '
-VaultName $kvName '
-Name $secretName '
-SecretValue $password
Congratulations! You have just created your first Azure key vault and a secret using PowerShell. Now, that you know how to create an Azure key vault and a key vault secret for your deployment scenario, we can move on to the next section, Azure VM deployment, in which you will learn how to use the resources that you have just created in a more complex scenario.
Azure VM deployment
When deploying an Azure VM, you always need to pass local admin credentials to it during the deployment process. The downside of deploying VMs using the Azure portal is that you need to manually enter the respective local admin credentials instead of using a secret that is stored in an Azure key vault. This is only one of the reasons why infrastructure-as-code deployments definitely make sense in an enterprise environment. In this section, you will learn how to reference credentials that are stored in an Azure key vault instead of hardcoding the information in the deployment script or template.
We will start by referencing a key vault secret for VM deployments using PowerShell.
VM deployments with PowerShell
You can easily access secrets in an Azure key vault with PowerShell, but also with ARM templates and Terraform. Let's see how we can do this by performing the following steps:
- After you have retrieved a secret, you need to create a new PSCredential object that can be used in the VM deployment, as follows:
# retrieve an Azure Key Vault secret
$secret = Get-AzKeyVaultSecret '
-VaultName $kvName '
-Name $secretName
# Create a new PSCredential object
$cred = [PSCredential]::new($localAdminUsername,$secret.
SecretValue)
- Later, you can use this PSCredential object in your deployment in the respective position. This would look similar to the following code snippet:
$myVM = Set-AzVMOperatingSystem '
-VM $myVM '
-Windows '
-ComputerName $vmName '
-Credential $cred '
[…]
It is always a good idea to work with variables in a PowerShell script. By doing so, you can have a variable section at the beginning of the script where you can define values that change depending on your needs and the environments that the script is used in.
Note
Since the complete VM deployment script in PowerShell consists of almost 200 lines, we have not printed it in the book, but have published it in the book's GitHub repository.
PowerShell is a good way to deploy Azure resources, but being an imperative scripting language, it is not the best fit for usage in DevOps/CI/CD scenarios. This is why we will explain how to reference a key vault secret in Terraform in the next section.
Referencing a key vault secret in Terraform
In Terraform, you can refer to an existing Azure object with data sources. For a key vault secret, the data source is called azurerm_key_vault_secret:
# Azure Key Vault data source to access local admin password
data "azurerm_key_vault_secret" "mySecret" {
name = "secretName"
key_vault_id = "/subscriptions/GUID/resourceGroups/RGName/
providers/Microsoft.KeyVault/vaults/VaultName"
}
This object can then be referenced in the os_profile section of a Terraform deployment template, as shown in the following code snippet:
os_profile {
computer_name = "myVM"
admin_username = "myLocalAdminUserName"
admin_password = "$(data.azurerm_key_vault_secret.mySecret.value)"
}
Terraform is quite an easy way of deploying and referencing Azure resources. As you can see from the preceding examples, you simply need to define a data source and then reference it in the respective resource section of your deployment template.
Tip
We have published a complete example for a VM deployment with Terraform in this book's GitHub repository: https://github.com/PacktPublishing/Mastering-Azure-Security-Second-Edition.
ARM templates are Microsoft's way of using automatic Azure resource deployments in DevOps pipelines. This example is described in detail in the following section.
Referencing a key vault secret in ARM templates
ARM templates might be the most complex way to refer to key vault secrets during template deployment. This is because you need to use linked templates in this scenario. That said, you need to have two different template files that are used for different purposes.
The main template is used as a reference to existing Azure resources, such as the Azure key vault and its secrets. In it, there is a parameters section that contains values that are either defined directly in the main template or passed to the template by an external call that is an Azure CLI or a PowerShell call and then passed directly to the linked template.
If the parameters section is filled by pipeline input, it will only contain the parameters' definitions:
"parameters": {
"vaultName": {
"type": "string"
},
"vaultResourceGroup": {
"type": "string"
},
"secretName": {
"type": "string"
}
}
If the parameters' values are defined within the main template, then this section will look like this:
"parameters": {
"vaultName": {
"type": "string",
"defaultValue": "<default-value-of-parameter>"
},
"vaultResourceGroup": {
"type": "string",
"defaultValue": "<default-value-of-parameter>"
},
"secretName": {
"type": "string",
"defaultValue": "<default-value-of-parameter>"
}
}
Behind the parameters section, there is a resource section in which the key vault reference is defined:
"parameters": {
"adminPassword": {
"reference": {
"keyVault": {
"id":"[resourceId(subscription().subscriptionId, parameters('VaultResourceGroup'), 'Microsoft.KeyVault/vaults', parameters('vaultName'))]"
},
"secretName": "[parameters('secretName')]"
}
}
}
The linked template is used for the actual resource deployment. In this file, the local admin username is defined, but the password value is passed from the main template, as follows:
"resources": {
"parameters": {
"adminUsername": {
"type": "string",
"defaultValue": "localAdminUsername",
"metadata": {
"description": ""
}
},
"adminPassword": {
"type": "securestring"
}
}
}
Using ARM templates to refer to a key vault secret is a bit more complex, but also a great fit for DevOps pipelines.
Tip
We have published a complete example for a VM deployment with Terraform in this book's GitHub repository: https://github.com/PacktPublishing/Mastering-Azure-Security-Second-Edition.
You have now learned how to use Azure key vaults and key vault secrets during automated Azure resource deployments with PowerShell, Terraform, and ARM templates. Please make sure that you take a look at this book's GitHub repository, as you will find examples of the steps that we have outlined in this chapter for your reference.
Summary
Azure Key Vault is one of the many services that are underrated but very valuable when it comes to security in Azure. In this chapter, you have learned how to create Azure key vaults and their entities, not only with the Azure portal, but also with scripting and deployment languages. You now know how to grant access to an Azure key vault for both individual users and Azure resources and how to reference items that have been securely stored in a key vault.
In the next chapter, we will address data security and encryption, two topics that are heavily dependent on Azure Key Vault, so make sure that you have read and understood this chapter before moving on.
Questions
As we conclude, here is a list of questions for you to test your knowledge regarding this chapter's material. You will find the answers in the Assessments section of the Appendix:
- Azure Key Vault is used to secure____
A. Keys
B. Secrets
C. Certificates
D. None of the above
E. All of the above
- How do we control who can access Azure Key Vault information?
A. Key Vault permissions
B. Access policies
C. Conditional Access
- Service-to-service authentication is done via____
A. Service principals
B. Certificates
C. Direct link
- To use Azure Key Vault in a VM deployment, which option do we need to enable?
A. EnabledForDeployment
B. EnabledForTemplateDeployment
C. EnabledForDiskEncryption
- To use Azure Key Vault for Azure Resource Manager (ARM) deployment, which option do we need to enable?
A. EnabledForDeployment
B. EnabledForTemplateDeployment
C. EnabledForDiskEncryption
- To use Azure Key Vault for VM encryption, which option do we need to enable?
A. EnabledForDeployment
B. EnabledForTemplateDeployment
C. EnabledForDiskEncryption
- To secure secrets during deployment, we need to____
A. Provide a password
B. Encrypt a password
C. Reference an Azure key vault