
7
Releasing an Application with Spring Boot
In the previous chapter, we learned about all the various ways we could configure our application using Spring Boot. This unlocked the ability to run our application in multiple environments, which made it more flexible.
The most critical place for our application to be is in production. Otherwise, it’s not doing what we set out to do. Production can be a scary place. The Spring team, in its battle-hardened experience, has built many features into Spring Boot to ease the processes involved with assembling applications, staging, and ultimately managing them once deployed.
Building upon the tools covered in the previous chapter, we’ll see how Spring Boot can turn what used to be a scary place to be into a thriving environment.
In this chapter, we’ll cover the following topics:
- Creating an uber JAR
- Baking a Docker container
- Releasing your application to Docker Hub
- Tweaking things in production
Where to find this chapter’s code
This chapter doesn’t have much in terms of original code. Instead, the code from Chapter 6, Configuring an Application with Spring Boot, has been copied into the following repository so that we can tackle various forms of deployment: https://github.com/PacktPublishing/Learning-Spring-Boot-3.0/tree/main/ch7.
Creating an uber JAR
This may or may not sound familiar, but once upon a time, long ago, developers would compile their code, run scripts to assemble the binary bits into ZIP files, and drag them into applications that would ultimately result in burning a CD or staging the file on some retro artifact such as a tape drive or jumbo hard drive.
Then, they would lug that artifact to another location, be it a vaulted room with special access control or an entirely different facility on the other end of town.
This sounds like something out of a post-techno sci-fi movie, to be honest.
But the truth is, the world of production has always been set apart from the world of development, whether we’re talking about cubicle farms with dozens of coders on one end of the building and the target server room on the other side of the room, or if we’re describing a start-up with five people spread around the world, deploying to Amazon’s cloud-based solution.
Either way, the place where our application must live for customers to access it and the place where we develop are two different locations.
And the most important thing is to minimize all the steps it takes to move the code out of our IDE and onto the servers, fielding web requests from around the globe.
That’s why, from early on in 2014, the Spring Boot team developed a novel idea: building an uber JAR.
The following Maven command is all it takes:
% ./mvnw clean packageThis Maven command has two parts:
- clean: Deletes that target folder and any other generated outputs. This is always good to include before building an uber JAR to ensure all generated outputs are up-to-date.
- package: Invokes Maven’s package phase, which will cause the verify, compile, and test phases to be invoked in the proper order.
Using Windows?
The mvnw script only works on Mac or Linux machines. If you’re on Windows, you either must have a comparable shell environment, or you can use ./mvnw.cmd instead. Either way, when you use start.spring.io to build your project, you’ll have both at hand.
When we use Spring Initializr (https://start.spring.io), as we did in several of the previous chapters, one of the entries included in our pom.xml file was spring-boot-maven-plugin, as shown here:
<plugin>
        <groupId>org.springframework.boot</groupId>
        <artifactId>spring-boot-maven-plugin</artifactId>
</plugin>
This plugin hooks into Maven’s package phase and does a few extra steps:
- It grabs the JAR file originally generated by standard Maven packaging procedures (target/ch7-0.0.1-SNAPSHOT.jar in this case) and extracts all of its content.
- Then, it renames the original JAR to set it aside (target/ch7-0.0.1-SNAPSHOT.jar.original in this case).
- It fashions a new JAR file with the original name.
- In the new JAR file, it adds the Spring Boot loader coder, which is glue code that can read JAR files from within, allowing it to become a runnable JAR file.
- It adds our application code to the new JAR file in a subfolder called BOOT-INF.
- It adds ALL of our application’s third-party dependency JARs into this JAR file in a subfolder called BOOT-INF/lib.
- Finally, it adds some metadata about the layers of the application to this JAR file underneath BOOT-INF as classpath.idx and layers.idx (more about that in the next section!).
With nothing but the JVM, we can launch our application, as follows:
% java -jar target/ch7-0.0.1-SNAPSHOT.jar
    .     ____                    _                        __ _ _
 /\ / ___'_ __ _ _(_)_ __    __ _
( ( )\___ | '_ | '_| | '_ / _` |
 \/    ___)| |_)| | | | | || (_| |    ) ) ) )
    '    |____| .__|_| |_|_| |_\__, | / / / /
 =========|_|==============|___/=/_/_/_/
 :: Spring Boot ::                         (v3.0.0)
…etc…
With such a simple command, our application has been transformed from an application that runs inside our developer-centric IDE into an application that runs on any machine with the right Java Development Kit (JDK).
Maybe this isn’t as impressive as you were led to believe, perhaps because this is incredibly simple. So, let’s revisit what exactly has happened:
- There is no need to download and install an Apache Tomcat servlet container anywhere. We are using embedded Apache Tomcat. This means this tiny JAR file is carrying the means to run itself.
- There is no need to go through the legacy procedure of installing an application server, fashioning a WAR file, combining it with third-party dependencies using some ugly assembly file to fashion an EAR file, and then uploading the whole thing to some atrocious UI.
- We can push this whole thing to our favorite cloud provider and command the system to run 10,000 copies.
Having Maven output a runnable application only dependent on Java is epic when it comes to deployment.
Newsflash
In the olden days (1997), it was common practice for me to perform a release by walking around (yes, physically walking) to various department heads and having them sign a piece of paper. With that in hand, I would burn a CD with compiled binaries. From there, I would carry out the rest of a 17-page procedure to essentially construct the binaries and walk them into a lab or onto the customer’s site and install the software. This process usually took a couple of days. Removing the technical barriers for doing releases like this is groundbreaking.
It should be pointed out that uber JARs weren’t invented by the Spring Boot team. The Maven Shade plugin has been around since 2007. This plugin’s job is to kind of do the same steps of bundling everything together one JAR file, but differently.
This plugin unpacks all the incoming JAR files, be it our application code or a third-party dependency. All the unpacked files are kind of mixed into a new JAR file. This new file is called a shaded JAR.
Some other tools and plugins do the same thing, but they are fundamentally wrong for mixing things this way.
Some applications need to be inside a JAR to work correctly. There is also a risk of the non-class files not ending up in the right place. Apps that consume third-party classes from JAR files may exhibit some aberrant behavior. And there is also a chance you could be violating some library’s license as well.
If you go to any library maintainer and ask if they will handle bug reports when you use their released JAR files beyond the scope of the way they are released, you may not get the support expected.
Spring Boot simply lets our code run as if the third-party JAR files are there as always. No shading is required.
But one thing remains: the part where I mentioned that the app is ready to run wherever you have a JDK installed.
What if your target machine doesn’t have one?
Check out the next section!
Baking a Docker container
One of the fastest technologies to sweep the tech world has been Docker. If you haven’t heard of it, Docker is sort of like a virtualized machine but more lightweight.
Docker is built on the paradigm of shipping containers. Shipping containers, which are responsible for moving the bulk of the world’s goods on ships and trains, have a common shape. This means people can plan how to ship their products while knowing the containers handled by the entire world are all the same size and structure.
Docker is built on top of Linux’s libcontainer library, a toolkit that grants not a completely virtual environment, but instead a partially virtual one. It allows a container’s processes, memory, and network stack to be isolated from the host server.
Essentially, you install the Docker engine on all your target machines. From there, you are free to install any container, as needed, to do what you need to do.
Instead of wasting time crafting an entire virtual machine, you simply spin up containers on the fly. With Docker’s more application-oriented nature, it becomes a much more nimble choice.
And Spring Boot comes with Docker support baked in.
Isn’t Docker experimental?
Docker has been around since 2013. When I wrote Learning Spring Boot 2.0 Second Edition back in 2017, it was highly experimental at the time. So, I didn’t mention it. People were using it on occasion, perhaps for demos or other one-off tasks, but it wasn’t widely used for systems in production. Fast-forward to today, and you can see Docker being used EVERYWHERE. Every cloud-based provider supports Docker containers. The most popular CI systems let you run container-based jobs. There are a plethora of companies built around the paradigm of orchestrating systems of Docker containers. Atomic Jar, a company built around the Docker-based test platform, Testcontainers, is out there. Asking developers and sys admins to install Docker on both local machines and customer-facing servers is no longer the big ask it once was.
Assuming you have installed Docker (visit docker.com to get started) on your machine, this is all it takes!
% ./mvnw spring-boot:build-imageThis time, instead of connecting to any particular phase of Maven’s build and deploy life cycle, the Spring Boot Maven plugin will execute a custom task to bake a container.
Baking a container is a Docker phrase meaning assembling all the parts needed to run a container. Baking implies that we only need to generate the image of this container once, and we can then reuse it as many times as needed to run as many instances as required.
When Spring Boot does a build-image process, it first runs Maven’s package phase. This includes running the standard complement of unit tests. After that, it will assemble the uber JAR we talked about in the previous section.
With a runnable uber JAR in our hands, Spring Boot can then go into the next phase: leveraging Paketo Buildpacks to pull the right type of container together.
Building the “right” type of container
What do we mean by the “right” container?
Docker has a caching solution built into it that involves layers. If a given step in building a container sees no changes from the previous container assembly process, it will use the Docker engine’s caching layer.
However, if some aspect has changed, it will invalidate the cached layer and create a new one.
Cached layers can include everything from the base image a container is built on (for example, if you were extending a bare Ubuntu-based container) to the Ubuntu packages downloaded to enhance it along with our custom code.
One thing we do NOT want to do is mingle our custom application’s code with the third-party dependencies our application uses. For example, if we were using Spring Framework 6.0.0’s GA release, that is certainly something it would be useful to cache. That way, we don’t have to keep pulling it down!
But if our custom code were mingled into the same layer and a single Java file were to change, the whole layer would be invalidated and we’d have to re-pull all of it.
So, putting things such as Spring Boot, Spring Framework, Mustache, and other libraries into one layer, while putting our custom code into a separate layer, is a good design choice.
In the past, this required several manual steps. But the Spring Boot team has made this layered approach the default configuration! Check out the following excerpt of running ./mvnw spring-boot:build-image:
[INFO] --- spring-boot-maven-plugin:3.0.0:build-image (default-cli) @ ch7 ---
[INFO] Building image 'docker.io/library/ch7:0.0.1-SNAPSHOT'
[INFO]
[INFO]    > Pulled builder image 'paketobuildpacks/builder@sha256:9fb2c87caff867c9a49f04bf2ceb24c87bde504f3fed88227e9ab5d9 a572060c'
[INFO]    > Pulling run image 'docker.io/paketobuildpacks/run:base-cnb' 100%
[INFO]    > Pulled run image 'paketobuildpacks/run@sha256:fed727f0622994807560102d6a2d37116ed2e03dddef5445119eb0172 12bbfd7'
[INFO]    > Executing lifecycle version v0.14.2
[INFO]    > Using build cache volume 'pack-cache-564d5464b59a.build'
…
[INFO] Successfully built image 'docker.io/library/ch7:0.0.1-SNAPSHOT'
This small fragment of the total output to the console reveals the following:
- It’s using Docker to build an image named docker.io/library/ch7:0.0.1-SNAPSHOT. This includes the name of our module as well as the version, both found in our pom.xml file.
- It uses the Paketo Buildpack from Docker Hub, as shown by pulling the paketobuildpacks/builder and paketobuildpacks/run containers.
- It finishes with a successfully assembled container.
Paketo Buildpacks
Paketo Buildpacks (https://paketo.io/) is a project focused on turning application source code into container images. Instead of doing it directly, Spring Boot delegates containerization to Paketo. Essentially, it downloads containers that do all the leg work, easing the process for us to bake a container.
Want to see more details?
The complete output of the Spring Boot Maven plugin’s build-image task is frankly too long and wide to fit into a book. But you are free to check out the complete output at https://springbootlearning.com/build-image-output.
At this stage, we have a fully assembled container. Let’s check it out! Using Docker, we can now run the container, as shown here:
% docker run -p 8080:8080 docker.io/library/ch7:0.0.1-SNAPSHOT
Calculating JVM memory based on 7163580K available memory
For more information on this calculation, see https://paketo.io/docs/reference/java-reference/#memory-calculator
    .     ____                    _                        __ _ _
 /\ / ___'_ __ _ _(_)_ __    __ _
( ( )\___ | '_ | '_| | '_ / _` |
 \/    ___)| |_)| | | | | || (_| |    ) ) ) )
    '    |____| .__|_| |_|_| |_\__, | / / / /
 =========|_|==============|___/=/_/_/_/
 :: Spring Boot ::                         (v3.0.0)
2022-11-18T23:32:30.711Z    INFO 1 --- [                     main] c.s.l.Chapter7Application                                : Starting Chapter7Application v0.0.1-SNAPSHOT using Java 17.0.5 on 5e4fb7fdead2 with PID 1 (/workspace/BOOT-INF/classes started by cnb in /workspace)
This portion of the console’s output can be described as follows:
- docker run: The command to run a Docker container
- -p 8080:8080: An argument that maps the container’s inner port number 8080 to everyone outside the container on port 8080
- docker.io/library/ch7:0.0.1-SNAPSHOT: The name of the container’s image
The rest of the output is Docker’s output of the running container. The container is now running. In fact, from another shell, we can see it in flight by doing this:
% docker ps
CONTAINER ID     IMAGE                                COMMAND                            CREATED                 STATUS                 PORTS                                        NAMES
5e4fb7fdead2     ch7:0.0.1-SNAPSHOT     "/cnb/process/web"     5 minutes ago     Up 5 minutes     0.0.0.0:8080->8080/tcp     angry_cray
docker ps is a command that shows any running Docker processes. The output is a bit cramped here inside a book, but this one-line output shows the following:
- 5e4fb7fdead2: The hashed ID of the container.
- ch7:0.0.1-SNAPSHOT: The name of the container’s image (without the docker.io prefix)
- /cnb/process/web: The command the Paketo Buildpack is using to run our Spring Boot application.
- "5 minutes ago" and "Up 5 minutes": When the container started and how long it’s been up.
- 0.0.0.0:8080->8080/tcp: The internal to external network mapping.
- angry_cray: The human-friendly name Docker has given this container’s instance. You can refer to an instance by either the hash code or this.
From here, we can shut it down:
% docker stop angry_cray
angry_cray
% docker ps
CONTAINER ID     IMAGE         COMMAND     CREATED     STATUS         PORTS         NAMES
This shuts the whole container down. We can see it on the console where we launched everything.
Important
In this instance of spinning up a Docker container, Docker chose the random human-friendly name angry_cray. Every container you spin up will have a different, unique, human-friendly name. You can use those details, the container’s hashed value, or simply point and click from the Docker Desktop application to control containers on your machine.
All that said, we can now check out the most important step: releasing the container.
Releasing your application to Docker Hub
Building a container is one thing. Releasing that container to production is critical. And as Spring advocate Josh Long likes to say, “Production is the happiest place on Earth!”
You can push the container to your favorite cloud provider. Just about all of them support Docker. But you can also push the container to Docker Hub.
Do you have access to Docker Hub?
Docker Hub offers several plans. You can even get a free account. Your company or university may also grant you access. Be sure to check out https://docker.com/pricing, choose the plan that’s best for you, and create your account. Assuming you’ve done so, please check out the rest of this section!
From the console, we can log in directly to our Docker Hub account:
% docker login -u <your_id>
Password: *********
Assuming all this has been done, we can now push our container to Docker Hub by running the following commands:
% docker tag ch7:0.0.1-SNAPSHOT    <user_id>/learning-spring-boot-3rd-edition-ch7:0.0.1-SNAPSHOT
% docker push <your_id>/learning-spring-boot-3rd-edition-ch7:0.0.1-SNAPSHOT
These steps to push are buried in the following succinct commands. The first involves tagging the local container, as shown here:
- docker tag <image> <tag>: Tags the local container name of ch7 possessing the local tag of 0.0.1-SNAPSHOT with a prefix of our Docker Hub user ID. This is critical because all of our container images MUST match our Docker Hub ID!
- The tagged container also has a name, learning-spring-boot-3rd-edition-ch7.
- The tagged container itself has a tag, 0.0.1-SNAPSHOT.
What just happened?
This can be kind of confusing. Docker Hub containers have three characteristics:
- Name of the container
- Tag of the container
- Namespace of the container
These go together as namespace/name:tag. This naming convention does NOT have to match whatever your local naming is for the container. You can simply reuse it, but since this is going to be public, you may wish to choose something else.
Tagging is essentially the way to take your local container and give it a public name. Whereas there are other Docker repositories, we are sticking with Docker Hub for now as our container repository of choice. And to comply with Docker Hub policy, its namespace needs to match our Docker Hub account ID.
What about latest tags?
A common convention seen all over Docker Hub is to use a tag name of latest. This implies that grabbing a container with such a tag would give you, well, the latest release. Or at least the latest stable release. But it’s important to understand that this is simply a convention. Tags are dynamic and can be moved. So, 0.0.1-SNAPSHOT can also be a dynamic tag you push every time you update the snapshot versions of your application, just like latest. The adoption of Docker Hub by software publishers managing multiple releases has led to multiple tags being managed to indicate which version is being fetched. Before adopting ANY container’s tag, be sure to check out their tagging strategy so that you can understand what, exactly, you are getting.
Once the container has been tagged, it can be pushed to Docker Hub using the following command:
- docker push <tagged image>: Pushes the container to Docker Hub using the public-facing tagged image name
To reiterate the last bullet point, you push the container to Docker Hub using the public-facing name. In our case, we must use gturnquist848/learning-spring-boot-3rd-edition-ch7:0.0.1-SNAPSHOT.
Having pushed the container, we can see it on Docker Hub, as shown here:
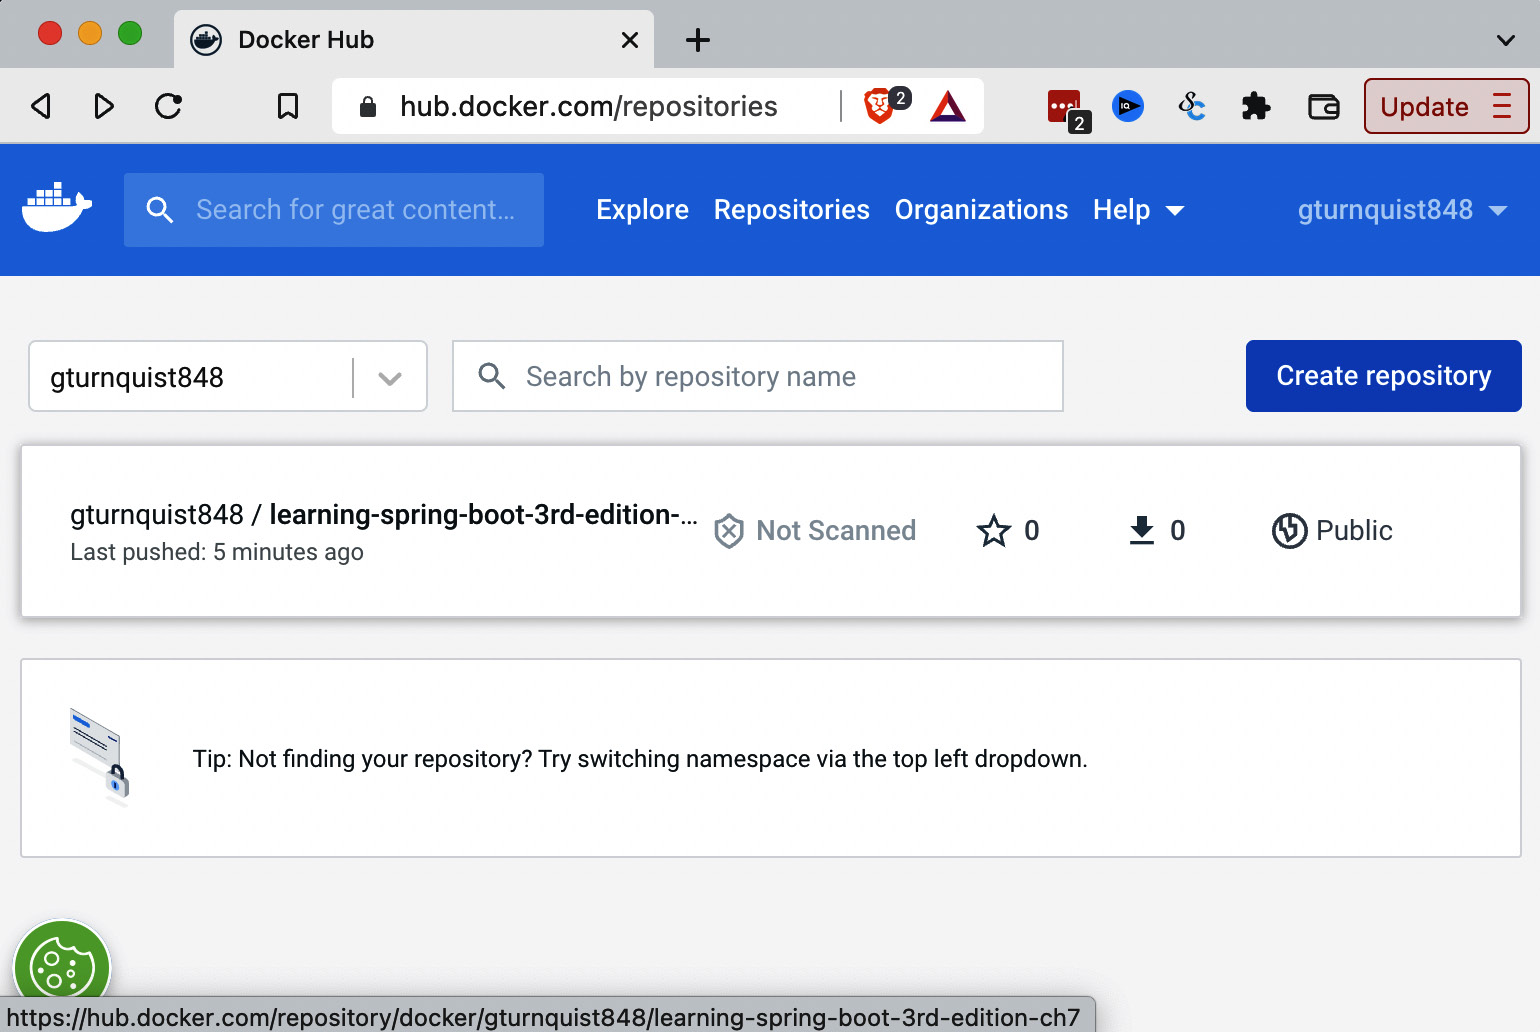
Figure 7.1 – Docker container pushed to Docker Hub
Where’s my Docker container on Docker Hub?
The preceding screenshot is from my Docker Hub repository. Any container you push should be on your own repository. It’s important to use your own Docker Hub ID when tagging and pushing!
We could go much deeper into Docker, Docker Hub, and the world of containers, but frankly, there are entire books dedicated to this topic.
The point of Spring Boot is to make it super simple to wrap up a completed application inside a container and release it to our users, and we just did that without writing any custom code.
What would it be like to pick up that container on the other side… and start tweaking things in production? Check out the following section.
Tweaking things in production
An application isn’t really in production until we need to start tweaking it, fiddling with it, and making adjustments after release.
This is the very nature of operations. And the various members of the Spring team are no strangers to the world of production.
There are multiple things we can tune and adjust after being handed either an uber JAR or a container. Assuming we have an uber JAR built out of this chapter’s code, we can easily type something like this:
% java -jar target/ch7-0.0.1-SNAPSHOT.jarThis would launch the app with all its default settings, including the standard servlet port of 8080.
But what if we needed it to run next to another Spring Boot web application we just installed yesterday? That suggests we’d need it to listen on a different port. Say no more. All we need do is run a slightly different command, like this:
% SERVER_PORT=9000 java -jar target/ch7-0.0.1-SNAPSHOT.jar
…
2022-11-20T15:36:55.748-05:00    INFO 90544 --- [                     main] o.s.b.w.embedded.tomcat.TomcatWebServer    : Tomcat started on port(s): 9000 (http) with context path ''
Toward the bottom of the console output, we can see that Apache Tomcat is now listening on port 9000 instead.
That’s nice, but it’s a bit of a hassle to have to type that extra parameter every single time, right?
A better way to offer customized configuration settings is to fashion an additional application.properties file in our local folder.
First, create a new application.properties file, like this:
server.port=9000This property override file contains one property: Spring Boot’s server.port setting with a value of 9000.
Now, we can run the uber JAR just like we did the first time:
% java -jar target/ch7-0.0.1-SNAPSHOT.jar
…
2022-11-20T15:41:09.239-05:00    INFO 91085 --- [                     main] o.s.b.w.embedded.tomcat.TomcatWebServer    : Tomcat started on port(s): 9000 (http) with context path ''
This time, when Spring Boot starts up, it looks around and spots the application.properties file in our local folder. Then, it applies all its settings as overrides to the one inside the JAR file, and voila!
We have a web app running on port 9000.
But that is not all. Any property we need to override is up for grabs. We can have multiple override files.
What’s an example of this? In the world of constantly evolving requirements, it’s not hard to imagine our manager showing up and telling us we need to run not one but three instances.
Scaling with Spring Boot
Now, we need to host our application on ports 9000, 9001, and 9002 to match up with the load balancer the sysadmins just set up!
Let’s expand things and come up with a tactical name for each instance. Something super original, such as instance1, instance2, and instance3.
First, rename that local application.properties file to application-instance1.properties.
Next, make a copy of the file and name the new one application-instance2.properties. Edit the file so that server.port is assigned 9001.
Then, make yet another copy, this time as application-instance3.properties. This time, make its server.port have a value of 9002.
With these in place, we can now run three instances using Spring Boot’s profile support. We’ll start by launching instance1, as follows:
% SPRING_PROFILES_ACTIVE=instance1 java -jar target/ch7-0.0.1-SNAPSHOT.jar
…
2022-11-20T15:52:30.195-05:00    INFO 94504 --- [                     main] o.s.b.w.embedded.tomcat.TomcatWebServer    : Tomcat started on port(s): 9000 (http) with context path ''
Here, we can see that instance1 is now running on port 9000.
Open another console tab and launch instance2, like this:
% SPRING_PROFILES_ACTIVE=instance2 java -jar target/ch7-0.0.1-SNAPSHOT.jar
…
2022-11-20T15:53:36.403-05:00    INFO 94734 --- [                     main] o.s.b.w.embedded.tomcat.TomcatWebServer    : Tomcat started on port(s): 9001 (http) with context path ''
In this console output, we can see instance2 is running on port 9001.
Don’t stop there! Let’s open a third console tab and run instance3, as shown here:
% SPRING_PROFILES_ACTIVE=instance3 java -jar target/ch7-0.0.1-SNAPSHOT.jar
…
2022-11-20T15:55:53.062-05:00    INFO 96783 --- [                     main] o.s.b.w.embedded.tomcat.TomcatWebServer    : Tomcat started on port(s): 9002 (http) with context path ''
Ta-dah!
We now have three instances of our application running on different ports. Buried in the first console’s output, we can see the following:
2022-11-20T15:52:28.076-05:00 INFO 94504 --- [ main] c.s.l.Chapter7Application : The following 1 profile is active: "instance1"This line shows that Spring Boot has spotted that the instance1 profile is active.
There is a similar entry for the other two console outputs. We won’t show them here. Suffice it to say, profiles are a powerful way to run multiple instances of what started as a simple, single application.
However, we aren’t done. That’s because the default configuration for this application happened to be with an in-memory HSQL database. This means that the three instances aren’t sharing a common database.
Considering the code was already integration tested against PostgreSQL with Testcontainers, we could tune the settings to allow us to point to a production instance of just such a database!
First, we need to spin up that database. And Testcontainers has shown us the way by using Docker. To run a standalone instance, try this:
% docker run -d -p 5432:5432 --name my-postgres -e POSTGRES_PASSWORD=mysecretpassword postgres:9.6.12This command will spin up a copy of PostgreSQL with the following characteristics:
- -d: The instance will run as a background daemon process.
- -p 5432:5432: The standard 5432 port will be exported to the public with the same port.
- --name my-postgres: The container will run with a fixed name instead of a random one. This will prevent us from running multiple copies at the same time.
- -e POSTGRES_PASSWORD=mysecretpassword: The container will run with an environment variable that, according to Postgres’s notes, will configure the password.
- postgres:9.6.12: The same container coordinates found in the Testcontainers-based integration test.
With this up and running, we can update application-instance1.properties with the following additional properties:
# JDBC DataSource settings
spring.datasource.url=jdbc:postgresql://localhost:5432/postgres
spring.datasource.username=postgres
spring.datasource.password=mysecretpassword
# JPA settings
spring.jpa.hibernate.ddl-auto=update
spring.jpa.hibernate.show-sql=true
spring.jpa.properties.hibernate.dialect = org.hibernate.dialect.PostgreSQLDialect
The JDBC properties can be summarized as follows:
- spring.datasource.url: This is the JDBC connection URL to reach the container-based instance
- spring.datasource.username: This contains the default postgres username the container runs under
- spring.datasource.password: This contains the password we picked earlier in this section
These are all the properties needed for Spring Boot to assemble a JDBC DataSource bean.
The JPA properties can be described as follows:
- spring.jpa.hibernate.ddl-auto: This is the Spring Data JPA setting that will update the schema if necessary, but not drop or delete anything
- spring.jpa.hibernate.show-sql: This will switch on Spring Data JPA’s ability to print out SQL statements that get generated
- spring.jpa.properties.hibernate.dialect: This is the Hibernate property that signals we are talking to a PostgreSQL-based database
With all these settings, we are aligning JDBC and JPA to communicate with the PostgreSQL database container we just spun up minutes ago.
Production data warning!
The one thing we need to handle… is ensuring that all three instances don’t create the same pre-loaded data. In Chapter 3, Querying for Data with Spring Boot, and Chapter 4, Securing an Application with Spring Boot, we added some bits to our application that would pre-load user login data, along with some video entries. This is, in fact, best done with outside tools. We should let the DBAs handle setting the schema and loading the data. An application that starts and stops, and runs multiple instances, is NOT the vehicle to apply persistent data management policy. Thus, any such beans need to be commented out or at least flagged to ONLY run with some OTHER profile, such as setup. If you examine the final code provided for this chapter, as shown at the beginning of this chapter, you’ll find an application-setup.properties file, along with such restrictions in the code. We won’t show them here, but if you want the app to pre-load this data, run it with profile setup (and only do this ONCE after starting up the database!).
From here, the sky is the limit. We could run a dozen copies, though we may NOT want to do it this way. That’s where it becomes valuable to use something meant to orchestrate multiple applications.
There are several options out there, including Kubernetes and Spinnaker. Kubernetes is a Docker container orchestrator. It lets us manage the containers as well as the load balancers from top to bottom. Check out https://springbootlearning.com/kubernetes for more details.
Spinnaker is a continuous delivery pipeline. It makes it possible to take commits to our GitHub repository, package them up into uber JARs, bake Docker container images, and then manage them with rolling upgrades in production. Check out https://springbootlearning.com/spinnaker for more information on that.
And of course, there is VMware Tanzu. Tanzu is a complete package, not just a Docker orchestrator. It has solid support for Kubernetes, along with other things. Be sure to check it out at https://springbootlearning.com/tanzu.
All of these are powerful tools, each with its tradeoffs. And they provide a comprehensive way to manage Spring Boot applications in production.
Summary
In this chapter, we learned several key skills, including creating an uber JAR that is runnable anywhere, baking a Docker container image that can be run locally with no need for Java, pushing our Docker container to Docker Hub where it can be consumed by our clients, and running multiple instances of our uber JAR pointed at a persistent database, different than the one it came bundled with.
That concludes this chapter! In the next chapter, we will dig in and discover ways we can speed up our Spring Boot application to near-warp speed through the power of GraalVM and something called native applications.