
Chapter 14: Auditing Named Entity Recognition Workflows
In the previous chapter, we were introduced to an approach for improving the accuracy of the results we wanted to extract from documents using Amazon Augmented AI (Amazon A2I). We saw that Amazon A2I can be added to a document processing workflow to review model prediction accuracy. This enabled us to include human reviews in LiveRight's check processing system.
In this chapter, we will walk through an extension of the previous approach by including Amazon Comprehend for text-based insights thereby demonstrating an end-to-end process for setting up an auditing workflow for your custom named entity recognition use cases. We put together this solution based on our collective experience and the usage trends we have observed in our careers. We expect to be hands-on throughout the course of this chapter, but we have all the code samples we need to get going.
With machine learning (ML), companies can set up automated document processing solutions that can be trained to recognize and extract custom entities from your documents. This helps you derive unique insights from your text corpus. These insights can help drive strategic decisions. However, there are certain challenges that need to be navigated first. Typically, companies receive large volumes of incoming documents of different templates, with varying contents, in multiple languages. Also, as businesses grow, the type and volume of documents evolve, and very soon you get into a maintenance overhead situation trying to keep the various templates, formats, and rules synchronized with how you are trying to use these documents for your operational needs. Furthermore, you will have to ensure your infrastructure is able to scale to support your processing needs.
To solve these challenges, we will show you how you can use the ready-made ML capabilities of Amazon Textract, leveraging transfer learning to create a custom entity recognition model with Amazon Comprehend, and auditing the predictions with a human reviewer loop using A2I. We introduced Amazon A2I in detail in Chapter 13, Improving the Accuracy of Document Processing Workflows. In this chapter, we will navigate through the following sections:
- Authenticating loan applications
- Building the loan authentication solution
Technical requirements
For this chapter, you will need access to an AWS account at https://aws.amazon.com/console/. Please refer to the Signing up for an AWS account subsection within the Setting up your AWS environment section in Chapter 2, Introducing Amazon Textract, for detailed instructions on how you can sign up for an AWS account and sign in to the AWS Management Console.
The Python code and sample datasets for the solution discussed in this chapter can be found at the following link: https://github.com/PacktPublishing/Natural-Language-Processing-with-AWS-AI-Services/tree/main/Chapter%2014.
Check out the following video to see the Code in Action at https://bit.ly/3GoBh1B.
Authenticating loan applications
Financial organizations receive significant volumes of loan applications every day. While the major organizations have switched to fully digital processing, there are still many banks and institutions across the world that rely on paper documents. To illustrate our example, let's go back to our fictitious banking corporation, LiveRight Holdings Private Limited, and review the requirements for this use case:
- LiveRight offers a number of lending products to its customers, which are primarily small-to-medium businesses and individual consumers. To apply for a loan, consumers fill out a paper-based loan/mortgage application form that is validated by a team of experts to determine the authenticity of the application (called the authenticity-check process). If found to be a valid applicant, LiveRight's loan processors will request supporting documentation from the consumers for pre-approval qualification.
- LiveRight receives anywhere from 8,000 to 10,000 loan applications a day from potential customers. These applications are forwarded nightly from its various branches to the document inlet center at the company's headquarters (HQ). Today, their authenticity-check process takes approximately 2 to 4 weeks for the team to scan all the applications and determine whether they are good enough to be forwarded to the loan processors, causing significant delays even at the pre-approval stage. This has irked many customers who are taking their business elsewhere. LiveRight has hired you to automate the authenticity-check process with a target to reduce the processing time to 24 hours within the first 3 months of the solution being implemented.
As the enterprise architect for the project, you decide to use Amazon Textract to leverage its pre-trained ML model for text extraction, the Custom Entity Recognizer feature of Amazon Comprehend to incrementally create your own entity recognizer for loan application checks without the need to build complex natural language processing (NLP) algorithms, and A2I to set up a human review workflow to monitor predictions from your entity recognizer and send feedback to the recognizer to improve its detection capabilities for entities unique to the use case.
You plan to have the private human workflow available for the first 2 to 3 months and subsequently disable it, at which point the document processing workflow will become fully automated. As the human team checks and updates the entity labels, you need to determine the authenticity check decision to be either APPROVE, SUMMARY APPROVE, or REJECT. This decision, along with the relevant content from the loan application, should be stored in an Amazon DynamoDB (a fully managed, low-latency NoSQL database service) table for loan processors to access the content and enable pre-approval qualification. The components of the solution we will build are shown in the following figure:
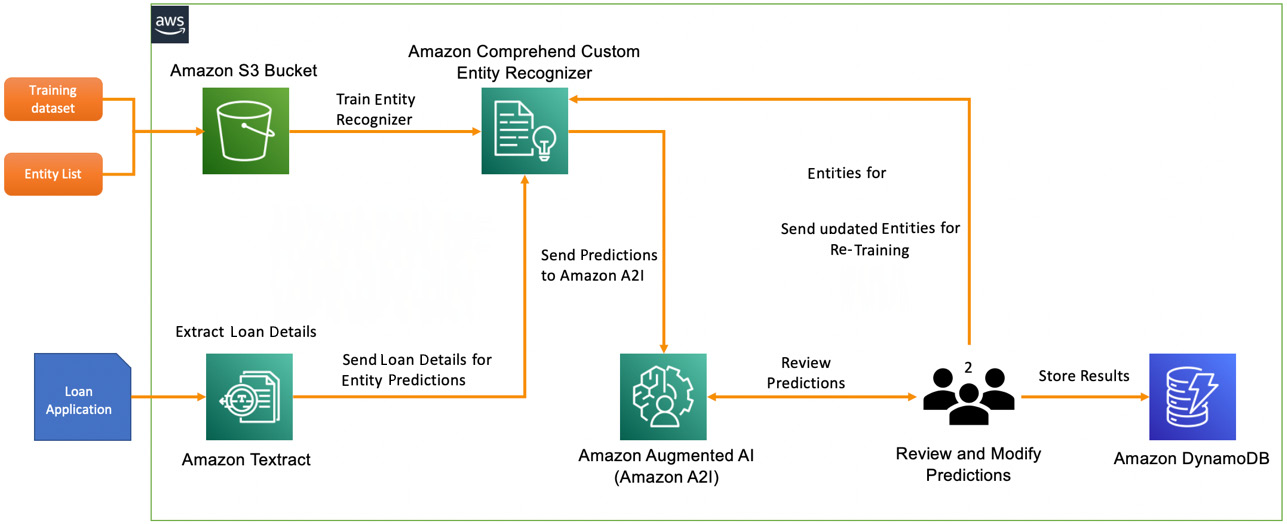
Figure 14.1 – Loan approval document processing solution architecture
We will be walking through our solution using an Amazon SageMaker Jupyter notebook that will allow us to review the code and results as we execute it step by step. The solution build includes the following tasks:
- As a first step, we will create an Amazon Comprehend custom entity recognizer based on the training dataset provided in our GitHub repository.
- We will then create a private labeling workforce and add a team member who will be responsible for reviewing predictions from the Amazon Comprehend custom entity recognizer, using the Amazon A2I service. We will create the private workforce using the labeling workforces feature available in the Amazon SageMaker console. For more details, please refer to this link: https://docs.aws.amazon.com/sagemaker/latest/dg/sms-workforce-private.html.
- We start the solution workflow by inspecting our sample input loan application available in our GitHub repository. We display the image of the loan application in our notebook and look at the contents.
- Next, we use Amazon Textract to extract the key-value pairs from our input document.
- We then create an inference request string from the key-value pairs and prepare it to send to Amazon Comprehend custom entity detection.
- Next, we set up an Amazon Comprehend real-time endpoint and invoke it to detect entities from our inference request string.
- We will set up an Amazon A2I human review loop using the entity recognition task UI template and send the results of the custom entity detection to an Amazon A2I human loop.
- Logging in as a private worker, we will review the detected entities and modify the labels as required.
- We will then check whether a new entity detection event occurred or whether an existing entity detection was modified, update the entity list, and send it back to Amazon Comprehend for retraining our entity detection model.
- Based on the output from the human loop review, we will also determine a decision for the loan application and upload this to a DynamoDB table for downstream processing.
Now that we've got the context for the exercise and gone over our intended process, let's start building the solution.
Building the loan authentication solution
In the previous section, we introduced the loan application approval use case, covered the architecture of the solution we will be building, and briefly walked through the solution components and workflow steps. In this section, we will get right down to action and start executing the tasks to build our solution. But first, there are pre-requisites we will have to take care of.
Setting up to solve the use case
If you have not done so in the previous chapters, you will first have to create a Jupyter notebook and set up Identity and Access Management (IAM) permissions for that notebook role to access the AWS services we will use in this notebook. After that, you will need to clone the GitHub repository (https://github.com/PacktPublishing/Natural-Language-Processing-with-AWS-AI-Services), create an Amazon S3 bucket (https://aws.amazon.com/s3/), and provide the bucket name in the notebook to start execution. Please follow the next steps to complete these tasks before we can execute the cells from our notebook:
Note:
Please ensure you have completed the tasks mentioned in the Technical requirements section.
- To create your Jupyter Notebook instance, follow the instructions in the Create an Amazon SageMaker Jupyter Notebook instance section in the Setting up your AWS environment section in Chapter 2, Introducing Amazon Textract.
IAM role permissions while creating Amazon SageMaker Jupyter notebooks
Accept the default for the IAM role at the notebook creation time to allow access to any S3 bucket.
- Once you create the notebook instance and its status is InService, click on Open Jupyter in the Actions menu, heading for the notebook instance.
- This will take you to the home folder of your notebook instance.
- Click on New and select Terminal.
- In the Terminal window, first, type cd SageMaker, and then, type git clone https://github.com/PacktPublishing/Natural-Language-Processing-with-AWS-AI-Services.
- Now, exit the Terminal window and go back to the home folder, and you will see a folder called Natural-Language-Processing-with-AWS-AI-Services. Click this folder to bring up the chapter folders and click Chapter 14. Open this folder by clicking. You should see a notebook called chapter14-auditing-workflows-named-entity-detection-forGitHub.ipynb.
- Open this notebook by clicking it.
Follow through the steps in this notebook that correspond to the next few subheadings in this section by executing one cell at a time. Please do read the descriptions provided preceding each notebook cell.
Additional IAM pre-requisites
To train the Comprehend custom entity recognizer, to set up real-time endpoints, we have to enable additional policies and also update the trust relationships for our SageMaker notebook role. Please refer to Changing IAM permissions and trust relationships for the Amazon SageMaker Notebook execution role in the Setting up your AWS environment section in Chapter 2, Introducing Amazon Textract, for more detailed instructions on how to execute the following steps:
- Please attach TextractFullAccess, ComprehendFullAccess, and AmazonAugmentedAIFullAccess policies to your Amazon SageMaker Notebook IAM role.
- Add an IAM:PassRole permission as an inline policy to your SageMaker Notebook execution role:
{ "Version": "2012-10-17", "Statement": [ {
"Action": [
"iam:PassRole"
],
"Effect": "Allow",
"Resource": "<your sagemaker notebook execution role ARN">
}
]
}
- Finally, update the trust relationships:
{ "Version": "2012-10-17", "Statement": [
{ "Effect": "Allow",
"Principal":
{ "Service":
[ "sagemaker.amazonaws.com",
"s3.amazonaws.com",
"comprehend.amazonaws.com" ]
},
"Action": "sts:AssumeRole" }
]
}
Now that we have set up our notebook and set up the IAM role to run the walkthrough notebook, in the next section, we will train an Amazon Comprehend entity recognizer.
Training an Amazon Comprehend custom entity recognizer
Let's begin by training a custom entity recognizer to detect entities unique to this solution. Amazon Comprehend offers pre-trained entity recognition features that we learned about in the previous chapter. For this solution, we will use the Custom Entity Recognition feature of Amazon Comprehend that allows you to train a recognizer for custom needs using incremental training. All we have to do is provide a list of entities we want it to recognize, and a raw dataset containing the lines of text comprising the context that will be detected as entities. Open the notebook and execute the steps as follows:
- Execute the cell under Step 0 – Import Libraries to ensure we have the libraries we need for the notebook. Note that in this cell you are getting the Amazon SageMaker execution role for the notebook, along with the SageMaker session. Please ensure you create an Amazon S3 bucket (https://docs.aws.amazon.com/AmazonS3/latest/userguide/create-bucket-overview.html) and provide the bucket name in the following line:
bucket = '<bucket-name>'
- Execute the cells under Step 1 – Train an Amazon Comprehend Custom Entity Recognizer:
a) First, initialize the boto3 handle for Amazon Comprehend:
comprehend = boto3.client('comprehend')
b) Then, define the variables for the S3 prefixes and upload the training dataset and the entity list to the S3 bucket:
s3_raw_key = prefix + "/train/raw_txt.csv"
s3_entity_key = prefix + "/train/entitylist.csv"
s3.upload_file('train/raw_txt.csv',bucket,s3_raw_key)
s3.upload_file('train/entitylist.csv',bucket,s3_entity_key)
c) Continue executing the rest of the cells in the notebook to declare the variables with the full S3 URIs for our input documents, define the input object for the entity recognizer, and finally, call the Comprehend API to create the custom entity recognizer. This will start the training job:
import datetime
cer_name = "loan-app-recognizer"+str(datetime.datetime.now().strftime("%s"))
cer_response = comprehend.create_entity_recognizer(
RecognizerName = cer_name,
DataAccessRoleArn = role,
InputDataConfig = cer_input_object,
LanguageCode = "en"
)
d) Print the results of the custom entity recognizer training job:
import pprint
pp = pprint.PrettyPrinter(indent=4)
response = comprehend.describe_entity_recognizer(
EntityRecognizerArn=cer_response['EntityRecognizerArn']
)
pp.pprint(response)
- Check the status of the training job periodically by visiting the Amazon Comprehend AWS console (https://console.aws.amazon.com/comprehend/v2/home?region=us-east-1#entity-recognition). The training should take approximately 15 to 30 minutes. Time for a coffee/snack break.
Creating a private team for the human loop
Refer to Step 2 in the notebook (https://github.com/PacktPublishing/Natural-Language-Processing-with-AWS-AI-Services/blob/main/Chapter%2014/chapter14-auditing-workflows-named-entity-detection-forGitHub.ipynb) for the instructions we will execute now.
In this step, we will create a private team using the Amazon SageMaker labeling workforce console, and we will add ourselves to the private team as a worker. This is required so we can log in to the labeling task UI when we reach the Amazon A2I step in this solution. Please execute the following tasks:
- Log in to the AWS Management Console if not already done (please refer to the Technical requirements section at the start of this chapter for more details), type amazon sagemaker in the Services search bar, and go to the Amazon SageMaker console. Once there, on the left of the UI, click on Ground Truth and then Labeling workforces. On this screen, select Private from the tab at the top and click on Create private team.
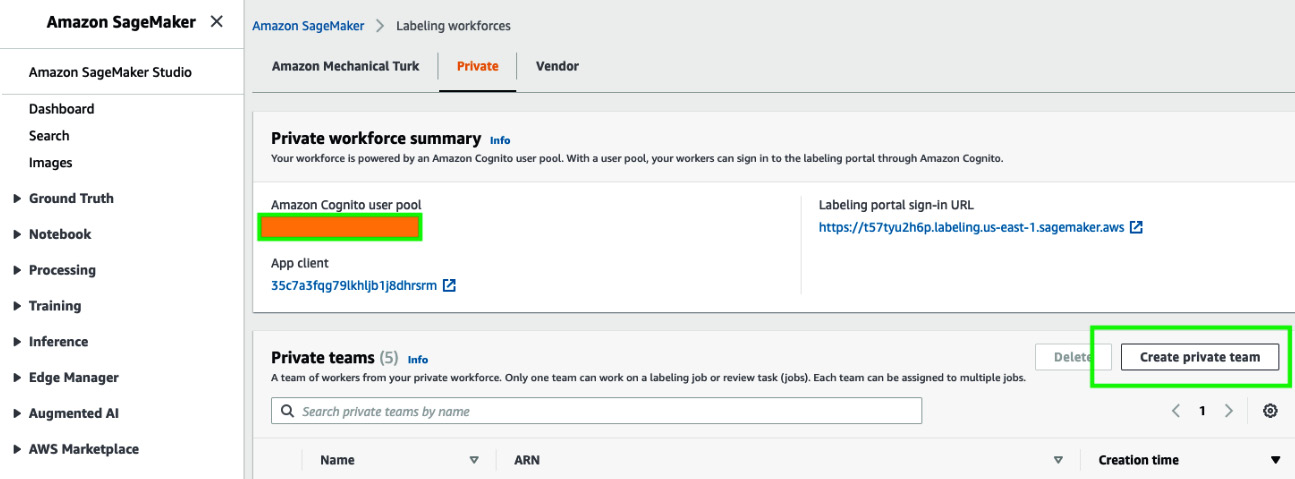
Figure 14.2 – SageMaker labeling workforces
- Enter a name for your private team in the Team name field and leave the default selection of Create a new Amazon Cognito user group in the Add workers section. Scroll down and click Create private team.
- You will now be returned to the Labeling workforces screen. The private team, nlp-doc-team, should be visible under Private teams. Next to that, you will see an ARN, which is a long string that looks like arn:aws:sagemaker:region-name-123456:workteam/private-crowd/team-name. Please copy the ARN from the screen and provide this in the notebook cell:
WORKTEAM_ARN= '<workteam-arn>'
- Next, scroll down in the previous screen, go to the Workers section, and click on Invite new workers. Provide your email address and click Invite new workers. You will receive an email from [email protected]. Follow the instructions to complete the sign-up process.

Figure 14.3 – Inviting new workers
- Now, add yourself to the private team by clicking on nlp-doc-team and then clicking on Add workers to team. Select your email address from the list and click on Add workers to team.
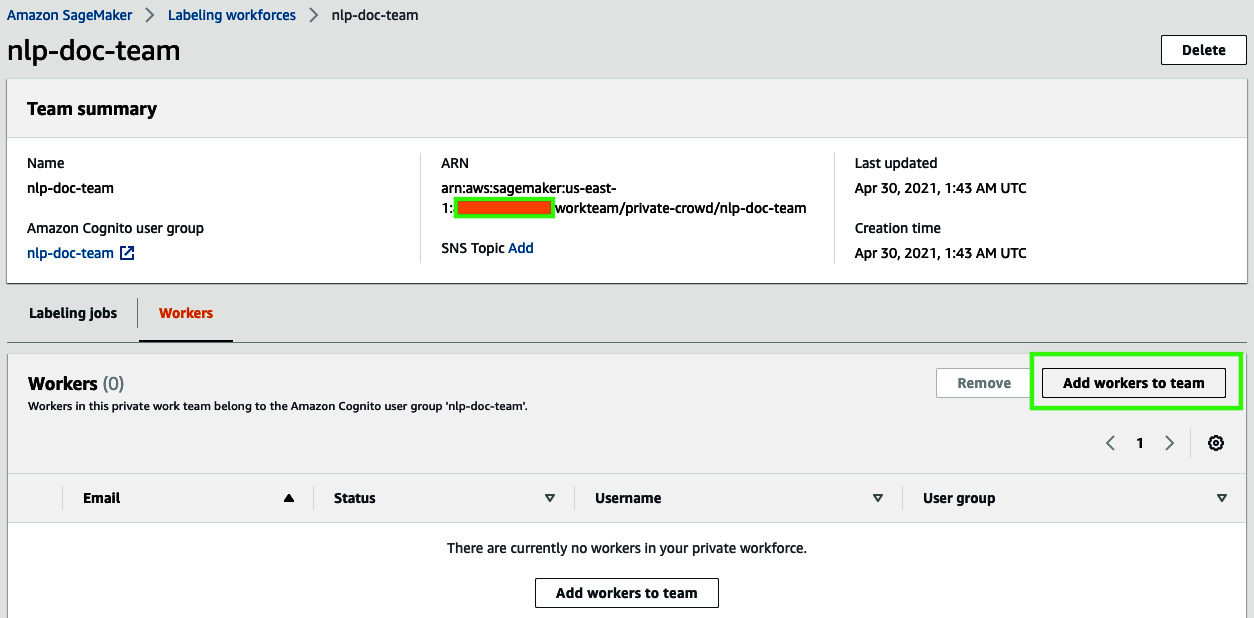
Figure 14.4 – Adding workers to team
Now that we have added the private team, let's review our loan application by extracting the contents using Amazon Textract.
Extracting sample document contents using Amazon Textract
This section corresponds to Step 3 in the notebook: https://github.com/PacktPublishing/Natural-Language-Processing-with-AWS-AI-Services/blob/main/Chapter%2014/chapter14-auditing-workflows-named-entity-detection-forGitHub.ipynb.
In this step, we will review the sample loan application, and then use Amazon Textract to extract the key-value pairs or form data that is of interest to our solution, creating an inference request CSV file to pass as an input to our Comprehend custom entity recognizer for detecting entities. Please follow through using the notebook and execute the cells to perform the tasks required for this step:
- Review the input document by executing the code in the notebook cell, as shown here:
documentName = "input/sample-loan-application.png"
display(Image(filename=documentName))
- Let's now load this image into our S3 bucket:
s3.upload_file(documentName,bucket,prefix+'/'+documentName)
- We will extract the key-value pair data from this document to transform and create a request string for inference using the Amazon Textract AnalyzeDocument API. This accepts image files (PNG or JPEG) as an input. To use this example with a PDF file, or for processing multiple documents together, you can use the StartDocumentAnalysis API: https://docs.aws.amazon.com/textract/latest/dg/API_StartDocumentAnalysis.html.
- We will use the amazon-textract-response-parser library to help with the JSON response from Textract. Install it by typing the following:
!pip install amazon-textract-response-parser
- Now, let's use the Textract boto3 Python SDK to retrieve the contents of the document, as shown here:
textract = boto3.client('textract')
response = textract.analyze_document(Document={'S3Object': {
'Bucket': bucket,
'Name': prefix+'/'+documentName
}}, FeatureTypes=['FORMS'])
- We will now extract the key-value pairs we need for our solution. We will not use the checkbox fields but only those fields with values in them. Also, we will filter out the fields that we actually need in the next few steps:
from trp import Document
doc = Document(response)
df = pd.DataFrame()
# Iterate over elements in the document
x = 0
for page in doc.pages:
for field in page.form.fields:
if field.key is not None and field.value is not None:
if field.value.text not in ('SELECTED','NOT_SELECTED'):
df.at[x,'key'] = field.key.text
df.at[x,'value'] = field.value.text
x+=1
df
- Now that we have loaded the results from Textract into a pandas DataFrame (https://pandas.pydata.org/docs/reference/api/pandas.DataFrame.html), we will run a series of operations to filter the columns we are interested in from the loan application. Execute all the cells under the Extract contents for sending to Comprehend CER section in the notebook. We should see the final filtered list of fields as follows:

Figure 14.5 – Finalized list of fields we will use for Comprehend entity recognition
Now, let's cover detecting entities using the Amazon Comprehend custom entity recognizer.
Detecting entities using the Amazon Comprehend custom entity recognizer
Now that we have what we need from the loan application, let's construct a string that will become our inference request to the Comprehend custom entity recognizer we trained at the beginning of this walkthrough (Step 1 in the notebook). Before we can detect the entities, we need to create a real-time endpoint and associate that with our entity recognizer. When you deploy this solution in batch mode or use it for processing multiple documents, you will use the Amazon Comprehend StartEntitiesDetection API: https://docs.aws.amazon.com/comprehend/latest/dg/API_StartEntitiesDetectionJob.html.
Please follow the instructions in this section by executing the cells in Step 4 in the notebook: https://github.com/PacktPublishing/Natural-Language-Processing-with-AWS-AI-Services/blob/main/Chapter%2014/chapter14-auditing-workflows-named-entity-detection-forGitHub.ipynb:
- We will now create a request string that will be sent to the Amazon Comprehend custom entity recognizer model to detect the entities we trained it on. This string comprises data that we extracted from our loan application document using Amazon Textract in the previous step. We will transpose our pandas DataFrame, add a document number column, and use it to prepare the inference request string:
df_T.columns = df_T.columns.str.rstrip()
df_T['doc'] = 1
df_T
for idx, row in df_T.iterrows():
entry = 'Country'+':'+str(row['Country']).strip()+" "+'Years'+':'+str(row['Years']).strip()+" "+'Cell Phone'+':'+str(row['Cell Phone']).strip()+" "+'Name'+':'+str(row['Name']).strip()+" "+'Social Security Number'+':'+str(row['Social Security Number']).strip()+" "+'TOTAL $'+':'+str(row['TOTAL $']).strip()+" "+'Date of Birth'+':'+str(row['Date of Birth']).strip()
- Next, let's create a real-time endpoint for Comprehend:
custom_recognizer_arn=cer_response['EntityRecognizerArn']
endpoint_response = comprehend.create_endpoint(
EndpointName='nlp-chapter4-cer-endpoint',
ModelArn=custom_recognizer_arn,
DesiredInferenceUnits=2,
DataAccessRoleArn=role
)
endpoint_response['EndpointArn']
- We see the endpoint Arn printed as follows:
arn:aws:comprehend:us-east-1:<aws-account-nr>:entity-recognizer-endpoint/nlp-chapter4-cer-endpoint
- Check the status of the endpoint by navigating to the Amazon Comprehend console, go to custom entity recognition in the left menu, click on your recognizer, and scroll down to verify your real-time endpoint has been created successfully. If the endpoint is not active, the code in the next cell in the notebook will fail. It may take about 15 minutes for the endpoint to be ready:
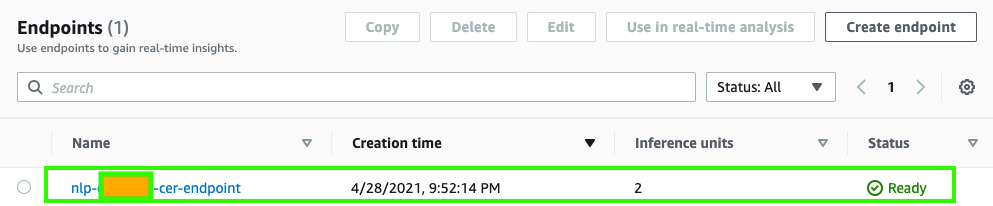
Figure 14.6 – Waiting for an endpoint to be ready
- When the endpoint is Ready, execute the code in the notebook cell to send the inference request to the custom entity recognizer, as shown here:
response = comprehend.detect_entities(Text=entry,
LanguageCode='en',
EndpointArn=endpoint_response['EndpointArn']
)
print(response)
- We see the output as shown in the following code block. This display shows that our Comprehend entity recognition has identified all these attributes that represent a valid person:
{'Entities': [{'Score': 0.9999999403953552, 'Type': 'PERSON', 'Text': 'Years:18', 'BeginOffset': 11, 'EndOffset': 19}, {'Score': 0.9999998211860657, 'Type': 'PERSON', 'Text': 'Cell Phone:(555 ) 0200 1234', 'BeginOffset': 20, 'EndOffset': 47}, {'Score': 1.0, 'Type': 'PERSON', 'Text': 'Name:Kwaku Mensah', 'BeginOffset': 48, 'EndOffset': 65}, {'Score': 1.0, 'Type': 'PERSON', 'Text': 'Social Security Number:123 - 45 - 6789', 'BeginOffset': 66, 'EndOffset': 104}, {'Score': 1.0, 'Type': 'PERSON', 'Text': 'TOTAL $:8000.00/month', 'BeginOffset': 105, 'EndOffset': 126}, {'Score': 1.0, 'Type': 'PERSON', 'Text': 'Date of Birth:01 / 01 / 1953', 'BeginOffset': 127, 'EndOffset': 155}], 'ResponseMetadata': {'RequestId': 'ecbd75fd-22bc-4dca-9aa0-73f58f6784e4', 'HTTPStatusCode': 200, 'HTTPHeaders': {'x-amzn-requestid': 'ecbd75fd-22bc-4dca-9aa0-73f58f6784e4', 'content-type': 'application/x-amz-json-1.1', 'content-length': '620', 'date': 'Tue, 06 Jul 2021 22:26:11 GMT'}, 'RetryAttempts': 0}}
- The last task in Step 4 is to prepare a human_loop_input list to be used with the Amazon A2I human workflow that we will create in the next step:
import json
human_loop_input = []
data = {}
ent = response['Entities']
existing_entities = []
if ent != None and len(ent) > 0:
for entity in ent:
current_entity = {}
current_entity['label'] = entity['Type']
current_entity['text'] = entity['Text']
current_entity['startOffset'] = entity['BeginOffset']
current_entity['endOffset'] = entity['EndOffset']
existing_entities.append(current_entity)
data['ORIGINAL_TEXT'] = entry
data['ENTITIES'] = existing_entities
human_loop_input.append(data)
print(human_loop_input)
126}, {'label': 'PERSON', 'text': 'Date of Birth:01 / 01 / 1953', 'startOffset': 127, 'endOffset': 155}]}]
In this section, we were able to detect entities with the Amazon Comprehend entity recognizer. In the next section, we will walk through how you can use Amazon A2I to review the predictions and make changes to the predicted versus actual entity.
Setting up an Amazon A2I human workflow loop
For the code blocks discussed here, refer to Step 5 in the notebook: https://github.com/PacktPublishing/Natural-Language-Processing-with-AWS-AI-Services/blob/main/Chapter%2014/chapter14-auditing-workflows-named-entity-detection-forGitHub.ipynb.
Now that we have the detected entities from our Comprehend custom entity recognizer, it's time to set up a human workflow using the private team we created in Step 2 and send the results to the Amazon A2I human loop for review, and any modifications/augmentation as required. Subsequently, we will update the entitylist.csv file that we originally used to train our Comprehend custom entity recognizer so we can prepare it for retraining based on the human feedback:
- Let's start by initializing some variables we will need for the next few tasks:
timestamp = time.strftime("%Y-%m-%d-%H-%M-%S", time.gmtime())
# Amazon SageMaker client
sagemaker = boto3.client('sagemaker')
# Amazon Augment AI (A2I) client
a2i = boto3.client('sagemaker-a2i-runtime')
# Flow definition name
flowDefinition = 'fd-nlp-chapter14-' + timestamp
# Task UI name - this value is unique per account and region. You can also provide your own value here.
taskUIName = 'ui-nlp-chapter14-' + timestamp
# Flow definition outputs
OUTPUT_PATH = f's3://' + bucket + '/' + prefix + '/a2i-results'
- Now, we will create the human task UI by executing the next cell in the notebook (refer to Step 5 in the notebook). We selected the task template for named entity recognition from the Amazon A2I Sample Task UI GitHub repository (https://github.com/aws-samples/amazon-a2i-sample-task-uis) and customized it for our needs.
- Create the task UI based on the template:
def create_task_ui():
'''
Creates a Human Task UI resource.
Returns:
struct: HumanTaskUiArn
'''
response = sagemaker.create_human_task_ui(
HumanTaskUiName=taskUIName,
UiTemplate={'Content': template})
return response
# Create task UI
humanTaskUiResponse = create_task_ui()
humanTaskUiArn = humanTaskUiResponse['HumanTaskUiArn']
print(humanTaskUiArn)
- We get the output as shown:
arn:aws:sagemaker:us-east-1:<aws-account-nr>:human-task-ui/ui-nlp-chapter14-<timestamp>
- Execute the next couple of cells in the notebook to create the Amazon A2I flow definition that manages the orchestration of tasks to workforces and the collection of the output data. We are now ready to start the human workflow loop. Execute the next code block in the notebook to start the human loop.
- Check the status of your human loop by executing the code block in the next cell in the notebook – it should be InProgress:
completed_human_loops = []
a2i_resp = a2i.describe_human_loop(HumanLoopName=humanLoopName)
print(f'HumanLoop Name: {humanLoopName}')
print(f'HumanLoop Status: {a2i_resp["HumanLoopStatus"]}')
print(f'HumanLoop Output Destination: {a2i_resp["HumanLoopOutput"]}')
print(' ')
if a2i_resp["HumanLoopStatus"] == "Completed":
completed_human_loops.append(resp)
- We get the output as shown:
HumanLoop Name: 0fe076a4-b6eb-49ea-83bf-78f953a71c89
HumanLoop Status: InProgress
HumanLoop Output Destination: {'OutputS3Uri': 's3://<your-bucket-name>/chapter4/a2i-results/fd-nlp-chapter4-2021-07-06-22-32-21/2021/07/06/22/33/08/<hashnr>/output.json'
In the next section, we will walk through how your private reviewers can log in to the console and review the entities detected by Amazon Comprehend.
Reviewing and modifying detected entities
Now, we will log in to the Amazon A2I Task UI to review, change, and re-label the detected entities from our Comprehend custom entity recognizer. Execute the cells in the notebook based on the instructions discussed in this sectio:.
- Let's log in to the worker portal to review the predictions and modify them as required. Execute the following code to get the URL to our Task UI:
workteamName = WORKTEAM_ARN[WORKTEAM_ARN.rfind('/') + 1:]
print("Navigate to the private worker portal and do the tasks. Make sure you've invited yourself to your workteam!")
print('https://' + sagemaker.describe_workteam(WorkteamName=workteamName)['Workteam']['SubDomain'])
- Once you log in you will see a LOAN APPLICATION REVIEW task. Select it and click on Start working:
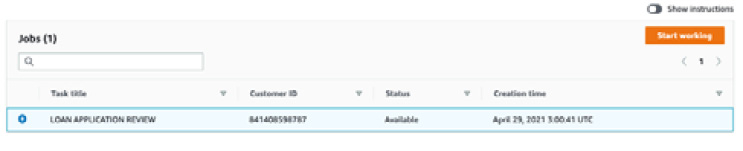
Figure 14.7 – Amazon A2I task list
- You should see the Amazon A2I labeling UI with the list of entities detected by Comprehend custom entity recognition highlighted along with the labels, as shown in the following screenshot:
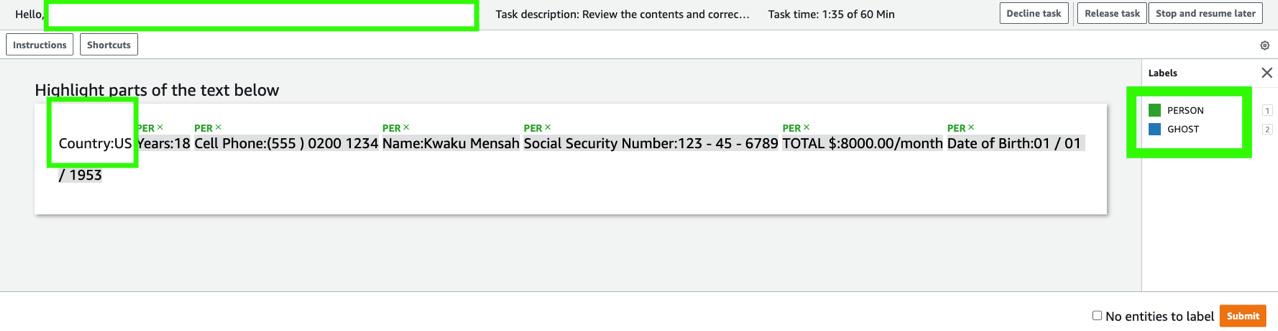
Figure 14.8 – Amazon A2I labeling UI ready for human review
- Now, select the GHOST label from the labels on the right then assign this to the unlabeled Country:US entry in the UI and click Submit.
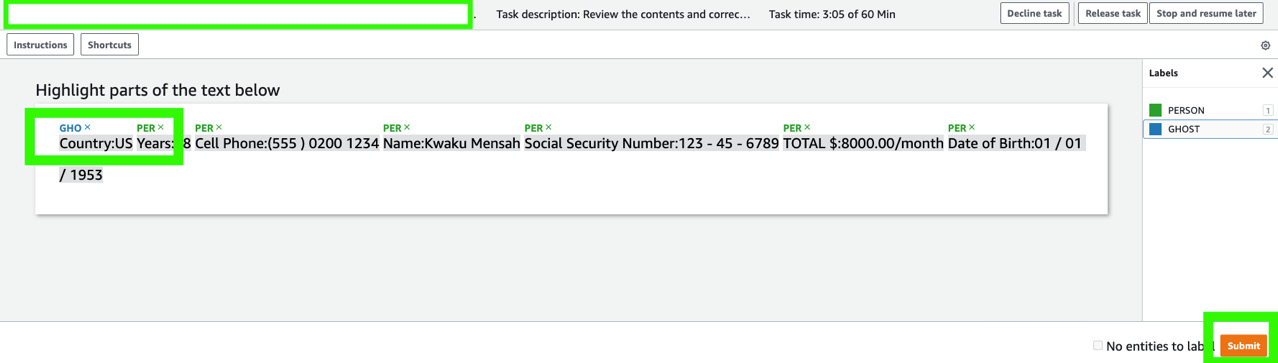
Figure 14.9 – Adding/modifying labels to the detected entities and clicking Submit
- Continue executing the cells in the notebook to check the status of the human loop again (this should show a status of Completed) and print the Amazon A2I output JSON object. If there is a difference in entities, we will update the entitylist.csv file and trigger a retraining of our Comprehend custom entity recognizer. Let's verify whether new entities are present:
retrain='N'
el = open('train/entitylist.csv','r').read()
for annotated_entity in a2i_entities:
if original_text[annotated_entity['startOffset']:annotated_entity['endOffset']] not in el:
retrain='Y'
word = ' '+original_text[annotated_entity['startOffset']:annotated_entity['endOffset']]+','+annotated_entity['label'].upper()
print("Updating Entity List with: " + word)
open('train/entitylist.csv','a').write(word)
if retrain == 'Y':
print("Entity list updated, model to be retrained")
- We see the output as shown in the following code block. Though Comprehend detected Years and Cell Phone to be a PERSON entity, it was not present in the original entitylist.csv file, and so it will be updated with these values and the Comprehend entity recognition will be re-trained:
Updating Entity List with:
Country:US,GHOST
Updating Entity List with:
Years:18,PERSON
Updating Entity List with:
Cell Phone:(555 ) 0200 1234,PERSON
Entity list updated, model to be retrained
This response is saved automatically in the Amazon S3 bucket JSON file in the form of labels. In the next section, we will use these modified or reviewed labels to retrain our custom entity recognizer model.
Retraining Comprehend custom entity recognizer
We will now retrain our Comprehend custom entity recognizer. The cells to be executed are similar to what we did when we originally trained our recognizer:
- Execute the cells in Step 7 of the notebook: https://github.com/PacktPublishing/Natural-Language-Processing-with-AWS-AI-Services/blob/main/Chapter%2014/chapter14-auditing-workflows-named-entity-detection-forGitHub.ipynb.
After declaring variables, we execute the following code block to start the training:
Import datetime
cer_name = "retrain-loan-recognizer"+str(datetime.datetime.now().strftime("%s"))
cer_response = comprehend.create_entity_recognizer(
RecognizerName = cer_name,
DataAccessRoleArn = role,
InputDataConfig = cer_input_object,
LanguageCode = "en"
)
- We see the output shown that indicates the retraining job has been submitted. The metadata has been removed from the response for clarity:
{ 'EntityRecognizerProperties': { 'DataAccessRoleArn': 'arn:aws:iam::<aws-account-nr>:role/service-role/<execution-role>',
'EntityRecognizerArn': 'arn:aws:comprehend:us-east-1:<aws-account-nr>:entity-recognizer/retrain-loan-recognizer1625612436',
'InputDataConfig': { 'DataFormat': 'COMPREHEND_CSV',
'Documents': { 'S3Uri': 's3://<s3-bucket>/chapter4/train/raw_txt.csv'},
'EntityList': { 'S3Uri': 's3://<s3-bucket>/chapter4/train/entitylist.csv'},
'EntityTypes': [ { 'Type': 'PERSON'},
{ 'Type': 'GHOST'}]},
'LanguageCode': 'en',
'Status': 'SUBMITTED',
'SubmitTime': datetime.datetime(2021, 7, 6, 23, 0, 36, 759000, tzinfo=tzlocal())}}
- As before, go to the Amazon Comprehend console to check the status of the entity recognizer, and verify that the status has changed to Trained.
- Please repeat Steps 3 to 5 from the notebook to test the newly retrained recognizer.
Let's now execute the steps to store the results of the authentication check for access by applications downstream.
Storing decisions for downstream processing
Now we understand how to set up an auditing workflow, let's execute the steps needed to persist the results from our entity detection so we can send them to a downstream application. If the majority or all of the entities are of the GHOST type, we will send a rejection decision, if the majority is of the PERSON type, we will send a summary approval, if all of them are PERSON, we will send approval, and if they are evenly distributed, we will send a rejection decisio:.
- First, let's check how many entities were detected to be of the PERSON or GHOST type from A2I. Execute the first cell in Step 8 from the notebook. We get the output as shown:
[{'endOffset': 10, 'label': 'GHOST', 'startOffset': 0},
{'endOffset': 19, 'label': 'PERSON', 'startOffset': 11},
{'endOffset': 47, 'label': 'PERSON', 'startOffset': 20},
{'endOffset': 65, 'label': 'PERSON', 'startOffset': 48},
{'endOffset': 104, 'label': 'PERSON', 'startOffset': 66},
{'endOffset': 126, 'label': 'PERSON', 'startOffset': 105},
{'endOffset': 155, 'label': 'PERSON', 'startOffset': 127}]
- Let's apply the preceding rules to determine the decision for this loan application:
from collections import Counter
docstatus = ''
ghost = float(Counter(labellist)['GHOST'])
person = float(Counter(labellist)['PERSON'])
if ghost >= len(labellist)*.5:
docstatus = 'REJECT'
elif min(len(labellist)*.5, len(labellist)*.8) < person < max(len(labellist)*.5, len(labellist)*.8):
docstatus = 'SUMMARY APPROVE'
elif person > len(labellist)*.8:
docstatus = 'APPROVE'
print(docstatus)
- We get the output APPROVE.
- Store the decision in an Amazon DynamoDB table (reminder: a managed database service for storing and accessing key-value pairs with very low latency). Loan processors can use this data to start the pre-qualification process. Execute the next cell in the notebook to create the DynamoDB table.
- Now, execute the next cell in the notebook to insert the contents of the loan application and the decision into the table. We see the values inserted into the DynamoDB table as follows:
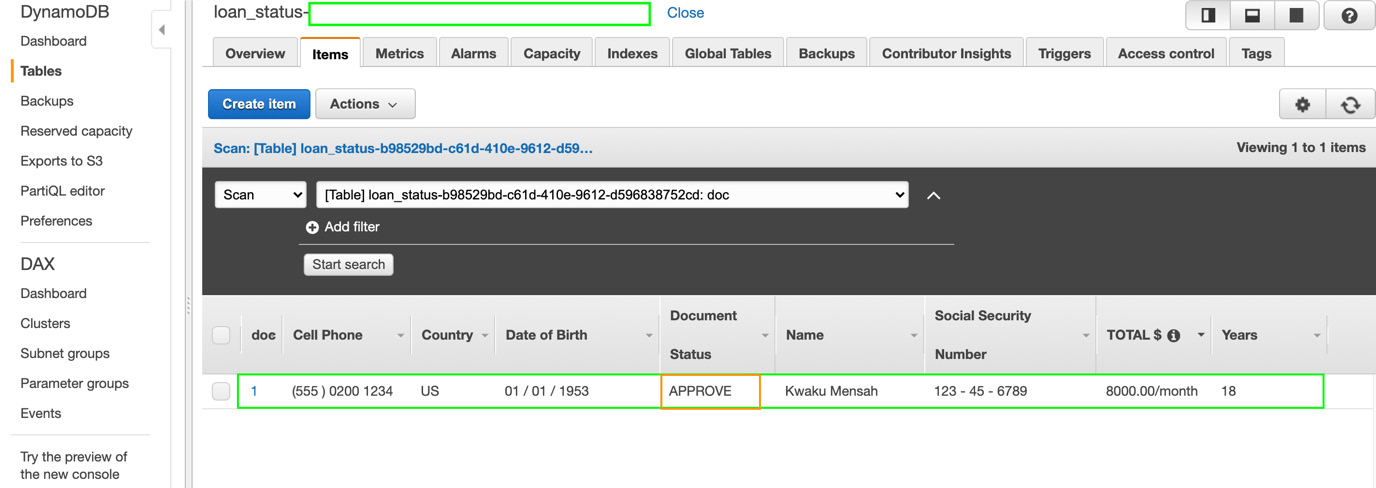
Figure 14.10 – Loan authenticity check status in DynamoDB
That concludes the solution build. Please refer to the Further reading section for more examples of approaches for this use case, as well as the code sample for building a similar solution using AWS Lambda and CloudFormation.
Summary
In this chapter, we learned how to build an auditing workflow for named entity recognition to solve real-world challenges that many organizations face today with document processing, using Amazon Textract, Amazon Comprehend, and Amazon A2I. We reviewed the loan authentication use case to validate the documents before they can be passed to a loan processor. We considered an architecture based on conditions such as reducing the validation time from 2 to 4 weeks to 24 hours within the first 3 months of solution implementation. We assumed that you, the reader, are the solution architect assigned to this project, and we reviewed an overview of the solution components along with an architectural illustration in Figure 4.1.
We then went through the pre-requisites for the solution build, set up an Amazon SageMaker Notebook instance, cloned our GitHub repository, and started executing the code in the notebook based on instructions from this chapter. We covered training an Amazon Comprehend custom entity recognizer, setting up our private work team using Amazon SageMaker labeling workforces, extracting the relevant content from the loan application using Amazon Textract, sending it to the Comprehend custom entity recognizer for detecting entities, forwarding the detection results to an Amazon A2I human review loop, completing the human task steps using the UI, reviewing the results of the review, updating the entities list to retrain the custom entity recognizer, and finally, storing the document contents and the loan validation decision to an Amazon DynamoDB table for downstream processing.
In the next chapter, we will be building a classical use case that's tailor-made for NLP – namely, the active learning workflow for text classification. We will be training a text classification model using Amazon Comprehend custom for labeling documents into classes, review predictions using Amazon A2I, and retrain the classifier based on feedback from the Amazon A2I human review loop. We will demonstrate how the solution evolves in intelligence in being able to improve classification accuracy because of the feedback loop.
Further reading
- Building an end-to-end intelligent document processing solution using AWS by Purnesh Tripathi: https://aws.amazon.com/blogs/machine-learning/building-an-end-to-end-intelligent-document-processing-solution-using-aws/
- Setting up human review of your NLP-based entity recognition models with Amazon SageMaker Ground Truth, Amazon Comprehend, and Amazon A2I by Mona Mona and Prem Ranga: https://aws.amazon.com/blogs/machine-learning/setting-up-human-review-of-your-nlp-based-entity-recognition-models-with-amazon-sagemaker-ground-truth-amazon-comprehend-and-amazon-a2i/
- Announcing model improvements and lower annotation limits for Amazon Comprehend custom entity recognition by Prem Ranga, Chethan Krishna, and Mona Mona: https://aws.amazon.com/blogs/machine-learning/announcing-model-improvements-and-lower-annotation-limits-for-amazon-comprehend-custom-entity-recognition/