
5
Managing States and Connecting Backends
In the previous chapter, you learned how to build an app that works fine and looks great. In this chapter, we will focus on data. First, you will learn how to handle more complex data in your app. Then, you’ll learn about different options regarding how to make your app communicate with the rest of the world by connecting it to remote backends.
In this chapter, we will cover the following topics:
- Managing global application states
- Working with global state management solutions
- Connecting to remote backends
Technical requirements
To be able to run the code in this chapter, you must set up the following:
- A working React Native environment (bit.ly/prn-setup-rn – React Native CLI Quickstart).
- While most of this chapter should also work on Windows, I recommend working on a Mac.
- To check out the simple examples, you can use https://codesandbox.io/ and import react-native-web as a dependency. This provides all React Native components and transforms them into HTML tags.
Managing global application states
Since React Native is based on React, managing the application state does not differ much from React applications. There are dozens of well-maintained and working state management libraries available, all of which you can use in React Native. However, having a good plan and knowing how to manage the application state is much more important in an app than in a web application.
While it might be acceptable to wait a couple of seconds for data to appear or for a new page to load, this is not the case in a mobile app. Users are used to seeing information or changes immediately. So, you have to ensure that this also is the case in your app.
In this section, we’ll have a look at the most popular state management solutions, but first, you’ll learn about the different state management patterns and which one you should use for your project.
Passing properties
While it may work fine to only work with local component states in small applications and example projects, this approach is very limited. There are a lot of use cases where you have to share data between different components. The bigger your application grows, the more components you will have, and the more layers you will have to pass your data through.
The following diagram shows the main problem:

Figure 5.1 – State management without a global state management solution
The preceding diagram shows a very simple example that’s very close to our example app, but you can already see the main problem: the app contains two tabs, one to show content and one to provide an individual user area. This second tab contains a login functionality, which is extracted in a login component.
The Content tab contains a dashboard component, which is mainly for showing content. But we also want to be able to adapt this content to the user. So, we need the information about the user in the dashboard component.
Without a global application state management library, we will have to do the following if a user logs in:
- Pass the information from the Login component to the User tab.
- Pass the information from the User tab to App.js.
- Set the user information in the state of App.js.
- Pass the user information as a prop to the Content tab.
- Pass the user information from the Content tab to the Dashboard component.
Even in this simple example, we had to include five components to provide the user information to the dashboard component. When we are talking about complex real-world applications, there could be 10 or more layers that you would have to pass your data through. This would be a nightmare to maintain and understand.
There is another problem with this approach: when we pass the user information as a prop to the Content tab, this will re-render the whole Content tab if the user information in the state of App.js changes. This means that we re-render the Content tab and potentially a lot of child components that haven’t changed because of the changed prop.
This is especially important because the global state of large apps can become quite complex and huge. If you compare this to a backend application, you can think of the global application state as the database of the system.
So, global state management libraries should solve two problems. On the one hand, they should give us an option to share information between components and keep our application’s state management maintainable. On the other hand, they should also help reduce unnecessary re-renders and therefore optimize our app’s performance.
Using global state providers/containers
The following diagram shows how the data flow is expected to work with a global state management solution:

Figure 5.2 – State management with a global state management solution
As you can see, the global app state management solution provides an option to set data to a global place and connect components to consume this data. While this ensures that the connected components get re-rendered automatically when this data changes, it also has to guarantee that only these components are re-rendered and not the whole component tree.
While this is a good pattern, it also comes with some risks. When every component can connect to your global state, you have to be very careful in which ways this state can be edited.
Important note
Never allow any component to write directly to your state. No matter what library you use, your global state provider should always have control over how the state can be altered.
As mentioned in the preceding information box, your global state provider should always be in control of the state. This means that you should never allow any component to set the state directly. Instead, your app state provider should provide some functions that alter the state. This ensures that you always know in which ways your state can change. A state that can only be altered in these ways is also called a predictable state.
Using the predictable state pattern
Having a predictable state is especially important when working on large-scale projects with multiple developers. Imagine a project where anyone could simply set the state directly from any component. When you run into an error because your state contains an invalid value, which cannot be handled by your application, it is nearly impossible to find out where this value is coming from. Also, you cannot provide any central validation when you allow your state to be edited directly from outside the global state provider.
When you use the predictable state pattern, you have three advantages. First, you can provide validation and prevent invalid values from getting written to your state. Second, if you run into an error because of invalid state values, you have a central point where you can start debugging. Third, it’s easier to write tests for it.
The pattern of creating a predictable state is shown in the following diagram:
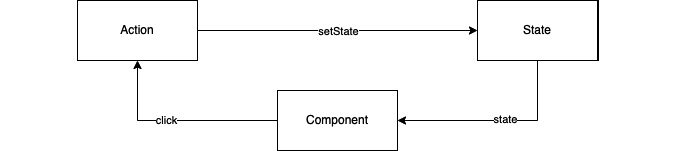
Figure 5.3 – Simple predictable state management
As you can see, a component triggers any event. In this example, a user clicks a button. This event triggers an action. This can be a custom Hook or a function that is provided by some state management library. This Hook or function can do multiple things, from validating the event to fetching data from a local storage solution or an external backend. In the end, the state will be set.
To give you a better idea, let’s have a look at a concrete example. The component is a reload button. Upon clicking it, the action fetches the most recent data from the backend. It handles the request and if the request is successful and provides valid data, the action sets this data in the state. Otherwise, it sets an error message and provides code to the state.
As you can see, this pattern can also provide a good layer of abstraction between business logic and UI. If you would like to have an even better abstraction, you could use the next pattern we’ll talk about.
Using the state/action/reducer pattern
This simple predictable state management pattern can be extended. The following diagram shows an extended version, which adds reducers and selectors:
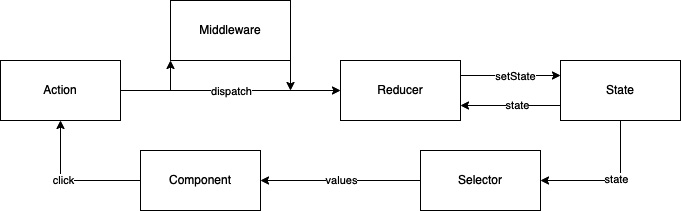
Figure 5.4 – The state/action/reducer pattern
The preceding diagram shows the so-called state/action/reducer pattern. In this pattern, the action is not a function or Hook but a JavaScript object that gets dispatched. In most cases, this action is handled by a reducer. The reducer takes the action, which can have some data as a payload, and processes it. It can validate data, merge the data with the current state, and set the state.
Normally, in this pattern, the reducer does not reach out to any other data sources. It only knows the action and the state. If you want to fetch data in this pattern, you can use middleware. This middleware intercepts the dispatched actions, processes its tasks, and dispatches other actions, which are then handled by reducers.
Again, let’s have a look at a concrete example. A user clicks on the Reload button. This click dispatches a FETCH_DATA action. This FETCH_DATA action is handled by the middleware. The middleware fetches the data and validates the request. If everything worked fine, it dispatches a SET_DATA action with the new data as a payload.
The reducer handles this SET_DATA action, maybe does some data validation, merges the data with the current state, and sets the new state. If the data fetching in the middleware fails, the middleware dispatches a DATA_FETCH_ERROR action with an error code and error message as a payload. This action is also handled by a reducer, which sets the error code and message for the state.
Another difference between Figure 5.3 and Figure 5.4 is the existence of selectors. This is something that exists in different state management solutions because it makes it possible to subscribe to only a part of the state instead of the whole state. This is very useful because it makes it possible to create complex state objects while not always re-rendering your whole application.
This is clearer when we look at an example. Let’s say that you have an application whose global state consists of a user, an array of articles, and an array of favorite article IDs. Your application shows the articles in one tab and every article has a button to add it to a favorite list. On a second tab, you show the user information.
When you put all this in the same global state, without using selectors, the default behavior of your User tab would be to re-render if you favor an article, even if nothing on the user page has changed. This is because the User tab also consumes the whole state and this state changed. When using a selector on the user, it doesn’t re-render, because the user part of the state that the User tab is connected to didn’t change.
If you were to use a complex state without selectors, you would have to create different state providers, which are completely independent of each other.
Now that you’ve learned about the different options, it’s time to have a look at when it is necessary to use a global state or when you can also use a local component state and simply pass the props.
Comparing local component state and global application state
If you want to provide some data to be shown in your UI, you must store it in your state in most scenarios. But the interesting question is: In which state? Local component state or global application state?
This is a topic that has no simple answer or rules that fit every situation. However, I want to give you some guidelines so that you can make a good decision for all of your use cases:
- Keep your global state as lean as possible: Global variables are something that is very uncommon to use in most programming languages. And this is for a reason. If everything can be set anywhere in your application, it is hard to debug and maintain it. Also, the bigger the global application state grows, the more likely it is that you will run into performance problems.
- Form data should not be part of the global state: When you provide input fields such as text fields, toggles, date pickers, or anything else, the state of these components should not be part of the global application state. This information belongs to the view, which provides these fields and should therefore be part of the view’s component state.
- Try not to pass data down more than three layers: When passing props to a child component, you should try to avoid passing this data through multiple layers. The best practice would be to never pass the component props to a child component, but only the component’s state. However, this can be quite hard in practice, so I would recommend sticking to never passing data down more than three layers.
- Try not to pass data up multiple layers: As you have already learned, it is possible to pass data from a child to a parent component by passing a function from the parent to the child, which sets the state of the parent and then calls this function from the child component. Since this can lead to very confusing component dependencies to each other, you should be even more careful with passing data up than passing it down. I would recommend passing data up only one layer.
- Use the global application state for data, which is used in multiple areas of your app: When data has to be available in multiple areas of your app, which are on completely different navigation stacks, you should always use the global app state.
Deciding which data belongs to which state can be challenging. It is always a case-by-case decision and sometimes, you will have to revert your decision because of changing requirements or because you realize that it wasn’t the right decision while working with it. That’s fine. However, you can reduce these efforts by thinking about the right state solution for your data at the beginning.
Now that we’ve covered the theory, it’s time to look at the most popular solutions and how to maintain the global application state.
Working with global state management solutions
Historically, we would have to start with Redux since it was the first global state management solution to be popular. Back in 2015, when it was introduced, it quickly became the de facto standard for global state management in React applications. It is still used very widely, but especially in the last 3 years, some other third-party solutions have emerged.
React also introduced a built-in solution for global state management that can be used in class components, as well as function components. It’s called React Context, and since it ships with React, we’ll start by looking at it.
Working with React Context
The idea of React Context is very simple: it is like a tunnel into a component that any other component can connect to. A context always consists of a provider and a consumer. The provider can be added to any existing component and expects a value property to be passed. All components that are descendants of the provider component can then implement a consumer and consume this value.
Working with plain React Context providers and consumers
The following code shows a plain React Context example:
export function App() {
  return (
    <ColorsProvider>
      <ColoredButton />
    </ColorsProvider>
  );
}
In your App.js file, you add a ColorsProvider, which wraps a ColoredButton component. This means that in ColoredButton, we will be able to implement a consumer for the ColorsProvider value. But let’s have a look at the implementation of ColorsProvider first:
import defaultColors from "defaultColors";
export const ColorContext = React.createContext();
export function ColorsProvider(props) {
  const [colors, setColors] =
      useState(defaultColors.light);
  const toggleColors = () => {
      setColors((curColors) =>
          curColors === defaultColors.dark ?
              defaultColors.light : defaultColors.dark
    );
  };
  const value = {
    colors: colors,
    toggleColors: toggleColors
  };
  return <ColorContext.Provider value={value} {...props} />;
}
In this example, ColorsProvider is a function component that provides a state with the property colors. This is initialized with a default color scheme, which is imported from defaultColors. It also provides a toggleColors function, which changes the color schemes.
The colors state variable and the toggleColors function are then packed into a value object, which is passed to the value property of ColorContext.Provider. ColorContext is initialized in line 2.
As you can see, the file has two exports: ColorContext itself and the ColorsProvider function component. You have already learned how to use the provider, so next, we’ll look at how to consume the context’s value.
Note
The ColorsProvider function component isn’t necessary for React Context to work. We could have also added the React Context initialization, the colors state, and the toggleColors function, as well as ColorContext.Provider directly into the App.js file. But it is best practice, and I would recommend extracting your contexts into separate files.
The following code shows ColoredButton, which is wrapped by our ColorsProvider in our App.js file:
function ColoredButton(props) {
  return (
    <ColorContext.Consumer>
      {({ colors, toggleColors }) => {
          return (
              <Pressable
                  onPress={toggleColors}
               style={{
                  backgroundColor: colors ?
                  colors.background :
                  defaultColors.background
            }}
          >
            <Text
                style={{
                    color: colors ? colors.foreground :
                    defaultColors.foreground
              }}
            >
              Toggle Colors
            </Text>
          </Pressable>
        );
      }}
    </ColorContext.Consumer>
  );
}
As you can see, we use a ColorContext.Consumer component, which provides the values of ColorsProvider. These values can then be used. In this case, we use the colors object to style the Pressable and Text components and we pass the toggleColors function to the onPress property of the Pressable component.
This method of implementing a consumer works in function components as well as in class components. When working with function components, there is a simpler syntax you can use to fetch the value of the context.
Working with Context and React Hooks
The following code example shows a small section of the code example we looked at previously:
function ColoredButton(props) {
const {colors, toggleColors} = React.useContext(ColorContext);
  return (
          <Pressable
              onPress={toggleColors}
As you can see, instead of having to implement the context consumer component, you can simply use the useContext Hook to fetch the values. This makes the code shorter and much more readable.
While this example is very simple, it nevertheless follows best practices. As you can see, the setColors function, which is the setter for our state, isn’t publicly available. Instead, we provide a toggleColors function, which allows us to alter the state in a predefined way. Also, we have the state abstracted very well from the UI.
Hooks enable you to even go one step further. When the project grows and you want to have an additional layer of abstraction, such as for making external requests, you could create a custom Hook as your middleware.
This is what we will add next to our example project. We’ll create some functionality so that the user can create a list of favorite movies, which then gets displayed in the User tab. While doing this, we’ll discuss the benefits and limitations of React Context for global state management.
The following figure shows what we’ll create:
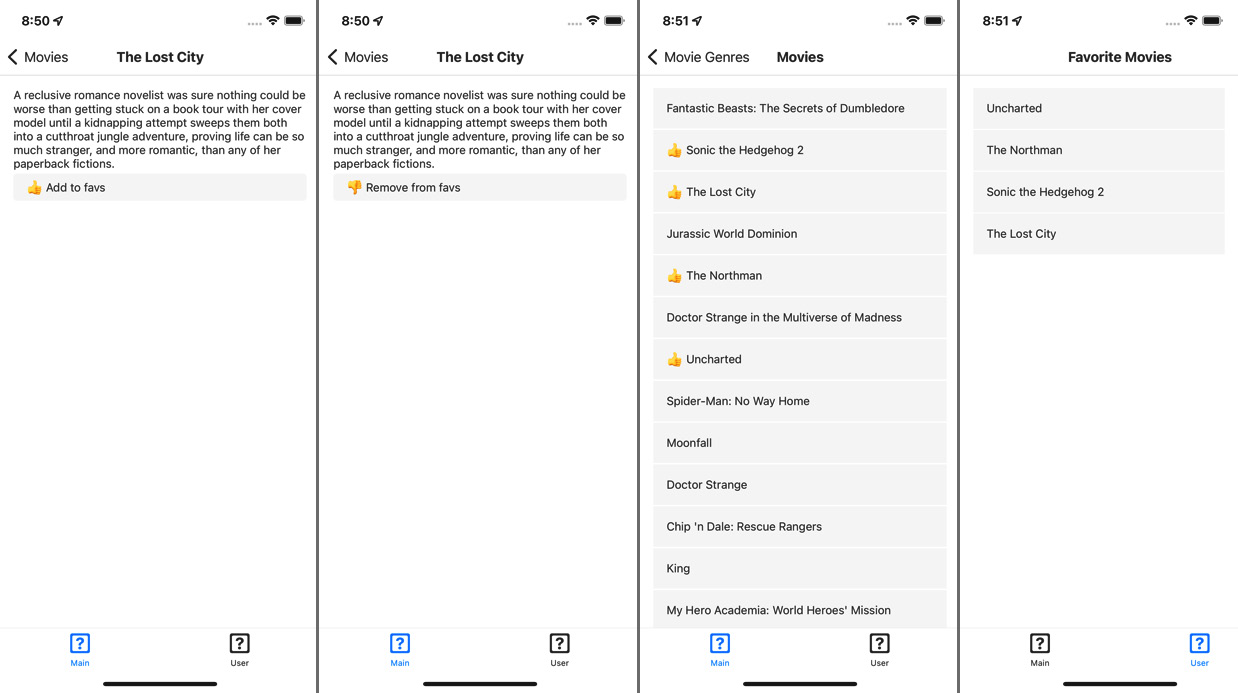
Figure 5.5 – Example app – Favorite Movies
This is what the app should be able to do. On each movie details page, we’ll add a button to add the movie to Favorite Movies. If a movie is already part of Favorite Movies, the button changes to a Remove button, which removes the movie from the list.
In the Movies list, we want to add a thumbs-up icon to all movies that are part of the Favorite Movies list. Finally, we want to display all movies in the User tab.
First, we have to create the context and the custom Hook to be able to store the data. The following code shows UserProvider:
export function UserProvider(props: any) {
  const [name, setName] = useState<string>('John');
  const [favs, setFavs] = useState<{[favId: number]:
      IMovie}>({});
  const addFav = (fav: IMovie): void => {
      if (!favs[fav.id]) {
          const _favs = {...favs};
          _favs[fav.id] = fav;
          setFavs(_favs);
      }
  };
  const removeFav = (favId: number): void => {
      if (favs[favId]) {
          const _favs = {...favs};
          delete _favs[favId];
          setFavs(_favs);
      }
  };
  const value = {
      name, favs, addFav, removeFav,
  };
  return <UserContext.Provider value={value} {...props} />;
}
As you can see, we have two state variables: an object that stores the favorite movies in a map-like structure (favs) and the name of the user (name). You can ignore name for now; we’ll need this later.
The provider also contains addFav and removeFav functions, which are the only ways to edit the store from outside the provider. These two functions and the name and favs state variables are packed into the value variable, which then gets passed to the value property of the provider.
Next, we’ll have a look at the custom Hook. This Hook serves as the middleware and the data selectors. It is used to fetch data before it’s stored and to transform data to provide it in the way it is needed:
export function useUser() {
  const context = React.useContext(UserContext);
  const {name, favs, addFav, removeFav} = context;
  const addFavById = (favId: number): void => {
      const movie = getMovieById(favId);
      if (!movie) {
          return;
      }
      addFav(movie);
  };
  const getFavsAsArray = (): IMovie[] => {
      return Object.values(favs);
  };
  const isFav = (favId: number): boolean => {
    return !!favs[favId];
  };
    return {
        name, favs, getFavsAsArray, removeFav, addFavById,
        isFav,
    };
}
As we did in our previous Hooks example, we’ll use the useContext Hook to make the provider’s data accessible in our custom Hook. The custom Hook contains three functions. The addFavById function takes a movieId and fetches the movie from our movieService. This is a typical middleware task.
The getFavsAsArray function provides the favorite movies of a user as an array. The isFav function answers the question if a given ID belongs to a movie in the user’s favorite list. These two functions are typical selectors.
The Hook returns these three functions as well as name, favs, and removeFav from the provider. With these things, we have all we need to implement our requirements very easily.
Let’s start with the movie details page. We’ll have a look at different parts of the added code; if you want to see the whole file, please visit this book’s GitHub repository:
const Movie = (props: MovieProps) => {
  const {isFav, addFavById, removeFav} = useUser();
  const _isFav = isFav(props.route.params.movie.id);
  ...
In this component, we need the isFav function to check if a movie is already part of the user’s favorites. Depending on that, we want to be able to add or remove the movie to or from the user’s favorites. Therefore, we import our useUser Hook and then use object destructuring to make these functions available. We also store the isFav information in a variable for later use.
Now that we can work with these functions, we have to implement the button itself:
<Pressable
  style={styles.pressableContainer}
  onPress={
      _isFav
      ? () => removeFav(props.route.params.movie.id)
      : () => addFavById(props.route.params.movie.id)
  }>
  <Text style={styles.pressableText}>
    {_isFav ? '? Remove from favs' : '? Add to favs'}
  </Text>
</Pressable>
As you can see, the implementation part of the button is quite easy. We use our _isFav variable to check which text our button should display and to decide which function we should call. The addFavById and removeFav functions can be called like any other function provided by the component.
Now that we have built the functionality to edit the favorites, the next step is to display this information in the movies list. The import of the Hook works as follows in the movie details view:
const Genre = (props: GenreProps) => {
  const [movies, setMovies] = useState<IMovie[]>([]);
  const {isMovieFav} = useUser();
  ...
Since we don’t want to write anything to the state, we don’t need to make these functions available. And in contrast to the movie details page, we must check multiple movies for their favorite status, so it makes no sense to create a variable to cache the result of isMovieFav here.
Next, let’s look at the implementation of the movie list’s JSX:
  return (
    <ScrollContainer>
      {movies.map(movie => (
          <Pressable
            {isMovieFav(movie.id) ? (
              <Text style={styles.movieTitleFav}>?</Text>
              ) : undefined}
            <Text style={styles.movieTitle}>{movie.title}
                </Text>
          </Pressable>
        ))}
    </ScrollContainer>
  );
While iterating over the movies, we’ll check every movie with the isMovieFav function. If it returns true, we’ll add a thumbs-up icon. That’s the only change that is needed here.
The last step is to show the list of Favorite Movies in the User tab. This is also just a few lines of code:
const User = (props: UserProps) => {
  const {getMovieFavsAsArray} = useUser();
  const _movieFavsArray = getMovieFavsAsArray();
  return (
    <ScrollContainer>
      {_movieFavsArray.map(movie => {
        return (
          <Pressable>
            <Text style={styles.movieTitle}>{movie.title}
                </Text>
          </Pressable>
        );
      })}
    </ScrollContainer>
  );
};
The preceding code shows the whole component (except imports and styling). We fetch our favorite movies with the Hook’s getMovieFavsAsArray function and store them in a variable. Then, we iterate over the array and render the movies. That’s it! Our example is complete.
As you have seen in this example, the implementation part of the components is very easy and only needs a few lines of code in most cases. This will stay the same, even in bigger projects, when you have a good structure in your contexts. I like this approach very much because it doesn’t need any external libraries and has a clear separation between UI components, middleware, and state provider. It also comes with another benefit.
It can be very useful to persist parts of the store and rehydrate (reload) them when the user reopens the app. This is also very easy when working with React Context. The following code snippet is part of UserProvider and shows how to store and reload the user’s favorite list.
In this case, we are using AsyncStorage as a local storage solution:
  useEffect(() => {
    AsyncStorage.getItem('HYDRATE::FAVORITE_MOVIES').then
        (value => {
            if (value) {
                setFavs(JSON.parse(value));
           }
      });
  }, []);
   useEffect(() => {
     if (favs !== {}) {
         AsyncStorage.setItem('HYDRATE::FAVORITE_MOVIES',
             JSON.stringify(favs));
     }
  }, [favs]);
Since the provider works like any other component, it can also use the useEffect Hook. In this example, we are using an effect to fetch favs from AsyncStorage when the provider gets mounted. We use another effect to store the favorites every time the favs variable changes. While there are a lot of benefits, unfortunately, this approach based on React Context comes with a big limitation.
Understanding the limitations of React Context
At the beginning of this example, I told you to ignore the name variable in the state provider because we would need it later. This later is now. If you have already looked at this book’s GitHub repository, you may have realized that the code for the Home view has changed.
The following code snippet shows the changes:
const Home = (props: HomeProps) => {
  const {name} = useUser();
  ...
  console.log('re-render home');
  return (
    <ScrollContainer>
      <Text style={styles.welcome}>Hello {name}</Text>
  ...
This view now imports the useUser Hook and reads the user’s name to provide a warm welcome message to the user. It also contains a console.log that logs every re-render of the page. When you run the code example and add/remove movies to/from the user’s favorites, you’ll realize that the Home component re-renders on every change of favs in UserProvider.
This happens even if we don’t use favs in this component. This is because a state change in UserProvider triggers a re-render in every descendant, which also contains every component that imports the custom Hook.
This limitation does not mean that you can’t use React Context. It is widely used, even in large projects. But you always have to keep this limitation in mind. My recommended solution for this problem is to split your global state into different contexts with different providers.
In this example, we could have created a UserContext, which only contains the name of the user, and a FavContext, which only contains the list of favorites.
You could also use useMemo, React.memo, or componentDidUpdate to optimize the performance of this approach. But if you need to do this, I recommend using another solution that provides these optimizations out of the box. One of them is Zustand, which we’ll have a look at next.
Working with Zustand
Zustand.js is a very lean approach to state management. It is based on Hooks and comes with performance-optimized selectors built in. It can also be extended in different ways so that you can use it to implement exactly the global state management pattern you like.
Note
If you want to use Zustand in class components, you can’t do this directly because class components don’t support Hooks. However, you could use the higher-order component (HOC) pattern to wrap the class component in a function component. Then, you can use the Hook in the function component and pass the Zustand state to the class component as a prop.
You can read more about HOC in the React documentation here: https://bit.ly/prn-hoc.
To create a Zustand store, you must use the create Hook provided by Zustand. This creates a store, which holds the state and provides functions to access the state. To get a more concrete idea, let’s have a look at what our example project looks like with the global state handled by Zustand.
The code snippets shown here are just excerpts. If you want to check out the running example, please go to this book’s GitHub repository and choose the chapter-5-zustand tag:
export const useUserStore = create<IUser & UserStoreFunctions>((set, get) => ({
  name: 'John',
  favs: {},
  addFavById: (favId: number) => {
    const _favs = {...get().favs};
    if (!_favs[favId]) {
      const movie = getMovieById(favId);
      if (movie) {
        _favs[favId] = movie;
        set({favs: _favs});
      }
    }
  },
  removeFav: (favId: number) => {
    const _favs = {...get().favs};
    if (_favs[favId]) {
      delete _favs[favId];
      set({favs: _favs});
    }
  },
}));
We use the create function provided by Zustand to create the store. We pass a function to create that can access the get and set parameters and returns the store. This store itself is an object that can hold data objects (the state) and functions (setters or selectors) as properties. Inside these functions, we can use get to access state objects or set to write parts of the store.
Again, when you work with objects as part of your state, you have to create a new object and write it to the store to trigger a re-render. If you just alter the existing state object and write it back, the state will not be recognized as changed because the object reference did not change.
Tip
When working with objects in your state, it can be annoying to always have to create copies of these objects before setting them to the state. This problem is solved by an open source library called immer.js. This library provides a produce function, which takes the old state, lets you make changes, and automatically creates a new object out of it. It also integrates into Zustand as middleware.
You can find out more about immer.js here: https://bit.ly/prn-immer.
In our example, we still have name and favs as state properties. To modify this state, our Zustand store provides an addFavById function and a removeFav function. The addFavById function not only writes to the store but also fetches the movie for a given ID from our movieService.
Next, we’ll look at how we connect to the store from within a component. We don’t even have to change much code to switch from React Context to Zustand in our components.
Let’s have a look at the movie view:
const Movie = (props: MovieProps) => {
  const [addFavById, favs, removeFav] = useUserStore(state
      => [
          state.addFavById,
          state.favs,
          state.removeFav,
         ], shallow);
  const _isFav = favs[props.route.params.movie.id];
  ...
Here, we use the useUserStore Hook we just created with Zustand’s create function to connect to the Zustand state. We connect to multiple parts of the state using array destructuring. Since we have already implemented the usage of the functions in our JSX code in the React Context example, we don’t have to change anything there. It’s the same functions doing the same thing, but coming from another state management solution.
However, the most important thing occurs when looking at the Home view:
const Home = (props: HomeProps) => {
  const name = useUserStore(state => state.name);
  console.log('rerender home');
  ...
Here, we are doing the same as we did in the React Context example: we are connecting our home view to the global state and fetching the name. When you run this example, you will realize that console.log will no longer be triggered when you add or remove favorites.
This is because Zustand only triggers re-renders if the part of the state the component is connected to changes, not if anything in the state changes. This is very useful because you don’t have to think about performance optimization that much. Zustand provides this out of the box.
Zustand is becoming more and more popular because of its simplicity and flexibility. As mentioned previously, you don’t have to choose this simple approach with Zustand. You could even create a Redux-like workflow with it.
Speaking of Redux, this is the next solution you’ll learn about.
Working with Redux
Redux is by far the most used solution when it comes to global state management. The following diagram compares the usage of react-redux and Zustand:

Figure 5.6 – Daily npm downloads of react-redux and Zustand
As you can see, the daily downloads of react-redux are quite stable at around 5 million. Zustand’s popularity is rapidly growing. It changed from around 100,000 daily downloads in Q3 2021 to around 500,000 daily downloads in Q2 2022. This is a sign that a lot of new projects prefer Zustand over Redux.
Nevertheless, Redux is a very good solution. It follows a very clear structure and has a huge ecosystem built around it. Redux uses the state/action/reducer pattern and forces the developer to stick to it. It can be enhanced with different middlewares such as redux-thunk or redux-saga to handle effects. It also provides great developer tools for debugging.
Since Redux is a very mature technology, there are a lot of great tutorials and books on the market that handle Redux. Therefore, the basic usage of Redux won’t be covered by this book. If you don’t already know the basics of Redux, I recommend starting with the official tutorial here: https://bit.ly/prn-redux.
While Redux is a great state management solution, it comes with two huge downsides. First, it creates some overhead for creating and maintaining all the parts of the process. To provide a simple string value in your global state, you need at least the store, a reducer, and an action. Second, the code of applications with a deep Redux integration can become quite hard to read.
I would recommend Redux for huge applications that a lot of developers work on. In this case, the clear structure and the separation between the logical layers are worth the overhead. Middleware should be used to handle side effects and redux-toolkit can be used to simplify the code. This setup can work very well in this large-scale scenario.
Now that you’ve learned how to use Redux, Zustand, and React Context to handle the global application state, you have seen that there are multiple different ways to approach global state management. While these solutions are my favorites at the moment, there are a lot more options available. If you want to look for different options, I also recommend MobX, MobX-state-tree, Recoil, and Rematch.
Now that you’ve learned how to handle data inside a React Native app, we’ll check out how we can retrieve data from external APIs.
Connecting to remote backends
React Native allows you to use different solutions to connect to online resources such as APIs. First, you’ll learn about plain HTTP API connections. Later in this section, we’ll also have a look at more high-level solutions such as GraphQL clients and SDKs such as Firebase or Amplify. But let’s start with some general things.
Understanding the general principles of connections in React Native
No matter what connection solution you use in your React Native app, it is always a good idea to use JavaScript Object Notation (JSON) as the format for your data transfer. Since React Native apps are written in JavaScript and JavaScript plays very well with JSON, this is the only logical choice.
Next, regardless of which connection solution you use, always wrap your API calls in a service. Even if you are sure about the connection solution you chose, you may want or have to replace it in a few years.
This is much simpler when you have all the code wrapped in a service than searching for it everywhere in your whole application. The last thing I want to mention here is that you have to think about how to secure your API.
Understanding security risks
You always have to keep in mind that a React Native app runs completely client-side. This means that everything you ship in your app can be considered publicly available. This also includes API keys, credentials, or any other authentication information. While there can never be 100% impenetrable software, you should at least provide some level of security:

Figure 5.7 – Security efforts and likelihood of a breach (inspired by https://reactnative.dev/docs/security)
As you can see, even some efforts in securing your app reduce the likelihood of a breach significantly. The minimum you should do is as follows:
- Don’t store your private API keys or credentials in your code.
- Don’t use tools such as react-native-dotenv or react-native-config to store sensitive data. This data is also shipped to the client in plain text.
- Use user-based keys or credentials wherever possible.
- Remove all console output in production builds to not expose keys.
- Store sensitive information in secure local storage solutions (see the Storage section of Chapter 4, Styling, Storage, and Navigation in React Native).
When you need to work with third-party APIs, which only provide you with one key, you should create your own server layer that you can call from within your app. Then, you can store your API key on the server, add it to the request, call the third-party API from your server, and provide the response to your app.
In that way, you don’t make your API key public. Again, always keep in mind that everything you ship with your app can be exposed.
With that warning given, let’s start with our first simple call, where we will use the JavaScript Fetch API.
Working with the built-in Fetch API
React Native ships with a built-in Fetch API, which is sufficient for most use cases. It is easy to use, easy to read, and can be used in apps of all sizes. We’ll use our example app again to see how it works. We’ll replace the genres.json and movies.json static files with real API calls to The Movie DB (https://www.themoviedb.org). Please note that this API is free for non-commercial use only and you have to stick to the terms of use when using it.
You can find the full example code on GitHub (the chapter-5-fetch tag). To run it, you have to register at https://www.themoviedb.org/ and obtain an API key. You can read more about this here: https://bit.ly/prn-tmd-api.
Now, let’s have a look at the code. First, we must create a constants file for all API information:
export const APIConstants: {
  API_URL: string;
  API_KEY: string;
     } = {
         API_URL: 'https://api.themoviedb.org/3/',
         API_KEY: '<put your api key here - never do that
             in production>',
};
In our example, we put the base URL and the API key here. This is where you can paste the API key you retrieved from The Movie DB.
Security note
Never put your API key in your app like this in production.
Since we have already extracted our data connection in movieService, this is the file where we will make most of the changes. Instead of reading and filtering local files, we’ll connect to the real API. To make the connection easier, we’ll write two helper functions first:
const createFullAPIPath: (path: string) => string = path => {
  return (
    APIConstants.API_URL + path +
        (path.includes('?') ? '&' : '?') +
        'api_key=' + APIConstants.API_KEY
   );
};
async function makeAPICall<T>(path: string): Promise<T> {
  console.log(createFullAPIPath(path));
  const response = await fetch(createFullAPIPath(path));
  return response.json() as Promise<T>;
}
The createFullAPIPath function takes the path of the request and adds the base URL and the API key for authentication to the call. The makeAPICall function does the fetch action and returns typed data from the response JSON.
These helper functions are used to create different functions that are exported so that they’re available in the application. Let’s look at one of them – the getGenres function:
const getGenres = async (): Promise<Array<IGenre>> => {
  let data: Array<IGenre> = [];
  try {
    const apiResponse = await makeAPICall<{genres: Array
        <IGenre>}>('genre/movie/list',
        );
    data = apiResponse.genres;
  } catch (e) {
        console.log(e);
    }
  return data;
};
As you can see, we use the makeAPICall helper function to fetch the data. We add the data type we expect the data to be. As the path, we only have to pass the relative path of the API. Then, we process the response and return the data. In production, we wouldn’t log the error to the console but to an external error reporting system. You’ll learn more about this in Chapter 13, Tips and Outlook.
There is one simple thing left that we have to change in our application to make it work again. You may have noticed that the functions in our service changed to async functions, which return promises instead of direct data. While we were able to process the local data synchronously, API calls are always executed asynchronously.
And that’s a good thing. You don’t want your application to freeze until the response to your API request is there. But since the service function returns promises now, we have to modify the places where these functions are called.
So, let’s have a look at the home view again – more precisely, the useEffect Hook part:
  useEffect(() => {
    const fetchData = async () => {
      setGenres(await getGenres());
    };
    fetchData();
  }, []);
Since we are not able to create async functions directly in the useEffect Hook, we create an async fetchData function that we then call in useEffect. In this function, we await the promise that is returned by getGenres and set the data in the state.
Similar changes have to be made in the genre view, the movie view, and the addFavById function of our Zustand store.
While Fetch is quite powerful and you can use it even in large-scale and enterprise projects, some other solutions can be useful too.
Working with other data fetching solutions
In this subsection, you’ll learn about other popular solutions for data fetching. All of them have their benefits and tradeoffs and in the end, you have to decide what’s the best fit for your project. The following solutions work fine, are well maintained, and are widely used:
- Axios: Axios is a third-party HTTP client for fetching data. It works quite similarly to the Fetch API but brings a lot of additional features. Once created, you can configure your Axios instance with headers, interceptors, and more. It also provides excellent error handling and allows you to cancel requests.
- Apollo/URQL GraphQL client: GraphQL is a query language for APIs that has become very popular over the last few years. The advantage it has over REST APIs is that you can control what you want to fetch on the client. You can also fetch multiple resources in one call. This results in fetching exactly the data you need in the most efficient way possible. You can read more about GraphQL here: https://bit.ly/prn-advantage-graph.
There are multiple client implementations for GraphQL. The most popular ones are Apollo and URQL. Both clients not only provide data fetching but also handle caching, refreshing, and data actualization in the UI. While this can be very useful, you always should ensure that you also provide a great user experience for users while they are offline.
- React Native Firebase: Firebase is a very popular app development backend platform. It provides different services with very well-maintained SDKs. React Native Firebase is a wrapper around the native Android and iOS SDK. It provides data fetching, but only for connections to the Firebase services. If you want to learn more about Firebase, you can visit the React Native Firebase documentation: https://bit.ly/prn-firebase.
- AWS Amplify: Amplify is a collection of AWS services that can be accessed via the Amplify SDKs. Like Firebase, it provides data fetching capabilities, but only to the AWS services that have been configured in Amplify. If you want to learn more about Amplify, you can visit the Amplify JavaScript documentation: https://bit.ly/prn-amplify.
Besides these solutions, a lot of service providers provide their own SDKs that can be used to access their services. It is totally fine to use these SDKs. But again, always remember to not store any API keys or authentication information in your app.
Summary
To wrap this chapter up, let’s have a short recap. In this chapter, you learned how to handle local and global states. You learned about the most popular concepts of global state handling and how to decide which data should be stored in your global state or the local state of a component or view. You also understood how to use React Context, Zustand, and Redux for global state handling.
After mastering state management in React Native, you learned how to connect your app to a remote backend. You understood how to use the built-in Fetch API, how to extract API calls in a service, how to create and use helper functions, and how to work with async calls. Finally, you learned about the different solutions for data fetching, such as Axios, GraphQL clients, and other SDKs.
Now that you have completed the first five chapters of this book, you can create a working app with a strong technical foundation. In the next chapter, you will learn how to make your app look good with beautiful animations.