
Docker for AWS is a Swarm cluster which has been tuned by Docker to run in Amazon Web Services.
The AWS CloudFormation template can be found at:
https://editions-us-east-1.s3.amazonaws.com/aws/stable/Docker.tmpl
As you can see there is quite a lot to it, the image below is a visualization of the template above – while you may not be able to see all the content in the image you should get an idea of the complexity of the CloudFormation template supplied by Docker.
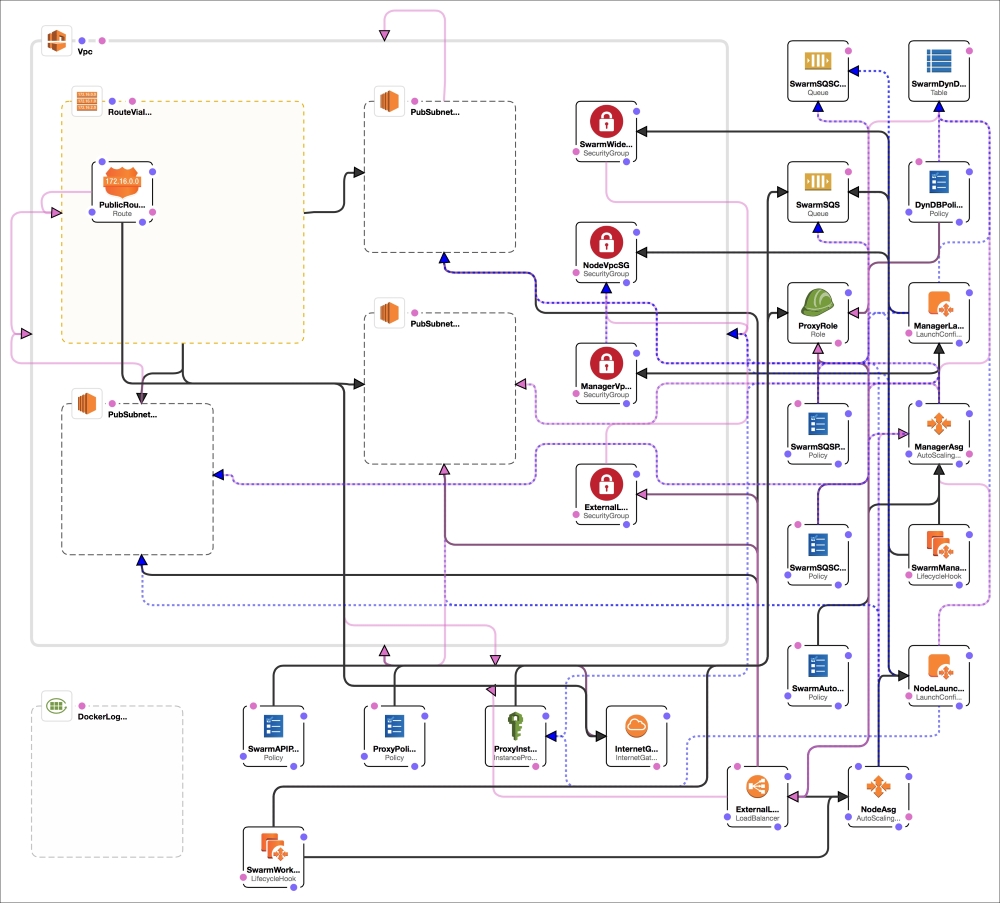
As you can see, the template does all the heavy lifting for you meaning you don't really have to do much apart from one thing, create an SSH key. To do this login to the AWS console at https://console.aws.amazon.com/, select EC2from the Services menu at the top of the screen, once the EC2 dashboard opens click on Key Pairs in the left-hand side menu.
Here you will have the option to Create Key Pair or Import Key Pair. Once you have your SSH key created or imported you can get to launching your Docker for Amazon Web Services cluster, to this, select CloudFormation from the Services menu.
Clicking Create New Stack will take you a page which lets you define your stack, as Docker have already done this for us all you need to do is enter the URL of the stack definition file:
https://editions-us-east-1.s3.amazonaws.com/aws/stable/Docker.tmpl
In the space below where is says Specify an Amazon S3 template URL, making sure that the radio icon above where you entered the URL is selected click on Next:

The next page you are taken to is where you define how you would like your stack to look, for this quick demonstration I used the following to roughly match the sizes of the manual Swarm cluster we launched in Digital Ocean:
- Stack name: Bootcamp
- Number of Swarm managers? 1
- Number of Swarm worker nodes? 3
- Which SSH key to use?<your own SSH key>
- Enable daily resource cleanup? No
- Use Cloudwatch for container logging?Yes
- Swarm manager instance type?t2.micro
- Manager ephemeral storage volume size? 20
- Manager ephemeral storage volume type standard
- Agent worker instance type? t2.micro
- Worker ephemeral storage volume size? 20
- Worker ephemeral storage volume type: standard
Once you have filled in all the details, click on the Next button at the bottom of the page. The next screen you are taken to contains additional options such as tagging, we don't need to enter anything here so just click on the Next button,
The final page is where we review everything before we comit to launching our stack. If you need to change any of the values you can do so by clicking on Previous, once you are happy with how the details you need to tick the box which says, I acknowledge that AWS CloudFormation might create IAM resources and then click the Create button.
This will immediately start deploying the resources for your Docker for Amazon Web Service cluster, you can check the status of the deployment by having the Events tab open.
Clicking the refresh button should show you something like the following screen:

Launching the stack will take several minutes, once it has completed you should see that the Status says CREATE_COMPLETE. Once you see this, click on the Outputs tab:

Here you should see four messages, the first contains the Elastic Load Balancer URL, the second is a message about the availability of your instances and finally you should see a message about Managers, this contains a link – click it.
This takes you to the Instances page of the EC2 dashboard, you will also notice that our single manager node has been filtered, selecting it shows information such as the public URL and IP address of the instance:

To interact with our cluster, we are going to SSH into the manager node, you need to use the docker username. I used the following command:
If you downloaded a key pair then you would use something like;
ssh [email protected] -I ~/path/to/keypair.pem
Once you are logged in you should see something like:

Running docker node ls shows that we have three worker nodes and the one manager node we are logged into:

Now let's launch our cluster application, as we are logged into a very basic operating system, in fact as you can from the output of running:
cat /etc/*release
We are logged into an Alpine Linux server:

Git is not installed by default so let's install it by switching to the root user and install the Git package using APK:
sudo su –
apk update
apk add git
Now that Git is installed we can clone the Bootcamp repo:
git clone https://github.com/russmckendrick/bootcamp
.git
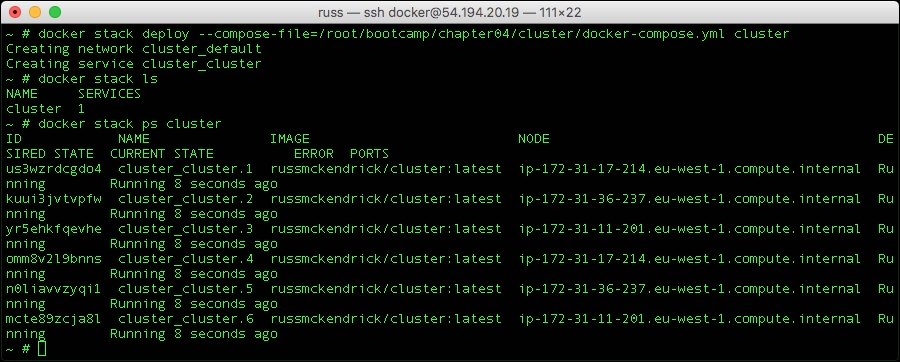
Once Git is installed we can then launch our stack using the following command:
docker stack deploy --compose-file=/root/bootcamp/chapter04/cluster/docker-compose.yml cluster
docker stack ls
docker stack ps cluster
You should see something like the following output:
Now that our stack is launched you can access it using the Elastic Load Balancer URL from the Outputs tab of the CloudFormation stack, in my case the URL was (please note that my URL no longer works):
http://bootcamp-elb-1145454691.eu-west-1.elb.amazonaws.com/
As you can see from the screen below the page displays as expected with the host name of the container the content is being served from:

As before, running curl against the Elastic Load Balancer URL shows that hostname of the container is changing (remember to replace the URL with your own):
curl -s http://bootcamp-elb-1145454691.eu-west-1.elb.amazonaws.com/ | grep class=
Before we teardown our Cluster there is one more to take a quick look at, if you when we launched our Docker for Amazon Web Service stack we said yes to Use Cloudwatch for container logging.
This option streams your container logs to Amazons own central logging service, to view return to the AWS console and select Cloudwatch from the Services menu, once the Cloudwatch dashboard has loaded, click Logs in the left-hand side menu and then click on the Bootcamp-lg link, here you should list of the containers which were launched by your docker stack create command:

Clicking on one of the log streams will show you everything which that container has logged, which in our case should just be a lot of information from the supervisord process:

To tear down our Docker for Amazon Web Services cluster return to the CloudFormation dashboard, select your stack then select Delete Stack from the Actions menu. This will pop-up a prompt, click the Yes, Delete button and deletion of your stack with start immediately.
Removing all the resource will take several minutes, it is important to ensure that all the resources are removed as Amazon operate a pay-as-go model meaning if a resource such as an EC2 instance is running you will be being charged for it so I would recommend you keep the window open and ensure that the deletion is successful.
Speaking of charges, you may have noticed that when we launched our stack there was a link to estimated costs, this takes all the resource defined in the CloudFormation template and runs it through Amazon's Simple Cost Calculator application, our four instance Docker for Amazon Web Services would cost us an estimated $66.98 per month to run.
As you can see, we launched a quite complex configuration without much effort at all, Docker have also applied this same methodology to Microsoft Azure, let's look at that now.