While the ability to create your own bridge is certainly appealing, your scope is still limited to that of a single Docker host. The overlay network Driver aims to solve that by allowing you to extend one or more subnets across multiple Docker hosts using an overlay network. Overlay networks are a means to build isolated networks on top of existing networks. In this case, the existing network provides transport for the overlay and is often named the underlay network. The overlay Driver implements what Docker refers to as multi-host networking.
In this recipe, we'll learn how to configure the prerequisites for the overlay Driver as well as deploy and validate overlay-based networks.
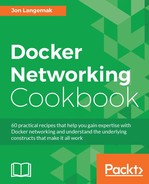
Throughout the following examples, we'll be using this lab topology:

The topology consists of a total of four Docker host's two of which are in the 10.10.10.0/24 subnet and the other two are in the 192.168.50.0/24 subnet. As we walk through this recipe, the hosts shown in the diagram will play the following roles:
docker1: Docker host serving a Consul key-value storedocker2: Docker host participating in overlay networksdocker3: Docker host participating in overlay networksdocker4: Docker host participating in overlay networks
As mentioned earlier, the overlay Driver isn't instantiated by default. This is because there are several prerequisites required for the overlay Driver to work.
Since we're now dealing with a distributed system, Docker needs a place to store information about the overlay network. To do this, Docker uses a key-value store and supports Consul, etcd, and ZooKeeper for this purpose. It will store information that requires consistency across all the nodes such as IP address allocations, network IDs, and container endpoints. In our examples, we'll be deploying Consul.
As luck would have it, Consul can be deployed as a Docker container itself:
user@docker1:~$ docker run -d -p 8500:8500 -h consul
--name consul progrium/consul -server -bootstrap
Running this image will start a single instance of the Consul key-value store. A single instance is all we need for basic lab testing. In our case, we'll start this image on the host docker1. All the Docker hosts that participate in the overlay must have reachability to the key-value store across the network.
Note
Running Consul with a single cluster member should only be done for demonstration purposes. You need at least three cluster members to have any sort of failure tolerance. Make sure that you research the key-value store you decide to deploy and understand its configuration and failure tolerances.
Your Linux kernel version needs to be 3.16 or greater. You can check your current kernel version with the following command:
user@docker1:~$ uname -r
4.2.0-34-generic
user@docker1:~$
Docker hosts must be able to talk to each other using the following ports:
- TCP and UDP
7946(Serf) - UDP
4789(VXLAN) - TCP
8500(Consul key-value store)
All the hosts that are participating in the overlay need access to the key-value store. To tell them where it is, we define a couple of service-level options:
ExecStart=/usr/bin/dockerd --cluster-store=consul://10.10.10.101:8500/network --cluster-advertise=eth0:0
The cluster-store variable defines where the key-value store is. In our case, it's a container running on the host docker1 (10.10.10.101). We also need to enable the cluster-advertise feature and pass it an interface and port. This configuration relates more to using a Swarm cluster, but the flag is also used as part of enabling multi-host networking. That being said, you need to pass it a valid interface and a port. In this case, we use the host physical interface and port 0. In our example, we'll add these options to hosts docker2, docker3, and docker4 as those are the hosts we'll have participating in the overlay network.
After adding the option, reload the systemd configuration and restart the Docker service. You can verify that Docker has accepted the command by checking the output of the docker info command:
user@docker2:~$ docker info
…<Additional output removed for brevity>…
Cluster store: consul://10.10.10.101:8500/network
Cluster advertise: 10.10.10.102:0
…<Additional output removed for brevity>…
Now that we've met the prerequisites for using the overlay Driver, we can deploy our first user-defined overlay network. Defining a user-defined overlay network follows much the same process as that of defining a user-defined bridge network. For instance, let's configure our first overlay network using this command:
user@docker2:~$ docker network create -d overlay myoverlay
e4bdaa0d6f3afe1ae007a07fe6a1f49f1f963a5ddc8247e716b2bd218352b90e
user@docker2:~$
Much like with user-defined bridges, we don't have to enter much information to create our first overlay network. In fact, the only difference here is that we have to specify the Driver as type overlay because the default Driver type is bridge. Once we enter the command, we should be able to see the network defined on any node participating in overlay networking.
user@docker3:~$ docker network ls
NETWORK ID          NAME                DRIVER              SCOPE
55f86ddf18d5        bridge              bridge              local
8faef9d2a7cc        host                host                local
3ad850433ed9        myoverlay           overlay             global
453ad78e11fe        none                null                local
user@docker3:~$

user@docker4:~$ docker network ls
NETWORK ID          NAME                DRIVER              SCOPE
3afd680b6ce1        bridge              bridge              local
a92fe912af1d        host                host                local
3ad850433ed9        myoverlay           overlay             global
7dbc77e5f782        none                null                local
user@docker4:~$
The host docker2 pushes the network configuration into the store when it creates the network. Now all the hosts can see the new network since they're all reading and writing data to and from the same key-value store. Once the network is created, any node participating in the overlay (configured with the correct service-level options) can view, connect containers to, and delete the overlay network.
For instance, if we go to host docker4, we can delete the network that we created on host docker2 initially:
user@docker4:~$ docker network rm myoverlay
myoverlay
user@docker4:~$ docker network ls
NETWORK ID          NAME                DRIVER              SCOPE
3afd680b6ce1        bridge              bridge              local
a92fe912af1d        host                host                local
7dbc77e5f782        none                null                local
user@docker4:~$
Let's now define a new overlay with a little more configuration. Unlike the user-defined bridge, the overlay Driver does not currently support any additional options being passed to it during creation with the --opt flag. That being said, the only options that we can configure on overlay type networks are those that are part of the network create subcommand.
aux-address: As with the user-defined bridge, this command allows you to define IP addresses that Docker should not assign to containers when they are spawned.gateway: Although you can define a gateway for the network, and if you don't, Docker will do it for you, this isn't actually used in overlay networks. That is, there is no interface that this IP address gets assigned to.internal: This option allows you to isolate networks and is covered in greater detail later in this chapter.ip-range: Allows you to specify a smaller subnet of the defined network subnet to use for container addressing.ipam-driver: In addition to consuming third-party network drivers, you can also leverage third-party IPAM drivers. For the purposes of this book we'll be focusing mostly on the default or built-in IPAM driver.ipam-opt: This allows you to specify options to pass to the IPAM driver.subnet: This defines the subnet associated with the network type you are creating.
Let's redefine the network myoverlay on the host docker4:
user@docker4:~$ docker network create -d overlay
--subnet 172.16.16.0/24  --aux-address ip2=172.16.16.2
--ip-range=172.16.16.128/25 myoverlay
In this example, we define the network with the following attributes:
- A
subnetof172.16.16.0/24 - A reserved or auxiliary address of
172.16.16.2(Recall that Docker will allocate a Gateway IP to be the first IP in the subnet despite the fact that it's not actually being used. In this case, this means that.1and.2are technically reserved at this point.) - A container assignable IP range of
172.16.16.128/25 - A name of
myoverlay
As before, this network is now available for consumption on all three hosts participating in the overlay configuration. Let's now define our first container on the overlay network from host docker2:
user@docker2:~$ docker run --net=myoverlay --name web1
-d -P jonlangemak/web_server_1
3d767d2d2bda91300827f444aa6c4a0762a95ce36a26537aac7770395b5ff673
user@docker2:~$
Here, we ask the host to start a container named web1 and attach it to the network myoverlay. Let's now inspect the container's IP interface configuration:
user@docker2:~$ docker exec web1 ip addr
1: lo: <LOOPBACK,UP,LOWER_UP> mtu 65536 qdisc noqueue state UNKNOWN
    link/loopback 00:00:00:00:00:00 brd 00:00:00:00:00:00
    inet 127.0.0.1/8 scope host lo
       valid_lft forever preferred_lft forever
    inet6 ::1/128 scope host
       valid_lft forever preferred_lft forever
7: eth0@if8: <BROADCAST,MULTICAST,UP,LOWER_UP> mtu 1450 qdisc noqueue state UP
    link/ether 02:42:ac:10:10:81 brd ff:ff:ff:ff:ff:ff
    inet 172.16.16.129/24 scope global eth0
       valid_lft forever preferred_lft forever
    inet6 fe80::42:acff:fe10:1081/64 scope link
       valid_lft forever preferred_lft forever
10: eth1@if11: <BROADCAST,MULTICAST,UP,LOWER_UP> mtu 1500 qdisc noqueue state UP
    link/ether 02:42:ac:12:00:02 brd ff:ff:ff:ff:ff:ff
    inet 172.18.0.2/16 scope global eth1
       valid_lft forever preferred_lft forever
    inet6 fe80::42:acff:fe12:2/64 scope link
       valid_lft forever preferred_lft forever
user@docker2:~$
Surprisingly, the container has two interfaces. The eth0 interface is attached to the network associated with the overlay network myoverlay, but eth1 is associated with a new network 172.18.0.0/16.
Note
You've likely noticed by this point that the name of the interfaces within the container use VETH pair naming syntax. Docker uses VETH pairs to connect containers to bridges and configures the container IP address directly on the container side interface. This will be covered extensively in Chapter 4, Building Docker Networks, where we walk through the details of how Docker attaches containers to the network.
To figure out where it's attached, let's try and find the other end of the VETH pair that the container's eth1 interface attaches to. As shown in Chapter 1, Linux Networking Constructs, we could use ethtool to look up the interface ID for a VETH pairs peer. However, there's an easier way to do this when looking at user-defined networks. Notice in the preceding output that the VETH pair name has a syntax of:
<interface name>@if<peers interface ID>
As luck would have it, the number shown after if is the interface ID of the other side of the VETH pair. So, in the preceding output, we see that the eth1 interface's matching interface has an interface ID of 11. Looking at the local Docker host, we can see that we have an interface 11 defined and that its peer interface ID is 10, which matches interface ID in the container:
user@docker2:~$ ip addr show
…<Additional output removed for brevity>…
9: docker_gwbridge: <BROADCAST,MULTICAST,UP,LOWER_UP> mtu 1500 qdisc noqueue state UP group default
    link/ether 02:42:af:5e:26:cc brd ff:ff:ff:ff:ff:ff
    inet 172.18.0.1/16 scope global docker_gwbridge
       valid_lft forever preferred_lft forever
    inet6 fe80::42:afff:fe5e:26cc/64 scope link
       valid_lft forever preferred_lft forever
11: veth02e6ea5@if10: <BROADCAST,MULTICAST,UP,LOWER_UP> mtu 1500 qdisc noqueue master docker_gwbridge state UP group default
    link/ether ba:c7:df:7c:f4:48 brd ff:ff:ff:ff:ff:ff
    inet6 fe80::b8c7:dfff:fe7c:f448/64 scope link
       valid_lft forever preferred_lft forever
user@docker2:~$
Notice that this end of the VETH pair (interface ID 11) has a master named docker_gwbridge. That is, this end of the VETH pair is part of the bridge docker_gwbridge. Let's look at the networks defined on the Docker host again:
user@docker2:~$ docker network ls
NETWORK ID          NAME                DRIVER
9c91f85550b3        myoverlay           overlay
b3143542e9ed        none                null
323e5e3be7e4        host                host
6f60ea0df1ba        bridge              bridge
e637f106f633        docker_gwbridge     bridge
user@docker2:~$
In addition to our overlay network, there's also a new user-defined bridge of the same name. If we inspect this bridge, we see our container is connected to it as expected and the network has some options defined:
user@docker2:~$ docker network inspect docker_gwbridge
[
    {
        "Name": "docker_gwbridge",
        "Id": "10a75e3638b999d7180e1c8310bf3a26b7d3ec7b4e0a7657d9f69d3b5d515389",
        "Scope": "local",
        "Driver": "bridge",
        "EnableIPv6": false,
        "IPAM": {
            "Driver": "default",
            "Options": null,
            "Config": [
                {
                    "Subnet": "172.18.0.0/16",
                    "Gateway": "172.18.0.1/16"
                }
            ]
        },
        "Internal": false,
        "Containers": {
            "e3ae95368057f24fefe1a0358b570848d8798ddfd1c98472ca7ea250087df452": {
                "Name": "gateway_e3ae95368057",
                "EndpointID": "4cdfc1fb130de499eefe350b78f4f2f92797df9fe7392aeadb94d136abc7f7cd",
                "MacAddress": "02:42:ac:12:00:02",
                "IPv4Address": "172.18.0.2/16",
                "IPv6Address": ""
            }
        },
        "Options": {
            "com.docker.network.bridge.enable_icc": "false",
            "com.docker.network.bridge.enable_ip_masquerade": "true",
            "com.docker.network.bridge.name": "docker_gwbridge"
        },
        "Labels": {}
    }
]
user@docker2:~$
As we can see, ICC mode for this bridge is disabled. ICC prevents containers on the same network bridge from communicating directly with each other. But what is the purpose of this bridge and why are containers spawned on the myoverlay network being attached to it?
The docker_gwbridge network is the solution to external container connectivity for overlay connected containers. Overlay networks can be thought of as layer 2 network segments. You can attach multiple containers to them and anything on that network can talk across the local network segment. However, this doesn't allow the container to talk to resources off the network. This limits Docker's ability to access container resources through published ports as well as the container's ability to talk to the outside network. If we examine the container's routing configuration, we can see that its default gateway points to the interface of the docker_gwbridge:
user@docker2:~$ docker exec web1 ip route
default via 172.18.0.1 dev eth1
172.16.16.0/24 dev eth0  proto kernel  scope link  src 172.16.16.129
172.18.0.0/16 dev eth1  proto kernel  scope link  src 172.18.0.2
user@docker2:~$
This coupled with the fact that the docker_gwbridge has IP masquerading enabled means that the container can still talk to the outside network:
user@docker2:~$ docker exec -it web1 ping 4.2.2.2
PING 4.2.2.2 (4.2.2.2): 48 data bytes
56 bytes from 4.2.2.2: icmp_seq=0 ttl=50 time=27.473 ms
56 bytes from 4.2.2.2: icmp_seq=1 ttl=50 time=37.736 ms
--- 4.2.2.2 ping statistics ---
2 packets transmitted, 2 packets received, 0% packet loss
round-trip min/avg/max/stddev = 27.473/32.605/37.736/5.132 ms
user@docker2:~$
As with the default bridge network, containers will hide behind their Docker host IP interface if they attempt to route through to reach the outside network.
It also means that since I published ports on this container using the -P flag that Docker has published those ports using docker_gwbridge. We can verify the ports were published by using the docker port subcommand:
user@docker2:~$ docker port web1
80/tcp -> 0.0.0.0:32768
user@docker2:~$
And verify that port is published on the docker_gwbridge by checking the netfilter rules with iptables:
user@docker2:~$ sudo iptables -t nat -L
…<Additional output removed for brevity>…
Chain DOCKER (2 references)
target     prot opt source      destination
RETURN     all  --  anywhere    anywhere
RETURN     all  --  anywhere    anywhere
DNAT       tcp  --  anywhere    anywhere  tcp dpt:32768 to:172.18.0.2:80
user@docker2:~$
As you can see in the preceding output, Docker is using the container's interface on the docker_gwbridge to provide port publishing to the Docker host's interfaces.
At this point, our container topology looks like this:

Adding a container to an overlay network automatically created the bridge docker_gwbridge, which is used for container connectivity onto and off the host. The myoverlay overlay network is used only for connectivity related to the defined subnet, 172.16.16.0/24.
Let's now start two more containers, one on the host docker3 and another on the host docker4:
user@docker3:~$ docker run --net=myoverlay --name web2 -d jonlangemak/web_server_2
da14844598d5a6623de089674367d31c8e721c05d3454119ca8b4e8984b91957
user@docker3:~$
user@docker4:~$  docker run --net=myoverlay --name web2 -d jonlangemak/web_server_2
be67548994d7865ea69151f4797e9f2abc28a39a737eef48337f1db9f72e380c
docker: Error response from daemon: service endpoint with name web2 already exists.
user@docker4:~$
Notice that, when I attempt to run the same container on both hosts, Docker tells me that the container web2 already exists. Docker won't allow you to run a container with the same name on the same overlay network. Recall that Docker is storing information related to each container on the overlay in the key-value store. Using unique names becomes important when we start talking about Docker name resolution.
Note
You may notice at this point that the containers can resolve each other by name. This is one of the really powerful features that come along with user-defined networks. We'll talk about this in much more detail in Chapter 5, Container Linking and Docker DNS, where we discuss DNS and linking.
Restart the container on docker4 with a unique name:
user@docker4:~$ docker run --net=myoverlay --name web2-2 -d jonlangemak/web_server_2
e64d00093da3f20c52fca52be2c7393f541935da0a9c86752a2f517254496e26
user@docker4:~$
Now we have three containers running, one on each host participating in the overlay. Let's take a brief moment to visualize what's going on here:

I've removed the host and underlay networking on the diagram to make this easier to read. As described, each container has two IP network interfaces. One IP address is on the shared overlay network and is in the 172.16.16.128/25 network. The other is on the bridge docker_gwbridge and is the same on each host. Since the docker_gwbridge lives on each host independently, there is no need to have unique addressing for this interface. The container interface on that bridge serves only as a means for the container to talk to the outside network. That is, every container on the same host, which has a network interface on an overlay type network, will receive an IP address on this same bridge.
You might be wondering if this raises a security concern since all containers with overlay networks, regardless of which they are connected to, will also have an interface on a shared bridge (docker_gwbridge). Recall earlier that I pointed out that the docker_gwbridge had ICC mode disabled. This means that, while many containers can be deployed to the bridge, none of them can actually communicate directly with each other through their IP interfaces on that bridge. We'll talk much more about this in Chapter 6, Securing Container Networks, where we discuss container security, but for now know that ICC prevents ICC from occurring on the shared bridge.
Containers on the overlay network believe that they are on the same network segment, or are layer 2 adjacent to each other. Let's prove this by connecting to the web service on container web2 from container web1. Recall that when we provisioned the container web2, we did not ask it to publish any ports.
As with other Docker network constructs, containers connected to the same overlay network can talk directly to each other on any port in which they have a service bound to without the need to publish the port:
user@docker2:~$ docker exec web1 curl -s http://172.16.16.130
<body>
  <html>
    <h1><span style="color:#FF0000;font-size:72px;">Web Server #2 - Running on port 80</span></h1>
</body>
  </html>
user@docker2:~$
As you can see, we can successfully access the web server running in container web2 from container web1. Not only are these containers on totally different hosts, but the hosts themselves are on totally different subnets. This type of communication was only available previously when both containers sat on the same host, and were connected to the same bridge. We can prove that the containers believe themselves to be layer 2 adjacent by checking the ARP and MAC entries on each respective container:
user@docker2:~$ docker exec web1 arp -n
Address         HWtype  HWaddress         Flags Mask            Iface
172.16.16.130   ether   02:42:ac:10:10:82 C                     eth0
172.18.0.1      ether   02:42:07:3d:f3:2c C                     eth1
user@docker2:~$

user@docker3:~$ docker exec web2 ip link show dev eth0
6: eth0@if7: <BROADCAST,MULTICAST,UP,LOWER_UP> mtu 1450 qdisc noqueue state UP
    link/ether 02:42:ac:10:10:82 brd ff:ff:ff:ff:ff:ff
user@docker3:~$
We can see that the container has an ARP entry from the remote container specifying its IP address as well as its MAC address. If the containers were not on the same network, the container web1 would not have an ARP entry for web2.
We can verify that we have local connectivity between all three containers from container web2-2 on host docker4:
user@docker4:~$ docker exec -it web2-2 ping 172.16.16.129 -c 2
PING 172.16.16.129 (172.16.16.129): 48 data bytes
56 bytes from 172.16.16.129: icmp_seq=0 ttl=64 time=0.642 ms
56 bytes from 172.16.16.129: icmp_seq=1 ttl=64 time=0.777 ms
--- 172.16.16.129 ping statistics ---
2 packets transmitted, 2 packets received, 0% packet loss
round-trip min/avg/max/stddev = 0.642/0.710/0.777/0.068 ms

user@docker4:~$ docker exec -it web2-2 ping 172.16.16.130 -c 2
PING 172.16.16.130 (172.16.16.130): 48 data bytes
56 bytes from 172.16.16.130: icmp_seq=0 ttl=64 time=0.477 ms
56 bytes from 172.16.16.130: icmp_seq=1 ttl=64 time=0.605 ms
--- 172.16.16.130 ping statistics ---
2 packets transmitted, 2 packets received, 0% packet loss
round-trip min/avg/max/stddev = 0.477/0.541/0.605/0.064 ms

user@docker4:~$ docker exec -it web2-2 arp -n
Address         HWtype  HWaddress         Flags Mask            Iface
172.16.16.129   ether   02:42:ac:10:10:81 C                     eth0
172.16.16.130   ether   02:42:ac:10:10:82 C                     eth0
user@docker4:~$
Now that we know the overlay works, let's talk about how it's implemented. The mechanism used for overlay transport is VXLAN. We can see the container-generated packets as they traverse the underlay network by looking at a packet capture taken on the physical network:

In the preceding screenshot of a packet taken from the capture, I want to call out a couple of items:
- The outer IP packet is sourced from the
docker2host (10.10.10.102) and destined to thedocker3host (192.168.50.101). - We can see that outer IP packet is UDP and is detected as being VXLAN encapsulation.
- The VNI (VXLAN Network Identifier) or segment ID is
260. VNI is unique per subnet. - The inner frame has a layer 2 and layer 3 header. The layer 2 header has a destination MAC addresses of container
web2as shown earlier. The IP packet shows a source of containerweb1and a destination of containerweb2.
The Docker hosts encapsulate the overlay traffic using their own IP interface and send it across the underlay network to the destination Docker host. Information from the key-value store is used to determine what host a given container is on in order for the VXLAN encapsulation to send the traffic to the right host.
You might now be wondering where all the configuration for this VXLAN overlay is. At this point, we haven't seen any configuration that actually talks about VXLAN or tunneling. To provide VXLAN encapsulation, Docker creates what I refer to as an overlay namespace for each user-defined overlay network. As we saw in Chapter 1, Linux Networking Constructs, you can use the ip netns tool to interact with the network namespace. However, since Docker stores their network namespaces in a nondefault location, we won't be able to see any of the namespaces using the ip netns tool. By default, namespaces are stored in /var/run/netns. The problem is that Docker stores its network namespaces in /var/run/docker/netns, which means the ip netns tool is looking in the wrong place to see network namespaces created by Docker. As a work around to this issue, we can create a symlink that links /var/run/docker/netns/ to /var/run/nents as follows:
user@docker4:~$ cd /var/run
user@docker4:/var/run$ sudo ln -s /var/run/docker/netns netns
user@docker4:/var/run$ sudo ip netns list
eb40d6527d17 (id: 2)
2-4695c5484e (id: 1)
user@docker4:/var/run$
Notice that there are two network namespace defined. The overlay namespace will be identified with the following syntax x-<id> where x is a random number.
So in our case, the overlay namespace is 2-4695c5484e, but where did it come from? If we inspect the network configuration of this namespace, we'll see that it has some unusual interfaces defined:
user@docker4:/var/run$ sudo ip netns exec 2-4695c5484e ip link show
1: lo: <LOOPBACK,UP,LOWER_UP> mtu 65536 qdisc noqueue state UNKNOWN mode DEFAULT group default qlen 1
    link/loopback 00:00:00:00:00:00 brd 00:00:00:00:00:00
2: br0: <BROADCAST,MULTICAST,UP,LOWER_UP> mtu 1450 qdisc noqueue state UP mode DEFAULT group default
    link/ether a6:1e:2a:c4:cb:14 brd ff:ff:ff:ff:ff:ff
11: vxlan1: <BROADCAST,MULTICAST,UP,LOWER_UP> mtu 1450 qdisc noqueue master br0 state UNKNOWN mode DEFAULT group default
    link/ether a6:1e:2a:c4:cb:14 brd ff:ff:ff:ff:ff:ff link-netnsid 0
13: veth2@if12: <BROADCAST,MULTICAST,UP,LOWER_UP> mtu 1450 qdisc noqueue master br0 state UP mode DEFAULT group default
    link/ether b2:fa:2d:cc:8b:51 brd ff:ff:ff:ff:ff:ff link-netnsid 1
user@docker4:/var/run$
These interfaces define the overlay network namespace I mentioned earlier. Earlier we saw that the container web2-2 has two interfaces. The eth1 interface was one end of a VETH pair with the other end placed on the docker_gwbridge. The VETH pair shown in the preceding overlay network namespace represents one side of the pair for the container's eth0 interface. We can prove this by matching up the sides of the VETH pair by interface ID. Notice that this end of the VETH pair shows the other end to have an interface ID of 12. If we look at the container web2-2, we'll see that its eth0 interface has an ID of 12. In turn, the container's interface shows a pair ID of 13, which matches the output we saw in the overlay namespace:
user@docker4:/var/run$ docker exec web2-2 ip link show
1: lo: <LOOPBACK,UP,LOWER_UP> mtu 65536 qdisc noqueue state UNKNOWN qlen 1
    link/loopback 00:00:00:00:00:00 brd 00:00:00:00:00:00
12: eth0@if13: <BROADCAST,MULTICAST,UP,LOWER_UP> mtu 1450 qdisc noqueue state UP
    link/ether 02:42:ac:10:10:83 brd ff:ff:ff:ff:ff:ff
14: eth1@if15: <BROADCAST,MULTICAST,UP,LOWER_UP> mtu 1500 qdisc noqueue state UP
    link/ether 02:42:ac:12:00:02 brd ff:ff:ff:ff:ff:ff
user@docker4:/var/run$
Now that we know how the container's overlay interface (eth0) is connected, we need to know how traffic headed into the overlay namespace gets encapsulated and sent to the other Docker hosts. This is done through the overlay namespace's vxlan1 interface. This interface has specific forwarding entries that describe all of the other endpoints on the overlay:
user@docker4:/var/run$ sudo ip netns exec 2-4695c5484e
bridge fdb show dev vxlan1
a6:1e:2a:c4:cb:14 master br0 permanent
a6:1e:2a:c4:cb:14 vlan 1 master br0 permanent
02:42:ac:10:10:82 dst 192.168.50.101 link-netnsid 0 self permanent
02:42:ac:10:10:81 dst 10.10.10.102 link-netnsid 0 self permanent
user@docker4:/var/run$
Notice that we have two entries referencing a MAC address and a destination. The MAC address represents the MAC address of another container on the overlay, and the IP address is the Docker host in which the container lives. We can verify that by checking one of the other hosts:
user@docker2:~$ ip addr show dev eth0
2: eth0: <BROADCAST,MULTICAST,UP,LOWER_UP> mtu 1500 qdisc pfifo_fast state UP group default qlen 1000
    link/ether f2:e8:00:24:e2:de brd ff:ff:ff:ff:ff:ff
    inet 10.10.10.102/24 brd 10.10.10.255 scope global eth0
       valid_lft forever preferred_lft forever
    inet6 fe80::f0e8:ff:fe24:e2de/64 scope link
       valid_lft forever preferred_lft forever
user@docker2:~$
user@docker2:~$ docker exec web1 ip link show dev eth0
7: eth0@if8: <BROADCAST,MULTICAST,UP,LOWER_UP> mtu 1450 qdisc noqueue state UP
    link/ether 02:42:ac:10:10:81 brd ff:ff:ff:ff:ff:ff
user@docker2:~$
With this information, the overlay namespace knows that in order to reach that destination MAC address, it needs to encapsulate traffic in VXLAN and send it towards 10.10.10.102 (docker2).