This chapter presents the options for providing user assistance in Eclipse, including how to write help pages, how to run an external help server, how to embed help in an RCP application or run it as standalone, and how to write cheat sheets to allow the user to step through standard operations. By the end of this chapter, you will know about the different aspects to the user assistance options in Eclipse and be able to contribute plug-ins that add an interactive documentation to a standalone Eclipse environment, an RCP application, or via a website.
Eclipse help pages are XHTML documents that are indexed with Apache Lucene and served over a web server either externally or as part of an Eclipse-based runtime. The pages are written in XHTML and have a table of contents that aggregates them together in a view known as a table of contents (toc). The table of contents may be primary, in which case it shows up as a closed book icon in the help pages; otherwise, it is shown as an open book icon and plugged in elsewhere.
This chapter will use the plug-in com.packtpub.e4.advanced.doc to act as the placeholder for documentation. This can be created from the extension point wizard by clicking on Add... in the Extensions tab of the plugin.xml file and choosing the org.eclipse.help.toc extension point, along with sample help contents:

Help pages are contributed through an extension point, which registers a table of contents that refers to individual help pages. The help pages are typically provided in a separate plug-in to the one they are documenting; this keeps the binary small for environments that don't need documentation, and permits the help pages to be translated into different languages.
The help pages are written in (X)HTML. Conventionally, they are stored under a directory html/ in the plug-in, but this is not a requirement. Whatever folder name is used, build.properties needs to be updated to ensure that the documents are part of the generated documentation JAR file. Typically, a help or documentation plug-in will include a dot (.) as the bin.includes property to include everything.
Create an index file, html/index.html, with the following content:
<!DOCTYPE html>
<html>
<head>
<title>Help Contents</title>
</head>
<body>
  <h1>This is the help contents file</h1>
</body>
</html>
A table of contents (toc.xml) file must be created, which references the HTML file:
<?xml version="1.0" encoding="UTF-8"?>
<toc label="Book">
  <topic href="html/index.html" label="Topic"/>
</toc>
Finally, the table of contents needs to be registered as an extension point within the plugin.xml file of the enclosing plug-in:
<?xml version="1.0" encoding="UTF-8"?>
<?eclipse version="3.4"?>
<plugin>
  <extension point="org.eclipse.help.toc">
    <toc file="toc.xml" primary="true"/>
  </extension>
</plugin>Now, run an Eclipse application and navigate to Help | Help Contents. A browser will open up with the help documentation. The previous XML content will be shown as a standalone book called Book.
Tip
Make sure that the toc.xml file is marked as primary, and that the toc.xml file points to at least one topic with a page. If a toc.xml file is non-primary, it will not show up in the top-level list and, if it has no topics, then it will be hidden.
Check that build.properties is updated to include all the help and toc.xml files as applicable.
It is possible to build up a nested table of contents, which appears in the help browser as a series of nested books. If a table of contents is marked as primary, it will show up as a top-level book; otherwise, the table of contents must be referenced from another file. Most table of contents files are not primary.
The Eclipse JDT documentation is split into two plug-ins: one that provides end user documentation on how to use the Java tools (org.eclipse.jdt.doc.user) and one that provides programming APIs for developers wanting to extend or integrate with JDT (org.eclipse.jdt.doc.isv).
Inside each of the Eclipse books, there is a standard series of tables of contents, including Getting started, Concepts, Tasks, Reference, Tips and Tricks, and What's New. In addition, there are Overview and Legal standalone help pages:
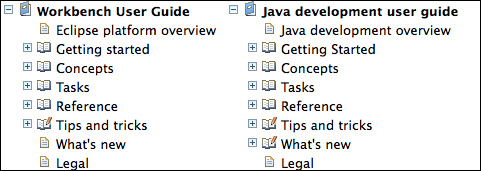
This is achieved with several different table of contents files (as shown in the following list), each corresponding to the previous book icons:
topics_GettingStarted.xmltopics_Concepts.xmltopics_Tasks.xmltopics_Reference.xmltopics_Tips.xml
Each topic XML file contains content similar to the toc.xml file shown earlier. They are referenced in the plugin.xml file as before, except that the primary="true" attribute is not present (and therefore defaults to false).
The top-level (primary) toc is an aggregation of all of these topics; for example, the JDT plug-in development guide help documentation contains a toc.xml that looks like the following:
<toc label="JDT Plug-in Developer Guide">
<topic label="Programmer's Guide" href="guide/jdt_int.htm">
<link toc="topics_Guide.xml" />
</topic>
<topic label="Reference">
<link toc="topics_Reference.xml" />
</topic>
…
</toc>This provides the top-level book and creates an aggregated list of the topic entries.
Note
Note that the topic (book icon) can have an optional HTML page, which contains the help documentation for the topic as a whole. In this case, clicking on Programmer's Guide in the JDT Plug-in Developer Guide link will show a custom overview along with some background. If a page is not given, such as the Reference page, then an automatically generated table of contents will be listed instead.
It is possible to generate a fixed list of contents using the help contents described previously. This works when the list of topics is known in advance and can be packaged into a single plug-in. However, if the documentation is more complex, it may need to be split across multiple plug-ins.
The references in the
href attribute must be local files in the same plug-in as the table of contents file. This can be limiting, especially if a plug-in contains extension points that may be provided by other plug-ins.
Instead, the table of contents file can define an anchor, which is an extension location for help pages. For example, a help page may have a Contributions anchor, which is the place any contributed documentation will go to, or an Examples page, which can be appended by others.
Such an anchor is represented in the toc.xml file as follows:
<toc label="Anchor Examples">
  <topic label="Overview" href="html/overview.html">
    <link toc="topics_Overview.xml" />
  </topic>
  <anchor id="contributions" />
</toc>
This provides a placeholder which allows others to contribute items to. This is achieved by specifying a link_to attribute in another toc file:
<toc label="Contribution1" link_to="toc.xml#contributions">
  <topic label="Contribution 1" href="html/contribution1.html"/>
</toc>
Now when the help page is rendered, the contribution will show up as if it had been in place of the anchor. This can be used to add other contributions from other toc files:
<toc label="Contribution2" link_to="toc.xml#contributions">
  <topic label="Contribution 2" href="html/contribution2.html"/>
</toc>
Note that the contribution topics will all be rendered at the top level in a list:

Although this works for some kinds of content, it may make sense to wrap an element in a topic so that when they are presented in the list, they are clearly distinguished. This also allows the automated table of contents to be generated based on the child topics. It is possible to contribute to a set of examples using the following:
<toc label="Grouped Examples">
  …
  <anchor id="contributions" />
  <topic label="Examples">
    <anchor id="examples" />
  </topic>
</toc>
Now examples can be contributed with the following:
<toc label="Examples" link_to="toc.xml#examples">
   <topic href="html/example1.html" label="Example 1"/>
</toc>

<toc label="Examples" link_to="toc.xml#examples">
   <topic href="html/example2.html" label="Example 2"/>
</toc>
When rendered, the content will show up with a group and an automatically generated index:

Along with contributing to anchors in the current plug-in, it is also possible to contribute to anchors defined in other plug-ins. The link_to in this case points to the file with a prefix of ../ and the plug-in name.
To contribute an example page to the Java Development Toolkit documentation, consult the table of contents provided by the JDT. In the org.eclipse.jdt.doc.user plug-in, the toc.xml topic contains a jdt_getstart anchor:
<toc label="Java development user guide">
  <topic label="Java development overview"
   href="gettingStarted/intro/overview.htm"
    <topic label="Getting Started">
      <link toc="topics_GettingStarted.xml" />
    </topic>
    <anchor id="jdt_getstart" />
    …
  </topic>

</toc>
This allows other plug-ins to contribute to the anchor, using an href of the form ../org.eclipse.jdt.doc.user/toc.xml#jdt_getstart. To see how this works, create a new contribution with a topic, as follows:
<toc label="JDT extension"
 link_to="../org.eclipse.jdt.doc.user/toc.xml#jdt_getstart">
  <topic href="html/jdt.html" label="JDT Help Extension"/>
</toc>
Running the Eclipse instance and opening the help documentation shows the page merged into the JDT documentation:

Help documentation is often directly associated with the plug-in that it is describing. It may not make sense, therefore, to show the help documentation if the corresponding plug-in is not installed.
Although one way of doing this would be to place a dependency from the help bundle to the bundle it describes, this does not necessarily make sense. Instead, the help extension point has an enablement condition, which can be used to selectively show parts of the documentation or even exclude it completely. This uses the Eclipse core expression syntax.
To add an enablement condition to determine whether JDT is installed or not, add the following code to a node in the toc:
<toc label="Book">
  …
  <topic label="Examples">
    <anchor id="examples"/>
    <enablement>
      <with variable="platform">
        <test args="org.eclipse.jdt.ui"
         property="org.eclipse.core.runtime.isBundleInstalled" />
      </with>
    </enablement>
  </topic>
</toc>
This condition is evaluated and the book is shown (and included in the search) if the condition is true. In this case, it is true if the org.eclispe.jdt.ui is installed.
If multiple conditions are required, they can be listed as siblings. An <or> or <and> element can be used to explicitly group conditions together.
The help documentation can also be conditionally included depending on the operating system:
<toc label="Book">
  …
  <topic label="OSX specific help" href="html/osx.html">
    <enablement>
      <systemTest property="osgi.os" value="macosx"/>
    </enablement>
  </topic>
  <topic label="Linux specific help" href="html/linux.html">
    <enablement>
      <systemTest property="osgi.os" value="linux"/>
    </enablement>
  </topic>
  <topic label="Windows specific help" href="html/win.html">
    <enablement>
      <systemTest property="osgi.os" value="win32"/>
    </enablement>
  </topic>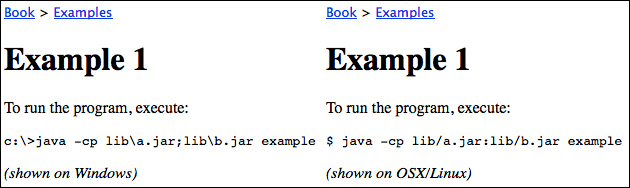
</toc>Note that the HTML help pages can also be selectively filtered based on the enablement conditions. This requires that the help documentation be written in XHTML; the processor is only enabled if the source document is valid XML. For example, to tell the user to run an application, there is a difference in the prompt depending on the operating system, which can be shown as follows:
<?xml version="1.0" encoding="UTF-8"?>
<!DOCTYPE html PUBLIC "-//W3C//DTD XHTML 1.0 Transitional//EN"
"http://www.w3.org/TR/xhtml1/DTD/xhtml1-transitional.dtd">
<html xmlns="http://www.w3.org/1999/xhtml">
<head>
<title>Example 1</title>
</head>
<body>
<h1>Example 1</h1>
<p>To run the program, execute:</p>
<p>
<code>c:>java -cp liba.jar;lib.jar example</code>
<enablement>
<systemTest property="osgi.os" value="win32" />
</enablement>
</p>
<p>
<code>$ java -cp lib/a.jar:lib/b.jar example</code>
<enablement>
<not>
<systemTest property="osgi.os" value="win32" />
</not>
</enablement>
</p>
</body>
</html>When the help page is shown to the user, it will show the correct form based on the platform's content:
This can also be used to customize the names of key presses, for example, on Windows and Linux, the primary modifier is Control, whereas on Mac OS X, it is Command:
<p>
  To copy the information, press
  <span>Command + C
    <enablement>
      <systemTest property="osgi.os" value="macosx" />
    </enablement>
  </span>
  <span>Control + C
    <enablement>
      <not>
        <systemTest property="osgi.os" value="macosx" />
      </not>
    </enablement>
  </span>
</p>
On Windows or Linux, this will show To copy the information, press Control + C, whereas on Mac OS X, it will show To copy the information, press Command + C.
In order to provide context-sensitive help for the Eclipse platform, a help context can be associated with a view, part, command, or any other widget. The IWorkbenchHelpSystem provides a means to associate help context IDs with widgets, which is a concatenation of the enclosing plug-in ID and a text identifier.
The Dynamic Help view updates its content based on the help context of the currently selected widget or view. The help view can be accessed by navigating to Help | Dynamic Help, or Window | Show View | Other | Help | Help.
For example, if the Project Explorer view has focus, then the Help view will look like the following screenshot:

The title and description of the Project Explorer help is specified in the help context. This uses the fully qualified context ID org.eclipse.ui.project_explorer_context in this case. The contexts_Platform.xml file contains:
<contexts>
  <context id="project_explorer_context"
   title="Project Explorer Additional">
    <description>The project explorer allows projects to be
     explored.</description>
  </context>
</contexts>
This file is referenced from the plugin.xml file, which allows the contexts to be associated with a specific plug-in (or the current plug-in if not specified):
<extension point="org.eclipse.help.contexts">
  <contexts
   file="contexts_Platform.xml"
   plugin="org.eclipse.ui"/>
</extension>
Now, when Project Explorer is selected, the alternative description will be shown instead:

The help context can also refer to other help topics; in this case, the See also section contains the Project Explorer and Views help pages. Other pages can be contributed here by adding topic references to the context:
<contexts>
  <context id="project_explorer_context"
   title="Project Explorer Additional">
    <description>The project explorer allows projects to be
     explored.</description>
    <topic href="html/contribution1.html" label="Contribution 1"/>
    <topic href="html/contribution2.html" label="Contribution 2"/>
  </context>
</contexts>
Now the help page will look like the following screenshot:

A JavaScript library (org.eclipse.help/livehelp.js) facilitates communication with the host Eclipse workbench to execute commands on the user's behalf. This is added by default to all Eclipse help pages served from an Eclipse workbench, and is known as active help.
To execute a command, the same serialization framework is used as with the cheat sheets, which is described later in this chapter in the Adding commands section. The format is commandId(key=value,key1=value); for example, org.eclipse.ui.newWizard(newWizardId=org.eclipse.jdt.ui.wizards.JavaProjectWizard) will launch the New Java Project wizard.
The JavaScript function executeCommand takes a string containing the serialized command. This can be called via a javascript: URL, or by using an href attribute with a value # and an onClick handler to invoke the code:
<p>You can run the
<code>org.eclipse.ui.newWizard(
 newWizardId=org.eclipse.jdt.ui.wizards.JavaProjectWizard)</code>
command by clicking on <a class="command-link" href='#'
 onClick='executeCommand("
  org.eclipse.ui.newWizard(
   newWizardId=org.eclipse.jdt.ui.wizards.JavaProjectWizard)
  ")'>show the new Java Wizard</a>
</p>
Along with the references to commands, the help server can also be used to access content inside other plug-ins. The plug-ins are referenced by the plug-in ID, followed by the path of the resource inside the plug-in itself. As a result, hyperlinks to sample files, other references to different topic files, or images for icons can be used to improve the quality of the documentation.
To add an icon to the help documentation for the new Java wizard, add the following:
<img width="16" height="16" alt="New Java wizard"
 src="../org.eclipse.jdt.ui/icons/full/etool16/newjprj_wiz.gif"/>
DocBook is a means to write technical documentation, and is described at http://www.docbook.org. DocBook documents are written in XML and can be transformed into a number of output formats, including Eclipse help. The XML files are typically translated with an XSL file, and the same source document can be processed with many XSL stylesheets to give different output types, such as PDF, HTML, or EPUB.
The standard DocBook stylesheet release, which is available on the project home page at http://docbook.sourceforge.net/release/xsl/current/eclipse/, contains stylesheets that can be used to generate Eclipse help documentation.
This approach is used by the WebTools project, which stores the help documentation as a DocBook source with the org.eclipse.wst.xsl.doc bundle.
Note
The source for the WebTools help documentation can be seen at the project's Git repository: https://git.eclipse.org/c/sourceediting/webtools.sourceediting.xsl.git/tree/docs/org.eclipse.wst.xsl.doc.
This sample can also be seen at the GitHub repository for this book at https://github.com/alblue/com.packtpub.e4.advanced/tree/master/com.packtpub.e4.advanced.docbook/ .
A simple DocBook book.xml document looks like the following:
<!DOCTYPE article PUBLIC "-//OASIS//DTD DocBook XML V4.5//EN"
 "docbook-xml-4/docbookx.dtd">
<book>
  <title>Sample DocBook</title>
  <bookinfo>
    <title>DocBook Intro</title>
  </bookinfo>
  <chapter>
    <title>Generating Help plug-ins</title>
    <section>
      <title>Generating Eclipse Help from DocBook</title>
      <para>
        The first step in generating Eclipse Help is to download
        DocBook templates from http://docbook.org, and styles from
        http://sourceforge.net/projects/docbook/files/docbook-xsl/
      </para>
    </section>
  </chapter>
</book>
The book.xml file can be translated with the docbook-xsl/eclipse/eclipse3.xsl stylesheet. A standalone program, xsltproc, can be used to do this:
$ xsltproc docbook-xsl/eclipse/eclipse3.xsl book.xml
This will generate a separate file for each chapter, and a table of contents file. It can also generate MANIFEST.MF and plugin.xml files.
Alternatively, an ant build file can be created to perform the translation with xslt:
<project name="DocBook to Eclipse Help" default="docbook-help">
  <target name="docbook-help">
    <xslt style="docbook-xsl/eclipse/eclipse3.xsl" destdir=".">
      <include name="book.xml" />
    </xslt>
  </target>
</project>
If using the ant and xslt task, a NullPointerException may occur in the referenceToNodeSet method. This can be fixed by adding Xalan to the ant classpath, as the version built into Java contains bugs. The easiest way is to add all of the plugins/org.apache.x* JARs to the External Tools Configuration dialog, as follows:

There are a number of optional parameters that can be used to configure the way that the help pages are generated. These can be passed with --param to xsltproc, or with a <param> element to the xslt task. The optional parameters are described in the following list:
eclipse.plugin.provider: This sets the name of theBundle-Vendoreclipse.plugin.id: This sets theBundle-SymbolicNameeclipse.plugin.name: This sets theBundle-Namesuppress.navigation: This turns thePrev/Up/Nextlinks off (0) or on (1)html.stylesheet: This is the location of the CSS file to be usedcreate.plugin.xml: This either creates theplugin.xmlfile (1) or doesn't (0)eclipse.manifest: This either creates theMANIFEST.MFfile (1) or doesn't (0)generate.index: This either creates the index (1) or doesn't (0)
Note that the standard Eclipse help style can be enabled using a link for the html.stylesheet with ../PRODUCT_PLUGIN/book.css. Additionally, since the Eclipse help system provides navigation, it is not needed in the individual HTML files:
<xslt style="docbook-xsl/eclipse/eclipse3.xsl" destdir=".">
  <include name="book.xml" />
  <param name="html.stylesheet"
   expression="../PRODUCT_PLUGIN/book.css"/>
  <param name="suppress.navigation"
   expression="1"/>
</xslt>
Note
More information about authoring Eclipse Help using DocBook is described at http://wiki.eclipse.org/Authoring_Eclipse_Help_Using_DocBook.
Mylyn WikiText can also be used to author help documentation. There are several different types of WikiText supported by Eclipse: textile, mediawiki, confluence, and trac are just some of them.
When a file is created with a known extension, the Mylyn WikiText provides a context menu WikiText with options such as Generate Docbook, Generate HTML, and Generate Eclipse Help. This allows the documentation to be written in an easy-to-manage format while still generating standard back-ends. In addition, the Mylyn WikiText can also be extended in future to support other wiki dialects, such as Markdown or AsciiDoc.
When generating Eclipse Help with Mylyn, the file is converted into HTML and a corresponding toc.xml file is created as well.
In addition to the user interface, Mylyn also provides ant tasks (defined in the org/eclipse/mylyn/wikitext/core/util/anttask/tasks.properties file) that can be used to convert documentation into the right format. The tasks are as follows:
wikitext-to-eclipse-help: Used to generate Eclipse help documentswikitext-to-html: Used to generate standalone HTML documentswikitext-to-docbook: Used to generate DocBook documentswikitext-to-dita: Used to generate DITA documentswikitext-to-xslfo: Used to generatexsl:foobjects to create PDFshtml-to-wikitext: Used for conversion of HTML to WikiText
There are two additional tasks (defined in the org/eclipse/mylyn/internal/wikitext/mediawiki/core/tasks/tasks.properties file) that can be used to acquire the contents of a MediaWiki server and generate help pages automatically:
These tasks are used by the EGit project to create documents automatically from the EGit wiki page at http://wiki.eclipse.org/EGit. The ant build file looks like the following:
<project name="org.eclipse.egit.doc" default="all">
  <path id="wikitext.tasks.classpath">
    <pathelement path="${compile_classpath}"/>
  </path>
  <taskdef classpathref="wikitext.tasks.classpath"
   resource="org/eclipse/mylyn/internal/wikitext/
    mediawiki/core/tasks/tasks.properties"/>
  <taskdef classpathref="wikitext.tasks.classpath"
   resource="org/eclipse/mylyn/wikitext/core/util/
    anttask/tasks.properties"/>
  <target name="all">
    <mediawiki-to-eclipse-help
     validate="true"
     wikiBaseUrl="http://wiki.eclipse.org"
     failonvalidationerror="true"
     prependImagePrefix="images"
     formatoutput="true"
     defaultAbsoluteLinkTarget="egit_external"
     dest="help"
     navigationimages="true"
     title="EGit Documentation"
     helpPrefix="help"
     generateUnifiedToc="true">
      <path name="EGit/User_Guide" title="EGit User Guide" />
      <path name="JGit/User_Guide" title="JGit User Guide" />
      <path name="EGit/Git_For_Eclipse_Users" title="Git for Eclipse Users" />
      <stylesheet url="book.css" />
      <pageAppendum>
= Updating This Document =
This document is maintained in a collaborative wiki.
If you wish to update or modify this document please visit
{url} </pageAppendum>
    </mediawiki-to-eclipse-help>
  </target>
</project>
To run this ant file, the org.eclipse.mylyn.wikitext plug-ins need to be on the classpath. This is launched from a Maven/Tycho build in the EGit distribution, which takes care of assembling the classpath from the bundle dependencies specified in the pom.xml file. Alternatively, the conversion can be performed by running the ant build file manually, provided that the classpath is correctly set up to resolve Mylyn dependencies.