
Incorporating Birds
Birds are found all over the world in every possible setting, from crowded city streets to rural, backcountry roads. They inhabit frozen, temperate, and tropical climates and can be seen on both land and water. The ability to fly from one location to another allows birds to migrate and be found in different environments during different seasons worldwide.
Birds are a challenging subject to draw because they move quickly, taking flight at a moment’s notice, and often disappearing before a single pencil stroke is made. Understanding and breaking down basic bird anatomy will greatly enhance your experience drawing them, whether you are working from photographs, taxidermy specimens, captive birds, or observing them in the wild.
Head & Beak Shapes
Just as plants exist in a wide range of shapes, sizes, and colors, birds are equally diverse. Each bird has a special way of gathering food. The first clue to look for is the shape of the head—especially the beak. The shape of the bill or beak lets you know something about its eating habits. Is the beak short or long, curved or pointed, flat or hooked? Each shape determines if the bird eats seeds, insects, fruit, nectar, meat, carrion, or fish. Here are some general shapes to look for and how they are specially designed for collecting food.
Beak Variations

a. General - Insects
b. Seed
c. Wood Boring
d. Filtering
e. Nut & Seed
f. Nectar
g. Fruit
h. Meat
i. Specialized Filter
j. Fish
k. Scoop
Feet
Bird feet are also specialized and help define the habitat where the bird resides. Special adaptation of the feet allows species to perch, grab, swim, climb, and even walk on water! Most birds have four digits, which are similar to human toes. The arrangement of the digits often helps classify what type of environment they live in. Here are some common bird feet arrangements.
Basic Bird Feet

a. Anisodactyl
b. Zygodactyl
c. Palmate
d. Semi-Palmate
e. Raptorial
f. Lobate
g. Totipalmate
h. Pamprodactyl
The largest group of birds belongs to the Passerine family. This group is generally described as birds that can perch. Most perching birds have an anisodactyl toe arrangement. There are three toes in the front and one toe in the back, which allows them to wrap their feet around branches and stems. Songbirds, such as finches, buntings, and sparrows, have this toe arrangement.

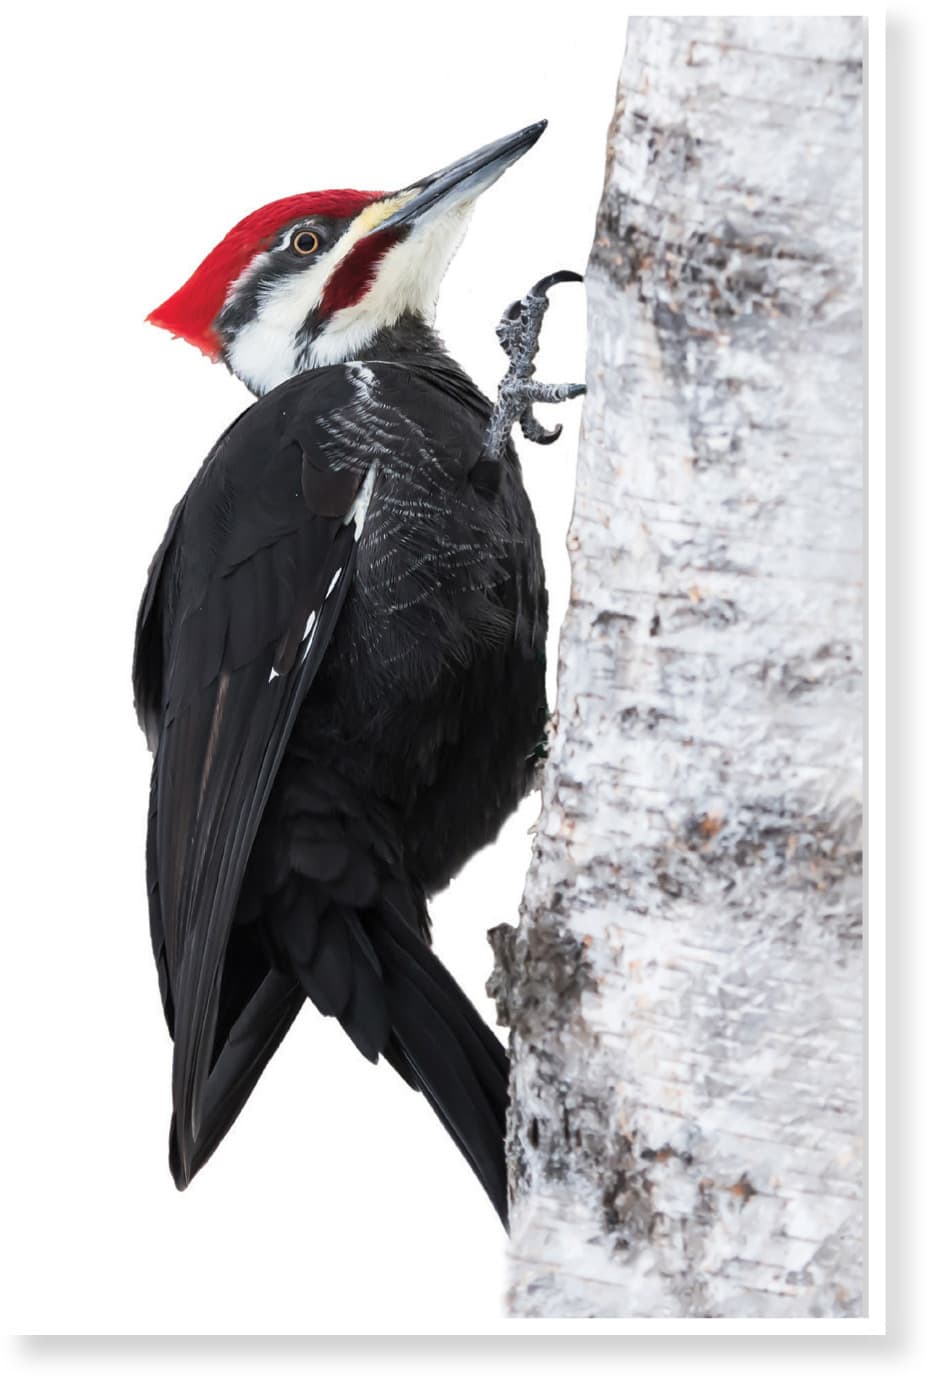
The second most common arrangement of toes is zygodactyl. There are two toes in the front and two toes in the back. Birds with this arrangement are likely to climb up and down trees and use this configuration for support. Woodpeckers, parrots, and owls commonly have this toe arrangement.
Birds that swim normally have a palmate, or webbed, foot. There are three toes in the front with webbing between the front toes and one toe in the back, which is not webbed. A semi-palmate arrangement means three toes are only partially webbed. Ducks, geese, and other swimming birds have this toe arrangement.

A lobate foot is an adaptation of the webbed foot. Instead of having skin between the toes, there is extra skin on the front three toes, which are wide and flat. Grebes typically have this toe arrangement. Take a look at the photo shown here. See the difference between the feet on this grebe and the webbed feet of a duck?

Birds of prey are great hunters. The raptorial toe arrangement is similar to the anisodactyl arrangement of perching birds, but has very large claws or talons. The talon in the back, called a hallux, is often longer and used for gouging its prey. This toe arrangement is commonly found in hawks, eagles, and falcons.

Another variation is the pamprodactyl arrangement. In this configuration, the first and fourth toes can pivot. This helps the bird hook onto areas like cliffs and cave walls. Swifts are the most common type of bird with this toe arrangement.

Feathers

Birds are the only animals that are covered in feathers. Feathers have many functions, including protection from the elements of heat, sun, and water. They provide color for camouflage and attracting a mate. In conjunction with the skeletal structure, feathers also make it possible for a bird to take flight.
There are two common types of feathers. Contour feathers are the most common, as they are found all over the body, including the tail and wings. Down feathers are typically found underneath contour feathers and are not visible. They waterproof and insulate the bird. The quill is where the feather attaches to the body, and it’s similar in appearance to the midrib on a leaf.

The barbs are individual, hairlike structures that come off the quill. Each barbule has microscopic hooks that interlock with one another.
Here is a diagram of two typical contour feathers and their parts. On the left is a contour feather with the quill equidistant from each side. On the right is a contour feather that has a variation, with the left side of the quill narrower with a notch and the right side wider. This variation is often found in the primary feathers on the wing.

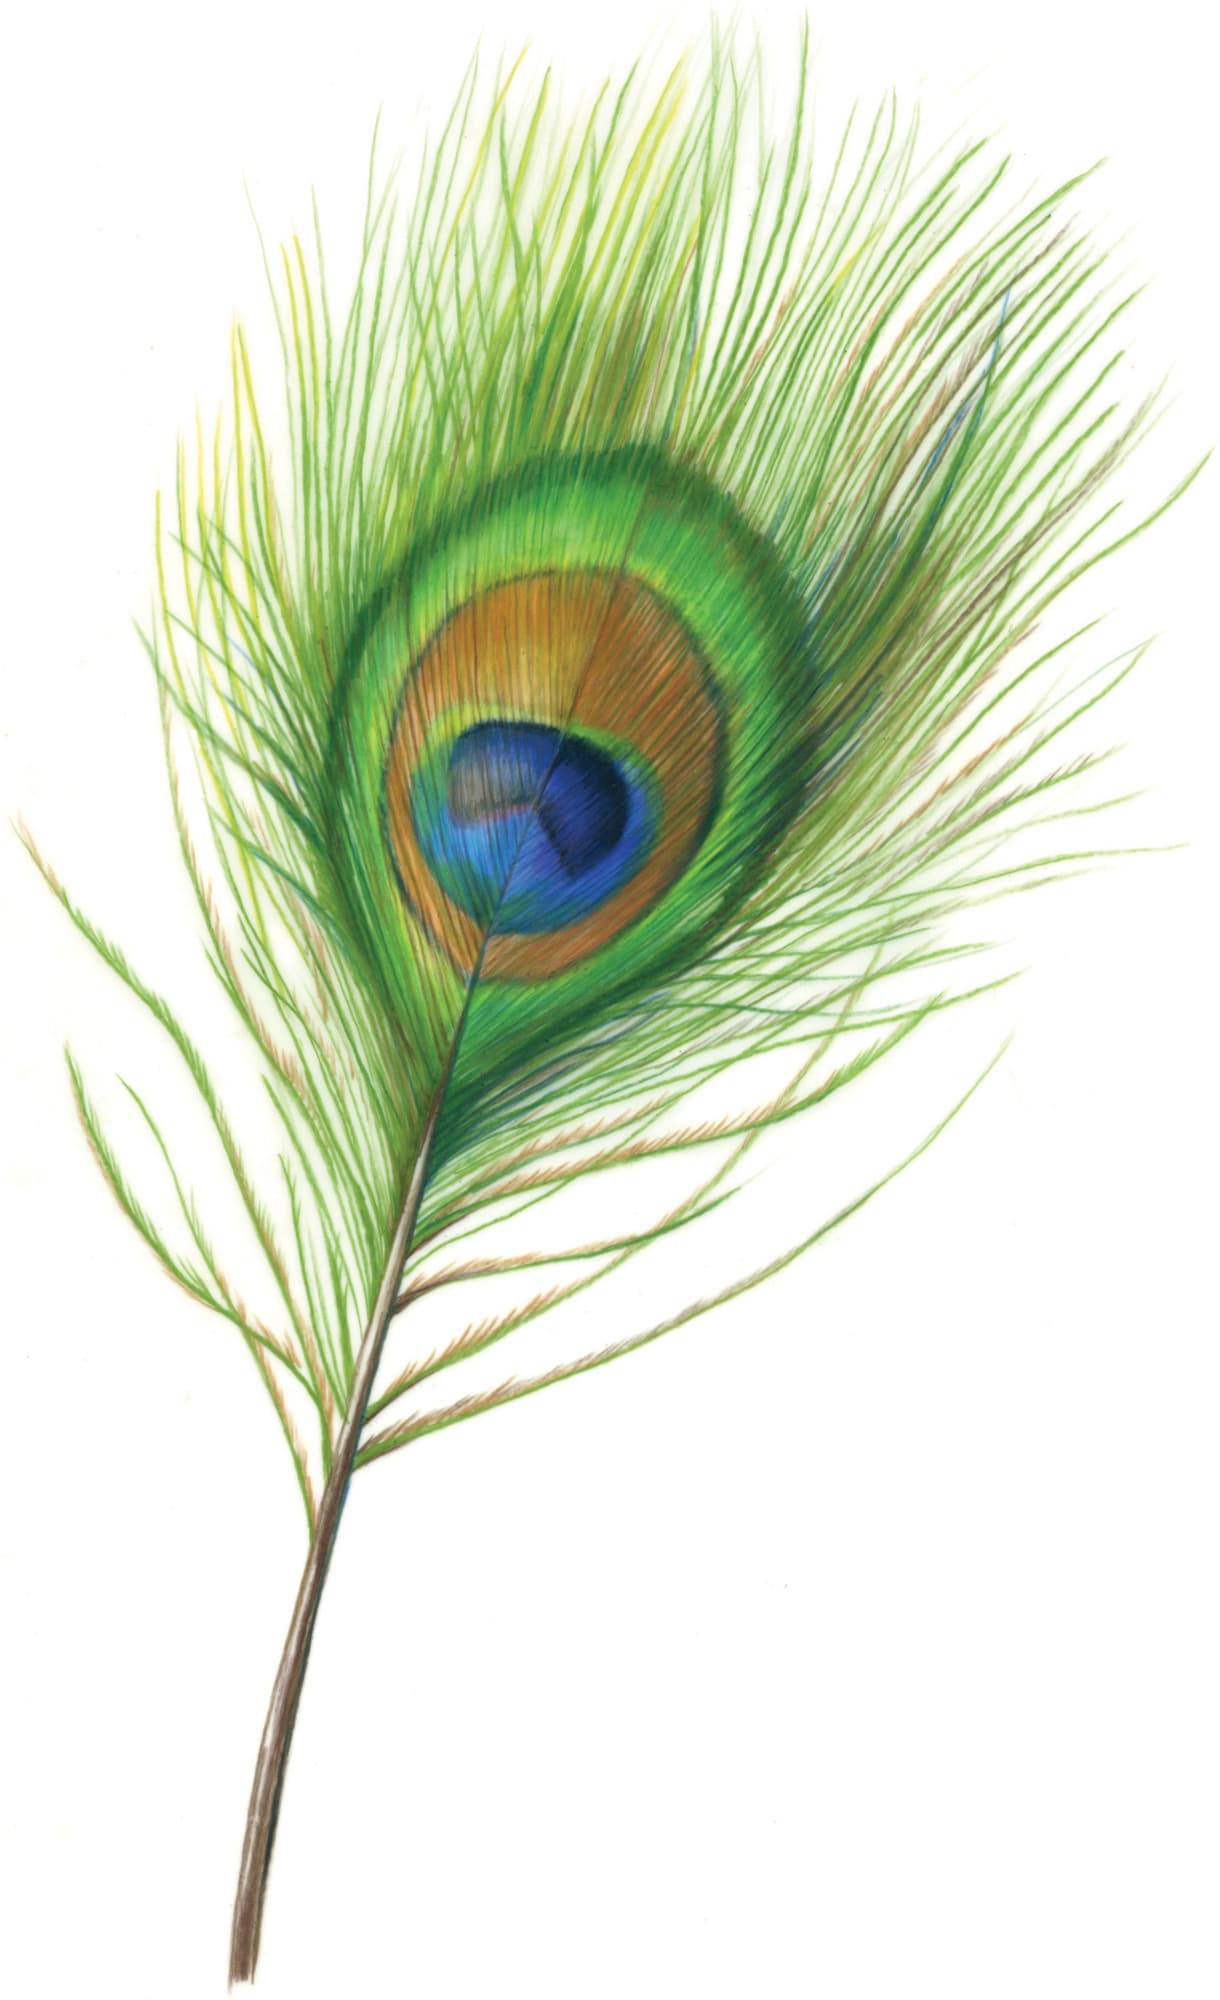
Peacock Feather
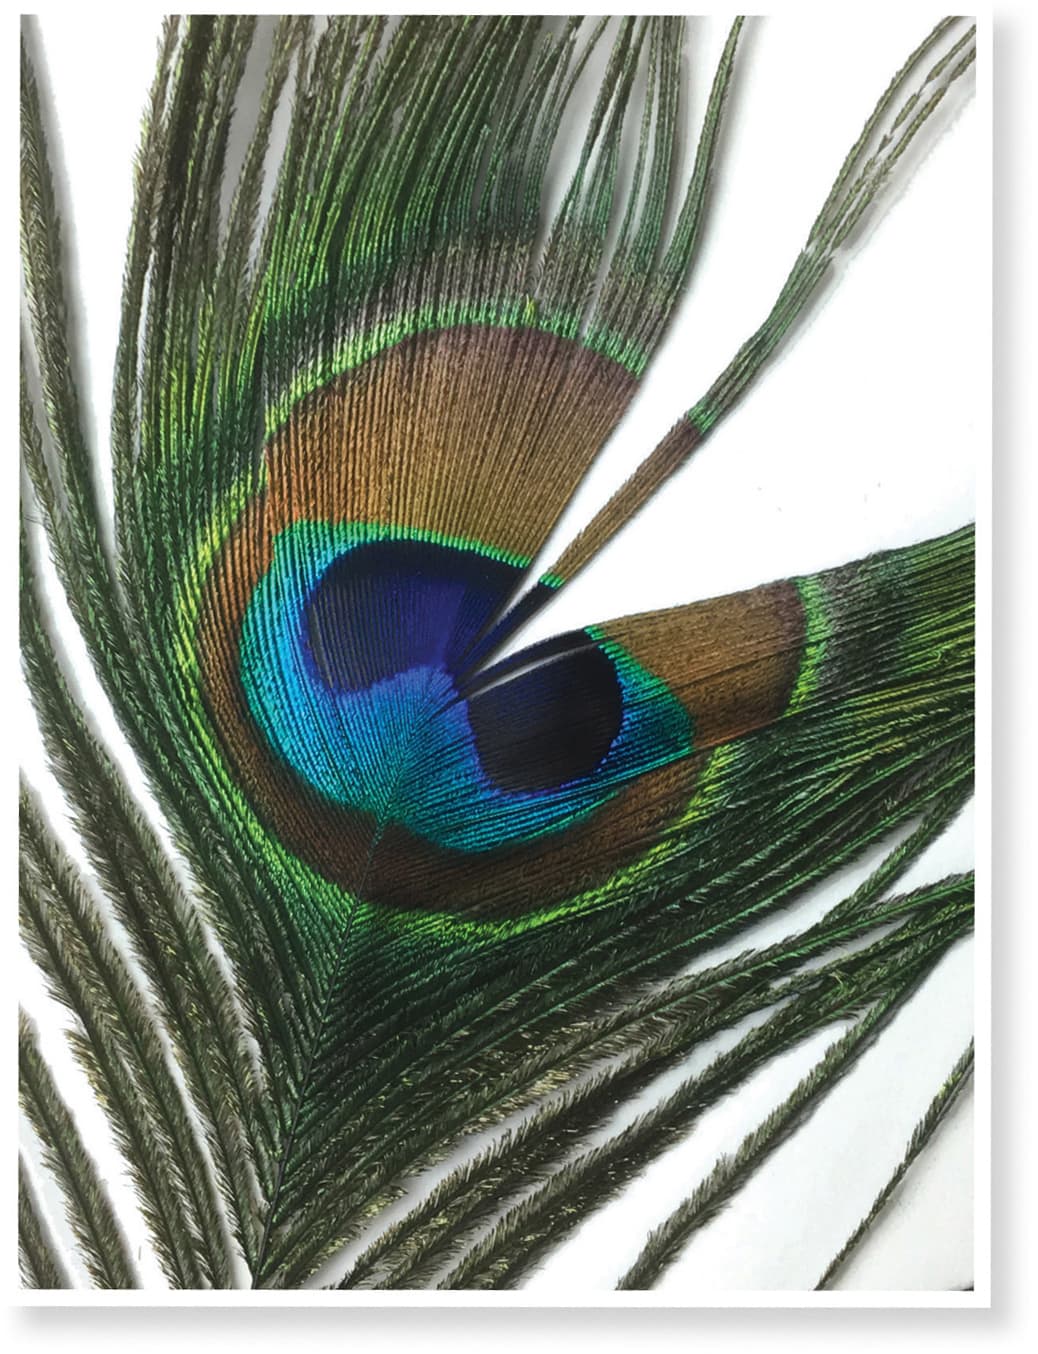
One of the most remarkable birds is the male peacock. Its tail feathers are designed to attract and impress a potential female for mating. Each tail feather consists of an eyespot and an arrangement of dazzling color. The beauty of these feathers has made them popular and readily available in the home décor and craft industry—they can easily be purchased for drawing reference.
For this demonstration, the light source again plays an important role in getting the colors to shimmer, creating iridescence. Here you can see how I used my “helping hands” to hold the feather at the base. I placed it against a large piece of white paper and set up my light source at 11 o’clock and 45 degrees from the picture plane.

It’s important to notice that each individual barb has a series of colors. When put together, the colors create the eyespot. In this detail photo, I separated the barbs to show how the color changes from the quill to the end in a series of stripes.
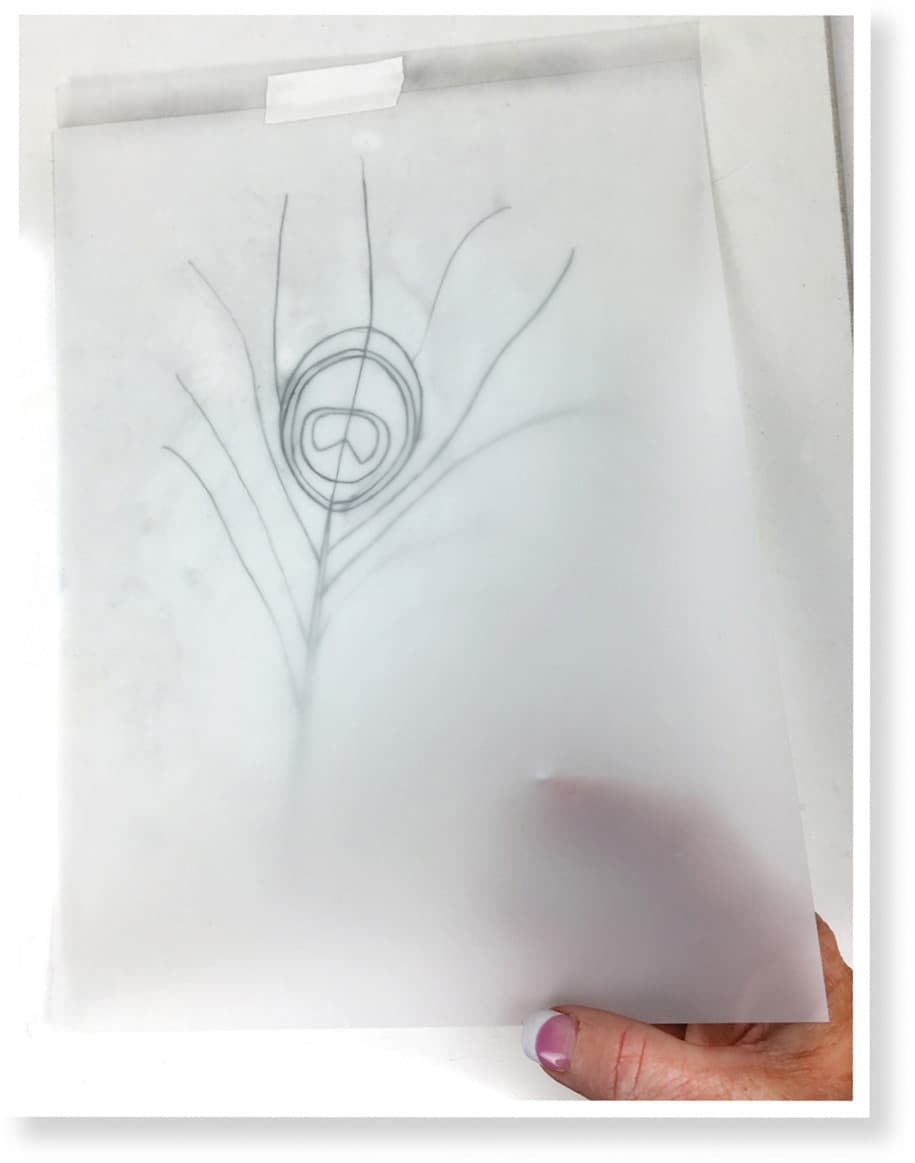
First draw the basic outlines for each color shift around the eye spot on tracing paper. If you’re working on mylar like me, secure the mylar on top of the tracing paper with removable tape to keep it in place. The underdrawing shows through the opaque mylar, so there is no need to transfer the drawing.

Start to lightly add color in the direction of the barbs. With this lighting setup, the left side of the feather is lighter and the right side is darker. I used the color tonal scales I created to evaluate the placement for each color. Note that the lighter colors are more dominant on the left and slowly integrate across the quill to a darker range. The dark lines you see here are the graphite lines on the tracing paper underneath the mylar.
Add more layers of color. This close-up shows the transition of color from light on the left to dark on the right. Once I established the eyespot and color shifts, I removed the graphite drawing from underneath the mylar.

Add the longer barbs, starting at the center of the quill and drawing through the eyespot to the outside perimeter. Use one continuous line with a darker, contrasting color to the define the detail and integrate the color shifts. The darker line represents the space between each barb.
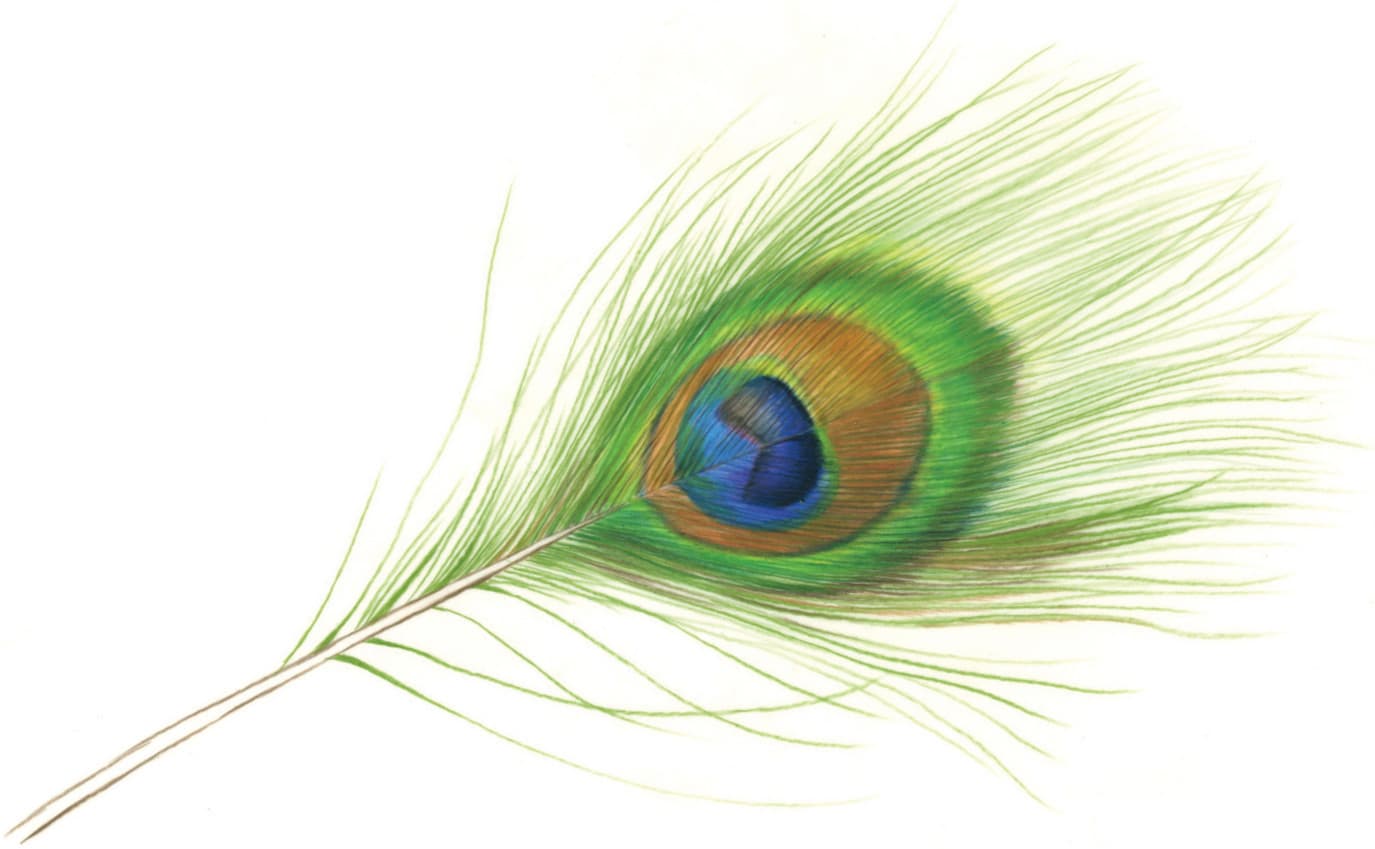
Add more layers to enhance and saturate the areas with color, always working from the quill to the outside and tapering the lines as they reach the edge.

One of the wonderful things about working on double-frosted mylar is that both sides can be used. It can be challenging to know if you should go darker with the color application. If you add more layers and it’s not what you wanted, it’s difficult to backpedal and remove layers. This is where the flip side comes in! I decided that I wanted to make the right side darker and blacker, but I wasn’t sure how dark to go. I flipped the mylar over and darkened in the right side (which is on the left when flipped). If it got too dark, I could always erase the back without damaging my work on the front.
In the final stages, you may want to work on both the front and back of the mylar, which is what I did. Continue to add color and darken until you are satisfied with the finished piece.
Wing Bone Structure
The basic bone structure of a wing is similar to that of the human arm. The humerus is the upper arm. The radius and the ulna make up the forearm and connect at the humerus. This connection is what we would consider the elbow. The radial and ulnare are the wrist. The wrist connects to the main section of the hand, the carpometacarpus. There are only two digits: the pollex, which is considered the thumb, and the phalange, which is a fused finger. From the base of the digits, carpometacarpus, and radius is the alar, which is the feather tract.
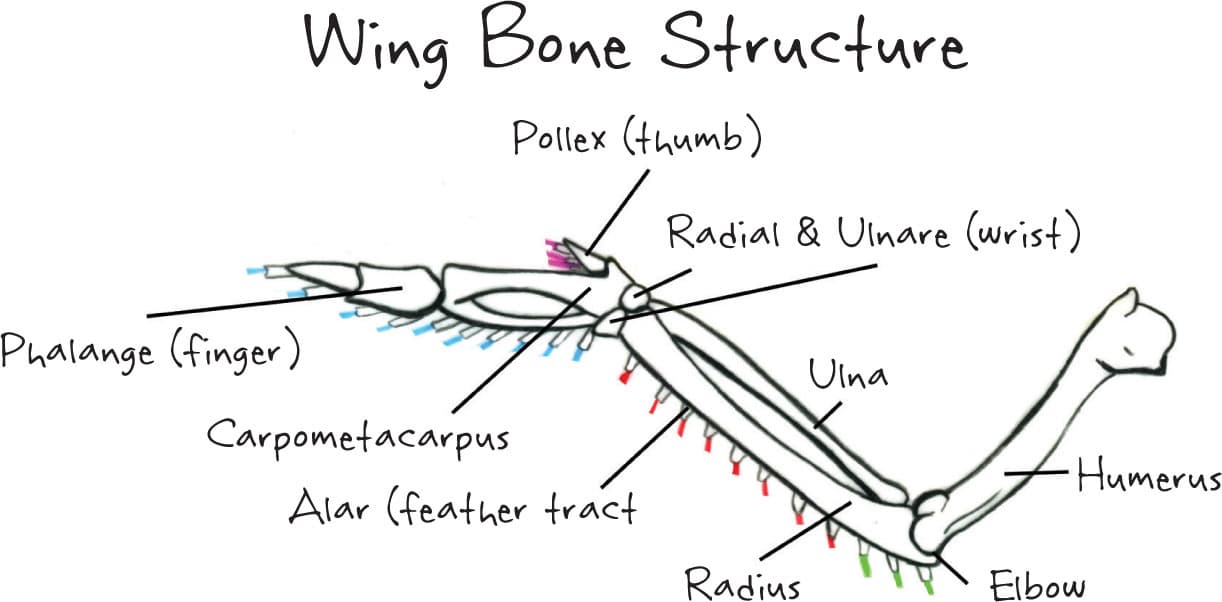
The bones in the wing are hollow, which makes them lightweight. This intricately designed wing is what gets birds into the air.

For this diagram, I illustrated a mallard duck wing. The feather arrangement on the wing consists of primary, secondary, covert, and alula feathers. The primary feathers usually consist of 10 contour feathers, which attach at the carpometacarpus and phalange bones. The feathers that extend the furthest from the body may be notched and asymmetrical. Closer to the body, the feathers become symmetrical.
The secondary and tertiary feathers attach at the radius and vary in number. The alula feathers attach at the pollex, or thumb. This small grouping of feathers can move independently and helps navigate a bird’s flight direction. The covert feathers cover the primary and secondary feathers and become incrementally smaller as they get closer to the body.
An important aspect of the wing structure is how it folds up into a resting position. The wing hinges at the radial and ulna, or wrist. When the bird opens its wings to fly, the primary feathers spread open like a fan away from the body, as do the secondary feathers, but in opposite directions, indicated here by the red arrows.
How Wings Fold
In the resting stage, birds hold their wings close to their body. The primary feathers fold under the secondary feathers. Use the color key shown here to understand the movement, indicated by the colored lines in the diagrams below. See how the secondary feathers cover the primary feathers? Only the bottom half of the primary feathers is visible when the bird is in a resting position.

Basic Skeletal Structure
There are a few important things to be aware of when drawing birds. One is how the head attaches to the neck and spine. Birds have very flexible necks. In the resting position, it forms the shape of an “S.” This is especially apparent when looking at birds with long necks, such as flamingos, herons, and cranes.

Leg bones can also present a drawing challenge. What we would consider the “knee” of the bird is not visible on most species. Instead we see the ankle and often mistake it for the knee. The leg appears to go backward, in the opposite direction than we think it should. This is a mistake many artists make in their drawings. The femur, or upper leg bone (thigh), attaches at the pelvis, which attaches to the fibula and tibiotarsus (shin) by the patella (knee). The tarsometatarsus (foot) attaches at this point, what we would call the ankle. From the tarsometatarsus the four digits (toes) emerge.
Sketching Birds
Birds are everywhere—but almost impossible to get close to! If you do get close, they move or fly away. This is both challenging and frustrating. The basic anatomy here gives you an overview of what you should look for. Here are some ideas for ways you can practice drawing birds.
Taxidermy Specimens

Photo taken at the University of Florida, Florida Museum of Natural History Ornithology Collection
Natural history museums, local wildlife centers, universities, and even taxidermists are great places to sketch birds. Some institutions have bird skins, which means the interior of the bird has been removed and the body cavity filled with cotton or other material. Such places may also have bird wings, skulls, and other body parts that can be useful to see up close and personal. These kinds of things are usually kept in climate-controlled drawers and are not often on display to the public. You can request permission to see them with a phone call to the collections manager.
Mounted specimens are prepared with a core-manufactured skeleton, on which the skin is mounted. The positions can be very lifelike. Museums may also have displays in dioramas, showing the birds in a replicated habitat.
Live Birds in Captivity
Zoos and wildlife rehabilitation centers offer a great opportunity to see live birds from around the world. They are also typically in enclosures with limited area for flight, making them much easier to draw than in the wild.


Live Birds Outdoors
Local parks, especially parks with ponds, streams, or other bodies of water, are a great place to find birds. A backyard bird feeder may also be a perfect place to see birds. Any place available where you can sit quietly and observe them is recommended. Even if you’re not sketching, just observing how they take to flight and land and interact with one another will add important information to your knowledge of birds.
Working from Photographs

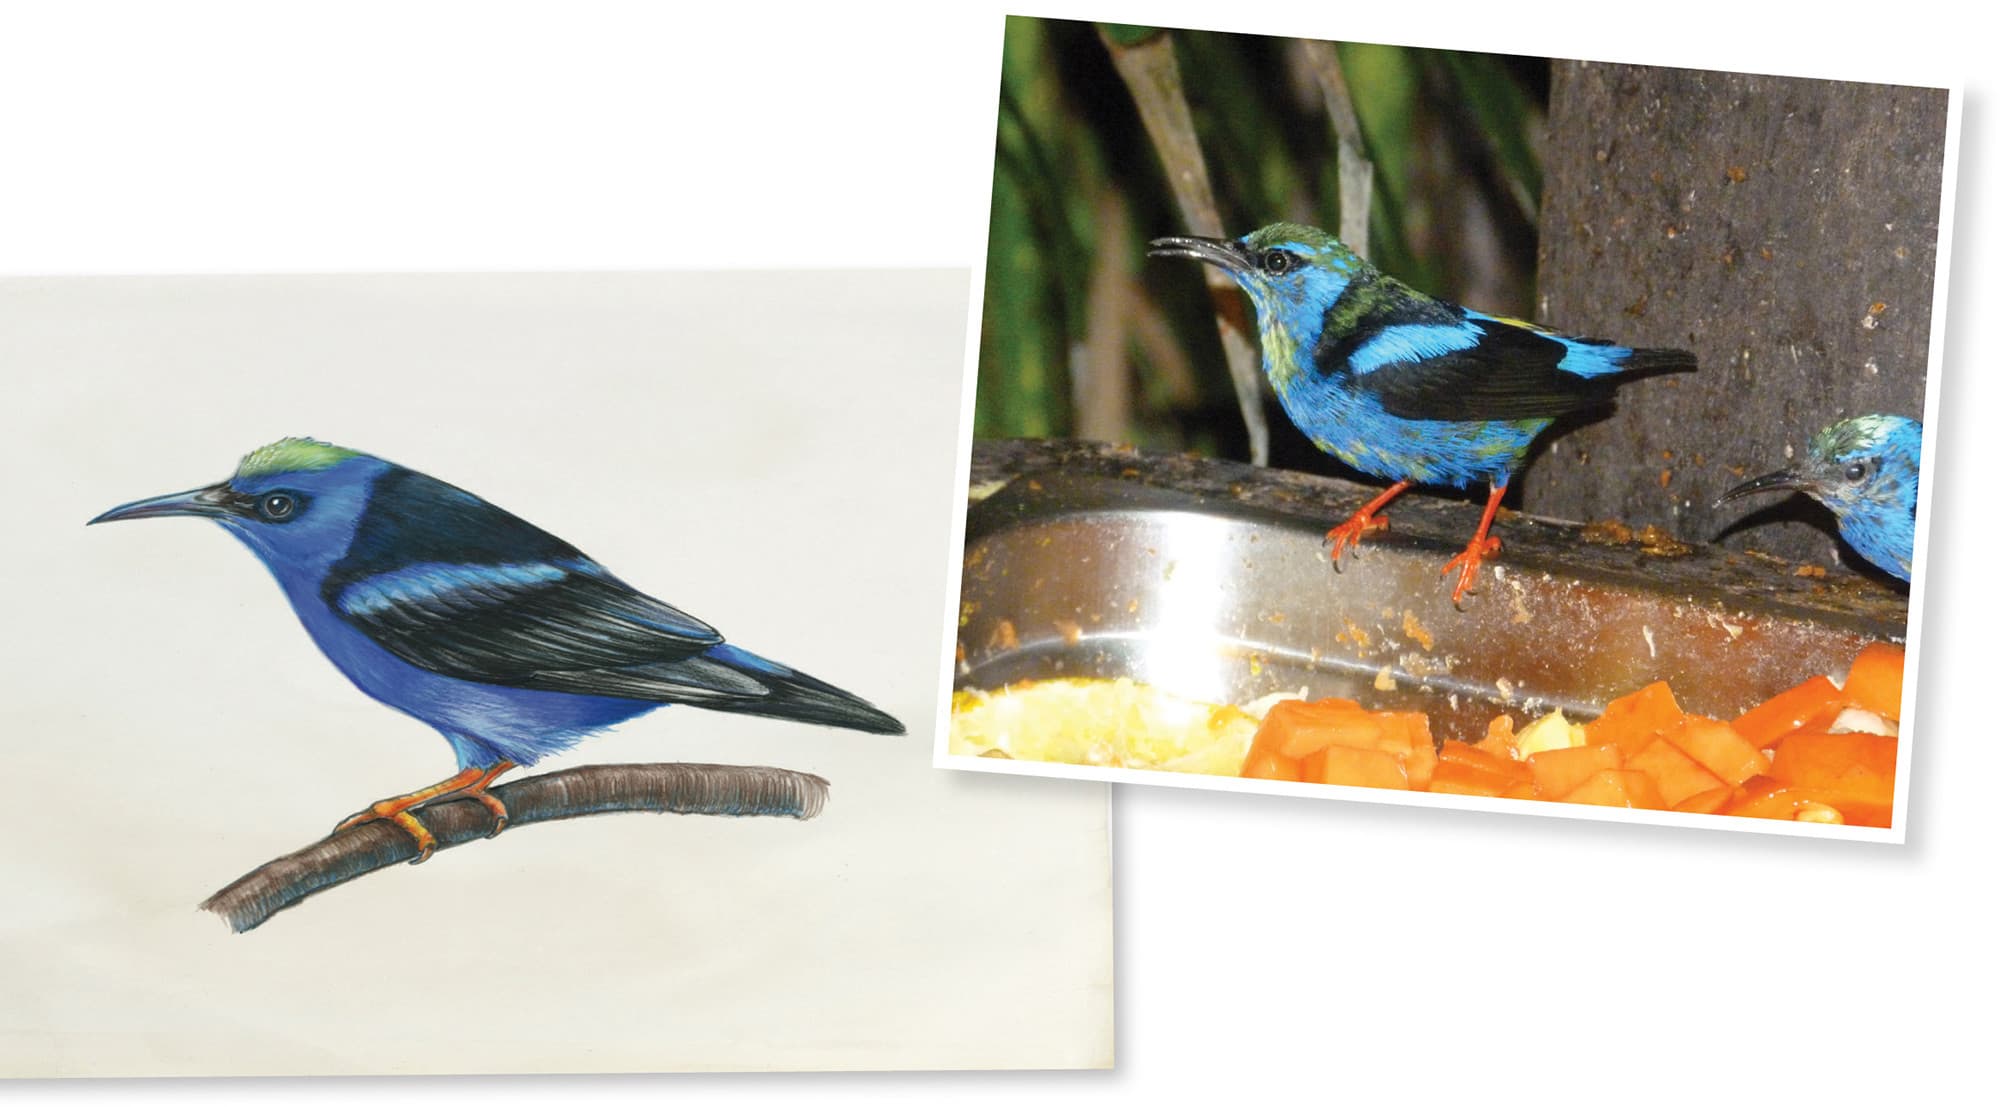
Many artists work from photographs when drawing birds. The pro is that the bird doesn’t move. The con is that photographs can distort perspective, rendering body parts out of focus or hidden by foliage. I highly recommend working from your own photographs; it’s unethical to copy a photograph taken by someone else, even as a drawing or painting, and claim the work as your own.
You don’t need to have expensive camera equipment or be a good photographer. Sometimes my photos are out of focus or poorly composed. Look at this example of a poor photograph I took of a great green macaw. I was observing how it preened its feathers and took several photos. This photo was out of focus, but I liked how the head was positioned peeking out over the wing. Using my knowledge of bird anatomy, I was able reconstruct it and create a colored pencil drawing. I changed the format from vertical to horizontal, expanded the wing, and changed some of the color markings of the bird.
Years ago, I had a photo reference library comprised of pages torn from wildlife magazines. I created folders and labeled them by species. As I accumulated images my folders turned into filing cabinets full of photos. I no longer have these paper files. I donated them to an art center, and now I use my iPad and Pinterest in the same way. If you’re not familiar with Pinterest, you need to open an account today! This online database allows you to upload, share, and organize digital images of every kind. I use it as an art reference library. Each time I start a project of a specific bird, I search the Internet and Pinterest for images using keywords of what I am looking for. I “pin” them onto designated boards and continue to collect them. Whenever I need a specific trait or body part, I can go to the appropriate board and look at several views, close-ups, and detail shots to enhance my work. While it’s unethical to copy someone else’s photograph, using photos for reference to fill in the gaps of missing information is perfectly acceptable and useful.

Gesture Drawing
Sketching birds in pencil is the best way to get started. It allows you to erase lines, correct proportions, and fix posture. When starting a bird drawing, whether from life, specimens, or photographs, it’s important to start with the basic shapes. Some artists are fascinated with details and spend their beginning efforts carefully drawing small details. However, this can lead to disaster if the overall proportions and perspective are incorrect. It’s better to start with the basic shapes of the head, body, tail, and legs, and then add the eye, beak, wing, and feet. After these proportions are correct, add the color markings and other details. In short, get the basic anatomy correct first, and then refine the drawing and add details.
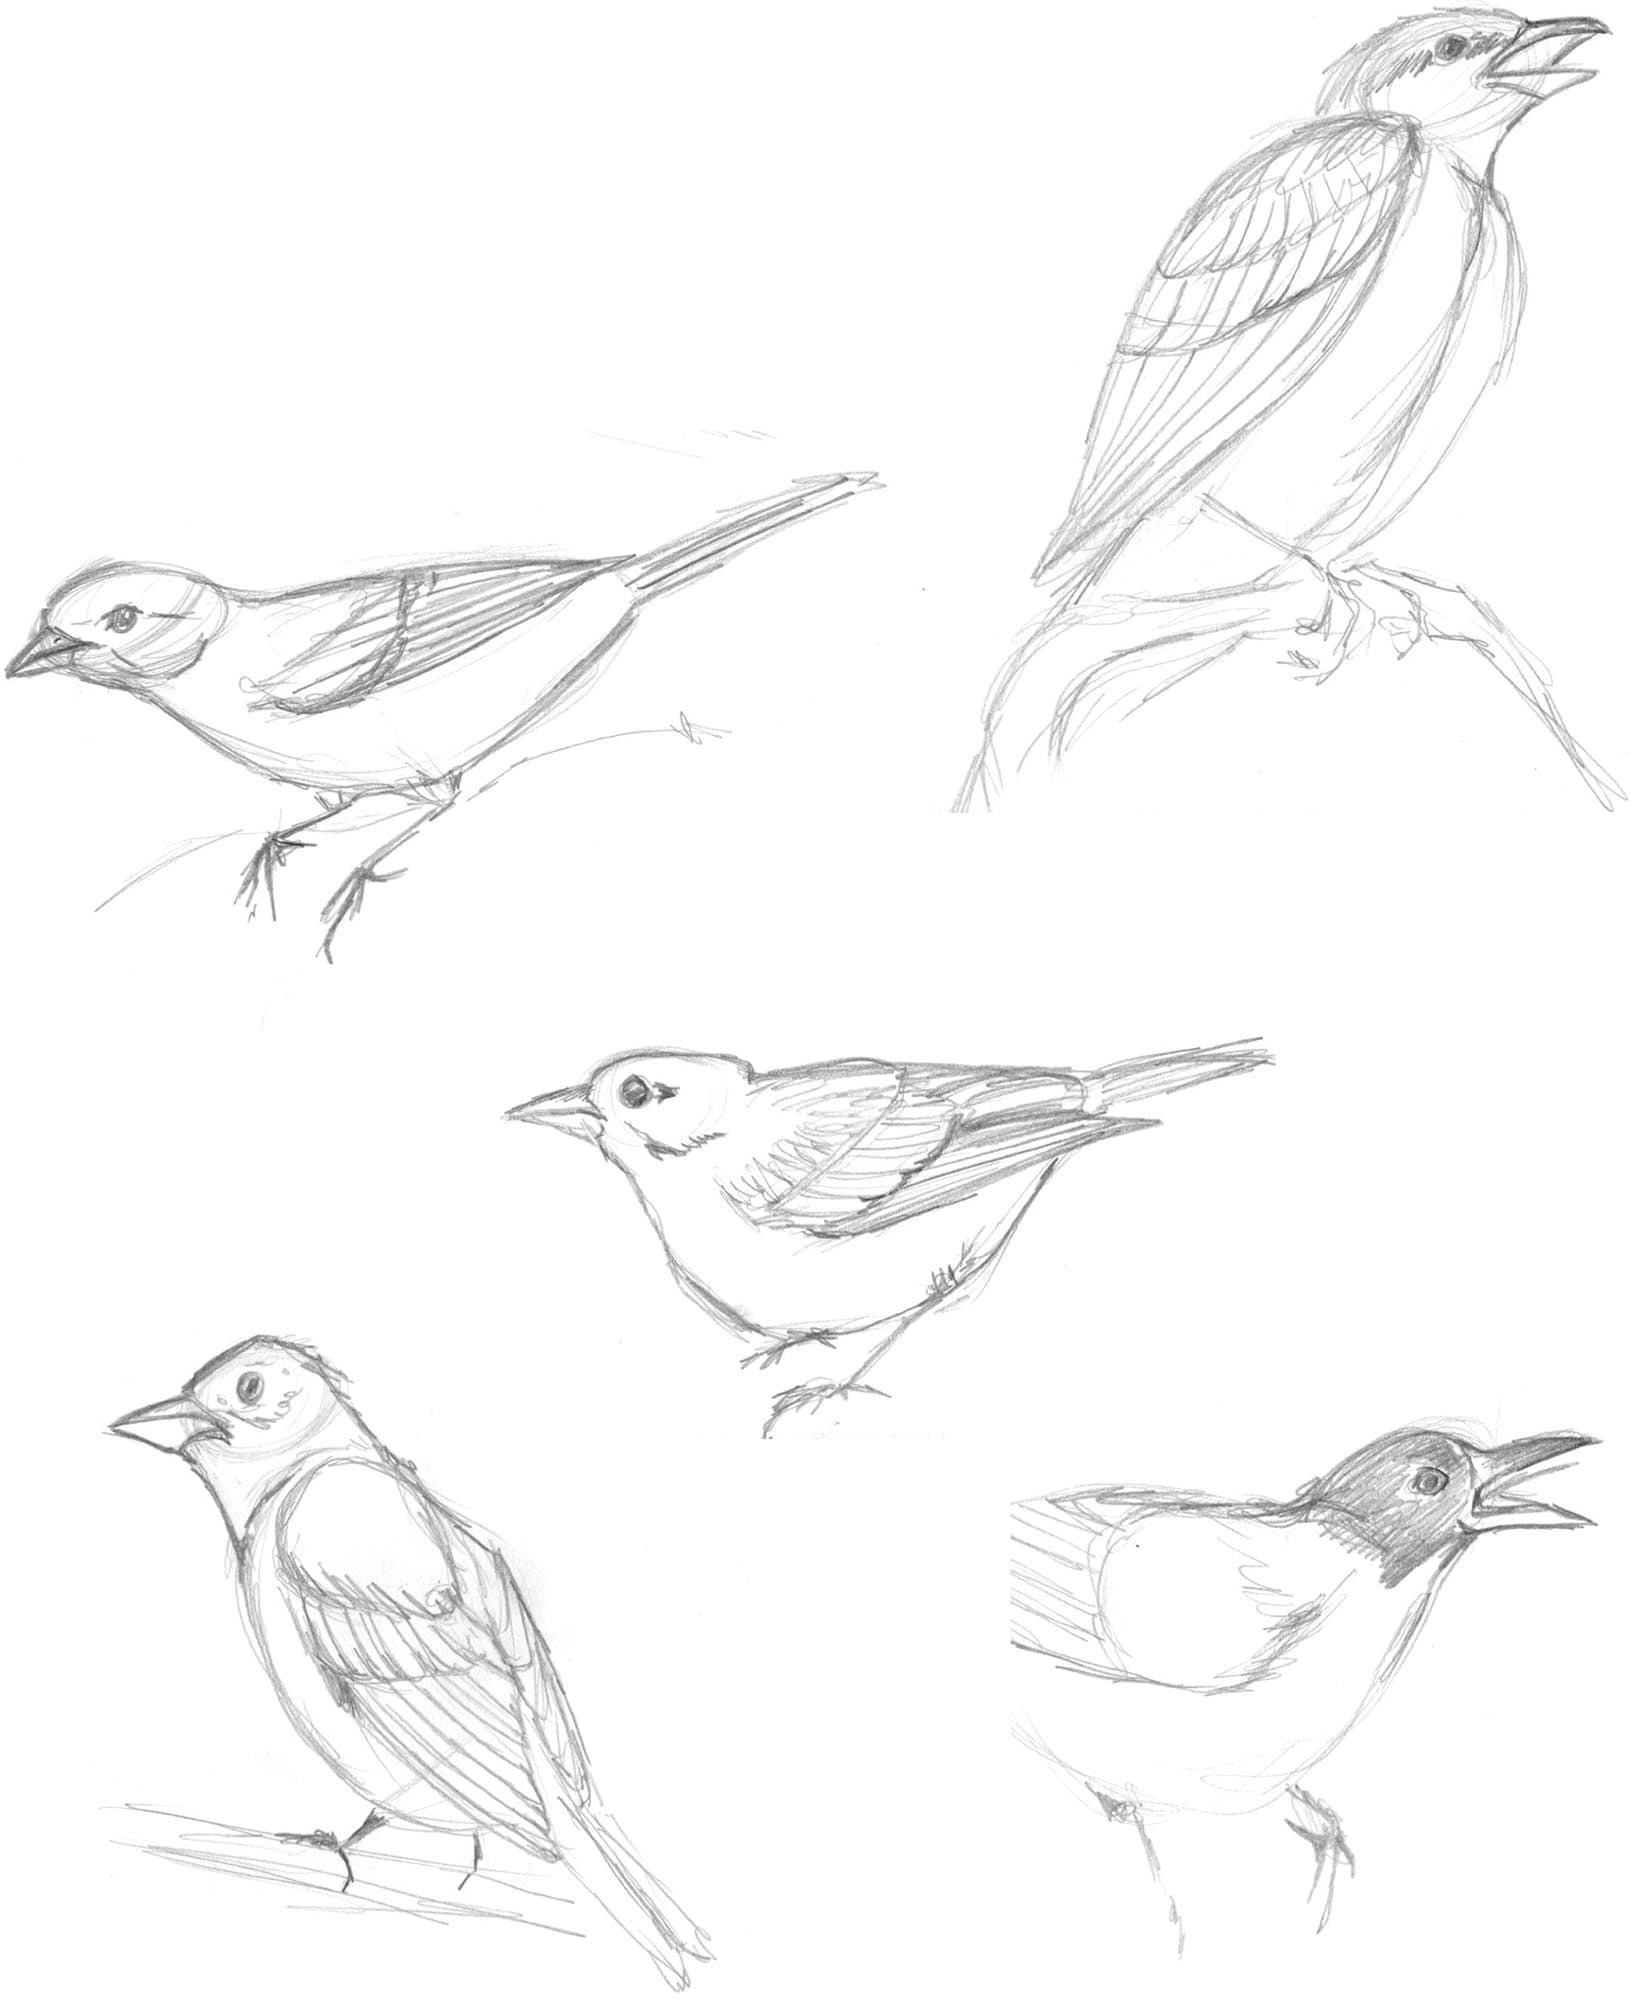
The most important thing to remember about sketching is to observe. A drawing won’t and shouldn’t be “perfect” during this stage. Drawing birds requires time, persistence, and patience. You can refine your sketches afterward with reference photos. This kind of drawing is meant for getting comfortable with seeing the movement and behavior of birds—not for producing a finished work of art. The more you draw, the more you see, and the more you can convey in your art. Relax and enjoy the journey.
