
Below the principal hierarchy, SQL Server provides a rich set of functionality for securing data. This chapter discusses the appropriate use of schemas, ownership chaining, impersonation, row-level security, and dynamic data masking.
Note
Row-Level Security and dynamic data masking are new features of SQL Server 2016.
Schemas
Schemas provide a logical namespace for database objects. They also provide a layer of abstraction between objects and their owners. Every object within a database must be owned by a database user. In much older versions of SQL Server, this ownership was direct. In other words, a user named Luan could have owned ten individual tables. From SQL Server 2005 onward, however, this model has changed so that Luan now owns a schema, and the ten tables reside within the schema—meaning that Luan implicitly owns the ten tables.
This abstraction simplifies changing the ownership of database objects; in this example, to change the owner of the ten tables from Luan to Paul, you need to change the ownership of a single artifact (the schema) as opposed to changing the ownership of all ten tables.
Well-defined schemas can also help simplify the management of permissions, because you can grant a principal the permissions on a schema, as opposed to the individual objects within that schema. For example, assume that you have five sales-related tables: SalesOrdersHeader, SalesOrderDetails, SalesPerson, Stores, and Customers. If you put all five tables within a single schema named Sales, you would then be able to assign the SELECT, UPDATE, and INSERT permissions on the Sales schema to a database role, which contains the sales team’s database users. Assigning permissions to an entire schema does not just affect tables, however. For example, granting SELECT on a schema also gives a user the permissions to run SELECT statements against all views within the schema. Granting the EXECUTE permission on a schema grants EXECUTE on all procedures and functions within the schema. For this reason, well-designed schemas group tables by business rules, as opposed to technical joins.
Consider the AdventureWorks2016 database, specifically the SalesOrderHeader, SalesOrderDetail, SalesPerson, Employee, and Person tables. Figure 4-1 is a partial database diagram of the AdventureWorks2016 database, which shows that these tables are physically joined with primary key and foreign key constraints. Even though the tables are physically joined, it would not be sensible to place the SalesOrderHeader or SalesOrderDetails tables in the same schema as the Employee or Person tables, because salespeople are unlikely to be authorized to see employee information. Instead, the only tables in the Sales schema should be the SalesOrderHeader, SalesOrderDetail, and SalesPerson tables. Indeed, this aligns with the actual design of the AdventureWorks2016 database.

Figure 4-1. Partial database diagram
Listing 4-1 demonstrates how to create a schema called Chapter4 in the AdventureWorks2016 database. It then assigns the user Danni, SELECT permission to the schema.
Listing 4-1. Create a New Schema
USE AdventureWorks2016GOCREATE SCHEMA Chapter4 ;GOGRANT SELECT ON SCHEMA::Chapter4 TO Danni ;GO
To change a table’s schema post creation, use the ALTER SCHEMA TRANSFER statement, as demonstrated in Listing 4-2. This script creates a table without specifying a schema, which means that it is automatically placed in the dbo schema. It is then moved to the Chapter4 schema.
Listing 4-2. Transfer an Object to a Different Schema
USE AdventureWorks2016GOCREATE TABLE ChangeSchema(ID int) ;GOALTER SCHEMA Chapter4 TRANSFER dbo.ChangeSchema ;GO
Ownership Chaining
SQL Server 2016 offers an implementation of row-level security, which is discussed in the “Row-Level Security” section of this chapter. In previous versions of SQL Server, however, row-level security could be rather tricky to implement. The standard way to implement row-level security was to use views or procedures, which limited the amount of data that was returned. Users can be granted permissions to the procedures and views, which form an abstraction layer, without granting the user permissions to the underlying tables .
This method works because of a concept called ownership chaining. When multiple objects are called sequentially by a query, SQL Server regards them as a chain. When you are chaining objects together, the permissions are evaluated differently, depending on the principal that owns the schema(s) in which the objects reside.
For example, imagine that you have a view named View1, which is based on two tables: Table1 and Table2. If all three of these objects share the same owner, then when a SELECT statement is run against the view, the caller’s permissions on the view are evaluated, but their permissions on the underlying tables are not.
This means that if you want to grant UserB the SELECT permissions on specific rows within Table1, then you can create a view that stores a query that returns the rows that this user is permitted to see. At this point, the user can run a SELECT statement from the view, as opposed to the base table. As long as he has SELECT permission on the view and the view shares an owner with the base table(s), then his permissions on the underlying table are not evaluated and the query succeeds. This is represented in Figure 4-2.

Figure 4-2. Successful ownership chain
The ownership chain is broken in the event that one of the objects that the view is based on does not have the same owner as the view. In this scenario, permissions on the underlying table are checked by SQL Server, and an error is returned if the user does not have appropriate permissions to the underlying table. This is illustrated in Figure 4-3.

Figure 4-3. Broken ownership chain
Caution
It is important to note that ownership chains lead to DENY assignments being bypassed. This is because neither the GRANT or DENY assignments of the user are evaluated.
Impersonation
Impersonation refers to the practice of executing T-SQL statements or code modules under the context of a different security principal. This helps you to enforce the principal of least privilege by assigning fewer permissions to users, but elevating those permissions at the point when a section of code is executed.
In SQL Server, impersonation can be implemented through the EXECUTE AS clause. The EXECUTE AS clause can be placed in the header of a stored procedure, function, or DML trigger. EXECUTE AS can also be used during a session to change the security context. Table 4-1 describes the context specifications that can be specified when using EXECUTE AS.
Table 4-1. EXECUTE AS Context Specifications
Usage | Context Specification |
|---|---|
Session | • LOGIN • USER |
Procedures, functions and DML triggers | • CALLER • SELF • OWNER • USER |
Database-level DDL triggers | • CALLER • SELF • USER |
Server-level DDL triggers | • CALLER • SELF • LOGIN |
Queues | • CALLER • SELF • USER |
Table 4-2 explains the usage of each of the context specifications.
Table 4-2. Context Specification Usage
Context Specification | Description |
|---|---|
CALLER | The code executes under the original context. This is the default behavior for all modules, except queues. |
SELF | The code executes under the context of the principal that created or last altered the module. |
OWNER | The code executes under the context of the principal that owns the module or the schema in which the module resides. |
USER | The code executes under the context of a specific database user. |
LOGIN | The code runs under the context of a specific login. |
The script in Listing 4-3 demonstrates the EXECUTE AS functionality by using a system function named SUSER_SNAME(). This function returns the name of a login from a SID that is passed a parameter. If no parameter is passed, then it returns the name of the login of the current security context.
Listing 4-3. Change Security Context
--Execute under current security contextSELECT SUSER_SNAME() ;--Switch to the context of DanniEXECUTE AS USER = 'Danni' ;--Execute under Danni's security contextSELECT SUSER_NAME() ;
The results of this query are shown in Figure 4-4. As you can see, the first query ran under the context of my login. After using the EXECUTE AS statement, however, the security context changed to Danni.

Figure 4-4. Results of change security context query
To revert back to the original security context, the code must use the REVERT statement. If no REVERT statement is supplied in the code, then the code continues to run under the modified context until the end of the session or code module.
Caution
The user that creates the code module that contains the EXECUTE AS clause, or the user executing the ad hoc SQL within a session using the EXECUTE AS clause, must have the IMPERSONATE permission on the security context that the code runs under.
Row-Level Security
Implemented in SQL Server 2016, Row-Level Security (RLS) allows DBAs to simplify the management of fine-grain security by providing an out-of-the-box technology. In many cases, security is implemented in the middle tier and the application connects to SQL Server using a single login. RLS can also assist with improving architectural principals by pushing logic and security to the back end.
RLS is implemented through a security policy and security predicates. The following sections introduce each of these concepts before demonstrating how the technology could be implemented in the AdventureWorks2016 database.
Security Predicates
A security predicateis a function that is applied to a result set to determine which rows can be returned or modified by the user accessing the data. The functions are inline table-valued functions that must be created by the DBA. There are two types of security predicates that can be implemented: filter predicates and block predicates .
Filter predicates filter the rows that are returned to a user when they query a table or view. This type of predicate is silent, meaning that the user or application is given no indication that rows have been filtered from the result set. Filter predicates affect SELECT, UPDATE, and DELETE statements.
Unlike filter predicates, block predicates return an error if they are violated. This type of predicate explicitly blocks INSERT, UPDATE, and DELETE statements, which violate the predicate. For UPDATE statements, block predicates can be defined as BEFORE or AFTER. When defined as BEFORE, the predicate is applied based on the original value. When defined as AFTER, the predicate is applied based on the value of a tuple after the UPDATE statement has been applied. As you would expect, if the predicate is for an INSERT statement, then AFTER is the only option, and if the predicate is for a DELETE statement, BEFORE is the only option.
It is a good idea to create a new schema in which to place your security predicates. This is because any user should be able to access the functions, and placing the RLS objects in a separate schema makes it easy to manage these permissions.
When creating the function, it is also a good idea to use SCHEMABINDING. This is because any function calls or joins to other tables can be made without additional permission configuration. If you do not use SCHEMABINDING, then SELECT or EXECUTE permissions are required on the referenced objects by users calling the security predicate.
Note
If you use SCHEMABINDING, then it is not possible to alter the columns in the table or view that are referenced by the security predicate.
Security Policies
A security policy binds the security predicate(s) to tables and views. It is the security policy that invokes the security predicate and specifies how the predicate should be used (filter, block before, block after).
A security policy can be created using the CREATE SECURITY POLICY statement. Table 4-3 describes the arguments that can be specified when creating a security policy .
Table 4-3. CREATE SECURITY POLICY Arguments
Argument | Description |
|---|---|
schema_name.security_policy_name | The name assigned to the security policy and the schema in which it should be created. |
ADD | Specifies if the predicate should be FILTER or BLOCK. |
PREDICATE | The two-part name of the security predicate. |
column_name | expression | The column name or expression used as the input parameter for the security predicate. |
table_schema.table_name | The two-part name of the target table to which the security policy is applied. |
block_DML_operations | If the ADD argument set to BLOCK, then the DML operations to block is defined. |
STATE | Specifies whether the security policy is enabled on creation. |
SCHEMABINDING | Specifies whether security predicates that are bound to the security policy must be created with SCHEMABINDING. |
NOT FORREPLICATE | Specifies that the security policy should not be executed when a replication agent modifies the target object. |
Implementing RLS
This section discusses how RLS can be implemented. Imagine that you are required to allow managers to view information in the HumanResources.Employee table of the AdventureWorks2016 database. The challenge using traditional permission assignments, however, is that they should only be able to view the information on employees who report to them (either directly or indirectly) .
You can achieve this using RLS, first by creating a security predicate and a security policy. The security predicate defines which rows are accessible by a user based on the OrganizationNode column of the table.
Tip
The OrganizationNode column of the HumanResources.Employee table uses the HierarchyID data type. HierarchyID is a complex data type implemented through CLR; it was first implemented in SQL Server 2008. It exposes a variety of methods to assess a row’s level of the hierarchy. A full method reference for the HierarchyID data type can be found at https://msdn.microsoft.com/en-us/library/bb677193.aspx .
The first step is to create the security predicate. Listing 4-4 is code used to write such a predicate function. Notice that before creating the predicate function, the script creates a new schema, called Security, in which the function resides. This is in line with the best practices described in the “Security Predicates” section.
Listing 4-4. Create a Security Predicate
USE AdventureWork2016GOCREATE SCHEMA Security ;GOALTER FUNCTION Security.fn_securitypredicate(@OrganizationNode HIERARCHYID)RETURNS TABLEWITH SCHEMABINDINGASRETURN SELECT 1 AS fn_securitypredicate_resultFROM HumanResources.Employee e1WHERE @OrganizationNode.IsDescendantOf(OrganizationNode) = 1AND LoginID = 'adventure-works' + SUSER_SNAME() ;GO
You now need to create the security policy. This is demonstrated in Listing 4-5.
Listing 4-5. Create a Security Policy
CREATE SECURITY POLICY Security.EmployeeSecurityPolicyADD FILTER PREDICATE Security.fn_securitypredicate(OrganizationNode) ON HumanResources.EmployeeWITH (STATE=ON, SCHEMABINDING=ON) ;
If you were now to run the script in Listing 4-6, only employees who report to Roberto are returned.
Listing 4-6. Test the RLS
EXECUTE AS USER = 'Roberto0'SELECT * FROM HumanResources.Employee ;REVERT
The results of this query are illustrated in Figure 4-5.

Figure 4-5. RLS rest results
Dynamic Data Masking
Dynamic data maskingis a technology that was introduced in SQL Server 2016 that allows non-privileged users to see only a subset of an atomic value stored within a tuple. For example, imagine a call center for a credit card company. For data protection, the call center operatives are not authorized to see an entire credit card number. They need to identify the customer, however, and one of the questions used for the security checks is the last four numbers of the credit card number.
In this scenario, dynamic data masking could be used on the credit card number column so that all but the last four digits are obfuscated. This can help improve application architecture by pushing code from the middle tier to the back end, which improves reusability and reduces resource consumption in the middle tier.
Table 4-4 describes the dynamic masking functions that are available in SQL Server 2016.
Table 4-4. Dynamic Data Masking Functions
Function | Supported Data Types | Description |
|---|---|---|
default | char, nchar, varchar, nvarchar, text, ntext, bigint, bit, decimal, int, money, numeric, smallint, smallmoney, tinyint, float, real, date, datetime2, datetime, datetimeoffset, smalldatetime, time, binary, varbinary, image | Fully masks a value. The type of masking depends on the data type of the value. |
partial | char, nchar, varchar, nvarchar | Accepts a prefix, a masking value, and a suffix. |
char, nchar, varchar, nvarchar | Reveals only the first letter of the e-mail address, the @ symbol, and the domain suffix. | |
random | bigint, decimal, int, numeric, smallint, smallmoney, tinyint, float, real | Replaces a value with a random value from within a specified range. |
Dynamic data masking can be implemented by using the MASKED WITH syntax in either a CREATE TABLE or an ALTER COLUMN statement. For example, the statement in Listing 4-7 adds a mask to the Sales.CreditCard table in the AdventureWorks2016 database so that users only see the last four digits of credit card numbers when the CardNumber column is queried.
Listing 4-7. Add a Data Mask
USE AdventureWorks2016GOALTER TABLE Sales.CreditCardALTER COLUMN CardNumber ADD MASKED WITH (FUNCTION = 'partial(0,"XXXX-XXXX-XXXX-",4)');
Let’s take a look at dynamic data masking in action. Let’s assume that the user brian3 has SELECT privileges to the Sales.CreditCard and runs the query shown in Listing 4-8.
Listing 4-8. Query the Sales.CreditCard Table
EXECUTE AS USER = 'brian3' ;SELECT TOP 10CreditCardID,CardType,CardNumber,ExpMonth,ExpYear,ModifiedDateFROM Sales.CreditCard ;REVERT
The results of this query are shown in Figure 4-6.
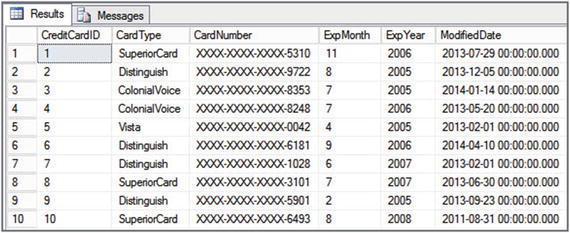
Figure 4-6. Results of masked query
To reveal the full value, users must be granted the UNMASK permission. For example, imagine that user brian3 was granted the UNMASK permission, as demonstrated in Listing 4-9. The user is now able to see the whole value of the credit card number.
Listing 4-9. Grant the UNMASK Permission
GRANT UNMASK TO brian3 ;Summary
SQL Server provides a rich suite of functionality for assisting in the management of data level security. Schemas provide a namespace for objects. When organized by business area (as opposed to technical relationship), they can simplify the administration of security, because it allows you to assign permissions based on business role.
Each new version of SQL Server introduces new security features—and SQL Server 2016 is no exception. Row-Level Security (RLS) introduces the ability to restrict the rows within a table based on a user’s security attributes, such as username or session context.
Dynamic data masking allows non-privileged users to see a partially obfuscated value rather than the full value within a column. For example, a call center operative can see only the last four digits of a customer’s credit card number, as opposed to the full number.