Over the years, automation has grown from batch files to PowerShell and finally automation routines. With the advent of the cloud, the word “automation” took on a whole new meaning. Whether you deployed in a public or private cloud, the mass scale that was required to perform the deployment could not be satisfied by any staffing model. The industry saw an immense need for automating the repetitive tasks, monitoring the deployed services and providing insights on the artifacts associated with your deployment. The word “scale-up” and “scale-out” in a cloud environment cannot be de-coupled without automation.
In the Microsoft Azure environment, you have workflows available that allow you to specify inputs, which the workflow will use as parameters to deploy the virtual machine with your required settings. In the traditional world of IT, a SQL Server deployment would have prerequisites like procuring hardware, setting up the hardware and the operating system, and then getting the prerequisites fulfilled like IP addresses, permissions, etc. After all these prerequisites were done, you would need to get the SQL Server installation media, run the installation with the necessary parameters, and then perform post-installation configuration steps.
A large number of IT professionals around the world leveraged various scripting and automation methods to make these deployments faster. A number of environments moved to virtualization to make the deployment of these environments quicker and lessen the procurement timeframe. If you were a firm believer that virtualization led to cost savings and prevented underutilization of resources, the cloud takes that a step further. It is truly like a pre-paid cellular service! You only pay for what you use. This pay-as-you-go model is replicated in many shared services models within enterprises in the form of charge back to a cost center. In this chapter, we will draw parallels of deployment with the on-premises world in Azure and explain the different deployment options present for SQL Server instances hosted on Azure VMs.
Deploying a Standalone SQL Server Instance
In the previous chapters, the Azure architecture was explained in detail along with the deployment models (Classic and ARM) available in Azure. Since Azure is transitioning to the Resource Manager (ARM) deployment model, this chapter will focus only on this particular model. When you log onto the Azure portal (portal.azure.com), you will be presented with a column view on the left that allows you to look at the various artifacts deployed and also the services that can be deployed.
One of the most common questions is why do you see two different items for Virtual Machines (see Figure 5-1). The Virtual Machines option is for virtual machines deployed using the Resource Manager model and the Virtual Machines (Classic) option is for virtual machines deployed using the Classic deployment model. The old portal (manage.windowsazure.com) does not show virtual machines deployed using the Resource Manager model.

Figure 5-1. Azure portal
Now that you are aware of the navigation differences, let us break the journey of deploying SQL Server into different phases. The first phase of the journey is choosing the deployment. Azure Virtual Machines provide multiple choices for deployment for SQL Server from a licensing perspective.
Deploying a SQL Server image from the marketplace (see Figure 5-2) and paying the per-minute rate of SQL Server

Figure 5-2. Azure Marketplace image showing SQL Server 2016 3.3 image
Installing or uploading your own SQL Server image using License Mobility benefits under Software Assurance
As a Service Provider with a Services Provider License Agreement (SPLA), you have an additional option of using your own image with Subscriber Access License (SAL) reported via your SPLA
Configuration Settings
Figure 5-2 shows the marketplace browsing options for Compute when you click on New option available on the left corner of the homepage. The marketplace allows you to deploy SQL Server releases ranging from SQL Server 2008 R2 to SQL Server 2016. You can even choose a range of editions like Enterprise, Standard, and Express. Another option is to pick pre-canned solutions like Availability Group deployment templates, which allow you to deploy Availability Groups during deployment.
Virtual Machine Region
For certain compute deployment options, you can select the deployment model (Classic or ARM). Once you select the image that you want to deploy, you will be provided with a number of options to specify the virtual machine and SQL Server settings (if you are using a SQL Server image). This part of the journey is where you provide inputs to the Azure deployment workflow for configuring various options for your environment. These options are constantly being reviewed by the Microsoft Engineering teams. Enhancements and improvements to these options are added during the sprint releases based on user inputs and available telemetry. Once you start working with the cloud, you learn that the public cloud is like the weather. You know the seasons and can sort of predict the weather based on various signs, but you will be pleasantly surprised once in a while. The only difference with the weather is that the enhancements and improvements showing up in various workflows are to make your life easier rather than more difficult. The Cloud Engineering teams are one of the most agile development organizations within Microsoft.
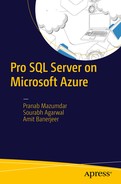
The Basics settings view showing Figure 5-3 are common to all Azure Virtual Machine configuration wizards and they allow you to specify the machine name, administrator username, password, and resource group name (since we are using ARM). You also have the option to specify the region, i.e., the data center where this virtual machine will be deployed, and the subscription. These are very important things to consider, as these cannot be changed using the portal after the deployment has completed. If you want to move an existing Azure Virtual Machine to a different region or subscription, you will need to write PowerShell commands to get this done. This is not something that happens in the blink of an eye!
Figure 5-3. Basic settings configuration for Azure Virtual Machine
Picking a subscription is an easier consideration. You would want to pick the subscription that should get billed for the resource usage and that would typically host the other parts of your application. This decision does not have performance considerations associated with it. However, picking the region for the virtual machine has performance aspects associated with it. The easiest way to think about the region is your data center. For a production environment, you would pick the server blades and SAN which are colocated within the same data center. Additionally, you would deploy your application in the same data center as well preferably unless you have geo-dispersed requirement. The same logic applies here. You would pick the same region for your compute, storage, and application deployment. This would prevent network hops across data centers, which would increase latency and negatively impact performance. This is one of the most common deployment misconfigurations that have been noticed in multitier architectures using Azure Virtual Machines.
Virtual Machine Hardware
The next set of inputs is also critical for performance and achieving the SLA that your application is supposed to adhere to. This involves choosing the right compute tier for your virtual machine. Figure 5-4 shows the different options that Azure provides. For critical production environments, the recommendation is to pick a compute tier that provides SSD disks (premium storage). The wizard would provide the CPU cores and RAM that is associated with each tier that you pick. Think of the size setting as picking your hardware but without the hassle of understanding the underlying configuration of hardware. All you need to know is the amount of horsepower (processing, IOPs, and physical memory) that your application database needs to run.

Figure 5-4. Picking the Azure Virtual Machine size
A major pitfall in this configuration is that most people forget to estimate the IOPs correctly during configuration. Azure will throttle IO bursts if they exceed the virtual machine or storage account’s maximum published limits (see Figure 5-5). This can lead to erratic performance slowdown in your virtual machine and thereby negatively impact user experience. Azure provides monitoring endpoints that can be used to determine if existing storage limits are being exceeded. You can even set up alerts to get notified when a threshold is exceeded. Chapter 7 covers more details about performance aspects for SQL Server instances running on Azure Virtual Machines.

Figure 5-5. Azure Standard storage account limits
Once you select the desired size, you will be provided with a number of knobs that allow you to configure the storage account. At the time of going to print, the Azure Storage limits were 100 storage accounts per subscription, with a limit of 500TB per Standard storage account. The maximum size of a page blob is 1TB, which means that the maximum size of a virtual hard disk attached to your virtual machine is 1TB. Depending on the virtual machine tier that you select, your storage size will be limited. In Figure 5-4, the selection of a DS4 standard would limit your storage to a maximum of 16 data disks, which means a storage size limit of 16TB. Furthermore, you need to keep in mind that each storage disk has a limit for the maximum IOPs supported for 8KB IOPs. For a standard tier virtual machine, it is limited to 500.
The calculation for the number of disks required for Standard and Premium storage is shown here.
Number of disks required:For Standard Storage = MAX of [(Total storage required (in GB) ÷ 1024), (Total IOPs required ÷ 500)]For Premium Storage (P30) = MAX of [Total storage required (in GB) ÷ 1024), (Total IOPs required ÷ 5000), (Total MB/s of IO required ÷ 200)]
If we had to put things into perspective, if you required 1TB of storage that supported 2000 IOPs, you would need four data disks, which would be hitting the scalability limit. If you were using P30 premium storage, you would be able to utilize a single premium IO disk and still have some room for additional luggage (see Figure 5-6).

Figure 5-6. Azure Premium storage limits
Standard storage is the economy sedan that you pick when you really don’t care about performance. But you would never bring this car to compete in the NASCAR rally or a Grand Prix. If you want to compete in this arena, your storage needs will only be satisfied through Premium IO. If you compare Figures 5-5 and 5-6, one of the limits that will jump out at you is the megabytes of IO per second. Premium storage provides that as a performance option to consider, whereas Standard storage limits at an IOPs level. As thumb rule, for high performance IO requirements, you should default to Premium storage.
Premium storage supports 64TB of storage for a virtual machine supporting up to 80,000 IOPs and 1600Mbps of throughput at less than one millisecond latency for read operations.
An important point that you need to keep in mind from a cost perspective is the billing difference for Premium versus Standard storage. For a Premium storage account, you will be charged for the allocated size of the disk but for any other type of Storage account, you will only be billed for the storage space used to store the data that is written to the disk regardless of the allocated disk size. So exercise caution while spawning off Premium storage disks to prevent unwarranted shocks in your Azure monthly subscription costs!
Keeping this wisdom in mind, the storage settings showing in Figure 5-7 are for Premium storage configured for Locally Redundant Storage. It is best to use Locally Redundant Storage for Azure disks hosting SQL Server data files. For high availability and disaster recovery, you can configure Availability Groups. The Availability Groups feature is a high-availability and disaster-recovery solution available in SQL Server 2012 and above. The Azure marketplace provides templates for configuring Availability Groups for SQL Server 2012 and above. The example in Figure 5-7 shows how a gallery image based on a template can be used for deploying a fully configured SQL Server instance.

Figure 5-7. Azure Storage Account settings
The other settings that you can tweak are the network settings. You can configure the virtual network for your virtual machine, which fences the resources using the same virtual network. This can be used for keeping the SQL Server instances and the application resources for a single business environment within a single subnet. You also have the option of choosing a public or static IP address if there is a strict application dependency on the IP address.
A new concept of Network Security Groups (NSG) was introduced over a year ago and it allows you to create a DMZ-like environment for your virtual machines. Once again network administrators would feel safe and at their data centers when they understand the concept of NSG. A Network Security Group can be applied to a subnet (within a virtual network) or individual virtual machines, which allows you to enable a two-layer protection. The rules within a NSG can be modified and updated independently of the virtual machine, thus allowing the management of access control lists outside the lifecycle of a virtual machine.
A simple use case would be using a NSG to restrict Internet access for virtual machines, as shown in Figure 5-8. One of the great usability features in the NSG configuration is the use of virtual network tags for configuring inbound and outbound rules. Tags are predefined identifiers that represent a category of IP addresses. The Internet tag denotes the public IP address space and will be used to restrict Internet access for the required virtual machines.

Figure 5-8. Network security groups
While configuring the virtual machine, you can configure monitoring (see Figure 5-7). This allows you to enable monitoring for your virtual machine during deployment by attaching a storage account that will host the diagnostic data received from the monitoring endpoints.
Another concept that comes into play is the Availability Set, which helps protect your virtual machines from unplanned and planned maintenance events. If you are deploying a standalone SQL Server instance, an Availability Set is not required. It is recommended that you configure an Availability Set to ensure that maintenance periods do not lead to downtimes for your application production environments hosted on Azure. The availability set is aware of Update/Upgrade and Fault Domains (refer Chapter 2), which ensures that all the machines in your availability set are not taken offline during planned and unplanned maintenance activities. For availability groups, it is best to group all the replica virtual machines in an availability set. The availability set of a virtual machine can’t be changed after it is created.
SQL Server Settings
If you are using a SQL Server image from the marketplace, these set of configuration options will be offered to configure the SQL Server connectivity, authentication, patching, backup, and storage requirements and key vault configuration.
In Figure 5-9, note that there are two settings available for connectivity, namely the type of connectivity required and the port number. The three options provided (in the SQL Connectivity dropdown list) are:
Local (inside VM only)—If you do not want connections being made to the SQL Server instance outside the virtual machine, then this is what you should pick.
Private (within a virtual network)—You should pick this if you want applications and services hosted in the same virtual network to connect to the SQL Server instance.
Public (Internet)—You should pick this option if you want to connect to the SQL Server instance from another virtual network or from an application like Management Studio running in an on-premises environment.

Figure 5-9. SQL Server specific configuration settings
The combination of the SQL Connectivity setting and Network Security Groups provides a powerful tool to lock down access to your SQL Server instance and virtual machine. You can also specify the port that the SQL Server instance will listen on. As a security best practice, it is best to change the default port of 1433 to a different port number to remove a known attack vector. You can also enable SQL Authentication from the same view.
The next configuration option that we are going to discuss is the storage! Storage configuration makes connectivity configuration look like a piece of cake. With the wizard, you have the option of specifying the IOPs, throughput and the storage size required. You also have the option of choosing the type of workload from General, Transactional Processing, and Data Warehousing. Once the inputs are provided, the wizard performs a calculation to determine the best storage configuration. Without this wizard, you would be resigned to attach disks manually to the virtual machine. If you wanted a higher throughput for a single database file and were unable to stripe the data or log file to multiple disks, you would need to configure storage spaces on the Windows Server to help boost IO performance. With this wizard, the right number of disks are attached to the virtual machine during provisioning. If more than one disk is required for the specified settings, the provisioning workflow configures storage spaces (virtual drive) across all disks. Your storage configuration tasks just got really easy!
Before we discuss the additional options available, let us talk about the SQL Server IaaS Agent Extension. This agent is available if you have Azure VM Guest Agent and are deploying SQL Server 2012 or above on Windows Server 2012 or above. This extension allows you to configure automated patching and backup settings for the virtual machine being provisioned. The SQL Automated Patching allows you to configure a maintenance window with a configurable duration for applying updates to your virtual machine without affecting users during peak business hours. The default for this setting is local time 2AM on Sunday for 60 minutes, which can be changed as per your needs. The SQL automated backup configuration allows you to configure as the name suggests automated backups of all your databases hosted on the SQL Server instance to an Azure storage account using the Backup to URL feature. You also have the option of specifying the retention period along with encryption options.
Azure Key Vault provides ease of key management for features like transparent database encryption (TDE), column level encryption and backup encryption. The Azure Key Vault (AKV) service is designed to improve the security and management of encryption keys in a secure and highly available location. The SQL Server Connector enables SQL Server to use these keys from the Azure Key Vault. You can now directly configure the SQL Server instance to use Azure Key Vault while configuring the provisioning inputs for the virtual machine.
Now that you know about all the configuration options, give the deployment wizard a test drive and spawn your optimized SQL Server instance running on an Azure Virtual Machine. Chapter 6 contains more information on deploying hybrid deployments using on-premise instances and also configuring availability groups.
Automating the Automation
Familiarity breeds contempt.
—Aesop
This famous saying should not be taken lightly when you are starting off initially with the ARM cmdlets. Keep the documentation open for reference while writing automation scripts for Azure ARM deployments because muscle memory does take over if you have deployed using PowerShell under the Classic deployment model.
If you manage an enterprise that has a need to provision hundreds of virtual machines on Azure to host SQL Server instances and other applications, you would probably feel the need to automate the steps shown in the earlier section. The need to automate the automation is actually very common among enterprises. Azure allows you to utilize REST APIs, Azure CLI, and PowerShell to automate deployments for virtual machines.
PowerShell always comes to the rescue when there is the need for automation and why should Azure be any different? If you are familiar with the Azure PowerShell cmdlets for the Classic deployment model, most of the ARM PowerShell cmdlets will be easy to get accustomed to as well. The older Azure PowerShell 0.9.x version required you to switch between Azure Resource Manager (ARM) and Azure Service Management (ASM for managing Classic deployment model virtual machines). However, with Azure PowerShell 1.0, you no longer need to switch between ARM and ASM. We will be using Azure PowerShell 1.0 (launched in November 2015) for all the cmdlets that are used in the discussions in this chapter. There are quite a few cmdlets that have a "Rm" substring propped in the middle of the cmdlet that you were used to in the Azure PowerShell 0.9.x version. An example of this is Get-AzureRM, which has an equivalent in the ARM world called Get-AzureRmVM.
Before you begin the Azure PowerShell modules, you need to install them from an administrative PowerShell ISE or command window using the following commands :
# Install the Azure Resource Manager modules from the PowerShell GalleryInstall-Module AzureRMInstall-AzureRM# Import AzureRM modules for the given version manifest in the AzureRM moduleImport-AzureRM
Keep in mind that the use of an incorrect cmdlet comes to light while the cmdlet is executing. There is no pre-execution check for incorrect use of cmdlets. So if your last cmdlet fails and was part of a single atomic automation block, you will have to repeat the cmdlet execution again. Once too often professionals have been known to use a Classic deployment cmdlet in the ARM world and face the wrath of a PowerShell exception!
Since the previous section covered the portal based deployment as a journey, let us again go through the journey in a scripted manner. Since you will not have the handy mouse click available, you will have to script everything that the UI does under the hood, starting from logging into the correct subscription (see Listing 5-1).
Listing 5-1. PowerShell Code for Logging Into an Azure Subscription
## Parameters$vSubscriptionName = "<subscription name>" # Required if you have multiple subscriptions## Import AzureRMImport-AzureRM## Log into the Azure and select the correct subscriptionLogin-AzureRmAccountGet-AzureRmSubscription –SubscriptionName $vSubscriptionName | Select-AzureRmSubscription
Once you have logged into your Azure account and selected the corrected subscription (if you have access to more than one), you will need to either create the Resource Manager Group, storage account, and other dependent artifacts that you will need to build your virtual machine or use an existing artifact. This chapter assumes that you will create everything from scratch. The first task is to create a resource group and a storage account to host the virtual hard disks for the virtual machine, as shown in Listing 5-2.
Listing 5-2. PowerShell Commands to Create a Resource Group and a Storage Account Associated with the Same Resource Group
## Parameters$vResourceGroupName = "<Resource Group Name>"$vRegion = "<Region Name>"$vStorageAccountName = "<Storage Account Name>"## Create the new resource group## An Azure resource group is required before you can create any resourcesNew-AzureRmResourceGroup -Name $vResourceGroupName -Location $vRegion## Create the storage account and associate it with the Resource GroupNew-AzureRmStorageAccount -ResourceGroupName $vResourceGroupName -Location $vRegion -Name $vStorageAccountName -Type Standard_LRS## Set the current storage account context to the newly created storage accountSet-AzureRmCurrentStorageAccount -ResourceGroupName $vResourceGroupName -StorageAccountName $vStorageAccountName
Now that you have the housing for the virtual hard disks and a logical container for the resources being created, let’s proceed with image selection. This is a bit complicated as the images are updated quite frequently and you need to enumerate based on current list available. Since we used a SQL Server 2016 image earlier in the chapter, we shall endeavor to do the same in this journey. Another selection that you need to zero in on is the virtual image size. Listing 5-3 uses Get-AzureRmVMSizeto get a list of all the virtual machine sizes available in the region.
Listing 5-3. PowerShell Code to Select the Available Virtual Machine Size and the Latest SQL Server 2016 Image Available in the Gallery
$vRegion = "WestUS"## Get a list of the VMs offered and then make a selection based on the latest SQL Server 2016 image availableGet-AzureRmVMImageOffer -Location $vRegion -PublisherName "MicrosoftSQLServer" | Where-Object {$_.Offer -like "*SQL2016*"}$vImageSelection = Get-AzureRmVMImage -Offer "SQL2016CTP3.3-WS2012R2" -PublisherName "MicrosoftSQLServer" -Skus "Evaluation" -Location $vRegion## Get the available virtual machine size and select the appropriate oneGet-AzureRmVMSize -Location $vRegion | Where-Object {$_.MemoryInMB -ge 8192 -and $_.NumberOfCores -ge 4} | ft$vImageSize = "Standard_DS3"
If you are looking to deploy an availability set, you need to use the New-AzureRmAvailabilitySetcmdlet to create a new availability set and add the virtual machine being provisioned (see Listing 5-4). The next task is to create the virtual network. If you are using a standalone instance of SQL Server, you do need an availability set. However, if you are deploying an Availability Group, then an Availability Set is required for completing the configuration. If you deploy Availability Groups using templates available in the gallery, then you will notice that an Availability Set is configured as part of the deployment.
Listing 5-4. Sample Code for Creating an ARM Virtual Network
$vNetName = "TigerNet"## Create the subnet configuration for the vNet$vSubnet = New-AzureRmVirtualNetworkSubnetConfig -Name "TigerSubnet" -AddressPrefix "10.0.0.0/24"## Create the virtual network$vVNet = New-AzureRmVirtualNetwork -Location $vRegion -Name $vNetName -ResourceGroupName $vResourceGroupName -Subnet $vSubnet -AddressPrefix "10.0.0.0/24"$vNet = Get-AzureRmVirtualNetwork -Name $vNetName -ResourceGroupName $vResourceGroupName$vNetInterface = New-AzureRmNetworkInterface -Name "vNetInterface" -ResourceGroupName $vResourceGroupName -Location $vNet.Location -SubnetId $vNet.Subnets[0].Id
Now you have all the necessary ingredients to actually create the virtual machine. Listing 5-5 ties together the image size, machine configuration, and the image configuration completed in the earlier sections and asks Azure for a new virtual machine with the provided configuration settings.
Listing 5-5. PowerShell Command to Provision the Virtual Machine
$Credential = Get-Credential$VirtualMachine = New-AzureRmVMConfig -VMName $VMName -VMSize $vImageSize$VirtualMachine = Set-AzureRmVMOperatingSystem -VM $VirtualMachine -Windows -ComputerName $ComputerName -Credential $Credential -ProvisionVMAgent -EnableAutoUpdate$VirtualMachine = Set-AzureRmVMSourceImage -VM $VirtualMachine -PublisherName MicrosoftSQLServer -Offer "SQL2016CTP3.3-WS2012R2" -Skus Evaluation -Version "latest"$VirtualMachine = Add-AzureRmVMNetworkInterface -VM $VirtualMachine -Id $Interface.Id$OSDiskUri = $StorageAccount.PrimaryEndpoints.Blob.ToString() + "vhds/" + $OSDiskName + ".vhd"$VirtualMachine = Set-AzureRmVMOSDisk -VM $VirtualMachine -Name $OSDiskName -VhdUri $OSDiskUri -CreateOption FromImage## Create the VM in AzureNew-AzureRmVM -ResourceGroupName $ResourceGroupName -Location $Location -VM $VirtualMachine
If you love the Ctrl+C and Ctrl+V feature in Windows, you will love the Get-AzureRmVM PowerShell cmdlet! Get-AzureRmVM fetches the properties of a virtual machine associated with a resource group (see Listing 5-6). It provides a JSON-like output of the model view, which is the user-specified property of the virtual machine like the machine configuration. The output also contains the instance view, which is the instance level status of the virtual machine like the status of the disks attached to the virtual machine. The JSON output can be used to construct virtual machine configurations for future similar deployments. This is highly beneficial when you need to set up test environments that replicate the production environment. Now with Azure PowerShell cmdlets, you can get this done.
Listing 5-6. An Example Output of the Model and Instance View of a Virtual Machine
ResourceGroupName : <...>Id : /subscriptions/<...>/resourceGroups/ninja/providers/Microsoft.Compute/virtualMachines/<...>Name : <...>Type : Microsoft.Azure.Management.Compute.Models.VirtualMachineGetResponseLocation : westusTags : {}AvailabilitySetReference : nullDiagnosticsProfile : {"BootDiagnostics": {"Enabled": true,"StorageUri":"https://<...>.blob.core.windows.net/"}}Extensions : [{"AutoUpgradeMinorVersion":false,"ExtensionType":"IaaSDiagnostics","InstanceView":null,"ProtectedSettings":null,"ProvisioningState":"Succeeded","Publisher": "Microsoft.Azure.Diagnostics","Settings": "{ "xmlCfg": ".......", "storageAccount": "<...>" }","TypeHandlerVersion": "1.2","Id": "/subscriptions/<...>/resourceGroups/<...>/providers/Microsoft.Compute/virtualMachines/tigerninja/extensions/Microsoft.Insights.VMDiagnosticsSettings","Name": "Microsoft.Insights.VMDiagnosticsSettings","Type": "Microsoft.Compute/virtualMachines/extensions","Location": "westus","Tags": {}}]HardwareProfile : {"VirtualMachineSize": "Standard_DS3"}InstanceView : nullNetworkProfile : {"NetworkInterfaces": [{"Primary": null,"ReferenceUri": "/subscriptions/<...>/resourceGroups/ninja/providers/Microsoft.Network/networkInterfaces/<...>"}]}OSProfile : {"ComputerName": "<...>","AdminPassword": null,"AdminUsername": "<...>","CustomData": null,"LinuxConfiguration": null,"Secrets": [],"WindowsConfiguration": {"AdditionalUnattendContents": [],"EnableAutomaticUpdates": true,"ProvisionVMAgent": true,"TimeZone": null,"WinRMConfiguration": null}}Plan : nullProvisioningState : SucceededStorageProfile : {"DataDisks": [{"Lun": 0,"Caching": "ReadOnly","CreateOption": "Attach","DiskSizeGB": null,"Name": "datadisk1.vhd","SourceImage": null,"VirtualHardDisk": {"Uri": "https://<...>.blob.core.windows.net/vhds/datadisk1.vhd"}},{"Lun": 1,"Caching": "ReadOnly","CreateOption": "Attach","DiskSizeGB": null,"Name": "datadisk2.vhd","SourceImage": null,"VirtualHardDisk": {"Uri": "https://<...>.blob.core.windows.net/vhds/datadisk2.vhd"}},{"Lun": 2,"Caching": "None","CreateOption": "Attach","DiskSizeGB": null,"Name": "logdisk.vhd","SourceImage": null,"VirtualHardDisk": {"Uri": "https://<...>.blob.core.windows.net/vhds/logdisk.vhd"}},{"Lun": 3,"Caching": "ReadOnly","CreateOption": "Empty","DiskSizeGB": 128,"Name": "<...>-20151017-015414","SourceImage": null,"VirtualHardDisk": {"Uri": "https://<...>.blob.core.windows.net/vhds/<...>-20151017-015414.vhd"}}],"ImageReference": {"Offer": "WindowsServer","Publisher": "MicrosoftWindowsServer","Sku": "2012-R2-Datacenter","Version": "latest"},"OSDisk": {"OperatingSystemType": "Windows","Caching": "ReadWrite","CreateOption": "FromImage","DiskSizeGB": null,"Name": "tigerninja","SourceImage": null,"VirtualHardDisk": {"Uri": "https://<...>.blob.core.windows.net/vhds/<...>.vhd"}}}DataDiskNames : {datadisk1.vhd, datadisk2.vhd, logdisk.vhd, tigerninja-20151017-015414...}NetworkInterfaceIDs : {/subscriptions/<...>/resourceGroups/ninja/providers/Microsoft.Network/networkInterfaces/<...>}
Post Deployment
Once the virtual machine deployment is complete, you will notice that there is a pretty useful diagnostics view of the alerts and resource usage. This can be further customized to your liking by adding tiles and groups and resizing the tiles (see Figure 5-10) as per your whims and fancies or business requirements. One of the most useful aspects of these tiles is that they can be pinned to your dashboard. So if you have a critical metric that you want to monitor, you could have it pinned on your dashboard that’s visible to you as soon as you log into the Azure web portal.

Figure 5-10. Azure Virtual Machine diagnostics view
If you find that a particular performance metric is very important for your business, then you can add an alert for the performance monitor data based on a threshold. As you can see in Figure 5-10, there is a CPU usage alert defined for the guest OS when it’s greater than 80. When the alert is raised, you can automatically send an e-mail to administrators of the virtual machine. If you need the alert notification sent to a specific group without your company, then you can add other recipients as well.
If you think e-mail is old school, you can take this a step further by configuring web hooks for your alerts. Azure provides the capability to use HTTP or HTTPS endpoints to send JSON payloads using POST methods. If you already have tools that process incoming web requests to create paging and service requests, your job becomes even simpler! Your support staff can seamlessly work on service requests without having to worry about setting up additional diagnostics and alerts for these environments. If you were thinking about reducing the learning curve and maximizing the efficiency curve, this is definitely a functionality that deserves a thumbs up for hitting the nail on the head!
If you feel the need to add metrics that need to be monitored, this can be done using the Diagnostics option available under the Monitoring group in the All Settings blade view. Azure does not add any alerts by default, so you would need to add the alerts pertinent to your business under the Alerts option available under the same Monitoring group.
With the advent of Azure Automation, you can convert a number of the PowerShell scripts into automation runbooks, which can be reused by multiple users having access to the Azure Automation account. You can use Azure Automation runbooks to run post install custom configuration like setting up user databases or even additional configuration for your Analysis Services, Reporting Services, and Integration Services.
Azure Resource Explorer
If you want to get the JSON representation of any of the ARM resources that you have deployed or even others have deployed in your subscription (provided you have permissions), then head over to Azure Resource Explorer (resources.azure.com). This is another Ctrl+C and Ctrl+V experience of sorts, albeit a bit new if you are not too familiar with the jargon of GET and PUT! You can use the Web UI to browse the resources in your subscription.
Before we digress too much, the Azure Resource Explorer provides a way to inspect your existing deployments and create templates out of them. There are a bunch of templates available on GitHub under Azure-QuickStart-Templates. If you are feeling adventurous, then you can create an Azure Resource Manager template from scratch using Visual Studio 2015. However, be forewarned that even the most seasoned professionals have been known to tear their virtual hair out for overlooking obvious omissions during debugging errors while creating templates from scratch. One of the most innocuous examples of such frustration was the inability to figure out the non-usage of a strong password during a virtual machine deployment.
The right pane shown in Figure 5-11 provides the GET and PUT options for your resource. You also get the documentation for your resource methods and the PowerShell equivalent commands for creating your resource when you click on the Documentation and PowerShell tabs respectively. An Azure template has the following components:
Schema provides the location of the JSON schema file, which describes the version of the template language. In today’s fast-changing world, this is very important.
Content Version specifies the version of the template to be used.
Parameters are values that can be customized for each deployment.
Variables are used as JSON fragments in the template to simplify the template language expressions.
Resources are the types of services that are deployed or updated, like virtual machines, storage accounts, etc.

Figure 5-11. Azure Resource Manager portal
The following PowerShell code from Azure Resource Explorer UI is used to get a virtual machine’s instance and model view:
$vRM = Get-AzureRmResource -ResourceGroupName <resource group name> -ResourceType Microsoft.Compute/virtualMachines -ResourceName <resource name> -ApiVersion 2015-06-15## Additional command to get the list of data disks attached to the virtual machine$vRM.Properties.StorageProfile.DataDisks
If you click on the Actions (POST, DELETE) tab as showing Figure 5-11, you will be able to perform a number of actions against your resource like shutting down, restarting, and starting your virtual machine and even deleting the resource. The UI also provides the equivalent action methods like POST and DELETE. Actions are possible only if you are in Read/Write mode. Once you have a template file available, you can use the New-AzureRmResourceGroupDeployment cmdlet to perform a deployment using the JSON template. This cmdlet provides an option to specify a list of parameters using the -TemplateParameterFile switch.
Azure CLI
If you are an automation fan, then the Azure Command Line Interface (CLI) is probably the next download that you will be performing! Microsoft Azure Xplat-CLI for Windows, Mac and Linux is a project that provides a cross-platform command line interface for developers and IT administrators to develop, deploy, and manage Microsoft Azure applications. The CLI version referenced in this chapter is 0.9.15 (node: 4.2.4). You will need to have node.js installed on your machine to operate Azure CLI .
Before you can start using the CLI commands, you will need to configure your settings and log into your subscription. Listings 5-7 and 5-8 log into Azure, which requires you to provide your authentication details and a code on the Azure web site. Then you can download your management settings file, which is imported into your account. Then the accounts (if more than one) are listed and the desired subscription is set as the default. Finally, the operation mode is set to ARM to view the ARM resources associated with the subscription. The version of CLI being referenced operates under the Classic deployment model by default.
Listing 5-7. Commands to Log Into Azure and Use the Desired Subscription for ARM Operations
azure loginTo sign in, use a web browser to open the page http://aka.ms/devicelogin. Enter the code XXXXXXXXX to authenticate.azure account downloadazure account import <path to your .publishsettings file>azure account listazure account set <Account Name>azure config mode arm
Listing 5-8. Azure CLI Commands to List the Virtual Machines and Properties of a Single Virtual Machine in JSON Format
azure vm listazure vm show <resource group name> <virtual machine>

Figure 5-12. Azure CLI output snippet for the azure vm show command
Summary
In this chapter, you learned how SQL Server instances can be deployed on Azure Virtual Machines using the wizard and through automation. We also discussed a number of considerations that will impact performance and the cost of your virtual machines.