Business continuity is all about ensuring that critical applications are resilient to planned or unplanned outages that might result in permanent or temporary loss of business functionality. The goal is to design and deploy the critical business so that these outages will have minimal or no impact on the business, or there is scope for recovery within a business-approved timeframe. There are several key discussion points that you need to consider when you’re planning or designing for business continuity.
Recovery time objective (RTO). The maximum possible allowed downtime for the application, post which the business might incur monetary losses. Applications need to be designed such that they recover within the specified RTO.
Recovery point objective (RPO). The maximum amount of data loss allowed before the applications need to be fully available.
Estimated Recovery Time (ERT). The estimated duration for the database to be fully available after a restore or failover request.
When designing applications for business continuity, architects need to consider multiple types of planned or unplanned outages that can cause the application to fail. Some of the most common scenarios are:
Human errors. Recovering from scenarios where an admin or a user with elevated privileges has deleted or modified critical business data by mistake. This is a very common scenario that folks working with SQL Server or related technologies are all too familiar with.
Site outages. Recovering from scenarios where the entire data center is unavailable. Examples include natural catastrophes and electrical malfunctions that render the entire DC unavailable.
Maintenance and upgrades. Ensuring business continuity during application maintenance and upgrades.
In this chapter, we will talk about the various business continuity and disaster recovery options available with Azure SQL Database and how these features can be utilized to provide a highly available database environment for your business-critical workloads.
While business continuity and disaster recovery are of paramount importance, another key criterion for any critical workload is to ensure the security and safety of the data stored on the database. We should be careful during the design and architecting phase to ensure that the final solution is secure against all potential external or internal attacks. In this chapter, we will cover the different security features and options available with the Azure SQL Database to ensure the safety of your data.
Azure SQL Database: Business Continuity and Disaster Recovery
Azure SQL Database provides out-of-the box high availability and fault tolerance, which goes a long way in ensuring business continuity and disaster recovery. Additionally, there are other configurable options that can be utilized to achieve high availability/disaster recovery across multiple regions.
Local Redundancy
Azure SQL Database by default provides two secondary copies of the database in the same data center. These secondaries are in sync with the primary copy of the database. All the read/write operations are performed on the primary copy. Additionally, the writes are replicated to the secondary copies. Figure 9-1 shows this process.

Figure 9-1. Representational view of Azure SQL DB local redundancy
Azure presents a transparent logical copy of the database to the end users, keeping other details hidden. If one of the copies goes down, Azure ensures that another copy of the database is created to maintain three copies of the database. Azure uses the Partition Manager and Global Partition Map to ensure that three copies of the database are maintained at any given point in time.
When a database is created, Azure creates the two secondary copies on different data nodes. As illustrated in Figure 9-2, if the node containing the primary copy of the database is down, Azure Partition Manager initiates a failover algorithm wherein one of the secondary copies is promoted to the primary role. Once the primary database copy is established, another secondary is created and synched with the primary.

Figure 9-2. Detailed representation of how local redundancy is achieved
If the node containing a secondary copy was down, the Partition Manager creates a new secondary copy on one of the nodes in order to ensure that there are three copies. In the following example, when the node 103 goes down, all the copies of the database on that node are moved to other nodes. This process is illustrated in Figures 9-2 and 9-3.

Figure 9-3. Reconfiguring local redundancy on a node failure
Point-in-Time Restore
Azure SQL Database service provides automatic backup capabilities for all databases. The retention of these backups is dependent on the service tier the database is running in. For example, for a database running in the basic service tier, the backups are retained for seven days, while for standard and premium service tiers, the retention is 14 days and 35 days, respectively. The database can be restored to any point in time within the retention period from the backups. These backups are stored on a geo-redundant storage account with read access to the geo-copy.
Azure SQL Database service takes full backups every week, differential backups every day, and log backup every five minutes. The first full backup is taken immediately after the database is created. Once the first full backup is completed, the other backups are scheduled automatically. Point-in-time restore can be completed using the Azure Portal or using PowerShell, as illustrated in Figure 9-4.

Figure 9-4. Initiating a point-in-time restore
Consider these few key points with regard to the restore operation :
Restore creates a new database on the same logical SQL Server and with the service tier, which was the being used during the restore point. Since the database is on the same logical server, it's important to ensure that there are enough DTUs on the server for the new database.
The time for restore is dependent on multiple factors like the size of the database, recovery point (how far back in time), the number of backups to be restored, etc.
Once the database is restored, it would be charged fully in accordance to the service tier and performance level being used.
If a database was deleted, the final backup of the database is retained in accordance with the retention policy. A deleted database can be restored to the point at which it was deleted. The deleted databases can be viewed in the Azure Portal under the logical server where the database resided. Figure 9-5illustrates how a deleted database can be restored using the Azure Management Portal.

Figure 9-5. Restoring a deleted database
As illustrated in Figure 9-6, the deleted date and the restore point are the same, meaning that the database would be restored to the point when it was deleted.

Figure 9-6. Initiating a deleted database restore
Azure PowerShell can be used to restore a database at a point in time. Listing 9-1 provides the sample code .
Listing 9-1. Point-in-Time Restore and Restoration of a Deleted Azure SQL Database
Login-AzureRmAccount#$resourceGroup = "ResourceGroupName"#$DbServer = "DBServerName"$resourceGroupName = "Default-SQL-SoutheastAsia"# Get the Logical Server Details$DbServerName = (Get-AzureRmSqlServer -ResourceGroupName $resourceGroupName).ServerName#1. Get for all the Databases on the account.$DBName = Get-AzureRmSqlDatabase -ServerName $DbServerName -ResourceGroupName $resourceGroupName | Where-Object {$_.DatabaseName -ne "Master"}## PointInTime Parameter takes values in GMT and not local server time.$RestoreRequest = Restore-AzureRmSqlDatabase -FromPointInTimeBackup -PointInTime “2016-05-17 04:00:00” -ResourceId $DBName[0].ResourceId -ServerName $DbServerName -TargetDatabaseName ($DBName[0].DatabaseName+"_Restored") -ResourceGroupName $resourceGroupNameif($RestoreRequest -ne $null){Write-Host "Database Restored Successfully!!"}## Restore a Deleted Database## in this example we will retrieve all the deleted databases and then restore the first database in the list.$deletedDBs = Get-AzureRMSqlDeletedDatabaseBackup -ResourceGroupName $resourceGroupName -ServerName $DbServerName$RestoredDB = Restore-AzureRmSqlDatabase -FromDeletedDatabaseBackup -DeletionDate $deletedDBs[0].DeletionDate -ResourceId $deletedDBs[0].ResourceId -ServerName $deletedDBs[0].ServerName -ResourceGroupName $deletedDBs[0].ResourceGroupName -ServiceObjectiveName $deletedDBs[0].ServiceLevelObjective -TargetDatabaseName $deletedDBs[0].DatabaseNameif($RestoredDB -ne $null){Write-Host "Database Restored Successfully!!"}
Geo-Restore
The Azure SQL Database Geo-Restore capability allows for the restoration of the database from the geo-redundant copy of the backups. As mentioned previously, Azure takes automated backups of the databases on a geo-redundant storage. Geo-Restore uses these geo-replicated copies of the backup for the restore purposes. Geo-Restore can help applications recover quickly from a disaster that impacts the entire primary site.
Note
There might be some delay between when the backups are taken and when they are replicated to the GRS. It is entirely possible that the last backup was not replicated before the primary site went down.
As with point-in-time restores, Geo-Restores can be done using the Azure Portal (see Figures 9-7 and 9-8) or using PowerShell (see Listing 9-2).

Figure 9-7. Initiating Geo-Restore

Figure 9-8. Configuring Geo-Restore options
Geo-Restore can be achieved by creating a new database with the source as the geo-redundant backups.
As with point-in-time restores, the time needed to restore the database depends on the size of the database being restored and the number of operations required to get the database online .
Listing 9-2. Geo-Restoring an Azure SQL Database
$GeoBackups = Get-AzureRMSqlDatabaseGeoBackup -ResourceGroupName $resourceGroupName -ServerName $DbServerName# Perform Geo-Restore$Restored_Geo_DB = Restore-AzureRmSqlDatabase -FromGeoBackup -ResourceGroupName $GeoBackups[0].ResourceGroupName -ResourceId $GeoBackups[0].ResourceId -TargetDatabaseName ($GeoBackups[0].DatabaseName + "_Geo_Restored") -ServerName $DbServerNameif($RestoredDB -ne $null){Write-Host "Database Restored Successfully!!"}
Geo-Replication
Geo-Replication provides the ability to create geographically disparate secondary replicas of the primary databases. Geo-Replication is available in two flavors—Standard Geo-Replication, available with the Standard and the Premium service tier, and the Active Geo-Replication, available only with Premium service tier.
Unlike on-premises high availability technologies (like SQL Server AlwaysOn), Geo-Replication is always asynchronous in nature. Transactions on the primary copy are shipped to the secondary copy and applied asynchronously. To safeguard against network issues between DCs or distance based latency, the changes on the primary copy are buffered and then shipped to the secondary copy.
Note
Geo-Replication is not available with basic tier databases.
Standard Geo-Replication
Standard Geo-Replication allows for the creation of (at most) one secondary replica (non-readable) to a Microsoft designated “DR Pair” region (see Figure 9-9). The list of Microsoft designated DR pair regions can be found at:

Figure 9-9. Representational view of the standard Geo-Replication
http://blogs.msdn.com/b/windowsazurestorage/archive/2013/12/11/introducing-read-access-geo-replicated-storage-ra-grs-for-windows-azure-storage.aspxThe secondary replica is non-readable while the primary is up and running. A manual failover is required to make the database available for user access. Standard Geo-Replication provides the classic DR scenario, wherein if the primary replica has some issue, the secondary can be immediately brought online.
Standard Geo-Replication can be set up using either the Management Portal, as illustrated in Figures 9-10 through 9-12, or by using PowerShell (see Listing 9-3).

Figure 9-10. Configuring standard Geo-Replication

Figure 9-11. Configuring standard Geo-Replication options

Figure 9-12. Configuring standard Geo-Replication options
Clicking on the Geo-Replication Role option opens up the window to set up Geo-Replication. This can also be configured by clicking on All Settings and then choosing Geo-Replication.
When on the Geo-Replication setup page, you get an option to specify the secondary server. As mentioned earlier with standard Geo-Replication, only a “DR Pair” region is allowed as the secondary region.
Just as with the Azure Portal, PowerShell can be used to set up standard Geo-Replication (see Listing 9-3).
Listing 9-3. Configuring Standard Geo-Replication Using PowerShell
$resourceGroupName = "Default-SQL-SoutheastAsia"$DbServerName = "primarysvr"$SecondaryServerName = "secondsvr"$DBName = Get-AzureRmSqlDatabase -ServerName $DbServerName -ResourceGroupName $resourceGroupName | Where-Object {($_.Edition -eq "Standard") -and ($_.DatabaseName -ne "master")}$replicationLink = New-AzureRmSqlDatabaseSecondary -DatabaseName $DBName[0].DatabaseName -ServerName $DbServerName -ResourceGroupName $resourceGroupName -PartnerResourceGroupName $resourceGroupName -PartnerServerName $SecondaryServerName -AllowConnections Noif($replicationLink -ne $null){Write-Host "Standard Geo Replication Setup successfully!!"}
Since the database in this case is configured with the standard tier, the only option allowed here is to have a non-readable secondary copy. This property can be verified using the Management Portal (see Figure 9-13).

Figure 9-13. Only a non-readable secondary copy is available in this case
Once replication is configured, the status of the database changes accordingly. For example, as shown in Figure 9-14, the primary database would show the Geo-Replication role status as Primary, while the secondary copy would show up as Secondary.


Figure 9-14. Database status has changed
Performing Database Failover
The Azure Portal provides a very easy one-click mechanism to failover the database when the primary database is down (see Figure 9-15). You simply need to browse to the Geo-Replication settings and then click on the secondary database and initiate failover. Azure also provides a mechanism to stop replication if required.

Figure 9-15. Performing database failover
PowerShell can also be used to failover a database to the secondary replica.
Set-AzureRMSqlDatabaseSecondary -DatabaseName $DBName[0].DatabaseName -PartnerResourceGroupName $resourceGroup -ResourceGroupName $resourceGroup -ServerName $SecondaryServer –Failover -AllowDataLossActive Geo-Replication
Active Geo-Replication uses the same technology as the standard Geo-Replication, but has the following differences (see Figure 9-16):
The secondaries are readable.
There can be up to four secondaries in any data center across the globe. Users can create the secondary in any data centre, irrespective of the DR Pair regions.
Active Geo-Replication is available only for the Premium tier databases.

Figure 9-16. Representation view of the Active Geo-Replication
As with Standard Geo-Replication, Active Geo-Replication can be set using the Azure Portal, as shown in Figures 9-17 and 9-18, or by using PowerShell, as shown in Listing 9-4.

Figure 9-17. Configuring Active Geo-Replication

Figure 9-18. Initialization of Active Geo-Replication
As mentioned, with Active Geo-Replication, up to four secondaries can be created (each in a different region). All the secondaries are readable and can be utilized for read-only workloads (such as running reports). If there is a problem with the primary server, a manual failover can be initiated to recover the secondary database and make it available for the application workload. Figure 9-18 represents a scenario with two Active Geo-Replication secondaries.
Database failover can be performed using Azure Portal or PowerShell. After the failover, the new primary database goes into the “Online” state, while the new secondary goes into the “Readable” state. As can be seen in Figure 9-19, the East US database is now the primary database, while the Southeast Asia database has become a readable secondary database.
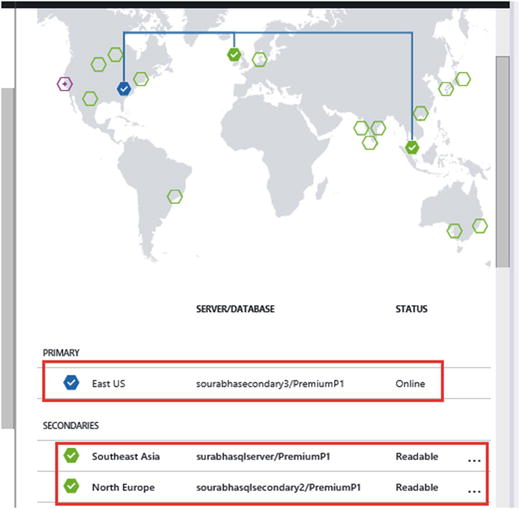
Figure 9-19. Active Geo-Replication in Action
Listing 9-4 shows a sample PowerShell script to enable Active Geo-Replication.
Listing 9-4. Enabling Active Geo-Replication
$resourceGroupName = "Default-SQL-SoutheastAsia"$DbServerName = "primarysvr"$SecondaryServerName = "secondsvr"$DBName = Get-AzureRmSqlDatabase -ServerName $DbServerName -ResourceGroupName $resourceGroupName | Where-Object {($_.Edition -eq "Premium") -and ($_.DatabaseName -ne "master")}$replicationLink = New-AzureRmSqlDatabaseSecondary -DatabaseName $DBName[0].DatabaseName -ServerName $DbServerName -ResourceGroupName $resourceGroupName -PartnerResourceGroupName $resourceGroupName -PartnerServerName $SecondaryServerName -AllowConnections Allif($replicationLink -ne $null){Write-Host "Geo Replication Setup successfully!!"}The “Allow Connections” Parameter t o the New-AzureRmSqlDatabaseSecondary cmdlet is of paramount importance. If the “All” option is not specified, Azure will end up creating a non-readable secondary copy of the database.
SQL Server Replication
SQL Server Transactional Replication (and Snapshot Replication) can be set up between an on-premises SQL Server or a SQL Server running on Azure VM to an Azure SQL database. The following key considerations must be made while setting up replication between SQL Server publisher and Azure SQL Database subscriber (see Figure 9-20).
The publisher and distributor can be an on-premises SQL Server instance or a SQL Server running on Azure VM. The minimum supported build for SQL Server is SQL Server 2012 SP2 CU8.
The subscriber (Azure SQL Database) should be in a push subscription, meaning the distribution agent will run on the distribution server.
All replication monitoring and management needs to be performed from the publisher server.

Figure 9-20. SQL replication to Azure SQL Database
Replication to Azure SQL Database can be set up using either SQL Server Management Studio, as illustrated in Figure 9-21, or using T-SQL scripts. When you’re selecting the subscription for an existing publication or a new publication, the Azure SQL Database server and the database can be specified.

Figure 9-21. Configuring replication to Azure SQL Database
Once replication has been set up, the Replication Monitor can be used to monitor and manage the subscriptions. Replication to Azure SQL Database can be used in an effective way to migrate an existing workload to Azure SQL Database.
Azure SQL Database: Security and Auditing
Azure SQL databases provide a plethora of out-of-box security features to ensure that users data residing on Azure are not compromised at any cost. The multi-layered security available with Azure SQL Database—which includes role-based authorization (just like SQL Server), features to encrypt the data at rest and in transit, data masking to restrict access and row-level security—is designed to provide full protection from any real or perceived threats.
Some of the key security features available with Azure SQL Database are covered next.
Firewall Administration
The first layer of security is provided by the Azure SQL Database firewall, which blocks all unauthorized connections to the Azure SQL Database (see Figure 9-22). Azure Portal (or PowerShell) can be used to configure the IP address (or address range) from which connections can be allowed to the Azure SQL databases (or the logical server). Connections from any other IP would be automatically refused.

Figure 9-22. Configuring firewall exceptions for Azure SQL databases
Authentication and Authorization
Azure SQL Database now allows both SQL authentication and Azure Active Directory authentication (provided there is an Azure AD configured to use). Like Microsoft SQL Server, Azure SQL Database also uses role-based access authorizations. SQL Database provides both server level roles and database level roles that can be managed using the Azure Portal, PowerShell, or using SQL Server Management Studio (only database roles). Server roles and/or database roles are effective tools that can help control which user has access to what data. In addition to providing role-based access, Azure SQL Database also provides some really cool features that have not yet made it to the box SQL Server (some of these features are slated to be included in SQL Server 2016 release).
Row-Level Security
Row-Level Security (RLS) provides a way to control access to individual rows in a table. This access control is implemented using security predicates (or security functions) created in the databases. Since the access control logic (the security predicates) is available in the database, it provides a very reliable and robust security mechanism. Moreover, since the logic is implemented within the database, the access will be controlled irrespective of which application or connection is requesting data.
Listing 9-5 shows a script for implementing RLS.
Listing 9-5. T-SQL Sample Script for Implementing RLS
CREATE USER GeneralManager WITHOUT LOGIN;CREATE USER Manager1 WITHOUT LOGIN;CREATE USER Manager2 WITHOUT LOGIN;CREATE TABLE EmployeePerformanceData(EmployeeID int,EmployeeName varchar(200),ManagerName sysname,EmployeeRating int,EmployeeIncrementPercent float);INSERT into EmployeePerformanceData values(10, 'Employee10', 'Manager2', 1,10.00),(11, 'Employee11', 'Manager2', 3, 6.53),(12, 'Employee12', 'Manager1', 2, 8.71),(13, 'Employee13', 'Manager2', 3, 6.25),(14, 'Employee14', 'Manager1', 3, 5.87),(15, 'Employee15', 'Manager2', 5, 0.00);SELECT * FROM EmployeePerformanceData;GRANT SELECT ON EmployeePerformanceData TO GeneralManager;GRANT SELECT ON EmployeePerformanceData TO Manager1;GRANT SELECT ON EmployeePerformanceData TO Manager2;-- If any of the users select data from the table at this point, they would see all 6 recordsEXECUTE AS USER = 'GeneralManager';SELECT * FROM EmployeePerformanceData;REVERT;EXECUTE AS USER = 'Manager1';SELECT * FROM EmployeePerformanceData;REVERT;EXECUTE AS USER = 'Manager2';SELECT * FROM EmployeePerformanceData;REVERT;--- Implement RLS using Security Predicates and Filters/*In this case we are creating a security predicate such that the managers can only their own Employee Data and the GM can see all the employee information.*/CREATE SCHEMA Security;GOCREATE FUNCTION Security.fn_securitypredicate(@ManagerName AS sysname)RETURNS TABLEWITH SCHEMABINDINGASRETURN SELECT 1 AS fn_securitypredicate_resultWHERE @ManagerName = USER_NAME() OR USER_NAME() = 'GeneralManager';-- Tie the Security Predicate with the User TableCREATE SECURITY POLICY SalesFilterADD FILTER PREDICATE Security.fn_securitypredicate(ManagerName)ON dbo.EmployeePerformanceDataWITH (STATE = ON);-- Now if we execute the Queries, each manager would only see their own employee information.EXECUTE AS USER = 'GeneralManager';SELECT * FROM EmployeePerformanceData;REVERT;EXECUTE AS USER = 'Manager1';SELECT * FROM EmployeePerformanceData;REVERT;EXECUTE AS USER = 'Manager2';SELECT * FROM EmployeePerformanceData;REVERT;-- Disable the security PolicyALTER SECURITY POLICY SalesFilterWITH (STATE = OFF);
Dynamic Data Masking
Data masking prevents exposure or unauthorized access to sensitive data by masking the database before it’s presented to the users. Data masking is configured by defining security policies within the table/object definition and using the mask/unmask permissions to control whether a user sees masked or unmasked data. Database owners and admins always see unmasked data.
A sample script to test data masking is included in Listing 9-6.
Listing 9-6. T-SQL Sample Script for Implementing Data Masking
CREATE TABLE Employee(EmployeeID int IDENTITY PRIMARY KEY,FirstName varchar(100) MASKED WITH (FUNCTION = 'partial(1,"XXXXXXX",0)') NULL,LastName varchar(100) NOT NULL,Phone# varchar(12) MASKED WITH (FUNCTION = 'default()') NULL,Email varchar(100) MASKED WITH (FUNCTION = 'email()') NULL,Salary float Masked with (Function='random(1,7)') Null);INSERT Employee (FirstName, LastName, Phone#, Email, Salary) VALUES('Roberto', 'Tamburello', '555.123.4567', '[email protected]',100000.00),('Janice', 'Galvin', '555.123.4568', '[email protected]',200000.00),('Zheng', 'Mu', '555.123.4569', '[email protected]',100000.00),('Bill', 'Anderson', '555.123.4570', '[email protected]',150000.00),('Graham', 'Scott', '555.123.4571', '[email protected]',120000.00);SELECT * FROM Employee;CREATE USER AppUser WITHOUT LOGIN;GRANT SELECT ON Employee TO AppUser;EXECUTE AS USER = 'AppUser';SELECT * FROM Employee;REVERT;
The user AppUser will see the following output (see Figure 9-23) with all sensitive information masked. The DBO, on the other hand, will see all the data as is.

Figure 9-23. Data masking
SQL Database Auditing
SQL Database Auditing provides the ability to track key events on the databases and store them on Azure Storage. These audit logs can then be utilized for regulatory compliance requirements or to provide a benchmark (or analysis) of the activities on the database. Auditing is available in all service tiers.
Additionally, auditing can be configured at a logical server level (which will ensure all DBs on the server are being audited) or at a database level (see Figure 9-24). Auditing can be configured using Azure Portal or PowerShell.

Figure 9-24. Configuring auditing for SQL Database
Note
After SQL Database Auditing is enabled, you might need to change your connection string to the SQL database from downstream clients, or your applications will fail to connect to the database. For example, replication to SQL database will fail after enabling auditing, since the distributor agent will fail to connect to the subscriber. In such cases, make sure to use the connection string <server name>.database.secure.windows.net.
Auditing data is available for consumption in a dashboard format in Azure Portal or can be exported to Excel and analyzed there.
SQL Database Threat Detection
SQL Database Threat Detection provides a mechanism to detect and respond to potential threats (anomalous activities) to the SQL database. Using a combination of threat detection and auditing, users can investigate and then take necessary actions on any such threat to the database. Threat detection can be easily set up using Azure Portal, as illustrated in Figure 9-25.

Figure 9-25. Configuring threat detection
Encryption
Azure SQL Database provides a plethora of encryption features to ensure that data residing on the database is not compromised. These features provide protection to data both at rest and in transit, discussed next.
Connection Encryption
Azure SQL Database allows users to use an encrypted SSL connection to the database. To ensure that the connection to SQL Database is encrypted, application developers need to use the "Encrypt = True" connection string parameter.
Transparent Data Encryption
Transparent Data Encryption (TDE ) is not a new feature and has been around since SQL Server 2008. It provides a way to encrypt the data at rest. Azure SQL databases use the same technology to provide a way to encrypt all data at rest. Transparent Data Encryption can be enabled by using either the Azure Portal (or PowerShell) or the following T-SQL code.
Alter Database [MyDatabase1] set Encryption OnThe PowerShell cmdlet Get-AzureRMSqlDatabaseTransparentDataEncryption can also be used to set TDE on the SQL database.
Cell-Level (or Column Data) Encryption
Column data encryption is not a new feature and users familiar with SQL Server know that this can be achieved by using a combination of symmetric keys and the EncryptByKey (or DecryptByKey) functions available with SQL. The key is to use the EncryptByKey function along with the key during data insert or update and the DecryptByKey function for SELECT operations.
The T-SQL script in Listing 9-7 creates a table to store encrypted data.
Listing 9-7. Sample T-SQL Script for Storing Encrypted Data
IF NOT EXISTS (SELECT * FROM sys.symmetric_keys WHERE symmetric_key_id = 101)CREATE MASTER KEY ENCRYPTION BYPASSWORD = 'ThisisaveryveryStr0ngPAss@w0rd1'GOCREATE CERTIFICATE EncryptCertWITH SUBJECT = 'Some Random Subject';GOCREATE SYMMETRIC KEY SymmetricKeyWITH ALGORITHM = AES_256ENCRYPTION BY CERTIFICATE EncryptCert;GO-- Create a column in which to store the encrypted data.Create table CustomerInfo(CustomerID int Identity Primary Key,CustomerName varchar(200),CustomerPhone varbinary(100),CustomerEmail varbinary(200),CustomerCreditCard varbinary(200))-- Open the symmetric key with which to encrypt the data.Begin TranOPEN SYMMETRIC KEY SymmetricKeyDECRYPTION BY CERTIFICATE EncryptCert;insert into CustomerInfo (CustomerName,CustomerPhone,CustomerEmail,CustomerCreditCard) values('Mike Anderson',EncryptByKey(Key_GUID('SymmetricKey'),'555-123-1234'),EncryptByKey(Key_GUID('SymmetricKey'),'[email protected]'),EncryptByKey(Key_GUID('SymmetricKey'),'1234567891011123'))Commit-- Decrypt the DataBegin TranOPEN SYMMETRIC KEY SymmetricKeyDECRYPTION BY CERTIFICATE EncryptCert;Select CustomerId,CustomerName,convert(varchar,DecryptbyKey(CustomerPhone)) as Phone,convert(varchar,DecryptbyKey(CustomerEmail)) as Email,convert(varchar,DecryptbyKey(CustomerCreditCard)) as CreditCardFrom CustomerInfoCommit
Always Encrypted
Always Encrypted is a new feature available with Azure SQL Database and SQL Server 2016, and it allows clients to manage encryption of sensitive data within the application, never having to expose the information to the database layer. Since the encryption logic is not exposed to the database layers, database admins and server admins do not have access or control over the actual sensitive information.
Always Encrypted supports both Deterministic Encryption and Random Encryption. Deterministic Encryptionwill always generate the same encrypted output for the same plan text, while Random Encryptiongenerates a different value every time. Deterministic Encryption, while useful in scenarios where the encrypted data needs to be searched or joined, can be more susceptible to attacks.
AlwaysOn uses two different keys—the Column Master key and the Column Encryption key, which is encrypted using the Column Master key. Listing 9-8 implements Always Encrypted on an Azure SQL database.
Listing 9-8. Sample T-SQL Script for Implementing Always Encrypted
USE [MyDatabase1]GOCREATE COLUMN MASTER KEY [CMKey]WITH(KEY_STORE_PROVIDER_NAME = N'AZURE_KEY_VAULT',KEY_PATH = N'https://<KeyVaultName>.vault.azure.net/keys/AlwaysEncryptedkey')GOCREATE COLUMN ENCRYPTION KEY [CEKey]WITH VALUES(COLUMN_MASTER_KEY = [CMKey],ALGORITHM = 'RSA_OAEP',ENCRYPTED_VALUE = 0x016E000001630075007200720065006E00740075007300650072002F006D0079002F0034006600330065003700660064003700360031003100330036003400340061003600310063003100330064006600390037003000620032003300620037006100320062006300660039006600380066000DEF701B5FAB3F23266DADCAAE7B448122BA75BF1841DEF7143A45C16D37AA4AC57799D50596BA92C0406CC30A3D755D6F5D260DCCA42BB9926136985A7CCF4537B85330DA7C1B12047048A51B04A352F6C3E71BEFEAE777019506D11AC71AF8A7AEC4DE7F5B98ACF6EF7D56B0706E0D521533514335E500E476C6B1777212CE043BDD09B20BB97B5C731CB4D58BF8DDA38A7DF08EECE797DCC15A9E25B064003DE869F6D87B75A3F6625A016292C3B8D8F8D3876DE62DDEE57F7BC2C901E3A2097B8E050862BEA0E33EF434D2DED6D5F2E54745D6E5C616932C5F2144B623C48B7643EDECE4CA545C31AB23DD2DFDF8067D25C05EF1786CCBC110E005D1567B53D6E34ACCC02052F6E9AE7365DE30856EF9DB5EC4315770D255FA76A9865204E8FBE5419AB5836480DE8345141073EB113E012CBF7132DCC22A3A32B6E44B961DDE2B0E7F24733062412CEF9C1A0DC96976A97D48EE5DCE4F5AE1213E680A31ADDFD9344A004ED59C6168CB7D5C8E42A22676A7D64F59A4C1687C61B5F60349699A45D11B8EE7DC8DBB61A156AE70449483D93073497B23597A5F340A98FB7BD37D9DC926360E32F927BB672F6BE1FFC5C01760827AF24B603E184479905BA5DFA9C23E523182F7C5C8ABC53E5D6E6CB3806C5707EDBB7CAC3DE50DA4A2FC38D27EE65F2638FFF37483ABC1050EEAD835919B384BB9136C0F24A6BD9489910)GOCREATE TABLE dbo.EncryptedTable(ID INT IDENTITY(1,1) PRIMARY KEY,LastName NVARCHAR(32) COLLATE Latin1_General_BIN2ENCRYPTED WITH(ENCRYPTION_TYPE = DETERMINISTIC,ALGORITHM = 'AEAD_AES_256_CBC_HMAC_SHA_256',COLUMN_ENCRYPTION_KEY = [CEKey]) NOT NULL,Salary INTENCRYPTED WITH(ENCRYPTION_TYPE = RANDOMIZED,ALGORITHM = 'AEAD_AES_256_CBC_HMAC_SHA_256',COLUMN_ENCRYPTION_KEY = [CEKey]) NOT NULL);GO
Always Encrypted ensures that data is never in plain text, be it at rest in the database storage, or in transit from the client to database or from the database to the client.
Apart from having a plethora of features to ensure safety of data, Azure SQL Database is also complaint with various industry standards.
Summary
In this chapter, you learned about the various business continuity options available with Azure SQL Database. Geo-Replication and its associated database failover capabilities provide very robust, out-of-box disaster recovery and high availability options, and can also be used to offload some of the read workloads to the secondary database to optimize the overall database performance.
You also learned about the numerous security features available with Azure SQL Database that can be configured or utilized to ensure that your data is never compromised. With Always Encrypted, Azure SQL Database ensures that in-transit data will never be compromised, while RLS and data masking ensure that users will only see the data they are authorized to see.