![]()
Using Apache Hive
Apache Hive is data warehouse framework for storing, managing and querying large data sets. The Hive query language HiveQL is a SQL-like language. Hive stores data in HDFS by default, and a Hive table may be used to define structure on the data. Hive supports two kinds of tables: managed tables and external tables. A managed table is managed by the Hive framework while an external table is not. When a managed table is deleted, the metadata and the table data are deleted. When a Hive external table is deleted, only the metadata is deleted, and the table data is not since the table data is not managed by the Hive framework. Hive makes use of a metastore to store metadata about Hive tables. A Hive metastore database is used for the metastore and is the Derby database by default. The metastore database may be run in embedded mode or remote mode; the default being embedded mode. In this chapter we shall use a Docker image to run Apache Hive in a Docker container.
- Setting the Environment
- Starting Apache Hive
- Connecting to Beeline CLI Shell
- Connecting to HiveServer2
- Creating a Hive Table
- Loading Data into Hive Table
- Querying Hive Table
- Stopping Apache Hive
Setting the Environment
The following software is required for this chapter.
- -Docker (version 1.8 used)
- -Docker image for Apache Hive
We have used an Amazon EC2 instance to install the software. Install Docker as discussed in Chapter 1. SSH connect to the Amazon EC2 instance.
ssh -i "docker.pem" [email protected]
Start the Docker service and verify status of the Docker service.
sudo service docker start
sudo service docker status
Download the svds/cdh Docker image, which is the same as used in some the other Apache Hadoop Ecosystem chapters on Apache HBase, Apache Sqoop and Apache Spark.
sudo docker pull svds/cdh
Starting Apache Hive
To start Apache Hive, start a Docker container running the cdh processes or components. Run the following docker run command, which starts a Docker container in detached mode and assigns the name “cdh” to the container.
sudo docker run -d --name cdh svds/cdh
List the running Docker containers; the “cdh” container should be listed.
sudo docker ps
Start an interactive terminal to run Apache Hive shell commands.
sudo docker exec -it cdh bash
Connecting to Beeline CLI Shell
Apache Hive provides the Hive CLI to access HiveServer1 from a command line interface. In latter versions of Hive, HiveServer1 has been deprecated and replaced with HiveServer2, and Hive CLI has been deprecated and replaced with Beeline CLI. While Hive CLI is an Apache Thrift based client, Beeline is a JDBC client based on the SQLLine CLI. With Beeline, the Thrift API is still used but not directly from the client; the Thrift API is used by the JDBC driver to communicate with HiveServer2.
Before using the Hive CLI or the Beeline CLI, we need to modify the permissions for the directory in HDFS in which Hive stores its data, the /user/hive/warehouse directory. Set global permissions (777) on the /user/hive/warehouse directory.
hdfs dfs –chmod –R 777 /user/hive/warehouse
The preceding command is run in the interactive terminal as shown in Figure 9-1.
![]()
Figure 9-1. Setting Permissions on the Hive Warehouse Directory
If the Hive CLI is to be used, run the following command in the interactive terminal.
hive
The Hive CLI is started. A WARNING message is also output indicating that Hive CLI is deprecated and migration to Beeline is recommended as shown in Figure 9-2.

Figure 9-2. Message about Migration to Beeline
We shall use the Beeline CLI in this chapter. Exit from the Hive CLI with the exit or quit command. Start the Beeline CLI with the following command.
beeline
Beeline version 1.1.0 CDH 5.4.3 gets started as shown in Figure 9-3.

Figure 9-3. Starting Beeline
Connecting to HiveServer2
We started the Beeline CLI in the previous section, but we are not connected to the HiveServer2 yet. To demonstrate run the following commands.
use default;
show tables;
A “No current connection” message gets output as shown in Figure 9-4.

Figure 9-4. Message “No Current Connection”
To connect to the HiveServer2, we need to run the !connect command. The !connect commanded usage may be output with the following command.
!connect
The !connect command usage gets output as shown in Figure 9-5.

Figure 9-5. Command Usage for !connect
HiveServer2 may be connected to in one of two modes: embedded or remote. The embedded mode may be used if the Beeline CLI is run on the same machine on which Hive is installed. The remote mode has to be used if the Beeline CLI is on a remote machine from the Hive. We shall use the embedded mode. The syntax for the connection url is the following in which the dbName is the Hive database and <host> and <port> are the hostname and port number for the HiveServer2.
jdbc:hive2://<host>:<port>/dbName
Run the following Beeline command !connect in which the connection url to HiveServer2 is specified first, followed by the username, password and the Hive JDBC driver. For the default username, password, and Hive JDBC driver specify and empty string “”. The default Hive JDBS driver is org.apache.hive.jdbc.HiveDriver.
!connect jdbc:hive2://localhost:10000/default “” “” “”
A connection to Apache Hive 1.1.0 gets established as shown in Figure 9-6. Apache Hive 1.1.0 version is the renamed Hive 0.15.0 version.

Figure 9-6. Connecting with Hive2 Server
The Beeline commands that did not run previously get run after connecting to the HiveServer2. Run the following commands again to set the database as “default” and list the Hive tables.
use default
show tables
The database gets set to default and the Hive tables get listed. The database is already the “default” database as specified in the connection url and the use default command is run to demonstrate that the command gets run. No tables get listed as none have been created yet as shown in Figure 9-7. We shall create a table in the next section.

Figure 9-7. Listing Tables
Creating a Hive Table
In this section we shall create a Hive table called “wlslog” with columns time_stamp, category, type,servername, code and msg, all of type string. Hive makes use of serializers/deserializers also called a Serde. A custom Serde may be used or the native Serde may be used. If a ROW FORMAT is not specified, the native Serde is used. If the ROW FORMAT DELIMITED is specified for delimited data files, the native Serde is used too. To separate fields with a ‘,’ specify FIELDS TERMINATED BY ‘,’ and to terminate a line of data with a newline, specify LINES TERMINATED BY ’ ’.
Run the following CREATE TABLE command to create a Hive managed table; the command for a Hive external table is CREATE EXTERNAL TABLE.
CREATE TABLE wlslog(time_stamp STRING,category STRING,type STRING,servername STRING,code STRING,msg STRING) ROW FORMAT DELIMITED FIELDS TERMINATED BY ’,’ LINES TERMINATED BY ’
’;
A Hive table called wlslog gets created as shown in Figure 9-8. We have not used a PRIMARY KEY field in the wlslog table.

Figure 9-8. Creating Hive Table
Run the following command to describe the wlslog table.
desc wlslog;
The table structure consisting of the column names and data types gets listed as shown in Figure 9-9.
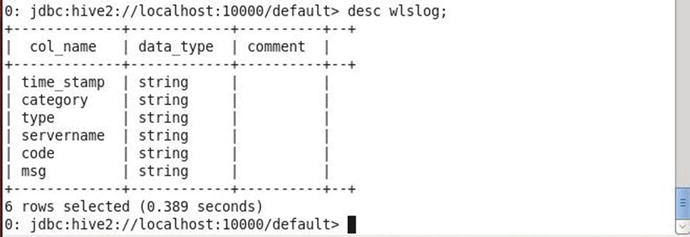
Figure 9-9. Describing Table Structure
Loading Data into the Hive Table
Next, we shall load data into the Hive table. Run the following INSERT HiveQL statement to add a row of data to the wlslog table.
INSERT INTO TABLE wlslog VALUES (’Apr-8-2014-7:06:16-PM-PDT’,’Notice’,’WebLogicServer’,’AdminServer’,’BEA-000365’,’Server state changed to STANDBY’);
A MapReduce job gets started to load data into the Hive table as shown in Figure 9-10.

Figure 9-10. Running the INSERT Command
The MapReduce job consists of 1 mapper and 0 reducers. Data gets loaded into the default.wlslog table as shown in Figure 9-11.

Figure 9-11. Loading Data into Hive Table
The data in a Hive table is not constrained to have unique column values if a PRIMARY KEY is not specified, which we did not. A row with the same data may be added without a PRIMARY KEY in the table definition. Run the following INSERT statements to add 7 more rows of data including a row of data with duplicate column data.
INSERT INTO TABLE wlslog VALUES (’Apr-8-2014-7:06:16-PM-PDT’,’Notice’,’WebLogicServer’,’AdminServer,BEA-000365’,’Server state changed to STANDBY’);

INSERT INTO TABLE wlslog VALUES (’Apr-8-2014-7:06:17-PM-PDT’,’Notice’,’WebLogicServer’,’AdminServer’,’BEA-000365’,’Server state changed to STARTING’);
INSERT INTO TABLE wlslog VALUES (’Apr-8-2014-7:06:18-PM-PDT’,’Notice’,’WebLogicServer’,’AdminServer’,’BEA-000365’,’Server state changed to ADMIN’);
INSERT INTO TABLE wlslog VALUES (’Apr-8-2014-7:06:19-PM-PDT’,’Notice’,’WebLogicServer’,’AdminServer’,’BEA-000365’,’Server state changed to RESUMING’);
INSERT INTO TABLE wlslog VALUES (’Apr-8-2014-7:06:20-PM-PDT’,’Notice’,’WebLogicServer’,’AdminServer’,’BEA-000331’,’Started WebLogic AdminServer’);
INSERT INTO TABLE wlslog VALUES (’Apr-8-2014-7:06:21-PM-PDT’,’Notice’,’WebLogicServer’,’AdminServer’,’BEA-000365’,’Server state changed to RUNNING’);
INSERT INTO TABLE wlslog VALUES (’Apr-8-2014-7:06:22-PM-PDT’,’Notice’,’WebLogicServer’,’AdminServer’,’BEA-000360’,’Server started in RUNNING mode’);
Querying Hive Table
Having created a Hive table and loaded data into the table, we shall query the table using a SELECT HiveQL statement. Run the following query in the Beeline CLI.
select * from wlslog;
The 8 rows of data get listed as shown in Figure 9-12.

Figure 9-12. Running a SELECT HiveQL Statement
Stopping Apache Hive
To stop the Apache Hive processes, run the docker stop command to stop the Docker container running the cdh frameworks.
sudo docker stop cdh
Summary
In this chapter we used a Docker image to run CDH frameworks including the Apache Hive framework in a Docker container. We started a Beeline CLI, which has replaced the Hive CLI and connected to the HiveServer2 from the Beeline CLI. We created a Hive managed table and loaded data into the Hive table. Subsequently, we queried the Hive table from the Beeline CLI. In the next chapter we shall use the Apache HBase Database in a Docker container.