![]()
Using Couchbase Server
Couchbase Server is a distributed NoSQL database. Couchbase is a JSON (JavaScript Object Notation) based document store. Couchbase, like other NoSQL datastores, does not have a fixed schema for data storage. Couchbase differs from MongoDB in that MongoDB is based on the BSON (binary JSON) document data model. Couchbase provides a Web Console for accessing the Couchbase server from a graphical user interface (GUI). Couchbase also provides a command-line interface (CLI) including several tools to run in the CLI. In this chapter we shall run Couchbase server in a Docker container.
- Setting the Environment
- Starting Couchbase
- Accessing Couchbase Web Console
- Configuring Couchbase Server
- Adding Documents
- Starting Interactive Terminal
- Running Couchbase CLI Tools
- Stopping Couchbase Server
Setting the Environment
The following software is required for this chapter.
- -Docker (version 1.8)
- -Docker image for Couchbase (version latest)
We have used the Ubuntu Server AMI shown in Figure 7-1 for running software in this chapter. Installing and configuring an Amazon EC2 instance is discussed in Appendix A.

Figure 7-1. Ubuntu Server AMI
SSH Login to the Ubuntu Amazon EC2 instance using user as “ubuntu” and the public IP address of the Amazon EC2 instance. The public IP address would be different for different users (multiple public IP addresses are also used in this chapter based on multiple runs of the sample discussed).
ssh -i "docker.pem" [email protected]
We need to modify the IP address setting for localhost in the hosts IP addresses file /etc/hosts. Set the IP address to the public IP address of the Amazon EC2 instance. Obtaining the public IP address of an Amazon EC2 instance is discussed in Appendix A. Open the /etc/hosts file in a vi editor.
sudo vi /etc/hosts
Replace “127.0.0.1” with the public IP address; replace the following line:
127.0.0.1 localhost
with:
54.152.90.139 localhost
Install Docker on Ubuntu as discussed in Chapter 1. Run the hello-world Docker image to test the Docker installation.
sudo docker run hello-world
The output from the hello-world application is shown in Figure 7-2.

Figure 7-2. Output from hello-world
Download the official Couchbase Docker image called “couchbase”.
sudo docker pull couchbase
The latest Docker image gets downloaded as shown in Figure 7-3.

Figure 7-3. Downloading Docker Image couchbase
Starting Couchbase
Next, run a Docker container for Docker image “couchbase”, which would start a Couchbase server process in the Docker container. Run the following docker command in which the port for the Couchbase Web Console to connect to Couchbase Server is specified as 8091. The container name is specified as “couchbasedb”.
sudo docker run --name couchbasedb -d -p 8091:8091 couchbase
Couchbase server could require non-default ulimit settings.
Ulimit Setting | Value | Description |
|---|---|---|
ulimit -n | 40960 | nofile: max number of open files |
ulimit -c | 100000000 | core: max core file size. The 100000000 setting is equivalent to “unlimited”, which is not directly supported. |
ulimit -l | 100000000 | memlock: maximum locked-in-memory address space. The 100000000 setting is equivalent to “unlimited”, which is not directly supported. |
A Docker container stores all persistent data in the /opt/couchbase/var directory, which could be mounted from the host using the –v command parameter. The –ulimit command parameter is used to set the docker run command. Run the following command to run a Docker container to run a Couchbase server as shown in Figure 7-4.
sudo docker run --name couchbasedb -v ~/couchbase/data:/opt/couchbase/var -d --ulimit nofile=40960:40960 --ulimit core=100000000:100000000 --ulimit memlock=100000000:100000000 -p 8091:8091 couchbase
Subsequently, list the running Docker containers.
sudo docker ps
The couchbasedb container gets listed as shown in Figure 7-4.

Figure 7-4. Running Docker Container for Couchbase
Output the logs for the container with the docker logs command.
sudo docker logs couchbasedb
The message shown in Figure 7-5 gets displayed.
![]()
Figure 7-5. Listing Docker Container Log
Accessing Couchbase Web Console
Next, we shall access the Couchbase Web Console from the URL indicated in the logs: http://<ip>:8091. The <ip> address to use would vary from which host system the Web Console is accessed. If on the same host as on which the Docker container is running, use the public IP address of the host Amazon EC2 instance. If on a remote host system as we have accessed, use the public DNS for the Amazon EC2 instance. Obtaining the public IP address and the public DNS are discussed in Appendix A. If the public DNS is ec2-54-152-90-139.compute-1.amazonaws.com, the URL to access the Couchbase WebConsole becomes the following.
http://ec2-54-152-90-139.compute-1.amazonaws.com:8091
Open a browser at the preceding URL. The Couchbase Console gets displayed as shown in Figure 7-6. In the next section we shall setup a Couchbase server cluster.

Figure 7-6. Accessing Couchbase Admin Console
If a Couchbase cluster has already been configured, the Couchbase Console URL would display the login page as shown in Figure 7-7.

Figure 7-7. Login Page
Specify the Username (Administrator) and the Password and click on Sign In as shown in Figure 7-8.

Figure 7-8. Specifying Username and Password
Configuring Couchbase Server Cluster
In this section we shall configure the Couchbase Server cluster. Access the Couchbase Web Console as discussed in previous section and shown in Figure 7-6, with URL http://ec2-54-152-90-139.compute-1.amazonaws.com:8091. Click on Setup in the Web Console; the “Setup” page is displayed only the first time the Web Console is accessed. Subsequently, after a cluster has been configured the Login page is displayed as discussed in the previous section.
Use the default settings for the Configure Disk Storage section. In Configure Server Hostname specify the Hostname as the Public IP Address of the Amazon EC2 instance, which would be different for different users, as shown in Figure 7-9. Short names are not acceptable for the Hostname field and at least one dot is required in the host name.
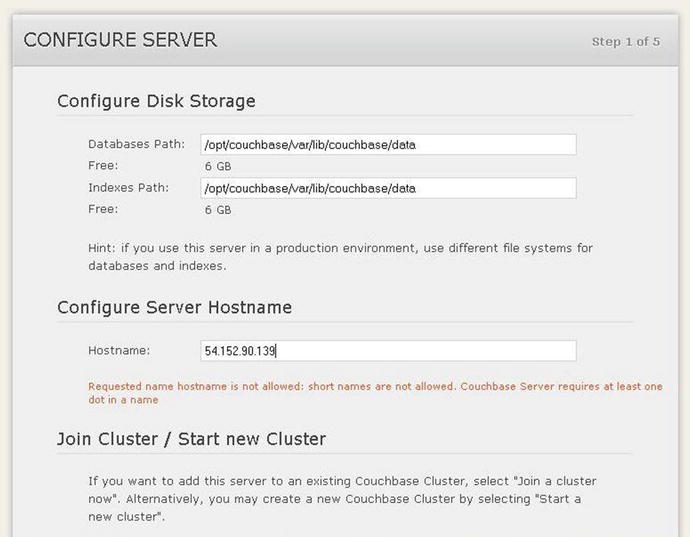
Figure 7-9. Configuring Server
Two options are provided in the Join Cluster/ Start new cluster section. As we are configuring a new cluster, select Start a new cluster as shown in Figure 7-10. Select the default settings or modify the settings keeping in consideration the total RAM configurable per server. Click on Next.

Figure 7-10. Starting a New Cluster
Couchbase server stores data in data buckets. In the Sample Buckets section the sample buckets are listed. A sample bucket is not required to be selected. Click on Next. In the Create Default Bucket screen the Bucket Name is pre-specified as “default”. Select Bucket Type as “Couchbase”. Select the default Memory Size & Replicas settings. Also select the default Disk I/O Optimization setting.

Figure 7-11. Configuring the Default Cluster
In Flush select Enable and click on Next as shown in Figure 7-12. To be able to flush (delete) data from a bucket, ‘Flush’ must be enabled.

Figure 7-12. Enabling Flush
In Notifications, select the default settings and the “I agree…” checkbox and click on Next as shown in Figure 7-13.

Figure 7-13. Configuring Notifications
In Secure this Server screen specify the Username as Administrator (default setting) as shown in Figure 7-14. Specify a password in the Password field and specify the same password in Verify Password field. Click on Next.

Figure 7-14. Specifying Username and Password
Click on the Cluster Overview tab to display the Cluster summary including the RAM allocated and in use, and the Disk storage allocated and in use as shown in Figure 7-15.

Figure 7-15. Displaying Cluster Summary
One bucket is shown as Active and one server is shown as Active in Figure 7-16.

Figure 7-16. Displaying Servers Summary
Click on Server Nodes to list the server nodes. The server running at IP address 172.17.0.1 gets listed as shown in Figure 7-17.

Figure 7-17. Listing Server IP Address
Click on the Data Buckets tab. The “default” bucket gets listed as shown in Figure 7-18.

Figure 7-18. Listing the Default Buckets
Adding Documents
In this section we shall add documents to the Couchbase server from the Couchbase Console. Click on the Documents button for the default bucket as shown in Figure 7-19.

Figure 7-19. Clicking on the Documents button
In the default ![]() Documents no document is listed to start with. Click on Create Document button as shown in Figure 7-20.
Documents no document is listed to start with. Click on Create Document button as shown in Figure 7-20.

Figure 7-20. Clicking on ‘Create Document’
In the Create Document dialog specify a Document ID, catalog1 for example and click on Create as shown in Figure 7-21.

Figure 7-21. Creating a Document
A JSON document with Id catalog1 gets added to the default bucket as shown in Figure 7-22. The new document has some default fields, which would probably be required to be modified.

Figure 7-22. New Document with ID as catalog1
Replace the sample JSON document with the following JSON document.
{
  "journal": "Oracle Magazine",
  "publisher": "Oracle Publishing",
  "edition": "November-December 2013",
  "title": "Quintessential and Collaborative",
  "author": "Tom Haunert"
}
Click on Save to save the modified JSON document as shown in Figure 7-23.
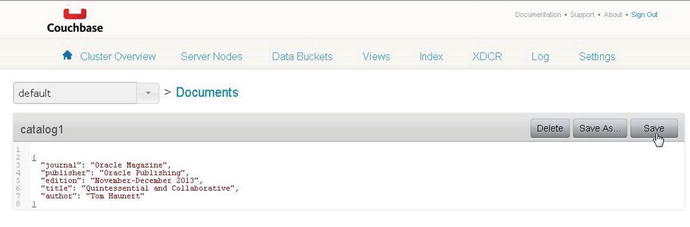
Figure 7-23. Saving a Couchbase Document
The catalog1 JSON document gets saved and also formatted in the Couchbase Console as shown in Figure 7-24.

Figure 7-24. Formatted JSON Document
In Couchbase Buckets, the Item Count for the “default” bucket gets listed as 1 as shown in Figure 7-25. Click on the Documents button to display the documents in the default bucket.

Figure 7-25. Item Count for default Bucket
The catalog1 document gets listed as shown in Figure 7-26. Click on the Edit Document button to display the document JSON if required.

Figure 7-26. Listing Documents in the default Bucket
Similarly add another document with document id as catalog2. The JSON for catalog2 document is as follows.
{
"journal": "Oracle Magazine",
"publisher": "Oracle Publishing",
"edition": "November December 2013",
"title": "Engineering as a Service",
"author": "David A. Kelly",
}
Add the JSON the sample document for catalog2 as we did for the catalog1 document and click on Save as shown in Figure 7-27.

Figure 7-27. Adding another JSON Document
The two documents catalog1 and catalog2 get listed as shown in Figure 7-28.

Figure 7-28. Listing the Two Documents Added
Starting Interactive Terminal
To access the Couchbase server from a command line, start the interactive terminal (tty).
sudo docker exec -it couchbasedb bash
The interactive shell gets started as shown in Figure 7-29.
![]()
Figure 7-29. Starting the Interactive Shell
The interactive terminal may also be started using the container id instead of the container name.
sudo docker exec -it bff916e55a52 bash
Running Couchbase CLI Tools
Couchbase Server provides several command-line interface tools (CLI) to monitor and manage Couchbase server buckets, nodes and cluster.
Some of these CLI tools are the couchbase-cli tool for operations on the entire cluster, the cbbackup tool to create a backup, the cbdocloader tool to load JSON documents, and the cbtransfer tool to transfer data between clusters and data files on the host.
As an example, run the cbtransfer tool to transfer data from the Couchbase server to the stdout with the following command run from the tty.
cbtransfer http://ec2-54-152-90-139.compute-1.amazonaws.com:8091/ stdout:
The two JSON documents previously added to the Couchbase cluster from the Couchbase Console get output the stdout as shown in Figure 7-30.

Figure 7-30. Running cbtransfer
Stopping Couchbase Server and Container
To stop the Couchbase Server and container, exit the interactive terminal with exit command as shown in Figure 7-31.

Figure 7-31. Stopping Couchbase Server
In the host system, run the docker stop command to stop the Docker container.
sudo docker stop couchbasedb
Subsequently, list the running Docker containers.
sudo docker ps
The couchbasedb container does not get listed as shown in Figure 7-32.

Figure 7-32. The Docker Container for couchbasedb does not get listed
Summary
In this chapter we used the official Docker image for Couchbase Server to run a Couchbase Server instance in a Docker container. We accessed the Couchbase Sever from the Couchbase Console and added some JSON documents. Subsequently, we used the cbtransfer CLI tool to output the documents stored to the stdout. In the next chapter we shall discuss using Apache Hadoop.