![]()
Using Oracle Database
Oracle Database is the most commonly used relational database. Relational databases are based on a fixed schema with the basic unit of storage being a table. Docker Hub has several Docker images for Oracle Database in the Public repository. In this chapter we shall use a Docker image for Oracle Database to install and use the database on Linux. This chapter has the following sections.
- Setting the Environment
- Starting Oracle Database
- Listing Container Logs
- Starting SQL* Plus
- Creating a User
- Creating a Database Table
- Removing Oracle Database
Setting the Environment
The following software is required for this chapter.
- -Docker Engine (version 1.8 used)
- -Docker Image for Oracle Database
We have used an Amazon EC2 instance with Red Hat Linux 7 as the OS. First, SSH login to the Amazon EC2 instance. The IP Address would be different for different users.
ssh -i "docker.pem" [email protected]
Find the status of the Docker engine.
sudo service docker status
If the Docker engine is not running, start the Docker service.
sudo service docker start
Download the sath89/oracle-xe-11g Docker image.
sudo docker pull sath89/oracle-xe-11g
The latest image of sath89/oracle-xe-11g gets downloaded as shown in Figure 3-1.

Figure 3-1. Downloading Docker Image for Oracle Database
List the Docker images.
sudo docker images
The sath89/oracle-xe-11g image gets listed as shown in Figure 3-2.

Figure 3-2. Listing Docker Images
Starting Oracle Database
Next, start an Oracle Database instance in a Docker container with the docker run command. Specify the 8080 port for the Oracle Application Express admin console and the 1521 port for the Oracle Database listener. Specify the container name with the –name option.
docker run --name orcldb -d -p 8080:8080 -p 1521:1521 sath89/oracle-xe-11g
Oracle Database gets started in a Docker container as shown in Figure 3-3.

Figure 3-3. Starting Oracle Database in a Docker Container
List the Docker containers with the following command.
sudo docker ps
The orcldb container gets listed as shown in Figure 3-4.

Figure 3-4. Listing Docker Containers that are Running
The Oracle Database hostname, port, SID, user name and password are as follows.
hostname: localhost
port: 1521
sid: xe
username: system
password: oracle
Listing Container Logs
To list the container logs, run the docker logs command.
sudo docker logs -f c0fa107a43d2
The container logs get listed as shown in Figure 3-5. The Oracle Database logs include the database initialization and configuration.

Figure 3-5. Listing Docker Container Log
A more detailed Docker container log is as follows.
[ec2-user@ip-172-30-1-192 ~]$ sudo docker logs -f c0fa107a43d2
Database not initialized. Initializing database.
Setting up:
processes=500
sessions=555
transactions=610
If you want to use different parameters set processes, sessions, transactions env variables and consider this formula:
processes=x
sessions=x*1.1+5
transactions=sessions*1.1

Oracle Database 11g Express Edition Configuration
-------------------------------------------------
This will configure on-boot properties of Oracle Database 11g Express
Edition.  The following questions will determine whether the database should
be starting upon system boot, the ports it will use, and the passwords that
will be used for database accounts.  Press <Enter> to accept the defaults.
Ctrl-C will abort.

Specify the HTTP port that will be used for Oracle Application Express [8080]:
Specify a port that will be used for the database listener [1521]:
Specify a password to be used for database accounts.  Note that the same
password will be used for SYS and SYSTEM.  Oracle recommends the use of
different passwords for each database account.  This can be done after
initial configuration:
Confirm the password:

Do you want Oracle Database 11g Express Edition to be started on boot (y/n) [y]:
Starting Oracle Net Listener...Done
Configuring database...Done
Starting Oracle Database 11g Express Edition instance...Done
Installation completed successfully.
Database initialized. Please visit http://#containeer:8080/apex to proceed with configuration
Oracle Database 11g Express Edition instance is already started

Database ready to use. Enjoy! ;)

[ec2-user@ip-172-30-1-192 ~]$
Starting SQL* Plus
Start an interactive shell using the following command. The container ID would most likely be different.
sudo docker exec -it c0fa107a43d2 bash
For more detail on bash refer to http://www.gnu.org/software/bash/manual/bash.html#Bash-Startup-Files. Run the following command in the tty. The terms “tty”, “interactive shell” and “interactive terminal” have been used interchangeably.
sqlplus
When prompted for a user-name as shown in Figure 3-6, specify “system”.

Figure 3-6. Starting SQL*Plus
When prompted for a password, specify “oracle”. A connection gets established with Oracle Database 11g Express. SQL*Plus gets started and the SQL> prompt gets displayed as shown in Figure 3-7.

Figure 3-7. SQL*Plus Shell Prompt
We used the container id to start the interactive tty terminal. Alternatively, the container name may be used as follows.
sudo docker exec -it orcldb bash
Creating a User
To create a user called OE with unlimited quota on SYSTEM tablespace and password as “OE”, run the following command.
SQL> CREATE USER OE QUOTA UNLIMITED ON SYSTEM IDENTIFIED BY OE;
Grant the CONNECT and RESOURCE roles to the OE user.
GRANT CONNECT, RESOURCE TO OE;
User “OE” gets created and the roles get granted as shown in Figure 3-8.

Figure 3-8. Creating User OE
Create a database called called “Catalog” in the “OE” schema with the following SQL statement.
SQL> CREATE TABLE OE.Catalog(CatalogId INTEGER PRIMARY KEY,Journal VARCHAR2(25),Publisher VARCHAR2(25),Edition VARCHAR2(25),Title VARCHAR2(45),Author VARCHAR2(25));
Table “Catalog” gets created as shown in Figure 3-9.

Figure 3-9. Creating Oracle Database Table OE.Catalog
Add data to the Catalog table with the following INSERT SQL statement.
SQL> INSERT INTO OE.Catalog VALUES(’1’,’Oracle Magazine’,’Oracle Publishing’,’November December 2013’,’Engineering as a Service’,’David A. Kelly’);
One row of data gets added as shown in Figure 3-10.

Figure 3-10. Adding Data to OE.Catalog Table
Run a SQL query with the following SELECT statement.
SQL> SELECT * FROM OE.CATALOG;
The one row of data added gets listed as shown in Figure 3-11.
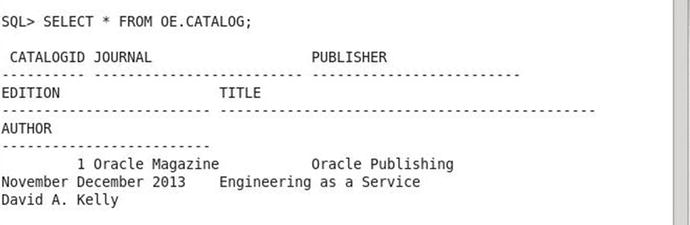
Figure 3-11. Running a SQL Query
To exit from SQL*Plus, specify the exit command as shown in Figure 3-12.

Figure 3-12. Exiting SQL*Plus
Removing Oracle Database
To remove the container running the Oracle Database instance, run the following docker rm command.
sudo docker rm c0fa107a43d2
To remove the Docker image sath89/oracle-xe-11g, run the following command.
sudo docker rmi sath89/oracle-xe-11g
The Docker container and image get removed as shown in Figure 3-13.

Figure 3-13. Removing Docker Image
Summary
In this chapter we used a Docker image to install Oracle Database 11g XE on an Amazon EC2 instance. We logged into SQL*Plus and created a database table to demonstrate the use of Oracle Database running in a Docker container. In the next chapter, we shall run the MySQL Database in a Docker container.