
![]()
Site Building: Building Drupal Sites Without Programming
This chapter describes what is known in the Drupal community as “site building,” which is the art of making web sites with Drupal without needing to know or write code. And, believe it or not, you can use Drupal to do quite a lot as you work to create bust web sites—all without ever writing a singl e line of HTML, JavaScript, or PHP. In fact, using Drupal just as it comes, out of the box, makes it easy to create full web sites with more generic requirements. Let’s get started and take a look at the many things you can do in Drupal without programming skills.
Setting a New Site Title and Logo
To personalize your first site, you’ll likely want to change the site’s title and upload a new logo, as shown in the following steps.
- In the black admin toolbar at the top of the screen, click the Manage tab, and then click the Configuration tab, which displays below the black admin toolbar. Under the SYSTEM heading, click the Site Information link. On this page you can set the title of the site. You can also enter in a page to replace the default error pages for the site, and you can put in an alternate page to be your site’s home page. For now, simply enter your site’s title. In this example I use the title “Drupal 8 Web Programming Essentials.” Click the “Save configuration” button.
- To change the default logo, click the Appearance tab in the top admin menu toolbar. Then click the Settings link.
- Scroll down the page a bit and uncheck the “Use the default logo supplied by the theme” check box. Click “Upload logo image.” After you upload your new image, click the “Save configuration” button.
- Click in the upper left of the site on the “Back to site” link.
In Figure 2-1 you can see the finished product of what my site looks like after I changed the site name and logo.

Figure 2-1. This is what my Drupal site looks like after changing the site name to “Drupal 8 Web Prgramming Essentials” and updating the logo to show a Drupal guy holding some tools
Now that you’ve rebranded your site with your own site name and logo, you’re ready to move on with building your great new Drupal site.
Adding More Users to Your New Drupal site
In Drupal you can gate your content so only logged-in users—known as “authenticated users”—can see content, or you can allow all “anonymous” non-logged-in users to view your site. You can also have a mix, allowing only certain pages to be viewed by authenticated users while leaving other pages open for even anonymous users to view. The following steps show you how to add more users to your site, so they can log in successfully and access your content.
- In the admin toolbar at the top of the screen, click the Manage tab and then click the People tab that appears. You’ll see a list of users who can log in. Again, these users who can log in to your site are known as “authenticated users.” “Anonymous users” are folks who visit your site without logging in. These are key terms in the Drupal world.
 Note If someone has removed the black admin bar, which is possible, you can always go to the ...admin/index URL on your Drupal site to see all the available admin options, so if your site is usually www.barnettech.com, for example, you would just go to www.barnettech.com/admin/index. As long as you’re logged in as the admin user or a user with administrative privileges, you’ll see all the admin links available to you. I often go to the ...admin/index URL and then press CTRL+F (or on a Mac, Cmd+F) to invoke the browser’s built-in search capability. Then you could search for the word “people” on the page and you would find the same admin screen links.
 - In the upper left, notice the “Add user” link. Use the “Add user” link to add an authenticated user or two to your site.
Now that your site has some users, you can assign different permissions to these users.
Assigning Roles and Permissions to Site Users
When you add one or more new users to your site, you’ll want to think about what these users should and should not be able to view and do on your site. This section looks at how to group your different users into roles, as well as how to limit their user activity by their role with the help of the Drupal permissions system. Assigning different roles and different permissions within your web site governs what users can do and view on the site.
- Navigate to the ...admin/people/permissions URL by clicking the Manage tab and then clicking the People tab. Alternatively, go to ...admin/index and search for “people.” See Figure 2-2.

Figure 2-2. The default People page
- Click the Permissions tab. Your screen should resemble Figure 2-3, which shows the Permissions page. Browse this permissions list to take a look at the type of control you have over content visibility, access to different pages, and so on within your site using permissions. Feel free at this point to change the permissions users on your site have to act within your site.
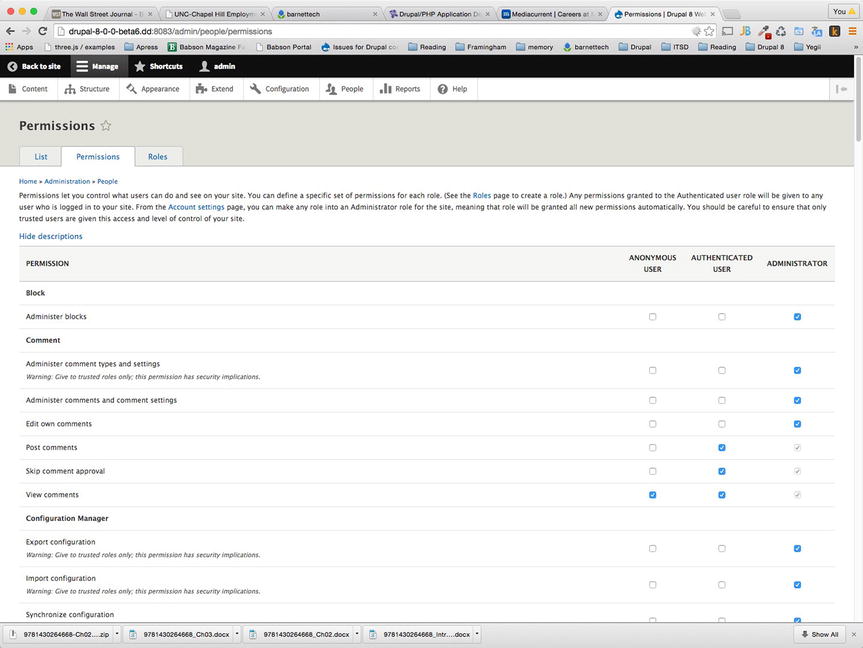
Figure 2-3. The Permissions page
If in the list of permissions you locate the “Post comments” permission and select the check box under the heading “ANONYMOUS USER” to the right, then just as you would guess, anonymous users will be able to post comments on your site. I don’t recommend allowing the anonymous posting of comments on a live site, however, because your site will be the victim of a lot of spam.
In Figure 2-3, notice the Roles tab, which is next to the Permissions tab. The Roles page lets you control permissions based on a user’s role(s). Out of the box, Drupal has an “anonymous” role for handling permissions for non-logged-in users, as well as an “authenticated user” role for all logged-in users. In addition, Drupal offers the “administrator” role, which is a role you can grant to anyone who should be able to administer the Drupal site. In the Roles tab, you can add new roles to be available.
- To add a role to a user’s account, click the List tab (next to the Permissions tab and Roles tab). Find a user you want to edit and click the “Edit” button next to that user’s name.
- Scroll down until you see all the different roles with check boxes next to them. Select each role you would like to grant to the user you selected.
- Click Save at the bottom of the page.
Now that you’ve learned about users, roles, and permissions, it’s time to learn how to create a basic blog.
Creating a Blog
With the home page set up with a new site name and logo, as well as users and their permissions, you’re now going to create a blog to feature on your home page. The recipe for creating a blog in Drupal is easy.
- If you are logged in as an admin, click the Manage tab and then click the Content tab. Next, click the “Add content” link. Figure 2-4 should help you make sure you’re in the right place.

Figure 2-4. Preparing to add content for a new blog
- Click the Article link to create a new article. (The other link is for “Basic page” to create a new basic page. You could click either link, but this example uses the Article link.)
- Fill out the fields presented to you. You’ll need to fill out the title and body fields at a minimum. You might, for example, choose to title your first post “Test First Post.” The actual body of you blog might be long or short, but for now try “Here is my blog’s body text!”
- On the right-hand side of the screen, click PROMOTION OPTIONS. You’ll see that Promote is set by default (see Figure 2-5). This option will promote this post to show up on your site’s home page. Also, notice the check box next to Sticky. This option ensures the items you’ve marked as “Sticky” will remain at the top of the list when you add subsequent pieces of content to be promoted to the home page of your site. I often use the Sticky feature to keep my “featured” blog articles at the top of my site’s home page. For this example, choose to make the current blog post you’re creating “Sticky.”
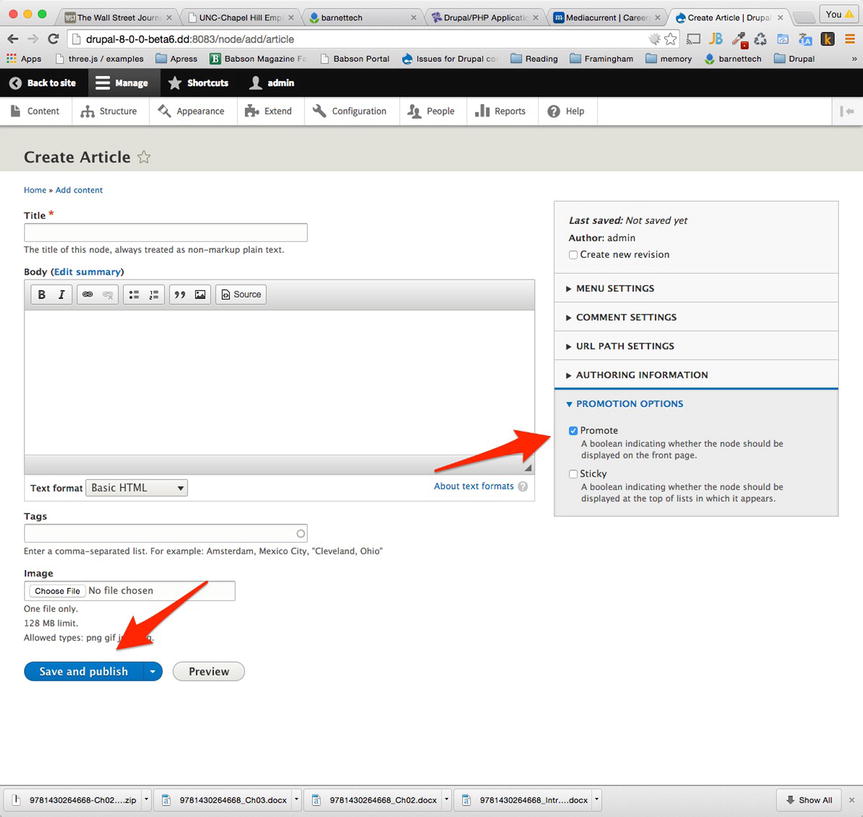
Figure 2-5. The “Promote” to the front page option and the “Save and publish” button
- Click the “Save and publish” button. Tip If you want to save the piece of content without publishing it, click the arrow next to the “Save and publish” button. This brings up the option to “Save as unpublished.”
- Repeat starting again from step 2 to add more blog entries to your site.
- When you are finished adding blog entries, click the “Save and publish” button again.
Okay, there you go. Now you know how to create a basic blog or two! Easy, like Sunday morning.
Editing and Customizing Your Blog Post
This section will show you how to edit and customize an existing blog post, modify the blog’s title or body fields, turn commenting on and off, and more. If you point your mouse to the upper right of your blog post, you’ll see two pencil icons appear. Click the top pencil icon to modify the view that is displaying your list of blog posts (I’ll explain what a view is in a bit); click the second pencil icon to edit your blog post (see Figure 2-6). You can choose Quick edit to modify the body of the blog post without leaving the page, which is a pretty cool new feature for Drupal 8. Alternatively, you can click Edit or Delete. In this example, you use the Edit feature, shown in step 1.
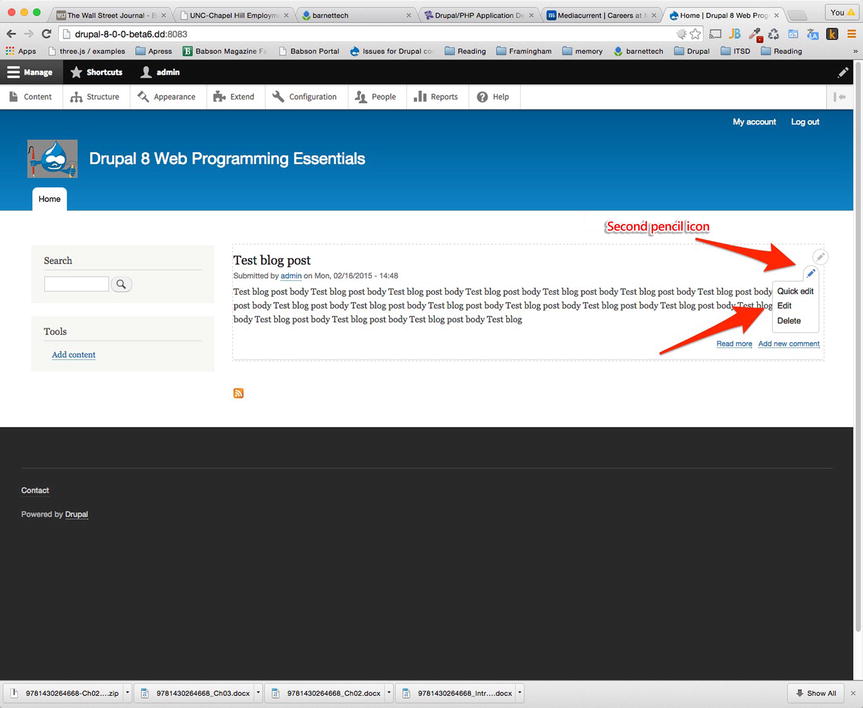
Figure 2-6. The edit pencil icons appear when you hover your mouse to the right of your blog post title
![]() Note In Drupal technical circles, any existing piece of content, like your existing blog post or a Wiki post, is referred to as a “node.”
Note In Drupal technical circles, any existing piece of content, like your existing blog post or a Wiki post, is referred to as a “node.”
- Click the bottom pencil icon and then click Edit.
- On the right side of your screen, you’ll see a bunch of settings that you can use to change your piece of content, or node. Let’s look at the comment settings and authoring information.
- Click COMMENT SETTINGS. You’ll see you can change this setting from Open to Closed, which will turn on (Open) or turn off (Closed) comments for this piece of content. If you were to change this setting to Closed, you would see—after you click “Save and keep published”—that when you view the piece of content, the option to add a new comment is gone (or is present if you chose Open). When you click “Save and keep published,” you will leave Edit mode and Drupal will automatically take you back to a screen where you will be viewing the piece of content again. For now, leave this setting to be Open. Note Nodes can have comments. You will see the term “node” over and over again in your Drupal development work. It is a key concept!
- Click AUTHORING INFORMATION. If you have multiple users in the system, you can change the author of this node (i.e., this article) to be any user of the Drupal site who has a registered account. You can change the “Authored on” time here as well. For now, leave this setting as is.
- Click PROMOTION OPTIONS. You’ll see that you can promote the node to the front page, which forces the node to show up on the home page of your web site. Promote the current blog post you’re editing to your site’s home page. You’ll also see the Sticky option, which I described in the previous section “Creating a Blog.” If you select this option for your blog post (your node), then that blog item will stick (stay) at the top of the list of blog articles, if you have multiple blog posts listed on your home page. This option is great for keeping some featured articles/blog posts at the top of your site. For now, leave this setting as is.
- Note the “Save and keep published” button at the bottom of the Edit screen (see Figure 2-7). You’ll see there is an arrow you can click. If you click this arrow, you have the option to “Save and unpublish” the piece of content. This option used to be alongside the options within Promotion Options in previous versions of Drupal, so if you’re a Drupal veteran, make sure to note this interface change.
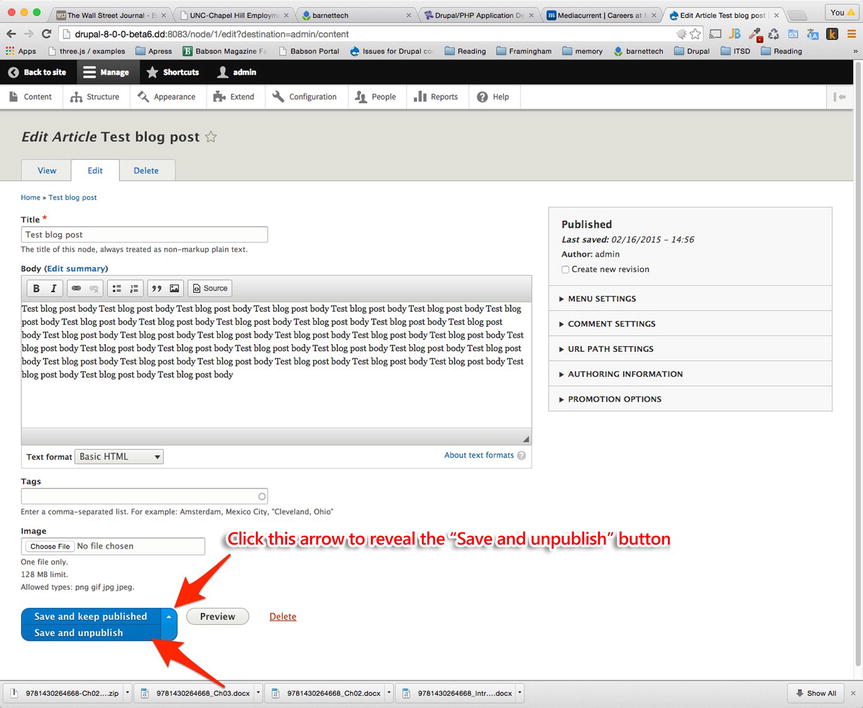
Figure 2-7. The “Save and unpublish” button
![]() Note If you choose not to publish a piece of content, or node, you can go and find it again by clicking the Manage tab in the admin toolbar and then clicking the Content tab. On the resulting screen, you’ll see a list of all content, both published and unpublished. By default, the most recently created items will be at the top of the list.
Note If you choose not to publish a piece of content, or node, you can go and find it again by clicking the Manage tab in the admin toolbar and then clicking the Content tab. On the resulting screen, you’ll see a list of all content, both published and unpublished. By default, the most recently created items will be at the top of the list.
This exercise demonstrated how to edit an existing piece of content, or node, in Drupal. If you changed the node title or body, updated authoring information, or turned comments on or off, you’ll now see your changes reflected on the home page.
Adding More Fields to Your Blog Node
When you create a blog post or any other kind of post, you have a title field and a body field. These fields are available when you install Drupal without your having to do anything. One of the most popular features of Drupal is that through the user interface, you can add more fields. These additional fields are known as “cck fields,” and it’s the CCK (content construction kit) module that comes with Drupal that allows this functionality.
- Click the Manage tab in the admin toolbar and then click the Structure tab. (As I said earlier, you can also go to the ...admin/index URL on your web site and find the same admin links.)
- Click the “Content types” link.
- Click the “Manage fields” link next to the content type called Article—these are our blogs right now.
You can easily create a new content type by clicking the Manage tab in the top admin toolbar, clicking “Content Types,” and then clicking the “Add content type” button. You can call your new content type “blog.” You may want to do this to help organize your content more clearly—it certainly would make it more clear for any other editors of your Drupal system because they aren’t in your brain and may not realize that the article content type is really where you’re putting your blog content. Let me clarify—your site users will not know you used an “article content type” for your blog content, but if you have other admins/editors of the system, making a new “blog,” “content type” would help to avoid confusion, because these are the terms they will see in the admin screens.
- After you click the “Manage fields” link, you’ll be able to add fields. Add a field of type “text (formatted, long).” Name the field Metadata. (In this case you’re using Metadata as the field name because metadata is a place to collect data about your data. So you would use this field to collect some info from the user about the entered piece of content.)
In the real world—outside this book, that is—you really can name the field anything you want. If you wanted to associate each piece of content with a country, for example, you could create a Country field, and users would fill out a node form field with the country name associated with the node content. Or you could create a Phone Number field and have users associate a node with a phone number. You can create any field that you find useful to add to your node for data collection and to display.
- Click Save. On the next screen you’re asked for the “Allowed number of values.” You can just leave it as “1” and then click the “Save field settings” button. On the next screen that displays, you can enter a default value for this field and some help text that will help show users, who will be entering the form, what they should enter for this field. For now, just click “Save settings.”
- Go back to the home page of your site by clicking the “Back to site” link in the upper left corner of your screen.
- Follow the directions from the section “Creating a Blog” to add a new blog article. You’ll see that the new Metadata field is available, ready to fill out.
- Create the new blog post and click the “Save and publish” button. You’ll see the output of the new field in View mode of the blog article (in View mode of the node, not to be confused with Edit mode of the node).
![]() Note We have the ability to extend a content type, as was shown here, thanks to the CCK module in Drupal. Most of CCK has moved into Drupal core since Drupal 7, so it wasn’t necessary to download the module. Some special field types still require a download of an add-on module. For example, you can add a file field type, which lets you add files to a node, or you can add an image field type. There are all sorts of field types that let you customize Drupal nodes.
Note We have the ability to extend a content type, as was shown here, thanks to the CCK module in Drupal. Most of CCK has moved into Drupal core since Drupal 7, so it wasn’t necessary to download the module. Some special field types still require a download of an add-on module. For example, you can add a file field type, which lets you add files to a node, or you can add an image field type. There are all sorts of field types that let you customize Drupal nodes.
You’ve now learned to add fields to content types to extend Drupal’s nodes to collect any kind of information you want to collect from users and display. In the next section, you’ll explore Drupal blocks, which allow you to better place content in any region of your Drupal site.
Working with Blocks
Blocks in the Drupal system refer to blocks of content that can be placed in different areas, or “regions,” of the site. A block could be placed in the header, the footer, the right sidebar, left sidebar, or any other region that you set up for your site.
For example, you could have a block in the right sidebar with the most recently created comments on the site, an option you can use out of the box. Or you could have a block with the most popular nodes on your site. You could also have a block with some advertisements from your site’s sponsors. The footer of your site might have a block with copyright info or links to your company’s job boards.
Blocks really can have any type of content you like, and Drupal’s block system allows you to easily place these blocks of content into different regions of your site. The following steps contain the easy recipe to place blocks in the Drupal system.
- In the admin toolbar, click the Manage tab, click the Structure tab, and then, under the “Block layout” heading, click the Block layout tab (see Figure 2-8). These are the different regions on your web site, where you can place blocks.

Figure 2-8. The Block layout screen
- Click the “Demonstrate block regions (Bartik)” link. You’ll see where on the screen each region exists within your theme.
- Click the “Exit block region demonstration” link at the top of the screen.
- Now in whatever region you would like to place a block you can click on “Place block”, and then you’ll see a list of the existing blocks available (i.e., the blocks that come with Drupal) for placement in the given region. The “Who’s online” block displays in a block, users who are currently logged in to your Drupal site. The “Recent content” block shows recently published nodes. The “Recent comments” block shows recent comments users have posted to your site. These blocks all come out of the box with Drupal, and you can place these blocks easily in whatever region(s) on the site you choose. Just click on the “Place block” button next to one of these blocks in the list of blocks. Try this on your own now. You can choose to display the title, or not, and you can restrict which pages the block appears within. When you are finished, click “Save block.”
- Add a block by clicking the “Custom block library” tab at the top of the page, then click on “Add custom block". This will allow you to create your own new block, and you can easily add text or HTML into the block. Type some basic text or HTML in the block body textarea and type in a block description in the textfield, and then click Save. Back on the main block page (as seen in Figure 2-8) you’ll see a “Confifigure block” button next to each placed block, clicking this button provides a bunch of options you can change (feel free to play with these options, or you can just leave them alone for now). You can change the title of the block here. You can restrict what pages your block shows up on, you can display the block on just certain pages that are of a certain content type, or you can restrict which roles can view your block (e.g., maybe only site administrators should be able to view a certain block). Chapter 11, “Creating a Drupal Block Programmatically and Basic MySQL Usage,” shows you how to programmatically create a block and opens the doors for creating far more complex blocks to enhance your site.
- To make edits to any custom block you created, remember the Custom Block Library tab in the upper right of the Block layout screen (see Figures 2-10 and 2-11). Within this tab you’ll find all your custom blocks made via the graphical user interface (GUI).
- After you save your changes, go back to your site’s home page. If you placed a block in the “sidebar second” (the right sidebar), footer, or whatever region you chose, you’ll now see the block show up there. Figure 2-9 shows what this looks like on my site.

Figure 2-9. The “Recent content” block placed in the “second sidebar” (right sidebar) region

Figure 2-10. The Custom Block Library
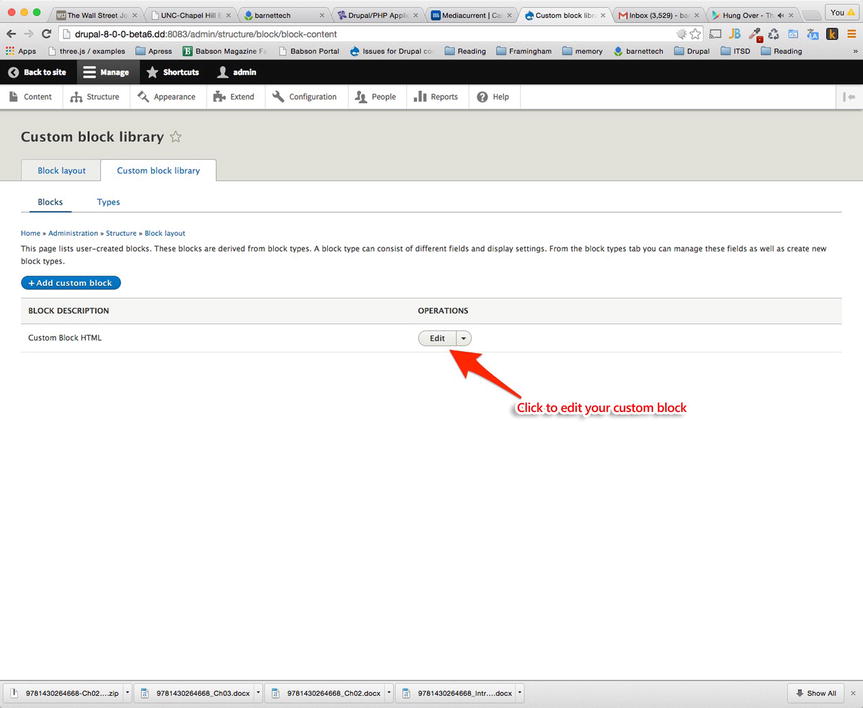
Figure 2-11. Editing your custom block
In this section, you used Drupal blocks to place content within your site and display where that content appears. In the following section, you’ll use Drupal views to gain more control over the look of your content.
Working with Views
You’ve now created a blog on your site, but that blog appears as Drupal’s default representation of the data. This section looks at Drupal’s Views feature, which gives you much more control over exactly how your blog or any other content is displayed. The Views feature is a popular option among site builders.
The Views feature allows you to create varied representations of the content that you’ve entered into the system by allowing you to alter the view of your nodes and the content you created by using the different content types. Views allows you to create pages with lists of your content items (your nodes), for example, or you can present your node data as a slide show (if you download and install the add-on module Views Slideshow). Views allows you to control the display of your nodes, including what fields are displayed and what fields are not displayed. There are many different ways Views allows you to present your data, and there are many add-on modules that further extend the many different ways to present your data. And, again, the beauty of Views in Drupal is you can do all this without needing to know how to program with HTML, JavaScript, and PHP.
In Drupal 8, the front page is now considered a view. If you are logged in as the admin user, you can hover in the upper right of the main content area of the home page and edit the view (see Figure 2-12).
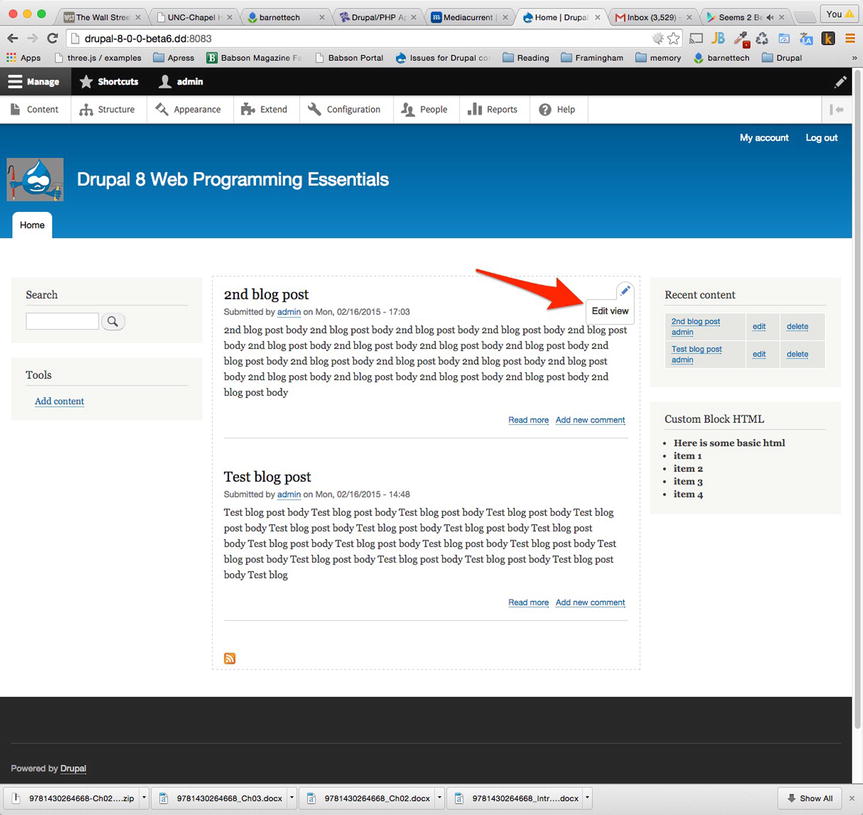
Figure 2-12. The “Edit view” link
In this section, you’re going to use Views to change the display of your blog data on the home page of your Drupal site. One way to continue would be to just click the “Edit view” link, as shown in Figure 2-12, and make edits to this existing view. But I want to demonstrate how to make a brand-new view should you ever need one, which is likely. The following steps walk you through creating a brand-new view to create a new display of your blog data.
- Make sure the Views module and the Views UI (user interface) module are enabled; these modules allow you to construct the view(s) through the user interface. Click the Manage tab in the admin menu toolbar; then click the Extend tab. (Alternatively, go to ...admin/index and click the Extend link.) Once on the modules admin page, within the Core section, select, if necessary, to install the Views module and the Views UI module. If these modules are already enabled, continue to step 2. Click “Save configuration” at the bottom to enable these two modules.
- Click the Manage tab and then click the Structure tab. Click Views. (Alternatively, the link is available at the ...admin/index URL.)
- Click “Add new view.” (You can find and edit any existing view from this page as well.)
- Name the view whatever you wish—this example will use “bloglist.” Then, under Page Settings, click the check box next to “Create a page.”
- There are some other options on the page, but for now just click “Save and edit.” You’ll see a screen similar to the one shown in Figure 2-13. This page has an overwhelming list of options to construct the view, but this exercise focuses on just a few of these items.

Figure 2-13. Configuring a view
- Click the “Add” button next to FILTER CRITERIA and then click “Content: Type.” (There’s an option to search, and I usually use it. In this case I searched for “type.”) Next, click “Apply (all displays),” choose just Article, and then click “Apply (all displays)” one more time. Now the view will just be showing content of type Article. If you created a content type called “Wikis” or “Blogs,” you could just as easily filter to only show data (content) from one of these content types.
- Now, to allow it so you can just pick certain fields from your Article content type to display, click Settings next to Format and then click the check box next to “Force using fields.” Click Apply.
- Under FORMAT, you’ll see “Unformatted list | settings.” Click the settings link, choose “Force using fields,” and then click the “Apply” button. Click the “Add” button next to Fields, which is now available, and choose the fields you want to display. There are a lot of fields to choose from, and this list can be a bit hard to sift through. But there is a search field at the top of the page, and there are some dropdowns also to help you quickly get to the fields you’re interested in. You may decide to show just titles in your display, show just the title and the body, or limit the view to show whatever fields you like from the content type. This option is very useful. For example, if you want to create a view that is not a page, but perhaps it’s a block, then you can display just the titles of new content—this might be all that you want to fit into a narrower “new content block.” Then you can display the block you create in Views in any region you like using the block system. When you are finished, click “Apply (all displays)” two times.
- Right now the view you’ve created is displayed as a Page. To create a version to show in the block system, click the “+Add” button at the top of this Views configuration screen under Displays and then choose Block. Now there will be a block version of the view available for placement in the Drupal blocks system. Figure 2-14 helps you follow along on how to create a block display for your view.

Figure 2-14. Creating a block using Views
- Remember to click the “Save” button. Your created view is not permanently changed until you click the “Save button.” Make sure to remember this.
You can show more than one content type in a single view. For example, you can download add-on modules like Views Slideshow (http://drupal.org/project/views_slideshow), which even allow you to create slideshows using Views. Or your blog might allow users to input an image using an image field if you’ve added an image field to the content type, which you’ve learned to do previously in the earlier recipe for how to add fields to your content type (to your blog). Views will let you select your article content type; then you choose just the image field to display and you follow the recipe outlined in the Views Slideshow add-on module to easily add a slideshow on your site within 15 minutes. (See the readme file or documentation on the right-hand side of the preceding link; it will eventually take you here: http://drupal.org/node/903244.) Setting up Views Slideshow is beyond the scope of this discussion, but I wanted to give you some sense of the wide array of possibilities Views brings to Drupal site builders.
Take some time to play around with the various views. You can represent your data in a table view, for example. In the GUI, look next to Format and click the hyperlink (the link) next to it—you’ll have lots of display options to choose from (Grid, HTML List, Table, Unformatted List, etc.). Notice at the bottom of the screen that there’s a live preview of how your view will look.
You can set the URL for your view, under PAGE SETTINGS—in the case of the view I’ve just created, it shows Path:/bloglist. (Make sure next to Displays you have the Page display type selected and not Block to set the page’s path. If Block is selected, simply select Page right next to where it says Block instead.)
After saving my view by clicking the “Save” button at the bottom of the screen, I can then visit my newly created view by going to http://localhost/bloglist if I’m developing locally or http://myurl.domain.com/bloglist if I’ve posted this using a full URL (probably not hosting it locally in that case). There are instructions on drupal.org on how to now make this view your home page, replacing the default page: http://drupal.org/node/265172. You click the Manage tab in the top admin toolbar, click the Configuration tab, and then click “Site information.” (Alternatively, at ...admin/index just look for the “Site information” link). See Figure 2-15, which shows the “Site information” configuration screen. In the FRONT PAGE, “Default front page” text box, type bloglist and then your new bloglist view will also become your site’s front page.

Figure 2-15. Change your site’s home page from the “Site information” configuration screen
Changing Your Site’s Theme
The “theme” is the overall look of your site—the general layout, colors, and graphics that define how your site looks. There are a few different ways to install a theme, to change the overall look of your site. You can install themes by using Drush or by downloading right from a URL (this latter method usually works only if you’re developing on your own computer, which allows file transfer protocol (FTP), to work; on a Linux box in the cloud, usually only secure file transfer protocol (SFTP) is enabled. First, this section looks at downloading a theme using Drush, which is the preferred method of installation.
Installing a Theme Using Drush (Preferred Method)
My favorite way to download and install a new theme in Drupal is to use Drush. To use Drush, you’ll need to install it. For step-by-step instructions on how to install Drush using Windows or Mac, refer to this book’s Appendix.
![]() Note If you’re on a Linux box in the cloud, Drush is very much the easiest way to download another theme to use within Drupal. Otherwise, you have to download the module to your local machine and then SFTP (copy the files over from your computer to another remote computer using an SFTP tool, such as fireFTP) the files over to the Linux box. Drush makes it much easier.
Note If you’re on a Linux box in the cloud, Drush is very much the easiest way to download another theme to use within Drupal. Otherwise, you have to download the module to your local machine and then SFTP (copy the files over from your computer to another remote computer using an SFTP tool, such as fireFTP) the files over to the Linux box. Drush makes it much easier.
If you’re using Windows, open the “Drush command prompt” program (which you can learn to install in this book’s Appendix if you don’t have it installed already). Once open, type cd C:UsersJames BarnettSitesdevdesktop—be sure to replace my name, “James Barnett,” with your Windows username. There you will see all of the folders created for your different Acquia Dev Desktop Drupal sites. Type cd and then the name of the folder that houses your Drupal site. If you’re unsure of which folder houses your Drupal site, you can always open the Acquia Dev Desktop Control panel and look at the link next to “Local code” which shows which folder houses your site’s code base.
Almost the same directions work on a Mac. Open the Terminal program and type cd /Users/jbarnett/Sites/devdesktop. This is the location on the Mac file system where you’ll find the folders that house your Acquia Dev Desktop Drupal installation(s). Be sure to replace “jbarnett” with own your username.
Now you can issue the following Drush command to download the barnettechetjlb theme, a theme that I’ve published for this book’s release, as shown in Figures 2-16 and 2-17:
drush dl barnettechetjlb
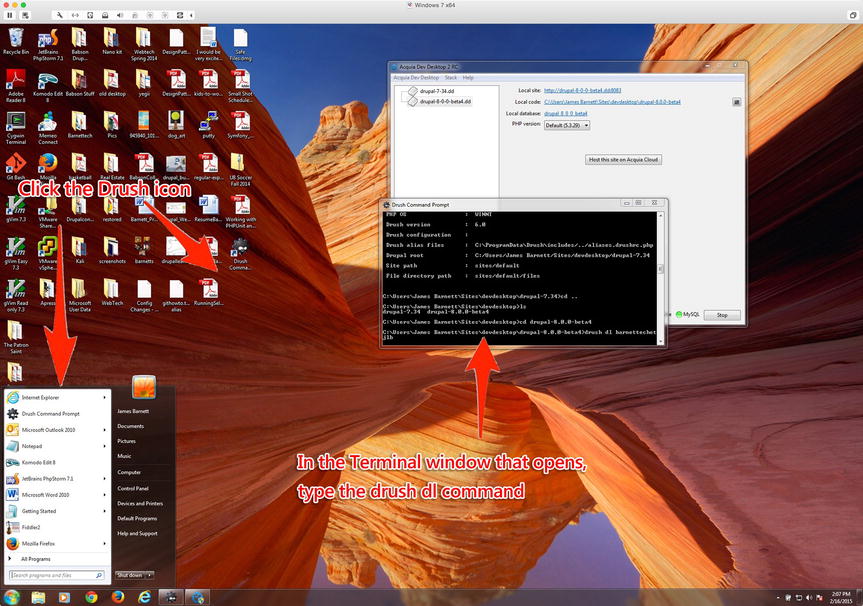
Figure 2-16. Using the Drush dl zen command in Windows

Figure 2-17. Using the drush dl barnettechetjlb command on a Mac. The directory path in this case is /Users/jbarnett/Sites/drupal-8.0.0-beta6. The path shown here is from a live Ubuntu site where I have installed the Drupal filesystem. You’ll notice that no matter where you’re using Drush or Drupal—on Ubuntu, a Mac, or Windows—the commands are all the same; only the directory path structure differs
Using this command will download the barnettechetjlb theme from drupal.org (https://drupal.org/project/barnettechetjlb).
![]() Note Another example is to download the Busy theme (https://drupal.org/project/busy). To download the Busy theme you would type drush dl busy at the sites/default directory.
Note Another example is to download the Busy theme (https://drupal.org/project/busy). To download the Busy theme you would type drush dl busy at the sites/default directory.
A trick to know what to put as the name of the project or theme to download is to look at the URL of the project or theme for what follows drupal.org/project/ in the name of the project. In this case, it’s “busy” because the URL is www.drupal.org/project/busy, so that is what you type for your Drush command. Sometimes projects with more than one word in the title have a name that has underscores in it—when you type the name into your Drush command, the underscores often replace the spaces between the words that comprise the project’s name. I’ve also seen cases where the spaces between the words of a project name are just removed. If you look at the Corporate Clean theme, they just concatenate the two words and the name to use in Drush is “corporateclean.” You can see that in the URL for the project as well https://drupal.org/project/corporateclean.
Now, type the following at the command prompt in your sites/default directory:
drush dl corporateclean
Once your new theme has been downloaded, you can go to the ...admin/appearance URL of your Drupal web site to enable the new theme and set it as the default theme. On my local machine the URL would be http://localhost:8082/admin/appearance. To navigate there you can also click the Manage tab in the admin toolbar and then click Appearance. Figure 2-18 shows the admin/appearance page.

Figure 2-18. The admin/appearance URL to set the theme for your site
Installing a Theme from a URL
This section shows you how to download a theme without using Drush, which works well when Drupal is installed on your local machine, because your local machine allows FTP connections. Linux boxes in the cloud require the more secure SFTP to transfer files. (I still prefer using Drush to install themes—and modules—locally.)
There are many alternative ways to install a theme, but in this section you’ll install a theme from a URL. This method works best if you’re working on a local copy of Drupal on your own computer. If you’re on a remote Linux box, this method of installing from a URL will work only if your Linux box supports FTP and not just SFTP—which is unlikely these days because SFTP is more secure, as I said.
![]() Note If you don’t understand the difference between FTP and SFTP, don’t worry. Just know that installing from a URL isn’t likely to work if you’re not working on your own local (personal) machine. FTP and SFTP are just behind-the-scenes ways (protocols) that computers use to transfer files from one computer to another.
Note If you don’t understand the difference between FTP and SFTP, don’t worry. Just know that installing from a URL isn’t likely to work if you’re not working on your own local (personal) machine. FTP and SFTP are just behind-the-scenes ways (protocols) that computers use to transfer files from one computer to another.
The next few steps assume you are working on a copy of Drupal installed on your local machine.
- Click the Manage tab and then click the Appearance tab in the admin toolbar.
- Click “Enable and set default” next to any of the theme’s you have installed already (a few come with Drupal). Click Save and then go view your home page again. Just like that you can change the look and feel of your site.
You can create your own themes as well, or you can download more themes from the Internet. Drupal.org showcases many themes at the following site: http://drupal.org/project/Themes.
- Back at the top of the Appearance page, click the “Install new theme” link.
If you don’t see the “Install new theme” link at the top of the ...admin/appearance page, go to the ...admin/modules URL of your Drupal site (on my local site it’s http://drupal-8-0-0-beta6.dd:8083/admin/modules). This is the Extend admin menu item you’ve seen previously by clicking the Manage tab and then clicking Extend in the admin toolbar. Make sure the “Update manager” module has a check mark next to it on this screen; if not click the check box next to this module and then click the “Save configuration” button.
- Go to the http://drupal.org/project/Themes page and find a theme you like that has a Drupal 8 version. (I like the Business theme.) Under Downloads, locate the tar.gz file, right-click the latest Drupal 8 version, and choose “Copy link address.”
- Back on the ...admin/appearance page of your Drupal site, click “Install new theme.” Then click within the “Install from url” field and paste in the link you just copied a second ago by right-clicking and choosing Paste.
- Click the “Install” button and then choose the option to enable the theme.
- On the appearance page, choose “Enable and set as default” next to the new theme that was just downloaded.
And there you go. Your Drupal site probably looks awesome already—if you chose a handsome theme.
Installing New Add-on Modules
Recall that modules are like plug-ins that extend Drupal functionality. Modules extend Drupal and add functionality. Although Drupal comes with several modules out of the box, you may have a need for additional modules. For example, you can download modules that will allow you to create slideshows, connect to your Google account, schedule nodes to be released based on a given time and date, and so on. You can find the list of 10,000+ Drupal modules in order of usage at www.drupal.org/project/usage.
Like the processes for installing themes, there are many ways to install new modules. Again, you’ll start with the easiest method: installing a module via Drush.
Installing a Module Using Drush (Preferred Method)
Just like you added a theme through Drush, you can add on new modules as well. There are many popular downloadable modules that extend Drupal’s functionality. You can find a list, sorted by which modules are most used in the Drupal space, at www.drupal.org/project/usage. So let’s say I want to download and install the Layout module, which allows for a responsive (mobile friendly) layout builder to manage the layout of your pages. Its project page is at https://drupal.org/project/layout. (This module almost made it into Drupal 8 core by the way. See https://drupal.org/node/2053879.)
- Go to a command prompt and navigate to the directory where you have your Drupal installation. Then within that directory, just as you did earlier with downloading a theme using Drush, issue the following command to download the layout module:
drush dl layout - To enable the module, type
drush en layout
dl stands for download and en stands for enable.
Alternatively, you could use Drush to download the module. Then you could go to the admin/modules URL of your web site, enable the layout module by clicking the check box next to the module, and then clicking “Save configuration” at the bottom of the screen. To navigate there you would click the Menu tab in the admin toolbar, then the Extend tab in the admin toolbar. This would take you to admin/modules, which in Drupal 8 is now called the “Extend” area where you can add on modules to extend Drupal’s functionality. See Figure 2-19 for a screenshot of the admin/modules page.
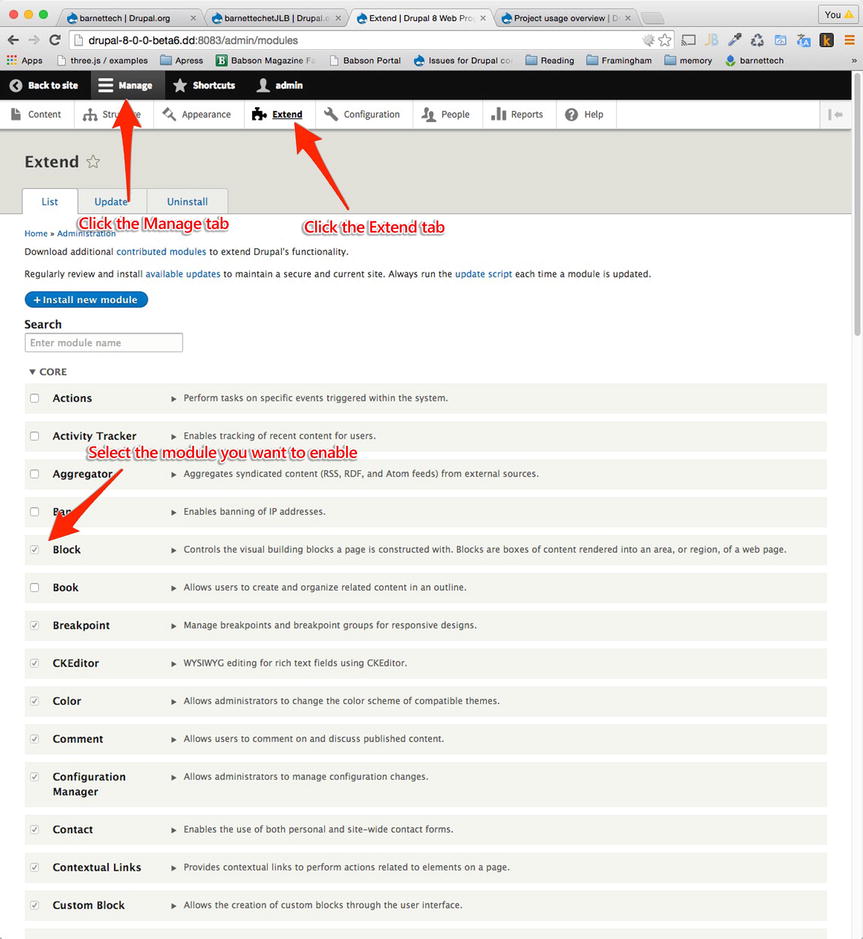
Figure 2-19. The “Extend” page in Drupal to administer add on modules to extend Drupal functionality
Installing a Module from a URL
This section looks at installing a module from a URL, just as you did with installing a theme. You’ll download the Views Slideshow module this time.
- Click the Manage tab in the admin toolbar in your Drupal 8 installation; then click Extend (you could also go directly to the admin/modules URL). If you don’t see the option at the top to “Install new module,” make sure the “Update manager” module has a check mark next to it on this screen. If not, click the check box next to this module and then click the “Save configuration” button at the bottom of the screen.
- Now you should be able to click “Install new module” at the top of this admin/modules screen, where you can manage all your Drupal modules.
- Go to the http://drupal.org/project/views_slideshow page.
- Go to the recommended releases section and right-click the tar.gz file next to the Drupal 8 version (just make sure it begins with 8.x—the rest of the numbers may change if they publish updates to the module). After right-clicking, choose “Copy link address.”
- In the Install from a URL text field, right-click and choose Paste. You’ll have pasted in something like the following: http://ftp.drupal.org/files/projects/views_slideshow-8.x-3.0.tar.gz. (The URL will vary depending on what project / module you’re downloading and which version.)
- Click “Enable newly added modules.”
On the http://drupal.org/project/views_slideshow page, look for the “Read documentation” link on the right-hand side of the screen (yes, in a block on the right-hand side of the screen—drupal.org is a Drupal site, after all). Read the documentation and play around with your new functionality in Drupal. Note: many modules have documentation from a link on their project page on drupal.org on the right-hand side of the screen. All modules have a README.txt file, which you can find in the code that gets downloaded to your Drupal install. You’ll go learn more about this readme later in book. For now, I’ll leave you to read the documentation on how to finish installing Views Slideshow on your own.
Summary
Ok, so that was about a half hour to an hour of playing around with some Drupal basics. This chapter covered some basics of Views, and you learned how to create different ways of viewing your content—all without needing any knowledge of HTML, JavaScript, or PHP. You learned about adding new content types and adding fields to content types to extend the type of data collected when creating your blogs, wikis, or whatever other content types you dream up. You can create fields to collect users’ phone numbers, for example, or you can have users add pictures or videos, or sound files perhaps, all by adding fields to your nodes using the CCK, which comes with Drupal. You learned to add blocks to your site, using the out-of-the-box “most recent content” or “most recent comments” block, and add these blocks to the right sidebar, left sidebar, or any other region on the site. You also changed the theme of your site and learned how to download new themes, and you saw how quickly you can change the look and feel of your site by changing your site’s theme. As well, this chapter went over how to download new modules to extend Drupal’s functionality even further. There are hundreds of Drupal add-on modules to try out. This chapter has given you quite a lot to play around with and to explore.