
![]()
Interaction with the built-in applications in Windows Phone is achieved through the Launcher and Chooser APIs. These APIs are contained in the Microsoft.Phone.Tasks namespace and expose their functionality through tasks that provide a consistent and seamless experience for your application users.
As the name implies, a Launcher task launches one of the built-in applications such as the e-mail client or web browser to allow the user to complete some task. Composing an e-mail, sharing something on a social network such as Twitter, or opening the browser to a specific web site are common examples of Launcher tasks. A Launcher task doesn’t return a result or status to your application, so you need to be aware of that when using them. There is no way to directly determine success or failure of the launched task or even whether the user completed or cancelled the task.
A Chooser task, true to its name, launches one of the built-in applications and allows the user the choose something. Examples of Chooser tasks include selecting a contact’s e-mail address, a photo stored on the phone, or some other piece of information. Unlike the Launcher tasks, a chooser returns the information you requested in addition to a Microsoft.Phone.Tasks.TaskResult that you can use to determine what happened.
The various Launchers and Choosers provided in the Microsoft.Phone.Tasks namespace provide access only to specific functionality. Interaction with the actual stored data after it has been created is done through classes in the Microsoft.Phone.UserData namespace. The main classes in this namespace are Contacts, Contact, Appointments, and Appointment. They provide an aggregated view of the user’s contact and calendar data across all of the user’s accounts.
Before any access to the user’s data is allowed, whether through tasks or the UserData classes, these capability requirements must be declared in the application manifest. Recipe 1-6 provides an excellent discussion, but I wanted to call out one important item here. The application capabilities documentation on MSDN1 states the following:
“When you test your app on Windows Phone Emulator during the development process, if your app uses APIs associated with items such as location services or device ID, your app is automatically granted the corresponding capability.”
This is a lie. Your application will compile. It will deploy. It will even run. The ensuing crash of your application when it actually tries to use one of these capabilities will be spectacular.2 Once again, for the full details surrounding capabilities, see Recipe 1-6.
The recipes included in this chapter are as follows:
- 6-1. Save an Appointment
- 6-2. Retrieve an Appointment
- 6-3. Save a Contact
- 6-4. Retrieve a Contact
- 6-5. Create a Custom Contact Store
6-1. Save an Appointment
Problem
You want to be able to allow the user to create and save an appointment in the Calendar application.
Solution
Use the SaveAppointmentTask in the Microsoft.Phone.Tasks namespace.
How It Works
The SaveAppointmentTask falls under the Launcher category of tasks, and its use couldn’t be easier. The first thing you need to do, however, is ensure that your application specifies the capabilities needed in the WPAppManifest.xaml file. Double-click the manifest file under the Properties folder in your project and then select the Capabilities tab. Make sure there is a check in the box beside ID_CAP_APPOINTMENTS.
With the capability added, you are now ready to create a new appointment. You might want to get comfortable and put on some coffee because this is going to take a little time to demonstrate. Ready?
SaveAppointmentTask newAppointment = new SaveAppointmentTask();
newAppointment.Show();
OK, so I might have been exaggerating just a little bit. Those two lines are all you need to launch the new Appointment screen in the Calendar application on the phone. The user can then fill in all of the details and save the new appointment. Or not. You’ll remember from the introduction to this chapter that Launchers don’t return a value or any kind of result to your application. They are “fire and forget.” You won’t even be notified if the user cancels the task. More than likely, you are going to have a specific reason in your application for wanting to create a new appointment, so let’s expand the example a little bit more. First let’s add an app bar button, as shown in Listing 6-1.
Listing 6-1. App Bar Icon Button for Adding an Appointment
<phone:PhoneApplicationPage.ApplicationBar>
    <shell:ApplicationBar IsVisible="True" IsMenuEnabled="False">
        <shell:ApplicationBarIconButton
            Click="AddAppointmentClick"
            IconUri="/Assets/AppBar/add.png"
            Text="add"/>
    </shell:ApplicationBar>
</phone:PhoneApplicationPage.ApplicationBar>
![]() Note When creating buttons on the application bar, you should use the icons provided with the Windows Phone 8 SDK. They can be found in C:Program Files (x86)Microsoft SDKsWindows Phonev8.0IconsDark. You need to use the Dark versions only, and the phone will take care of the rest if the user switches to, or is already using, the Light theme.
Note When creating buttons on the application bar, you should use the icons provided with the Windows Phone 8 SDK. They can be found in C:Program Files (x86)Microsoft SDKsWindows Phonev8.0IconsDark. You need to use the Dark versions only, and the phone will take care of the rest if the user switches to, or is already using, the Light theme.
Listing 6-2 shows the XAML for a UI that allows the user to enter a few details. We’ll add a DatePicker for the start and end dates of the appointment and provide a TextBox for the user to enter a location. Figure 6-1 shows the visual results. Ignore the LongListSelector for now. It’s just hanging out backstage waiting for its cue coming up in Recipe 6-2.
Listing 6-2. XAML for the New Appointment User Interface
<Grid x:Name="ContentPanel" Grid.Row="1" Margin="12,0,12,0">
     <Grid.RowDefinitions>
         <RowDefinition/>
         <RowDefinition Height="Auto"/>
         <RowDefinition Height="Auto"/>
         <RowDefinition Height="Auto"/>
         <RowDefinition Height="Auto"/>
     </Grid.RowDefinitions>
     <Grid.ColumnDefinitions>
         <ColumnDefinition/>
         <ColumnDefinition/>
     </Grid.ColumnDefinitions>
     <phone:LongListSelector
         Grid.Row="0"
         Grid.Column="0"
         ItemsSource="{Binding Appointments}"
         ItemTemplate="{StaticResource SelectorDataTemplate}"
         Grid.ColumnSpan="2"
         VerticalAlignment="Stretch"
         HorizontalAlignment="Stretch"
         x:Name="appointmentList"/>
     <TextBlock
         VerticalAlignment="Center"
         Grid.Row="1"
         Grid.Column="0"
         Text="start"
         Style="{StaticResource PhoneTextNormalStyle}"/>
     <toolkit:DatePicker
         Grid.Column="0"
         Grid.Row="2"
         x:Name="startDatePicker"/>
     <TextBlock
         VerticalAlignment="Center"
         Grid.Column="1"
         Grid.Row="1"
         Text="end"
         Style="{StaticResource PhoneTextNormalStyle}"/>
     <toolkit:DatePicker
         x:Name="endDatePicker"
         Grid.Column="1"
         Grid.Row="2"/>
     <TextBox
         Grid.Column="0"
         Grid.Row="3"
         Grid.ColumnSpan="2"
         x:Name="locationTextBox"/>
</Grid>

Figure 6-1. The screen to add an appointment
With the user interface in place, we’ll add some code to the Click event of the app bar icon button that prepopulates some of the new appointment’s properties. Listing 6-3 shows the required code.
Listing 6-3. App Bar Icon Button Code for Adding a New Appointment
private void AddAppointmentClick(object sender, EventArgs e)
{
    SaveAppointmentTask newAppointment = new SaveAppointmentTask();
    newAppointment.StartTime = startDatePicker.Value;
    newAppointment.EndTime = endDatePicker.Value;
    newAppointment.Location = locationTextBox.Text;
    newAppointment.Subject = "The CODEZ";
    newAppointment.Show();
}
We just pick up the values from the controls and set the various properties of the SaveAppointmentTask and then call the Show method. Figure 6-2 shows the result of the call to Show. It’s worth repeating that as a Launcher, the SaveAppointmentTask does not return a result or status to the calling code. The only way to know if it succeeded would be to retrieve the appointments and see whether an appointment exists that corresponds to the values you were expecting. Of course, the user may have changed the values that you preset, so your code shouldn’t count on anything being the same.3 Recipe 6-2 will cover searching for an appointment.

Figure 6-2. The new appointment page from the Calendar application
Problem
You want to display a list of appointments from the Calendar application within your application.
Solution
Use the SearchAsync method of the Appointments class in the Microsoft.Phone.UserData namespace.
How It Works
As mentioned in the introduction to this chapter, the Microsoft.Phone.UserData namespace contains classes that provide an aggregated view of the user’s contacts and appointments across all accounts.
The first thing you need to do, however, is ensure that your application specifies the capabilities needed in the WPAppManifest.xaml file. Double-click the manifest file under the Properties folder in your project and then select the Capabilities tab. Make sure there is a check in the box beside ID_CAP_APPOINTMENTS. With the capability added, you are now ready to provide appointment search functionality in your application.
First let’s add an app bar button, as shown in Listing 6-4.
Listing 6-4. App Bar Icon Button for Searching Appointments
<phone:PhoneApplicationPage.ApplicationBar>
    <shell:ApplicationBar IsVisible="True" IsMenuEnabled="False">
        <shell:ApplicationBarIconButton
            Click="SearchAppointmentsClick"
            IconUri="/Assets/AppBar/feature.search.png"
            Text="search"/>
    </shell:ApplicationBar>
</phone:PhoneApplicationPage.ApplicationBar>
![]() Note When creating buttons on the application bar, you should use the icons provided with the Windows Phone 8 SDK. They can be found in C:Program Files (x86)Microsoft SDKsWindows Phonev8.0IconsDark. You need to use the Dark versions only, and the phone will take care of the rest if the user switches to, or is already using, the Light theme.
Note When creating buttons on the application bar, you should use the icons provided with the Windows Phone 8 SDK. They can be found in C:Program Files (x86)Microsoft SDKsWindows Phonev8.0IconsDark. You need to use the Dark versions only, and the phone will take care of the rest if the user switches to, or is already using, the Light theme.
Listing 6-5 shows the XAML for a UI that allows the user to enter the date range they want to search. We’ve added a DatePicker for the start date and end date. The DatePicker control can be found in the Windows Phone Toolkit available on CodePlex.4 We’ve also added a LongListSelector to display the results of our search. Take special note of the ItemTemplate element defined for the LongListSelector and its use of the built-in TextBlock styles defined by the Windows Phone 8 SDK. Using these styles will ensure that your application provides a seamless visual experience for your users. The display of calendar appointments in your application will look the same as those in the Calendar app. It also respects the user’s theme and accent color choices.
Listing 6-5. XAML for the Search Appointments User Interface
<Grid x:Name="ContentPanel" Grid.Row="1" Margin="12,0,12,0">
     <Grid.RowDefinitions>
         <RowDefinition/>
         <RowDefinition Height="Auto"/>
         <RowDefinition Height="Auto"/>
         <RowDefinition Height="Auto"/>
         <RowDefinition Height="Auto"/>
     </Grid.RowDefinitions>
     <Grid.ColumnDefinitions>
         <ColumnDefinition/>
         <ColumnDefinition/>
     </Grid.ColumnDefinitions>
     <phone:LongListSelector
         Grid.Row="0"
         Grid.Column="0"
         ItemsSource="{Binding Appointments}"
         Grid.ColumnSpan="2"
         VerticalAlignment="Stretch"
         HorizontalAlignment="Stretch"
         x:Name="appointmentList">
         <phone:LongListSelector.ItemTemplate>
             <DataTemplate >
                 <StackPanel Margin="0,0,0,5">
                     <TextBlock
                         Style="{StaticResource PhoneTextLargeStyle}"
                         Text="{Binding Subject}"/>
                     <TextBlock
                         Style="{StaticResource PhoneTextAccentStyle}"
                         Text="{Binding StartTime}"/>
                     <TextBlock
                         Style="{StaticResource PhoneTextAccentStyle}"
                         Text="{Binding Location}"/>
                 </StackPanel>
             </DataTemplate>
         </phone:LongListSelector.ItemTemplate>
     </phone:LongListSelector>
     <TextBlock
         VerticalAlignment="Center"
         Grid.Row="1"
         Grid.Column="0"
         Text="start"
         Style="{StaticResource PhoneTextNormalStyle}"/>
     <toolkit:DatePicker
         Grid.Column="0"
         Grid.Row="2"
         x:Name="startDatePicker"/>
     <TextBlock
         VerticalAlignment="Center"
         Grid.Column="1"
         Grid.Row="1"
         Text="end"
         Style="{StaticResource PhoneTextNormalStyle}"/>
     <toolkit:DatePicker
         x:Name="endDatePicker"
         Grid.Column="1"
         Grid.Row="2"/>
     <TextBox
         Grid.Column="0"
         Grid.Row="3"
         Grid.ColumnSpan="2"
         x:Name="locationTextBox"/>
</Grid>
Next we’ll need a property to hold the results of our search that we can bind to the LongListSelector for display. To keep things simple and not distract from our goal, we’ll just expose it in a code-behind file and then set the DataContext of the page to itself. MVVM is a fantastic pattern that enables much, but it is not without its overhead. In simple applications, it’s just more pragmatic to just use the code-behind. Listing 6-6 shows how to accomplish this.
Listing 6-6. Setting the DataContext and Exposing the Results of the Search
public AppointmentsView()
   {
       InitializeComponent();
       DataContext = this;
   }

   private ObservableCollection<Appointment> appointments
       = new ObservableCollection<Appointment>();

   public ObservableCollection<Appointment> Appointments
   {
       get
       {
           return appointments;
       }
       set
       {
           appointments = value;
       }
   }
Now that we have everything we need in place, all that’s left is the code to retrieve the data based on our date range. The SearchAsync method of the Appointments class takes a start date, an end date, and a parameter of type Object that allows you to pass any state information to the SearchCompleted event handler. The state object is stored in the AppointmentsSearchEventArgs. It also has three overloads that allow you to narrow your search by restricting the number of results or by limiting the search to a single account. See Table 6-1 for a description of each overload. Listing 6-7 shows the code-behind for our example.
Table 6-1. SearchAsync Overloads of the Appointments Class
| Name | Description |
|---|---|
| SearchAsync(DateTime, DateTime, Object) | Asynchronously searches for appointments that occur between the specified start date and time and end date and time |
| SearchAsync(DateTime, DateTime, Account, Object) | Asynchronously searches for appointments in the specified account and returns results between the start date and time and the end date and time |
| SearchAsync(DateTime, DateTime, Int32, Object) | Asynchronously searches for appointments between the start date and time and the end date and time and returning no more than the specified number of appointments |
| SearchAsync(DateTime, DateTime, Int32, Account, Object) | Asynchronously searches for appointments in the specified account that occur between the specified start date and time and end date and time and returning no more than the specified number of appointments |
Listing 6-7. Code-Behind for a Simple Appointment Date Range Search
private void SearchAppointmentsClick(object sender, EventArgs e)
  {
      GetAppointmentsByDateRange(
          startDatePicker.Value ?? DateTime.Today,
          endDatePicker.Value ?? DateTime.Today.AddDays(7));

  }

  private void GetAppointmentsByDateRange(DateTime startOfRange, DateTime endOfRange)
  {
      Appointments apps = new Appointments();

      apps.SearchCompleted += AppointmentsSearchCompleted;

      apps.SearchAsync(startOfRange,
          endOfRange,
          null);
  }

  void AppointmentsSearchCompleted(object sender, AppointmentsSearchEventArgs e)
  {
      Appointments = new ObservableCollection<Appointment>( e.Results);
  }
There are a couple of things to note in the code. The Value property of the DatePicker is defined as Nullable<DateTime>, but the SearchAsync method does not accept nulls. The easiest way to work with Nullable<T> types is to use the null-coalescing operator (??) to substitute in an appropriate value should the control not have a value set. For this example, a suitable substitute range might be the next seven days.
![]() Note The Windows Phone 8 emulator images don’t ship with any preconfigured appointments, so you will have to create a few using the code in Recipe 6-7 or the built-in Calendar application. Also, each time you shut down the emulator, it gets reset to its original state, and the data you create will be lost. For this example, I just created a single appointment that recurs every weekday to get a range of appointments that would show up in a search.
Note The Windows Phone 8 emulator images don’t ship with any preconfigured appointments, so you will have to create a few using the code in Recipe 6-7 or the built-in Calendar application. Also, each time you shut down the emulator, it gets reset to its original state, and the data you create will be lost. For this example, I just created a single appointment that recurs every weekday to get a range of appointments that would show up in a search.
The GetAppointmentsByDateRange method takes a start date and an end date, adds a SearchCompleted handler, and then calls the SearchAsync method, passing in null for the state parameter because we have nothing interesting to communicate to the handler. The Results property of the AppointmentsSearchEventArgs parameter is an IEnumberable<Appointment>, which we pass to the constructor of a new ObservableCollection<Appointment> to reset the Appointments property we have bound to the LongListSelector.
Figure 6-3 shows the results of a search.

Figure 6-3. Search results shown in the sample application
Problem
You want the users of your application to be able to create a new contact in contacts of their Microsoft account.
Solution
Use the SaveContactTask in the Microsoft.Phone.Tasks namespace to configure and launch the new contact page of the built-in People application.
How It Works
The SaveContactTask falls under the Launcher category of tasks, and its use couldn’t be easier. The first thing you need to do, however, is ensure that your application specifies the capabilities needed in the WPAppManifest.xaml file. Double-click the manifest file under the Properties folder in your project and then select the Capabilities tab. Make sure there is a check in the box beside ID_CAP_CONTACTS.
LAUNCHERS AND CHOOSERS
Or How I Learned to Stop Worrying and Love Windows Phone 8
The code needed to use the various tasks is startlingly simple; it’s so simple in fact that I couldn’t figure out how to do it when I first started playing with Windows Phone 8. I wanted to “new up” a contact and add it to something. Where are the contacts stored? Contacts doesn’t have a public constructor, so I can’t “new up” one, which means there is probably a factory method somewhere. Hey look, Contacts. I’ll bet that’s where they. . .nope. Only a SearchAsync method. Contacts has an Accounts property. . .surely5 that's where they. . .only Kind and Name, you say? I abandoned my first foray into Windows Phone 8 development in frustration. Besides, I had more pressing work to do at the time.
Unlike traditional development, where you had to provide every feature, in Windows Phone 8 there is much that is already done for you. The main rationalization for this design is to protect the user and to prevent rogue programs from filling up the user’s contacts or appointments with junk. Applications must not only declare their intended capability requirements up front but also interact with those capabilities through the designated APIs. Keep this in mind as you embark on your discovery of the platform, and you’ll avoid the frustration that I experienced.
With the capability added, you are now ready to create a new contact. Here is the code required:
SaveContactTask newContact = new SaveContactTask();
newContact.Show();
Those two lines are all you need to launch the new Contact page in the People application on the phone. The user can then fill in all of the details and save the new contact. Or not. Just as I described in the introduction to this chapter, Launchers don’t return a value or any kind of result to your application. They are “fire and forget.” You won’t even be notified if the user cancels the task.
Let’s expand the example a little bit more and add the ability for your application to pass in some additional details before launching the new Contact page. First, let’s add an app bar button, as shown in Listing 6-8.
Listing 6-8. App Bar Icon Button for Adding an Appointment
<phone:PhoneApplicationPage.ApplicationBar>
    <shell:ApplicationBar IsVisible="True" IsMenuEnabled="False">
        <shell:ApplicationBarIconButton
            Click="AddContactClick"
            IconUri="/Assets/AppBar/add.png"
            Text="add"/>
    </shell:ApplicationBar>
</phone:PhoneApplicationPage.ApplicationBar>
![]() Note When creating buttons on the application bar, you should use the icons provided with the Windows Phone 8 SDK. They can be found in C:Program Files (x86)Microsoft SDKsWindows Phonev8.0IconsDark. You need to use the Dark versions only, and the phone will take care of the rest if the user switches to, or is already using, the Light theme.
Note When creating buttons on the application bar, you should use the icons provided with the Windows Phone 8 SDK. They can be found in C:Program Files (x86)Microsoft SDKsWindows Phonev8.0IconsDark. You need to use the Dark versions only, and the phone will take care of the rest if the user switches to, or is already using, the Light theme.
Next we’ll add some controls that let the user enter a first name and a last name that will prepopulate the add contact page. The PhoneTextBox is available in the Windows Phone Toolkit, which you can add to your project using NuGet. The PhoneTextBox provides properties such as the Hint help to simplify the user interface. The Hint is displayed as a watermark placeholder in the text box, so there is no need for a label. See Recipe 2-6 for additional information on working with the Windows Phone Toolkit. Listing 6-9 shows the XAML we need.
Listing 6-9. XAML for the Add Contact Functionality
<Grid x:Name="ContentPanel" Grid.Row="1" Margin="12,0,12,0">
    <Grid.RowDefinitions>
        <RowDefinition Height="1*"/>
        <RowDefinition Height="2*"/>
        <RowDefinition Height="Auto"/>
        <RowDefinition Height="Auto"/>
    </Grid.RowDefinitions>
    <Grid.ColumnDefinitions>
        <ColumnDefinition/>
        <ColumnDefinition/>
    </Grid.ColumnDefinitions>
    <StackPanel Grid.Row="0" Grid.ColumnSpan="2">
        <TextBlock
            Text="accounts"/>
        <phone:LongListSelector
            Name="accountSources"
            ItemsSource="{Binding Accounts}"
            Margin="24,0,0,0">
            <phone:LongListSelector.ItemTemplate>
                <DataTemplate>
                    <TextBlock
                        Name="ContactResults"
                        Text="{Binding Path=Name}"/>
                </DataTemplate>
            </phone:LongListSelector.ItemTemplate>
        </phone:LongListSelector>
    </StackPanel>
    <StackPanel Grid.ColumnSpan="2" Grid.Row="1">
        <TextBlock
            Text="contacts"/>
        <phone:LongListSelector
            ItemTemplate="{StaticResource ContactDataTemplate}"
            ItemsSource="{Binding Contacts}"
            Margin="24,0,0,0"
            x:Name="contactList"/>
    </StackPanel>
    <toolkit:PhoneTextBox
        Grid.Row="3"
        Grid.Column="0"
        x:Name="firstNameTextBox"
        Hint="first name" />
    <toolkit:PhoneTextBox
        Grid.Column="1"
        Grid.Row="3"
        Hint="last name"
        x:Name="lastNameTextBox"/>
</Grid>
The only thing left to do now is to add some code to create a SaveContactTask, set the first and last name properties to the values entered in the PhoneTextBox, and start the Show. Listing 6-10 has the required code.
Listing 6-10. The Code Required to Save a New Contact
private void NewContactClick(object sender, EventArgs e)
{
    SaveContactTask saveContact = new SaveContactTask();
    saveContact.FirstName = firstNameTextBox.Text;
    saveContact.LastName = lastNameTextBox.Text;
    saveContact.Completed += SaveContactCompleted;
    saveContact.Show();

}

void SaveContactCompleted(object sender, SaveContactResult e)
{
    if (e.TaskResult == TaskResult.OK)
    {
        MessageBox.Show("Contact Added");
    }
    else if (e.TaskResult == TaskResult.Cancel)
    {
        MessageBox.Show("Contact not added. You cancelled it.");
    }
}
And that’s all there is to it. As I mentioned in the sidebar, interacting with user data and the Launcher and Chooser APIs is incredibly simple and straightforward.
6-4. Retrieve a Contact
Problem
You want to allow the user of your application to search for a specific contact or a piece of information about that contact.
Solution
There are several ways to solve this problem depending on the information you desire to retrieve. You can use the SearchAsync method of the Contacts class in the Microsoft.Phone.UserData namespace to find a contact. There are also several chooser tasks available to find specific pieces of information about a contact. They are as follows:
- AddressChooserTask
- PhoneNumberChooserTask
- EmailAddressChooserTask
How It Works
We’ll forego the creation of any type of user interface in this recipe so that we can devote more space to searching using the Contacts class in the Microsoft.Phone.UserData namespace. Using the Chooser tasks is quite straightforward, so we’ll focus on using the Contacts class only. As you will see, its implementation is. . .interesting.
The first thing you need to do, however, is ensure that your application specifies the capabilities needed in the WPAppManifest.xaml file. Double-click the manifest file under the Properties folder in your project and then select the Capabilities tab. Make sure there is a check in the box beside ID_CAP_CONTACTS. With the capability added, you are now ready to work with the various elements of this recipe.
Microsoft.Phone.UserData.Contacts
Those of you who have already reviewed Recipe 6-2 on searching using the Appointments class might expect, as I did, that the Contacts class would work in pretty much the same fashion. Unfortunately, it looks like this:
Bubble yourBubble = new Bubble();
yourBubble.Burst();
Sorry about that. It turns out that searching in Contacts is a little more, or less depending on your perspective, complicated than Appointments. There is only a single implementation of the SearchAsync method that takes three parameters, as described in Table 6-2.
Table 6-2. Parameters of the SearchAsync Method of the Contacts Class
| Parameter | Type | Description |
|---|---|---|
| Filter | System.String | The filter string to use for search matching. |
| filterKind | Microsoft.Phone.UserData.FilterKind | The kind of filter to be used when searching. |
| State | System.Object | This object is stored in the State property of the ContactsSearchEventArgs that is returned to the SearchCompleted delegate. |
The behavior of the search is controlled by the filterKind parameter. Table 6-3 describes the members of the FilterKind enumeration. A sample search for each member is also included.
Table 6-3. The Members of the Microsoft.Phone.UserData.FilterKind Enumeration
| Filter kind | Sample search | Description |
|---|---|---|
| None | SearchAsync(String.Empty, FilterKind.None, null) | Searches for all contacts |
| PinnedToStart | SearchAsync(String.Empty, FilterKind.PinnedToStart, null) | Searches for all contacts that are pinned to the start screen |
| DisplayName | SearchAsync(“A”, FilterKind.DisplayName, null) | Searches by the display name |
| EmailAddress | SearchAsync(“[email protected]”, FilterKind.EmailAddress, null) | Searches by e-mail address |
| PhoneNumber | SearchAsync(“555-0004”, FilterKind.PhoneNumber, null) | Searches by phone number |
In addition to using the built-in filters and the SearchAsync method, you can also use LINQ to query for Contacts. You would first search for all contacts with an empty string for a filter and using FilterKind.None and then use LINQ to query the results any way you want. The built-in search filters, however, are indexed to improve performance, so a LINQ query that filters all contacts in memory is going to be slower. How much slower? Well, assuming you have every person in your home state or province in your contacts, I’m guessing it could run into the tens of nanoseconds at least.6
As you can imagine, each of the different filters also has its own set of rules that it uses to determine a match. The following sections examine these rules in turn.
The name filter uses the filter string and tries a prefix-match of the first, middle, and last names of the contacts. It is a StartsWith string match as opposed to a Contains. Table 6-4 shows the match results of the same filter string against various name combinations.
Table 6-4. Match Results of the Same Filter String with Different Data
| Filter String | Name | Match? |
|---|---|---|
| Ri | Ricardo Montalbán | Yes |
| Ri | David Richard Totzke | Yes |
| Ri | Richie Rich | Yes |
| Ri | Ed Harris | No |
| Ri | Lori Lalonde | No |
The PhoneNumber filter uses a combination of exact and smart matching. You must provide at least the last six digits of the phone number in order for a match to be returned. The documentation on MSDN7 states that “differences such as dialing codes and international dialing codes are ignored.” Unlike earlier claims regarding the veracity of search performance, I did do some experiments to validate these claims, and the results are contained in Table 6-5. The results are . . . interesting.
Table 6-5. PhoneNumber Search String Test Results
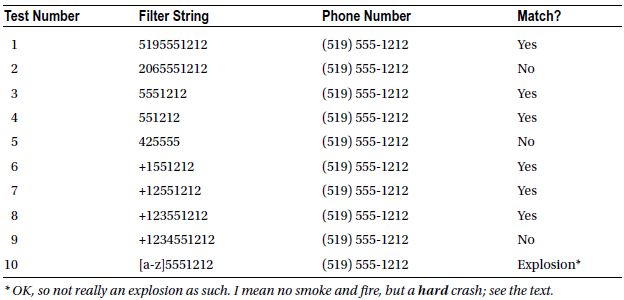
Test 1 was not a surprise, whereas test 2 was, in that the difference in area code is clearly not ignored as stated in the documentation. Tests 3 through 5 are consistent with the documentation. Adding a plus sign prefix created some interesting changes. Based on the results of tests 6 through 9, the first three digits immediately following the plus sign are ignored presumably as international dialing codes. Ten was a big surprise.
You crash hard. It’s the kind of crash that a try/catch can’t even save you from. Figure 6-4 shows the exception details when you end up in the UnhandledException handler at the top of the stack. It’s not pretty.

Figure 6-4. Crash!
Those of you who have been around a bit will recognize the 80004005 error code. That’s our good, ol’ friend and generic COM error E_FAIL - Unspecified error. It’s rather an odd thing to happen really. At the time of this writing, the only workaround for this is to validate the string you pass as the filter and ensure it conforms to the accepted patterns and doesn’t start with anything other than a plus sign, an open bracket, or a number.
I find this odd because the implementation of the event-based asynchronous programming model would require that the SearchAsync method swallow the exception silently and then assign the exception to the Error property of the relevant CompletionEventArgs class for examination in your handler. There isn’t even an Error property on the ContactsSearchEventArgs. Oh, the shame of it.
![]() Note I have verified with the Windows Phone 8 SDK folks that I have indeed discovered a bug in the SDK. It’s been logged with low priority, so. . .you know. You are going to want to be sure to validate the filter string you submit to the SearchAsync method or your app is going to crash. And that’s not good for anybody.
Note I have verified with the Windows Phone 8 SDK folks that I have indeed discovered a bug in the SDK. It’s been logged with low priority, so. . .you know. You are going to want to be sure to validate the filter string you submit to the SearchAsync method or your app is going to crash. And that’s not good for anybody.
The EmailAddress filter kind uses a combination of exact and smart matching to find contacts. The first part of the e-mail address that precedes the @ symbol must match exactly. Table 6-6 shows some examples of various filter strings and how they match with certain e-mail addresses.
Table 6-6. Pattern Matching with FilterKind.EmailAddress

The good news is that I was unable to outright crash this filter as I did with FilterKind.PhoneNumber; however, the filter doesn’t behave exactly as described on MSDN.8 We can infer the matching rules from the results of our tests in Table 6-6, and here, to within experimental error, is what I believe the requirements for a positive match to be:
Primary Rule: The characters before the @ symbol in the filter string must always match the characters before the @ of the e-mail address of the contact.
- Tests 1 and 2 in Table 6-6
- A filter string with no @ or with @ at the end of the string will match only with the characters prior to the @ in the e-mail address of a contact.
- Test 5 in Table 6-6
- Primary Rule match and
- There is no dot separator in the characters after the @.
- The characters after the @ match the top-level domain .
- Test 3 in Table 6-6
- Primary Rule match and
- The characters after the @ are of the form subdomain.domain.topleveldomain.
- The topleveldomain portion of the filter string match the top-level domain of the e-mail address of the contact.
- The domain portion of the filter string match the domain of the e-mail address of the contact.
- Any and all subdomain portions of the filter string are ignored.
As far as I can tell, any other combination of characters in the filter string will result in there being no matches returned, but, hey, at least you don’t crash.
FilterKind.None and FilterKind.PinnedToStart
These two filters are the easiest to use and behave nearly identical to each other. Both of these filters ignore any filter string that is passed. FilterKind.None returns a list of all of the contacts that is aggregated across all accounts. FilterKind.PinnedToStart returns all of the contacts that have been pinned to the start screen. It couldn’t be simpler.
6-5. Create a Custom Contact Store
Problem
You have an application that has a need to create and store its own contacts. You would like it if these contacts were also available to the user in the People hub.
Solution
You can create application-specific contacts that are stored on the phone by using the ContactStore class in the Microsoft.Phone.PersonalInformation namespace.
How It Works
I’ve been writing these recipes in the order in which they are listed in the book, so I’m coming from a different perspective than you might be if you just jumped right into this recipe. If you’ve been reading this chapter from the beginning, then you’ll understand when I say, “I get to use async/await! Finally!”9
Asynchronous programming is generally regarded as a must for Windows Phone 8 development, and almost everything you interact with has an asynchronous implementation. What is somewhat surprising, however, is that the APIs are implemented using the event-based asynchronous pattern. The .NET daddy of multithreading and asynchronous programming, Jeffrey Richter, believes that this model should never have been introduced into the framework,10 as do many others. There are very few classes in the entire Framework Class Library that implement this pattern. There are 17 to be exact. In any case, rant over. On with the code.
Opening the Store
As with all functionality, you’ll need to declare the capabilities required by your application. For this recipe you will need the ID_CAP_CONTACTS capability. Double-click the WPAppManifest.xml file in your project, click the Capabilities tab, and then check the box beside ID_CAP_CONTACTS.
You create application-specific contacts using the CreateOrOpenAsync factory method of the ContactStore class. This method has two overloads, as shown in Table 6-7.
Table 6-7. CreateOrOpenAsync Method Overloads on the ContactStore Class
| Method | Description |
|---|---|
| CreateOrOpenAsync() | Opens the app’s custom contact store, creating the store with the default options if it does not already exist |
| CreateOrOpenAsync(ContactStoreSystemAccessMode, ContactStoreApplicationAccessMode) | Opens the app’s custom contact store, creating the store with the specified options if it does not already exist |
The default values of ReadOnly for ContactStoreSystemAccessMode and LimitedReadOnly for ContactStoreApplicationAccessMode are used if you choose to use the parameterless version of the method. Tables 6-8 and 6-9 show the values of the ContactStoreSystemAccessMode and ContactStoreApplicationAccessMode enumerations, respectively.
Table 6-8. ContactStoreSystemAccessMode Enumeration
| Member | Value | Description |
|---|---|---|
| ReadOnly | 0 | The operating system can only read from the contact store. |
| ReadWrite | 1 | The operating system can modify contacts in the store. |
Table 6-9. ContactStoreApplicationAccessMode Enumeration
| Member | Value | Description |
|---|---|---|
| LimitedReadOnly | 0 | Other applications can only read the description and display picture for contacts in the store. |
| ReadOnly | 1 | Other applications can read all properties for contacts in the store. |
The defaults are good enough for our purposes, so we’ll just use the parameterless version.
ContactStore store = await ContactStore.CreateOrOpenAsync();
Now that we have our ContactStore, we pass that to the constructor of a new StoredContact, set some property values, and then save the new contact to the store.
StoredContact contact = new StoredContact(store);
contact.FamilyName = "Totzke";
contact.GivenName = "Dave";
await contact.SaveAsync();
The number of properties available to you on the StoredContact are limited. Table 6-10 lists the properties available.
Table 6-10. Properties of the StoredContact Class
| Property | Access type | Description |
|---|---|---|
| DisplayName | Read/write | Gets or sets the display name of a stored contact |
| DisplayPicture | Read-only | Gets the display picture of a stored contact |
| FamilyName | Read/write | Gets or sets the family name of the stored contact |
| GivenName | Read/write | Gets or sets the given name of the stored contact |
| HonorificPrefix | Read/write | Gets or sets the honorific prefix of the stored contact |
| HonorificSuffix | Read/write | Gets or sets the honorific suffix of the stored contact |
| Id | Read-only | Gets the local identifier of the stored contact |
| RemoteId | Read/write | Gets the remote identifier of the stored contact |
| Store | Read-only | Gets the ContactStore in which the contact is stored |
In addition to the basic properties, however, the StoredContact supports additional properties by making a collection of name-value pairs available to you in the form of an IDictionary<string, object>. You can retrieve this list of custom properties by calling the GetExtendedPropertiesAsync method, as shown in the following snippet:
IDictionary<string, object> props = await contact.GetExtendedPropertiesAsync();
props.Add("FavoriteColor", "CobaltBlue");
await contact.SaveAsync();
You can also use the static class KnownContactProperties, which exposes quite a few static string properties with common contact property names. Using this class will help you remain consistent in the storage and retrieval of custom information, as shown here:
props.Add(KnownContactProperties.JobTitle, "Dark Wizard");
And that’s all there is to it. The custom ContactStore makes it very simple for you to create and store application-specific contacts. Your contacts will show up in the People hub as well as search results.
1 You can find the application capabilities and hardware requirements for Windows Phone at http://msdn.microsoft.com/en-us/library/windowsphone/develop/jj206936(v=vs.105).aspx#BKMK_Softwarecapabilities.
2 In reality, most would consider the demise of your application to be anything but. It is simply shut down, and you are returned from whence you came. I stand by the adjective, as all things of this nature are relative, and I don’t get out much since I’ve been writing this book.
3 No. There is no way to prevent the user from changing the values provided by your application.
4 See the Windows Phone Toolkit at http://phone.codeplex.com.
5 And don’t call me Shirley.
6 To within experimental error. Number of experiments conducted by author: Zero. Sarcasm Detected: Yes.
7 http://msdn.microsoft.com/en-us/library/windowsphone/develop/hh286417(v=vs.105).aspx8 http://msdn.microsoft.com/en-us/library/windowsphone/develop/hh286417(v=vs.105).aspx9 Asynchronous Programming with Async and Await (C# and Visual Basic): http://msdn.microsoft.com/en-us/library/vstudio/hh191443.aspx10 CLR via C# by Jeffrey Richter (Microsoft Press, 2010)