
C H A P T E R 4
Accessing Data from Code
Sooner or later, you will reach the limits of what you can achieve by using the graphical designers. To progress further, you will need to write code. LightSwitch provides a strong set of APIs to help you out in this task. There are many things that you can achieve through code, one of which is accessing data.
In this chapter, you will learn how to access your data by using code. This not only includes the data that you have defined through your data sources, but also security details such as the currently logged-on user. When data is committed to the database (or underlying data store), it passes through the save pipeline, and LightSwitch automatically manages the issues that relate to transactions and concurrency. This chapter shows you how all of this works and more.
Introducing Data Access
In Chapter 1, you learned about the architecture that sits behind a LightSwitch application. This is summarized in Figure 4-1, which illustrates the interaction between client and server.
Each screen in an application maintains an independent view of the data by using a DataWorkspace object. The main role of this object is to fetch and manage data. The data workspace contains a change set for each data source that is used to track all of the data changes that relate to that data source.
When the time comes to save, the SaveChanges operation that corresponds to the data source on the server is invoked by the client. When the call is made, the change set is serialized and passed into the SaveChanges method. When the change set is received by the server, it is deserialized into a server data workspace, and the save pipeline operates on those changes.

Figure 4-1. Client and server interaction during a save
LightSwitch allows you to programmatically access most of the data objects that have been mentioned. For example, you can use code to access the data workspace, change sets, entities, and entity properties. On the server, you can inject code into the save pipeline and write additional logic.
Using LightSwitch Data Access Objects
Figure 4-2 illustrates the data access objects that LightSwitch exposes to you.
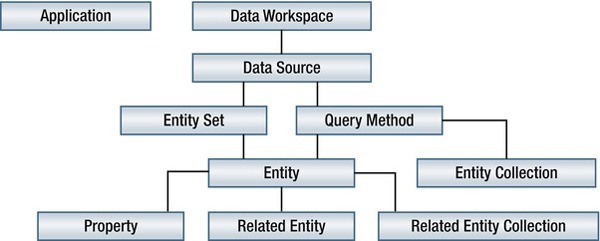
Figure 4-2. Data access objects
LightSwitch does a very good job of automatically generating objects that are used for accessing data. The object names match the names of the items in your solution, which makes it intuitive for you to write code. For example, if you create a table called Customers in your project, you can programmatically access the details of your customer through an object called Customer. The inner workings of all of these objects are described in the following sections in greater detail.
Application Object
The Application object is a top-level object that allows you to access details such as the current user. The properties and methods that are available to you will depend on where that object is used. Figure 4-3 illustrates the IntelliSense options that are visible when writing code on a screen, as compared to writing code in the common or server projects.
When writing screen code, methods that relate to managing screens are available. Because there isn't any notion of a screen when writing code on the server, these screen methods are not available. In both instances, a User property is exposed (which is explained later in this chapter).
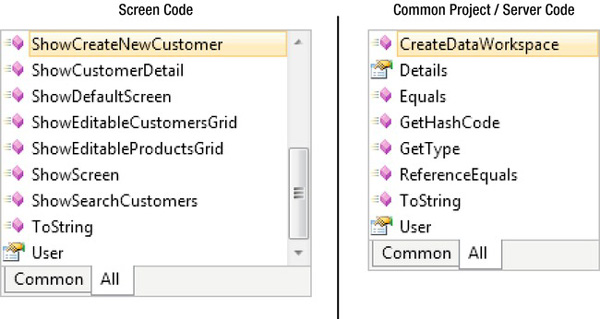
Figure 4-3. The Application object properties and methods
Using the Application Object in Screen Code
LightSwitch includes various methods for managing screens when using the application object to write client-side code. LightSwitch automatically generates a Show method for each screen in your application, which you can use to open screens. For example, Figure 4-3 illustrates a method called ShowCreateNewCustomer. In this example, CreateNewCustomer is the name of a screen in the application.
The ShowScreen method allows you to write code that navigates to another open screen in your application. Listing 4-1 shows how you would use this method to open a screen called CustomerSearchScreen, along with a few of the other screen methods that are available to you.
Listing 4-1. Navigating to a Different Open Screen
VB:

File: ShipperCentralClientUserCodeHomeScreen.vb


'Activating the customer search screen if it is already open

Application.ActiveScreens.First(?

  Function(screen) screen.GetName() = CustomerSearchScreen"?

  ).Activate()


'Opening a screen called CreateNewCustomer

Application.ShowCreateNewCustomer()


'Opening the CustomerDetail screen for customer ID 8

Application.ShowCustomerDetail(8)


'Opening the CustomerDetail screen for customer ID 8 using the ShowDefaultScreen method


Dim cust = DataWorkspace.ApplicationData.Customers_Single(8)

Application.ShowDefaultScreen(cust)


C#:


File: ShipperCentralClientUserCodeHomeScreen.cs


//Activating the customer search screen if it is already open

Application.ActiveScreens.First(?

 screen => screen.GetName() == CustomerSearchScreen"

).Activate();


//Opening a screen called CreateNewCustomer

Application.ShowCreateNewCustomer();


//Opening the CustomerDetail screen for customer ID 8

Application.ShowCustomerDetail(8);


//Opening the CustomerDetail screen for customer ID 8 using the ShowDefaultScreen method

Customer cust = DataWorkspace.ApplicationData.Customers_Single(8);

Application.ShowDefaultScreen(cust);
The ShowDefaultScreen method allows you to pass in any entity and opens the entity in the default screen.
The application object also exposes a collection called ActiveScreens. This collection contains a reference to each screen that is currently open in your application. As an example of how you would use this collection, you could create a button on your screen to refresh all other screens that are currently open. The code in Listing 4-2 shows you how to do this.
Listing 4-2. Refreshing All Open Screens in Your Application
VB:


File: ShipperCentralClientUserCodeHomeScreen.vb


Dim screens = Me.Application.ActiveScreens()

For Each s In screens

 Dim screen = s.Screen

 screen.Details.Dispatcher.BeginInvoke(

    Sub()

      screen.Refresh()

    End Sub

Next


C#:


File: ShipperCentralClientUserCodeHomeScreen.cs


var screens = this.Application.ActiveScreens;

foreach (var s in screens)

{

   var screen = s.Screen;

   screen.Details.Dispatcher.BeginInvoke(() => {

     screen.Refresh();

   });

}
Data Workspace
The DataWorkspace object is the top-level data access object and provides access to your data sources. LightSwitch exposes a data source object for each data source in your application. The programmatic object name will be identical to the name of your data source. Figure 4-4 illustrates the data source objects that are visible through IntelliSense and how these relate to the data sources that you see in Solution Explorer.
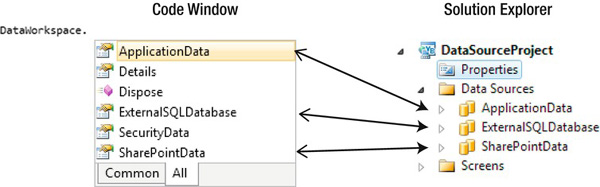
Figure 4-4. The DataWorkspace object
Data Source Object
Data source objects allow you to access query methods and entity collections. Figure 4-5 illustrates the IntelliSense options that are visible at a data source level. The data source object provides access to entity sets such as Orders, OrderStatus, and Products. These entity sets relate to the entities that you have added into your data source and allow you to access collections of data.
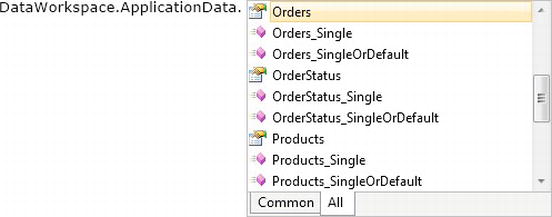
Figure 4-5. Data source methods shown in IntelliSense
LightSwitch generates two query methods called _Single and _SingleOrDefault for each entity in the data source. The examples shown in Figure 4-5 illustrate query methods called Orders_Single and Orders_SingleOrDefault. These methods would allow you to retrieve a single record by the ID property or primary key. The difference between Single and SingleOrDefault is that Single throws an exception if the record is not found. SingleOrDefault returns null rather than throwing an exception.
Listing 4-3 illustrates the code that you would use to retrieve the order record with an OrderID of 8. This code can be used on both the client and server.
Listing 4-3. Retrieving a Single Record
VB:

Dim orderRecord as Order = Me.DataWorkspace.ApplicationData.Orders_Single(8)
C#:

Order orderRecord = this.DataWorkspace.ApplicationData.Orders_Single(8);
Data source properties also expose a details class. This can be used to access details that relate to the change set and to access the original value of any modified data. The details classis described further in the “Working with Change Sets” section.
An important method found in the data source object is the SaveChanges method. This method saves the changes that you have made to the data store. However, you typically don't call this directly, but rather call the screen's Save method, which delegates the save operation to the appropriate data source object.
Entity Sets
Entity sets allow you to programmatically access sets of data. Figure 4-6 illustrates the methods and properties that you can access.
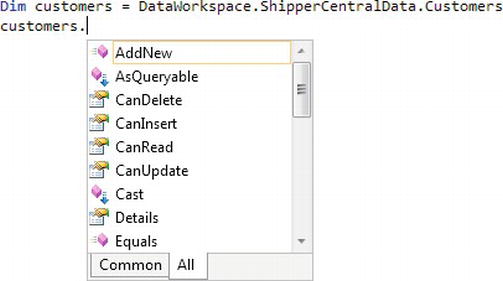
Figure 4-6. Methods and properties of entity sets
Entity sets contain methods that allow you to check whether the current user has permission to read, update, or delete entities in the collection. Chapter 14 covers security and authorization in further detail.
Entity collections contain an extension method called Search. This enables you to programmatically perform a search by passing a parameter array of search terms.
Entity collections also contain a method called Add, which allows you to add a new record. Listing 4-4 illustrates the code that you would use to do this. The Add method returns an instance of an entity object (which will be described in the next section).
There is no method at the entity-set level to delete entities. Deleting entities is carried out through the actual entity object.
VB:

Dim OrderRecord = New Order()
C#:

Order OrderRecord = new Order();
![]() Note Entity sets and entity collections are not the same, as you might recall from Chapter 3. Entity sets represent tables and lists in the store. The term collection is often used to refer to something cached locally. Within LightSwitch, entity collections are used for navigation properties.
Note Entity sets and entity collections are not the same, as you might recall from Chapter 3. Entity sets represent tables and lists in the store. The term collection is often used to refer to something cached locally. Within LightSwitch, entity collections are used for navigation properties.
Entities
An entity object represents a single instance of an entity. In LightSwitch terms, an entity represents a single row in a table or a list in the data source. Figure 4-7 illustrates the IntelliSense options for an entity object that relates to a customer entity.
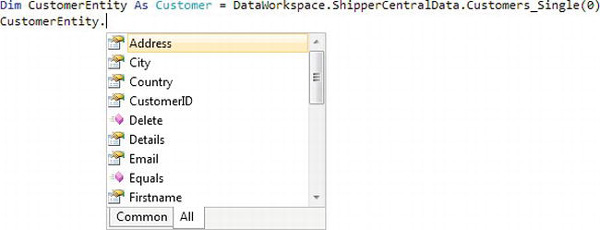
Figure 4-7. Customer entity methods and properties
An entity object contains methods that you can use to delete an entity, or to read or update the properties in your entity. An entity object also allows you to retrieve the details of related entities. For the preceding customer entity, LightSwitch exposes an entity navigation property called Orders that allows you to programmatically work with the related orders.
To delete an entity, you would call the Delete method. Listing 4-5 demonstrates the code that you would use to delete an order record with an ID of 8. Calling the Save method on the data source object commits the deletion in the data store.
Listing 4-5. Deleting an Entity
VB:

Dim OrderRecord as Order = Me.DataWorkspace.ApplicationData.Orders_Single(8)

orderRecord.Delete()


C#:

Order OrderRecord = this.DataWorkspace.ApplicationData.Orders_Single(8);

orderRecord.Delete();
Entities also contain a Details object that you can use to obtain further details about the entity. In particular, this object includes a DiscardsChanges method that you can use to undo any changes. An example of calling this method is explained in upcoming “Working with Change Sets” section.
Properties and Nullable Data Types
LightSwitch programmatically exposes the properties that belong to an entity. You can use these to get or set the corresponding values.
The data type of the property corresponds to the data type defined in the table. If a field is not defined as required, LightSwitch exposes the property by using a nullable data type (except for String and Binary, which are reference types). Nullable data types were introduced in .NET 2.0, and this can sometimes cause confusion for users who have not seen this feature before. Figure 4-8 illustrates a Product table that contains two fields called Price and Discount. Price is a required field, whereas Discount is a field that is not required. Discount is therefore exposed as a nullable double. Figure 4-8 illustrates the difference that is shown through the code window.
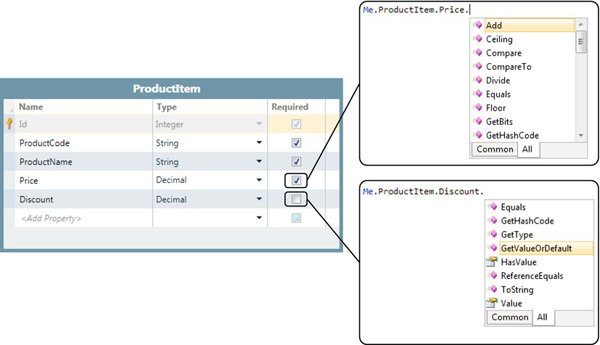
Figure 4-8. Nullable data types in IntelliSense
These nullable types include additional properties and methods, which are shown in Table 4-1.
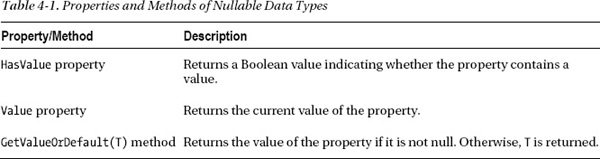
You can always assign a value or null (Nothing in VB) directly to a nullable property. But getting the value requires care. Accessing the Value property will throw an exception if it is null. Using GetValueOrDefault is often safer.
In the example that follows, a screen button is created that multiplies the discount by the price and shows this to the user through a message box.
When writing this type of code, the price cannot be directly multiplied by the discount because discount is a nullable double and price is not. Listing 4-6 shows how you would carry out this multiplication by calling the GetValueOrDefault method of the discount property.
Listing 4-6. Using the GetValueOrDefault Method
VB:


File: ShipperCentralClientUserCodeProductDetail.vb


Private Sub ShowDiscountedPrice_Execute()

   ShowMessageBox(ProductProperty.Discount.GetValueOrDefault(0) * ProductProperty.Price)

End Sub
C#:


File: ShipperCentralClientUserCodeProductDetail.cs


private void ShowDiscountedPrice_Execute()

{

   ShowMessageBox(ProductProperty.Discount.GetValueOrDefault(0) * ProductProperty.Price) ;

}
If you choose not to use the GetValueOrDefault method, you could achieve the same thing by writing logic that uses the HasValue or Value properties.
![]() Note If you receive a compilation error along the lines of Cannot implicitly convert type decimal to decimal, it is likely to be caused by nullable variables. The
Note If you receive a compilation error along the lines of Cannot implicitly convert type decimal to decimal, it is likely to be caused by nullable variables. The GetValueOrDefault method can help you resolve such errors.
Working with Screen Data
Many developers want to programmatically access the data items that are shown on a screen. For example, you might want to loop through all orders shown on a data grid and set the shipped date to today's date. Alternatively, you might want to create a button that changes a surname field to uppercase when clicked. These examples may appear fairly unrealistic, but the purpose of this exercise is to illustrate how you can programmatically access these screen properties.
Developers new to Silverlight or WPF (Windows Presentation Foundation) may approach this task by attempting to access the surname text box control directly or by looping through the data in the data grid control. Such developers might be accustomed to accessing grid data by ordinal row and column numbers, looping through row objects in the grid, or using ItemDataBound or ItemCommand type events that are exposed by the control. LightSwitch doesn't work like this, and this shift in thinking may be difficult for some developers at first.
The controls that you see on screens such as text boxes, lists, and grids are purely views and exist only to display data, nothing else. Therefore, getting and setting the data shown on controls is not done through the controls themselves. Instead, the correct way to do this is to work with the actual underlying screen data (the model). Because the controls are data bound to the model through the view model, the screen data will automatically refresh itself as soon as the model data changes.
Setting Text Box Values
Let's begin with a text box illustration. In this example, a screen is created based on a customer table using the New Data Screen template. After creating the screen, we'll create a new method called MakeUpperCase by using the Add Data Item dialog box. A button is created on the screen by dragging the method onto the Command Bar area.
The screen template automatically creates a customer property for you called CustomerProperty. This name is used in code to access all of the fields that relate to a customer. Figure 4-9 illustrates how this appears in the screen designer.
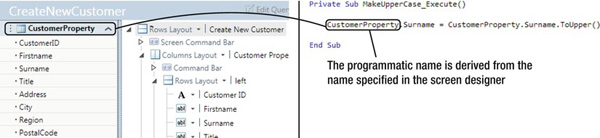
Figure 4-9. Accessing screen properties in code
When the screen is run and the button clicked, the Surname property is changed to uppercase, and LightSwitch automatically updates the text box to reflect the change.
Accessing Grid and List Values
You can access the data in a data grid in a similar fashion to the preceding text box example. In the following example, a screen is created based on the Orders table by using the editable screen template. After creating the screen, create a new method called SetShippingDate by using the Add Data Item dialog box. Figure 4-10 shows the screen in the designer.
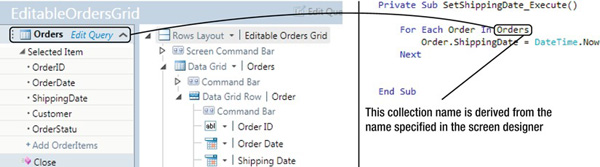
Figure 4-10. Accessing a screen collection property in code
Listing 4-7 shows the code that is used to loop through the Orders collection on the screen.
When the screen is run and the button clicked, the shipping dates on all orders in the grid are set to today's date by using the underlying order collection. Once again, LightSwitch automatically updates the grid to reflect the change.
Listing 4-7. Accessing Grid Values
VB:

File : ShipperCentralCommonUserCodeOrderDetailGrid.vb


Private Sub SetShippingDate_Execute()

   For Each order In Me.Orders

     order.ShippingDate = DateTime.Now

   Next

End Sub
C#:

File : ShipperCentralCommonUserCodeOrderDetailGrid.cs

private void SetShippingDate_Execute()

{

   foreach (Order order in this.Orders) {

     order.ShippingDate = DateTime.Now;

   }

}
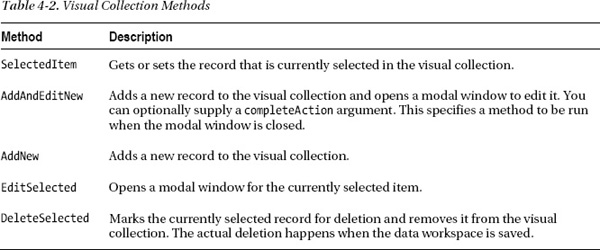
In grid- and list-type screens, LightSwitch exposes the data as a visual collection (of type Microsoft.LightSwitch.Framework.Client.VisualCollection). A visual collection contains the records that are currently shown in the grid or list. In this example, the visual collection is called Orders. Visual collections include some useful methods that you can use. These are shown in Table 4-2.
![]() Note Visual collections contain only the page of data that is currently visible to the end user. If the collection supports paging (the default) or if the end user has filtered the list, any code that references it (such as that shown in Listing 4-7) will operate only on the records that are currently visible.
Note Visual collections contain only the page of data that is currently visible to the end user. If the collection supports paging (the default) or if the end user has filtered the list, any code that references it (such as that shown in Listing 4-7) will operate only on the records that are currently visible.
Setting AutoCompleteBox Values
Setting AutoCompleteBox values can be difficult at first. New users to LightSwitch often search for SelectedItem or SelectedValue properties in an attempt to set an AutoCompleteBox value.
Like all controls, AutoCompleteBox values are set by setting the underlying data value. In this example, an order detail screen is created that contains an AutoCompleteBox showing order status values. The order statuses are stored in a related table with the relationships properly set up (rather than defined in a choice list). A button is created that sets the status to shipped and also changes the shipped date to today's date. Figure 4-11 illustrates how the screen appears in the designer. Listing 4-8 shows the code that is used to set the value of the AutoCompleteBox.
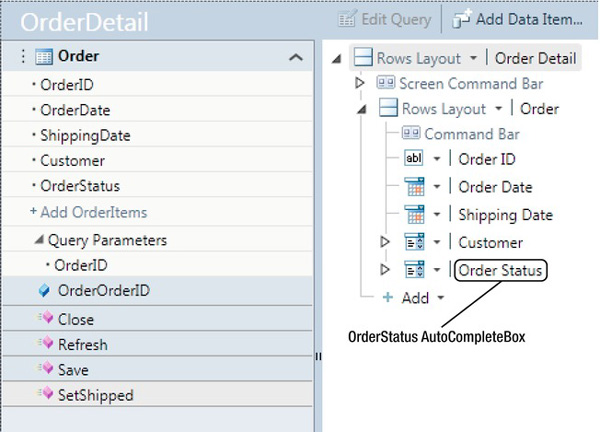
Figure 4-11. Accessing an AutoCompleteBox in code
To set the AutoCompleteBox value, the OrderStatus property on the Order property must be set. The OrderStatus must be set to an object of type OrderStatus. Listing 4-8 shows the code that is used to do this. A lambda expression is used to search for the status by name. More details on this type of syntax can be found in Chapter 6.
If you wanted to set the AutoCompleteBox value by ID rather than the string value of Shipped, you could use the OrderStatus_SingleOrDefault method on the data source object that was mentioned earlier.
Listing 4-8. Setting an AutoCompleteBox Value in Code
VB:

File: ShipperCentralClientUserCodeOrderDetailGrid.vb


Private Sub SetShipped_Execute()

   Order.ShippingDate = DateTime.Now

   Order.OrderStatus = Me.DataWorkspace.ApplicationData.OrderStatusSet.Where(

     Function(status) status.StatusDescription = Shipped").FirstOrDefault()

End Sub
C#:


File: ShipperCentralClientUserCodeOrderDetailGrid.cs


private void SetShipped_Execute()

{

   Order.ShippingDate = DateTime.Now;

   Order.OrderStatus = this.DataWorkspace.ApplicationData.OrderStatusSet.Where

      (status => status.StatusDescription == Shipped").FirstOrDefault();

}
![]() Note The code that is used to look up the status requires a round-trip to the server. If this code is going to be called several times, caching the lookup entity in the screen object will help performance. This is most easily done by creating a private field yourself and initializing it in the
Note The code that is used to look up the status requires a round-trip to the server. If this code is going to be called several times, caching the lookup entity in the screen object will help performance. This is most easily done by creating a private field yourself and initializing it in the _Loaded method.
Working with Change Sets
Change sets are used to get the data items that have changed, retrieve the original values prior to you changing them, and to discard any changes that you may have made. You can access change set properties and methods by using the details member of a data source. For example, the code snippet that you would use to access the change set details relating to the intrinsic database would be DataWorkspace.ApplicationData.Details. For other data sources, you would replace ApplicationData with the name of the data service object. Change sets are available when writing client, server, or common code.
Table 4-3 summarizes the change set properties and methods that are available through the details object.
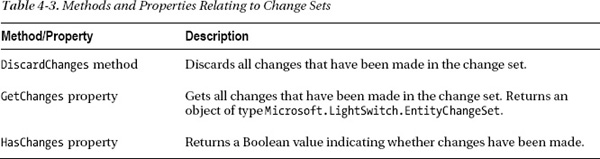
The HasChanges property returns a Boolean value indicating whether any changes have been made. When changes are made on a LightSwitch screen, an asterisk symbol appears next to the title that is shown in the screen tab. The HasChanges method returns the same information.
The DiscardChanges method restores any changes that have been made to properties back to their original values, removes any records that have been added, and undeletes any records that may have been deleted.
The GetChanges method returns an object of type Microsoft.LightSwitch.EntityChangeSet. You can use this collection to inspect the changes that have occurred.
Discarding Changes
To demonstrate the use of DiscardChanges, a screen is created by using the Orders table, based on the editable screen template. After creating the screen, a new method is created called DiscardScreenChanges by using the Add Data Item dialog box. Listing 4-9 illustrates the code that is called in this method.
Listing 4-9. Code to Discard All Screen Changes
VB:


File: ShipperCentralClientUserCodeOrderDetailGrid.vb


Private Sub DiscardScreenChanges_Execute()

   Me.DataWorkspace.ApplicationData.Details.DiscardChanges()

End Sub
C#:


File: ShipperCentralClientUserCodeOrderDetailGrid.cs


partial void DiscardScreenChanges_Execute()

{

   this.DataWorkspace.ApplicationData.Details.DiscardChanges();

}
Getting Items That Have Changed
The GetChanges method returns a collection of entities that have been modified. You can loop through these items and do whatever you want to do with them.
As an example, Listing 4-10 illustrates a piece of code that handles the saving event on an editable grid screen that displays orders. The code loops over the orders that have been modified. If the order status is 4 (indicating a shipped order), the change is discarded. This is done by calling the DiscardChanges method of the details object that relates to the order entity.
At the end of the process, a message showing the modified order numbers is displayed to the user.
Listing 4-10. Code to Discard Screen Changes
VB:


File: ShipperCentralClientUserCodeOrdersGrid.vb


Imports System.Text

Private Sub OrderGrid_Saving(ByRef handled As Boolean)


   Dim message As StringBuilder = New StringBuilder("Modified Orders:")

   For Each order As Order In _

     DataWorkspace.ApplicationData.Details.GetChanges().OfType(Of Order)()

     If order.OrderStatus.OrderStatusID = 4 Then

       order.Details.DiscardChanges()

     Else

       message.AppendLine(order.OrderID.ToString())

     End If

   Next

   ShowMessageBox(message.ToString())


End Sub
C#:


File: ShipperCentralClientUserCodeOrdersGrid.cs


using System.Text;

private void OrderGrid_Saving(ref bool handled)

{

   StringBuilder message = new StringBuilder("Modified Orders:");


   foreach (Order order in

     DataWorkspace.ApplicationData.Details.GetChanges().OfType<Order>())

   {

     if (order.OrderStatus.OrderStatusID == 4)

     {

       order.Details.DiscardChanges();

     }

     message.AppendLine(order.OrderID.ToString());

   }


   this.ShowMessageBox(message.ToString());

}
Retrieving Original Values
The details object of an entity contains a properties collection. This collection contains a reference to all of the properties (fields) in an entity. You can retrieve the original value of a property by calling the OriginalValue property.
Listing 4-11 demonstrates some validation code on the surname field of a customer table. If the surname value changes from the original value, the comment field on the table must also be modified. If not, a message is shown to the user. The IsChanged property can be used to return a value indicating whether a field has been modified.
Listing 4-11. Code to Retrieve Orginal Values
VB:


File: ShipperCentralClientUserCodeCustomersDetail.vb


Private Sub Customer_Validate(results As ScreenValidationResultsBuilder)

   If Customer.Details.Properties.Surname.IsChanged

     AndAlso Customer.Details.Properties.Surname.IsChanged = False Then

     results.AddScreenError("Surname has changed from &

         Customer.Details.Properties.Surname.OriginalValue & To" &

         Customer.Surname &

         ". Comment must be updated when surname changes"

     )

   End If

End Sub
C#:


File: ShipperCentralClientUserCodeCustomersDetail.cs


partial void Customer_Validate(ScreenValidationResultsBuilder results)

{

   if (Customer.Details.Properties.Surname.IsChanged &

      (Customer.Details.Properties.Surname.IsChanged == false)) {

         results.AddScreenError(

           Customer.Details.Properties.Surname.OriginalValue + To" +

           Customer.Surname +

           ". Comment must be updated when surname changes");

   }

}
Working with the Save Pipeline
So far, you have seen how to access data objects in code. You will now see what happens when you perform a save. After the client serializes the change set and passes it to the save pipeline on the server, the code passes through several phases, which are shown in Figure 4-12. At each phase, there are interception points that allow you to inject your own custom code.

Figure 4-12. The phases in the save pipeline
The table designer gives you access to the methods in the save pipeline. When you open a table and select the Write Code option, the save pipeline methods appear as shown in Figure 4-13. All of these are listed in Table 4-4.
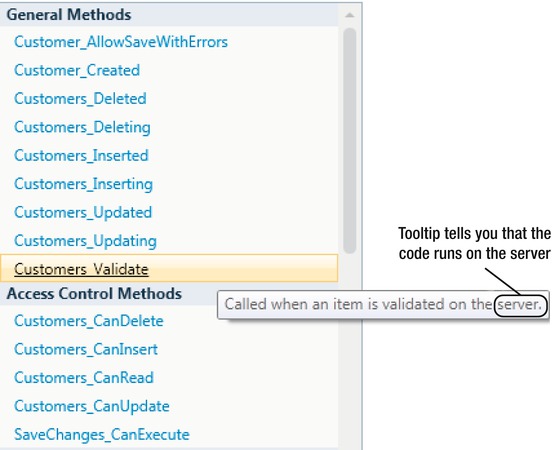
Figure 4-13. Writing code in the save pipeline
The General Methods section contains events that relate to the save pipeline. These events are prefixed with the entity set name (in this example, Customers). If you hover the mouse over the events that are shown, the tooltip shows you where the code is run. Those events that run on the server are associated with the save pipeline.
This section also contains entity-specific methods that belong in the common project. These methods are prefixed with the entity name (in this example, Customer).
The Access Control Methods section contains the methods that are called to carry out security checks. You can find out more about this topic in Chapter 14.
The remaining methods in the save pipeline are listed under the Data Source Methods section. This section includes the SaveChanges_Executed and the SaveChanges_ExecutedFailed methods.
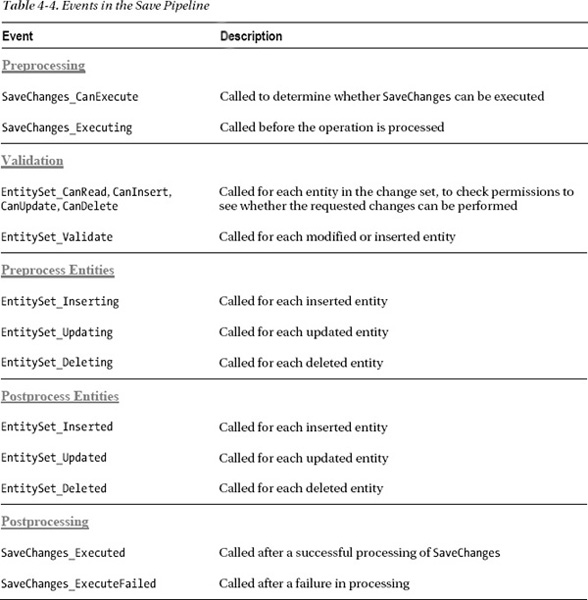
At the very start of the pipeline, the Preprocess, Validate, and Preprocess Entity phases occur. These phases allow you to perform security checks and validation.
If any errors occur during the save operation, an exception is raised and the SaveChanges_ExecuteFailed event is raised. This exception can be captured and handled on the client if necessary. If any entities are changed, execution returns to the start of the pipeline, and the validation methods are carried out again. If the processing succeeds, any changes made to entities in the original change set are serialized and returned to the client. This allows the client to get the ID values or any other changes that have been made during processing.
It is important to note that any entities that you have added via the save pipeline will not be returned to the client. To retrieve items that have been added, you would need to handle the Screen_Saved event and manually call code to refresh the data. The refresh method on the screen visual collection can be called to do this (for example, Customers.Refresh() on a customer grid screen). Alternatively, you can call the screen methods Me.Refresh() in VB.NET or this.Refresh() in C# (although this would completely restart the screen and reload all of the screen's data).
To give an example of why you might want to intercept the save pipeline, the entity set inserted, updated, or deleted methods could be used to create audit records whenever entities are modified. Chapter 15 explains this in more detail.
Calling Server-Side Code from the Client
You have seen how server-side code can be initiated only through a save operation on an entity. However, at times you might want to trigger a server-side operation from the client. For example, you might want to create a screen button that backs up a database, calls a web service to perform validation, or sends an email.
One technique for triggering server-side code is to create a dummy table that exists purely for the purpose of running server code. Chapter 12 demonstrates how this technique can be used for sending SMTP (Simple Mail Transfer Protocol) email from the server.
Using the EntityFunctions ClassM
The System.Data.Objects namespace contains a useful class called EntityFunctions. This class contains simple, canonical methods that can assist when writing server code. It contains functions for working with aggregate, math, string, and date data. For example, there are aggregate functions to help calculate average, minimum, maximum, standard deviation, and variance results.
The math type functions include a power function for calculating exponents, and other functions such as ceiling, round, and floor.
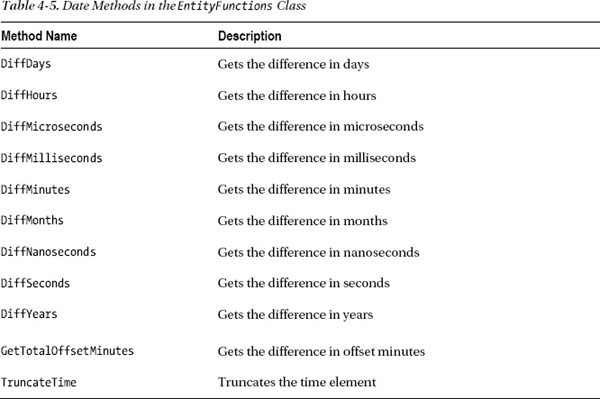
When working with dates, various methods are included for performing date calculations. These are ideal for C# developers who do not have access to functions, such as DateDiff, that are available in VB.NET. These date functions are summarized in Table 4-5.
To use this class, you will need to add a reference to System.Data.Entity in the server project.
Managing Transactions in LightSwitch
LightSwitch includes built-in support for transactions for data in the intrinsic, or attached, SQL Server data sources. In this section, we'll define what a transaction is and show you how they are managed in LightSwitch.
![]() Note Data operations performed against a SharePoint data source are not transactional.
Note Data operations performed against a SharePoint data source are not transactional.
Understanding Transactions
You probably know what a transaction is already, but just in case, we'll start off with a brief explanation. A banking system is the traditional example that is given when describing transactions. Let's suppose that Tim attempts to make a payment of $100 to Yann. Behind the scenes, two things happen. First, $100 is deducted from Tim's account. Second, that $100 is added into Yann's account. Either both of these operations must succeed, or both must fail. The outcome that should never happen is for one operation to succeed and the other to fail. For example, $100 should never be added into Yann's account if the amount fails to be deducted from Tim's account.
Understanding ACID Principles
Many computer science students have encountered the acronym ACID during their studies. This term is used to define the properties of a transaction and consists of the following:
- Atomicity: As illustrated in the preceding example, atomicity is the all-or-nothing rule. Operations in a transaction must either all succeed or all fail.
- Consistency: This states that the data affected by the transaction must be consistent. For example, if database rules and operations exist such as constraints, triggers, and cascade deletes, these must all be correctly applied within a transaction.
- Isolation: Separate transactions should each maintain an independent view of the data, and operations that take place in one transaction should not interfere with those from another transaction.
- Durability: This guarantees that after a transaction is committed, it survives permanently. In the event of a system failure or power loss, uncommitted transactions should be rolled back.
Reading Data in LightSwitch
Let's return to our banking example. Once again, Tim makes a payment of $100 to Yann. A transaction begins, and $100 is deducted from Tim's account. At this precise moment, the bank manager Annie views Tim's balance. What does Annie see? Does she see the $100 deduction or not?
In LightSwitch, the answer to this question is no. When reading data, LightSwitch uses the transaction isolation level of Read Committed, which is inherited from the default transaction isolation level of SQL Server. In other words, Annie will see the $100 deduction only when this amount has been added into Yann's account and the transaction has been committed.
When reading data from a SQL Server data source, LightSwitch never shows uncommitted changes. This behavior cannot be changed.
Implementing Transactions in .NET
This section offers you some insight into how transactions are implemented in .NET. There are two main kinds of transactions: connection transactions and ambient transactions.
Connection transactions are tied to a database connection. In traditional ADO.NET code, you would connect to a SQL Server database by creating a SqlConnection object. A transaction would be started by calling the BeginTransaction method, and either the Commit or Rollback method would be called at the end of the process. Connection transactions can be difficult to work with if data access code is contained in different methods or classes. For example, if the SQL commands that you want to execute are contained in several different methods, you would need to write code that passes the SqlConnection object into each separate method.
Ambient transactions were introduced in .NET 2.0 to help overcome this problem and to simplify the task of working with transactions. You use a TransactionScope object, which is found in the SystemTransactions namespace. To begin a transaction, you would create a new TransactionScope object. Any database code that is subsequently called will enlist in the ambient transaction. Every database call can use its own connection and can even close and dispose of its connection before the ambient transaction is committed. This enlistment process happens automatically. There isn't any additional code that you need to write to include a command into a transaction. At the end of the process, you would call the Complete and Dispose methods on the TransactionScope object to commit the transaction. Calling Dispose without Complete would roll back the transaction.
Ambient transactions are also not just limited to database calls. Operations based on transaction-aware providers can also enlist in a transaction. Therefore, any changes made to data from a transaction-aware RIA service can also be included inside a transaction.
Implementing Transactions in the Save Pipeline
When the SaveChanges operation is called, a data workspace is created and the change set that was passed to the method from the client is loaded into that workspace. Each data workspace owns its own SqlConnection and creates a connection transaction at the start of the save pipeline process.
By default, ambient transactions are not used. However, you could create your own transaction scope, and the save pipeline would use this. This would allow you to enroll in a distributed transaction (DTC is not used by default) or to modify the default isolation level.
During a save, the default transaction isolation level is RepeatableRead. This means that other transactions cannot modify data that is read by the current transaction until the current transaction completes.
Because the save pipeline works against a single data source, transactions do not happen across data sources. To create transactions across data sources during the current save operation, you would need to create a transaction scope and make changes to your second data source within a new data workspace. This is explained in more detail later in this chapter.
Because there is scope for data inconsistency to arise when working against multiple data sources, LightSwitch protects novice developers by making screen sections based on other data sources read-only. This behavior is shown in Figure 4-14.
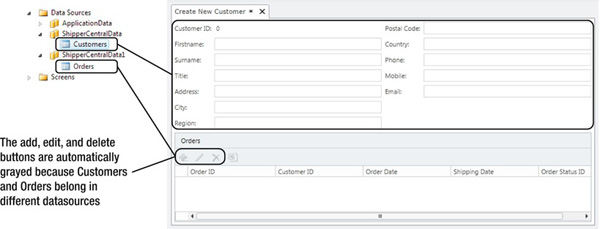
Figure 4-14. Screen sections are read-only when multiple data sources are used
Creating an Ambient Transaction
If you wanted to create your own transaction scope, you would do this in the Executing phase of the pipeline and commit it in the Executed phase. Listing 4-12 shows an example of saving data changes in the intrinsic database. If the changes succeed, an audit record is created in a second data source called AuditDataSource. If the changes to the intrinsic database fail, an audit record must not be created.
To use this code, you will need to add a reference to the System.Transactions.dll file in the server project.
Listing 4-12. Creating Your Own Transaction Scope
VB:

File: ShipperCentralServerUserCodeApplicationDataService.vb


Imports System.Transactions


Namespace LightSwitchApplication


   Public Class ApplicationDataService


     Dim transaction As TransactionScope


     Private Sub SaveChanges_Executing()


       Dim transactionOptions = New TransactionOptions()

       transactionOptions.IsolationLevel = IsolationLevel.ReadCommitted


       'Create an audit record as part of the transaction

       Me.transaction = New TransactionScope(

         TransactionScopeOption.Required, transactionOptions)

         Using dataworkspace2 = this.Application.CreateDataWorkspace()

         Dim auditRecord = dataworkspace2.AuditDataSource.Audits.AddNew

         auditRecord.AuditDesc = Data change made " & DateTime.Now.ToString()

         dataworkspace2.AuditDataSource.SaveChanges()

         End Using


     End Sub


     Private Sub SaveChanges_Executed()

       'Commit the transaction

       Me.transaction.Complete()

       Me.transaction.Dispose()

     End Sub


     Private Sub SaveChanges_ExecuteFailed(exception As System.Exception)

       'Rollback the transaction on a error

       Me.transaction.Dispose()

     End Sub


   End Class


End Namespace
C#:

File: ShipperCentralServerUserCodeApplicationDataService.cs


using System.Transactions;


namespace LightSwitchApplication

{
   public class ApplicationDataService

   {

     TransactionScope transaction;


     private void SaveChanges_Executing()

     {

       TransactionOptions transactionOptions = new TransactionOptions();

       transactionOptions.IsolationLevel = IsolationLevel.ReadCommitted;


       //Create an audit record as part of the transaction

       this.transaction = new TransactionScope(

         TransactionScopeOption.Required, transactionOptions);

       using (var dataworkspace2 = this.Application.CreateDataWorkspace()) {

       Audit auditRecord = dataworkspace2.AuditDataSource.Audits.AddNew();

       auditRecord.AuditDesc = Data change made "

         + DateTime.Now.ToString();

       dataworkspace2. AuditDataSource.SaveChanges();

       }

     }


     private void SaveChanges_Executed()

     {

       //Commit the transaction

       this.transaction.Complete();

       this.transaction.Dispose();

     }


     private void SaveChanges_ExecuteFailed(System.Exception exception)

     {

       //Rollback the transaction on an error

       this.transaction.Dispose();

     }

   }


}
In the preceding code, an ambient transaction is created in the executing method. The constructor allows you to pass in a TransactionOption object, and this can be used to set the transaction isolation level. A new instance of a data workspace is created, and this is used to create an entry in an audit table.
If the data changes in the data service are saved successfully, the transaction scope is completed in the SaveChanges_Executed method, and this commits the transaction. Otherwise, the transaction scope is disposed in the SaveChanges_ExecuteFailed method, and the transaction is rolled back. This means that the audit record that was created in the SaveChanges_Executing method will not be persisted to the data store, along with any other data changes that were attempted in the save pipeline.
Rolling Back Transactions—A Demonstration
To summarize what has been said in simple terms, LightSwitch automatically provides transactions for data operations at a data source level without you having to write any additional code. To prove that this actually works (when working against a single data source), a data entry screen is created that allows customers and orders to be created.
To mimic a data store failure at the SQL Server level, we'll create a database trigger on the order table to raise an error during an insert. This code is shown in Listing 4-13.
Listing 4-13. Database Trigger to Mimic a Data Insert Failure
CREATE TRIGGER [dbo].[OrderFailureTrigger]

ON [dbo].[Order]

AFTER INSERT

AS

BEGIN

     RAISERROR('Order Insert Failure Demonstration',16,1)

END
Both a customer and order record are now created by using our LightSwitch screen. When the Save button is clicked, the order record insertion fails, and both operations are rolled back. Figure 4-15 illustrates the error that the user sees.
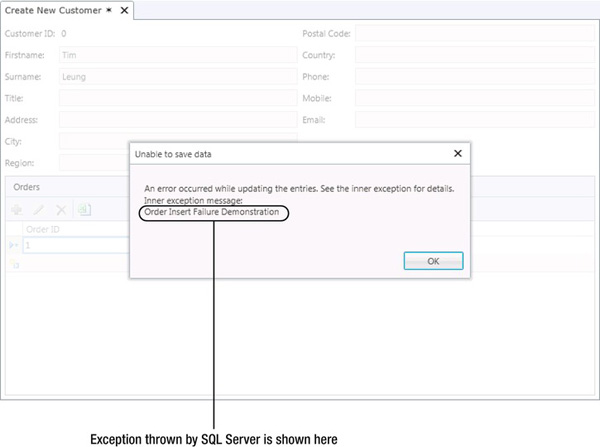
Figure 4-15. Error dialog box that is shown to the user
By using SQL Server Profiler to trace the activity that is carried out by LightSwitch (as explained in Chapter 2), we can confirm that LightSwitch starts a transaction and rolls it back when the failure occurs during the insert of the order record. The rollback operation is confirmed in the screenshot shown in Figure 4-16.
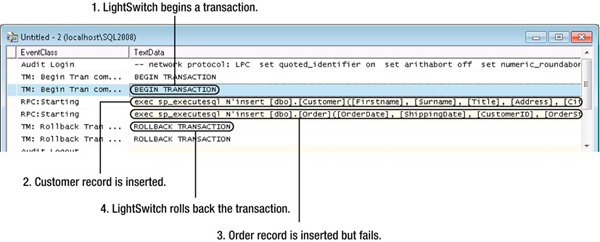
Figure 4-16. Transactions as seen through SQL Profiler
Understanding Concurrency
Concurrency is yet another important aspect that needs to be understood when writing applications. Let's suppose that Tim and Yann both edit a product record at the same time. Tim increases the price of the product and modifies the comment field of the record. Seconds later, Yann also changes the price, updates the product photo, and attempts to save the record.
What happens at this moment in time, and what data exactly will the database contain? In this particular example, LightSwitch prevents Yann from saving his changes because that would overwrite the changes that have been made by Tim. LightSwitch prevents data from being saved if modifications have been made since the record was first opened.
LightSwitch uses optimistic concurrency control and works without locking any of the underlying records. LightSwitch handles concurrency issues by automatically displaying a data conflict screen to the end user. For more-complex scenarios, you can even write your own code to handle concurrency issues.
Displaying a Data Conflict Screen
The neat thing about LightSwitch is that you don't need to worry about data conflicts. By default, LightSwitch handles all of this for you through a data conflict screen. This is automatically created and shown to the user when a conflict occurs. Figure 4-17 illustrates the screen that Yann would see.
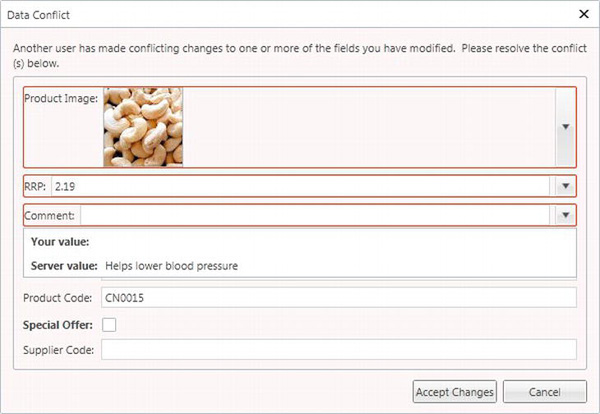
Figure 4-17. Autogenerated data conflict screen
The data conflict screen allows Yann to see the state of the data when the record was first opened, the current data, and the proposed changes. This allows him to review the changes before committing his changes.
But how does LightSwitch detect that a conflict has occurred? We can find out by profiling the database. Figure 4-18 shows the result. LightSwitch constructs a WHERE clause that includes all of the fields.
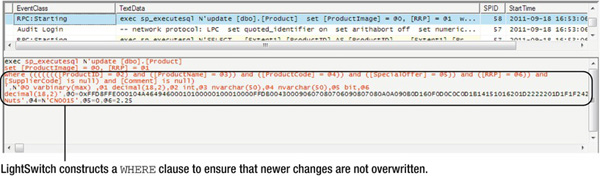
Figure 4-18. WHERE clause that is generated for conflict detection
In the preceding example, you have seen what happens when a data conflict occurs. The other possible scenario is that Tim deletes the product record. In this instance, there is nothing that Yann can do to recover the record. The dialog box illustrated in Figure 4-19 will be shown to him.
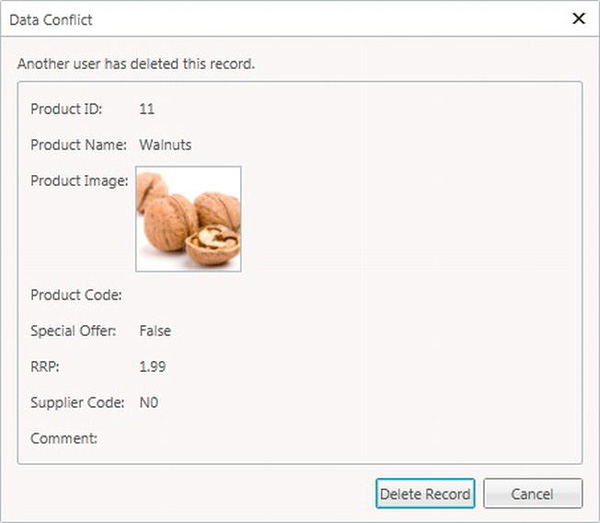
Figure 4-19. Dialog box shown to the user when a record is deleted
Handling Conflicts in Code
If you prefer not to display the data conflict screen to the user, you can perform the data conflict resolution manually in code. When a data conflict occurs, a ConcurrencyException is thrown by the data service. This exception can be handled by using client-side code at the screen level.
It isn't possible to handle concurrency exceptions at the server level by using a method such as SaveChanges_ExecuteFailed. This is because changes can't be resaved in the save pipeline, so even if you corrected any data conflicts in the SaveChanges_ExecuteFailed method, there wouldn't be any way for you to save those changes.
Listing 4-14 shows how conflicts can be resolved in code. If an attempt is made to alter the price of a product, the user will be allowed to make this change even if it overwrites changes that have been made by another user.
In this example, error-handling code is attached to the Saving method of a product screen. If a ConcurrencyException is raised by the data service, an EntitiesWithConflicts collection is returned with the exception. This contains a collection of entities. The exact properties that are causing the conflict can be found by inspecting the entity's Details.EntityConflict.ConflictingProperties object.
If a conflict in price is detected, you can call the ResolveConflicts method to resolve the conflict. This method accepts the argument ConflictResolution.ClientWins or ConflictResolution.ServerWins. ClientWins means that the server copy will be overwritten by the out-of-date client version. ServerWins means that the up-to-date server version will replace the client version.
The Saving method on the client includes a handled parameter. By setting this to true, LightSwitch does not automatically save data changes, and this is what enables us to manually call the SaveChanges method on the data source object.
Listing 4-14. Resolving Conflicts in Code
VB:


File: ShipperCentralClientUserCodeProductDetail.vb


Private Sub ProductDetail_Saving(ByRef handled As Boolean)


   handled = True


   Try

     Me.DataWorkspace.ApplicationData.SaveChanges()

   Catch ex As ConcurrencyException


     For Each entityConflict In ex.EntitiesWithConflicts.OfType(Of Product)()


       Dim conflictingPrice =

entityConflict.Details.EntityConflict.ConflictingProperties.Where(

          Function(x) x.Property.Name = Price").SingleOrDefault


       If conflictingPrice IsNot Nothing Then

         ' There is a conflict with the price

         conflictingPrice.EntityConflict.ResolveConflicts(

           Microsoft.LightSwitch.Details.ConflictResolution.ClientWins)

         Try

           Me.DataWorkspace.ApplicationData.SaveChanges()

         Catch ex2 As Exception

           ' An exception has occurred with the second save

           ShowMessageBox(ex2.Message.ToString())

         End Try

       Else

         ' There is a conflict with some other property

         ShowMessageBox("Error - data has been modified by another user")

       End If

     Next


   End Try


End Sub
C#:


File: ShipperCentralClientUserCodeProductDetail.cs


partial void ProductDetail_Saving(ref bool handled)

{

   handled = true;


   try

   {

     DataWorkspace.ApplicationData.SaveChanges();

   }

   catch (ConcurrencyException ex)

   {


     foreach (var entityConflict in ex.EntitiesWithConflicts.OfType <Product>())

     {

       var conflictingPrice =

entityConflict.Details.EntityConflict.ConflictingProperties.Where

         (x => x.Property.Name == Price").SingleOrDefault();


       if ((conflictingPrice != null))

       {

         // There is a conflict with the price

         conflictingPrice.EntityConflict.ResolveConflicts(

           Microsoft.LightSwitch.Details.ConflictResolution.ClientWins);

         try

         {

           this.DataWorkspace.ApplicationData.SaveChanges();

         }

         catch (Exception ex2)

         {

           this.ShowMessageBox(ex2.Message.ToString());

         }


       }

       else

       {

         // There is a conflict with some other property

         this.ShowMessageBox("Error - data has been modified by another user");

       }

     }


   }

}
![]() Caution Calling
Caution Calling ResolveConflicts(ConflictResolution.ClientWins) will overwrite the server record in its entirety, rather than just the properties that are in conflict. For example, if user A modifies the price and description, and user B subsequently modifies just the price, ResolveConflicts(ConflictResolution. ClientWins) also overwrites the description even though the description property was not in conflict.
Working with User Data
There are a couple of places where you can access user-related details in LightSwitch. As mentioned earlier, the application object provides access to the currently logged-on user. The code in Listing 4-15 shows you the code to retrieve the username.
Listing 4-15. Accessing the Currently Logged-on User
VB:

Me.Application.User
C#:

this.Application.User;
LightSwitch manages membership and permissions in a built-in data source called SecurityData. This data source is backed by an ASP.NET membership provider. The membership provider allows you to access membership and security features such as the ChangePassword and IsValidPassword methods. The ChangePassword method allows you to change the password for a user by passing in username, old password, and new password arguments. The IsValidPassword method accepts a password string and returns a Boolean result that indicates whether the password adheres to the rules relating to password strength.
You can also access role and permission details by using the Role, Permission and RolePermission collections. Figure 4-20 illustrates some of the methods that are shown to you through the IntelliSense window.
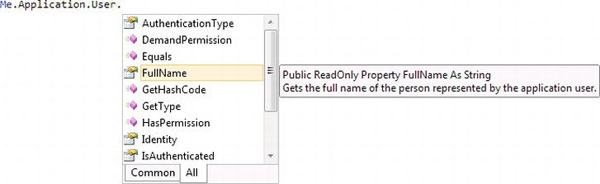
Figure 4-20. IntelliSense options that relate to the user
Summary
In this chapter, you have learned how to access data in code. This chapter has:
- described the data access objects that are generated by LightSwitch
- showed you how to work with data on screens
- illustrated the stages in the save pipeline
- explained the purpose of change sets
- described how transactions and concurrency are handled
LightSwitch generates data access objects with names that match the tables and fields that you have defined in your project. This makes it intuitive for you to write code that accesses data.
When writing client-side screen code, the Application object allows you to access the logged-on user and provides methods for accessing and opening screens.
When creating screens, the user interface elements are bound to screen properties that appear on the left side of the screen designer. You can programmatically access these properties in code by using the name of the property. Because UI elements are bound to screen properties, you can change the values that are shown in controls by modifying the screen property values in code.
Each screen contains an independent view of the data in a data workspace. The data workspace contains a change set for each data source. When a save is performed, the change set is passed to the server and is processed through the save pipeline.
There are various phases in the save pipeline that allow you to inject your own custom code. You can access these events by opening a table in the table designer and clicking the Write Code button. The tooltip that appears for the events will show you where the code is executed. Events that execute on the server relate to the events in the save pipeline.
The events in the save pipeline occur within a transaction (except when working against SharePoint data sources). All data changes that you attempt to save on a screen will happen atomically (per data source). In other words, either all or nothing will be saved for each data source. If an error occurs when saving a data item, any other changes that may have already been made in that data source will be rolled back.
If you attempt to make a change that overwrites a change that someone else has made, LightSwitch automatically detects this and displays a data conflict screen to the user. This allows the user to correct the data conflict and to resubmit the change.