
Lesson 22
Testing
In order to make sure your Go applications are “job ready,” you should test them to make sure they work correctly. In this lesson, we not only present information on test-driven development, but we introduce behavior-driven development as well. As an added bonus, we walk through an example of a test-driven case.
TEST-DRIVEN DEVELOPMENT
The traditional coding process involves writing code and then running and testing the code to see what happens. If the code fails, you rewrite the program and try it again. If it doesn't fail, you move on to the next program. However, this approach can lead to wasted time because you typically spend a lot of time writing code before testing it, and if the code fails, it takes more time to find and correct the errors. In many respects, it makes more sense to test code as you write it so that you can make corrections as soon as the errors are found.
TESTING LEVELS
There are multiple testing levels that can be used to test software. These levels are designed to allow software developers to test all units in a program, from the smallest units to bigger and more complex units.
The four main testing levels are:
- Unit testing
- Integration testing
- System testing
- Acceptance testing
Unit testing deals with testing units, the smallest components in a software program that can be compiled and executed. When you are designing and developing a large, complex software package, the development processes typically involve dividing the software into components, each of which can be developed individually by separate teams of developers. As teams develop these units, it is important to test each unit. This type of testing is done by developers throughout the development of the software and before handing the software to the testing team. The goal of unit testing is to isolate each unit in the software and test it separately.
The next step in the development process is to integrate the separate components into a single, final solution. During this integration process, it is crucial to use integration testing to determine how well the individual components work together.
System testing deals with testing the entire software as a whole. After integrating the different units into one final package, the next step is to test the integrated program to make sure it behaves as expected. System testing is the first level of testing where the software is tested as a whole.
Finally, the quality assurance (QA) team will perform acceptance testing to ensure that the requirements established in the early steps of the software development life cycle (SDLC) are met. At this point, the tests focus on quality and performance requirements, using prewritten test cases to make sure that the software behaves as expected.
THE TDD WORKFLOW
When you use tests throughout the software development process, you are using an approach referred to as test-driven development (TDD), a workflow that involves writing test units first and then writing the simplest code possible to pass those tests. When the code passes the unit tests, you typically go back and refactor code to make it more efficient while ensuring it still passes those tests.
TDD is the process of developing and executing automated tests prior to the development of the application (before writing any code). For this reason, TDD is also known as test-first development.
The goal of TDD is to focus on requirements rather than writing and validating code (testing). In fact, TDD allows developers to focus on the requirements before writing any functional code. The process of TDD starts with designing and implementing tests for every block of code, function, class, and so on. In other words, the tests are developed first to validate what the code will do, and the code is written only after the tests have been designed.
TDD is different from traditional testing in many ways, including:
- TDD allows developers to feel more confident about the system under development because they build the code to meet requirements.
- TDD focuses on creating production-quality code, while traditional testing focuses more on test case design.
- Using TDD, you can achieve 100 percent test coverage: every line in the code can be tested.
The TDD Process
TDD revolves around the same set of standard steps for each part of a program under development:
- Before implementing any code, you write an automated test for the code that you intend to write. To write the automated test, you must identify all possible aspects of what the code will do, including inputs, errors, and outputs.
- Run the automated test, which will fail because you haven't written any code yet.
- Implement the code that will pass the automated test.
If the test continues to fail, the code is not complete or correct. You must fix and retest the code until it passes the test.
- After the code passes the automated test, you can start the refactoring step, where the goal is to improve the quality of the code while still passing the automated test.
- Once you are satisfied with the quality of the code (and the code passes the automated test), you can move on to the next set of requirements and repeat the whole process again.
Advantages of TDD
TDD offers the following advantages over the traditional approach of testing only after the code is written:
- Developers are forced to understand the expected outcome before developing the code.
- Developers are forced to complete one component in a program before moving to the next because they can't move on to the next step as long as the current test fails.
- Unit tests run at each step in the development process, which provides constant feedback to developers that all code is working correctly. If one component breaks because of a new component, the developer will receive instant feedback because the unit test will fail.
- Developers can refactor code at any time in the development process and the test units ensure the software is still working.
- Developers can create tests to identify defects and then modify the code to pass the test units.
- Because testing is an integral part of the development process, the testing step in the SDLC is typically shorter.
THE TESTING PACKAGE
Go provides a testing package that includes a variety of tools you can use to write unit tests. As a first step, when you want to execute a Go file as a test unit, you should use the convention of adding _test to the end of the filename. For instance, if you have a file called Hello.go, you will need to create a file named Hello_test.go for the tests.
This file contains the tests for the main program. The test file essentially defines the output you expect the program itself to generate, and it compares the expected output with the actual output.
Creating the Program
Let's create a program that will calculate the square of an input number. Begin by creating a file named Square.go and add the code shown in Listing 22.1.
This is a short listing that computes the square of an input number using a function called Square that takes a number of type int and returns the resulting square also as an int.
Writing the Test
With the program written, you can now create a test file. Enter the code in Listing 22.2 and save it as Square_test.go in the same directory as Square.go.
The program includes two tests: TestSquare and TestSquareTableDriven. By convention, the name of any function used for testing purposes starts with Test.
In TestSquare, you test the function for a single input. The TestSquare takes as input a pointer of type testing.T. This is a built-in type in the testing package that allows you to manage testing states and record errors during testing.
TestSquareTableDriven is a more robust test that uses table-driven testing, where you provide various scenarios/expected output. We recommend that you use this type of testing whenever possible. In the table-driven test, you create a struct (called tests) that contains the various scenarios you want to test and their expected output.
The struct includes two fields, named a and expect in this example. a represents a possible input value, and expect represents the expected output based on a. You provide several scenarios and corresponding expected output in the initialization of the struct. You can add as many scenarios as needed.
The test iterates through the struct table, comparing input to expected output. If it encounters an error, it outputs an appropriate message.
Running the Test
You have two choices for running the tests from the command line. The first is to run the following at the command line:
go test
This option runs the tests and gives a simple PASS/FAIL response for the program as a whole. It can tell you that the program is working as expected, but it only displays FAILs, without displaying PASSes.
For example, in the program you have at this point, the output for go test is:
PASSok _/C_/Users/username/Documents/Go/testing 3.935s
Note that if the program and its testing program are in the same folder as other programs, you will need to name the files when running the tests:
go test Square.go Square_test.go
If you want a more verbose output, you can include the -v switch:
go test -v
This option will provide feedback for each test, whether it passes or fails, like so:
=== RUN TestSquare--- PASS: TestSquare (0.00s)=== RUN TestSquareTableDriven=== RUN TestSquareTableDriven/0=== RUN TestSquareTableDriven/1=== RUN TestSquareTableDriven/2=== RUN TestSquareTableDriven/6=== RUN TestSquareTableDriven/5--- PASS: TestSquareTableDriven (0.01s)--- PASS: TestSquareTableDriven/0 (0.00s)--- PASS: TestSquareTableDriven/1 (0.00s)--- PASS: TestSquareTableDriven/2 (0.00s)--- PASS: TestSquareTableDriven/6 (0.00s)--- PASS: TestSquareTableDriven/5 (0.00s)PASSok _/C_/Users/username/Documents/Go/testing 0.070s
Again, if the program and its testing program are in the same folder as other programs, you will need to name the files when running the tests:
go test -v Square.go Square_test.go
TUTORIAL: TEST-DRIVEN DEVELOPMENT
We've shown you a basic example of test-driven development. Let's take a step back and apply what you've learned to a larger example. In the following sections, you will implement Dollar objects that represent the dollar currency using test-driven development.
To develop software using TDD, follow these guidelines:
- Try not to read or think ahead.
- Work incrementally, doing only one task at a time.
In this short tutorial, you will add requirements as we go through the example, making it easy to focus on one step at a time. This particular example will seem simple in its solution, but keep in mind that you are focusing on the process, not the solution, so that you can get a glimpse of how to develop using TDD.
First Test: String Representation of Dollar Amount
With TDD, you start by defining what you want to test, and then you build the code that you want to test. So, your first step is to create the test. This allows you to focus on what you want the program to do first, and then you can write code that meets your expectations. If you start with a well-defined outcome, it takes less time to write the code that produces that outcome.
Add a Test
The first requirement in your solution is that you need to be able to create Dollar objects and get string representations for them, like "USD 2.00". To do this you will write the test program shown in Listing 22.3 and name it Dollar_test.go.
This test defines how the number output should be formatted (as USD 2.00). If the output does not have this format, the test will fail.
Write the Program
Now you are ready to write the Dollar.go program that will be tested by the test. This program is shown in Listing 22.4.
This program is very simple in that it contains a function called FormatAmount that returns a float64 value formatted as a string. The main function prints a message and then formats and prints the value of 2.00.
At this point, you have implemented enough code to pass the test you created in Listing 22.3, which is the only test that you have created so far. The dollar amount is hard-coded into the program, and you can easily guess that it will fail given a different amount.
Run the Test
Let's run the test to see what happens. This can be accomplished by entering the following on the command line where the program listings are located:
go test -v Dollar.go Dollar_test.go
Because there is only one possible outcome to our program and the test tests for that outcome, it isn't a surprise that the program passes the test:
=== RUN TestFormatAmount--- PASS: TestFormatAmount (0.00s)PASSok command-line-arguments 1.214s
Second Test: Test with Other Values
You have now established that the output USD 2.00 created by the FormatAmount function is equal to USD 2.00 defined in the test. However, it's important to test that the functions also fail when you expect them to fail. Let's see what happens if we have another value instead of 2.00.
Add a Test
Let's add another test to the Dollar_test.go program. Listing 22.5 contains an updated version.
In this update you add a second function called TestFormatAmount2 to see if the result of your call to FormatAmount is equal to "USD 4.00". You expect the program to fail this test, because 2.00 is not equal to 4.00. This is confirmed when you run the test again:
=== RUN TestFormatAmount--- PASS: TestFormatAmount (0.00s)=== RUN TestFormatAmount2TestFormatAmount2: Dollar_test.go:17: FormatAmount(2.00) = USD 2.00; Should be 2.00--- FAIL: TestFormatAmount2 (0.00s)FAILFAIL command-line-arguments 1.725sFAIL
Reconfigure the Test
Before addressing the failure, you first need to reconfigure the test to handle decimal values. Let's add a third test called TestFormatAmount3 that will test for a decimal value. Update the Dollar_test.go program with the added test shown in Listing 22.6.
The TestFormatAmount3 test is similar to the previous two tests. This time, however, a value of 5.10 is passed to the FormatAmount function for testing.
Reconfigure the Program
The FormatAmount function in the Dollar.go program must be able to handle any appropriate dollar amount, so you need to update it to be more flexible. Specifically, you want it to take any float64 and express that value with the prefix USD and rounded to two decimal places. The fmt.Sprintf function will be used, which converts the number to a string, with the format specifier %.2f, which rounds the original value to two decimal places. Update the Dollar.go listing with the changes to FormatAmount shown in Listing 22.7.
You can see that the change in the listing is to the return value in the FormatAmount function. You are using "%.2f" to indicate that you want a precision of two decimal places, which is enough to represent dollar amounts for now. You are formatting the value of a that is passed into the function using this precision. You are no longer returning the value of "USD 2.00".
Run the Test
Run the tests again to verify that each test passes. The following should be shown:
=== RUN TestFormatAmount--- PASS: TestFormatAmount (0.00s)=== RUN TestFormatAmount2--- PASS: TestFormatAmount2 (0.00s)=== RUN TestFormatAmount3--- PASS: TestFormatAmount3 (0.00s)PASSok command-line-arguments 1.246s
You have successfully written the test to allow for any float64 value that you may have in the program. You can change the value in the program to test this.
Third Test: Operation Output
You want your program to do more than just format the number. You also want it to be able to perform a mathematical operation on two numbers and format the output of that operation. Since you are using TDD, you will start by writing the test for this new functionality.
Add a Test
Update Dollar_test.go with the new test shown in Listing 22.8.
The new test performs the SubtractFormatAmount function from Dollar.go using two hard-coded values and the formatted result you should see using those values. However, if you run the test at this point, it will fail because you haven't yet created the SubtractFormatAmount function. But keep in mind that this is the whole point of TDD: you write tests, you fail them, you implement minimal code to pass them, you refactor, you pass the tests, and repeat.
Reconfigure the Program
Let's implement minimal code to pass the new test that was created. Listing 22.9 updates the Dollar.go program with a very basic SubtractFormatAmount function.
Note that the SubtractFormatAmount function doesn't actually perform subtraction at this point. The listing is using a minimal viable output that can pass the test to make sure that the test works with a valid input.
Run the Test
Run the test to check that it passes. You should see output similar to the following:
=== RUN TestFormatAmount--- PASS: TestFormatAmount (0.00s)=== RUN TestFormatAmount2--- PASS: TestFormatAmount2 (0.00s)=== RUN TestFormatAmount3--- PASS: TestFormatAmount3 (0.00s)=== RUN TestSubtractFormatAmount--- PASS: TestSubtractFormatAmount (0.00s)PASSok command-line-arguments 1.294s
Test the Test
Remember that you also want to check that the test will fail when you expect it to. To this end, add another test to Dollar_test.go that will fail, as shown in Listing 22.10.
This test verifies that subtracting 1.12 from 3.00 using the SubtractFormatAmount function returns a proper result of 1.88. Run the test. Because you know SubtractFormatAmount returns a hard-coded value of "USD 2.0" at this time, you expect the most recent test to fail at this point. When the test runs, you should see that it, indeed, does fail:
=== RUN TestFormatAmount--- PASS: TestFormatAmount (0.00s)=== RUN TestFormatAmount2--- PASS: TestFormatAmount2 (0.00s)=== RUN TestFormatAmount3--- PASS: TestFormatAmount3 (0.00s)=== RUN TestSubtractFormatAmount--- PASS: TestSubtractFormatAmount (0.00s)=== RUN TestSubtractFormatAmount2TestSubtractFormatAmount2: Dollar_test.go:38: FormatAmount(3.00,1.12) = USD 2.00; Should be USD 1.88--- FAIL: TestSubtractFormatAmount2 (0.00s)FAILFAIL command-line-arguments 1.262sFAIL
Refactor SubtractFormatAmount
Next, you want to refactor the SubtractFormatAmount function to use the format settings you added to the FormatAmount function so that it will work with any float64 value. This update is shown in Listing 22.11.
Run the Test
After making this latest update, run the test again to check that it passes. You should see that it does:
=== RUN TestFormatAmount--- PASS: TestFormatAmount (0.00s)=== RUN TestFormatAmount2--- PASS: TestFormatAmount2 (0.00s)=== RUN TestFormatAmount3--- PASS: TestFormatAmount3 (0.00s)=== RUN TestSubtractFormatAmount--- PASS: TestSubtractFormatAmount (0.00s)=== RUN TestSubtractFormatAmount2--- PASS: TestSubtractFormatAmount2 (0.00s)PASSok command-line-arguments 1.222s
Examining the Tests
Sometimes just running a test (even with the verbose option) doesn't tell you everything you need to know. For example, you may want to know how much of the code is being tested, and you may want to share that information with others on your team.
Test Coverage
You can get the test coverage by using the -cover flag when running the test program from the command line:
go test -cover Dollar.go Dollar_test.go
You should see a result that looks like this:
ok command-line-arguments 0.051s coverage: 40.0% of statements
In this example, 40 percent of the code is tested. This value should be as high as possible, but it is not always necessary to achieve 100 percent coverage. Test coverage is computed as follows:
Test coverage = (B / A) × 100
where A is the total lines of code in the piece of software you are testing, and B is the number of lines of code all test cases currently execute.
Coverage Reports
Detailed coverage reports can be created as well by using the following commands:
go test -cover -coverprofile=c.out Dollar.go Dollar_test.gogo tool cover -html=c.out -o coverage.html
The first command creates a text file with references to the test coverage, including which lines were tested and which lines weren't. The second command formats that file as an HTML file, making the information easier to see. Both files will appear in the directory identified in the command prompt similar to what is shown in Figure 22.1.
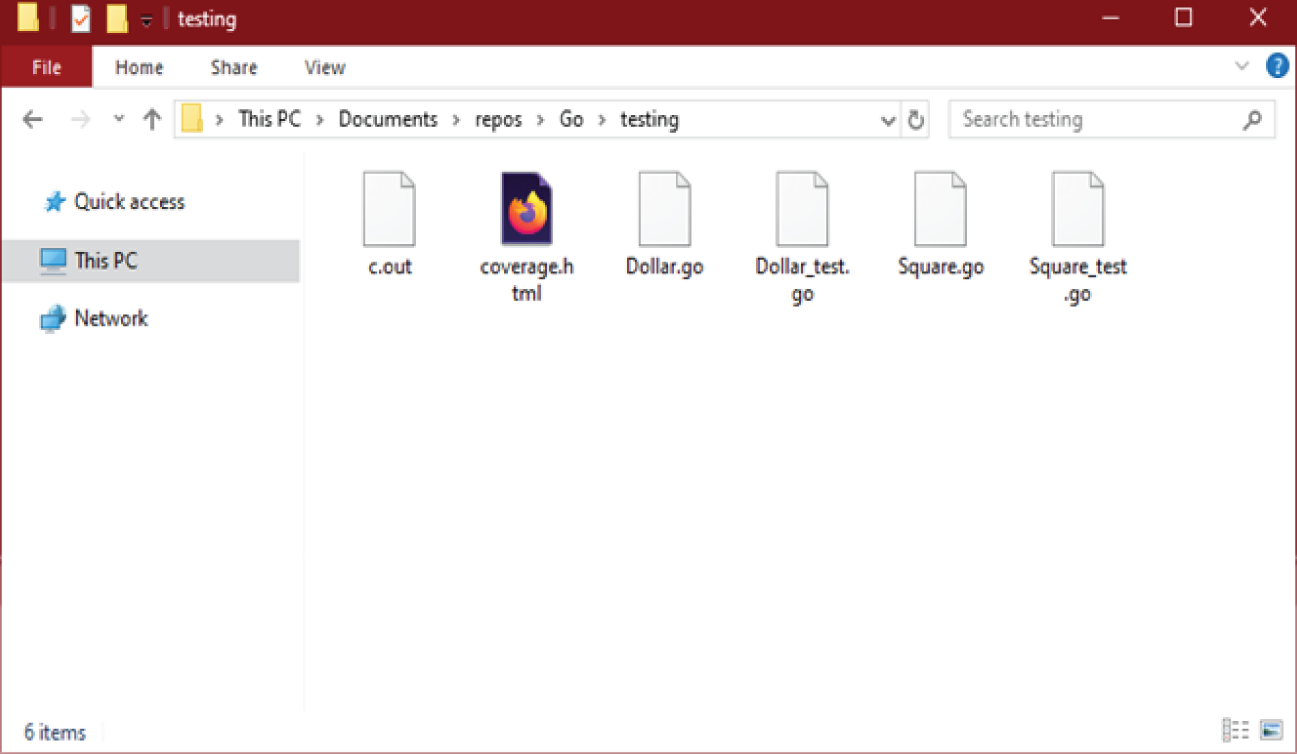
Figure 22.1: The Windows folder includes the files c.out, coverage.html, Dollar.go, Dollar_test.go, Square.go, and Square_test.go
The HTML file looks something like Figure 22.2.
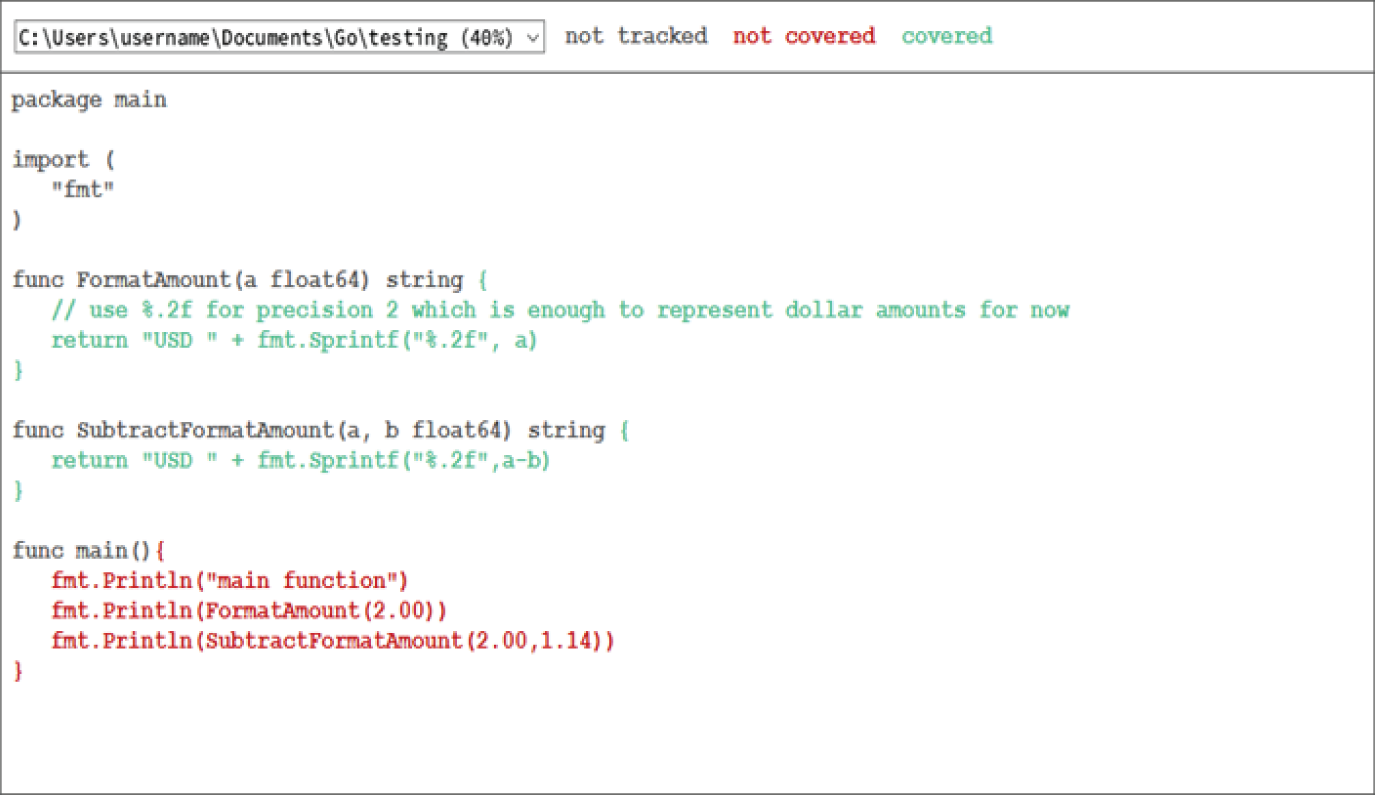
Figure 22.2: The web page color-codes the lines of code. The results are summarized next.
The original CSS settings use black backgrounds, making the content hard to read. You can edit this file to remove the background styles and improve its appearance. Additionally, the code not tracked, not covered, and covered are each presented in a different color to make it easy to see the coverage.
As shown in this report, only the lines inside the functions were covered, which you expect. The test ignores the entirety of the main function, as well as the import statements.
Fourth Test: Include Subtraction
Now let's get back to our program and continue developing the test. Specifically, you want SubtractFormatAmount to include a subtraction operation.
Add a Test
Test to see what happens when you subtract values and a < b. You expect this value to be negative (even if you don't want it to be negative in the context of money). Add the test to the Dollar_test.go file, as shown in Listing 22.12.
Refactor the Program
If you run the test now, the new test will fail since your SubtractFormatAmount is not set up to handle cases where a < b. Fix that by updating your SubtractFormatAmount function as shown in Listing 22.13.
As you can see, the SubtractFormatAmount function now checks to make sure that a is greater than or equal to b before returning the formatted string. If a doesn't pass the check (it should be less than b), then the message Impossible operation is returned instead.
Run the Test
Let's test the updates with coverage. Remember, you do this with the following command:
go test -v -cover Dollar.go Dollar_test.go
The results show that you have increased the coverage:
=== RUN TestFormatAmount--- PASS: TestFormatAmount (0.00s)=== RUN TestFormatAmount2--- PASS: TestFormatAmount2 (0.00s)=== RUN TestFormatAmount3--- PASS: TestFormatAmount3 (0.00s)=== RUN TestSubtractFormatAmount--- PASS: TestSubtractFormatAmount (0.00s)=== RUN TestSubtractFormatAmount2--- PASS: TestSubtractFormatAmount2 (0.00s)=== RUN TestSubtractFormatAmount3--- PASS: TestSubtractFormatAmount3 (0.00s)PASScoverage: 57.1% of statementsok command-line-arguments 0.069s coverage: 57.1% of statements
Final Tests: Look at Input Values
Testing helps you identify places where a program can go wrong, and you want most of the code to be tested. Let's look at other ways you can improve the testing and increase the coverage.
Add a Test
You normally want to use positive numbers when manipulating values that represent money. How would you handle a case where one of the input values is negative? You should consider the same when using FormatAmount. If the input a is negative, you should handle it properly as well.
Update the Tests
The code in Listing 22.14 shows the updates necessary to handle situations of negative values.
In this update, you've added a few tests for scenarios where negative values are entered. Two test cases were added, TestSubtractFormatAmount4 and TestSubtractFormatAmount5. Each checks for negative numbers.
Refactor the Program
Now you will update the program itself to handle these situations. Listing 22.15 presents the updated program that handles negative results.
There are a couple of things to note with this updated listing. In the function SubtractFormatAmount, you have separate statements to determine if a or b is negative. You could use a single OR statement instead:
if ((a < 0) || (b < 0))…
In the same function, you also simplify the code a bit using if statements for each possible combination of values less than 0, and you perform the function only if a is greater than or equal to b. You have a default return that runs only if a is less than b but neither value is less than 0.
Run the Test
After updating both the program and the tests, run the test again. All tests should pass, and the coverage amount should be even higher.
=== RUN TestFormatAmount--- PASS: TestFormatAmount (0.00s)=== RUN TestFormatAmount2--- PASS: TestFormatAmount2 (0.00s)=== RUN TestFormatAmount3--- PASS: TestFormatAmount3 (0.00s)=== RUN TestFormatAmount4--- PASS: TestFormatAmount4 (0.00s)=== RUN TestSubtractFormatAmount--- PASS: TestSubtractFormatAmount (0.00s)=== RUN TestSubtractFormatAmount2--- PASS: TestSubtractFormatAmount2 (0.00s)=== RUN TestSubtractFormatAmount3--- PASS: TestSubtractFormatAmount3 (0.00s)=== RUN TestSubtractFormatAmount4--- PASS: TestSubtractFormatAmount4 (0.00s)=== RUN TestSubtractFormatAmount5--- PASS: TestSubtractFormatAmount5 (0.00s)PASScoverage: 71.4% of statementsok command-line-arguments 0.468s coverage: 71.4% of statements
BEHAVIOR-DRIVEN DEVELOPMENT
Behavior-driven development (BDD) focuses on user requirements of the software throughout the development process, using plain language and user stories rather than programming code to define what the software should do and to verify that the software meets expectations as it is developed.
Goals of Behavior-Driven Development
Behavior-driven development is a methodology that arose from test-driven development, where the focus is on testing software as the code is developed by first defining what the code should do, creating a test for those requirements, and finally writing code that passes the tests.
BDD employs user stories to describe the behavior of the software under development. These stories are written in plain language that can be understood by all parties involved in the development process, including those with no coding experience. For example, a starting point for a BDD rule might be something like, “The user must be able to update their address when they move.”
BDD has the following goals:
- Promote a better understanding of the customer, the product, and the requirements.
- Promote continuous communication between customers and developers.
- Bridge communication gaps between team members.
These goals are accomplished by using tools and resources that reinforce communication between the different parties involved in the software development process.
Avoiding Failure
One of the most common ways that a software development project can fail is when various teams or individuals have different understandings of how the software should behave. The importance of identifying the correct requirements is emphasized in BDD by:
- Deriving examples of different behaviors of the software
- Allowing developers to write these examples in plain language that everyone involved in the process can understand, including the customer
- Verifying the examples with the customers to make sure the requirements are correct
- Focusing on the examples (or requirements) throughout the development process
- Using examples as tests to ensure that the requirements are implemented correctly into the software
- Implementing only behaviors that contribute directly to the business outcomes
As mentioned earlier, BDD is an extension of TDD. As with TDD, in BDD, you write test units first and then implement the code to pass that test. However, BDD is different from TDD in the following aspects:
- Tests are first written in plain English, so everyone can understand them.
- Tests are explained as behaviors of the application under development.
- Tests are more user-focused.
- Examples are used to clarify requirements.
- There is more focus on behavior than on tests.
Development teams can use tools like Cucumber (https://cucumber.io), SpecFlow (https://specflow.org), and behave (https://behave.readthedocs.io) when using a BDD approach to software development. These tools allow the development team to write software specifications and requirements in a business-readable, domain-specific language, which developers can then translate into unit tests in programming languages like Java and .NET. Writing requirements in a business-readable language means that nontechnical parties such as project managers and external clients can understand and verify them throughout the development process.
These specifications serve as documentation as well. As a result, BDD tools solve problems related to identifying requirements, creating automated testing, and producing documentation in a single step, which saves time and development costs.
Behavior Specifications
Unlike TDD, BDD heavily relies on tools like Cucumber and SpecFlow, which use DSL (domain-specific language) to describe the behavior of the software under development. Behavior specifications are written using a standard Agile framework of a user story. A typical syntax for these user stories looks like this:
As a [role] I want [feature] so that [benefit]
Acceptance criteria are written in the form of scenarios:
Given [initial context] when [event occurs], then [outcomes]
To better understand the principles of BDD, let's look at a specific example. Imagine that you are building a user portal where users can view various information such as weather, stock market reports, news, and similar content. Users from all over the world will be using this software, so the software must support the different languages of the users themselves. You need to test the language to make sure that the selected language for each user is correct. For the sake of simplicity, let's assume that users will speak only one of two languages: English and French.
As a starting point, let's look at the site's login functionality. When the user fails to log in, you should be able to display an error message in their native language:
- English: Invalid Login
- French: Le login est invalide
Let's consider these three users:
- Kate from the United States (Language: English)
- Brittney from the United Kingdom (Language: English)
- Jean from France (Language: French)
Story: Failed Login
Feature: As a user, I want to see information in my own language, so I can understand the information.
Now let's consider the following scenarios. Note the use of Given, When, and Then to define each step of the validation process:
Scenario: Failed Login
Given: Failed login by Kate
When: The website sends the error message
Then: The error message should be “Invalid Login”
Scenario: Failed Login
Given: Failed login by Jean
When: The website sends the error message
Then: The error message should be “Le login est invalide”
Tools like the Given-When-Then scenario in Cucumber (named for the first word in each line following the scenario definition) make it relatively straightforward to define scenarios like this and test to be sure that each scenario is satisfied appropriately in the code.
Defining User Stories
Typically, BDD includes two main activities: specification workshops and executable specifications.
Specification Workshops
The purpose of specification workshops is to gather the teams involved in the development of the software and agree on a common understanding of how the software should behave. During these workshops, the teams involved in the meetings create user stories like the one presented previously, along with concrete examples that describe the business rules and acceptance criteria.
These examples define how the software will behave. By conducting specification workshops, teams help avoid any confusion or misunderstanding about the behavior or requirements of the software. Moreover, specification workshops allow business stakeholders to make sure that the developers understand the requirements of the software before they start building the software.
Executable Specifications
Once the teams have identified the specifications, the next step is to transform these specifications into executable software specifications (unit tests), which will verify that the implemented software is behaving the same way as the identified behavior in the specification workshops.
Cucumber is an example of a tool that can transform specifications into executable specifications. In this case, we simply provide the Given-When-Then scenarios (like the ones in the login example earlier) and Cucumber will create executable specifications. These executable specifications provide developers with instant feedback throughout the development process, which reduces the chances of defects.
SUMMARY
This was one of the longest lessons in the book, but a lot was covered. Testing is an important part of doing “job ready” development because it helps ensure your applications work properly. In this lesson you learned about test-driven development (TDD) and how it can be used to create testing along with your code. You also learned about behavior-driven development (BDD), which is similar to TDD but with a focus on requirements.
EXERCISES
The following exercises are provided to allow you to experiment with the tools and concepts presented in this lesson. For each exercise, write a program that meets the specified requirements and verify that the program runs as expected. The exercises are:
- Exercise 22.1: Breaking the
Square - Exercise 22.2: Adding More to
Dollar
Exercise 22.1: Breaking the Square
The code presented in Listing 22.1 and Listing 22.2 does what you want it to do, so all the tests pass. Build both programs (in the same folder) and verify that the program passes all the tests. Once this is working, change the Square function in the main program so that it performs a different calculation, such as addition instead of multiplication. Save the change and run the tests again to see the results.
After changing and testing the function in the main program, change the tests to match the expected output for the new function, and run the tests again.
Exercise 22.2: Adding More to Dollar
Update the Dollar program and test to include a function that adds the input values and formats the result in the same format used in the current program. Write appropriate tests that apply to that function as well.
Once you have a complete working program that passes all tests, refactor the program to include:
- User inputs for
aandb. - Allow the program to apply other currency formats to the output, based on user input.