
Chapter 10
Setting Up Your Mining Hardware
IN THIS CHAPTER
![]() Properly setting up your equipment
Properly setting up your equipment
![]() Assembling your mining hardware
Assembling your mining hardware
![]() Understanding mining software options
Understanding mining software options
![]() Building a GPU mining rig
Building a GPU mining rig
![]() Configuring your mining hardware
Configuring your mining hardware
After selecting a cryptocurrency you intend to mine, acquiring all the needed supplies and hardware, and choosing a suitable location to run your mining equipment, the next step is to bring it all together and set up your mining rig. Whether you plan to use application specific integrated circuit (ASIC) mining hardware, or a custom-built graphical processing unit (GPU) mining rig, we look at how to assemble the mining equipment, hook up all the needed cables, and install and run the correct software.
ASIC Mining Rigs
ASIC mining equipment is manufactured in a prebuilt package that takes care of much of the technical software and physical setup requirements that make GPU cryptocurrency mining somewhat more difficult. ASICs are designed to be virtually plug and play. After all, ASIC mining equipment is specially intended and built for cryptocurrency mining, so it is designed to be easy to use in that very application. Your ASIC should come with an installation manual, of course, with detailed instructions. This chapter is more of an overview to give you a feel for what will be required.
Racks
Computer colocation facilities are full of racks that are a little over 19 inches wide and 40 to 50 inches high. A rack contains different customers’ installed mining rigs, with one setup above the other. Each rack is subdivided into vertical units; 1U means a vertical space 1.75 inches high. Thus, computer equipment designed to fit into racks may be 1U or 2U or 3U, and so on. A piece of equipment that is 2U will fit into a 3.5-inch-tall space in the rack, for example.
Well, some ASICs are designed to be rack mountable. This typically means that the ASIC slots right into a standard 19-inch computer rack and may take up several vertical units. However, this is actually relatively rare. In general, ASICs are not designed to be rack mountable. You can see an example of the typical form factor of an ASIC in Figure 10-1.
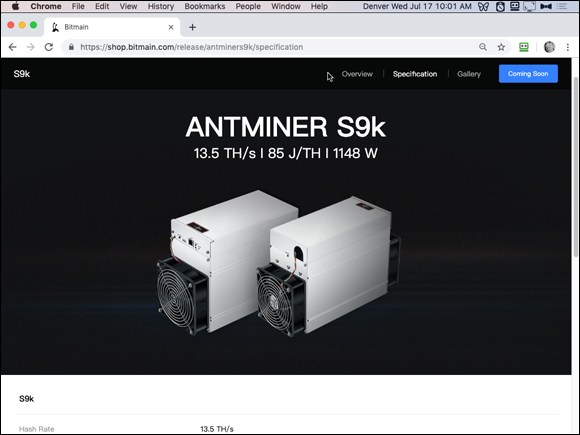
FIGURE 10-1: A typical ASIC size and shape; the Antminer S9k.
So how do you rack-mount an ASIC that isn’t rack-mountable? You use a case. A few companies sell rack-mount shelves designed to hold particular ASICs and mount them in server racks. For example, in Figure 10-2, you can see an example of a Gray Matter Industries rack designed specifically for the Antminer Bitmain S9 and L3 ASICs (www.miningrigs.net). This rack holds three Bitmain ASICs, and the PSU (power supply unit), too. The case is 7U tall.

FIGURE 10-2: A Gray Matter Industries shelf designed to hold, and rack mount, three Bitmain ASICs and a PSU.
These rack-mount shelves are not terribly expensive (usually less than $200), and if you are running a large mining operation, with dozens of ASICs, you’ll probably want to use some kind of mounting equipment. However, there’s no need to go overboard if you have a small mining operation! There’s nothing wrong with sitting a couple of ASICs on a table, or perhaps on utility shelving from your local hardware store or big box outlet. Computer server racks in data centers are typically electrically grounded, and if you are using a metal rack or shelving, it should also be grounded so you and your equipment are safe.
Power supply
Most ASIC mining rigs use external power supply units (PSUs); you can see an example in Figure 10-3. In general, when you buy an ASIC, you’ll probably get an appropriate PSU bundled with it — not always, though, so if not, you’ll need to carefully select the right PSU and buy it separately.
Power supplies convert the alternating current (AC) supplied from the electrical utility to direct current (DC) electricity, used by computer equipment. So, you’ll connect your ASICs directly to the appropriate PSUs.
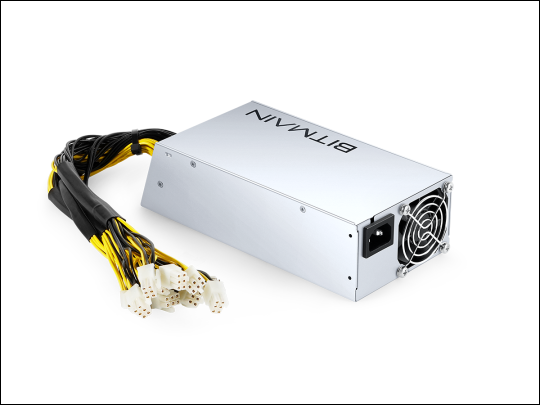
FIGURE 10-3: A Bitmain power supply, designed for use with the company’s Antminer ASICs.
 It is critical that you ensure that none of your devices are plugged into a wall socket before you begin connecting components. Connect the power supply to the ASIC first and then the power supply to the PDU prior to connecting the PDU to the wall outlet.
It is also important to only use one power supply per mining rig. Trying to connect a single ASIC miner to multiple power supplies can be dangerous and lead to equipment failure or electrical faults. Also, be aware that while some power supplies are equipped with a power switch, others are not and will power on as soon as you connect them to the outlet. (See Chapter 9 for more information on the electrical requirements and equipment.)
 Power supplies are equipped with PCIe (Peripheral Component Interconnect Express) power cables that allow for easy and quick connection. If you’ve worked on personal computer hardware, you’ll be familiar with these. There are many variations of PCIe cables, but for mining power supplies, the 6-pin version is typically used.
Your ASIC will have multiple PCIe connectors. Each hash board has several PCIe plugs — likely at least 2, maybe 3 or 4 — and each mining rig has about three hash boards (though some may have more) for a rough total of 6 to 12 PCIe ports for hash boards per ASIC. Each ASIC mining rig also has a control board that must be powered, so you’ll also see a PCIe connection for that board. In Figure 10-4, you can see a page from the installation manual for the Antminer Z9 ASIC, in which power connections are discussed.

FIGURE 10-4: The Antminer Z9 ASIC documentation showing the power connections.
PDUs
Power delivery units, or PDUs, are not necessary for running cryptocurrency mining equipment, especially in small installations. However, they are recommended, as PDUs make the connection of multiple mining PSUs easier and safer.
To install your PDUs, they must be connected to the mining PSUs, via cables that are typically provided with the purchase of the PSU. Once that is complete, you can connect the PDUs to the electrical outlets. We discuss electrical infrastructure requirements in more detail in Chapter 9. For a view of a typical PDU, see Figure 10-5.
Fire risk is real (see Chapter 9). You must make sure you’re using the right equipment, configured correctly. If you’re not sure, you must get the assistance of a professional electrician. Keep a fire extinguisher accessible, but not too close, to your mining rig.

FIGURE 10-5: A typical PDU.
Network and Ethernet connection
Your ASIC mining hardware needs Internet access, of course. You’ll need some kind of box that your Internet service provider gives you (or you buy so you don’t have to pay the monthly rent) that connects your home (or whatever other kind of facility you are using for your mining) to the Internet.
Specifically, you need both an Internet modem and a router, and these days you typically get a single box that has both functions built into it. Anyway, that’s up to you and your ISP.
Your modem/router, whether you own it yourself or it is provided by your Internet service provider, has multiple Ethernet ports. Ethernet is a connection standard used in most local area network (LAN) applications. An Ethernet port looks a little like a phoneline port, but is slightly larger and can be found on most desktop and many laptop computers.
ASIC control boards are equipped with Ethernet ports as well and must be connected to your Internet modem to access the Internet. Connections to your miner and the Internet modem can be made either via direct Ethernet connection or through a network switch.
Once your power supply and Ethernet connections are hooked up to your miner, the next step is to power the equipment on. Make sure everything is properly connected — ASIC PCIe cables are connected to the PSU, and the PSU is connected to the PDU. Then, and only then, should you plug the PDU into the wall socket and turn everything on.
A computer to control your rig
To access the control board and the installed GUI of specialized cryptocurrency mining ASICs, you will need to access it via any computer that is connected to the same local area network as the mining equipment. Any laptop or desktop will work. Even a cell phone can connect as long it is on the same LAN. The computer managing your ASIC doesn’t need to be powerful. It’s just used to set it up and get it running; the ASIC itself is doing all the work.
Open up a web browser and type the ASIC’s IP address into the browser to navigate to the user interface.
Where do you find the IP address? You can use software, such as the free Angry IP Scanner (https://angryip.org), or log on to your network’s router and scan. Your ASIC manufacturer may provide a tool to find the IP number. For example, some of the Bitmain Antminer ASICs work with a Windows program called IP Reporter (downloaded from the Bitmain website). You run the software and then press the IP Report button on the ASIC, and the ASIC reports its IP number to the software (see Figure 10-6). You can then take that IP number, enter it into a web browser, and connect to the ASIC. Refer to your ASIC’s documentation; each ASIC is going to function a little differently.
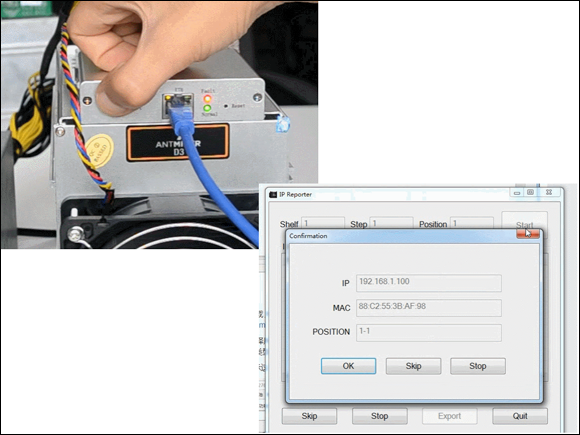
FIGURE 10-6: Bitmain Antminer’s IP Report button on the ASIC which reports the ASIC’s IP number to the IP Reporter software.
You’ll then use the ASIC software, accessed through your web browser, to point to the pool you’re working with. Here’s an example of the settings required to input into your miner for a United States–based Bitcoin ASIC running on Slush Pool:
URL: stratum+tcp://us-east.stratum.slushpool.com:3333
userID: userName.workerName
password: [yourpoolpassword]
In Figure 10-7, you can see the Bitmain Antminer ASIC user interface in the pool configuration screen.
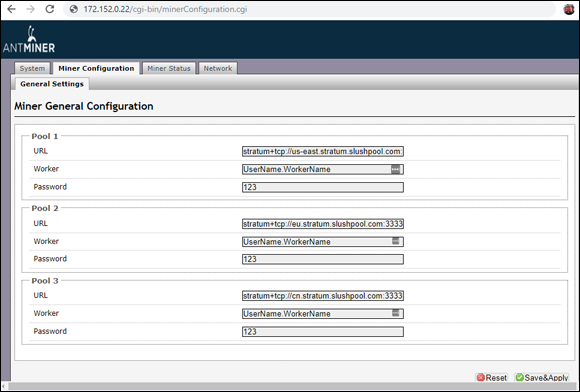
FIGURE 10-7: The Bitmain ASIC configuration settings screen where you can set the pool, username, and server URL for pool mining with your ASIC rigs.
The specific mining pool you choose will also provide details on connection settings. Sometimes, for example, instead of requiring you to enter a user account, a mining pool will need you to input only your blockchain payout address for the cryptocurrency you are mining. Again, check your pool’s documentation for details.
The server you connect to depends on which location is closest to you; your pool will provide you with several options. In general, you’ll pick the one closest to you geographically, but you may want to test a few to see which is really the fastest connection; you’ll use the ping command. For example, say you’re in Australia and you’re not sure if you should use NiceHash’s U.S. server or Japanese server. If you have a Windows computer, you could open the Windows command line and run these two commands, one after the other:
ping -n 50 -l 128 speedtest.usa.nicehash.com
ping -n 50 -l 128 speedtest.jp.nicehash.com
On the macOS, you can use the Network Utility app’s Ping screen. For each one, you’ll get a response something like this:
50 packets transmitted, 50 packets received, 0.0% packet loss
round-trip min/avg/max/stddev = 62.156/67.665/83.567/7.214 ms
For Linux machines (Ubuntu, Debian, and so on), you’ll just need to open the terminal and run these two commands (after 10 to 15 seconds, you’ll need to press CTRL+C to obtain a report of the ping test):
ping speedtest.usa.nicehash.com
ping speedtest.jp.nicehash.com
You can then compare the average ping time to find the fastest connection (the smaller the number, measured in ms, or milliseconds, the faster the connection, of course). That’s the server you’ll want to use because with cryptocurrency mining, every fraction of a second is important.
If you need to enter a username rather than your blockchain address, it will be the same as your mining pool account. You can get creative with what you decide to name your worker, or mining rig, but do not duplicate worker names if you are connecting more than one piece of mining gear. (You may have multiple workers — individual GPU rigs or ASICs — working within your single mining account. See the particular pool’s instructions to find out how to provide this information.)
GPU Mining Rigs
If you bought a prebuilt GPU mining rig, setting it up is as simple as setting up an ASIC. Building it yourself requires a lot more work and planning.
Getting your GPU rig online
Some mining-equipment providers sell preconfigured GPU mining rigs (see the list of prebuilt GPU mining rig manufacturers in Chapter 9 for some popular equipment providers), but these preassembled mining rigs come at a premium cost when compared to the sum of the cost of the computer parts. These preassembled rigs are easier to set up and get mining, of course, and are similar to ASIC miners — they’re essentially plug and play. Figure 10-8 shows you a prebuilt 8-GPU mining rig with slots for eight individual GPUs. You will essentially treat a preassembled GPU like an ASIC, with the exception that a GPU rig is itself a computer and does not need an external computer to manage it. Thus, you will do the following:
- Place it on a table, in a rack, or on a shelf.
- Connect it to a PSU.
- Connect the PSU to a PDU.
- Connect it to an Ethernet network.
- Install an operating system (unless it came with one, as some prebuilt rigs do).
- Connect a mouse, keyboard, and screen (unless it came with a screen).
- Install mining software on the computer (unless the prebuilt rig came with the software already installed).
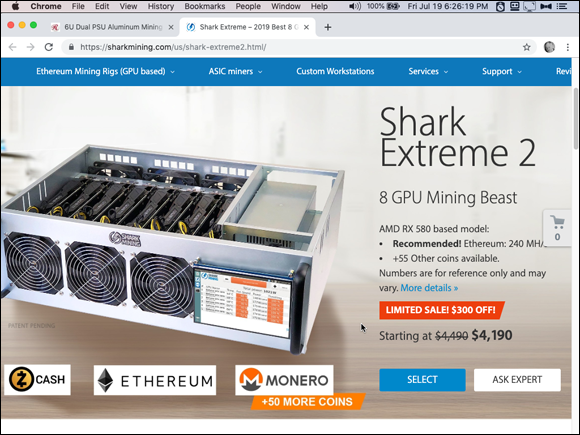
FIGURE 10-8: A preconfigured 8-GPU mining rig.
Building your own GPU miner
Prebuilt GPU mining hardware rigs can be expensive, so some aspiring miners acquire the parts needed off websites, such as Newegg and Amazon, or retailers, such as Micro Center or Best Buy, and assemble their rigs themselves. Building your own GPU mining rig comes at quite a discount compared to the prebuilt options. However, this route is also more complex, with some assembly required as well as sometimes fairly complicated software implementations.
A typical desktop computer will have space onboard for only a single GPU or two. Some custom-built computers have space for up to three in standard tower cases, but in general, for GPU mining applications, special mining rig frames and custom-assembled hardware are needed to be able to run 6 to 12 GPUs.
You can buy all these parts separately, or perhaps buy a bundle and put it all together. For example, gpuShack (gpuShack.com) sells bundles that come with a motherboard configured for 5 to 13 GPUs (depending on the bundle), RAM, and a small amount of flash data storage with the ethOS operating system already installed. These range from $189 to $399, but you’ll still require riser cards, various cables, a rack, and so on.
There are many different possible configurations, so our explanation here is really quite basic and just outlines the essential principles. Before you jump into building your own GPU mining rig, we strongly recommend that you spend some time viewing videos from people who have already done it so that you can get a really good idea of what it entails. You can easily find many examples and detailed guides by typing build GPU mining rig into your favorite search engine.
Mining rig frame
Gamers often custom-build their own high-power desktop computers, buying a tower case and all the individual components — motherboard, CPU, graphics cards, power supplies, and so on — that they place into the case. The principle is the same when building a GPU mining rig, except that you can’t use a typical tower case because of the size limitations for multiple GPUs. Rather, you need a special mining-rig case or frame.
Simple mining-rig frames are around the same price as regular computer cases, or sometimes cheaper (depending on the type you choose), hold more GPUs, of course, and allow for greater ventilation to remove the heat from the GPUs. The frame allows you to connect a motherboard, a power supply unit, and multiple GPUs in a compact form factor.
However, there’s a wide range of what you can get when buying GPU frames, from the very basic (just a metal frame with holes to help you mount components); to more expensive versions that come with a CPU, hard drive, RAM, fans, all the necessary connectors, and even an operating system (essentially everything but the GPU cards); to the full-blown GPU racks with everything ready to go. The MiningSky Mining Rig shown in Figure 10-9, for example, is $899, but comes ready to plug GPU cards into it, making it very simple to work with.
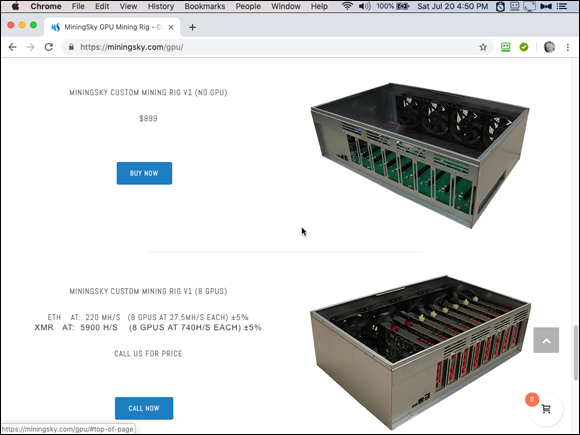
FIGURE 10-9: The MiningSky V1 GPU Mining Rig — everything you need but the GPU cards.
Some frames are also designed to allow for stacking other frames on top, in case you want to deploy multiple mining rigs in a small space. Other frames can be mounted in a computer-server rack, allowing for scalability and easier deployment. Many online retailers sell mining rig cases or frames (Amazon, eBay, Newegg, Walmart, the mining-gear companies we mention in Chapter 9, and so on). The companies that sell preassembled GPU mining rigs generally also sell individual parts, including mining rig frames. (Some miners build their own frames to save on costs, though the extra hassle may not be worth it in many cases.)
Figure 10-10 shows a Rosewill GPU Mining Case, or Frame (see www.rosewill.com), which takes up to eight GPU cards and is also rack-mountable (6U tall). The diagram shows where the motherboard, GPUs, PSUs, and fans are installed. This case retails for around $100.

FIGURE 10-10: The Rosewill 6U Dual PSU Aluminum Mining Case.
In Figure 10-11, you can see an open-air design, which is popular with many miners. All you get is the bare frame, with space to mount everything you need, such as the motherboard, fans, GPUs, and so on.
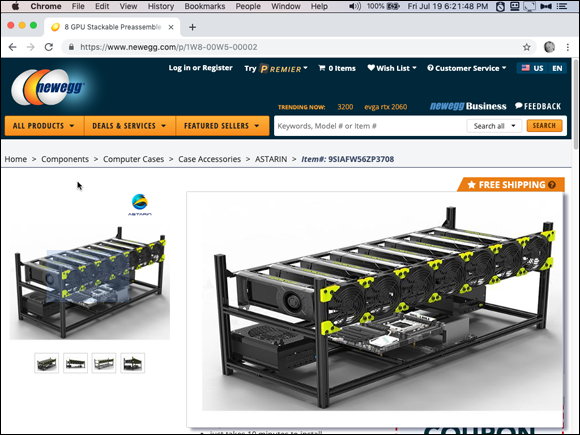
FIGURE 10-11: An open-air GPU mining frame, shown after all the equipment has been mounted (it comes empty).
Motherboard
The motherboard is the piece of computer hardware that ties everything else together. It provides connections on the board for installation of the CPU, the GPUs, and the power supply, as well as the RAM and hard drive.
It would be handy if your motherboard has plenty of slots for GPU cards. However, few motherboards have more than a couple of slots available. If you’re using one of the more sophisticated, prebuilt mining-rig frames, that’s okay — all the connectors are built in. You’ll install your motherboard into the frame and connect it to the frame following the manufacturer’s instructions. If you’re using a simpler frame, then you’ll need to use a riser card to connect your GPUs.
In fact, you may want to purchase a motherboard that is designed for cryptocurrency mining, which will likely have all the connectors you’ll need. ASUS, the well-known computer company, manufactures a mining motherboard, the B250 Mining Expert, which you can see in Figure 10-12. This board allows you to connect up to 19 GPUs.
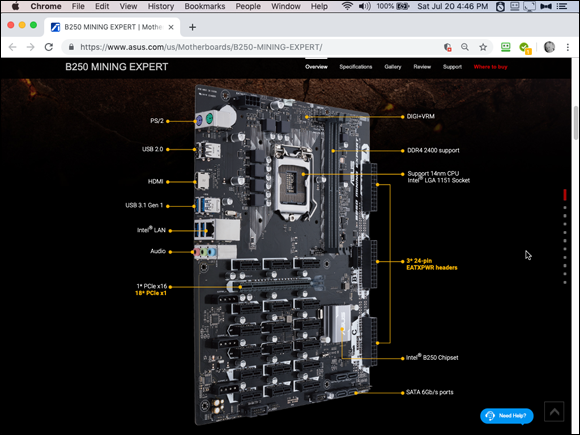
FIGURE 10-12: The ASUS B250 Mining Expert motherboard, which can handle up to 19 GPUs.
 Make sure to securely mount your motherboard to your case or mining rig frame with the provided screws that come with the motherboard. Ensure the motherboard that you select is compatible with the CPU model you purchase.
Central processing unit
The central processing unit (CPU) is the main computer chip, the brain of your desktop or laptop computer. It serves this same function for GPU mining rigs. The individual GPU cards are the specialized processors, and they still need a CPU to manage them all.
In general, any off-the-shelf CPU is sufficient; it doesn’t take much power to manage the GPU cards. However, in some circumstances, you may also use the CPU to mine, depending on the software you’re using. Both the GPU cards and the CPU will be hashing. In such a case, you’ll want a faster CPU. Faster CPUs will have many different cores (both physical and virtual) that will allow for more mining capability and hash rate from the CPU.
Make sure that the CPU you purchase is compatible with your motherboard. Some motherboards are usable with Intel CPUs, while others work with AMD CPUs. (The difference is in the number of pins for the CPU socket connection. The AMD chips use 938-pin sockets and the Intel chips use 1,366-pin sockets.) The manufacturer of the motherboard will list which CPU it is designed to work with. Figure 10-13 shows a fairly standard AMD CPU from Micro Center that would be able to run a GPU mining rig.
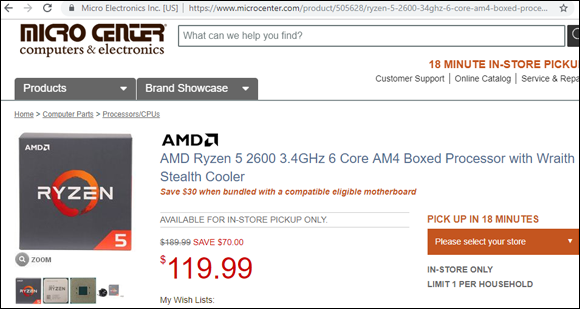
FIGURE 10-13: An AMD CPU that would be suitable to run a GPU mining rig. This CPU comes with a fan.
Mount the CPU to the motherboard, following the manufacturer’s instructions. It is best to also use a CPU fan and heat sink to cool the CPU chip. CPU fans are powered by a four-pin connection to the motherboard, and the fan pin will be labeled “CPU” on the motherboard. The heat sink and fan should be connected to the CPU via a heat sink bonding compound or paste, known as thermal grease, which allows for a proper connection and heat dissipation from the CPU to the heat sink and fan apparatus. Figure 10-14 shows a heat sink that is designed to attach to a motherboard and cool the CPU with an equipped fan.
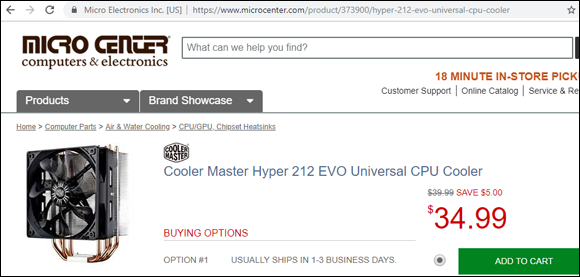
FIGURE 10-14: A CPU heat sink with built-in fan (from Cooler Master). The pad shown directly under the fan sits directly on top of the CPU chip to pull the heat way from the chip.
Graphical processing units
The graphical processing units, or GPUs, are the essential and keystone piece of equipment required for GPU mining rigs.
 While other components needed for a GPU mining rig may not need to be top-of-the-line and you could get away with the purchase of cheaper components to save on mining rig costs, the GPU is the piece of computer equipment you may want to spend more on. It’s the GPU that does the hashing, after all.
You can see an example of a GPU card that is often used for mining in Figure 10-15. This card was not cheap when it was new, but it’s powerful. It has built-in fans and heat-sink cooling. In general, GPU frames are built to allow for the thickness of most common GPUs, though if you think your GPUs are particularly thick, you’ll want to check the frame’s specifications carefully.
Top-of-the-line GPUs are more efficient, so they require less power and output more hashes when mining. Figure 10-16 ranks popular GPUs used in cryptocurrency mining by price. These costs are an average from late 2019, but be warned: Prices fluctuate wildly over time, with supply, and between retailers.
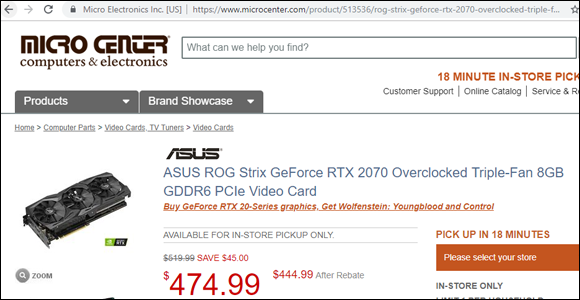
FIGURE 10-15: GPU cards are popular among some miners.
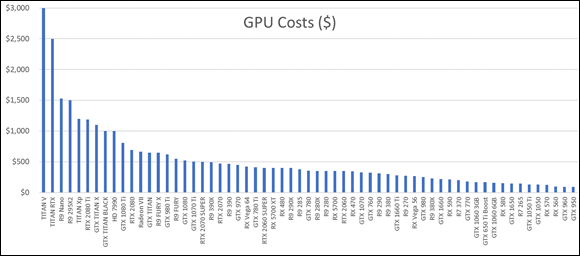
FIGURE 10-16: Average price of popular GPUs for cryptocurrency mining in 2019.
We recommend not mixing and matching GPU types on a single mining rig, as they may use different GPU drivers, which will cause problems. Sticking with the same brand and type will ensure that this will not be an issue.
See Chapter 11 for figures and more details on GPU mining hardware hash output, power consumption, and overall efficiency. Some GPU mining rigs are able to run up to 12 GPUs (see, for example, the prebuilt mining rigs from https://miningstore.com.au). These mining rigs require larger frames, multiple power supplies, and, in some cases, two motherboards to run that many GPUs. Six GPUs is a common deployment and is near the limit that can be safely and easily powered by a single power supply.
Riser card and cables
A special GPU riser card and cables may be required to connect your GPUs to the motherboard. Most motherboards have only a few onboard PCIe connections for GPUs. Depending on your hardware setup and motherboard, you may be able to plug the GPU directly into the motherboard, but if you have more GPU cards than PCIe connections, you won’t be able to.
However, if your motherboard doesn’t have enough PCIe connections, you can use GPU riser cards, one for each GPU card you want to use. (They are around $15 to $20 each.) The riser cards are mounted on the frame; they then plug into the motherboard via USB (Universal Serial Bus) connections, of which most motherboards have plenty.
Some GPUs are powered directly from the motherboard connection. However, the most modern and powerful GPUs (the ones best suited for mining) require the GPU to be powered directly from the power supply by a separate PCIe 6-pin cable.
Each GPU is then plugged into a riser card via the PCIe port, and physically mounted to the mining case or frame. You can see an example of a riser card, being sold on the popular Newegg electronics site, in Figure 10-17.
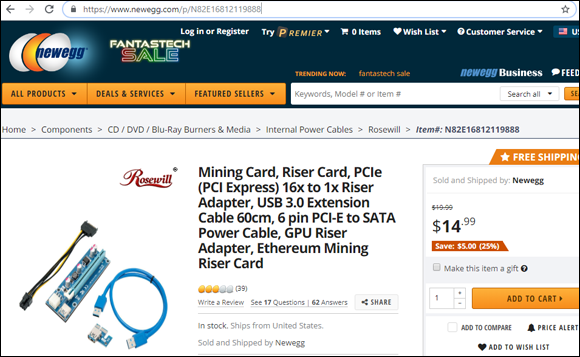
FIGURE 10-17: A riser card designed to connect a single GPU card to a motherboard.
Memory
Random access memory, or RAM, is needed for any computer as well as for a GPU-based mining rig. RAM is cheap, but mining doesn’t actually need very large amounts of memory (unlike the graphics-intensive operations the GPU cards were originally designed for), so you won’t need to go overboard. Still, your rig will run better with a decent amount of RAM, and anywhere from 4 to 16GB of RAM is most likely adequate.
RAM sticks or cards can be plugged directly into the motherboard, but be sure to follow your motherboard manufacturer’s instructions carefully. For example, you may need to plug two chips into slots 1 and 2 with some motherboards, or slots 1 and 3 with others. Typical modern motherboards are equipped with four slots for expandable RAM, but because GPU-mining rigs do not require much RAM, you generally don’t need to use all four slots.
Power supply
You’ll need a power supply — maybe several. GPU-rig power supplies, similar to their ASIC counterparts, also come equipped with PCIe 6-pin cables, allowing for easy and quick connection to the various pieces of gear that require power.
Make sure to properly calculate your mining rig’s power supply needs before purchasing your power supplies. GPU manufacturers will list the maximum rated power consumption of their graphics cards. Multiply this number by the number of GPUs you have and install enough power to supply them all. Also account for the CPU, fans, and motherboard power consumption. The power requirements for these additional items should be provided in the manufacturer’s documentation, but do not normally exceed 200 to 400 watts. Typically, computer power supplies range between 600 and 1,600 watts and can easily power between 3 and 8 GPUs, depending on the GPUs’ electricity consumption. Refer to Chapter 11 for a ranking of popular GPUs’ power consumption in watts when mining a cryptocurrency such as Ethereum.
Hard drive
The storage mechanism for digital data, the hard disk drive (HDD) is needed for any computer, and a GPU mining rig is essentially a specialized computer. Some solo miners, with their own full cryptocurrency node, use state-of-the-art solid-state drives (SSDs), but in pool mining this type of technology isn’t needed. With pool mining, the pool is managing the blockchain itself. All your gear is doing is the hashing, so you don’t need a particularly fast or large hard drive. A smallish HDD is fine.
For solo mining, though, it’s a different matter. You’ll have a full copy of the blockchain on the hard drive. What that means, as far as a choice between HDD and SDD is concerned, depends on the cryptocurrency you’re mining. In the case of many smaller cryptocurrencies, the choice probably isn’t terribly important. In some cases, though, in particular if you’re mining the Ethereum blockchain using an archival blockchain (a copy of the blockchain that includes all historical data), the choice is more important. You’d need a multi-terabyte SSD, because the archival blockchain is huge, and an HDD really wouldn’t be fast enough to keep up or sync. (On the other hand, it’s possible to solo mine in the Ethereum blockchain using what is known as a pruned blockchain, one in which non-essential historical data has been removed, which is much smaller.)
SSD drives are more expensive than HDDs, but much faster, and can help solo-mining equipment quickly read and write block data into storage. This isn’t needed for pool mining, but in solo cryptocurrency mining, every (split) second counts. If you’re trying to download, sync, and verify an archival Ethereum blockchain, for example, you cannot even catch up to the real-time blocks being added to the chain without using an SSD, as an HDD is just too slow. (On the other hand, this isn’t a problem with most cryptocurrencies.)
Drives are connected to the motherboard, generally using a Serial ATA (SATA) cable, as well as connected to the power supply via a six-pin PCIe power cable.
Fans
Air flow is essential for any mining application, as the computational processes generate quite a bit of heat. The GPUs best suited for cryptocurrency mining have built-in, on-board fans to cool off large heat sinks. You’ll also need a CPU fan. The mining-rig frame itself may also be equipped with a place to mount a few external fans to the unit. These can be connected to the motherboard via four-pin fan power connections and will help dissipate heat off the mining rig and keep your equipment running optimally.
Ensure all these connections are firmly secured and plug in your GPU mining rig. Once online, the next step is to install the software to get your mining rig pointed to your cryptocurrency blockchain or pool of choice.
An operating system, mouse, keyboard, and screen
Unlike working with an ASIC, which requires an external computer to manage the ASIC, your GPU rig is going to be managed by an operating system stored on the HDD or SSD that you installed into the frame. The GPU mining rig itself is a computer. Just like your desktop or laptop PC, it has a motherboard, CPU, RAM, and a disk drive.
If you bought a prebuilt GPU rig, it likely already has an operating system included. The Shark Mining rig we looked at earlier in the section, “GPU Mining Rigs,” has something called SharkOS installed, which is a Linux-based operating system with mining software included, and the MiningSky V1 GPU Mining Rig comes with Windows pre-installed on the disk (though not registered). Otherwise, you’ll have to install an operating system, probably downloaded to the rig’s hard drive through your Internet connection.
Note that some of the software we look at in this chapter is also, like the SharkOS, a combination of operating system and mining software. You install the operating system, and it comes with the mining functions ready to run.
You’ll also need to control that GPU rig computer, so you’ll need a mouse, keyboard, and display. (A few, like the Shark Mining rig, may have a built-in touch screen.)
CPU Mining
CPU mining was very popular and, in fact, was the only method of mining in the early days of Bitcoin and other cryptocurrencies, pre-ASIC. Since then, specialized mining hardware has evolved to be much more effective and efficient. However, it is still viable to CPU mine on a variety of smaller cryptocurrencies or cryptocurrencies that intentionally discourage the development of ASICs, such as Monero. These days, almost nobody builds CPU “rigs.” Instead, you either use a spare computer that’s sitting around or decide that if you have a GPU rig running, you may as well use the CPU in the rig, too. It’s there, controlling the GPU cards, so why not use the additional computational power that is sitting idle to mine as well?
Still, the easiest way to mine using a CPU in a spare machine is by using pool software, such as NiceHash, Cudo Miner, and Kryptex. You can also use other programs, such as Easyminer and Hive OS.
If you want to solo mine, you’ll generally install the cryptocurrency’s core software on the computer holding the CPU you’re planning to use, though a few other solo-mining programs are also available to use. We talk more about mining software in the next section.
With any form of mining, you need to understand the numbers and whether you can mine profitably (see Chapter 11). This is even more important with CPU mining, which is far less likely to be profitable.
Mining Software
After you have your hardware running, you’ll need to install the appropriate software. The software you’ll use depends on whether you’re pool mining or solo mining, your hardware setup (ASIC, GPU, or CPU), and the particular cryptocurrency you plan to mine.
In some cases, the mining software replaces the entire operating system (ethOS and Braiins OS, or Braiins OS+, for example), but in other cases, the software is application software that runs within another operating system, typically Windows, Linux, or macOS (such as MultiMiner, NiceHash, and Cudo Miner).
Pool mining
Pool mining is a cooperative mining system in which thousands of individual miners work together to mine blocks. They share in the rewards proportional to their individual contributions of hash power.
We recommend pool mining for steady and consistent mining rewards, and later in this section, we discuss some software options for getting your mining rig (CPUs, ASICs, and GPUs) set up and working with a mining pool. Some work with all three, while some only work with one of these systems.
If you bought an ASIC or a prebuilt GPU rig, your rig most likely already has mining software installed on it. ASIC mining rigs generally come equipped with a manufacturer-provided operating system (running on the ASIC’s control board), with a simple graphical user interface. You will work with this operating system from another computer, connected to your local network; you’ll use a web browser to navigate to the unit’s IP address on the LAN.
See the manufacturer’s documentation to properly set up the mining software. For a view of a typical mining manufacturer’s GUI, refer to the snapshot in Figure 10-6 showing the pool-configuration screen in the software that ships with Bitmain’s ASICs, and the discussion earlier in this chapter in the section, “A computer to control your rig.” If you purchased a prebuilt GPU frame, it most likely comes with an operating system and mining software, too.
However, many of these manufacturer-provided systems are not open-source. Some implementations have been prone to issues, such as backdoors, remote monitoring, and lack of full overclocking or other efficiency limitations, so miners often replace the manufacturer’s software. (If you’re interested in finding out more about possible efficiency limitations or backdoors, search for Bitmain ASICBoost scandal and Antbleed scandal.)
A lot of downloadable programs are specifically designed for mining cryptocurrencies. However, many of them are from unreliable sources, and some may include malware or other computer viruses. We have compiled this list of reliable mining software programs designed to mine towards pools.
- ethOS: This Linux-based mining operating system for GPU cryptocurrency mining rigs is highly recommended for pool mining GPU applications and is easy to install, set up, and operate (for people who have worked with Linux software!). ethOS currently supports mining Ethereum, Zcash, Monero, and others. ethOS is free software licensed under the General Public License (GNU), but it is highly recommended that you purchase a copy to support the ongoing development of the software. (While free, it is not open source; it is, according to the website, provided under the “‘Small Goat with Red Eyes’ license. You should buy one ethOS from gpuShack.com per each rig on which you intend to run ethOS. If you don’t, a small goat with red eyes will visit you while you sleep.”) The software can be directly downloaded, or you can purchase a preloaded flash drive or SSD. Follow the documentation to get your mining rig fully set up and hashing (
http://ethosdistro.com). - NiceHash: This is a pool-mining service and mining configuration software (which also allows people to buy and sell hash rate; see Chapter 7) that is used for a wide variety of different cryptocurrencies. It is specifically designed to mine via GPUs, ASICs, and CPUs and runs only on the Windows operating system. So, you could GPU mine by installing it into the Windows operating system that is installed in your mining rig, and CPU mine by running it on a Windows PC to use that computer’s CPU. To ASIC mine, you use its instructions to point your ASIC rig to its server (see Figure 10-18). Follow the documentation to get your mining rig fully set up and hashing (
www.nicehash.com). - Easyminer: This free, open-source mining tool allows for the mining of various coins, such as Bitcoin, Dogecoin, Litecoin, and others. It can be configured to mine with CPUs, GPUs, and ASICs and can mine pointed to a pool as well as solo mine. It runs only in Windows (
www.easyminer.net). - Hive OS: Hive OS is a free operating system for up to three mining rigs, but requires a monthly fee for larger deployments. It can be configured to mine with CPUs, GPUs, and ASICs, and can mine a variety of different hashing algorithms (
www.hiveon.com/os). - Braiins OS: Braiins OS is a great alternative to manufacturer-provided web-based GUIs when mining Bitcoin on ASIC rigs. It is an open-source, completely auditable, operating system designed for the Antminer S9 and the DragonMint T1 ASICs (and maybe more by the time you read this). In some hardware configurations, it allows for an increase in hash power with the same electricity expenditures, increasing your efficiency and returns. Follow the documentation and installation guide to flash the operating system software to your mining rig’s control board to get set up and hashing toward your chosen pool (
https://braiins.com). - Mother of Dragons: Mother of Dragons is software that runs on your Linux computer (implementations such as Debian, Ubuntu, and CentOS) or other LAN-connected Linux-based device, such as a Raspberry Pi (a tiny, cheap, single-board computer; see
www.raspberrypi.org). You enter your settings — pool server, user, password, clock speed, fan speed — and then the software automatically detects ASIC miners (DragonMint/Innosilicon) that are connected to your network and changes their settings. It has a built-in monitoring system and will also update firmware for your ASICs as well as reboot any miners that fall offline. It saves quite a bit of work, but is built for the expert user. Follow the documentation on the following GitHub page for setup instructionshttps://github.com/brndnmtthws/mother-of-dragons. - MultiMiner: MultiMiner is an open-source mining tool designed for Windows, Linux, and macOS. It is designed to work with GPUs, ASICs, and FPGAs (Field Programmable Gate Arrays). MultiMiner actually uses the BFGMiner mining engine (discussed in the later section, “Solo mining”) in combination with an easy-to-use interface for simple configuration and monitoring. It can be configured to mine toward pools and, similar to Mother of Dragons, it has monitoring systems and automatic updates (
https://github.com/nwoolls/MultiMiner).
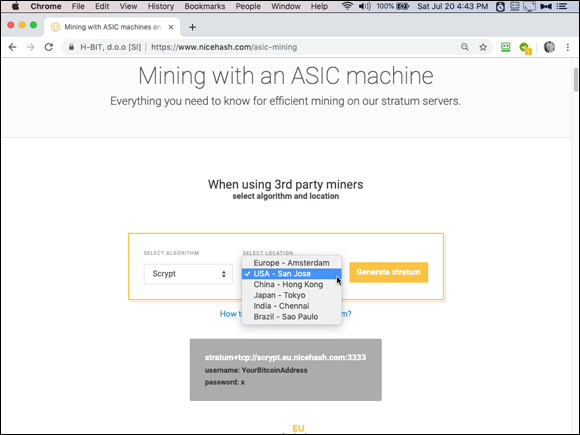
FIGURE 10-18: To ASIC mine with NiceHash, pick an algorithm and server location, and NiceHash tells you how to configure your ASIC.
Although setting up pool-mining software designed for Windows and macOS to run on your laptop or desktop PC is generally pretty simple (as you can see in Chapter 7, for example), working with some of these other systems can be far more complicated.
Setting up, say, ethOS or Braiins OS can be fairly straightforward for an experienced Linux user. However, if you’ve never left the Windows or macOS operating systems or your idea of dealing with a complicated software installation process is letting your employer’s tech guy have the computer for the afternoon, then some of this stuff will be out of your zone of experience! You’ll either need to find a friendly geek to help, or understand that you will have to read instructions very carefully and quite likely will expend serious amounts of time finding out how to get the job done.
Most mining software is designed for ASIC and GPU mining because they are the most efficient systems and the sorts of systems used by most experienced miners. The non-ASIC cryptocurrencies, such as Monero, are an exception, as they are intended to be mined with CPUs and GPUs. (If you can GPU mine, you can CPU mine, too, but GPUs are far more powerful.) Some mining programs do work with CPUs. However, in many cases, miners who are CPU mining Monero or smaller cryptocurrencies simply use the core software — the software provided by the cryptocurrency itself — either on the cryptocurrency website or from the cryptocurrency’s GitHub account. However, it is difficult to CPU mine profitably. Most Monero miners are GPU mining, though they often also use the CPU in the GPU rig.
It’s generally not worth it to CPU mine. If you do intend to mine with your CPU, probably the only software it makes sense to use is NiceHash.
Solo mining
Solo mining is not recommended unless you have very carefully run the numbers (see Chapter 11) and are sure it makes sense. You need to fully understand and accept your odds (which may be low), or you need a significant enough network hash rate to ensure profitability. With that said, quite a few software implementations allow for configurable solo mining.
Most solo mining tools require that you download and sync a full node of the cryptocurrency you intend to mine on a separate computer system on your network, and then point the software running on your ASIC or GPU mining rig to the full node on that computer. Heavily research the documentation for the software you plan on using before firing up your mining equipment.
Check out the following list of solo-mining software.
- Core Cryptocurrency Software: Some cryptocurrencies, such as Monero, have mining functionality built into the GUI of their core full-node software (Bitcoin also did at one point, though it’s been removed). Simply download their core node, sync up to the blockchain (this may take a while), and enable mining under the Mining tab. Refer to the cryptocurrency’s main site for the software download and documentation. (For example, for Monero, go to
https://web.getmonero.org/get-started/mining). - CGMiner: CGMiner is open-source software created for Bitcoin mining with ASICs or FPGAs, and runs on Linux, Windows, and macOS. Its codebase is also open source (
https://en.bitcoin.it/wiki/CGMiner). - BTCminer: BTCminer is a Bitcoin-mining software designed for FPGA mining that is open source. It runs on Windows and Linux (
https://en.bitcoin.it/wiki/BTCMiner). - BFGMiner: This free and open-source software for Windows, macOS, and Linux can be configured for mining with CPUs, GPUs, FPGAs, and ASICs (
https://en.bitcoin.it/wiki/BFGMiner).