
Chapter 1
Creating a Basic ASP.NET Core App
IN THIS CHAPTER
![]() Working with the ASP.NET core templates
Working with the ASP.NET core templates
![]() Building your first web application using ASP.NET core
Building your first web application using ASP.NET core
In the beginning, things were simple. Developers used HTML tags to build web pages in a very basic manner. These pages weren’t flexible, they broke easily, and there wasn’t a good way to update them, but they were simple and extremely easy to understand. Today, things are flexible and updateable, but they’re much harder to understand and they still break easily at times. This said, ASP.NET core applications are designed to work with vast quantities of data in a variety of ways that provide automation that those early developers couldn’t contemplate, and this chapter is your introduction to them. It begins by introducing you to some of the templates (of which there are more than a few confusing options, so listen up). All the chapters in this part of the book are specific to Visual Studio 2022 and above.
Creating an ASP.NET core application requires a lot of files, so the second section of this chapter helps you wade through them. Nothing is worse than the feeling that you shouldn’t touch something because you don’t know what it’s connected to. After all, you could possibly cause a complete meltdown of the Internet (but then again, probably not). During this whole process, you create your first ASP.NET Core Web Application and actually see it do something more than say Hello World (not a lot more, but something more). In the end, you gain an appreciation for what all those files do and why you really do want to touch them.
 You don’t have to type the source code for this chapter manually. In fact, using the downloadable source is a lot easier. You can find the source for this chapter in the
 CSAIO4D2EBK06CH01 folder of the downloadable source. See the Introduction for details on how to find these source files.
Understanding the ASP.NET Core Templates
As with other forms of development in Visual Studio 2022, ASP.NET Core sports a number of specialized templates to meet various developmental needs. As with other templates, the goal is to help you get started with a project with the minimum of effort. Essentially, these templates help you avoid the blank-page syndrome (where looking at a blank screen causes brain freeze) that many developers face. The following sections describe each of the templates in more detail so you have some idea of which template to use for a particular purpose.
Starting with nothing using ASP.NET Core Empty
This is the most basic template in the list. It doesn't provide any sort of content when you create it. However, this doesn’t mean that the template doesn’t include any files. Depending on how you configure the template using the wizard (as described in the “Creating the project” section, later in this chapter), you actually get quite a few files, but they mostly affect the actual running of the resulting website rather than provide any kind of content, as shown in Figure 1-1. In the figure, you see the files for an ASP.NET Core Empty template that relies on the .NET Core 3.1 and has no HTTP or Docker support. (Docker provides the means to package and share both applications and code with others.)
Figure 1-2 shows the same ASP.NET Core Empty template, but this time it uses NET 6.0 and supports both HTTPS and Docker. The way you configure even an empty project is important because the support files that the template provides are different depending on the selections you make. For example, this second version of the template supplies a Secrets.json file that contains sensitive application information (see https://docs.microsoft.com/aspnet/core/security/app-secrets for details).
As you go through the list of files, you notice that the Startup.cs file is missing from Figure 1-2. This is because you installed Docker support, and Docker will take care of application startup needs. However, this is the only file missing between the two setups. Otherwise, adding features adds files.
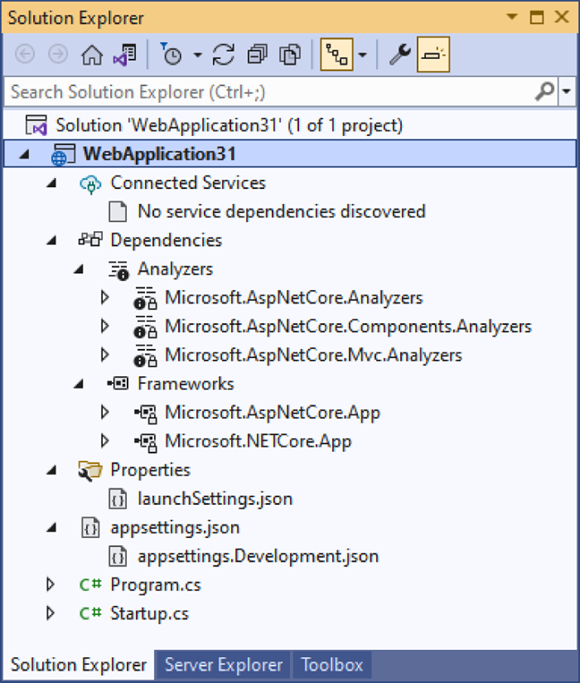
FIGURE 1-1: Even an empty template provides you with a considerable number of files.
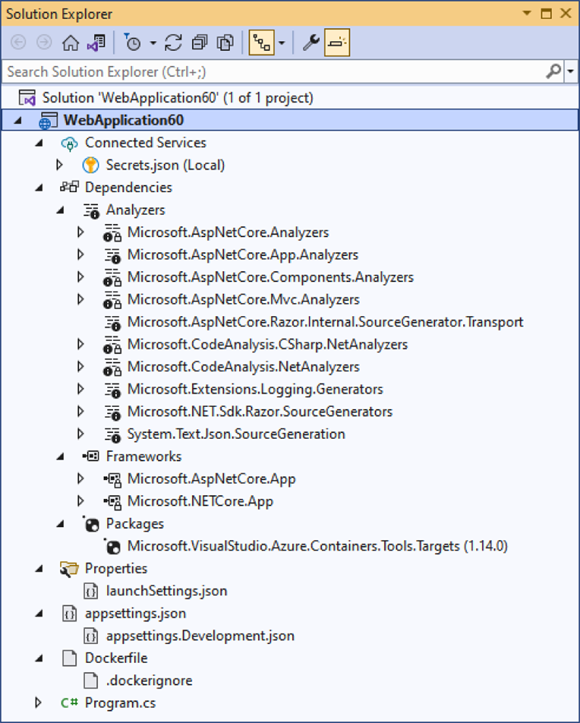
FIGURE 1-2: The version of .NET and app features both contribute to the file structure of the project.
Of course, you still don't have any sort of content. All these entries in Solution Explorer support the application in some way. This is why the chapter begins by noting that things were a lot simpler when working with HTTP pages in the old days. As the chapter progresses and you read more in this part of the book, you discover that all those files are making it easier for you to provide the kind of content that people expect today — content that HTTP pages couldn’t provide.
Creating a basic app using the ASP.NET Core Web App
The project template wizards for ASP.NET Core applications vary a little. These wizards ask you how the user will authenticate on the website, with a default of no authentication. You also have the following choices:
- Individual accounts
- Microsoft identity platform
- Windows
If you select the .NET Core 3.1 or .NET Core 5.0 options for your template, you also see an option to enable Razor runtime compilation. Razor helps you create server-side dynamic pages using a syntax that looks a lot like C#. It’s really a simple syntax, view engine, that displays your web pages as you create them. Enabling runtime compilation means that you can see UI changes in real time without restarting your application. Oddly enough, selecting .NET Core 6.0 as your target framework hides this option because it’s enabled by default. Chapter 2 of this minibook tells you about the Razor syntax for C# developers, so you don’t need to worry about the complexities of it now.
As with the empty template, the configuration options you use greatly affect the number of files you see. Figure 1-3 shows a project that uses the .NET 6.0 Framework and Windows authentication, and it’s configured for HTTPS.
 If you’re getting the idea that the number of files will only increase as you begin using more ASP.NET features, you’re right. Soon you’ll feel buried neck deep, perhaps even deeper, in pages. The pages all serve a purpose, and the best way to avoid getting overwhelmed is to take the pages one at a time. If you try to look at the whole picture, smoke will pour out of your ears and people will wonder about you. The main addition to look at in Figure 1-3 is the Pages folder, which contains the basic content that the template provides. The
 .cshtml files contain Razor code that makes up the website content. In this case, you get a main page (index.cshtml), a privacy statement page (Privacy.cshtml), and an error message page (Error.cshtml).
You may be wondering where the authentication page is because it doesn't appear in the Pages folder. How authentication takes place depends on the sort of authentication you choose, but it’s scripted in the PagesShared folder. For example, if you choose individual accounts, you find a _LoginPartial.cshtml with the logic required to log a user into the system. The main page will have an additional Log In option that displays a separate page for logging into the website. This is the kind of page that you see on most websites today.
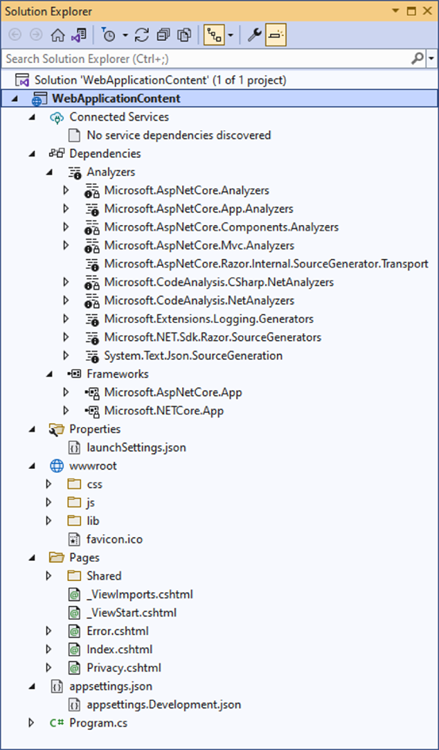
FIGURE 1-3: The Web App template provides you with basic content as a starting point.
Fumbling around with HTTPS-enabled sites
For most people, security can seem complex and like one of those things that you can't quite get right on the first try. This is especially true when security has multiple parts to it, as with a website. Consequently, it can feel more like you’re fumbling with the security settings instead of adjusting them with some level of authority.
 When you choose the HTTPS option, which is the likely one for everything except the empty template, you see a Trust ASP.NET Core SSL Certificate dialog box like the one shown in Figure 1-4 when you run the application the first time. This message box is giving you the opportunity to use a generated SSL certificate so that you don’t have to buy one just for development purposes. If you already have a certificate, you want to use it for your development to ensure that everyone is using the correct certificate. To use your certificate, install it using the instructions at
 https://docs.microsoft.com/aspnet/core/security/authentication/certauth.
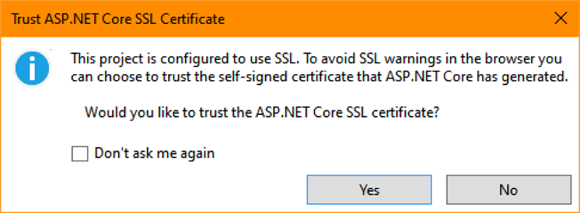
FIGURE 1-4: Use the generated SSL certificate or install your own.
Installing a certificate for ASP.NET to use doesn’t install it on your system. When you start the application up, you also see another Security Warning dialog box like the one shown in Figure 1-5. This second dialog box is asking whether you want to trust the certificate in Windows. This is a separate process from installing the certificate in Visual Studio, so for once, Microsoft isn’t being purposely obtuse or annoying. Both message boxes actually are necessary.

FIGURE 1-5: You must install any certificate you use in Windows as well as Visual Studio.
At some point, you may want to remove the Windows SSL certificate that you installed, but how to do that seems to be a deep, dark secret. The article at https://docs.microsoft.com/dotnet/framework/wcf/feature-details/how-to-view-certificates-with-the-mmc-snap-in tells you how to open the Microsoft Management Console (MMC) and install the Certificates snap-in. You want the snap-in for the local computer (there are several options). The certificate you want appears in the CertificatesPersonalCertificates folder as localhost. To remove the certificate, choose Action⇒ Delete. You can also perform all sorts of other tasks, such as exporting the certificate should you need it later.
Building in business logic using ASP.NET Core App (Model-View-Controller)
If you have a really large project that presents the same data in multiple ways, you really want to use the Model-View-Controller (MVC) paradigm as part of your design (https://docs.microsoft.com/aspnet/core/mvc/overview). This paradigm breaks up your application into three parts:
- Model: Provides access to all the data-related elements of your application. The data can come from anywhere. In fact, you may generate part of the data as part of the model logic. The model doesn't consider how the data is used or even organized —it simply makes the data available. Consequently, a
Customerobject may retrieve some bits of a database, and aBillingobject may retrieve other bits from the same database. - View: Determines how the user sees the data. The same data might appear in multiple views, organized in different ways. For example, the same data may appear in a detail or table view. Users often control how the data is presented, so the same data may appear in a nearly infinite number of ways.
- Controller: Defines the business logic used to make the model and view work together in a manner that reflects company policies, legal requirements, and application needs. As you might expect, the controller provides the control required to keep chaos at bay and ensure that the user has a good computing experience that doesn't open any security holes.
Breaking the application into three pieces in this manner makes it possible for a large team to work efficiently because the various members aren’t as likely to get in each other’s way. Graphic artists who work on views don’t need to interact with the model; all they need to know is that the data is available for use in a particular format. Likewise, database administrators can work with the model without worrying about user-interface concerns. Developers and security professionals can deal with controller issues separately from everyone else.
The downside of all this flexibility is that even more files are interconnected in even more complicated ways, as shown in Figure 1-6. Now you have separate folders for Controllers, Models, and Views — each of which has its own set of files. The figure doesn’t show the usual Connected Services, Dependencies, or Properties folders content. It's about the same as that for other templates described so far in the chapter.
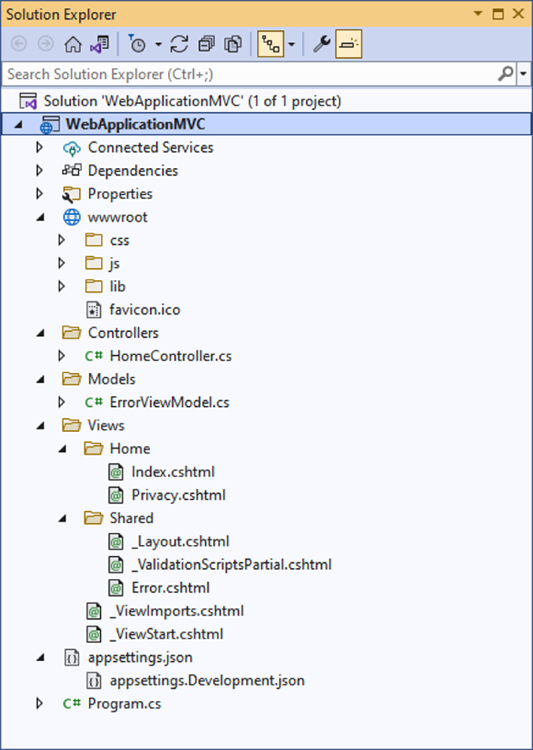
FIGURE 1-6: Separating functionality in MVC means yet more files.
Oddly, this template’s default content doesn’t vary from the content provided with other templates. In other words, you get more files for the same content. The difference is solely in the level of flexibility that this template provides.
Developing a programming interface using ASP.NET Core Web API
A lot of development depends on the use of Representational State Transfer (REST) today. Relying on an API means that the client portion of an application can reside anywhere. In addition, an API opens the possibility of third parties making use of the same data to create other applications or to perform similar tasks. The ASP.NET Core Web API is somewhat different from other templates in this chapter in that the focus is on the API and a few of the configuration requirements are different. For example, when setting up an authentication type, you have access only to the Microsoft identity platform or Windows.
There is a good reason to use either the .NET 5.0 or .NET 6.0 Framework with this template: You gain access to OpenAPI (https://www.openapis.org/) support. If you have ever tried using APIs from various third parties in the same application, you know that each API will come with its own quirks, which proves confusing, at best, when you write code. Using OpenAPI standardizes how developers describe APIs so that they become significantly easier to use. If you plan to create an API for use by third parties, enabling OpenAPI support is to your benefit. Figure 1-7 shows the files that you typically see when using the ASP.NET Core Web API with .NET 6.0 Framework, HTTPS enabled, no authentication, and OpenAPI support enabled.
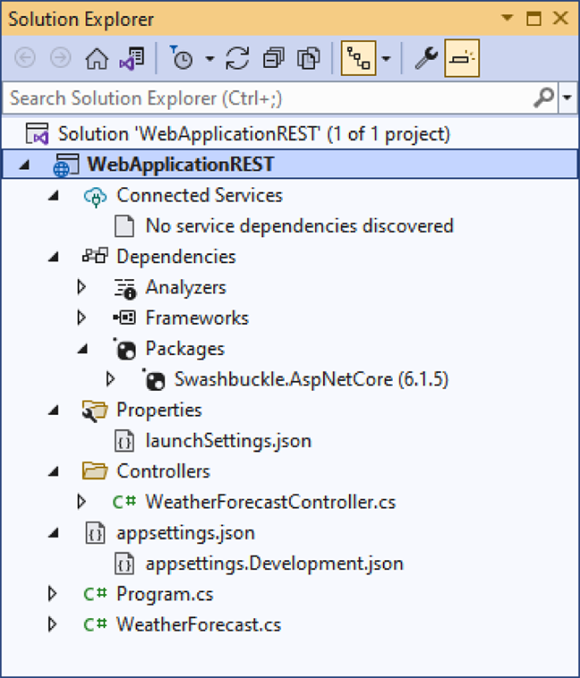
FIGURE 1-7: The ASP.NET Core Web API focuses on the API, not the client.
When you run this application, you see a web page that lets you play with the API. It’s a fun API to try out, and who doesn’t want to know the weather? Of course, now you’re looking at the URL in your browser and wondering what Swagger is all about. No, it has nothing to do with pirates (https://www.pinterest.com/ligeiahabanero/pirateswagger/). OpenAPI is based on the Swagger Specification (https://swagger.io/specification/) originally created by SmartBear (https://smartbear.com/), where you can read a number of articles written by this book’s author (https://smartbear.com/blog/authors/john-mueller/).
An overview of those other weird templates
When looking through the list of potential templates, you see some templates, such as ASP.NET Core gRPC Service. These templates let you work with third-party, open source software to create solutions that work with other third-party software. This book doesn’t cover these open source solutions. However, here is an overview of the solutions that are installed with Visual Studio 2022:
- gRPC (
https://grpc.io/): A Remote Procedure Call (RPC) occurs when a client makes a call to a server for various kinds of services or resources, such as performing tasks or accessing data. The advantage of RPC is that a client can make a call without knowing anything about the host network. All that is needed are the call particulars. Using gRPC enables RPC calls in any environment. You can use this service to perform load balancing, trace activity, check system health, and authenticate users, among other tasks. - Angular (
https://angular.io/): You use Angular to create complex enterprise-level apps that incorporate features, such as dashboards, that would take a long time to develop on your own. Consider Angular as a kind of super template service for those who like the look and feel of Angular apps and don’t have a lot of time to code everything from scratch. You can get a better idea of Angular functionality athttps://angular.io/features. - React.js (
https://reactjs.org/): While products like Angular focus on building an overall solution, React.js focuses on the user interface. The idea is to get a user interface put together as quickly as possible (see the tutorial athttps://reactjs.org/tutorial/tutorial.html) without loss of flexibility or speed. This product uses a component-based architecture that lets you snap user-interface features together in a Lego-like manner. - React.js and Redux (
https://redux.js.org/): This template combines React.js, which provides the user interface, with Redux, which provides the means to store application state. Now it’s possible for an application to have a memory of sorts so that a user can move from device to device and pick up at the same point where it left off in the last session without any loss of data or time.
Developing a Basic Web App
It’s time to try your hand at creating an ASP.NET Core application. This application will involve a little more than saying Hello World, but not much more. The intent is to get you started with something simple that helps emphasize what a simple web application might look like. It’s guaranteed to be easier than overcoming the learning curve of a lot of online examples, but also to help you over the learning curve as well. You can find this application in the BasicWebApplication example in the downloadable source.
Creating the project
This example starts with an empty project. Because of all the various permutations available, the example creates a specific website instead of providing more general information (as is found in previous sections of this chapter). Using an empty project and the specific steps help you see how to add various features to an application and then play around with it. Plus, you can avoid some of the complexities of figuring out predefined code for the moment. Follow these steps to create a new empty project:
On the Start page, click Create a New Project.
You see the usual list of templates on the Create a New Project page that appears.
Select C#, All Platforms, and Web from the three drop-down list boxes at the top of the right pane.
The list of templates now shows all the ASP.NET Core applications you can create, plus a number of other web-specific projects not covered in the book.
Highlight the ASP.NET Core Empty template and then click Next.
You see the Configure Your New Project dialog box, shown in Figure 1-8.

FIGURE 1-8: Configure your new project with identifying information.
Type BasicWebApplication in the Project Name field and a location in the Location field, and select the Place Solution and Project in the Same Directory box. Click Next.
You see the Additional Information page, shown in Figure 1-9. This example keeps things as simple as possible by restricting the number of features the template provides. After you complete this example, you should try other options to see how they affect the starting project you receive.
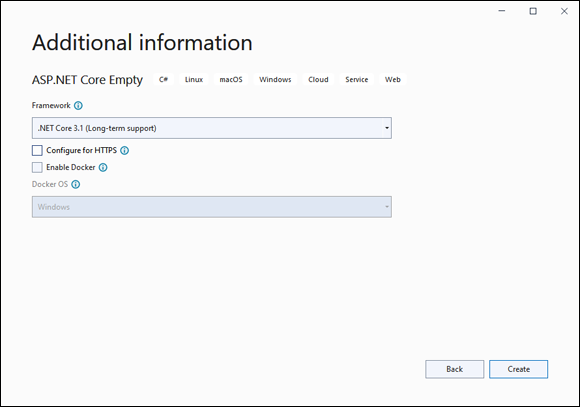
FIGURE 1-9: The example uses fewer template features to reduce project complexity.
Choose .NET Core 3.1 (Long-term Support) in the Framework field, choose None in the Authentication Type field, and deselect both the Configure for HTTPS and Enable Docker check boxes. Click Create.
You see a new empty project created with content similar to that shown previously in Figure 1-1.
Considering the development process
If you run the application now, you see a web page appear in your browser with Hello World! in it. This content comes from the default output of the Configure() method in the Startup class found in Startup.cs, shown here:
// This method gets called by the runtime. Use this method to configure the
// HTTP request pipeline.
public void Configure(IApplicationBuilder app, IWebHostEnvironment env)
{
    if (env.IsDevelopment())
    {
        app.UseDeveloperExceptionPage();
    }

    app.UseRouting();

    app.UseEndpoints(endpoints =>
    {
        endpoints.MapGet("/", async context =>
        {
            await context.Response.WriteAsync("Hello World!");
        });
    });
}
Essentially, all this code does is create the home page, which is mapped to /, and writes Hello World! to it. If you want to add a page, you need to add another endpoint using endpoints.MapGet(). To see how this works for yourself, try adding the following code directly below the first endpoints.MapGet() call:
endpoints.MapGet("/page2/", async context =>
{
    await context.Response.WriteAsync("This is the second page.");
});
When you start the application now and change the URL in your browser to read: http://localhost:11623/page2 (the port number, 11623, will vary by system), you see the next message, “This is the second page.” While this addition is interesting, it's not particularly helpful in creating a website. It is helpful in understanding endpoints.
Adding web content
This example won’t do any fancy interaction with databases or require a degree in web design. Instead, the example will serve some static content so that you can see a next step in the process of working with ASP.NET Core. Follow these steps to add some static web content.
Right-click the BasicWebApplication entry in Solution Explorer and choose Add⇒ New Folder.
You see a new folder added to the hierarchy.
Type wwwroot and press Enter.
The folder icon changes to a world icon.
Right-click the wwwroot folder and choose Add⇒ New Item from the context menu.
You see the Add New Item dialog box, shown in Figure 1-10.
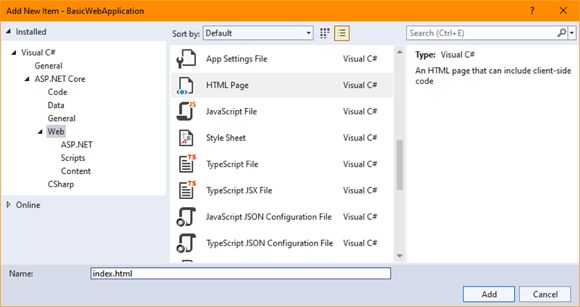
FIGURE 1-10: Add a new item to the wwwroot folder.
Drill down to locate the
Visual C#ASP.NET CoreWebfolder, and then highlight the HTML Page entry. Type index.html in the Name field and click Add. The name and capitalization of this first file is essential. For example, if you type Index.html, the example may not work. The application is designed to look for these four files:- default.htm
- default.html
- index.htm
- index.html
- Change the content of the default HTML page (such as
index.html) as shown in bold below so that you can verify that it works:<!DOCTYPE html>
<html>
<head>
<meta charset="utf-8"/>
<title>Test Page</title>
</head>
<body>
<p>This is some test content.</p>
</body>
</html>At this point, you have a web page to use, but it isn't connected to the application. You need to make these connections in
Startup.cs. - Select
Startup.cs. Comment out the entireapp.UseEndpoints()section. Add the following code below right after theapp.UseRouting()call:app.UseDefaultFiles();
app.UseStaticFiles();The
UseDefaultFiles()call tells your application to look for index.html. There are a lot of ways to change this configuration, but one way is to create a list of options and then pass those options to theUseDefaultFiles()call. The article athttps://docs.microsoft.com/aspnet/core/fundamentals/static-filesprovides some additional insights on how to create a list of options.The
UseStaticFiles()call enables the use of static files, such as CSS, JavaScript, and HTML, with your application. As withUseDefaultFiles(), you can modify the behavior of static file usage by supplying a list of options with theUseStaticFiles()call.
At this point, you can start adding functionality to the wwwroot folder to create a completely static website similar to any other static website out there.
Making some basic changes to the first page
You can add JavaScript and CSS to your static pages, just as you would with any other website. However, for now, you just add a little additional content so that you can see the next step. Chapter 2 begins taking you through use of Razor files, but here you stick with static content. Begin by adding page2.html to your project using Steps 3 and 4 of the previous section. Modify the code for this page so that it looks like this:
<!DOCTYPE html>
<html>
<head>
    <meta charset="utf-8"/>
    <title>Second Page</title>
</head>
<body>
    <p>This is the second page.</p>
    <p>
        Click
        <a href="index.html">here</a>
        to return to the home page.
    </p>
</body>
</html>
Now make a connection between page2.html and index.html by adding the code in bold to the index.html page:
<!DOCTYPE html>
<html>
<head>
    <meta charset="utf-8"/>
    <title>Test Page</title>
</head>
<body>
    <p>This is some test content.</p>
    <p>Click
        <a href="page2.html">here</a>
        to see the second page.
    </p>
</body>
</html>
Now when you run the application, you can switch between the home page and the second page without effort simply by clicking the link. Yes, this is a very simple application, but it demonstrates a number of ASP.NET Core features that you’ll find helpful later.