
Chapter 4
Practical WPF
IN THIS CHAPTER
![]() Understanding the command types
Understanding the command types
![]() Using built-in commands
Using built-in commands
![]() Using custom commands
Using custom commands
![]() Using routed commands
Using routed commands
Even though WPF still supports the direct event-handler wire-up (for example, through the OnClick event), WPF introduces a much better mechanism for responding to user events. It significantly reduces the amount of code you have to write and adds testability to your application. Traditional event handling is all contained in the code-behind for your form, which is extremely difficult to test in an automated fashion.
Software patterns have been around for a long time, first brought to the forefront by the classic tome Design Patterns: Elements of Reusable Object-Oriented Software (Addison-Wesley) by Erich Gamma, Richard Helm, Ralph Johnson, and John Vlissides — commonly referred to as the “Gang of Four.” Software has evolved, and many new patterns have been developed over the years. One of the most effective user interface patterns developed for WPF is the Model-View-View Model (MVVM) pattern (commonly referred to as ViewModel, see https://docs.microsoft.com/archive/msdn-magazine/2009/february/patterns-wpf-apps-with-the-model-view-viewmodel-design-pattern). Using the ViewModel pattern in your WPF applications will improve software reuse, testability, readability, maintainability, and most of the other “-ilities” as well. (You run across other design patterns throughout this whole book.)
This chapter concentrates on yet another pattern, the Command Pattern, which can provide an effective middle ground between directly wiring things up and using an intermediary to make the connection between data and the view. Using the command pattern brings order to directly wiring things up, but is less difficult to implement than MVVM. The chapter begins by comparing the Command Pattern to traditional event handling. It then discusses three command types: built-in, custom, and routed.
 You don't have to type the source code for this chapter manually. In fact, using the downloadable source is a lot easier. You can find the source for this chapter in the
 CSAIO4D2EBK05CH04 folder of the downloadable source. See the Introduction for details on how to find these source files.
Commanding Attention
The Command Pattern has been around since, well, forever, and you most likely use it every day. Copy and Paste commands are example implementations of the pattern built into Windows and most Windows applications. WPF provides a significant number of built-in commands and also allows for completely customized commands! The following sections provide you with additional information about how commands can work in WPF.
Traditional event handling
Traditional handling of user events (and still supported in WPF) is through an event handler. When the button on the Window is clicked, the code in the event handler (which has to be in the code-behind file) will execute. Here is an example of the WPF for using event handling (also found in the TraditionalEventHandling example in the downloadable source):
<Grid>
    <Grid.RowDefinitions>
        <RowDefinition Height="30"/>
        <RowDefinition Height="30"/>
    </Grid.RowDefinitions>

    <TextBox Name="Message" Grid.Row="0" HorizontalAlignment="Left"
             Width="200" Height="20"/>
    <Button Name="ClickMe" Grid.Row="1" HorizontalAlignment="Center"
            Content="Click Me" Click="ClickMe_Click"/>
</Grid>
Note how the Button is connected to the code-behind by using the Click event. The mechanism used here is quite simple, but you must perform it for each control individually, making an error likely in some cases. Any change to the code-behind necessitates a change to every location at which the event handler is referenced in the XAML as well. The actual event-handler code is equally easy to figure out because it follows the technique used for Windows Forms applications:
private void ClickMe_Click(object sender, RoutedEventArgs e)
{
    MessageBox.Show(Message.Text);
}
By placing this code in the code-behind event handler, the business logic is now mixed with the user interface code, mixing concerns. To be fair, nothing in the framework makes one put the code in the code-behind; it just seems to always end up there. (You can, of course, separate your business logic into classes outside of your code-behind.)
This problem gets compounded when additional UIElements are added to the window that need to execute the same code. The common fix for this situation is to refactor the code in the original event handler into a separate method and have the event handlers for the related UIElements call the new method. The new method can even be moved into the Business Layer, separating concerns and allowing for testability.
The other issue is one of user experience. Often, menus and buttons need to be actively enabled or disabled based on the condition of the data (or some other condition/user action) in the window.
In this example, the ClickMe button remains enabled all the time because the application doesn't provide any code to enable or disable it based on the content of the Message text box. Realistically, the user interface should disable ClickMe automatically whenever Message is blank. Users tend to click active items repeatedly when given the option, wondering why nothing is happening. The command pattern as implemented in WPF cleanly and easily resolves both issues.
ICommand
The ICommand interface provides the contract for a command that a particular class will execute. It specifies the conditions required so that the command can execute. When those conditions are met, a class implementing ICommand executes the command. ICommand (which is the base interface for all commands discussed here) defines two event handlers and one event, as shown here.
bool CanExecute(object parameter);
void Execute(object parameter);
event EventHandler CanExecuteChanged;
Perhaps the most powerful feature of WPF commands is the capability to determine at runtime whether the bound controls can execute. (See the next section for a detailed discussion.) The following list describes the ICommand elements in more detail.
CanExecuteis run by theCommandManagerwhenever focus changes, thePropertyChangedorCollectionChangedevents are raised, or on demand through code. If the event handler returnsfalse, all UIElements bound to that command are disabled.Executecontains the code that executes when the user action is processed or the command is executed through code.CanExecuteChangedaccesses a mechanism supplied byINotifyCollectionChangedandINotifyPropertyChangedthat determines whenCanExecuteis required.
Routed commands
The ICommand interface doesn't provide the entire goodness of commands in WPF. The RoutedCommand class (and its first descendant, RoutedUICommand) takes advantage of event routing to provide additional power.
The CanExecute event handler raises the PreviewCanExecute event, and the Execute event handler raises the PreviewExecuted event. These events are raised just prior to the CanExecute and Execute handlers and bubble up the element tree until an element with the correct command binding is located. This approach is useful to allow the control of commands at a higher level, while the fine-grained elements still control the CanExecute and the Execute event handlers.
Routed commands also expose a collection of InputGestures — keystrokes or other gestures that fire the Execute event handler. You use InputGestures to assign hot-key combinations to commands, such as Ctrl+S for saving.
Using Built-In Commands
WPF provides a number of built-in commands that you can use with little or no code (see the list at https://docs.microsoft.com/dotnet/api/system.windows.input). The most common set used by line-of-business-developers is wrapped up in the ApplicationCommands library. The advantage of using the built-in commands is that all the plumbing is taken care of for you. For example, the CanExecute and Execute event handlers are already implemented. All you have to do is bind them to UIElements through XAML, as shown in the BuiltInCommands example.
 You may end up running the example code several times or have items on the Clipboard from other uses. To ensure that you begin with a clear Clipboard for this example, add the following call after
 InitializeComponent(); in the MainWindow() constructor:
Clipboard.Clear();
The sample shown in the following code and Figure 4-1 uses the ApplicationCommands.Copy and ApplicationCommands.Paste commands to facilitate Clipboard manipulation in your application. As a side note, WPF allows you to abbreviate the built-in commands by dropping the container name (ApplicationCommands), so Copy and Paste are legitimate abbreviations for the command bindings ApplicationCommands.Copy and ApplicationCommands.Paste.
<Grid>
    <Grid.RowDefinitions>
        <RowDefinition Height="40"/>
        <RowDefinition Height="30"/>
        <RowDefinition Height="30"/>
    </Grid.RowDefinitions>

    <Menu Grid.Row="0" HorizontalAlignment="Left" Name="menu1">
        <MenuItem Command="Copy">
            <MenuItem.Style>
                <Style TargetType="{x:Type MenuItem}">
                    <Setter Property="Foreground" Value="Black"/>
                    <Style.Triggers>
                        <Trigger Property="IsEnabled" Value="True">
                            <Setter Property="Foreground" Value="Red"/>
                            <Setter Property="FontSize" Value="16"/>
                        </Trigger>
                    </Style.Triggers>
                </Style>
            </MenuItem.Style>
        </MenuItem>

        <MenuItem Command="Paste">
            <MenuItem.Style>
                <Style TargetType="{x:Type MenuItem}">
                    <Setter Property="Foreground" Value="Black"/>
                    <Style.Triggers>
                        <Trigger Property="IsEnabled" Value="True">
                            <Setter Property="Foreground" Value="Red"/>
                            <Setter Property="FontSize" Value="16"/>
                        </Trigger>
                    </Style.Triggers>
                </Style>
            </MenuItem.Style>
        </MenuItem>
    </Menu>

    <TextBox Grid.Row="1" HorizontalAlignment="Left" Width="200"/>
    <TextBox Grid.Row="2" HorizontalAlignment="Left" Width="200"/>
</Grid>

FIGURE 4-1: Using the Copy and Paste features of the application.
The example contains a bit of trick code that makes it easier to see changes in the UI. Notice how it uses MenuItem.Style to change how the menu items appear normally or when they have the focus. Normally, the Setter configures Property="Foreground" to Value="Black", so you see black lettering. However, Trigger watches for Property="IsEnabled" to become True. When this occurs, the color of the text changes to Red. The code also changes the size of the menu by using Property="FontSize" and Value="16". Of course, you can use this technique for all sorts of purposes, not only to make UI testing easier.
When the UIElement with focus supports the Clipboard Copy action and there are items selected that can be copied to the Clipboard, any elements bound to the Copy command are enabled.
When the UIElement with focus supports the Clipboard Paste action and there is data in the Clipboard that is supportable by the element with focus, any elements bound to the Paste command are enabled.
Using Custom Commands
You can use custom commands in all sorts of ways. For example, you might decide to implement the ApplicationCommands.Copy command by using a Button instead of a MenuItem. When you try using just the Command property, as you do with a MenuItem, it doesn't work. You need to create the connectivity that a MenuItem possesses, but a Button doesn't, by using a custom command. The following sections show the simplest method for creating a custom command. You can also see this code in the CustomCommands example in the downloadable source.
Defining the interface
This example uses two custom buttons, one labeled Copy and another labeled Paste. It also has two text boxes, one to hold the source text and another to hold the destination text. Destination is set for read-only use because the example copies from the source to the destination to keep things simple. You use the buttons as you did the menu items in the previous example. However, the connectivity isn’t nearly as automated this time. The following code shows the interface for this example:
<Grid>
    <Grid.RowDefinitions>
        <RowDefinition Height="40"/>
        <RowDefinition Height="30"/>
        <RowDefinition Height="30"/>
    </Grid.RowDefinitions>

    <StackPanel Grid.Row="0" Orientation="Horizontal"
                HorizontalAlignment="Left">
        <Button Content="Copy" Command="ApplicationCommands.Copy"/>
        <Button Content="Paste" Command="ApplicationCommands.Paste"/>
    </StackPanel>

    <TextBox Name="Source" Grid.Row="1" HorizontalAlignment="Left"
             Width="200"/>
    <TextBox Name="Destination" Grid.Row="2" HorizontalAlignment="Left"
             Width="200" IsReadOnly="True"/>

</Grid>
Creating the window binding
To make the example code work, you must create a binding between the controls and the underlying code-behind. You have a number of ways in which to create a binding, and this example shows the most common. In the following code, you define the Window.CommandBindings as a series of CommandBinding elements. Note that the Command attributes here match the Command attributes used for the two buttons in the previous section:
<Window.CommandBindings>
    <CommandBinding Command="ApplicationCommands.Copy"
                    Executed="CommandBinding_Executed"
                    CanExecute="CommandBinding_CanExecute"/>
    <CommandBinding Command="ApplicationCommands.Paste"
                    Executed="CommandBinding_Executed"
                    CanExecute="CommandBinding_CanExecute"/>
</Window.CommandBindings>
When you type certain attribute names, such as Executed, the IDE automatically asks whether you want to create the associated event handler. If you allow the automatic creation, the event handler will appear in the code-behind for you. The temptation is to create a unique event handler for each of the command entries, but this would be a mistake because doing so makes maintenance harder. Instead, you want to use a single event handler for everything, as shown in the next section.
Ensuring that the command can execute
Now that you have controls and binding from the controls to an event handler, you need to create the event-handler code. In this case, you first need to determine whether executing the command is even possible. The buttons will automatically enable or disable as needed based on the value of e.CanExecute in the following code:
private void CommandBinding_CanExecute(object sender,
    CanExecuteRoutedEventArgs e)
{
    string Name = ((RoutedCommand)e.Command).Name;

    if (Name == "Copy")
    {
        if (Source == null)
        {
            e.CanExecute = false;
            return;
        }

        if (Source.SelectedText.Length > 0)
            e.CanExecute = true;
        else
            e.CanExecute = false;
    }
    else if (Name == "Paste")
    {
        if (Clipboard.ContainsText() == true)
        {
            e.CanExecute = true;
        }
        else
        {
            e.CanExecute = false;
        }
    }
}
Note that you must convert the incoming e.Command value to a name string as shown in the code so that you can test for a particular command. The command Name is a simple string that contains either Copy or Paste in this case. The values you see depend on how you configure the Command attributes for your application controls.
The determiner for execution differs in each case. The Copy button won't work if the user hasn’t selected some text. Likewise, it’s not possible to paste text to the destination when the Clipboard lacks data of the correct type. Note that you must use Clipboard.ContainsText() to ensure that the user hasn't copied an image or some other type of data.
Performing the task
Now that you have all the connections defined between the window and the code-behind, you can begin coding the actual task. First you must add the Clipboard.Clear(); call after InitializeComponent(); in the MainWindow() method, as you did for the previous example.
The next step is to handle the Executed event. A single event handler works with both buttons, as shown here:
private void CommandBinding_Executed(object sender,
    ExecutedRoutedEventArgs e)
{
    String Name = ((RoutedCommand)e.Command).Name;

    if (Name == "Copy")
    {
        Clipboard.SetText(Source.SelectedText);
    }
    else if (Name == "Paste")
    {
        Destination.Text = Destination.Text + Clipboard.GetText();
    }
}
As with the CommandBinding_CanExecute() method in the previous section, this code begins by obtaining the name of the button that the user clicked. It uses this information to select a course of action. The goal is to copy text from Source and place it on Clipboard, or to copy text from Clipboard and place it in Destination.
You normally wouldn't make the code this simple. The example does so to keep from hiding the workings of the code-behind as it relates to the Window controls. When you first start the application, neither button is activated.
Typing some text and then selecting some of it enables the Copy button, as shown in Figure 4-2. Note that the button doesn’t become enabled when you type the text; it’s the act of selecting the text that enables it. This is the same action that occurs when you use menu controls in the previous example.

FIGURE 4-2: Selecting the text enables the Copy button.
When you click Copy, both the Copy and the Paste buttons are enabled. This action occurs because the text remains highlighted in the source text box. When you click Paste, the Copy button remains enabled. Normally, an application would place the focus on the pasted location, disabling the Copy button. As previously mentioned, this example does things simply so that you can see how the connections work. Clicking in the source text box (so that the text is no longer highlighted) does disable the Copy button.
Using Routed Commands
Routed commands require a little more effort, but they also allow you to perform custom actions that ICommand doesn't support. This example does something simple: displays a message box. However, the technique shown works for complex applications as well. The following sections demonstrate how you can use routed commands for both buttons and menus. You can also see this code in the RoutedCommands example in the downloadable source.
Defining the Command class
The center of the exercise is the RoutedUICommand object, cmdSayHello. It provides the resource needed to make the command available. However, to make this object work properly, it must appear within its own class within the RoutedCommands namespace (rather than as part of the MainWindow class).
To interact with your Command class, you first must create it and then choose Build⇒ Rebuild Solution to ensure that the class is visible to XAML. Otherwise, you might find that the XAML you write has blue underlines beneath the various command callouts for no apparent reason. Here is the code used to create the Command class:
public static class Command
{
    public static readonly RoutedUICommand cmdSayHello =
        new RoutedUICommand("Say Hello Menu", "DoSayHello",
            typeof(MainWindow));
}
 Note that the
 Command class and the cmdSayHello field are both static and that cmdSayHello is also readonly. If you don't create your Command class in this manner, WPF will refuse to recognize it. Unfortunately, your application will fail in odd ways, and finding this particular bug can be quite difficult. If you find that your application simply crashes in odd ways, you need to verify that you have created your Command class correctly.
Making the namespace accessible
Modern versions of Visual Studio automatically add the code required to make your namespace accessible as local. The actual entry appears as xmlns:local="clr-namespace:RoutedCommands" in this case. Here is the full code so that you see where to look for the namespace declaration:
<Window x:Class="RoutedCommands.MainWindow"
    xmlns="http://schemas.microsoft.com/winfx/2006/xaml/presentation"
    xmlns:x="http://schemas.microsoft.com/winfx/2006/xaml"
    xmlns:d="http://schemas.microsoft.com/expression/blend/2008"
    xmlns:mc="http://schemas.openxmlformats.org/markup-compatibility/2006"
    xmlns:local="clr-namespace:RoutedCommands"
    mc:Ignorable="d"
    Title="MainWindow" Height="200" Width="400">
If you don't have such an entry already in your XAML code, you must create one. Otherwise, your application won’t be able to find your custom commands.
Adding the command bindings
As with the ApplicationCommands entries used with buttons, you must provide command bindings in order to access your custom commands. The following code shows the command bindings used for this example:
<Window.CommandBindings>
    <CommandBinding Command="local:Command.cmdSayHello"
                    CanExecute="CommandBinding_CanExecute"
                    Executed="CommandBinding_Executed"/>
</Window.CommandBindings>
Note how the example code declares the CommandBinding. The CanExecute and Executed entries are much the same as in the previous section. However, the Command entry accesses the local namespace as local:Command.cmdSayHello, where Command is the name of the class used to hold the RoutedUICommand object and cmdSayHello is the name of the object.
Developing a user interface
You can use custom commands with any control that normally supports a click-type event. This example uses both a menu and a button to access the custom command, but you have many other options. The following code creates the application interface, which looks much like the other examples in this chapter:
<Grid>
    <Grid.RowDefinitions>
        <RowDefinition Height="40"/>
        <RowDefinition Height="30"/>
        <RowDefinition Height="30"/>
    </Grid.RowDefinitions>

    <Menu Grid.Row="0" HorizontalAlignment="Left" Name="menu1">
        <MenuItem Command="local:Command.cmdSayHello"/>
    </Menu>

    <TextBox Name="NameStr"  Grid.Row="1" HorizontalAlignment="Left"
             Width="200"/>
    <Button Grid.Row="2" Content="Say Hello"
            HorizontalAlignment="Right"
            Command="local:Command.cmdSayHello"/>
</Grid>
Note that the MenuItem element of the Menu control doesn't provide a textual entry for the user to see. On the other hand, the Button does provide this information in the form of the Content property. Even though the MenuItem lacks this information, it still displays Say Hello Menu. This information comes from the RoutedUICommand object declaration. When creating your RoutedUICommand object, it pays to provide a default text definition that works well with menus and then use custom text for other controls as needed.
Developing the custom command code-behind
Creating code for your custom command is almost an anticlimax because it works the same as when working with ICommand. You still need to define code for the CanExecute and Executed event handlers, such as the code shown here:
private void CommandBinding_CanExecute(object sender,
    CanExecuteRoutedEventArgs e)
{
    if ((NameStr != null) && (NameStr.Text.Length > 0))
        e.CanExecute = true;
    else
        e.CanExecute = false;
}

private void CommandBinding_Executed(object sender,
    ExecutedRoutedEventArgs e)
{
    MessageBox.Show("Hello " + NameStr.Text);
}
Obviously, this is a really simple example, but the technique works fine for complex setups as well. Note that you don't need to create different code for menus or buttons (or other controls, for that matter). Everyone uses the same code. Also note that you don’t need to perform any special wire-ups to make the application work.
When you first start the application, the menu and button are both disabled. However, when you type text into the text box, both controls become enabled, as shown in Figure 4-3. Clicking either control produces a message box similar to the one shown in Figure 4-4.

FIGURE 4-3: Typing a name (or other text) enables both the button and the menu.
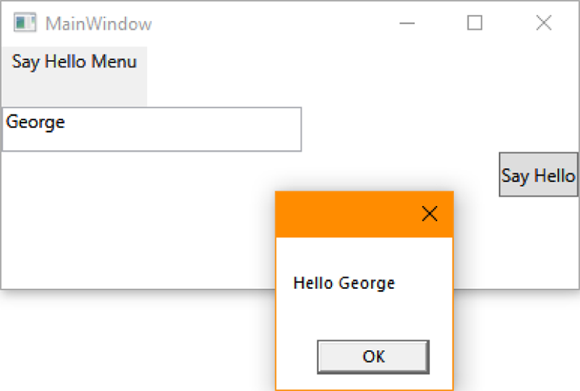
FIGURE 4-4: Clicking either control produces simple output.
The moment you clear the text, the button and menu item become disabled again, so you know that the CanExecute event handlers work as expected. The main idea to take from this chapter is that WPF provides multiple methods for defining commands that you can use to create robust applications.